1
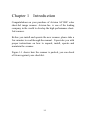
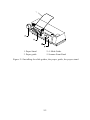
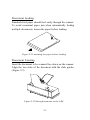
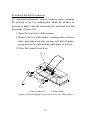
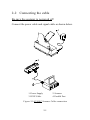
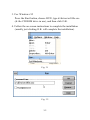
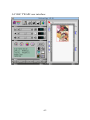
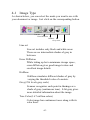
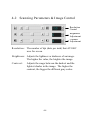
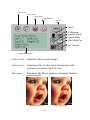
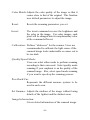
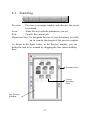
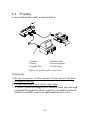
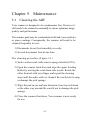
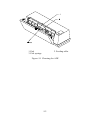
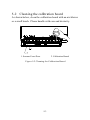
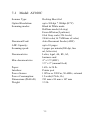
AV100C Color Image Scanner User's Manual Version 1.0 (Doc. No. 250-0047-0) AVISION INC. 1996 ii Trademarks Microsoft is a U.S. registered trademark of Microsoft Corporation. Windows and MS-DOS are trademarks of Microsoft Corporation. IBM, PC, AT, XT are registered trademarks of International Business Machines Corp. Other brands and product names herein are trademarks or registered trademarks of their respective holders. Copyright All rights reserved. No part of this publication may be reproduced, transmitted, transcribed, stored in a retrieval system, or translated into any language or computer language, in any form or by any means, electronic, mechanical, magnetic, optical, chemical, manual, or otherwise, without the prior written permission of Avision Inc. Material scanned by this product may be protected by governmental laws and other regulations, such as copyright laws, the customer is solely responsible for complying with all such laws and regulations. iii Warranty The information contained in this document is subject to change without notice. Avision makes no warranty of any kind with regard to this material, including, but not limited to, the implied warranties of fitness for a particular purpose. Avision shall not be liable for errors contained herein or for incidental or consequential damages in connection with the furnishing, performance, or use of this material. iv FCC Radio Frequency Interference Statement This equipment has been tested and found to comply with the limits for a class B digital device, pursuant to Part 15 of the FCC rules. These limits are designed to provide reasonable protection against harmful interference in a residential installation. This equipment generates, uses, and can radiate radio frequency energy and, if not installed and used in accordance with the instruction manual, may cause harmful interference to radio communication. However, there is no guarantee that interference will not occur in a particular installation. If this equipment does cause harmful interference to radio or television reception, which can be determined by turning the equipment off and on, the user is encouraged to try to correct the interference by one or more of the following measures: * Reorient or relocate the receiving antenna. * Increase the separation between the equipment and receiver. * Connect the equipment into an outlet on a circuit different from that to which the receiver is connected. * Consult the dealer or an experienced radio/TV technician for help. CAUTION: Any changes or modifications not expressly approved by the manufacture of this device could void the user's authority to operate the equipment. v Table of Contents CHAPTER 1 INTRODUCTION............................................................1-1 CHAPTER 2 SCANNER INSTALLATION ..........................................2-1 2-1 UNPACKING THE SCANNER ................................ .............................. 2-1 2-2 CONNECTING THE CABLE ................................ ................................ .2-5 CHAPTER 3 SCANNER DRIVER INSTALLATION ..........................3-1 3-1 AUTO-INSTALLATION PROGRAM ................................ ...................... 3-1 3-2 UNINSTALL THE SCANNER ................................ ............................... 3-3 CHAPTER4 SCANNER OPERATION AND DOCUMENT PRINTING ..4-1 4-1 IMAGE TYPE ................................ ................................ ...................4-3 4-2 SCANNING PARAMETERS & IMAGE CONTROL ................................ ...4-4 4-3 SCANNING ................................ ................................ ...................... 4-7 4-4 PRINTING................................ ................................ ........................ 4-8 CHAPTER 5 MAINTENANCE.............................................................5-1 5-1 CLEANING THE ADF ................................ ................................ .......5-1 5-2 CLEANING THE CALIBRATION BOARD................................ ................5-3 CHAPTER 6 TROUBLESHOOTING..................................................6-1 6-1 QUESTION AND ANSWER................................ ................................ ..6-1 6-2 TECHNICAL SERVICE ................................ ................................ .......6-5 CHAPTER 7 SPECIFICATIONS..........................................................7-1 7-1 MODEL: AV100C................................ ................................ ...........7-2 vi Chapter 1 Introduction Congratulations on your purchase of Avision AV100C color sheet-fed image scanner. Avision Inc. is one of the leading company in the world to develop the high performance sheetfed scanner. Before you install and operate the new scanner, please take a few minutes to read through the manual. It provides you with proper instructions on how to unpack, install, operate and maintain the scanner. Figure 1-1 shows how the scanner is packed, you can check all items against your checklist. 1-1 1. Power Supply 2. Checklist, S/W Package, Driver Kit, User's Manual, etc. 3. Upper Separate Tray 4. Paper Stand 5. Right Cushion 6. Separate Tray 7. Carton 8. Signal Cable 9. Left Cushion 10. Guide Unit Figure 1-1 Scanner packing 1-2 Chapter 2 Scanner Installation Precautions * Keep the scanner out of direct sunlight. Direct exposure to the sun or excessive heat may damage the unit. * Do not install the scanner in a humid or dusty place. * Be sure to use the proper AC power source. * Install the scanner securely on a level surface. Tilted or uneven surfaces may cause mechanical or paper feeding problems. * Retain the scanner box and packing materials for shipping purpose. 2-1 Unpacking the Scanner Please unpack the scanner carefully, and check the contents against the Checklist. If any items are missing or damaged, please contact your dealer immediately. Installation of the slide guides, paper guide and paper stand (Fig 2-1) 1. Open the front door by slightly pulling it away from the unit for few inches. 2. Insert the paper guide onto the center notch located on top of the unit. 3. Insert the two slide guides to the left and right of the paper guide. When properly installed, the guides should move freely from side to side. 4. Insert the two ends of the paper stand into the small holes on both sides of the paper guide. 5. Close the front door. 2-1 1. Paper Stand 3. Paper guide 2. 4. Slide Guide 5. Scanner Front Panel Figure 2-1 Installing the slide guides, the paper guide, the paper stand 2-2 Document loading Standard-sized paper should feed easily through the scanner. To avoid occasional paper jam when automatically feeding multiple documents, loosen the paper before loading. Figure 2-2 Loosening the paper before loading Document Feeding Insert the document to be scanned face down on the scanner. Align the two sides of the document with the slide guides. (Figure 2-3) Figure 2-3 Placing documents on the ADF 2-3 Scanning Small Documents To scan small documents, such as business cards, exchange the position of the two slide guides, adjust the distance in between so that it suits the document size, and hand feed the document. (Figure 2-4) 1. Open the front door of the scanner. 2. Remove the two slide guides, exchange their position, and reinsert them onto the scanner with the left guide going now to the right and the right guide to the left. 3. Close the scanner front door. 1. Paper guide unit 2. Slide guides Figure 2-4 Exchanging the position of the two slide guides 2-4 2-2 Connecting the cable Be sure the scanner is powered off. Connect the power cable and signal cable as shown below. 1. Power Supply 3. D25P Cable 2. Scanner 4. Parallel Port Figure 2-5 AV100 C Scanner Cable connection 2-5 Chapter 3 Scanner Driver Installation To run at rated speed as recommended, the AV100C color image scanner must have the following minimum requirements: * IBM compatible PC 386/486 or Pentium; * Microsoft Windows 3.1 or Windows 95; * DOS 5.0 or higher; * One printer port available (enhanced parallel port recommended); * 2 megabytes of available hard disk space for installation; * 4 megabytes of RAM (8 megabytes or higher recommended); * A video graphics array (VGA) monitor; * A Microsoft Windows-compatible pointing device (e.g., the mouse); * A CD ROM drive. 3-1 Auto-Installation Program Installation procedure of AV100C driver with Avision Autoinstallation Program is as follows: 1. Start Windows 3.1 or Windows 95. 2. Insert AV100C CD kit into your CD ROM drive. 3. For Windows 3.1 or Windows 3.11(See Figure 3-1,3-2) From the File Menu, choose RUN, type d:\driver\av100c.exe (d: the CD ROM drive in use), and then click O.K. 3-1 3. For Windows 95 Press the Start button, choose RUN, type d:\driver\av100c.exe (d: the CD ROM drive in use), and then click O.K. 4. Follow the on-screen instructions to complete the installation (usually just clicking O.K. will complete the installation). Fig. 3.1 Fig. 3.2 3-2 3-2 Uninstall the Scanner You can uninstall the scanner driver by double-clicking on the Uninstall icon stored in the AV100C Driver group. ... 3-3 Chapter 4 Scanner Operation and Document Printing There are two types of application software interface to use with the AV100C scanner. TWAIN is the most popular interface among image-editing application software. Scanning Images from within an Application (TWAIN) 1. Open your application and choose Select Source from the File menu. If the Select Source menu options are not available from the File menu, see the user guide of your application to learn how the TWAIN link is used. 2. A dialog box appears containing the different TWAIN sources that you can choose for bringing an image into your application. 3. Select AV100C/16 Driver V3.3 as the source. 4. You need to select AV100C for just once except when you have used the dialog box to select a different source. In that case, you will need to select AV100C as the source again before you can reuse the AV100C scanner. 5. Place the image to be scanned face down on the scanner. 6. From the File menu, selectAcquire. 7. AV100C TWAIN user interface will pop up on the screen. Click on the Preview or Scan button to get the image. 4-1 AV100C TWAIN user interface: 4-2 4-1 Image Type As shown below, you can select the mode you want to use with your document or image. Just click on the corresponding button. Line art Error Diffusion Halftone Gray Scale Color Line art Line art includes only black and white areas. There are no intermediate shades of gray in between. Error Diffusion While taking up but a minimum storage space, error diffusion gives good image texture and excellent image details. Halftone Halftone simulates different shades of gray by varying the threshold value of a matrix. Gray (256 levels gray scale) Scanner recognizes each point in themage i as a shade of gray (continuous tone). 8-bit gray gives more detailed information about the image. True Color (16.7 million colors) Color image has continuous tones along with its color hues. 4-3 4-2 Scanning Parameters & Image Control Resolution Control Brightness Adjustment Contrast Adjustment Resolution: The number of dpi (dots per inch) that AV100C uses for a scan. Brightness: Adjusts the lightness or darkness of an image. The higher the value, the brighter the image. Contrast: Adjusts the range between the darkest and the lightest shades in the image. The higher the contrast, the bigger the different gray scales. 4-4 Auto Level Auto Area Descreen Color Match Reset Invert Calibration Quality Mode Speed Mode Pixel/Inch/Cm Set Gamma Image Information Auto Level: Optimizes the scanned image. Auto Area: Automatically sets the whole document as the scan area, no matter what its size. Descreen: Eliminates the Moire patterns commonly found in printed matter. Before descreen 4-5 After descreen Color Match:Adjusts the color quality of the image so that it comes close to that of the original. This function uses default parameters to adjust the image. Reset: Resets the scanning parameters you set. Invert: The invert command reverses the brightness and the color in the image. For color images, each pixel will be changed into its complementary color at the command of Invert. Calibration: Defines “whiteness” for the scanner. Users are recommended to calibrate the light source if the scanned image looks undesirable or comes out to be too dark. Quality/Speed Mode: Users can select either mode to perform scanning according to their own need. Select quality mode scanning if your emphasis is on the quality of the scanned image. Else, select speed mode scanning if you want to speed up the scanning process. Pixel/Inch/Cm: Represents the different measure systems to be used in each scan. Set Gamma: Adjusts the midtone of the image without losing details of the lightest and the darkest areas. Image Information: Gives related information of the scanned image. 4-6 4-3 Scanning Preview: Previews your image roughly and allocates the area to be scanned. Scan: Scans the area with the parameters you set. Exit: Cancels the current job. Document Size: To designate the size of your document, just click on its icon on the margin of the preview window As shown in the figure below, in the Preview window, you can define the area to be scanned by dragging the four cursor auxiliary lines. Document size Cursor Auxiliary lines The Preview Window 4-7 4-4 Printing Connect the printer cable as shown below. 1. Scanner 3. Printer 5. Parallel Port 2. Printer Cable 4. Host Computer 6. D25P Cable Figure 4.1 Printer cable connection Attention: 1. Be sure to power on the scanner if you want to do passthrough printing. 2. Do not scan and print at the same time. 3. If your PC does not support EPP mode or have pass-through compatibility problem, please contact your authorized local dealer for an EPP card or an additional interface card. 4-8 Chapter 5 Maintenance 5-1 Cleaning the ADF Your scanner is designed to be maintenance free. However it still needs to be cleaned occasionally to ensure optimum image quality and performance. The scanner parts may be contaminated with ink, toner particles or paper coatings. Consequently, the scanner will need to be cleaned frequently in case: 1) Documents do not feed smoothly or easily. 2) Several documents feed at one time. The cleaning procedure (Figure 5-1) 1) Soak a cotton swab with some isopropyl alcohol.(95%). 2) Open the scanner front door and wipe the upper Feeding Roller by moving the swab from side to side. Rotate the roller forward with your finger and repeat the cleaning steps until the entire roller is cleaned. Be careful not to snag or damage the pick springs. 3) Wipe the pad in one uniform direction, from top to bottom or the other way around. Be careful not to damage the pick springs. 4) Close the scanner front door. Your scanner is now ready for use. 5-1 1. Pad 3. Pick springs 2. Feeding roller Figure 5-1 Cleaning the ADF 5-2 5-2 Cleaning the calibration board As shown below, clean the calibration board with an air-blower or a small brush. Please handle with care and dexterity. 1. Scanner Front Door 2. Calibration Board Figure 5-2 Cleaning the Calibration Board 5-3 Chapter 6 Troubleshooting The scanner will automatically perform a simple self test each time it is powered on to use. This will help spot major system errors in the scanner itself. If you have problems with the operation of your scanner, please check the following troubleshooting hints. 6-1 Question and Answer Question: Paper becomes jammed during scanning. Answer: 1) Open front door of the scanner. 2) Pull out the jammed paper carefully. 3) Close the front door. Question: More than one sheet of paper are fed into the scanner. Answer: 1) Open the scanner front door. 2) Remove the multi-fed paper. 3) Close the front door. 4) Flatten the corners and edges. Loosen the paper before reloading. 5) Check the Feeding Roller condition and if necessary, follow the cleaning directions in Section 5.1 to clean the scanner. Question: Paper becomes skewed in the scanner. Answer: 1) Use the slide guides to keep the paper path straight. 6-1 2) Check Feeding Roller condition. If necessary, follow the directions given in Section 5-1and do scanner cleaning Question: Why is it the scanned image always comes out to be too dark. Answer: 1) Modify the Gamma setting to 1.8 for your monitor and when printing, set Gamma to 2.2 for your printer. 2) Use the Brightness setting on TWAIN user interface to get a brighter image. Question: Why does my scanner scan at a very low speed? 7 Answer: If you have installed "Works for Windows, ' it will install Window Printing System (WPS) in your WIN.INI file. This will share the printer port time remarkably. You can remove the WPS from your WIN.INI file, as follows; From: [MS Text Converters] MSWorksWin=Works for Windows 2.0,C:\WINDOWS\MSAPPS\TEXTCONV\worksdos.cnv, wps Works forDos 2.0=Works for DOS 2.0MSAPPS\TEXTCONV\workswin.con, wps To: [MS Text Converters] MSWorksWin=Works for Windows 2.0,C:\WINDOWS\MSAPPS\TEXTCONV\worksdos.cnv Works for DOS 2.0=Works for DOS 2.0, C:\WINDOWS\MSAPPS\TEXTCONV\workswin.con Question: My printer does not print the scanned documents. Answer: Pass-through printing may pose a problem for some printers. It is suggested that you a) add a second printer card for printing purpose, 6-2 or, b)add Avision scanner interface card IF05 to perform scanning. Please call your authorized local dealer for support. Question: The scanning speed of my scanner is much slower than that of those installed at other computers. Can I speed it up? Answer: In such case, please a) Set you PC printer port to the EPP mode from BIOS setting, or, b) Add Avision scanner interface card IF05 to scan at a higher speed. Question: Does it take long for the scanner to initialize? Answer: If your printer port supports SPP mode only, it takes about two minutes for the scanner to initialize. If your printer port supports EPP mode, the initialization speed is much faster, about 20 seconds. Generally, it takes a two to three minutes time for the AV100C scanner lamp to warm up. It may be that your scanner lamp is out of order if it works otherwise. Question: Sometimes it seems the scanner does not detect paper. Answer: The AV100C scanner's paper sensor is located central of the paper guide. Please place whatever you want to scan somewhere thereabout and use 6-3 the slide guides to keep the paper path straight. Question: Why sometimes pass-through printing does not work at all? Answer: It may be that you forgot to power on the scanner. When doing pass-through printing, please first remember to power on the scanner. Else, without power, the scanner can not transfer the printing data/signals to the printer. Question: Why doesn't my GDI printer work with the AV100C scanner? Answer: Disable the "Auto Scan" function in the application, and your printer will function all right. Question: Why some parallel port devices and software's keypro do not work with the AV100C scanner? Answer: The AV100C scanner can do pass-through printing all right, but not otherwise. As such, if you would like to connect some parallel port devices other than printer, please do not connect them to the same parallel port that AV100C currently uses. It is advisable that. you use other parallel ports to connect these devices orkeypro. For instance, you can connect the AV100C scanner to LPT1, and connect other parallel port devices to LPT2. Or you can add a data switch to avoid the problem. 6-4 6-2 Technical Service Technical support for Avision scanner is provided through the Avision Technical Assistance Center (ATAC). Before contact ATAC please make sure you have the following information: * Scanner serial & revision number(located on the bottom of the scanner). * The hardware configuration (e.g. Your host CPU type, RAM size, free disk space, display card, interface card...) * The name and version of your software application. * The name, version and date of your scanner driver. Please call us at: US and Canada Area: Avision Labs., Inc. Address: 48521 Warm Springs Blvd. #312 Fremont, CA 94539 Tel: 510-440-8785 Fax: 510-440-8337 E-mail: [email protected] Other Area: Avision Inc. Address: No. 20, Creation Road I, Science-Based Industrial Park, Hsin-Chu, Taiwan, R.O.C. Tel: 886-3-5782388. Fax number: 886-3-5777017 BBS: 886-3-5786149 CompuServe: 101400,444 Internet: [email protected] Web Site: http://www.avision.com 6-5 Note: 1. You can find the latest driver and document in Avision BBS. Our service is 24 hours a day. The communication setting is 2400-19200 BPS, 8N1S. 2. You will be asked to enter your first name, last name and password at all times. With the same name and password.(any, if first time). 3. For first time user, you will need to request with your full name and password ready. Therefore, the same name and same password are required to enter BBS in next time. 6-6 Chapter 7 Specifications All specifications are subject to change without notice. The following can not be properly fed by ADF: * * * * * * * * * Paper clip or staple attached Paper with ink that are not dry Paper with inconsistent thickness, such as envelopes Paper with wrinkles, curls, folds or tears Tracing paper Coated paper Carbonless paper Paper narrower than 3.5" or wider than 8.5" Items that are other than papers, such as cloth, metal or OHP film. * Photographic paper * Notched paper * Paper with odd(non-rectangular) shape * Very thin paper 7-1 7-1 Model: AV100C Scanner Type: Optical Resolution: Scanning modes: Document Feed: ADF Capacity: Scanning speed: Document size: Min. document size: Paper: Interface: Power Source: Power Consumption: Dimensions: (WxHxD) Weight: Desktop Sheet-fed up to 300 dpi * 300dpi (H*V) Black & White mode Halftone mode (64-step) Error diffusion(2 patterns) 8-bit Gray scale (256 levels) 24-bit color(16.7 Millions of color) Auto Document Feeder (ADF) up to 10 pages 6 pages per minute(200 dpi, line art, letter size) Letter, legal, A4, B5, A5, business card 4" x 3.5"(ADF) 3.5" x 2" (manual feed) 16 lb. to 24 lb. Printer port 110Vac or 220Vac, 50-60Hz, external 12 watts(12Vdc,1A) 293 mm x 89 mm x 107 mm 3.5 lb. 7-2 EC Declaration of Conformity According to EN45014 Manufacturer's Name: Manufacturer's Address: AVISION INC. No. 20, Creation RD. I, Science-Based Industrial Park, Hsinchu, Taiwan, R.O.C. declare that the product Model Number : AV100C conforms to the following Product Specifications: Emission: EN 50081-1(1992) EN 55022(class B) (Conducted Radiated) (1994) EN 60555-2 (Harmonics) (1987) EN 60555-3 (Flicker) (1987) Immunity: EN50082-1(1992) IEC 1000-4-2 (ESD)(1995) IEC 1000-4-3(RS)(1995) IEC 1000-4-4(EFT/Burst)(1995) IEC 1000-4-5(SURGE)(1995) Date: December, 1995 7-3