1
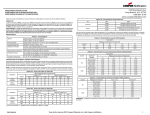
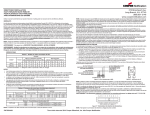
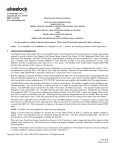
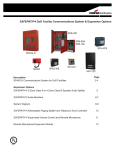
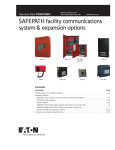
Steps Ahead
A Guide to Loudspeaker Paging and
Telephone Systems Interface
www.coopernotification.com
Contents
Step 1
Select the Correct System...............................................................................................................................3
24vdc Self Amplified System
70v Central Amplified System
25v And 100v Central Amplified Systems
Step 2
System Design and Layout..............................................................................................................................5
Spl & Db — How Loud?
Ceiling Speakers
• Speaker Spacing
• How Many Speakers?
• Wheelock Speaker System Calculator
• How Much Power?
• Pattern Of The Layout
Wall Mount Speakers
Horns
Step 3
Select the Correct Amount of Power...............................................................................................................14
Power Supplies For Self-Amplified (24v) Systems
Amplifiers For Central Amplified (70v) Systems
Proper Wire Size
Step 4
Other Considerations......................................................................................................................................18
Telephone System Interface
• Telephone Systems
• Unused Co Ports And Talk Battery
Zone Paging/Zone Controls
Talkback Paging
Accessories
ANY MATERIAL EXTRAPOLATED FROM THIS DOCUMENT OR FROM MANUALS OR OTHER DOCUMENTS DESCRIBING THE
PRODUCT FOR USE IN PROMOTIONAL OR ADVERTISING CLAIMS, OR FOR ANY OTHER USE, INCLUDING DESCRIPTION OF THE PRODUCT’S
APPLICATION, OPERATION, INSTALLATION AND TESTING IS USED AT THE SOLE RISK OF THE USER AND WHEELOCK WILL NOT HAVE
ANY LIABILITY FOR SUCH USE.
Due to continuous development of our products, specifications and offerings are subject to change without notice in
accordance with Wheelock, Inc., standard terms and conditions.
Copyright 2008 Cooper Notification. All Rights Reserved.
www.coopernotification.com
2
Step 1 - Select the Correct System
24 volt self amplified or 70 volt central amplified. Which is best? The answer is that either system is right for certain
applications. Here are a few guidelines:
For small systems involving 6-8 speakers, 24VDC self amplified systems offer the advantages of low cost, easy installation
using telephone (quad) wire, individual volume control and built-in redundancy (if one fails, the rest keep working). Self
amplified speakers are speakers with their own amplifier attached. They use a 4-wire connection — a 2-wire connection
for the 24VDC that powers the amplifier and another 2-wire for the audio.
70 volt distributed systems are generally preferable with larger systems because one central amplifier can power a great
many speakers that cost much less than self amplified speakers. The price break occurs at about 6-8 speakers, where
the cost of a central amplifier and lower cost speakers will begin to offset the cost of self amplified speakers and 24 volt
power supplies. The wiring is simpler: A single pair of wires.
70 volt systems are the better choice when good sounding background music is a requirement. The speakers and amplifiers generally have much better frequency response than the self amplified systems, which are designed basically for
good speech reproduction, but not for good music reproduction. Additionally, 70 volt amplifiers provide selective inputs
and mixing capability for FM tuners, CD players, etc.
Wiring/Code Issues for Audio Systems
In the past, there has been much debate on the issue of wiring requirements for speaker systems,
especially 70 volt audio. Table 11, chapter nine of the National Electric Code (NEC) 1999 version, establishes Class 3
circuit rating for 70V audio as well as for 24 volts DC signaling circuits. This means that 70 volt (central amp) or 24 volt
(self-amplified) speaker systems may use Class 3 wiring methods, for example the common practice of loose cabling
draped across ceiling tiles. Further, according to the National Electric Code Handbook (McGraw-Hill, 1999 edition)
page 1183: “….Amplifier output circuits rated not over 70V, with open-circuit voltage (this means no speakers connected)
not over 100V, may use Class 3 wiring as set forth in Code section 725-41(a) of Article 725”. Unless local codes or local
authorities specify otherwise (yes, always check if in doubt), this ruling basically says that you don’t have to run conduit
( a typical Class 1 wiring method) for speaker cabling.
Actually, UL (Underwriter’s Laboratories) has greatly simplified the matter by requiring amplifier
manufacturers to silkscreen their speaker output section terminals with the specific class of wiring method required,
a much simpler approach that makes it easy for anyone to understand. For 70 volt speaker lines, Class 3 wiring is
specified. For 100 Volt or greater speaker lines, Class 1 wiring is specified.
A word about 100 volt systems: 100 volt audio simply means that the amplifier develops full output power, in watts,
with 100 volts of potential across its speaker output terminals. This is a higher transmission voltage than 70V or 25V,
and there are certain advantages to this. Technically, the higher the transmission voltage, the more efficient the system
becomes. Consider the relationship P=VA, where P=power in watts, V=voltage and A=current in amperes. This is a
variation of Ohm’s Law which says that for a given amount of power (in watts) the higher the voltage the lower the
amperage. The choice of wire size and length of run is directly related to the amount of current (amperage) that the
wire has to carry. In high voltage, low amperage systems, wire runs can be longer and smaller in size than the wire
runs used in lower voltage systems. 100 volt systems are more efficient than 70 volt systems, which in turn are more
efficient than 25 volt systems.
According to the NEC, 25 and 70 volt central amplified systems can be wired using class 3 methods, for example, the
common practice of loose cabling draped across ceiling tiles or other methods using exposed cabling. By strict definition,
100 volt audio would have to be wired according to class 1 wiring methods, which usually means conduit in commercial/
industrial installations. However, if the builder/installer is already committed to conduit for the speaker wiring (almost
a given for hospitals, factories, government buildings) 100 volt audio for the speaker wiring becomes the clear choice
because of the power transmission efficiency and lower wiring cost.
100 volt audio is not new: It is widely used around the world, especially in Europe. High power stadium applications in
this country have traditionally used even higher voltages, such as 140 volt and 200 volt, because of the length of runs
and the power involved. The majority of applications in the US are 70 volt. 25 volt is also commonly used, mostly in
schools. However, in order to make our discussion easier, the term 70 volt audio will be used throughout this book to
describe all central amplifier type systems.
Amplified Paging Speakers and Horns
SA-Series Amplified Speakers and Horns
The SA-Series Amplified Speaker Horns provide clear, audible, output for voice paging,
background music, and tone alerting. The two models offered are 5 watt and 15 watt
weatherproof horns. Each model features a built-in amplifier and individual tamper resistant
volume control. The horns are provided with a conduit interface adapter and a clear plastic
shield. A universal mounting base is adjustable in both vertical and horizontal planes and has
banding slots for beam and pillar mounting.
Model No.
Power
Output
Input
Impedance
SA-H5B
5 Watts
600 Ohms
SA-H15B
15 Watts
600 Ohms
Audio Input
-15 dBM to
+10 dBM
Operating
Voltage
Nominal
Current
dBA @ 1
Meter
24VDC
325mA
118
24VDC
900mA
122
Frequency
275 Hz to
10K Hz
Paging Speakers and Horns with
25V/70V/100V Transformer
Series ST-B4, ST-C8 and ST-C8V Speakers and Series
ST-H15 and ST-H30 Horns
The ST Series Speakers and Horns provide clear, audible, output for
voice paging, background music, and tone alerting. Five models are
offered: an 8” with white textured plastic grille with or without volume
control for flush ceiling mount; a 4” with ivory colored plastic housing
for surface wall mount and two metal weatherproof horns. All are
equipped with a line matching transformer, for matching the speaker
or horn power requirements to the 25 V or 70 V constant voltage
output of an amplifier. The horns can additionally be powered from
a 100 V line. The speaker transformer has color coded power taps
and the horns have a power selector switch. The horns are provided
with a conduit interface adapter and clear plastic shield. A universal
mounting base is adjustable in both horizontal and vertical planes and
has banding slots for beam and pillar mounting.
Item
A
B
Model No.
ST-B4
ST-C8
dBA@ 1
Meter
93
95
ST-C8V
C
ST-H15B
122
D
ST-H30
125
www.coopernotification.com
4
4
Frequency
Response
200 Hz to 10K
Hz
80 Hz to 14K
Hz
275 Hz to 10K
Hz
Max. Wattage
Selection
4 Watts
A
C
B
D
Wattage Tap
Selections
1/8W, 1/4W,
1/2W, 1W, 2W,
4W
15 Watts
1.0, 2.0, 3.8,
7.5, 15.0
30 Watts
2.0, 3.8, 7.5,
15.0, 30.0
NOTE: Sound output (dBA @ 1
meter) measured at 1 W for STB4, ST-C8 and ST-C8V. ST-H15
and ST-H30 are measured at full
rated power.
Step 2 - System Design and Layout
It’s easier than it may first appear, and once you master some basics, it will become routine. Armed with these basics
and a good dose of common sense, you can design a system that will work well, every time.
Creating a uniform sound field
In order to be effectively heard, a paging system simply has to be loud enough to be heard above the noise level of the
environment, and intelligible, which means the system should produce clear, audible sound without being muffled or
distorted. “Sounds” simple, right? Now let’s look a little closer.
An important point to remember is that effective
coverage in a room depends more upon speaker
placement and spacing than upon volume of the
speaker themselves.
For example, a garden hose has a certain spray pattern. Increasing the water pressure will not give you much greater
coverage for your garden but adding another nozzle certainly will. In a similar fashion, multiple paging speakers “spray”
sound evenly to all areas and create a uniform sound field. Achieving sufficient loudness and intelligibility is not simply
a matter of turning up the volume. Many poor paging systems are the result of trying to compensate for an insufficient
amount of speakers with too much volume. At one end of the room people are asking “What did he say?”...while the
people near the speaker are getting “knocked out of their socks”.
SPL & dB — WHAAAA???
Here come two more intimidating terms. But, once you master their meaning and application, they will become two of
the best tools you could possibly have. Your customers will also be impressed with your expertise, which will enhance
your image as a knowledgable installer. We should first discuss “sound pressure level” (SPL) which your ears interpret
as “loudness” or “volume”. SPL is expressed in decibels, abbreviated dB. dB’s are tossed around a lot, without much
understanding. When you talk dB’s, you are always talking the difference between two sound levels. For example, “100
dB SPL” means a sound pressure level 100 dB above a zero point set at the lowest sound pressure level discernible
by the average human ear.
You are also talking differences when you say one sound is 3 dB louder than another sound. A 3 dB difference can be
heard by most people, but it certainly won’t “knock your socks off”. It takes something like a 10 dB difference in average
SPL to be perceived as a doubling of loudness. As we shall see in the next section, doubling amplifier power gives only
a 3 dB increase in a speaker’s output. The same result, or better, can be obtained by using a more efficient speaker. For example, a ceiling speaker might specify 92 dB SPL @ 1 meter distance from the speaker with 1 watt of applied
power. Yet, a different speaker may yield 95 dB SPL @ 1 meter @ 1 watt. That’s 3 “free” dB, or about 30% more volume,
because of the difference in speaker efficiency.
Power and distance
Okay, now that it’s safe to talk about dB’s and SPL, let’s continue — A paging speaker’s loudness (SPL) is affected by
two unchanging laws of physics: The power (in watts) applied to the speaker and the distance between the listener
and the speaker itself.
Power and the 3dB rule
As previously stated, if you double the power to a speaker, you gain 3 dB. Cut the power in half and you lose 3
dB. For example, if you have an appliance that produces 90 dB at a distance of 64 feet using the 3.8 watt tap, then
doubling the power by using the 7.5 watt tap will give you 93 dB. A modest gain at best, and something to really consider
since doubling the power can mean double the amplifier cost. A more efficient speaker or more effective placement
could give you that extra 3 dB without having to double the amplifier power. HMM...seems like we’ve mentioned this
before, but let’s go on.
Distance and the 6 dB rule
Simply put, doubling the distance from the speaker means you lose 6 dB SPL, cut the distance in half, and you
gain 6 dB. This means that each time you double or half the distance you lose or gain 6 dB. In the above example,
an appliance delivers 90 dB @ 64 feet with 3.8 watts of applied power. Double the distance to 128 feet and the SPL
drops 6 dB to 84 dB. Doubling once again to 256 feet means 78 dB, and so forth. Of course, the reverse is also true:
Cutting the distances in half yields gains of 6 dB each time you do it.
The distance factor becomes especially important when laying out a system using horns. Ceiling speakers typically have
to project sound only a few feet to the listener’s ears, but a horn may have to project sound 30, 60, 100 feet or more. So it’s important to understand how a horn’s output is affected by distance and applied power. A cost effective, well
designed system balances amplifier power, speaker placement and speaker efficiency.
How loud?
OK, here’s the point of the entire last section: The paging volume should be at least 6dB over the background (ambient) noise level. This makes sense. The page level is competing with the background noise level and if the page
isn’t loud enough, no one can hear it!
How do we know what the background noise level is? Most offices, lobbies, department stores, banks and restaurants
are fairly quiet (55-70 dB) and can be predictably dealt with using ceiling or wall speakers tapped or set at 1 watt or less. This is usually more than enough power to generate sufficient volume. Noisier environments are generally industrial
areas or large expansive areas such as warehouses. The speakers usually chosen for these areas are horns because
they are more efficient (louder) than a typical cone ceiling speaker.
The wise installer will want to know precise background noise levels in order to properly design the paging system to
overcome these noise levels. In these situations, the first step is to measure the ambient, or background noise. Don’t
guess — use a sound level meter! You can purchase an inexpensive, yet effective sound level meter and it is money
well spent if you want to design a paging system that works. By eliminating the guesswork, you will be “right on” with
your levels and subsequent selection of equipment. For best results, take SPL readings during peak noise hours so the
system can be designed for “worst case” conditions.
Here are some examples of the most commonly encountered commercial background noise levels:
Typical Noise Levels
Location
dB
Machine Shop
90
Manufacturing (Noisy)
80
Printing Shop
80
Assembly Line
75
Supermarket
75
Transportation Waiting Room
75
Office (Noisy)
70
Shipping/Warehouse
70
Restaurant
70
Department Store
65
Bank (Public Area)
65
Office (Quiet)
55
Office/Doctors Waiting Room
55
Hotel Lobby
55
Doctors Exam Room
55
Once again, this gives us a starting point for our “6 dB over ambient” paging system goal.
www.coopernotification.com
6
Ceiling Mount Speakers
Speaker spacing
For ceiling mount installation in most offices, stores, schools, etc., recessed ceiling mount speakers can be used. Space
the speakers at twice the ceiling height. If the ceiling is 12 feet high, space the speakers 24 feet apart. This will
provide uniform coverage.
Ceiling Speaker Spacing and Coverage
Ceiling Height
Spacing
20 ft
40 ft
12 ft
24 ft
10 ft
20 ft
8 ft
16 ft
How many speakers?
First, find the coverage given by one speaker in square feet. The coverage of one speaker is the spacing times itself. In other words, if the speakers are spaced 20 feet apart (because of 10 feet ceilings) then 20 feet X 20 feet = 400 sq
feet. Next, divide the square footage of the room by the square foot coverage of one speaker. For example, if a room
measures 60 feet X 100 feet (6000 sq feet) divide 6000 sq feet (the square footage of the room) by 400 sq feet (the
square foot coverage of one speaker) and you will get 15 (the total number of speakers required for that room). Here’s
a handy chart for spacing and coverage:
Ceiling Speakers
The 2 times rule
(2 times ceiling height = speaker spacing)
Coverage = Spacing
Ceiling Speaker Spacing and Coverage
Ceiling Height
Speaker Spacing (Feet)
Coverage per Speaker (Sq Feet)
8
16
256
9
18
324
10
20
400
11
22
484
12
24
576
Wheelock Speaker System Calculator
Much of the information contained in this book has been condensed into a simple and easy to use sliderule calculator
available from your local Wheelock sales representative. This powerful tool calculates the required number of ceiling
speakers or horns, power requirements, wire size, etc., for a given size area, ceiling height and background noise level. The calculator is designed for both self amplified (24VDC) and central amplified (25/70/100 volt) systems.
This calculator is also available and
dowloadable on Cooper Notification’s
website at www.coopernotification.com
How much power?
Always design the system for maximum “headroom”...which means plenty of reserve power to allow for future expansion
or unusual volume requirements. For example, for office environments, try to design for at least 1 watt of power for
each eight inch (central amplified) speaker and/or full power for each self amplified speaker. What this means in terms
of hardware is correct amplifier power supply size and proper wire size (more about this later).
What does this kind of reserve power actually mean? 70 volt speakers and horns typically incorporate a number of
different power settings or wattage “taps”. These taps determine the amount of power that the speaker will draw from
the amplifier. A Wheelock ST-C8 ceiling speaker with one watt applied will typically generate about 95 dB @ 1 meter,
which is just about the distance to someone’s ears if they were standing under the speaker, and 95 dB is overkill to say
the least, in a 60 dB office environment! However, in order for the speaker, tapped at 1 watt, to actually receive that 1
watt, the amplifier must be at full power. That’s right: Pedal to the metal, volume control to the max. Although most
modern amplifiers can operate in this manner, it’s more ideal to operate any amplifier with the volume controls at or near
their midway position. This gives the user some flexibility and overall system control.
Consider this: With the amplifier at 50% power (approx 1/2 volume) the speaker, tapped at 1 watt, will actually pull 1/2
watt from the speaker line. With 1/2 watt of applied power the speaker will still deliver 92 dB! Remember power and
the 3 dB rule? Cutting the power from 1 watt to 1/2 watt results in a 3 dB drop in volume. A speaker tapped at only 1/8
watt would still deliver better than 80 dB, assuming the amplifier is turned up to max power. At 1/2 volume this same
speaker, tapped at 1/8 watt, would still deliver better than 75 dB. Thus, in a quiet office environment a single 100 watt
central amplifier could power a large number of ceiling speakers tapped at 1/2, 1/4 or 1/8 watt with sufficient volume for
6 dB-over the ambient noise.
www.coopernotification.com
8
The choice of wattage tap in this situation can simply depend on the number of speakers required. In other words, more
speakers tapped at 1/4 watt could be put on the line than speakers tapped at 1/2 watt. It’s just that you have to crank up
the amplifier a little more and sacrifice some headroom. In any case, as we will also see a bit later, the amplifier size
is determined by the sum total of the wattage taps, not the number of speakers.
What about the pattern of the layout?
The “square pattern” layout uses all 12 speakers and is used because of layout simplicity. The “stagger pattern”, because
it results in a tighter edge-to-edge pattern, gives somewhat better coverage and actually uses less speakers. In this
example, 11 speakers are used.
Square Pattern
Stagger Pattern
Wall Mount Speakers
If the ceiling is too high or not accessible, then wall mount speakers can be used.
Coverage
These speakers will project 30 feet into the room, so the square foot coverage is 20 feet x 30 feet = 600 sq feet. Power
settings for either a wall mounted central amplified speaker or a wall mounted self amplified speaker should be similar
to that of the ceiling mount speakers previously described. Design for 1 watt (70 volt system) or 105 mA (self amplified)
per speaker; use initial settings of 1/2 watt or 1/2 power for best system flexibility and headroom.
How many speakers?
Once again, divide the square footage of the room by the square foot coverage of one speaker. If the room is wider
than 30 feet, a second row of speakers can be used. The preferred method is shown below, where all speakers are
aimed in the same direction. This requires the room to have pillars or posts to which the second row of speakers can
be mounted. Where possible, a stagger pattern is preferred. The more common arrangement (due to lack of pillars or
posts in most locations), is having the second row of speakers mounted on the opposing wall. (As shown) a stagger
pattern must be used.
Because of a phenomenon called phase cancellation, NEVER have speakers pointing
directly at each other because the result will be poor sound reproduction.
Wall Speaker Layout Speakers
Mounted on One Wall and Pillars
Wall Speaker Layout
Speakers Mounted on Opposing Wall
Horns
Horns are used in large, open areas or very high noise areas mainly because of their efficiency. They put out a lot of
sound! Typical applications are factories, warehouses, loading docks, school yards, military applications, parking lots,
etc.
Typical Horn Installation
www.coopernotification.com
10
Spacing and forward projection
Experience has shown that the most effective side to side spacing of a typical horn is about 40 feet. This is determined
by the flare rate and dispersion pattern, which are fixed and constant.
The front-to-rear spacing requires a little more thought, because we are actually dealing with the forward projection of
the horn. This projection is determined by two variables:
• The SPL (sound pressure level) that the horn is capable of at a specified wattage
• The ambient noise that this SPL has to compete with in order for the audio to be heard
Remember, a page has to be at least 6 dB above the ambient noise level in order to be heard effectively. Generally,
for horns such as Wheelock’s SA-H5, SA-H15 (self-amplified) or ST-H15B, ST-H30 (70 volt) to be effective, front-to-rear
spacing should be as follows:
• 128 feet for quiet to moderate locations (50-74 dB ambient)
• 64 feet for noisy locations (75-85 dB ambient)
• 32 feet for very noisy locations (86-96 dB ambient)
The following discussion should make this clear. Let’s say you are bidding a job and this particular situation calls for
paging in a noisy production area. You take out your trusty SPL meter and get readings of 85 dB throughout the area. Now, we know that for the page to be heard, we need at least 6 dB more than ambient, or 91 dB. You have already
decided upon a 70 volt system, and you will be using Wheelock’s ST-H15B horn. Wheelock provides the following performance data for the horn:
ST-H15B Performance
Feet on
Axis
Sound Pressure Level (dB @ 1K Hz)
Full Power
(15W)
1/2 Power
(7.5W)
1/4 Power
(3.8W)
4
120
117
114
8
114
111
108
16
108
105
102
32
102
99
96
64
96
93
90
128
90
87
84
Remember, we need 91 dB for an effective page. From the table, we can see that at 64 feet the selection of wattage taps
gives us the SPL range we need. At the 7.5 watt setting the horn will give 93 dB which is certainly adequate. Note that
at 128 feet there is a range of 84 dB to 90 dB (not quite good enough) and that at 32 feet the range is 90 dB to 102 dB
— probably too much, and spacing the horns at 32 feet instead of 64 feet means twice the quantity of horns and twice
the money. So, the best choice for front-to-rear spacing is 64 feet.
The same principles apply to the self-amplified SA-H15 horn. Instead of wattage taps, however, there is simply a volume
control. Full volume means full power or 15 watts; half volume means half power or 7.5 watts. The SPL and dB
performance is very similar to the 70 volt ST-H15B.
How much area will this cover? Multiply the side-to-side spacing (40 feet) by the front-to-rear spacing (64 feet) — 40
feet x 64 feet = 2560 sq feet. Area of coverage is useful because you can get a quick estimate of the actual number of
horns you need. Let’s say you have a 100,000 square foot area to cover. You know from taking readings that you will
be spacing the horns at 64 feet for a coverage of 2560 sq feet. You divide 100,000 by 2560 and get 39 — the number
of horns that you need for the job.
The Nuts and Bolts of an Actual Installation
This application of paging horns in a noisy (75-85 dB) warehouse and production facility, as shown in the following
illustration, puts it all together: In the 23,040 sq foot production area we have...
• Divided by 2560 sq feet per horn to get 9 horns
• Applied the stagger pattern which used only 8 horns
• Applied the 40 foot side-to-side spacing
• Applied the 64 foot front-to-rear spacing
• Remembered to face all horns in the same direction (Don’t forget phase cancellation)
In warehouses, we commonly encounter tall storage racks creating aisles. These racks effectively block the “clear shot”
we need for the horns. The solution is to treat each aisle as a long narrow room. Our example illustrates four aisles. The horns can be mounted on overhead girders, ducts or on the sides of the storage racks. The horns are arranged
back-to-back, and we have again applied the 64 foot forward coverage.
If the warehouse was quiet to moderate (50-74 dB), a “throw” of 128 feet per horn would generate sufficient SPL over
ambient noise and...
• Only 4 horns would be needed
• Each with a forward projection of 128 feet
That means there could be one horn...
• Located at the beginning of each aisle
• Each horn would cover the full length of its aisles
www.coopernotification.com
12
Application of Horns in a Noisy Production and Warehouse Facility
PRODUCTION AREA (23,040
SQUARE FEET TOTAL
120’
64’
WAREHOUSE WITH
STORAGE RACKS
192’ 64’
64’
128’
64’
64’
40’
EACH AILSLE TREATED AS A
SEPERATE LONG NARROW ROOM
40’
240’
Here is a handy chart that pulls together horn selection along with distance and power settings in typical commercial
applications:
Horn Loudspeaker Selection Guide
Wheelock
Central
Amplified
25/70/100
Volt Horn
Typical Area
Wheelock Self
Amplified Horn
Effective
Forward
Coverage
Quiet to
Moderate
50-75dB
Shipping
Warehouse
SA-H5
128 feet
ST-H15B
3.8 watts/128 feet
Noisy
75-85dB
Print Shop,
Factory
SA-H5
SA-H15
64 feet
96 feet
ST-H15B
7.5 watts/64 feet 15.0
watts/96 feet
Very Noisy
86-96dB
Machine
SA-H15
Shop, Factory
32 feet
ST-H15B
ST-H30
15.0 watts/32 feet 30.0
watts/48 feet
Noise
Level
Wattage Tap/Effective
Forward Coverage
Step 3 Select the Correct Amount Of Power
In this section we will see how to select the appropriate size power supply (self amplified 24 volt system) or
amplifier (central amplified 70 volt system).
Self amplified
Self amplified (24VDC) systems are 4-wire systems. A pair of wires for the audio and a pair for the DC voltage necessary
to power each speaker’s amplifier. A very important consideration then is the maximum total current draw, in
milliamps of all speakers to be connected on the same power supply. Thus a single Wheelock RPS-2406 power
supply, which provides 600mA, may be sufficient to power multiple speakers. Actually this approach is somewhat
conservative; it is seldom necessary to operate these speakers at full volume and power. At half volume self amplified
speakers draw considerably less current and still deliver plenty of sound for most environments. Power supplies can
be run in tandem...that is, paralleled with positive poles and negative poles connected together to yield double the
available current. For example, a pair of 600mA RPS-2406 power supplies can be tied together to yield 1200mA (1.2
amps). For more power, Wheelock also provides the 4 amp RPS-2440 24VDC power supply, and the 8-output, 20.8
amp PSC-2420-B 24VDC power supply. The PSC-2420-B features a battery charging circuit with automatic switchover
to backup batteries. Check the specifications of the power supply to be used in order to stay within its operating range.
Using self-amplified speakers and other 24 VDC products with a power supply with battery backup will allow a completely
battery backed telephone paging system.
Central Amplifier
For central amplifier 70 volt systems, the sum of the selected speaker wattage taps will determine the size of the amplifier
— in other words, add up the wattage taps. Forty speakers tapped at 1 watt represent a total wattage demand of 40
watts. Then, size the amplifier so that the sum of the wattage taps does not exceed 85% of the amplifier’s rated power. This will ensure headroom and reserve power.
www.coopernotification.com
14
Power Supplies
A
RPS-2406: Fully Regulated and Filtered, 24 VDC, 600
mA. Current limited, short circuit and overload protected
with auto shutdown and reset. Wall mounting with 6 ft.
AC power cord. RPS-2440-A: 24 VDC, dual output. Either two 2 A, or
one 4A. Fully regulated and filtered. Each output with
independent power on LED, current limiting overload and
short circuit protection, auto shutdown and reset. AC
circuit breaker for input protection. Item
Model Number
B
Output
Voltage
Output
Current
Regulations
Ripple
Voltage
A
RPS-2406
24 VDC
600 mA
± 5%
10mVRMS
B
RPS-2440
24 VDC
4A
± 5%
10mVRMS
Correct Wire Size for Central Amplified System Speaker Lines and
Amplified Speaker System 24 VDC Power Lines
In any electrical installation, sound or otherwise, proper wire size is important if you want maximum efficiency from the
system, not to mention safety and reliability.
Wire conducts the audio and electrical signals in your system. Like arteries and veins in the human body, good unobstructed
flow is vital. Wire that is sized too small acts like a resistor in the circuit and can restrict the flow. If the wire is too small
(or the run too long) for the speaker load, a lot of amplifier power will never reach the speaker. This electrical energy
simply becomes heat in the wires, and will result in volume loss.
So, bigger is better. The less restriction in the wire, the better the path for your audio and electrical signals. It’s like
the difference between sending your signal down a dirt road or the interstate. However, if you have more wire size than
you need you’re wasting money. So, it’s important to know what size wire to use for a given power load and how far you
can run this particular size wire with this power load.
Cable lengths for 70 volt speaker lines
Table #1 should prove useful for 100 volt, 70 volt, 25 volt or low impedance (8 ohm) speaker lines. As an example, let’s
say your installation calls for a 60 watt load and you have to run the cable about 900 feet. Looking at the chart, the
correct wire size is #14. Or, let’s say it’s an older installation and you want to use the existing wire — 600 feet of #22. Again, looking at the chart, you must limit the connected load to 15 watts, which could be 15 speakers tapped at 1 watt,
30 speakers tapped at 1/2 watt or a single horn tapped at 15 watts. These figures are meant to be guidelines. It is not
that the system would not work at all if you used smaller wire or longer runs than specified, it is just that the volume loss
would be greater, and the efficiency of the system reduced.
Table #1
2 WIRE COPPER CABLE LENGTHS FOR SPEAKER LINES AT 0.5 dB
LOSS IN SPL (12.5% POWER LOSS IN WATTS)
AWG
Max
Size Power
AWG
10 Per NEC
12 Per NEC
14
1,060 W
16
420 W
18
210 W
20
70 W
22
35 W
Low Impedance
Speaker Line
8 Ohms
240
150
95
60
40
25
15
70 Volt Speaker Line
Nominal Power in the Load Length in Feet
10W 15W 20W 40W
15,0009,900 7,500 3,750
9,100 6,200 4,680 2,340
5,600 3,800 2,880 1,440
3,600 2,400 1,870 930
2,300 1,500 1,150 570
1,400 960 730 360
900 600 460 —
60W100W125W 200W250W400W500W
2,500 1,500 1,180
730
590
370
290
1,560 940
730
460
370
230
180
960 600
450
280
220
140
110
620 370
290
180
140
90
—
380 230
180
110
—
—
—
240
—
—
—
—
—
—
—
—
—
—
—
—
—
AWG
Size
10
12
14
16
18
20
22
NOTE: 1. For 25 V line divide all 70.7 lengths by 8. 2. For 100 V line multiply all 70.7 lengths by 2.0. 3. To allow for future expansion and distribution
cable line loss, it is recommended that the total system wattage should not exceed 85% of the amplifier’s rated output. 4. The total system wattage
requirement is the summation of the wattage tap selections of all system speakers and horns.
Cable Lengths for 24 VDC Power Lines
Wiring for self amplified systems, or systems using low voltage DC to power self contained amplified speakers, can
present a different problem, and that is voltage drop. With 70 volt speaker systems, the audio signal is distributed at a
higher voltage and then stepped down at each speaker via a transformer much the same way utility companies bring
power to your home — high voltage transmission that is stepped down at each location. This is a very efficient method
that works because of the nature of AC voltages (audio is an AC voltage) and transformers (voltages can be stepped up
or down). DC voltage cannot be stepped up or down with transformers, so the voltage that is available from the source
(the power supply) is the same voltage that the device receives. If the device that must be powered by this voltage is
some distance away, careful attention must be paid to current draw, length of run and wire size.
www.coopernotification.com
16
In self amplified speakers, the small amplifiers behind each speaker are powered with 24 VDC, and these amplifiers
have a definite current draw, which means that a specific length of run and wire size (which in turn create a certain
resistance) will have an impact on the amount of current, measured in amperes, or milliamps, that the amplifiers will
actually receive. By imposing a larger current draw than the wiring can handle, the system will “see” a drop in voltage
and current flow. Most devices specify a minimum operating voltage and current requirement.
All of these considerations are basically gyrations of Ohm’s Law. And, unless the wire is sized correctly for the current
draw and length of run, strange things may happen when you fire up the system. Volume will be lower than expected,
sound may drop in and out, or, in extreme cases, it may not work at all!
Table #2, at a glance, gives wire size, length of runs and current draw for a 10% drop in voltage for 24 VDC systems. A
voltage drop of 10% represents 21.6 VDC, well within the operational range of Wheelock’s 24 VDC powered products. As an example, let’s say your installation calls for ten 8” self amplified ceiling speakers. The distance between the power
supply and the last speaker on the line is about 170 feet. For simplicity and even greater “headroom”, let’s assume an
“end of the line” situation — that is, view the situation as if all 10 speaker amplifiers were sitting out there at the end of
a 170 foot run of wire.
If, at full power, a typical self amplified speaker draws about 105 mA, the full connected load will draw 105 mA x 10
speakers = 1050 milliamps, (1.05 amps). Looking at the chart, 1100 milliamps can be drawn through 170 feet of #18
gauge wire. The correct wire size, therefore, is #18 AWG.
Table #2
2 WIRE COPPER CABLE LENGTHS FOR 24 VDC POWER LINES
AT A 10% DROP IN VOLTAGE
AWG
CURRENT DRAW (MILLIAMPS)
Size 100 200 300 400 500 600 700 800 9001000 1100 1200 1300 1400
10 12000 6000 400030002400 2000 1720 1500 1335 1200 1090 1000 925
860
12 7500 3750 250018801500 1250 1070 940 835 750 680 625 570 535
14 4800 2400 16001200 960 800 690 600 535 480 435 400 370 345
16 3000 1500 1000 750 600 500 430 375 335 300 275 250 230 215
18 1880 940 630 470 380 310 270 235 210 190 170 155 145 135
20 1200 600 400 300 240 200 170 150 135 120 110 100 90
85
22 375 375 250 185 150 125 110 95 85 75
70
65
60
55
24 470 235 160 120 95 80 70 60 55 50
45
40
35
35
LENGTH IN FEET
AWG
1500 Size
800
10
500
12
320
14
200
16
125
18
80
20
50
22
30
24
NOTES:
1. Doubling the current draw reduces cable length 1/2. Halving the current draw doubles cable length.
2. Doubling the voltage (ie. 48 VDC) doubles cable length. Halving the voltage
(ie. 12 VDC) reduces cable length 1/2.
3. 1000 milliamps — 1.0 amp.
What about the audio pair?
As mentioned previously, self-amplified speakers use a 4-wire hook-up: A pair for the 24 VDC power and a pair for the
paging audio. What about the audio pair? Shouldn’t we worry about correct wire size for the audio wiring as well? Pre-amplified paging audio is a very low power, low impedance (usually 600 ohms or less) electrical signal. For this
reason, small gauge wire of #22-24 AWG works well, even for very long cable runs. To illustrate this further, consider that
telephone companies typically transmit low level voice audio over distances of two miles or more on #24 AWG wire.
Low power, low impedance pre-amp audio can generally be transmitted
over considerable distances using small (#22-24) wire gauge.
Shielded vs unshielded wire
An entire book could be written on this subject, so let’s boil it down to a few simple guidelines. Speaker lines from 70
volt central amplifiers can generally be unshielded cable with little or no chance of noise pick-up. An exception would
be elevator shafts where an audio signal’s worst nightmare comes true. These are electrically high noise environments
and shielded wire or conduit should be used. Audio lines (wires carrying any low power pre-amplifier signal) should
always use shielded cable to avoid noise pickup. This included microphone wiring, amp-to-amp connection between
70 volt amplifiers, and amplifier connections to FM tuners, tape decks, CD players, etc.
Self amplified speakers are often installed in telephone paging systems with acceptable results using unshielded
telephone wire. Generally, this can be done with little or no noise pickup provided that the wiring doesn’t pass close
to electric motors, transformers, or fluorescent lighting ballasts. If in doubt, use shielded cable for the audio pair. It’s
cheap insurance.
Step 4 - Other Considerations
Telephone System Interface
Now that we know the basics of designing a paging system, in terms of speaker placement, efficiency and amplifier
power, let’s explore how to connect all of this hardware to a telephone system.
Up to this point, we have been discussing a paging system as a “stand alone” system — as if we had all of these
components in place and we were going to use a single microphone to speak through it. This is often the case in small
retail stores or perhaps a bowling alley, but in large complexes such as manufacturing plants, hospitals, office buildings,
airports, etc., it becomes very desirable to access the paging system via the inhouse telephone system thereby enabling
many users in many locations access to the paging system right from the nearest telephone. By taking advantage of
all the extensions within the phone system, it’s like having a PA system with 20, 50 or 100 microphones connected to it;
all at different points in the building.
Telephone systems
Most commercial telephone systems in use today are basically variations of several types, namely electronic key systems (EKSU’s), PBX systems, hybrid systems that are sort of a mixture of the two, and Centrex. First, let’s look at EKSU’s
and PBX systems, because in the field, they are similar from an interface standpoint. Centrex systems are a little
different, so we’ll look at them separately.
Although they differ considerably in switching function, most EKSU’s and PBX systems have a built-in page output right
on the main unit which is accessed by pressing a dedicated key (EKSU) or a set of numbers on the touch-tone™ pad
(PBX). In either case, the system has now connected you to a low power (usually 600 ohm) audio module in the main
unit. That’s right, an audio output that you can now bring right over to the 600 ohm output on your paging amplifier or
self-amplified speaker(s).
www.coopernotification.com
18
Centrex systems work very much like PBX systems with one important difference: Instead of being located on premise, the switching gear is located at the telephone company’s central office (CO). The extension lines come back from
CO like telephone lines coming into your home — with 90-130 volt ringing voltage. Centrex lines cannot be directly
connected to amplifier inputs. An telephone paging interface must be used to connect a ring voltage line to a paging
system. The telephone paging interface answers a regular ringing voltage line (such as Centrex, station level PBX or
single line residential type phone service) and then opens an audio path for connection to additional equipment such as
a Wheelock paging system (MZC-144). ™ — AT&T registered trademark
Using Unused CO Ports
Some EKSU’s and PBX’s have no built-in paging access. In such cases, an unused CO line port or trunk port can be
used. However, talk battery (“A” battery) must be provided in these applications.
What is it?
Talk battery or “A” battery is the DC voltage supplied by the telephone company (CO) central office to:
A) Operate the carbon transmitter in the telephone handsets to allow audio (talking).
B) Enable initiation of calls.
C) Allow communication through the CO trunk ports of a telephone system (PBX, key, hybrid) installed in a customer’s premise.
Talk battery (usually 48 VDC) is constantly present on the TIP (green) and RING (red) wires of each telephone company line. Note that talk battery is not to be confused with ring voltage, which is an AC voltage of about 105 volts
and is superimposed right on top of the 48 VDC talk battery, over the same pair of wires, for the purpose of ringing a
telephone.
How does it affect telephone paging applications?
When paging is connected to a telephone system’s unused CO trunk port, talk battery is not available at that port. The
operative word is “unused”. That means the CO port is not connected to a public telephone (CO) line. If the telephone
line is not connected to the port, then the talk battery the line would otherwise provide is simply not present. Nevertheless, the telephones within the system need to access that port for paging, so the port still needs talk battery for audio
(paging). Therefore, talk battery must be supplied by the paging equipment.
Single Zone CO Port Paging Applications
Talk battery can be provided with a filtered and regulated 24 VDC power supply as illustrated by the
following diagram
2 WIRE
CABLE
2 WIRE
CABLE
TELEPHONE SYSTEM
UNUSED CO PORT
TELEPHONE
INPUT
(+)
(-)
SPARE
POWER SUPPLY
Note: This diagram shows the output of the telephone system feeding the input of a typical Wheelock amplifier for distribution on a 70 volt system. That same output could also directly feed self-amplified speakers or
Wheelock talk back speakers in a similar manner.
Accessories
Now that we have built a paging system and interfaced it with a telephone system let’s take a look at some different
accessories that can be utilized.
Common Audible
If the telephone system has no night ring feature, you can activate a tone generator by using a common audible, such
as a Wheelock CA-312-1 or CA-622-1. These devices connect to all of the CO lines ahead of the EKSU or PBX mainframe and then put out a common ring signal whenever a call comes in on any of the lines. This common output can
be either a dry contact or network ringing voltage, either of which can be used to activate a tone generator — or other
types of signals for that matter.
PRM-150 Pre-Amplifier
Besides correcting for proper impedance matching and compensating for long wire runs, the PRM-150 functions as a
master volume control for a group of 600 Ohm, Self Amplified speakers. The PRM-150 requires 24 VDC.
Common Audible Interfaces
A
OUTPUT OPTIONS:
B
Front Cover
1 = Ringing Voltage
2 = Contact Closure: (use Wheelock’s DCI-24-24 or EPS-2401 to drive
24 VDC alerts)
www.coopernotification.com
20
Wheelock’s Series CA-622-1 Common Audible Control Unit can
monitor up to six telephone lines to provide “All Call” signaling or
“Zone” signaling. Two separate zones can be signaled and two or
more control units can be ganged to monitor additional input lines. The economical CA-312-1 model monitors three tip and ring lines. These interface products are designed for Electronic Key Systems
and PBX or 1A2 systems (with touch tone station sets) that do not
offer a common audible ring circuit or dry contact closure for night
bell connection or zoned ringing.
Both models provide a choice of two outputs for connection of alert
signals: standard ringing voltage output or contact closure. A wide
selection of audible and visual alert signals is available to operate
directly off the ringing voltage output. Alternatively, Wheelock’s dry
contact interface or economy power supply can be connected to the
optional contact closure output to drive 24 VDC alert signals.
ORDERING INFORMATION
Item
A
Input
Output
50-130 V,
20-30 Hz
Ringing
Voltage or
Contact
Closure
B
Application
Model No.
Monitor up to 3
tip & ring lines
(one zone)
CA-312-1
Monitor up to 6
tip & ring lines
(two zones)
CA-622-1
NOTES: 1. Both models UL 1459 Listed, FCC Registered.
Paging Pre-Amplifier
Series PRM-150 Pre-Amplifier
Wheelock’s PRM-150 Line Pre-Amplifier boosts the low audio signal from
600 ohm CO and audio page ports to a level capable of driving up to 150 600
Ohm self amplified speakers. The pre-amplifier will also compensate for audio
signal loss (low volume) on long cable runs. The PRM-150 also functions as
a one-way paging CO port interface. When used with a Wheelock RPS-2406
power supply talk battery is supplied to the CO port. It contains a volume
control and is designed for convenient wall mounting.
Item
Model
Number
Input Current
@24 VDC
Input
Impedance
Output
Impedence
Input
Level
Max Audio
Output
Level
A
PRM-150
35mA
600 Ohms
4 Ohms
-15 dBM
to +10 dB
0.8 VRMS
Conclusion
Hopefully all of this has been of some help. There’s no reason to be timid when faced with a job involving a paging
or sound system. If you have never done much paging and/or telephone interface before, your process may be slow
at first, but after you have handled some of the more routine phases of installation, troubleshooting and maintenance,
you will be surprised at the confidence you develop. Confidence and experience; these are the most important
basic keys to becoming a real paging “pro”!
Questions?/Assistance?
Contact Cooper Notification’s Technical Support Engineering at
1-800-631-2148 or 732-222-6880
8 am - 5 pm Eastern Time
We are waiting to assist you with your paging/commercial sound needs!
Visit us on the web: www.coopernotification.com
Cooper Notification
NJ Location
FL Location
VA Location
273 Branchport Ave.
Long Branch, NJ 07740
P: 800-631-2148
F: 732-222-2588
7565 Commerce Court
Sarasota, FL 34243
P: 941-487-2300
F: 941-487-2389
4401 Wilson Boulevard, Suite 220
Arlington, VA 22203
P: 703-294-6768
F: 703-294-6560
www.coopernotification.com
©2008 Cooper Industries, Inc.
Your Authorized Cooper Notification Distributor is:
Cooper Notification is
Cooper Industries, Ltd.
600 Travis, Ste. 5800
Houston, TX 77002-1001
P: 713-209-8400
www.cooperindustries.com
SA 07/08
Printed in USA
Notification