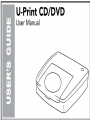
1
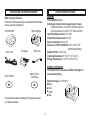
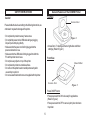
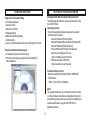
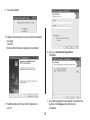
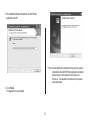
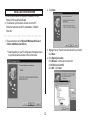
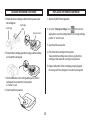
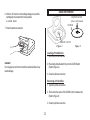
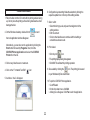
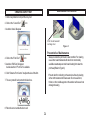
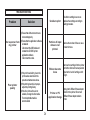
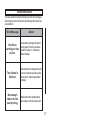
NOTICE
WELCOME MESSAGE
Thank you for choosing the U-Print CDP78 CD/DVD Printer. The
U-Print is compact and extremely easy to use, giving you the ability
to customize your CDs and DVDs by directly printing onto the surface
of the disc. The U-Print prints text and images are smudge resistant
and waterproof, giving your projects a proffesional look and feel. With
its exceptional quality and simple design program, the U-Print lets you
Print with ease and confidence.
The information contained in this manual is subject to change
without notice.
U-Print shall not be liable for errors contained in this manual or for
any loss or damage in connection with the furnishing, performance,
or use of this manual and product.
No person shall duplicate, photocopy , or reproduce this manual and
application software without the prior written consent of U-Print.
Please use the CD/DVD Printer on BLANK CDs or DVDs, as the
printing process could damage any data stored on a CD/DVD. Please
ensure the printing surface is SMOOTH AND CLEAN. U-Print
assumes no liability for any loss or corruption of data stored as a
result of using this product.
Printed in 2006. All right reserved.
Be sure to read the SAFETY INSTRUCTIONS as stated in this user’s
manual as handling it improperly might cause damage to the printer or
cause physical harm to the users.
TRADEMARKS
Microsoft and Windows are registered trademarks of
Microsoft Corporation.
2
TABLE OF CONTENTS
WELCOMEMESSAGE
○
○
○
○
○
○
○
○
○
○
○
○
○
○
○
○
○
○
○
NOTICE
MAINTAINING THE PRINTER
Preventative Maintenance
Trouble Shooting
Error Messages
2
○
2
○
○
TRADEMARKS
○
○
○
○
○
○
○
○
○
○
○
○
○
○
○
○
○
○
○
○
○
○
○
○
○
○
○
○
○
○
○
○
○
INTRODUCING YOUR CD/DVD PRINTER
What’s in your printer box
Product Specifications
Safety Instructions
General Features of the CD/DVD Printer
Printing Functions
SETTING UP THE CD/DVD PRINTER
Getting Started : Minimum System Requirement
Installing Application Software
Installing USB Driver
Uninstalling Application Software
Making Connections
Loading the Ribbon Cartridge
Replacing the Ribbon Cartridge
USING THE PRINTER
Loading a Printable Disc
Removing a Printed Disc
Creating A Label
Importing Images
Creating Curvy Text
○
○
○
○
○
○
○
○
○
○
○
○
○
○
○
○
○
○
○
○
○
○
○
○
○
○
○
○
○
○
○
2
4~8
8~21
21~24
3
○
○
○
○
○
○
○
○
○
○
○
24~26
INTRODUCING YOUR CD/DVD PRINTER
PRODUCT SPECIFICATIONS
PRINTER
Print Resolution: 200dpi
4x90 degree rotation function supports 4 print areas:
Top & Bottom Section - 2 x 0.94" X 2.36" (24mm x 60mm)
Left & Right Section - 2 x 0.94" X 1.57" (24mm x 40mm)
Input Power Requirements: 100 - 240 V
Output Power Requirements: 24V DC
Power Consumption: max 14.4W
Dimensions of Printer (WxDxH): 9.25" X 7.48" X 2.76"
(235mmx190mmx70mm)
Weight of Printer: 2.2lbs (1 Kg)
Operating Temperature: 50° to 95° F (10° to 35° C)
Storage Temperature: 68° to 140° F (20° to 60° C)
What’s in your printer box
Please check and make sure that you have all the items listed below
when you unpack your printer box:
Ribbon Cartridge
CD / DVD Printer
Power Cord
Driver CD-ROM
AC Adapter
USB Cable
RIBBON CARTRIDGES
The CD/DVD Printer includes one Ribbon Cartridge for
monochrome printing.
Blank CD-R for
Test Printing
Ribbon Cartridge: 27.91 ft (8.5m)
Black
Red
Yellow
Blue
If any of the above items are damaged or missing, please contact
your retailer immediately.
4
PRODUCT SPECIFICATIONS
SAFETY INSTRUCTIONS
Please read the safety instructions thoroughly before using the CD/
DVD Printer.
PRINTER CABLE
Your printer comes with a standard USB cable for connecting
the printer to the PC.
Danger!
Power Cord & AC Adapter
A Power Cord and AC Adapter is supplied for connection to
a power source.
Please handle the device according to following safety instructions,
as otherwise it may cause fire or electric shock, which could result
in the possibility of death or serious personal injury.
APPLICATION SOFTWARE
The CD/DVD Printer’s application software enables you to design
your CD/DVD label, and communicate your print command to the
printer. You will find the software on the driver CD-ROM supplied.
• Do not touch the power cord, USB cable or AC adapter
when your hands are wet.
• Do not allow any liquids to get into the product.
• Do not use the printer if it starts to emit smoke or strange odor.
• Do not abuse the power cord, AC adapter or USB cable.
• Do not disassemble or modify the printer.
• Do not dispose of the product by incineration as it may explode
in fire.
• Keep the plastic bag away from children after unwrapping as
it may cause suffocation.
5
General Features of the CD/DVD Printer
SAFETY INSTRUCTIONS
Top View
Caution!
Access Door
Please handle the device according to the following instructions, as
otherwise it may lead to damage of the printer.
• Do not place the product near any heat sources.
• Do not pull the power cord or USB cable during unplugging.
Grip and pull out the plug directly.
• Make sure that the power cord is firmly plugged into the
power socket when in use.
• Make sure that the USB cable is firmly plugged into both the
PC and the printer when in use.
• Do not place any objects on top of the printer.
• Do not place the printer on unstable surfaces.
• Do not touch the printer head or metallic parts nearby after
use as they may be hot.
• Do not use electrical items that are not supplied with the printer.
Figure 1
•Access Door - For loading and removing the disc and ribbon
cartridge. (Refer to Figure 1)
Front View
Power Button
Access Door
Figure 2
Power ON/OFF button
•Press power switch to ON to be ready for applications.
(Refer to Figure 2)
•Press power switch to OFF to cancel a print job or shut down
the printer.
6
Rear View
PRINTING FUNCTIONS
The CD/DVD Printer provides printing in up to 4 sectional areas to
create a CD/DVD label.
• Top, right, bottom and left areas each covered at 900 intervals
• Easy-to-use selection of areas to edit.
Supports creation of Text and Graphics Labels
• Original text labels
• Curved text labels
• Resizable images
AC adapter
terminal
USB Port
Curved Text
Print Area
Figure 3
AC adapter terminal
• Connect the supplied AC adapter to the printer’s AC adapter
terminal (Refer to Figure 3) for connection to power source.
Printer’s USB port
• Connect the supplied USB cable to the USB port
(Refer to Figure 3) for connection to your PC.
Text
Graphic
7
SETTING UP THE CD/DVD PRINTER
PRINTING FUNCTIONS
Getting Started: Minimum System Requirements
The following are the minimum system requirements for using
the CD/DVD Printer.
Operating Systems
•The printer’s application software is designed to operate in
the following environments:
• Microsoft Windows 98 Second Edition
• Microsoft Windows Millennium Edition (Windows ME)
• Microsoft Windows 2000 (Professional)
• Microsoft Windows XP (Home or Professional)
• Minimum color display of 256 colors
(high color display is recommended)
• Minimum resolution of 800 x 600
(higher resolution is recommended)
•Support for Text Label Editing
Font setting variations
Selection of font
Selection of font size
Paragraph setting
Bullets and Numbering Setting
Tables insertion
Copy, Cut and Paste features for easy import/export of rich text
•Easy to understand window layout
Immediate print preview in window layout
Word processor style layout gives maximum flexibility for
text manipulation.
Hardware Requirements
• Minimum requirements of Pentium 90MHz, 32MB RAM
• CD-ROM drive
• 1 USB 1.1 port (USB 2.0 compatible)
Note!
The application software may not be able to function correctly
on certain hardware and software configurations. Ensure that
all available operating system service packs are installed if you
experience difficulties in using the CD/DVD Printer’s
application software.
8
1 . The InstallShield Wizard will guide you through the program setup.
INSTALLING APPLICATION SOFTWARE
1 . Insert the CD-ROM in your PC.(If auto run is disabled on your
PC, open Windows Explorer and click the CD icon.)
2. The driver set -up instructions will auto-run on the PC.
3. Follow the instructions on the PC and install the
“Microsoft®. NET Framework” (if you do not have the
Microsoft. NET Framework installed on your PC)
4. Install the “CD/DVD Application”.
Note: Depending on your PC configuration, the display screen
may not be the same as shown on the picture below.
2 . InstallShield® will search for the Microsoft. NET Framework. If
it is not found, the Microsoft. NET Framework License Agreement
will appear.
Note: Read all the terms and conditions of the License Agreement.
Click “I agree” & “Install” to begin the installation
9
3. This starts installation
4. A display screen will appear to let you know when the installation
is complete.
Click OK.
The Microsoft.Net Framework application is now installed.
6. Key in your User Name & Organization
Click Next
7. If you want the application to be installed in a folder other than
specified, Click Change and input the directory.
Click Next
5. **InstallShield will search for the CD-DVD Application on
your PC.
10
8. The InstallShield Wizard will install the CD-DVD Printer
Application to the PC.
** Note : Due to stability, the install wizard may ask for a system
reboot before the CD/DVD Printer Application is installed.
If setup doesn’t continue after a reboot, just re-run
the set-up. The installation will continue from the place
it was interrupted.
9. Click Finish.
The application is now installed.
11
2 . Click Next.
INSTALLING THE USB DRIVER
1. After you have finished the Application Installation, connect
Printer to PC through the USB cable.
2. The driver set -up instructions will auto-run on the PC.
Follow the instructions on the PC and install the “CSQ200
Driver file”.
○
○
○
○
○
○
○
○
○
○
○
○
○
○
○
○
○
○
○
○
○
○
○
○
○
○
○
1. These instructions are for Microsoft Windows 98 Second
Edition and Millennium Edition.
3. Highlight the icon “Search for the best driver for your device”.
Click Next.
4. Click Specify a location.
Click Browse. It will locate the driver from
CD-ROM\\Drivers\win98ME
Click OK. Click Next.
** Note: Depending on your PC configuration, the display screen
may not be the same as shown on the picture below.
12
6. This starts the installation
Click Finish.
5. The Windows driver will search for the CSQ200 driver
Click Next.
13
1. These instructions are for Microsoft Windows 2000
(Professional)
** Note: Depending on your PC configuration, the display screen
may not be the same as shown on the picture below.
3. Highlight the icon “Search for a suitable driver for my device”.
Click Next.
2. Click Next.
• This causes the Found New Hardware Wizard to appear.
14
4. Click Specify a location.
Click Next.
Click Browse . It will locate the driver from
CD-ROM\\Drivers\win2kXP
Click OK. Click Next
6. This starts the installation
Click Finish.
5. The Windows driver will search for the CSQ200 driver.
Click Next.
15
1. These instructions are for Microsoft Windows XP
** Note: Depending on your PC configuration, the display screen
may not be the same as shown on the picture below.
3. Click “Search for the best in these locations”.
Click “Include this location in the search”.
Click Browse
4. It will locate the driver from CD-ROM\\Drivers\win2kXP
Click OK
Click Next
2. Highlight the icon “Install from a list or specific location”.
Click Next.
16
7. Click Finish.
5. The Windows driver will search for the CSQ200 driver
Click Next.
6. Click “Continue Anyway”
This starts the installation
17
MAKING CONNECTIONS
UNINSTALLING THE APPLICATION SOFTWARE
The application software for the CD/DVD Printer must be installed
on your PC before connecting the power supply.
1. Click the Windows Start button, point to Settings, and then
click Control Panel.
2. Once the control panel window appears, double click
Add / Remove Programs.
1) Connect the power cord to the AC adapter.
3. Once the dialogue box appears, click CD/DVD Printer Application
in the list of installed software.
4. Click the Remove button. Once the file delete confirmation
dialogue box appears, click Yes to begin the
uninstallation process.
5. Once it is completed, click Close to exit.
2) Connect AC adapter to the printer’s AC adapter terminal & plug
the power cord into a power socket.
18
MAKING CONNECTIONS
LOADING THE RIBBON CARTRIDGE
3) Connect the USB cable to the USB port of the PC.
1. Tighten the ribbon in the ribbon cartridge by turning the hub
using an object with sharp end. The printer will malfunction
if the ribbon is slack.
Pen
Cartridge
4) Connect the USB cable to the USB port of the printer
2. Start the CD/DVD printer application.
3. Click the “Change Cartridge” icon
The side with the arrow should be pointing down.
• Do not disconnect the AC Adapter, power cord or USB cable during
the printing process as it may cause the printer to malfunction.
• Only use the power cord and AC Adapter supplied with the printer.
• Ensure that you use a standard household power socket rated for
the voltage specified on the supplied AC adapter.
• Connect the USB cable directly to the USB port of the PC.
• Connecting through a hub or chaining through another USB device
may cause the printer to malfunction.
on the window
application to move the cartridge holder to the ‘Change
cartridge position” or “cancel” to exit.
4. Open the printer access door.
19
Access door
LOADING THE RIBBON CARTRIDGE
REPLACING THE RIBBON CARTRIDGE
5. Position the ribbon cartridge so that the ribbon passes under
the cartridge bar.
Cartridge
1. Start the CD/DVD Printer Application
Cartridge
Bar
2. Click the “Change Cartridge” icon
Access door
on the window
application to move the cartridge holder to the “change cartridge
position” or “cancel” to exit.
3. Open the printer access door.
4. Pull out the ribbon cartridge from its position.
Take care that the cartridge does not move, grip the ribbon
cartridge on both sides with your fingers and pull it out.
6. Press the ribbon cartridge against the carriage until the cartridge
is in line with the carriage bar.
5. Replace with another ribbon cartridge by pressing it against
the carriage until the cartridge is in line with the carriage bar.
7. Click the OK button on the cartridge dialogue box and the
cartridge will move back to the home position,
or “Cancel” to exit.
8. Close the printer access door.
20
USING THE PRINTER
6. Click the OK button on the cartridge dialogue box and the
cartridge will move back to the home position,
or cancel to exit.
CD/DVD CATCH
press and release
CD/DVD
7. Close the printer access door.
CD/DVD CATCH
Figure 4
Figure 5
Loading a Printable Disc
1. Open the printer access door
Caution !
Do not apply too much force to the ribbon winder shaft as it may
lead to damage.
2. Place blank printable disc firmly onto the CD/DVDcatch
(Refer to Figure 4)
3. Close the printer access door
Removing a Printed Disc
1. Open the printer access door
2. Press down the center of the CD/DVD catch to release disc
(Refer to Figure 5)
3. Close the printer access door
21
CREATING A LABEL
6. Configure the layout setting. Make the selection by clicking the
respective pattern icon on the top of the editing window.
1. Place the disc onto the CD catch with its printing surface facing
up. Do not place the printing surface facing downward as it will
damage the disc.
2. On the Windows desktop, double-click the
7. Select a font
• Select the font type, size, style and text alignment in the
editing window.
• Edit the content
• Click on other label boxes to continue with their editing or
outside these boxes to exit.
icon and
the main application window will appear.
Alternatively, you can also run the application by clicking the
Start button followed by Programs. Next, click the
CD/DVD Printer application and select the CD/DVD
Printer from the list.
8. Print a label
• Click the print
• The printing display dialog box appears.
• Click OK. This will start the printing operation.
3. Click on any label boxes to create text.
4. Click on the “Formatted Text Edit”
icon.
9. Save a label by clicking the
icon
icon. The printing job is saved
in your Windows My Document folder.
5. A window “Area” will appear
10. To quit the CD/DVD Printer application.
• Go to File tab.
• On the drop down menu, click Exit.
• A dialog box will appear. Click Yes to exit the application.
22
IMPORTING IMAGES
6. Click on the “Load Image”. The file dialog box will appear,
select the directory and the file that you want to insert.
You can import images into the label from files or folders.
1. Click on any label boxes to import the images.
7. Click OK.
2. Click on the “Switch to image edit mode”
icon.
8. The image will be imported to the label box.
3. A window “Area” will appear.
4. Click on the “Insert/Change image”
icon
5. A window “Image Attributes” will appear “Image Position” and
“Scaling” can be adjusted under here.
23
MAINTAINING THE PRINTER
CREATING CURVY TEXT
1. Click on any label box to import the curvy text
2. Click on the “Curved Text”
icon
3. A window “Area” will appear
Print head beneath
carriage bar
Figure 6
Preventative Maintenance
4. Click on the “Enter Text”
• Always maintain the print head in clean condition. For cleaning,
use a cotton swab moistened with alcohol or commercially
available cassette tape recorder head cleaning kit to clean the
print head (Refer to Figure 6)
icon
5. A window “Edit Text” will appear
A wide selection of “Font Text” is available.
6. Click “Distance From Centre” to adjust the size of the font.
• Prevent dust from collecting on the exterior surface by cleaning
with a cloth moistened with clean water. Do not use alcohol,
thinner, or other volatile agents on the exterior surfaces as it can
damage the casing.
7. The curvy text will be imported to the label box.
8. Place the cursor outside the box to exit.
24
CLEANING THE PRINT HEAD
3. The Carriage will move to the cleaning position. Unplug the Power
Cable and the USB Cable before cleaning the Print Head.
Click Ok.
A dirty print head will produce bad print quality.
Perform the following steps to clean the print head when it
becomes dirty.
Note: Use a cotton bud stick or other soft material to clean
the print head.
4. Use a cotton bud stick moistened with alcohol to clean the print
head. You can also use a commercially available cassette tape
recorder head cleaning kit to clean the print head. Insert the tip of
the cotton bud stick and slide it lightly back and fro along the area
shown in the Figure 8.
1. Click on file and select “Clean Print Head…” on the drop down
menu. (See Figure 7)
Figure 7
Figure 8
2. Click OK to continue.
5. Plug the 2 cables back and continue printing.
25
TROUBLESHOOTING
Problem
Unable to print
Solution
1)Ensure that all the connectors are
connected properly.
No response from 2)Ensure that the application software
is installed:
my printer
-Disconnect the USB cable and
reinstall the CD/DVD printer
application software.
-Reconnect the cable.
Poor printer
quality
1)If the print head is dirty, clean the
print head as described in the
preventive maintenance above.
2)If the printing density is improper,
adjust the printing desity.
3)If the disc print surface is not
suitable, change the disc media.
Thermal printable media is
recommended.
The ribbon cartridge has run out.
Replace the cartridge according to
loading procedure.
Portions of input
data are not
printed.
Reduce the number of lines or use a
smaller font size.
Ribbon become
loose
Remove the cartridge from the printer
and roll the ribbon with a sharp ended
object at the hub of cartridge until it
is tight.
Unplug both USB and Power adapter
cable from the printer. Reconnect
Printer or PC
application hangs USB and Power adapter cable to
printer.
26
ERROR MESSAGES
You may sometimes receive the following common error messages
while using the printer. Please follow the following instructions if you
encounter them.
Error Message
No ribbon
cartridge in the
printer.
Action
Load a ribbon cartridge in the printer
and try again. Follow the procedure
under the section on “ loading the
ribbon cartridge”
The ribbon is
finished.
Unload the ribbon cartridge and load a
new one. Follow the procedure under
the section on “Replacing the ribbon
cartridge.”
Not enough
ribbon for the
next printing.
Replace the ribbon cartridge before
proceeding on with the next print job.
27