1
GE Healthcare
UNICORN™ 6
Advanced system administration
Table of Contents
Table of Contents
1
Introduction ..........................................................................................................
5
2
User, client computer and database server set up .......................................
6
3
OPC settings for UNICORN process picture ....................................................
28
4
Firewall exceptions ..............................................................................................
36
5
Database upgrade ...............................................................................................
41
6
Manual uninstallation .........................................................................................
52
UNICORN 6 Advanced system administration 28-9642-49 Edition AB
3
1 Introduction
1 Introduction
This document contains information that is relevant for UNICORN 6 network deployments
and additional details about Windows™ settings that are not included in the UNICORN
6 Administration and Technical Manual. It describes software settings and selections
necessary in order for the UNICORN client and server computers to operate as intended
in a network environment. Issues addressed include
•
Prerequisite application installations
•
Windows user names and passwords
•
Local settings for component services
•
Firewall settings
•
Services and ports used
•
Upgrading the SQL Server version
The document also includes instructions for how to uninstall UNICORN 6 and SQL Server
Express manually if the installation has become corrupted and cannot be uninstalled
using the normal procedures.
UNICORN 6 Advanced system administration 28-9642-49 Edition AB
5
2 User, client computer and database server set up
2 User, client computer and database
server set up
Introduction
This chapter provides information about the Windows user setup and computer settings
which, for most parts, is not included in the UNICORN 6 Administration and Technical
Manual. The settings described are necessary in network deployments. The chapter also
contains information about basic computer configuration and prerequisite installations.
General computer
recommendations
The table below is an overview of the general computer recommendations for UNICORN
6 installation options.
6
Full installation
UNICORN
Remote client
UNICORN
Database and
E-license
Server
UNICORN
Instrument
Server and local client
Minimum
free disc
space
11 GB
1 GB
6 GB
5 GB
Minimum
available
RAM
3 GB (both
Windows XP
Professional
and Vista)
2 GB on Windows XP Professional
2 GB on Windows XP Professional
2 GB on Windows XP Professional
3 GB on Windows Vista
3 GB on Windows Vista
3 GB on Windows Vista
Disc format
NTFS
NTFS
NTFS
NTFS
Operating
systems including service packs
Windows XP
Professional ,
SP3
Windows XP
Professional ,
SP3
Windows XP
Professional ,
SP3
Windows XP
Professional ,
SP3
Windows
Vista Business, SP1
Windows Vista
Business, SP1
Windows Vista
Business, SP1
Windows Vista
Business, SP1
UNICORN 6 Advanced system administration 28-9642-49 Edition AB
2 User, client computer and database server set up
Full installation
UNICORN
Remote client
UNICORN
Database and
E-license
Server
UNICORN
Instrument
Server and local client
Operating
system language
English (US)
English (US)
English (US)
English (US)
Architecture
x86, Dual
Core (or
more)
x86, Dual Core
(or more)
x86, Dual Core
(or more)
x86, Dual Core
(or more)
Hard disk compression
The hard disks of the computers where UNICORN 6 is installed should not be compressed.
Computer configuration with
Windows XP™
Follow the instructions below to configure a Windows XP computer before installing
UNICORN:
Step
Action
1
Install Windows XP Professional. Ensure that Service Pack 3 is included in
the installation.
2
•
Select US English as the Language Option.
•
Set the regional settings to use the US standard for decimal delimiter,
which is a decimal point (".").
Install any additional hardware drivers that may be needed, for example
network, graphics, sound or chipset drivers.
See also "Install extra network cards" below.
3
Since a dual core computer is the recommended minimum for UNICORN 6,
ensure that all cores of the processor are running.
UNICORN 6 Advanced system administration 28-9642-49 Edition AB
7
2 User, client computer and database server set up
Step
Action
4
Install the following prerequisite applications in the exact order listed below 1 :
1
{912F19C1-DFD2-487F-A168-2E98B5FFC30E}\WindowsXP-KB942288v3-x86.exe
(Microsoft Windows Installer 4.5)
Note:
2
This installation will normally force a re-start of the
computer.
{FBAF5483-7C07-40A3-BD50-9B1FA8FDCA65}\dotnetfx35sp1.exe
(Microsoft .NET Framework 3.5 SP1)
Note:
3
This installation will normally force a re-start of the
computer.
{DA190F81-371E-49E3-A4DF-1E657E148FE5}\WindowsXP-KB926139v2-x86-ENU.exe
(Windows PowerShell 1.0)
4
{11BC222D-3482-4200-9C1A-1C004D2D6C2C}\msxml.msi
(Microsoft Core XML Services 4.0 SP2)
5
{11BC222D-3482-4200-9C1A-1C004D2D6C2C}\msxml6.msi
(Microsoft Core XML Services 6.0)
Note:
6
If MSXML 6.0 SP2 is already installed, this installation
may fail. If so, this step can be skipped and the newer
version will work as intended.
{E9D60B10-81E0-4ED1-A3D7-153977F29467}\vcredist_x86.exe
(Microsoft Visual C++ 2005 Redistributable Package)
5
Verify that all cores of the processor are still running.
6
Turn off Windows Update:
1
Open the Windows Control Panel (in Category View).
2
Choose Security Center.
3
Choose Automatic Updates.
Result: The Automatic Updates dialog opens.
4
Select the Turn off Automatic Updates option.
5
Click the OK button to apply the settings and close the dialog.
6
Close the Windows Security Center dialog.
Proceed with the next step without closing the Control Panel.
8
UNICORN 6 Advanced system administration 28-9642-49 Edition AB
2 User, client computer and database server set up
Step
Action
7
Disable power save mode:
1
Choose Performance and Maintenance in the Control Panel.
2
Choose Power Options.
Result: The Power Options Properties dialog opens.
8
1
3
Disable all power save settings.
4
Click the OK button to apply the settings and close the dialog.
5
Close the Performance and Maintenance dialog.
Turn off the Windows screen saver:
1
Right-click anywhere in the Windows desktop and choose Properties
from the shortcut menu.
2
Click the Screen Saver tab.
3
Choose [None] from the Screen Saver menu.
4
Click the OK button to apply the settings and close the dialog.
All listed prerequisites are available on the UNICORN 6 installation DVD in the
ISSetupPrerequisites folder.
Computer configuration with
Windows Vista™
Follow the instructions below to configure a Windows Vista computer before installing
UNICORN:
Step
Action
1
Install Windows Vista Business Edition. Ensure that Service Pack 1 is included
in the installation.
2
•
Select US English as the Language Option.
•
Set the regional settings to use the US standard for decimal delimiter,
which is a decimal point (".").
Install any additional hardware drivers that may be needed, for example
network, graphics, sound or chipset drivers.
See also "Install extra network cards" below.
UNICORN 6 Advanced system administration 28-9642-49 Edition AB
9
2 User, client computer and database server set up
Step
Action
3
Since a dual core computer is the recommended minimum for UNICORN 6,
ensure that all cores of the processor are running.
4
Install the following prerequisite applications in the exact order listed below 1 :
1
{6BD3444F-03E6-4E21-BAD0-50E6A5820433}\Windows6.0-kb942288v2-x86.msu
(Microsoft Windows Installer 4.5 for Windows Vista and Server 2008)
Note:
2
This installation will normally force a re-start of the
computer.
{FBAF5483-7C07-40A3-BD50-9B1FA8FDCA65}\dotnetfx35sp1.exe
(Microsoft .NET Framework 3.5 SP1)
Note:
3
This installation will normally force a re-start of the
computer.
{DA190F81-371E-49E3-A4DF-1E657E148FE5}\Windows6.0-KB928439v2-x86.msu
(Windows PowerShell 1.0 Vista)
4
{11BC222D-3482-4200-9C1A-1C004D2D6C2C}\msxml.msi
(Microsoft Core XML Services 4.0 SP2)
5
{11BC222D-3482-4200-9C1A-1C004D2D6C2C}\msxml6.msi
(Microsoft Core XML Services 6.0)
Note:
6
If MSXML 6.0 SP2 is already installed, this installation
may fail. If so, this step can be skipped and the newer
version will work as intended.
{E9D60B10-81E0-4ED1-A3D7-153977F29467}\vcredist_x86.exe
(Microsoft Visual C++ 2005 Redistributable Package)
5
10
Verify that all cores of the processor are still running.
UNICORN 6 Advanced system administration 28-9642-49 Edition AB
2 User, client computer and database server set up
Step
Action
6
Turn off Windows Update:
1
Open the Windows Control Panel (in Category View).
2
Choose Windows update.
3
Choose Change settings.
Result: The Change settings dialog opens.
4
Select the Never check for updates option.
5
Click the OK button to apply the settings and close the dialog.
6
Click the Back button to return to the Control Panel.
Proceed with the next step without closing the Control Panel.
7
For some graphic cards, the Vista Aero color scheme will be selected by
default. If this is the case, the Vista Aero color scheme must be turned off
manually:
1
Choose Appearance and personalization.
2
Choose Change the color scheme under Personalization.
Result: The Appearance Settings dialog opens.
3
Set the Color scheme to Windows Vista Basic
and
8
4
click the OK button.
5
Close the Control Panel.
Turn off the Windows screen saver:
1
Right-click anywhere in the Windows desktop and choose Properties
from the shortcut menu.
2
Click the Screen Saver tab.
3
Choose [None] from the Screen Saver menu.
4
Click the OK button to apply the settings and close the dialog.
UNICORN 6 Advanced system administration 28-9642-49 Edition AB
11
2 User, client computer and database server set up
Step
Action
9
Turn off IPV6:
Either
•
Add a dword value named DisabledComponents with the value 000000ff
to the registry entry
[HKEY-LOCAL-MACHINE\SYSTEM\CurrentControlSetServices\Tcpip6\Parameters]
or
•
Create and execute a .reg file with the contents shown below:
------------------------------------------------------------------Windows Registry Editor Version 5.00
[HKEY-LOCAL-MACHINE\SYSTEM\CurrentControlSetServices\Tcpip6\Parameters]
"DisabledComponents"=dword:000000ff
-------------------------------------------------------------------
1
All listed prerequisites are available on the UNICORN 6 installation DVD in the
ISSetupPrerequisites folder.
Install extra network cards
To ensure optimal performance and to ensure that an ongoing run can be completed
even if the main network or database is inaccessible, it is recommended that computers
operating as instrument servers are equipped with an extra network interface card
dedicated for the communication between the ÄKTAavant instrument and the server
computer. This is necessary both for computers operating with Windows XP and for
computers operating with Windows Vista.
Follow the instruction below to install and configure this network card:
Step
Action
1
Install the Network Interface Card according to the installation instructions
provided by the manufacturer.
2
Open the Windows Control Panel (in Category View).
3
Choose Network and Internet Connections.
4
Choose Network Connections.
Result: The Network Connections dialog opens.
12
UNICORN 6 Advanced system administration 28-9642-49 Edition AB
2 User, client computer and database server set up
Step
Action
5
•
•
Right-click the network connection for the Network Interface Card which
will be used for the instrument communication and choose Rename
from the shortcut menu..
Rename the network connection AKTA.
(This will enable GE Healthcare field service staff to easily identify the
dedicated instrument communication card)
6
Choose the Advanced:Advanced Settings menu item in the Network Connections dialog.
Result: The Advanced Settings dialog opens.
7
8
•
Select the network connection for the Network Interface Card in the
Connections list in the Adapters and Bindings tab.
•
Click the up arrow button to move this network connection to the top of
the list.
•
Click the OK button to apply the settings and close the Advanced Settings
dialog.
•
Double-click the instrument network connection.
Result: The Status dialog opens.
•
Click the Properties button in the dialog.
Result: The Properties dialog opens.
6
Select Internet Protocol (TCP/IP) and click the Properties button.
Result: The Internet Protocol (TCP/IP) Properties dialog opens.
UNICORN 6 Advanced system administration 28-9642-49 Edition AB
13
2 User, client computer and database server set up
Step
Action
7
Select Use the following IP address and enter
•
IP address: 10.1.1.2
•
Subnet mask: 255.255.255.0
Note:
8
Do not enter a Default gateway in this dialog. If an adress
is defined, it should be deleted.
Click the Advanced button.
Result: The Advanced TCP/IP Settings dialog opens.
14
UNICORN 6 Advanced system administration 28-9642-49 Edition AB
2 User, client computer and database server set up
Step
Action
9
De-select the Automatic metric checkbox and set the Interface metric to
5:
10
•
Click the OK button to apply the settings and close the Advanced TCP/IP
Settings dialog.
•
Click the OK button to close the Internet Protocol (TCP/IP) Properties
dialog.
•
Click the OK button to close the Properties dialog.
•
Click the Close button to close the Status dialog.
11
Note:
Close the Network Connections dialog.
The other Network Interface Card, which is used for network
communication, will have the default metric setting 20. This will ensure
that the communication between instrument server and instrument
will be prioritized.
UNICORN 6 Advanced system administration 28-9642-49 Edition AB
15
2 User, client computer and database server set up
Windows user names and
passwords
Unless a domain controller is used, all users must have exactly the same user name and
password on all computers running UNICORN. If a domain controller is used, the users
will be created at the domain controller and not on each computer. This eliminates the
need for synchronized user names and passwords.
Component services
The table below describes the steps for how to set up the Component Services settings
on a UNICORN computer.
My Computer Properties
16
Step
Action
1
Open the Administrative Tools dialog from the Windows Control Panel.
2
Double-click the Component Services icon to open the dialog.
3
Select Component Services in the tree structure and expand the tree to
show My Computer.
UNICORN 6 Advanced system administration 28-9642-49 Edition AB
2 User, client computer and database server set up
Step
Action
4
Right-click My Computer and choose Properties to open the My Computer
Properties dialog.
UNICORN 6 Advanced system administration 28-9642-49 Edition AB
17
2 User, client computer and database server set up
Step
Action
5
Click the Default Properties tab and select the following:
•
Enable Distributed COM on this computer
•
Default Authentication Level set to Connect
Note:
18
Client and server computers should all have corresponding
Default Authentication Level settings and be in the same
domain.
UNICORN 6 Advanced system administration 28-9642-49 Edition AB
2 User, client computer and database server set up
Step
Action
6
Click the COM Security and click the Edit Default button in the Access Permissions field, to open the Access Permission dialog.
7
•
Add the group Everyone with permissions for Local Access and Remote
Access.
•
Click OK to apply and close the dialog.
•
Click the MSDTC tab
and
•
click the Security Configuration button.
UNICORN 6 Advanced system administration 28-9642-49 Edition AB
19
2 User, client computer and database server set up
Step
Action
8
Select the following options in the Security Configuration dialog:
•
Network DTC Access
-
•
Allow Remote Clients
Transaction Manager Communication
-
Allow Inbound
and
•
Allow Outbound
Enable XA Transactions
9
Click OK to apply the changes and close the Security Configuration dialog.
10
Click OK to close the My Computer Properties.
Proceed with the UNICORN Instrument Server Properties settings described
below.
20
UNICORN 6 Advanced system administration 28-9642-49 Edition AB
2 User, client computer and database server set up
UNICORN Instrument Server Properties
Step
Action
1
•
Select the DCOM Config folder
and
•
locate and select the UNICORN Instrument Server icon.
UNICORN 6 Advanced system administration 28-9642-49 Edition AB
21
2 User, client computer and database server set up
Step
Action
2
Right-click the icon and choose Properties to open the UNICORN Instrument
Server Properties dialog.
3
•
Click the Security tab
•
Select Customize in the Launch and Activation Permissions field
and
•
22
click the Edit button to open the Launch Permission dialog.
UNICORN 6 Advanced system administration 28-9642-49 Edition AB
2 User, client computer and database server set up
Step
Action
4
Select the SYSTEM user and choose Allow for all permissions:
Note:
Only the SYSTEM user should have Launch permissions.
UNICORN 6 Advanced system administration 28-9642-49 Edition AB
23
2 User, client computer and database server set up
24
Step
Action
5
Select the Administrators user and choose Allow for the Local Activation
and Remote Activation permissions:
UNICORN 6 Advanced system administration 28-9642-49 Edition AB
2 User, client computer and database server set up
Step
Action
6
Select the Everyone user and choose Allow for the Local Activation and
Remote Activation permissions:
7
•
Click OK to apply the changes and close the Launch Permissions dialog.
•
Click OK to close the UNICORN Instrument Server Properties dialog.
UNICORN 6 Advanced system administration 28-9642-49 Edition AB
25
2 User, client computer and database server set up
Additional settings for database
servers running on Windows XP
If the database is running on a computer with Windows XP, the following settings must
also be set:
In setting...
Also choose...
My Computer Properties: Default Properties:
Default Authentication
Level
Default Autentication Level: None
(Step 5 in instruction My
Computer Properties
above)
26
UNICORN 6 Advanced system administration 28-9642-49 Edition AB
2 User, client computer and database server set up
In setting...
Also choose...
Security Configuration:
Transaction Manager
Communication
No Authentication Required.
(Step 8 in instruction My
Computer Properties
above)
UNICORN 6 Advanced system administration 28-9642-49 Edition AB
27
3 OPC settings for UNICORN process picture
3 OPC settings for UNICORN process
picture
Introduction
The process picture in UNICORN 6 uses an industry standard called OPC, and is based
on DCOM as the underlaying communication layer between client and instrument server.
This means that DCOM must be configured properly for the process picture shown on
the client computer to be updated with live information from the instrument server.
There are differences in how to configure the computer depending on if the used
operating system is Windows XP or Windows Vista. There are also differences depending
on if the computers are within a Windows workgroup or a domain.
Prerequisites
Several of the following configuration scenarios require the installation of OPC Core
Components. UNICORN 6 contains parts of that installation, but to get the process picture
to work in certain configuration scenarios, the complete package is required. OPC Core
Components can be installed from the UNICORN 6 installation media.
Windows XP
Normally, the process picture in UNICORN 6 should be able to communicate with the
instrument server when running Windows XP in a domain. When Windows XP is used in
a workgroup, there is a need for some additional settings before the process picture will
work.
Step
Action
1
Install OPC Core Components on the instrument server.
(Not necessary on the client)
28
UNICORN 6 Advanced system administration 28-9642-49 Edition AB
3 OPC settings for UNICORN process picture
Step
Action
2
If there is a firewall enabled on the instrument server:
•
Allow the OPCEnum service access
(The executable file is located in the System32 directory in the Windows
installation directory, typically c:\windows\system32)
•
Allow DCOM (port 135) access.
3
Make sure that the UNICORN clients and the instrument server are using
the same subnet mask for the computer IP adresses.
4
Set the Local Security Policy setting Network access: Sharing and security
module for local accounts to
•
Classic - Local users authenticate as themselves.
(Open Control Panel:Administrative Tools, click Local Security Settings
and locate this setting under Security Settings:Local Policies:Security
Options in the dialog.)
5
In the same dialog:
•
6
Make sure that the setting Network access: Let Everyone permissions
apply to anonymous users is enabled.
Make sure that the user account which is running the UNICORN client has
an equivalent account (using the same name and password) on the instrument server computer. A password is required and cannot be omitted.
DCOM configuration
The following settings should be applied to both the remote client and the instrument
server computers using the Component Services:
Step
Action
1
Open the Component Services dialog:
1
Choose Start:Run
2
type dcomcnfg in the Open field
and
3
click OK.
UNICORN 6 Advanced system administration 28-9642-49 Edition AB
29
3 OPC settings for UNICORN process picture
Step
Action
2
Open the My Computer Properties dialog:
3
4
1
Click the + beside the Component Services object
2
Click the + beside the Computers object
3
Right-click on My Computer and choose Properties from the menu.
In the tab Default Properties:
1
Verify that Enable Distributed COM... is checked
2
Set Default Authentication Level to Connect
3
Set Default Impersonation Level to Identify
In the Default Protocols tab:
•
5
30
Verify that Connection-oriented TCP/IP is on top of the list.
In the COM Security tab:
1
Click the Edit Default button in the Access Permissions field and allow
Everyone to have Local Access and Remote Access permissions.
2
Allow Anonymous logon to have Local Access and Remote Access
permissions.
3
Click the Edit Limits button in the Access Permissions field and allow
Everyone to have Local Access and Remote Access permissions.
4
Allow Anonymous logon to have Local Access and Remote Access
permissions.
5
Click the Edit Default button in the Launch and Activation Permissions
field and allow Everyone to have Local Launch, Remote Launch, Local
Activation and Remote Activation permissions.
6
Click the Edit Limits button in the Launch and Activation Permissions
field and allow Everyone to have Local Launch, Remote Launch, Local
Activation and Remote Activation permissions.
UNICORN 6 Advanced system administration 28-9642-49 Edition AB
3 OPC settings for UNICORN process picture
Step
Action
6
Verify the UNICORN Instrument Server DCOM settings:
1
Click the + beside My Computer.
2
Click the + beside the DCOM Config.
3
Locate UNICORN Instrument Server.exe in the list, right-click and choose
Properties from the menu.
4
Choose the Security tab.
5
Verify that Launch and Activation Permissions and Access Permissions
both are set to Use Default.
6
Click the Apply button (if changes have been made) or the OK button to
close the Properties dialog.
7
Close the Component Services dialog.
8
Restart the computers after the DCOM settings have been applied.
Windows Vista
The User Account Control (UAC) feature in Windows Vista, combined with restrictions
applied on DCOM when running UNICORN on Windows Vista computers in a workgroup,
makes additional changes to the configuration necessary to allow the process picture
to communicate with the instrument server. These settings can be applied to Windows
Vista both in workgroups and domains if needed.
Step
Action
1
Install OPC Core Components on the instrument server.
(Not necessary on the client)
2
If there is a firewall enabled on the instrument server:
•
Allow the OPCEnum service access
(The executable file is located in the System32 directory in the Windows
installation directory, typically c:\windows\system32)
•
3
Allow DCOM (port 135) access.
Make sure that the UNICORN clients and the instrument server are using
the same subnet mask for the computer IP adresses.
UNICORN 6 Advanced system administration 28-9642-49 Edition AB
31
3 OPC settings for UNICORN process picture
Step
Action
4
Set the Local Security Policy setting Network access: Sharing and security
module for local accounts to
•
Classic - Local users authenticate as themselves.
(Open Control Panel:Administrative Tools, click Local Security Settings
and locate this setting under Security Settings:Local Policies:Security
Options in the dialog.)
5
In the same dialog:
•
6
Make sure that the setting Network access: Let Everyone permissions
apply to anonymous users is enabled.
Make sure that the user account which is running the UNICORN client has
an equivalent account (using the same name and password) on the instrument server computer. A password is required and cannot be omitted.
Instrument server settings
The following settings should be applied to the instrument server computers using the
Component Services:
Step
Action
1
Open the Component Services dialog:
1
Choose Start
2
type dcomcnfg in the Search field
and
3
32
press Enter.
UNICORN 6 Advanced system administration 28-9642-49 Edition AB
3 OPC settings for UNICORN process picture
Step
Action
2
Open the UNICORN Instrument Server.exe Properties dialog:
3
4
1
Click the
beside the Component Services object
2
Click the
beside the Computers object
3
Click the
beside My Computer.
4
Click the
beside the DCOM Config.
5
Locate UNICORN Instrument Server.exe in the list, right-click and choose
Properties from the menu.
Add the built-in group Users (or Authenticated Users if the computer is used
in a domain) and set Launch and Activation Permissions for the group:
1
Choose the Security tab.
2
Choose the Customize option in theLaunch and Activation Permissions
field.
3
Click the Edit button.
4
Click the Add button in the Launch and Activation Permissions dialog.
5
Enter the group Users (or Authenticated Users if the computer is used
in a domain) in the Select Users, Computers, or Groups dialog and click
OK.
Set the permissions for the new group in the Launch and Activation Permissions dialog. Select the group and click the checkboxes to Allow
•
Local Launch
•
Remote Launch
•
Local Activation
and
•
Remote Activation
Click OK to apply and close the Launch and Activation Permissions dialog.
UNICORN 6 Advanced system administration 28-9642-49 Edition AB
33
3 OPC settings for UNICORN process picture
Step
Action
5
Add the built-in group Users (or Authenticated Users if the computer is used
in a domain) and set Access Permissions for the group:
6
1
Choose the Customize option in theAccess Permissions field.
2
Click the Edit button.
3
Click the Add button in the Launch and Activation Permissions dialog.
4
Enter the group Users (or Authenticated Users if the computer is used
in a domain) in the Select Users, Computers, or Groups dialog and click
OK.
Set the permissions for the new group in the Access Permission dialog. Select
the group and click the checkboxes to Allow
•
Local Access
•
Remote Access
Click OK to apply and close the Access Permission dialog.
Click OK to close the UNICORN Instrument Server Properties dialog.
7
Adjust the limits globally on the instrument server computer:
1
Right-click on My Computer and choose Properties from the menu.
2
Select the COM Security tab.
3
Click the Edit Limits button in the Launch and Activation Permissions
field and allow Users to have Local Launch, Remote Launch, Local Activation and Remote Activation permissions.
4
Click the Edit Limits button in the Access Permissions field and allow
Users to have Local Access and Remote Access permissions.
8
Click OK to close the My Computer Properties dialog.
9
Close the Component Services dialog and restart UNICORN.
(Normally you will not need to restart the computer)
34
UNICORN 6 Advanced system administration 28-9642-49 Edition AB
3 OPC settings for UNICORN process picture
UNICORN client computer settings
The following settings should be applied to the remote client computers using the
Component Services:
Step
Action
1
Open the Component Services dialog:
1
Choose Start
2
type dcomcnfg in the Search field
and
3
2
3
4
Open the My Computer Properties dialog:
1
Click the
beside the Component Services object
2
Click the
beside the Computers object
3
Right-click on My Computer and choose Properties from the menu.
In the tab Default Properties:
1
Verify that Enable Distributed COM... is checked
2
Set Default Authentication Level to Connect
3
Set Default Impersonation Level to Identify
In the Default Protocols tab:
•
5
press Enter.
Verify that Connection-oriented TCP/IP is on top of the list.
In the COM Security tab:
1
Click the Edit Default button in the Access Permissions field and allow
Everyone to have Local Access and Remote Access permissions.
2
Allow Anonymous logon to have Local Access and Remote Access
permissions.
3
Click the Edit Limits button in the Access Permissions field and allow
Everyone to have Local Access and Remote Access permissions.
4
Allow Anonymous logon to have Local Access and Remote Access
permissions.
6
Close the Component Services dialog.
7
Restart UNICORN on the client computers.
(Normally you will not need to restart the computers)
UNICORN 6 Advanced system administration 28-9642-49 Edition AB
35
4 Firewall exceptions
4 Firewall exceptions
Introduction
If firewalls are used within the UNICORN network, the exceptions described in this chapter
must be set in order for UNICORN to operate properly. However, the UNICORN installation
will normally configure the firewall settings appropriately.
Note:
Firewall settings which concern the UNICORN flow scheme process
picture function are listed in Chapter 3 OPC settings for UNICORN
process picture, on page 28 as well as here.
General firewall exceptions
Exceptions must be set for the following programs:
•
OPCEnum.exe (usually found in C:\WINDOWS\system32)
•
UNICORNClient.exe (usually found in C:\Program Files\GE Healthcare\UNICORN\bin)
Also, exceptions must be made for
•
the TCP and UDP port ranges 40500 to 40510
and
•
36
port 135 (for DCOM communication as described in Chapter 3 OPC settings for
UNICORN process picture, on page 28)
UNICORN 6 Advanced system administration 28-9642-49 Edition AB
4 Firewall exceptions
Define firewall exceptions
Follow the instructions below to define firewall excpetions in the Windows Firewall:
Step
Action
1
Open the Windows Security Center.
(Choose menu item Start:All Programs:Accessories:System Tools:Security
Center in Windows XP)
2
•
Click Windows Firewall to open the settings dialog
and
•
choose the Exceptions tab.
UNICORN 6 Advanced system administration 28-9642-49 Edition AB
37
4 Firewall exceptions
Step
Action
3
Click the Add Program... button to open the Add a Program dialog:
4
•
Click the Browse button to locate and select the program files
or
•
select the program in the list
and
•
click the OK button to add the exception.
Perform this step for UNICORNClient.exe and OPCEnum.exe.
38
UNICORN 6 Advanced system administration 28-9642-49 Edition AB
4 Firewall exceptions
Step
Action
5
Click the Add Port... button in the Windows Firewall dialog, to open the Add
a Port dialog:
6
•
Select to add a TCP port
•
Enter a name in the Name field
•
Enter the Port number
and
•
Click the OK button to add the port exception.
Repeat step 5 and 6 to add exceptions for all TCP ports between 40500 and
40510.
7
•
Click the Add Port... button in the Windows Firewall dialog to open the
Add a Port dialog again.
•
Select to add a UDP port
•
Enter a name in the Name field
•
Enter the Port number
and
•
Click the OK button to add the port exception.
Repeat this step to add exceptions for all UDP ports between 40500 and
40510.
8
Repeat step 5 and 6 to add an exception for TCP port 135. Name this port
DCOM.
UNICORN 6 Advanced system administration 28-9642-49 Edition AB
39
4 Firewall exceptions
Step
Action
9
Click the OK button to close the Windows Firewall dialog and apply the
changes.
10
Close the Windows Security Center.
Instrument Server firewall
exceptions
In addition to the general exceptions listed above, computers running as UNICORN
instrument servers should have firewall exceptions for the following programs:
•
UNICORN Instrument Server.exe (usually found in C:\Program Files\GE
Healthcare\UNICORN\bin)
•
SystemInstallation.exe (usually found in C:\Program Files\GE
Healthcare\UNICORN\bin)
Follow the instructions above to enter these exceptions.
Database Server firewall
exceptions
In addition to the general exceptions listed above, computers running as UNICORN
database servers should have firewall exceptions for the following programs:
•
Sqlservr.exe (usually found in C:\Program Files\Microsoft SQL
Server\MSSQL10.UNICORN\MSSQL\Binn)
•
gehealth.exe (usually found in C:\Program Files\GE
Healthcare\UNICORN\LicenseServer)
•
lmgrd.exe (usually found in C:\Program Files\GE
Healthcare\UNICORN\LicenseServer)
Follow the instructions above to enter these exceptions.
Also, UDP port 1434 should be opened. Name this exception SQL Server Browser.
Note:
40
This port setting is a default for secure networks. If a higher level of
security is needed, other settings must be selected. Contact GE
Healthcare for advice.
UNICORN 6 Advanced system administration 28-9642-49 Edition AB
5 Database upgrade
5 Database upgrade
Introduction
The SQL Server Express edition provided with the UNICORN 6 installation is suitable for
small workgroups operating only two to three instrument servers sharing the same
database. For organizations where larger groups of users need access to a common
database it is recommended that the SQL Server edition is upgraded. This section
describes how to perform an upgrade.
Prerequisites
The setup must be run by a user that is logged on as administrator. If the installation is
performed from a remote share, you must use a domain account with read and execute
permissions on the remote share.
Ensure that no other user is logged on to the database before the upgrade is performed.
Disable scheduled backups
before upgrading
Before upgrading you must disable the scheduled backups in your present database
installation. The table below describes how to do this:
Step
Action
1
Click the Database Management icon in the Administration module.
Result: The Database Management dialog opens.
2
Click the Edit Backup Schedule button.
Result: The Edit Backup Schedule Wizard opens.
3
Click the Next button to open the next wizard dialog.
4
Click and select the Disable backup schedule checkbox.
5
Click the Next button to proceed.
Result: The next wizard dialog shows a confirmation message that you have
disabled the backup schedule.
6
Click the Finish button to apply the settings.
UNICORN 6 Advanced system administration 28-9642-49 Edition AB
41
5 Database upgrade
Step
Action
7
Click the Close button to close the Database Management dialog.
8
Exit UNICORN before proceeding with the upgrade.
Upgrade the SQL Server edition
The table below describes how to perform the upgrade.
Note:
Some of the images in the instruction have been cropped and do not
show the available buttons on the bottom part of the dialog (OK, Next,
Back, Cancel, Help etc.).
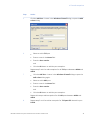
Step
Action
1
Browse to the root folder where the installation files are and double-click
the file setup.exe
Result: The SQL Server Installation Center dialog opens.
2
42
Click the heading Maintenance in the left menu field.
UNICORN 6 Advanced system administration 28-9642-49 Edition AB
5 Database upgrade
Step
Action
3
Choose the Edition Upgrade maintenance option.
4
A Setup Support Rules dialog will open and run a discovery operation to
identify possible problems with the support file installation.
•
Click the OK button to proceed after this operation step is completed.
UNICORN 6 Advanced system administration 28-9642-49 Edition AB
43
5 Database upgrade
Step
Action
5
The discovery operation continues in a second dialog.
•
6
Click the Next button to proceed after this operation step is completed.
The Product Key dialog opens.
•
Select Enter the product key
and
•
enter the 25-character product key.
Click the Next button to proceed.
44
UNICORN 6 Advanced system administration 28-9642-49 Edition AB
5 Database upgrade
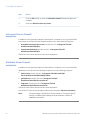
Step
Action
4
The License Terms dialog opens.
5
•
Read the license agreement
•
Select the checkbox to accept the terms
•
Click the Next button to proceed.
The Select Instance dialog opens.
•
Specify which SQL Server instance to upgrade
•
Click the Next button to proceed.
UNICORN 6 Advanced system administration 28-9642-49 Edition AB
45
5 Database upgrade
Step
Action
6
The Edition Upgrade Rules dialog opens. A configuration validation is performed before the upgrade can proceed.
•
7
After the validation is completed, click the Next button to proceed.
The Ready to upgrade edition dialog opens. A tree view of the selected installation options is shown.
•
Click the Upgrade button to proceed.
During the upgrading process, the services will be restarted to register the
new settings.
46
UNICORN 6 Advanced system administration 28-9642-49 Edition AB
5 Database upgrade
Step
Action
8
The Complete dialog opens. This dialog provides a link to a summary log
file.
•
Read the information in the log file and on the Complete page.
•
Click the Close button to close the wizard dialog.
•
Close the SQL Server Installation Center dialog.
•
If necessary (this will be listed in the summary) restart the server computer.
UNICORN 6 Advanced system administration 28-9642-49 Edition AB
47
5 Database upgrade
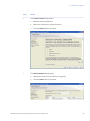
Actions after the upgrade
After the upgrade is finished, you must perform the following steps:
48
Step
Action
1
•
Open the Windows Services Control Manager.
(Control Panel:Administrative Tools:Services)
•
Locate and select the SQL Server Agent.
UNICORN 6 Advanced system administration 28-9642-49 Edition AB
5 Database upgrade
Step
Action
2
Right-click and choose the Properties menu item.
Result: The SQL Server Agent Properties dialog opens.
UNICORN 6 Advanced system administration 28-9642-49 Edition AB
49
5 Database upgrade
50
Step
Action
3
Choose the Automatic option from the Startup type menu.
UNICORN 6 Advanced system administration 28-9642-49 Edition AB
5 Database upgrade
Step
Action
4
Click the Log On tab and select to let the SQL Server Agent log on as Local
System account.
5
•
Click the Apply button to apply the changes.
•
Click OK to close the Properties dialog.
•
Close the Services Control Manager and the Administrative Tools dialogs.
6
Re-enable the scheduled database backup. This is described in the "UNICORN
6 Administration and Technical Manual".
Note:
Verify that the scheduled database backups are performed.
UNICORN 6 Advanced system administration 28-9642-49 Edition AB
51
6 Manual uninstallation
6 Manual uninstallation
Introduction
This chapter contains instructions for how to remove a UNICORN 6 and/or SQL Server
installation manually in the event that the installation has become corrupt and cannot
be removed in a regular manner.
Remove a UNICORN 6
installation
The instruction below describes how to remove the UNICORN 6 installation:
52
Step
Action
1
Open the Windows Task Manager.
UNICORN 6 Advanced system administration 28-9642-49 Edition AB
6 Manual uninstallation
Step
Action
2
Select and end the following processes:
•
UNICORN client
•
UNICORN instrumentserver
•
UNICORN Support Service
•
NextCU
•
VIDMain
Close the Windows Task Manager.
3
Execute the following command:
•
msiexec.exe /x {15F8765A-5854-4E3B-83EA-C38BBF390DCD} /qb
Result: A silent uninstallation is performed.
4
5
Remove the UNICORN backup task:
1
Open the Scheduled Tasks dialog from the Windows Control Panel.
2
Select the UNICORN backup task.
3
Click the Delete this item option in the Folder Tasks menu.
4
Close the Scheduled Tasks dialog.
Remove the folder C:\Program Files\GE Healthcare\UNICORN.
Note:
The actual search path to this folder depends on what was
selected at the UNICORN installation.
This folder can contain backup files, log files and error reports that you may wish to save for future reference.
6
Reboot the computer.
UNICORN 6 Advanced system administration 28-9642-49 Edition AB
53
6 Manual uninstallation
Remove the UNICORN database
instance
The instruction below describes how to remove the UNICORN database instance using
the Windows Add or Remove Programs routine.
Note:
Some of the images in the instruction have been cropped and do not
show the available buttons on the bottom part of the dialog (OK, Next,
Back, Cancel, Help etc.).
NOTICE
If more than one database instance is installed on the computer
you must ensure that only the UNICORN database instance is
removed. Do not remove Setup Support Files, Native Client or any
SQL Server files, to ensure that the other database instances will
remain operable.
54
Step
Action
1
Start the Windows Control Panel and choose Add or Remove Programs.
2
Select Microsoft SQL Server 2008 and click the Change/Remove button.
UNICORN 6 Advanced system administration 28-9642-49 Edition AB
6 Manual uninstallation
Step
Action
3
The SQL Server 2008 dialog opens.
•
4
Choose the Remove option.
A Setup Support Rules dialog will open and run a discovery operation to
identify possible problems with the maintenance operation.
•
Click the OK button to proceed after this operation step is completed.
UNICORN 6 Advanced system administration 28-9642-49 Edition AB
55
6 Manual uninstallation
Step
Action
5
•
Select UNICORN as the Instance to remove features from
and
6
•
click the Next button to proceed.
•
Select Database Engine Services and SQL Server Replication
and
•
7
Setup will run Removal Rules to identify possible problems with the removal.
•
56
click the Next button to proceed.
Click the Next button to proceed after this operation step is completed.
UNICORN 6 Advanced system administration 28-9642-49 Edition AB
6 Manual uninstallation
Step
Action
8
A summary of the removal operation will be shown.
•
9
Click the Remove button to proceed.
The progression of the removal operation will be shown.
•
Click the Next button to proceed after this operation step is completed.
UNICORN 6 Advanced system administration 28-9642-49 Edition AB
57
6 Manual uninstallation
58
Step
Action
10
The Complete dialog opens. This dialog provides a link to a summary log
file.
•
Read the information in the log file and on the Complete page.
•
Click the Close button to close the wizard dialog.
•
Close the Add or Remove Program dialog.
UNICORN 6 Advanced system administration 28-9642-49 Edition AB
6 Manual uninstallation
Uninstalling an existing instance
of SQL Server
The instruction below describes how to uninstall SQL Server if the procedure described
above cannot be used.
NOTICE
The uninstallation procedure below should only be used if the
UNICORN database instance is the only database instance installed
on the computer. The procedure described will cause all Microsoft
SQL Server-related entries to be completely deleted from the
computer.
Step
Action
1
Perform a backup of the Windows Registry.
2
Delete the registry keys listed below:
3
•
HKEY_LOCAL_MACHINE\SOFTWARE\Microsoft\Microsoft SQL Server
•
HKEY_LOCAL_MACHINE\SOFTWARE\Microsoft\MSSQLServer
•
Locate and select the key HKEY_LOCAL_MACHINE\SYSTEM\CurrentControlSet\Control\Session Manager.
•
If there is an entry ( of the Type REG_MULTI_SZ) named FileRenameOperations:
1
Right-click the entry and choose the Modify menu command.
Result: The Edit Multi-String dialog opens.
•
2
Clear the Value data.
3
Click OK to close the dialog and update the Data column.
If there is a key HKEY_LOCAL_MACHINE\SYSTEM\CurrentControlSet\Control\Session Manager\FileRenameOperations:
1
Right-click the key and choose the Rename menu command.
2
Change the name to FileRenameOperations2.
Note:
4
After a successful installation, the name of this key
should be restored to FileRenameOperations.
Delete the SQL Server related services from
•
HKEY_LOCAL_MACHINE\SYSTEM\CurrentControlSet\Services\MSSQL
UNICORN 6 Advanced system administration 28-9642-49 Edition AB
59
6 Manual uninstallation
Step
Action
5
Rename all folders on Microsoft SQL Server under C:\Program Files and in
any data drive.
6
•
Download the cleanup utility from http://support.microsoft.com/kb/29031
•
Use this utility to remove the SQL Server entries and MSXML6.
7
TIP:
60
Reboot the computer.
For more information refer to
http://msdn.microsoft.com/en-us/library/ms143412.aspx
UNICORN 6 Advanced system administration 28-9642-49 Edition AB
For local office contact information, visit
www.gelifesciences.com/contact
GE, imagination at work and GE monogram are trademarks of General Electric
Company.
GE Healthcare Bio-Sciences AB
Björkgatan 30
751 84 Uppsala
Sweden
All third party trademarks are the property of their respective owners.
www.gelifesciences.com/unicorn
UNICORN is a trademark of GE Healthcare companies.
© 2009 General Electric Company – All rights reserved.
First published Oct. 2009
All goods and services are sold subject to the terms and conditions of sale of
the company within GE Healthcare which supplies them. A copy of these terms
and conditions is available on request. Contact your local GE Healthcare
representative for the most current information.
UNICORN: Any use of this software is subject to GE Healthcare Standard Software
End-User License Agreement for Life Sciences Software Products.
GE Healthcare Europe GmbH
Munzinger Strasse 5, D-79111 Freiburg, Germany
GE Healthcare UK Limited
Amersham Place, Little Chalfont, Buckinghamshire, HP7 9NA, UK
GE Healthcare Bio-Sciences Corp.
800 Centennial Avenue, P.O. Box 1327, Piscataway, NJ 08855-1327, USA
GE Healthcare Japan Corporation
Sanken Bldg.3-25-1, Hyakunincho Shinjuku-ku, Tokyo 169-0073, Japan
imagination at work
28-9642-49 Edition AB 12/2009