1
GE Healthcare
UNICORN™ 6.1
Administration and Technical Manual
Table of Contents
Table of Contents
1
Introduction ..........................................................................................................
1.1
1.2
1.3
1.4
1.5
2
7
9
13
15
20
Installation and configurations .........................................................................
21
2.1
2.2
2.3
2.3.1
2.3.2
2.3.3
2.4
2.4.1
2.4.2
2.4.3
2.4.4
2.4.5
2.4.6
2.5
2.6
2.7
2.8
2.9
3
5
Administrator functions – overview .............................................................................................
Network terms and concepts .........................................................................................................
Network environment .........................................................................................................................
Deployment examples .......................................................................................................................
UNICORN 6.1 user documentation ...............................................................................................
Installation overviews .........................................................................................................................
Other software installed by UNICORN 6.1 .................................................................................
Stand-alone workstation installation and configuration ...................................................
Install the UNICORN software - Full installation ...................................................................
Configure an e-license .....................................................................................................................
Define a system at installation .....................................................................................................
Network installation and configuration .....................................................................................
Install a UNICORN database and license server ...................................................................
Configure an e-license .....................................................................................................................
Configure the network .....................................................................................................................
Configure and set up the client computers ............................................................................
Install the UNICORN 6.1 Client/Instrument server software ...........................................
Define a system at installation .....................................................................................................
OPC settings for UNICORN flow scheme ...................................................................................
Firewall exceptions ..............................................................................................................................
Upgrade UNICORN 6.0 to UNICORN 6.1 .....................................................................................
Printers ......................................................................................................................................................
Remove a UNICORN 6.1 installation ............................................................................................
23
29
32
33
45
53
56
57
70
78
81
88
98
101
111
117
123
125
Configure systems and set up users and licenses ......................................... 132
3.1
System administration .......................................................................................................................
3.1.1
System properties ..............................................................................................................................
3.1.2
Instrument Configurations .............................................................................................................
3.1.3
Define a new system ........................................................................................................................
3.1.4
System Settings ..................................................................................................................................
3.1.5
UNICORN and System logs ............................................................................................................
3.2
User setup ................................................................................................................................................
3.2.1
User access groups ...........................................................................................................................
3.2.2
Access items .........................................................................................................................................
3.2.3
Create a new user ..............................................................................................................................
3.2.4
User options ..........................................................................................................................................
3.2.5
User passwords and account access limitations .................................................................
3.2.6
Delete users and folders ..................................................................................................................
3.3
License server administration ........................................................................................................
UNICORN 6.1 Administration and Technical Manual 28-9817-68 AA
133
134
141
144
147
152
159
160
165
167
176
180
185
187
3
Table of Contents
4
Database administration ................................................................................... 192
4.1
Database overview ..............................................................................................................................
4.2
Database maintenance .....................................................................................................................
4.2.1
Database backup ...............................................................................................................................
4.2.2
Restore backup data .........................................................................................................................
4.2.3
Archive data ..........................................................................................................................................
4.2.4
Retrieve archived data .....................................................................................................................
4.2.5
Release locked database objects ................................................................................................
4.2.6
Import data from UNICORN 5.x and older versions ............................................................
4.3
SQL Server edition upgrade .............................................................................................................
5
Security .................................................................................................................. 224
5.1
Access security ......................................................................................................................................
5.2
Connection security .............................................................................................................................
5.3
Data security ...........................................................................................................................................
5.3.1
Network communication failure - remote station ...............................................................
5.3.2
Network communication failure – local station ....................................................................
5.3.3
Local station communication failure .........................................................................................
6
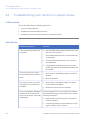
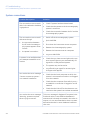
Troubleshooting: User, function or system access ................................................................
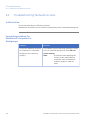
Troubleshooting: Network access ................................................................................................
Troubleshooting: Database functions .........................................................................................
System Error Reports ..........................................................................................................................
232
236
237
238
Technical specifications ...................................................................................... 243
A.1
A.2
A.3
B
225
226
227
228
229
230
Troubleshooting ................................................................................................... 231
6.1
6.2
6.3
6.4
A
193
194
195
199
202
206
209
211
213
System recommendations ...............................................................................................................
UNICORN 6.1 control capacity ........................................................................................................
Data sampling ........................................................................................................................................
244
246
248
Advanced system administration ..................................................................... 249
B.1
B.2
User, client computer and database server set up ...............................................................
Manual uninstallation .........................................................................................................................
250
269
C
Post installation settings .................................................................................... 279
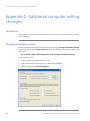
D
Additional computer setting changes .............................................................. 286
Index ....................................................................................................................... 298
4
UNICORN 6.1 Administration and Technical Manual 28-9817-68 AA
1 Introduction
1
Introduction
Purpose of the Administration
and Technical Manual
The UNICORN 6.1 Administration and Technical Manual describes how to install, set up
and maintain the UNICORN software.
For the most part, the installation is assumed to be in a network environment. A system
administrator should be able to refer to this manual for the information that is necessary
to ensure that the network and all UNICORN clients operate smoothly.
Ordinary users, not assigned as system administrators, may need to refer to parts of
this manual. This is explained below.
Intended readers
System administrators
The general intended reader is a designated UNICORN system administrator, responsible
for the network.
In a large organization, the system administrator may be a specific individual, either
exclusively responsible for the UNICORN network, or also for the support for other
networks or related systems (e.g. LIMS, Laboratory Information Management Systems).
In a smaller organization, the system administrator may be a regular user, who both
performs other duties and the duties described in this manual.
•
The system administrator will need to be familiar with all the contents of this manual.
Ordinary users
UNICORN 6.1 may be installed on a stand-alone workstation, with no network connection
to other workstations. In this scenario, the UNICORN database and license server software,
as well as the client and instrument server software, are installed on the local computer.
In other words, all component parts of a UNICORN network are included in the single
installation.
•
The user of a stand-alone installation will need to refer to this manual for information
on how to perform administrative UNICORN duties, for example how to maintain the
database, install new instrument configurations etc.
•
Normally, ordinary users may refer only to selected, relevant parts and do not need
to be familiar with all the contents of this manual.
UNICORN 6.1 Administration and Technical Manual 28-9817-68 AA
5
1 Introduction
Software declaration of
conformity
UNICORN 6.1 is technically compatible with all relevant sections of FDA 21 CFR Part 11.
A part 11-system assessment checklist is available on request through the local GEHC
representative.
Contents
This chapter contains these sections:
Section
6
See page
1.1 Administrator functions – overview
7
1.2 Network terms and concepts
9
1.3 Network environment
13
1.4 Deployment examples
15
1.5 UNICORN 6.1 user documentation
20
UNICORN 6.1 Administration and Technical Manual 28-9817-68 AA
1 Introduction
1.1 Administrator functions – overview
1.1
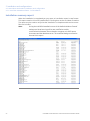
Administrator functions – overview
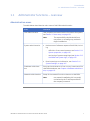
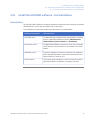
Administration areas
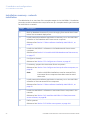
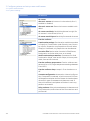
The table below describes the main areas of UNICORN administration:
Area
Concerns
User administration
User properties and authorization of access to the system,
see Section 3.2 User setup, on page 159.
Note:
System administration
•
•
The responsibility should should lie on
one person, or a small group, at least in
larger installations.
Maintenance of software aspects of UNICORN, including
-
definition of connected systems, see Section 3.1.1
System properties, on page 134.
-
monitoring of system usage (logs), see Section3.1.5
UNICORN and System logs, on page 152.
Routine settings and calibration, see Section 3.1.4
System Settings, on page 147.
Database administration
Set up and maintenance of one or many instances of the
UNICORN database, see Chapter 4 Database administration, on page 192.
Network administration
Setup of the network functions relevant to UNICORN.
Note:
UNICORN 6.1 Administration and Technical Manual 28-9817-68 AA
In a network installation, this is normally
carried out by the IT staff responsible for
the company's network.
7
1 Introduction
1.1 Administrator functions – overview
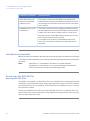
Actions before UNICORN is
installed
Before UNICORN is installed, the administrator must preform the actions in this table to
prepare the network environment:
Step
Action
1
Prepare a dedicated network, see Section 2.4.3 Configure the network, on
page 78.
2
Configure all client computers in the network, see Section 2.4.4 Configure
and set up the client computers, on page 81.
Actions before the UNICORN
program can be used
When UNICORN has been installed, the administrator must perform the actions in this
table before other users can use the program:
Step
Action
1
Set up system definitions for the ÄKTA™ avant systems, see Section 3.1.1
System properties, on page 134.
Note:
2
8
The systems may also be defined as part of the UNICORN
installation procedure, when the software is installed on
the instrument server computer.
Define new users with home folders, assigned access groups and access
profiles, see Section 3.2 User setup, on page 159.
UNICORN 6.1 Administration and Technical Manual 28-9817-68 AA
1 Introduction
1.2 Network terms and concepts
1.2
Network terms and concepts
Introduction
In this section, some important network terms and concepts are explained.
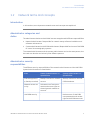
Administrator categories and
duties
The administrator duties can be divided into two categories with different responsibilities:
•
Network administrator: Responsible for network setup, software installation and
software maintenance.
•
System administrator (or UNICORN administrator): Responsible for the use of UNICORN
to control chromatography systems.
The network administrator and the system administrator can be the same person, but
the tasks can also be carried out by two different persons.
Administrator security
responsibilities
The different security responsibilities of the network administrator and the UNICORN
(system) administrator are listed below.
Area
Network administrator responsibilities
System administrator responsibilities
Data storage security (backup routines)
Backup routines for network
servers.
Backup routines for the UNICORN database.
Network access security
Maintenance of user passwords and access rights to
shared general network resources.
-
UNICORN security
-
Maintenance of UNICORN
user passwords and access
rights to UNICORN resources.
UNICORN 6.1 Administration and Technical Manual 28-9817-68 AA
9
1 Introduction
1.2 Network terms and concepts
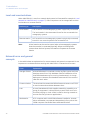
Local and remote stations
When UNICORN 6.1 is used in a network deployment (as illustrated for example in Local
network for UNICORN only, on page 17), client computers can be categorized as either
local stations or remote stations.
Station type
Description
Local station
A PC to which a chromatography system is physically connected.
The local station is the Instrument Server for the connected chromatography system.
Remote station
Note:
A PC to which no chromatography system is physically connected,
but which can control systems over a network link.
A local station can be used to control other chromatography systems
than the one that is connected physically. When controlling other
systems than the local system, the station will operate as a remote
station.
Network terms and general
concepts
In the table below are explanations for some network and general concepts which are
important to understand when working with UNICORN in a network environment.
10
Term
Explanation
Storage of data
All UNICORN data (i.e. methods, results, log files, system and user
data) are stored in an SQL database. Several installation of the
UNICORN database may be running simultaneously in a large
deployment. However, the database instances will not communicate with each other.
Communication
The local and the remote UNICORN clients and servers use TCP/IP
to send commands and data between them.
LAN
A Local Area Network (LAN) supplies networking capability to a
group of computers in close proximity to each other such as in
an office building or a lab. A LAN is used for sharing network resources like files, printers or applications.
Workstation
A PC computer with a UNICORN software installation. A standalone workstation can operate independently of any other UNICORN computer. See Stand-alone workstation below.
UNICORN 6.1 Administration and Technical Manual 28-9817-68 AA
1 Introduction
1.2 Network terms and concepts
Term
Explanation
Stand-alone
workstation
A stand-alone workstation has a locally connected instrument
and contains all the software components necessary to operate
UNICORN as an independent unit, that is
•
the client software
•
the instrument server software
•
the database server software and a local UNICORN database
and
•
the license server software.
The workstation may be connected to a network to be able to
access other network resources, but it is not set up to interact
with other UNICORN clients or common UNICORN servers.
Instrument server
The station that controls a connected instrument. The UNICORN
instrument server software must be installed.
Control system
access mode
Users with Control access to a system may assume control over
the instrument, either using the local, instrument server computer,
or from a remote station.
View system access mode
Users with View access to a system may monitor all activities on
the instrument, but cannot control the activities without changing
the access mode first.
Instrument configuration
The complete dataset defining the properties and enabling the
control of an instrument. The instrument configuration consists
of
•
strategy
•
flow scheme
•
phase library
and
•
embedded software.
(This is described further in Section3.1.2 Instrument Configurations,
on page 141.)
Strategy
The strategy defines the available method and manual instructions, system settings, run and curve data. It is part of the Instrument Configuration.
UNICORN 6.1 Administration and Technical Manual 28-9817-68 AA
11
1 Introduction
1.2 Network terms and concepts
12
Term
Explanation
Flow scheme
The flow scheme contains the necessary elements which are used
to create the flow scheme images in the Method Editor and System Control modules.
Phase library
The phase library contains predefined phases and methods. It is
part of the Instrument Configuration and adapted to the properties
and available options for a specific instrument or group of instruments.
Floating license
The user licenses for UNICORN 6.1 are floating. That means that
there can only be as many simultaneous users as there are valid
licenses. UNICORN 6.1 may be installed on more computers than
the number of valid licenses, but not all these computers can be
used simultaneously.
UNICORN 6.1 Administration and Technical Manual 28-9817-68 AA
1 Introduction
1.3 Network environment
1.3
Network environment
Who can perform the network
setup?
The network setup should be performed by someone with experience in Windows™ XP
and/or Windows 7, and network installations. Preferably, a skilled network administrator
should be involved in the network setup, the installation of the UNICORN software and
the maintenance of the network.
Tip:
Network recommendations are listed in Section A.1 System
recommendations, on page 244.
UNICORN versions
All computers in a UNICORN 6.1 network deployment (described in Section1.4 Deployment
examples, on page 15) must have UNICORN 6.1 software installed. Older versions of
UNICORN, including UNICORN 6.0, cannot be used in a UNICORN 6.1 network.
UNICORN versions older than 6.0 may be installed on the same computers as UNICORN
6.1. However, a computer that is used as instrument server with UNICORN 6.1 cannot
also be used as a controlling computer for instruments using UNICORN 5. UNICORN 6.0
cannot be installed on the same computer as UNICORN 6.1.
UNICORN networks as parts of
other Local Area Networks
In most cases, UNICORN computers will be connected to a Local Area Network (LAN) to
access other network resources and, where applicable, the Internet.
Stand-alone workstations may or may not be connected to a network depending on the
need for access to other resources. Since such workstations contain all necessary
components for independent operation, the external network connection is not essential
when using UNICORN. Network connection between the computer and the ÄKTA avant
instrument is however essential.
A UNICORN network, consisting of several client stations sharing common servers, may
either be a totally independent network with no external access or connected to an
external office LAN. The external LAN connection is necessary for example to provide
Internet access and access to other network resources.
The scenarios described above are illustrated in Section 1.4 Deployment examples, on
page 15.
UNICORN 6.1 Administration and Technical Manual 28-9817-68 AA
13
1 Introduction
1.3 Network environment
Note:
14
UNICORN will not work in a network environment where some UNICORN
computers are connected in a workgroup and others are in a domain.
UNICORN 6.1 Administration and Technical Manual 28-9817-68 AA
1 Introduction
1.4 Deployment examples
1.4
Deployment examples
Introduction
This section shows three examples of how UNICORN can be deployed in different
environments.
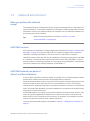
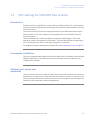
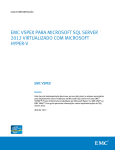
Stand-alone deployment
The figure below illustrates a stand-alone workstation:
The workstation is a stand-alone unit which can operate independently of any other
UNICORN workstation or server. It contains all the necessary software components, that
is
•
the UNICORN client software
•
instrument server software
•
database server and a local database
and
•
software for license authentication
UNICORN 6.1 Administration and Technical Manual 28-9817-68 AA
15
1 Introduction
1.4 Deployment examples
In this deployment example, the workstation may also be connected to an office network.
The computers delivered by GE Healthcare with ÄKTA avant are equipped with two
network interface cards as a standard feature. One card is used for the communication
with the instrument and the other for communication with a network. The connected
network may be a UNICORN network as described in the other deployment examples
below, or an office network.
You may also connect the workstation to both the instrument and a network from a
single network interface card by using a switch. This solution is not recommended since
it may impair the system performance.
You will use the Full Installation alternative for this workstation. This option is described
in Section 2.3.1 Install the UNICORN software - Full installation, on page 33.
16
UNICORN 6.1 Administration and Technical Manual 28-9817-68 AA
1 Introduction
1.4 Deployment examples
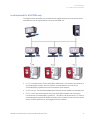
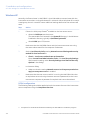
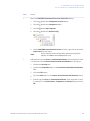
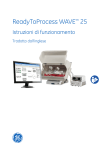
Local network for UNICORN only
The figure below illustrates how a network with a dedicated server and several client
workstations can be organized for exclusive UNICORN use:
•
PC 1 is a remote station: it has UNICORN installed but is not directly connected to a
chromatography system. Via the network, remote stations can control the
chromatography systems that are connected to local stations.
•
PC 2 is a server. The UNICORN database and license server software is installed here.
•
PCs 3, 4 and 5 are local stations: they have UNICORN installed and are directly
connected to chromatography systems 6, 7 and 8 as instrument servers. To have a
chromatography system accessible remotely, the local station that is the instrument
server must be switched on and logged on to the network.
UNICORN 6.1 Administration and Technical Manual 28-9817-68 AA
17
1 Introduction
1.4 Deployment examples
You will use different options from the Custom Installation alternative for each of the
client stations and the server in this scenario. The client installation is described in
Section 2.4.5 Install the UNICORN 6.1 Client/Instrument server software, on page 88. The
server installation is described in Section 2.4.1 Install a UNICORN database and license
server, on page 57.
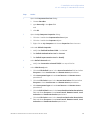
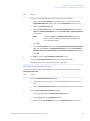
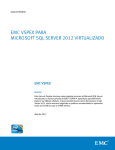
UNICORN network as part of
larger LAN
The figure below illustrates how a UNICORN network can be included as part of a larger
Local Area Network:
•
18
PC 1 is a server. The UNICORN database and license server software is installed here.
UNICORN 6.1 Administration and Technical Manual 28-9817-68 AA
1 Introduction
1.4 Deployment examples
•
PCs 2 and 3 are local stations: they have UNICORN installed and are directly connected
to chromatography systems 4 and 5 as instrument servers.
•
The UNICORN network is connected to the larger LAN, which serves the entire
organization and provides access to the Internet, other network resources (i.e. printers,
office application servers etc.) and other client computers. The connection between
the UNICORN network and the larger LAN is through a router and protected by a
firewall.
•
PCs 6 and 7 are connected to the larger LAN and not directly to the UNICORN LAN.
Provided the units have UNICORN client software installed and are allowed access
by the firewall, they can operate UNICORN remotely and have access to the common
database on the UNICORN database server.
You will use different options from the Custom Installation alternative for each of the
client stations and the server in this scenario. The client installation is described in
Section 2.4.5 Install the UNICORN 6.1 Client/Instrument server software, on page 88. The
server installation is described in Section 2.4.1 Install a UNICORN database and license
server, on page 57.
UNICORN 6.1 Administration and Technical Manual 28-9817-68 AA
19
1 Introduction
1.5 UNICORN 6.1 user documentation
1.5
UNICORN 6.1 user documentation
Introduction
This section describes the user documentation that is delivered with an ÄKTA avant
system.
User documentation
The user documentation listed in the table below is available from the Help menu in
UNICORN or on the ÄKTA avant and UNICORN User Documentation CD.
20
Document
Main contents
ÄKTA avant and UNICORN 6.1
Installation Guide
Site preparation, stand-alone installation and test
procedure.
Getting Started with ÄKTA
avant and UNICORN 6.1
System overview and instructions to perform a basic
run.
ÄKTA avant and UNICORN 6.1
User Manual
Instructions for safe handling of the system. Descriptions of components. Information about how to run
and maintain the system.
UNICORN Help
Dialog descriptions for UNICORN (from the Help
menu).
UNICORN 6.1 Method Manual
Overview and detailed descriptions of the method
creation features in UNICORN. Instructions on how
to use the software. Workflow descriptions for
common operations.
UNICORN 6.1 Evaluation Manual
Overview and detailed descriptions of the evaluation
features in UNICORN. Instructions on how to use
the software. Workflow descriptions for common
operations.
UNICORN 6.1 Administration
and Technical Manual
Network setup and complete software installation.
Administration of UNICORN and the UNICORN
database.
UNICORN 6.1 Administration and Technical Manual 28-9817-68 AA
2 Installation and configurations
2
Installation and configurations
Introduction
This chapter describes how to
•
install a complete UNICORN 6.1 installation on a stand-alone workstation (Full
installation)
•
install a UNICORN database and license server (Custom installation)
and
•
install UNICORN software client and instrument server software on a network client
station (Custom installation).
It also describes how to
•
define a system as part of the installation
•
configure E-licenses
•
configure Windows settings necessary for the UNICORN flow schemes in a netwrok
deployment
•
configure firewall settings, when necessary
•
upgrade previously installed UNICORN versions (6.0 only) to UNICORN 6.1
•
remove UNICORN installations
and
•
set up a system printer.
Finally, the chapter also includes listings and descriptions of other software that are
installed as prerequisites for the UNICORN 6.1 installation.
Contents
This chapter contains these sections:
Section
See page
2.1 Installation overviews
23
2.2 Other software installed by UNICORN 6.1
29
2.3 Stand-alone workstation installation and configuration
32
UNICORN 6.1 Administration and Technical Manual 28-9817-68 AA
21
2 Installation and configurations
Section
22
See page
2.4 Network installation and configuration
56
2.5 OPC settings for UNICORN flow scheme
101
2.6 Firewall exceptions
111
2.7 Upgrade UNICORN 6.0 to UNICORN 6.1
117
2.8 Printers
123
2.9 Remove a UNICORN 6.1 installation
125
UNICORN 6.1 Administration and Technical Manual 28-9817-68 AA
2 Installation and configurations
2.1 Installation overviews
2.1
Installation overviews
Introduction
This section provides overviews for UNICORN 6.1 installations and configurations either
as independent, stand-alone workstations or in a small, dedicated network.
Installation summary stand-alone workstation
installation
The table below is an overview of the complete stages in the UNICORN 6.1 installation
procedure and the related actions required to set up a UNICORN stand-alone workstation.
This installation option is called a Full Installation in the installation program.
Stage
Description
1
Install prerequisite software applications necessary to run the UNICORN
software.
Reference See Section 2.2 Other software installed by UNICORN 6.1, on
page 29.
2
Install the UNICORN 6.1 software.
Reference See Section 2.3.1 Install the UNICORN software - Full installation,
on page 33.
3
Configure an e-license.
Reference: See Section 2.3.2 Configure an e-license, on page 45.
4
Define a system.
Reference: See Section 3.1.3 Define a new system, on page 144.
5
Define a user profile and a home folder.
Reference: See Section 3.2.3 Create a new user, on page 167.
6
Check the system settings for the attached ÄKTA avant instrument.
Reference: See Section 3.1.4 System Settings, on page 147.
UNICORN 6.1 Administration and Technical Manual 28-9817-68 AA
23
2 Installation and configurations
2.1 Installation overviews
Installation summary - network
installation
The table below is an overview of the complete stages in the UNICORN 6.1 installation
procedure and the related actions required to set up a complete working environment
for UNICORN in a network.
Stage
Description
1
Back up database instances if you are changing from stand-alone installations into a network deployment.
2
Install prerequisite software applications necessary to run the UNICORN
software on the Database and License server computer.
Reference See Section 2.2 Other software installed by UNICORN 6.1, on
page 29.
3
Install the UNICORN 6.1 software on the Database and License server
computer.
Reference: See Section 2.4.1 Install a UNICORN database and license server,
on page 57.
4
Configure e-licenses.
Reference: See Section 2.3.2 Configure an e-license, on page 45.
5
If necessary, prepare the Instrument Server computers.
Reference: See Section 2.4.4 Configure and set up the client computers, on
page 81.
Note:
6
Previous UNICORN installations must be removed if the
Instrument Server computers have been used as standalone units.
Install prerequisite software applications necessary to run the UNICORN
software on the Instrument Server computers.
Reference See Section 2.2 Other software installed by UNICORN 6.1, on
page 29.
7
Install the UNICORN 6.1 software on Instrument Server computers in the
network.
Reference: See Section 2.4.5 Install the UNICORN 6.1 Client/Instrument
server software, on page 88.
8
Define systems.
Reference: See Section 3.1.3 Define a new system, on page 144.
24
UNICORN 6.1 Administration and Technical Manual 28-9817-68 AA
2 Installation and configurations
2.1 Installation overviews
Stage
Description
9
Check the system settings for the attached ÄKTA avant instruments.
Reference: See Section 3.1.4 System Settings, on page 147.
10
If desired, install UNICORN 6.1 software on Remote station computers in
the network, after installing any prerequisite software.
11
If desired, set up a default printer for system generated prints (e.g. printed
reports generated by evaluation procedures).
Reference: See Section 2.8 Printers, on page 123.
12
Set up user access rights and profiles
Define access levels for the installation.
Reference: See Section 3.2.1 User access groups, on page 160 and Section 3.2.2 Access items, on page 165.
13
Define users with home folders and access profiles.
Reference: See Section 3.2.3 Create a new user, on page 167.
Note:
This overview includes all the necessary actions for a network
environment with several users and different work descriptions. Some
of the stages may not be applicable for your organization. You may
perform the actions in a different order and for a single client computer
or user at a time if that is preferable.
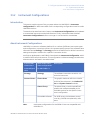
The Custom installation options
Using the Custom UNICORN 6.1 installation, you may select the software component
parts that are needed for the workstation in question.
The Custom installation options are described in the table below.
Software components
Characteristics
UNICORN Software
Client
The UNICORN client software for the station, including the
four UNICORN software modules; Administration, Method
Editor, System Control and Evaluation.
Select this option if the station will be used as a remote
station only. This option does not include the necessary
server components to control a locally connected ÄKTA
avant instrument.
UNICORN 6.1 Administration and Technical Manual 28-9817-68 AA
25
2 Installation and configurations
2.1 Installation overviews
Software components
Characteristics
UNICORN Instrument
server and UNICORN
Software Client
This option includes the UNICORN client software described above, as well as the software necessary to control
and manage an ÄKTA avant instrument that is connected
to the station.
Database server and license server
This option installs the server software necessary to operate the database where all UNICORN data is stored. It also
installs the license server software which is used to authenticate that all UNICORN software clients with access
to the network are properly licensed.
In a network environment, the database and license
server will normally be installed on a dedicated server
computer.
Installation prerequisites
Before you start the installation procedure the operating system, Windows XP or Windows
7, must be correctly installed on your computer. See the operating system documentation
for details.
Note:
UNICORN 6.1 is not tested for operation in a mixed Windows
XP/Windows 7 environment. It is our recommendation that all client
stations and servers use the same operating system.
Do not copy the DVD-ROM or
decompress the files
UNICORN 6.1 is supplied on a DVD-ROM. Files on the DVD-ROM are compressed and the
installation cannot be performed by simply copying the files onto the hard disk. However,
the installation files can by copied to a hard drive and the installation may be run from
the hard drive instead.
During the installation procedure, the required folder structure is created on the hard
disk and the files are decompressed. Do not attempt to decompress the files using any
other file decompression utility.
26
UNICORN 6.1 Administration and Technical Manual 28-9817-68 AA
2 Installation and configurations
2.1 Installation overviews
Upgrading a UNICORN
installation
Upgrading UNICORN 6.0 installations to UNICORN 6.1 is a relatively simple matter of
installing the new software version and converting the database into UNICORN 6.1
standard. This is described in Section 2.7 Upgrade UNICORN 6.0 to UNICORN 6.1, on
page 117.
Replacing a UNICORN installation older than UNICORN 6.0 (e.g. UNICORN 5.2 and older)
with the UNICORN 6.1 version of the software is not possible, since the data was stored
as files in a folder structure and not in a database in these versions. It is possible to
operate UNICORN 6.1 in parallell with older versions, but methods and results cannot
be shared.
You can import the result data from UNICORN 5.x into the UNICORN 6.1 database,
provided it has been created using ÄKTAexplorer™ or ÄKTApurifier™ instruments. The
import will not be complete, but it will include enough data to enable comparison between
the older results and new results generated in UNICORN 6.1. The import is described
further in Section 4.2.6 Import data from UNICORN 5.x and older versions, on page 211.
Changing the installation type
If you want to change a stand-alone workstation to become a network client unit, you
must first remove the UNICORN 6.1 installation before you can install the network
instrument server and/or client software version. The removal is described in Section 2.9
Remove a UNICORN 6.1 installation, on page 125.
If you wish to merge several independent stand-alone workstations into a network with
a common database, you should follow the procedure described below. The largest
database should be restored on the new database server.
Note:
The e-licenses for the stand-alone workstations will need to be re-hosted
to the common e-license server in the scenario described below. Contact
GE Healthcare for information and assistance.
Step
Action
1
Create a backup of the database from the workstation that has the largest
database, and save it outside the regular backup folder.
2
Remove the installation from the workstation.
3
Install the database and license server software.
4
Restore the database backup to the empty, new database.
UNICORN 6.1 Administration and Technical Manual 28-9817-68 AA
27
2 Installation and configurations
2.1 Installation overviews
Step
Action
5
Export and save the log files from each of the other workstations.
(These logs cannot be imported into the new database, but should be saved
to provide a history of usage for the workstations before the database merge)
6
Export all results and methods you wish to move from the other workstations.
7
Perform database backups on the other workstations
8
Remove the Full installations from the workstations and install the
client/instrument server versions instead.
9
Re-define the systems.
10
Import results and methods as needed.
Note:
28
DoE results can only be exported as Modde projects. However, Modde
projects cannot be imported into a UNICORN database. This means
that DoE results cannot be moved from a stand-alone workstation
database to a common database in the same manner as other results.
UNICORN 6.1 Administration and Technical Manual 28-9817-68 AA
2 Installation and configurations
2.2 Other software installed by UNICORN 6.1
2.2
Other software installed by UNICORN 6.1
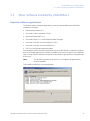
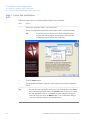
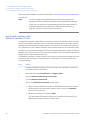
Required software applications
The following other software applications must be installed before the UNICORN
installation can begin:
•
MS Windows Installer 4.5
•
Microsoft™ .Net Framework 3.5 SP1.
•
Windows PowerShell™ 1.0
•
Microsoft Visual C++™ 2005 Redistributable Package
•
Microsoft Core XML Services (MSXML) 4.0 SP2
•
Microsoft Core XML Services (MSXML) 6.0
•
OPC Core Components Redistributable
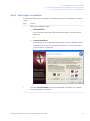
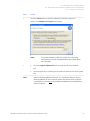
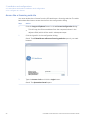
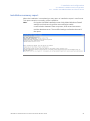
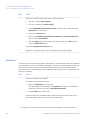
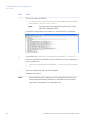
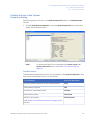
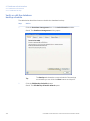
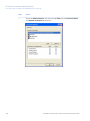
The installation will be initiated automatically by the UNICORN 6.1 installation program.
If any of the listed applications is already installed it will not be included in this installation
step. You may need to restart the computer several times to proceed from one application
to the next.
Note:
This process may take up to one hour to complete if all applications
must be installed.
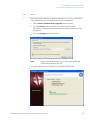
The InstallShield Wizard is illustrated below:
UNICORN 6.1 Administration and Technical Manual 28-9817-68 AA
29
2 Installation and configurations
2.2 Other software installed by UNICORN 6.1
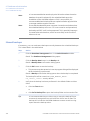
Note:
By default, the applications listed above will be installed on the computer
C drive. If the available space on this drive is insufficient, the installation
may fail and the installation program will attempt to repeat the
installation after each restart. Ensure that enough space is available
on the C drive before starting the installation. The actual required space
will vary depending on what is previously installed on the computer
(e.g. applications listed above), and subsequent selections in the
UNICORN installation. However, the installation program needs a total
of 11 GB of free space to initiate the installation.
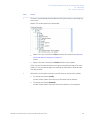
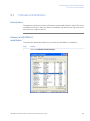
The help viewer application
As part of the UNICORN software installation, a special viewer for the online help will be
installed. This application, the MadCap™ Help Viewer, is accessed from the UNICORN
user interface either by clicking help buttons in dialogs, by pressing the F1 key or by
selecting Help menu items.
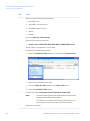
By default, this application will place a shortcut icon on the desktop. If you cannot log
on to UNICORN, you can open the online help using this shortcut.
To start the UNICORN online help:
•
Double-click the shortcut icon.
•
Choose File:Open.
•
Browse to the folder UNICORN\Documentation\Help
•
select the file Manual.mchelp
and
•
click the Open button.
This will open the online help at the portal page.
Note:
30
Sometimes Windows may need to register the MadCap Help Viewer as
the application for files of the type .mchelp before it will recognize calls
from help buttons in UNICORN 6.1. If that happens, you may need to
open the viewer manually as described above. It should only be
necessary to do this once for a new Windows user profile.
UNICORN 6.1 Administration and Technical Manual 28-9817-68 AA
2 Installation and configurations
2.2 Other software installed by UNICORN 6.1
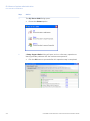
Other software installed by GE
Healthcare
On computers delivered and/or installed by GE Healthcare, service staff may have
installed a software tool which is used for diagnostic, testing and quality control. This
tool can only be used by GE Healthcare service staff, for quality control, to optimize
system performance and as an aid in troubleshooting.
UNICORN 6.1 Administration and Technical Manual 28-9817-68 AA
31
2 Installation and configurations
2.3 Stand-alone workstation installation and configuration
2.3
Stand-alone workstation installation and configuration
Introduction
The UNICORN 6.1 software is normally installed by a GE Healthcare representative. Follow
the instructions in this section to install the program yourself if your system is not
preinstalled.
Contents
This section contains the following topics:
Section
32
See page
2.3.1 Install the UNICORN software - Full installation
33
2.3.2 Configure an e-license
45
2.3.3 Define a system at installation
53
UNICORN 6.1 Administration and Technical Manual 28-9817-68 AA
2 Installation and configurations
2.3 Stand-alone workstation installation and configuration
2.3.1 Install the UNICORN software - Full installation
2.3.1
Install the UNICORN software - Full installation
Introduction
The full UNICORN installation includes all software component parts necessary to operate
UNICORN and a connected, local ÄKTA avant instrument.
The installation includes the components described in the table below.
Software component
Characteristics
UNICORN client
The UNICORN client software for the workstation, including
the four UNICORN software modules; Administration,
Method Editor, System Control and Evaluation.
Instrument server
The UNICORN software necessary to control and manage
an ÄKTA avant instrument that is connected to the workstation.
Database server
The server software necessary to operate the database
where all UNICORN data is stored. Microsoft SQL Server™
Express Edition is used for this.
License server
The license server software is used to authorize that the
UNICORN software installation is properly licensed.
UNICORN 6.1 Administration and Technical Manual 28-9817-68 AA
33
2 Installation and configurations
2.3 Stand-alone workstation installation and configuration
2.3.1 Install the UNICORN software - Full installation
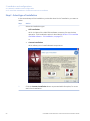
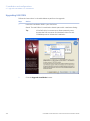
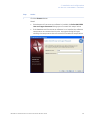
Step 1 - Insert the installation
DVD
Follow the instructions in the table below to begin the installation:
Step
Action
1
Insert the installation DVD in your DVD drive.
Result: The UNICORN Installation wizard opens with a welcome dialog.
Tip:
2
Click the Start button.
3
The UNICORN Installation Program is launched. Continue the installation
below.
Tip:
34
If the DVD drive is not set up to allow automatic start,
browse the DVD contents and doubleclick the file UNICORNSetup.exe to initiate the installation.
You can exit the installation by clicking either the Close or, in some
subsequent wizard steps, the Cancel button. However, if you do this
the installation will be incomplete and the software cannot be used.
You may also click the Back button in some installation steps, to return
to a previous step to change selections.
UNICORN 6.1 Administration and Technical Manual 28-9817-68 AA
2 Installation and configurations
2.3 Stand-alone workstation installation and configuration
2.3.1 Install the UNICORN software - Full installation
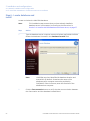
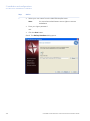
Step 2 - Select type of installation
In the second step of the installation you decide what kind of installation you want to
make:
Step
Action
1
Select the installation type:
•
Full installation
which includes all the UNICORN software necessary for stand-alone
operation.
or
•
Custom installation
which allows you to install selected components. (This installation option
is described in Section 2.4.5 Install the UNICORN 6.1 Client/Instrument
server software, on page 88).
2
Click the Full installation button to proceed with this option, for a standalone workstation installation.
UNICORN 6.1 Administration and Technical Manual 28-9817-68 AA
35
2 Installation and configurations
2.3 Stand-alone workstation installation and configuration
2.3.1 Install the UNICORN software - Full installation
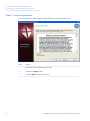
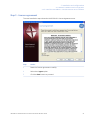
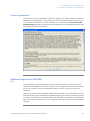
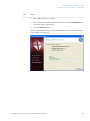
Step 3 - License agreement
The next installation step shows the UNICORN 6.1 License Agreement text.
36
Step
Action
1
Read the license agreement carefully.
2
Select the I agree option.
3
Click the Next button to proceed.
UNICORN 6.1 Administration and Technical Manual 28-9817-68 AA
2 Installation and configurations
2.3 Stand-alone workstation installation and configuration
2.3.1 Install the UNICORN software - Full installation
Step 4 - Select installation folder
Select the installation folder for UNICORN:
Step
Action
1
By default, UNICORN will suggest the following installation folder:
C:\Program Files\GE Healthcare\UNICORN\.
Either
•
accept this installation folder
or
•
2
click Browse and locate the folder you want to install in.
Note:
UNICORN will calculate the available diskspace for the selected installation folder. The space required for the installation is also shown.
Note:
UNICORN 6.1 cannot be installed on a compressed disk.
Click the Next button to proceed.
UNICORN 6.1 Administration and Technical Manual 28-9817-68 AA
37
2 Installation and configurations
2.3 Stand-alone workstation installation and configuration
2.3.1 Install the UNICORN software - Full installation
Note:
The general UNICORN installation folder structure will be saved in the
folder selected in this step. However, the SQL Server software and
e-license server software will be installed on the C drive by default. If
the available space for this is insufficient, the installation may fail. The
required space will vary depending on what is previously installed on
the computer but at least 2 GB should be available to ensure that the
installation will be completed correctly.
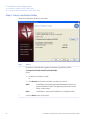
Step 5 - Specify data storage
Specify storage folders for database backups and for archived database items.
38
UNICORN 6.1 Administration and Technical Manual 28-9817-68 AA
2 Installation and configurations
2.3 Stand-alone workstation installation and configuration
2.3.1 Install the UNICORN software - Full installation
Step
Action
1
Click the Browse button adjacent to the Backup files folder field and navigate
to a suitable folder where the database backups should be saved.
2
By default UNICORN will suggest a Backup folder in the
selected installation folder. However, if possible it is recommended that the backups are saved on another physical
drive than where the active database is stored. This physical
drive must be installed on the same computer as where
the database is installed, for example a D drive as illustrated above. Network folders cannot be used for this purpose.
Note:
Ensure that the user "SYSTEM" has access rights to the selected folder 1 .
Click the Browse button adjacent to the Archive files folder field and navigate
to a suitable folder where the data should be archived.
3
Note:
By default UNICORN will suggest an Archive folder in the
selected installation folder. However, if possible it is recommended that the archives are saved on another physical
drive than where the active database is stored. This physical
drive must be installed on the same computer as where
the database is installed. Network folders cannot be used
for this purpose.
Note:
Ensure that the user "SYSTEM" has access rights to the selected folder.
Click the Next button to proceed.
Note:
1
Note:
To ensure data safety, it is recommended that the backup and the
archive folders are copied or moved at regular intervals to another
server computer or some other storage media.
The access rights are shown in the Security tab of the folder Properties.
UNICORN 6.1 Administration and Technical Manual 28-9817-68 AA
39
2 Installation and configurations
2.3 Stand-alone workstation installation and configuration
2.3.1 Install the UNICORN software - Full installation
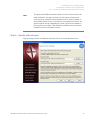
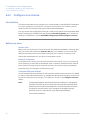
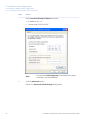
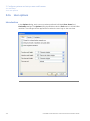
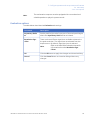
Step 6 - Password settings
Choose the password settings you wish to apply for UNICORN.
Step
Action
1
By default, the Require passwords option is selected.
•
2
Enter the minimum number of characters required for the password (Between
1 and 15 characters).
Tip:
3
Recommendations for how passwords should be set up
are listed in Section 3.2.5 User passwords and account
access limitations, on page 180.
Enter the number of times the passwords must be changed before an
identical password may be used again.
•
40
If you do not want to use passwords at log on or for electronic signatures,
de-select this option and proceed with step 5 in this instruction.
In the example illustration above, the password must be changed three
times before the first password may be used again.
UNICORN 6.1 Administration and Technical Manual 28-9817-68 AA
2 Installation and configurations
2.3 Stand-alone workstation installation and configuration
2.3.1 Install the UNICORN software - Full installation
Step
Action
4
Select if user accounts should be locked after log on attempts have failed,
and enter the number of tries before the account is locked.
•
5
Tip:
In the example illustration above, the user account will be locked after
three failed log on attempts. Another user with User Setup access must
reset the passwords before the user account is available again.
Click the Next button to proceed.
Under the Windows Start:Programs:GE Healthcare menu you will find
Change Installation Settings. This dialog can be used to edit the
password settings after the installation.
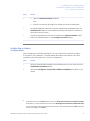
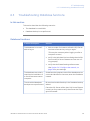
Step 7 - Column logbook
The Column Logbook enables the recording of usage and performance history of
individual columns.
Step
Action
1
Click the Enable Column Logbook checkbox to set up the logbook.
(This is selected by default)
UNICORN 6.1 Administration and Technical Manual 28-9817-68 AA
41
2 Installation and configurations
2.3 Stand-alone workstation installation and configuration
2.3.1 Install the UNICORN software - Full installation
Step
Action
2
Click the Install button.
Result: The UNICORN 6.1 installation begins.
Tip:
42
Under the Windows Start:Programs:GE Healthcare menu you will
find Change Installation Settings. This program can be used to edit
the column logbook settings after the installation.
UNICORN 6.1 Administration and Technical Manual 28-9817-68 AA
2 Installation and configurations
2.3 Stand-alone workstation installation and configuration
2.3.1 Install the UNICORN software - Full installation
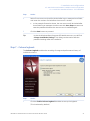
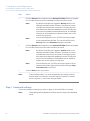
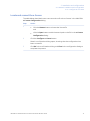
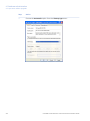
Step 8 - Installation completed
The final wizard dialog shown below opens when the installation is complete and the
UNICORN 6.1 database, e-license server, software client and instrument server are all
installed on the workstation computer.
At this point you may
•
select to configure an e-license
•
select to define a system
and/or
•
view an installation summary report.
Note:
The report can only be displayed at this point. If you proceed with
e-license configuration and/or system definition, you will not be
able to generate the report later.
If you have selected to proceed with an e-license configuration and a system definition,
first the e-License Configuration dialog and then the Define System dialog will
automatically open when you click the Close button, which completes the installation
wizard. These dialogs are described in subsequent sections in this chapter.
Tip:
You may also configure an e-license and define a system later if you
so wish. The e-license configuration is described in Add more e-licenses
to the license server, on page 189, and how to define a system is
described in Section 3.1.3 Define a new system, on page 144.
UNICORN 6.1 Administration and Technical Manual 28-9817-68 AA
43
2 Installation and configurations
2.3 Stand-alone workstation installation and configuration
2.3.1 Install the UNICORN software - Full installation
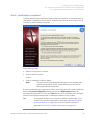
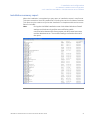
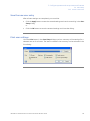
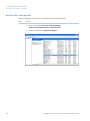
Installation summary report
When the installation is completed you may open an installation report in text format.
This report contains a list of all installed files, including size, version and date of creation.
The report may be used to verify that the installation is complete and that the correct
files are included.
Note:
44
During the UNICORN installation some of the default Windows firewall
settings and local security policies are modified to enable
communication between the workstation computer, the ÄKTA avant
instrument and the database server. The modified settings are listed at
the end of the report.
UNICORN 6.1 Administration and Technical Manual 28-9817-68 AA
2 Installation and configurations
2.3 Stand-alone workstation installation and configuration
2.3.2 Configure an e-license
2.3.2
Configure an e-license
Introduction
This section describes how to configure an e-license as part of a UNICORN 6.1 installation.
If you are configuring e-licenses for a common license server in a network, you will
retrieve a block of licenses using the procedure described below.
You can access the configuration dialog at a later time to perform the steps described
below. The dialog is available from the Windows Start:All programs menu under the
heading GE Healthcare. Choose UNICORN:Configuration Tools:Configure e-license.
Before you start
Access Code
Before you can retrieve an e-license from the GE Healthcare software e-licensing web
site, you must have received an Access Code with your software or via courier mail.
Without this code you will not be able to configure the e-license. Contact your GE
Healthcare representative if you have not received the code.
Internet connection
To activate the e-license, you must have access to the Internet. If you are configuring
the e-license for a stand-alone workstation with no external network access, retrieve
the e-license file using another computer and then move the file to the workstation
computer using, for example, a USB memory stick.
Computer Ethernet address
You will need the Ethernet address for the computer where the license server is installed
(i.e. either a stand-alone workstation or a database and license server) when you perform
the actions described in this section. This address is shown in the Configure e-license
dialog.
Note:
The displayed address should be the Ethernet address for the Network
Interface Card (NIC) which is used for the communication with the ÄKTA
avant instrument, and not the address for a second interface card used
for network communication. If the computer is equipped with two
interface cards you may need to verify the Ethernet address.
This is described below.
UNICORN 6.1 Administration and Technical Manual 28-9817-68 AA
45
2 Installation and configurations
2.3 Stand-alone workstation installation and configuration
2.3.2 Configure an e-license
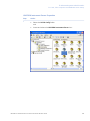
Step
Action
1
•
Open a Command Prompt window 2
and
•
enter the command ipconfig/all to display the Ethernet addresses.
2
Locate the Network Interface Card (also called Ethernet adapter) with the
IP Address 10.1.1.2. This is the Network Interface Card which is used for instrument communication.
3
The Ethernet address for this card is listed as the Physical Address. Verify
that this is address shown in the Configure e-license dialog.
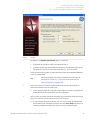
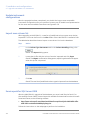
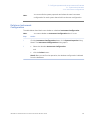
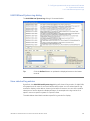
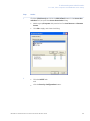
Initiate the e-license
configuration
After completing a UNICORN installation, you can choose to proceed to configure
e-licenses for the installation. The table below describes how to perform the final
installation step and initiate the e-license configuration.
Step
Action
1
Perform the UNICORN installation wizard sequence until you reach the final,
Installation Completed dialog.
2
Select the Configure e-license after software installation checkbox in the
dialog.
2
In Windows XP, click the Start button and choose Programs:Accessories:Command Prompt.
In Windows 7, click the Windows icon and choose All Programs:Accessories:Command Prompt.
You can also press and hold the Windows key and then press the letter R. Type cmd in the input
field and click OK or press Enter.
46
UNICORN 6.1 Administration and Technical Manual 28-9817-68 AA
2 Installation and configurations
2.3 Stand-alone workstation installation and configuration
2.3.2 Configure an e-license
Step
Action
3
Click the Close button to exit the software installation sequence.
Result: The Configure e-License dialog opens.
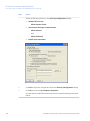
Note:
4
•
If you also selected to define a system, the e-licensing
configuration must be completed before the system definition can begin.
Click the Copy to Clipboard button to copy the Ethernet address
and
•
Note:
click the hyperlink in the dialog to proceed to access the e-licensing web
site.
When activating additional licenses, it is essential to always use the
Ethernet address for the computer where the license server software
is installed. You should not use the Ethernet addresses for the additional
client computers.
UNICORN 6.1 Administration and Technical Manual 28-9817-68 AA
47
2 Installation and configurations
2.3 Stand-alone workstation installation and configuration
2.3.2 Configure an e-license
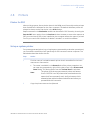
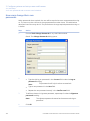
Access the e-licensing web site
You must retrieve the e-license from the GE Healthcare e-licensing web site. The table
below describes how to access the site from the configuration dialog.
Step
Action
1
Click the Copy to Clipboard button in the e-License Configuration dialog.
•
2
This will copy the Ethernet address from the computer (shown in the
adjacent field), which will be used in subsequent steps.
Click the hyperlink in the configuration dialog.
Result: The GE Healthcare software elicensing web site opens in your web
browser.
3
Type the Access Code and click the Login button.
Result: The Operations Portal opens.
48
UNICORN 6.1 Administration and Technical Manual 28-9817-68 AA
2 Installation and configurations
2.3 Stand-alone workstation installation and configuration
2.3.2 Configure an e-license
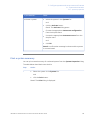
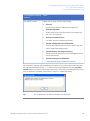
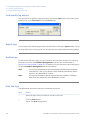
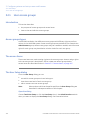
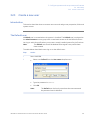
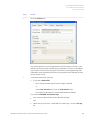
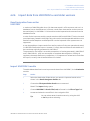
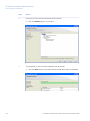
Retrieve the e-license
The table below describes how to retrieve the e-license from the web site.
Step
Action
1
Click the Collect License hyperlink.
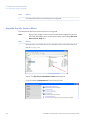
Result: The Manage Entitlements page opens.
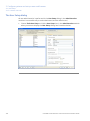
2
Select the checkbox for your license and click the Activate button.
Result: A Manage Entitlements data input page opens.
UNICORN 6.1 Administration and Technical Manual 28-9817-68 AA
49
2 Installation and configurations
2.3 Stand-alone workstation installation and configuration
2.3.2 Configure an e-license
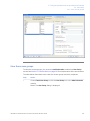
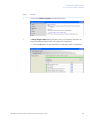
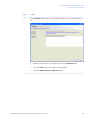
Step
Action
3
Enter the data below:
•
Start date, if requested by the GE Healthcare software e-licensing web
site.
•
Customer data:
-
Name
-
Department
-
Organization
-
Order Email
You must also note if you want software updates and information about
related products or not. All items marked with red dots are mandatory.
•
Click the Next button to proceed to the next page.
Note:
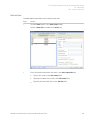
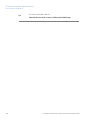
4
The options Ship to Email or Ship to Address can be selected if, for some reason, the e-license cannot be saved
to a file during the configuration. Normally, this will not be
necessary.
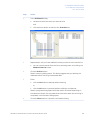
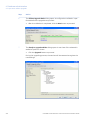
Under the heading Server Hosts, click the Add New Host button.
Result: The Create License Host dialog opens.
50
UNICORN 6.1 Administration and Technical Manual 28-9817-68 AA
2 Installation and configurations
2.3 Stand-alone workstation installation and configuration
2.3.2 Configure an e-license
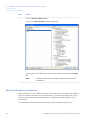
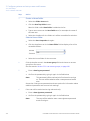
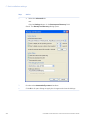
Step
Action
5
Click in the empty Server Hosts field and press the Ctrl and V keys simultaneously to paste your Ethernet address from the clipboard into this field.
Note:
If you use another computer to retrieve the e-license, you
must write down the Ethernet address from the computer
you are installing UNICORN on and type this address in the
Server Hosts field.
Also, if UNICORN identified the wrong Ethernet address
(e.g. from a second network interface card) in the Configure
e-License dialog, you must find the correct address and
type it in manually.
This is described in Computer Ethernet Address above.
Click the OK button to proceed.
Result: Your computer address is added to the Server Hosts list.
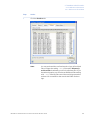
6
Select the checkbox for your computer address and click the Next button.
Result: The Configure Counts page opens.
7
Read to verify that the information is correct and click Next to proceed.
Result: The Generate Licenses - Review page opens.
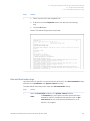
8
If the displayed information is correct, click the Generate button.
Result: The License summary page opens.
9
Select the checkbox for your license and click the Save to File button.
Result: A download dialog opens. Save the license file in a temporary folder
or on your Windows desktop.
10
Click the Complete button and Logout to close the GE Healthcare software
e-licensing web site.
UNICORN 6.1 Administration and Technical Manual 28-9817-68 AA
51
2 Installation and configurations
2.3 Stand-alone workstation installation and configuration
2.3.2 Configure an e-license
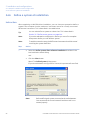
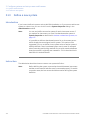
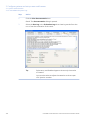
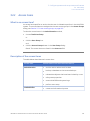
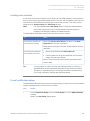
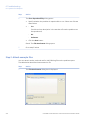
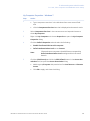
Locate and connect the e-license
The table below describes how to connect and confirm the e-license in the UNICORN
e-License Configuration dialog.
Step
Action
1
•
Click the Browse button to locate the license file
and
•
2
click the Open button to add the search path to the file in the e-License
Configuration dialog.
Click the Configure e-License button.
Result: A confirmation dialog opens, showing that the configuration has
been successful.
3
52
Click OK in the confirmation dialog, and Close in the configuration dialog to
complete the process.
UNICORN 6.1 Administration and Technical Manual 28-9817-68 AA
2 Installation and configurations
2.3 Stand-alone workstation installation and configuration
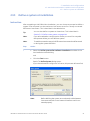
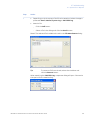
2.3.3 Define a system at installation
2.3.3
Define a system at installation
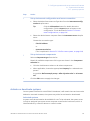
Instruction
After completing a UNICORN client installation, you can choose to proceed to define a
system if the computer is to be used as an instrument server for a locally connected
ÄKTA avant instrument. This is described in the table below.
Tip:
You can also define a system at a later time. This is described in
Section 3.1.3 Define a new system, on page 144.
Note:
If you also selected to configure an e-license you must first complete
that process before you can define a system.
Note:
To enable connection tests, the ÄKTA avant instrument should be turned
on during the system definition.
Step
Action
1
•
Select the Define system after software installation checkbox in the
last installation wizard dialog
and
•
Click the Close button.
Result: The Define System dialog opens.
(If you also selected to configure an e-license, this process will start first)
Note:
Before defining the system, ensure that the cable between
instrument and the correct network interface card is connected properly.
UNICORN 6.1 Administration and Technical Manual 28-9817-68 AA
53
2 Installation and configurations
2.3 Stand-alone workstation installation and configuration
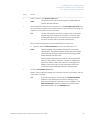
2.3.3 Define a system at installation
Step
Action
2
Enter a name in the System name field.
Note:
3
Enter the serial number for the instrument in the Instrument serial no field.
You will find this number on the labels either on the inside of the swing-out
toolbox or on the back of the instrument.
You can also retrieve the serial number of the instrument
by entering the IP address and make a connection test
as described below. If the connection test is successful,
the serial number will be entered automatically.
Tip:
4
The system name cannot be changed or edited after the
system has been defined.
Select how the instrument shall be identified for connections:
•
Enter the default Fixed IP address for the instrument (10.1.1.1).
Note:
Fixed IP address should always be used for instrument
identification. The default address shown above should be
used whenever the instrument is connected using a dedicated network interface card.
Serial numbers should only be used for instrument identification in very specific situations. Contact GE Healthcare
Service for advice if there are reasons to investigate if IP
address cannot be used or if the instrument will not be
connected using a dedicated network interface card.
5
Click the Connection Test button.
Result: The connection between the instrument server local station and the
instrument is verified.
Tip:
54
If the connection fails, check that the Default Gateway
address in the ÄKTA avant instrument settings corresponds to the default instrument server IP address. The
Default Gateway address is shown on the ÄKTA avant
instrument display, on the Settings page.
UNICORN 6.1 Administration and Technical Manual 28-9817-68 AA
2 Installation and configurations
2.3 Stand-alone workstation installation and configuration
2.3.3 Define a system at installation
Step
Action
6
Select the appropriate instrument configuration from the Instrument Configuration droplist menu.
The list includes all instrument configurations currently in the UNICORN
database. To select a new instrument configuration:
7
•
Insert the instrument configuration CD in your CD-ROM drive.
•
Click the Browse button and navigate to the configuration file on the
CD.
•
Select the appropriate configuration file.
Click the Define System button.
Result: The system definition settings are saved and the new system is made
available as an active system.
UNICORN 6.1 Administration and Technical Manual 28-9817-68 AA
55
2 Installation and configurations
2.4 Network installation and configuration
2.4
Network installation and configuration
Introduction
This section describes how to install the UNICORN 6.1 for server and client computers
in a network deployment. It also describes basic configuration of the server and client
computers.
Contents
This section contains the following topics:
Section
56
See page
2.4.1 Install a UNICORN database and license server
57
2.4.2 Configure an e-license
70
2.4.3 Configure the network
78
2.4.4 Configure and set up the client computers
81
2.4.5 Install the UNICORN 6.1 Client/Instrument server software
88
2.4.6 Define a system at installation
98
UNICORN 6.1 Administration and Technical Manual 28-9817-68 AA
2 Installation and configurations
2.4 Network installation and configuration
2.4.1 Install a UNICORN database and license server
2.4.1
Install a UNICORN database and license server
Introduction
The Custom Installation option is used to install a UNICORN 6.1 database and the license
server application necessary to authenticate licenses and host data for a number of
UNICORN client stations in a network deployment.
The database is a Microsoft SQL Server database. The standard database software
supplied with the UNICORN 6.1 installation is Microsoft SQL Server Express. This server
software is suitable for small workgroups consisting of two to three client stations.
Contact your GE Healthcare representative to discuss other options if you need a larger
installation.
The database and license server installation is the first part of the set up of a UNICORN
6.1 network.
UNICORN 6.1 Administration and Technical Manual 28-9817-68 AA
57
2 Installation and configurations
2.4 Network installation and configuration
2.4.1 Install a UNICORN database and license server
Step 1 - Insert the installation
DVD
Follow the instructions in the table below to begin the installation:
Step
Action
1
Insert the installation DVD in your DVD drive.
Result: The UNICORN Installation wizard opens with a welcome dialog.
Tip:
2
Click the Start button.
3
The UNICORN Installation Program is launched. Continue the installation
below.
Tip:
58
If the DVD drive is not set up to allow automatic start,
browse the DVD contents and doubleclick the file UNICORNSetup.exe to initiate the installation.
You can exit the installation at any point by clicking either the Close
or, in subsequent wizard steps, the Cancel button. However, if you do
this the installation will be incomplete and the software cannot be
used. You may also click the Back button in any installation step to
return to a previous step to change selections.
UNICORN 6.1 Administration and Technical Manual 28-9817-68 AA
2 Installation and configurations
2.4 Network installation and configuration
2.4.1 Install a UNICORN database and license server
Step 2 - Select type of installation
In the second step of the installation you decide what kind of installation you want to
make:
Step
Action
1
Select the installation type:
•
Full installation
which includes all the UNICORN software necessary for stand-alone
operation. (This installation option is described in Section 2.3.1 Install the
UNICORN software - Full installation, on page 33)
or
•
Custom installation
which allows you to install selected components.
2
Click the Custom installation button to proceed with this option, for a
server installation.
UNICORN 6.1 Administration and Technical Manual 28-9817-68 AA
59
2 Installation and configurations
2.4 Network installation and configuration
2.4.1 Install a UNICORN database and license server
Step 3 - License agreement
The next installation step shows the UNICORN 6.1 License Agreement text.
60
Step
Action
1
Read the license agreement carefully.
2
Select the I agree option.
3
Click the Next button to proceed.
UNICORN 6.1 Administration and Technical Manual 28-9817-68 AA
2 Installation and configurations
2.4 Network installation and configuration
2.4.1 Install a UNICORN database and license server
Step 4 - Select software
components
Select the software components to install:
Step
Action
1
Choose UNICORN Database and license server.
2
Click the Next button to proceed.
Note:
You can also select to install a software client or an instrument
server/software client at the same time if you so wish. It may be useful
to have UNICORN client software installed locally on the server, for
example for database maintenance. You can use the database and
license server computer as an instrument server as well, but that may
impact the performance for all clients that access this database.
UNICORN 6.1 Administration and Technical Manual 28-9817-68 AA
61
2 Installation and configurations
2.4 Network installation and configuration
2.4.1 Install a UNICORN database and license server
Step 5 - Select installation folder
Select the installation folder for UNICORN:
Step
Action
1
By default, UNICORN will suggest the following installation folder:
C:\Program Files\GE Healthcare\UNICORN\
Either
•
accept this installation folder
or
•
2
62
click Browse and locate the folder you want to install in.
Note:
UNICORN will calculate the available diskspace for the selected installation folder. The space required for the installation is also shown.
Note:
UNICORN 6.1 cannot be installed on a compressed disk.
Click the Next button to proceed.
UNICORN 6.1 Administration and Technical Manual 28-9817-68 AA
2 Installation and configurations
2.4 Network installation and configuration
2.4.1 Install a UNICORN database and license server
Note:
The general UNICORN installation folder structure will be saved in the
folder selected in this step. However, the SQL Server software and
e-license server software will be installed on the C drive by default. If
the available space for this is insufficient, the installation may fail. The
required space will vary depending on what is previously installed on
the computer but at least 2 GB should be available to ensure that the
installation will be completed correctly.
Step 6 - Specify data storage
Specify storage folders for database backups and for archived database items.
UNICORN 6.1 Administration and Technical Manual 28-9817-68 AA
63
2 Installation and configurations
2.4 Network installation and configuration
2.4.1 Install a UNICORN database and license server
Step
Action
1
Click the Browse button adjacent to the Backup files folder field and navigate
to a suitable folder where the database backups should be saved.
2
3
Note:
Note:
By default UNICORN will suggest a Backup folder in the
selected installation folder. However, if possible it is recommended that the backups are saved on another physical
drive than where the active database is stored. This physical
drive must be installed on the database server, for example
a D drive as illustrated above. Network folders can not be
used for this purpose.
Note:
Ensure that the generic user "SYSTEM" has access rights
to the selected backup folder. This can be verified in the
Security tab of the Properties dialog for the folder.
Click the Browse button adjacent to the Archive files folder field and navigate
to a suitable folder where the data should be archived.
Note:
By default UNICORN will suggest a Archive folder in the
selected installation folder. However, if possible it is recommended that the archives are saved on another physical
drive than where the active database is stored. This physical
drive must be installed on the database server. Network
folders can not be used for this purpose.
Note:
Ensure that the user "SYSTEM" has access rights to the selected archive folder. Right-click the folder and open Properties:Security to verify this.
Click the Next button to proceed.
To ensure data safety, it is recommended that the backup and the
archive folders are copied or moved at regular intervals to another
server computer or some other storage media.
Step 7 - Password settings
Choose the password settings you wish to apply for the UNICORN 6.1 network.
Note:
64
These settings will be applied to all client stations sharing this database
server.
UNICORN 6.1 Administration and Technical Manual 28-9817-68 AA
2 Installation and configurations
2.4 Network installation and configuration
2.4.1 Install a UNICORN database and license server
Step
Action
1
By default, the Require passwords option is selected.
2
•
If passwords should be used, proceed with step 2.
•
If you do not want to use passwords at log on or for electronic signatures,
de-select this option and proceed with step 5 in this instruction.
Enter the minimum number of characters required for the password (Between
1 and 15 characters).
Tip:
3
Enter the number of times the passwords must be changed before an
identical password may be used again.
•
4
Recommendations for how passwords should be set up
are listed in Section 3.2.5 User passwords and account
access limitations, on page 180.
In the example illustration above, the password must be changed three
times before the first password may be used again.
Select if user accounts shall be locked after log on attempts have failed, and
enter the number of tries before the account is locked.
•
In the example illustration above, the user account will be locked after
three failed log on attempts. Another user with User Setup access must
reset the passwords before the user account is available again.
UNICORN 6.1 Administration and Technical Manual 28-9817-68 AA
65
2 Installation and configurations
2.4 Network installation and configuration
2.4.1 Install a UNICORN database and license server
Step
Action
5
Click the Next button to proceed.
Tip:
Under the Windows Start:Programs:GE Healthcare menu you will find
Change Installation Settings. This dialog can be used to edit the
password settings after the installation.
Step 8 - Column logbook
The Column Logbook enables the recording of usage and performance history of
individual columns.
66
Step
Action
1
Click the Enable Column Logbook checkbox to set up the logbook. This is
selected by default.
UNICORN 6.1 Administration and Technical Manual 28-9817-68 AA
2 Installation and configurations
2.4 Network installation and configuration
2.4.1 Install a UNICORN database and license server
Step
Action
2
Click the Install button.
Result: The UNICORN 6.1 installation begins.
Tip:
Under the Windows Start:Programs:GE Healthcare menu you will find
Change Installation Settings. This dialog can be used to edit the
column logbook settings after the installation.
UNICORN 6.1 Administration and Technical Manual 28-9817-68 AA
67
2 Installation and configurations
2.4 Network installation and configuration
2.4.1 Install a UNICORN database and license server
Step 9 - Installation completed
The final wizard dialog shown below opens when the installation is complete and the
UNICORN 6.1 database and license server software are fully installed on the server
computer.
At this point you may
•
select to configure e-licenses
and/or
•
view an installation report.
Note:
The report can only be displayed at this point. If you proceed with
e-license configuration, you will not be able to generate the report
later.
If you have selected to proceed with the e-licenses at this point, the e-License
Configuration dialog will automatically open when you click the Close button, which
completes the installation wizard.
The e-license configuration is described in Section 2.3.2 Configure an e-license, on page 45.
68
UNICORN 6.1 Administration and Technical Manual 28-9817-68 AA
2 Installation and configurations
2.4 Network installation and configuration
2.4.1 Install a UNICORN database and license server
Installation summary report
When the installation is completed you may open an installation report in text format.
This report contains a summary of the installation.
Note:
During the UNICORN installation some of the default Windows firewall
settings and local security policies are modified to enable
communication between client computers, ÄKTA avant instruments
and the database server. The modified settings are listed at the end of
the report.
UNICORN 6.1 Administration and Technical Manual 28-9817-68 AA
69
2 Installation and configurations
2.4 Network installation and configuration
2.4.2 Configure an e-license
2.4.2
Configure an e-license
Introduction
This section describes how to configure an e-license as part of a UNICORN 6.1 installation.
If you are configuring e-licenses for a common license server in a network, you will
retrieve a block of licenses using the procedure described below.
You can access the configuration dialog at a later time to perform the steps described
below. The dialog is available from the Windows Start:All programs menu under the
heading GE Healthcare. Choose UNICORN:Configuration Tools:Configure e-license.
Before you start
Access Code
Before you can retrieve an e-license from the GE Healthcare software e-licensing web
site, you must have received an Access Code with your software or via courier mail.
Without this code you will not be able to configure the e-license. Contact your GE
Healthcare representative if you have not received the code.
Internet connection
To activate the e-license, you must have access to the Internet. If you are configuring
the e-license for a stand-alone workstation with no external network access, retrieve
the e-license file using another computer and then move the file to the workstation
computer using, for example, a USB memory stick.
Computer Ethernet address
You will need the Ethernet address for the computer where the license server is installed
(i.e. either a stand-alone workstation or a database and license server) when you perform
the actions described in this section. This address is shown in the Configure e-license
dialog.
Note:
The displayed address should be the Ethernet address for the Network
Interface Card (NIC) which is used for the communication with the ÄKTA
avant instrument, and not the address for a second interface card used
for network communication. If the computer is equipped with two
interface cards you may need to verify the Ethernet address.
This is described below.
70
UNICORN 6.1 Administration and Technical Manual 28-9817-68 AA
2 Installation and configurations
2.4 Network installation and configuration
2.4.2 Configure an e-license
Step
Action
1
•
Open a Command Prompt window 3
and
•
enter the command ipconfig/all to display the Ethernet addresses.
2
Locate the Network Interface Card (also called Ethernet adapter) with the
IP Address 10.1.1.2. This is the Network Interface Card which is used for instrument communication.
3
The Ethernet address for this card is listed as the Physical Address. Verify
that this is address shown in the Configure e-license dialog.
Initiate the e-license
configuration
After completing a UNICORN installation, you can choose to proceed to configure
e-licenses for the installation. The table below describes how to perform the final
installation step and initiate the e-license configuration.
Step
Action
1
Perform the UNICORN installation wizard sequence until you reach the final,
Installation Completed dialog.
2
Select the Configure e-license after software installation checkbox in the
dialog.
3
In Windows XP, click the Start button and choose Programs:Accessories:Command Prompt.
In Windows 7, click the Windows icon and choose All Programs:Accessories:Command Prompt.
You can also press and hold the Windows key and then press the letter R. Type cmd in the input
field and click OK or press Enter.
UNICORN 6.1 Administration and Technical Manual 28-9817-68 AA
71
2 Installation and configurations
2.4 Network installation and configuration
2.4.2 Configure an e-license
Step
Action
3
Click the Close button to exit the software installation sequence.
Result: The Configure e-License dialog opens.
Note:
4
•
If you also selected to define a system, the e-licensing
configuration must be completed before the system definition can begin.
Click the Copy to Clipboard button to copy the Ethernet address
and
•
Note:
72
click the hyperlink in the dialog to proceed to access the e-licensing web
site.
When activating additional licenses, it is essential to always use the
Ethernet address for the computer where the license server software
is installed. You should not use the Ethernet addresses for the additional
client computers.
UNICORN 6.1 Administration and Technical Manual 28-9817-68 AA
2 Installation and configurations
2.4 Network installation and configuration
2.4.2 Configure an e-license
Access the e-licensing web site
You must retrieve the e-license from the GE Healthcare e-licensing web site. The table
below describes how to access the site from the configuration dialog.
Step
Action
1
Click the Copy to Clipboard button in the e-License Configuration dialog.
•
2
This will copy the Ethernet address from the computer (shown in the
adjacent field), which will be used in subsequent steps.
Click the hyperlink in the configuration dialog.
Result: The GE Healthcare software elicensing web site opens in your web
browser.
3
Type the Access Code and click the Login button.
Result: The Operations Portal opens.
UNICORN 6.1 Administration and Technical Manual 28-9817-68 AA
73
2 Installation and configurations
2.4 Network installation and configuration
2.4.2 Configure an e-license
Retrieve the e-license
The table below describes how to retrieve the e-license from the web site.
Step
Action
1
Click the Collect License hyperlink.
Result: The Manage Entitlements page opens.
2
Select the checkbox for your license and click the Activate button.
Result: A Manage Entitlements data input page opens.
74
UNICORN 6.1 Administration and Technical Manual 28-9817-68 AA
2 Installation and configurations
2.4 Network installation and configuration
2.4.2 Configure an e-license
Step
Action
3
Enter the data below:
•
Start date, if requested by the GE Healthcare software e-licensing web
site.
•
Customer data:
-
Name
-
Department
-
Organization
-
Order Email
You must also note if you want software updates and information about
related products or not. All items marked with red dots are mandatory.
•
Click the Next button to proceed to the next page.
Note:
4
The options Ship to Email or Ship to Address can be selected if, for some reason, the e-license cannot be saved
to a file during the configuration. Normally, this will not be
necessary.
Under the heading Server Hosts, click the Add New Host button.
Result: The Create License Host dialog opens.
UNICORN 6.1 Administration and Technical Manual 28-9817-68 AA
75
2 Installation and configurations
2.4 Network installation and configuration
2.4.2 Configure an e-license
Step
Action
5
Click in the empty Server Hosts field and press the Ctrl and V keys simultaneously to paste your Ethernet address from the clipboard into this field.
Note:
If you use another computer to retrieve the e-license, you
must write down the Ethernet address from the computer
you are installing UNICORN on and type this address in the
Server Hosts field.
Also, if UNICORN identified the wrong Ethernet address
(e.g. from a second network interface card) in the Configure
e-License dialog, you must find the correct address and
type it in manually.
This is described in Computer Ethernet Address above.
Click the OK button to proceed.
Result: Your computer address is added to the Server Hosts list.
6
Select the checkbox for your computer address and click the Next button.
Result: The Configure Counts page opens.
7
Read to verify that the information is correct and click Next to proceed.
Result: The Generate Licenses - Review page opens.
8
If the displayed information is correct, click the Generate button.
Result: The License summary page opens.
9
Select the checkbox for your license and click the Save to File button.
Result: A download dialog opens. Save the license file in a temporary folder
or on your Windows desktop.
10
76
Click the Complete button and Logout to close the GE Healthcare software
e-licensing web site.
UNICORN 6.1 Administration and Technical Manual 28-9817-68 AA
2 Installation and configurations
2.4 Network installation and configuration
2.4.2 Configure an e-license
Locate and connect the e-license
The table below describes how to connect and confirm the e-license in the UNICORN
e-License Configuration dialog.
Step
Action
1
•
Click the Browse button to locate the license file
and
•
2
click the Open button to add the search path to the file in the e-License
Configuration dialog.
Click the Configure e-License button.
Result: A confirmation dialog opens, showing that the configuration has
been successful.
3
Click OK in the confirmation dialog, and Close in the configuration dialog to
complete the process.
UNICORN 6.1 Administration and Technical Manual 28-9817-68 AA
77
2 Installation and configurations
2.4 Network installation and configuration
2.4.3 Configure the network
2.4.3
Configure the network
Introduction
The network environment for UNICORN 6.1 can be set up in many different ways, from
a very simple solution for two to three simultaneous users to large scale operations
where up to twenty instrument servers share a common database instance. In a larger
installation the network can be set up either as Workgroups or Domains. But since the
requirements for large scale installations inevitably are different and must be solved on
a case by case basis, a model solution cannot be presented in this manual. Additional
information necessary for larger installations is available on request from GE Healthcare.
Instead, this section describes a very simple solution for a small network, which is suitable
for the number of clients that SQL Server Express is intended for.
78
UNICORN 6.1 Administration and Technical Manual 28-9817-68 AA
2 Installation and configurations
2.4 Network installation and configuration
2.4.3 Configure the network
Network illustration
The illustration below shows a small network example:
•
The UNICORN network resides on a router, protected from the larger office LAN by
a firewall. The router adress range is defined as 192.168.0.0 - 192.168.0.24.
•
The Database and License server is set up with the static IP adress 192.168.0.1
(This computer will require a single Network Interface Card only)
•
Each client station is also an Instrument server.
•
The Network Interface Card 2 (NIC 2) for each Instrument Server is connected to the
router for network communication. The IP adresses are allocated dynamically.
•
The Network Interface Card 1 (NIC 1) for each Instrument server is set with the static
IP adress 10.1.1.2. This card is connected to the ÄKTA avant instrument in a
peer-to-peer connection.
UNICORN 6.1 Administration and Technical Manual 28-9817-68 AA
79
2 Installation and configurations
2.4 Network installation and configuration
2.4.3 Configure the network
•
The IP adresses for the ÄKTA avant instruments are set with the static IP adress
10.1.1.1.
(This adress is set on delivery, by default)
Firewall settings
The UNICORN 6.1 installation will configure the Windows Firewall to allow all the network
traffic necessary for the communication between the database server and client
computers, and for the license authentication. However, if another firewall is used, the
ports listed below must be set to allow traffic.
80
Port
For application
1433
SQL server
51723
License server
UNICORN 6.1 Administration and Technical Manual 28-9817-68 AA
2 Installation and configurations
2.4 Network installation and configuration
2.4.4 Configure and set up the client computers
2.4.4
Configure and set up the client computers
Introduction
UNICORN 6.1 client computers delivered from GE Healthcare are set up with dual Network
Interface Cards and configured for use as instrument servers in a network environment
by default. These computers are ready to be installed following the instructions in the
ÄKTA avant and UNICORN 6.1 Installation Guide and will require no additional
configurations.
If other computers are used in a network, an extra Network Interface Card must be
installed and configured. This is described here.
This section also briefly describes the connections between the client computer and
other units. This is explained and illustrated in detail in ÄKTA avant and UNICORN 6.1
Installation Guide.
Finally, the section lists the necessary firewall settings if another firewall than Windows
Firewall is used.
Additional information about the client computer configuration and set up is available
in Section B.1 User, client computer and database server set up, on page 250 and in
Appendix C Post installation settings, on page 279.
Client computer prerequisites
Computers used for UNICORN 6.1 should be set up as listed below before installation:
•
Windows XP Professional with Service Pack 3 installed
or
•
Windows 7 Professional installed
•
US English language settings
•
Screen resolution 1280x1024 or better
•
Standard Windows Normal font
•
Windows Update disabled
(using Windows Update may interfere with the instrument server operation during
active runs)
•
All Windows power save features should be turned off
(using power save may interfere with the instrument server operation during active
runs)
•
The Windows basic color scheme is recommended
•
The Windows 7 Aero color scheme should not be used
UNICORN 6.1 Administration and Technical Manual 28-9817-68 AA
81
2 Installation and configurations
2.4 Network installation and configuration
2.4.4 Configure and set up the client computers
Other computer hardware requirements are listed in SectionA.1 System recommendations,
on page 244.
Note:
It is also strongly recommended to ensure that instrument server
computers are not included in automatic software updates (for example
of Anti-Virus or other security applications) requiring system restart. A
scheduled update with a restart may collide with a method run in
progress. A restart would cause the run to stop.
Install and configure dual
Network Interface Cards
It is possible to operate a UNICORN 6.1 instrument server in a network environment with
only a single Network Interface Card. In that case, the ÄKTA avant instrument and the
network could be accessed through a switch. This solution is not recommended since
any disturbance in the network traffic will have a direct impact on all instruments that
are directly connected to the network. By using dual cards and a peer-to-peer connection
between instrument server and instrument, the reliability of the instrument operation is
independent of other network resources.
The Network Interface Card serving the instrument should also be prioritized to further
ensure that the instrument communication is undisturbed. This is described in the
instruction below.
Step
Action
1
Install the Network Interface Card according to the installation instructions
provided by the manufacturer.
2
Open the Windows Control Panel (in Category View).
3
Choose Network and Internet Connections.
4
Choose Network Connections.
Result: The Network Connections dialog opens.
5
•
Right-click the network connection for the Network Interface Card which
will be used for the instrument communication and choose Rename
from the shortcut menu..
•
Rename the network connection AKTA.
(This will enable GE Healthcare field service staff to easily identify the
dedicated instrument communication card)
82
UNICORN 6.1 Administration and Technical Manual 28-9817-68 AA
2 Installation and configurations
2.4 Network installation and configuration
2.4.4 Configure and set up the client computers
Step
Action
6
Choose the Advanced:Advanced Settings menu item in the Network Connections dialog.
Result: The Advanced Settings dialog opens.
7
8
•
Select the network connection for the Network Interface Card in the
Connections list in the Adapters and Bindings tab.
•
Click the up arrow button to move this network connection to the top of
the list.
•
Click the OK button to apply the settings and close the Advanced Settings
dialog.
•
Double-click the instrument network connection.
Result: The Status dialog opens.
•
Click the Properties button in the dialog.
Result: The Properties dialog opens.
6
Select Internet Protocol (TCP/IP) and click the Properties button.
Result: The Internet Protocol (TCP/IP) Properties dialog opens.
UNICORN 6.1 Administration and Technical Manual 28-9817-68 AA
83
2 Installation and configurations
2.4 Network installation and configuration
2.4.4 Configure and set up the client computers
Step
Action
7
Select Use the following IP address and enter
•
IP address: 10.1.1.2
•
Subnet mask: 255.255.255.0
Note:
8
Do not enter a Default gateway in this dialog. If an adress
is defined, it should be deleted.
Click the Advanced button.
Result: The Advanced TCP/IP Settings dialog opens.
84
UNICORN 6.1 Administration and Technical Manual 28-9817-68 AA
2 Installation and configurations
2.4 Network installation and configuration
2.4.4 Configure and set up the client computers
Step
Action
9
De-select the Automatic metric checkbox and set the Interface metric to
5:
10
•
Click the OK button to apply the settings and close the Advanced TCP/IP
Settings dialog.
•
Click the OK button to close the Internet Protocol (TCP/IP) Properties
dialog.
•
Click the OK button to close the Properties dialog.
•
Click the Close button to close the Status dialog.
11
Note:
Close the Network Connections dialog.
The other Network Interface Card, which is used for network
communication, will have the default metric setting 20. This will ensure
that the communication between instrument server and instrument
will be prioritized.
UNICORN 6.1 Administration and Technical Manual 28-9817-68 AA
85
2 Installation and configurations
2.4 Network installation and configuration
2.4.4 Configure and set up the client computers
Connect the instrument, network
and barcode scanner.
When the Network Interface Cards are properly installed and set up, the instrument
server computer can be connected to the instrument and the network.
Step
Action
1
Connect an Ethernet cable from the prioritized Network Interface Card to
the ÄKTA avant instrument.
(On computers delivered from GE Healthcare, the card connector for this
card will be marked)
2
Connect an Ethernet cable from the other Network Interface Card to the
network router, or to a network outlet directly connected to the router.
3
Connect the Barcode Scanner to a USB port on the instrument server computer.
Tip:
The instrument connections are described and illustrated in the "ÄKTA
avant and UNICORN 6.1 Installation Guide"
Define the default gateway
adress for the ÄKTA avant
instrument
To enable communication between the instrument server and the ÄKTA avant instrument,
the correct default gateway adress must be set on the instrument. This is done on the
instrument display, in the Settings page. The gateway adress should be the IP adress
used by the instrument server Network Interface Card 1, that is 10.1.1.2 by default.
Note:
Ensure that the instrument IP adress is set to a static adress of 10.1.1.1.
Firewall settings
The UNICORN 6.1 installation will configure the Windows Firewall to allow all the network
traffic necessary for the communication between the instrument server, the database
and license server and other client computers. However, if another firewall is used, the
ports listed below must be set to allow traffic.
86
Port
For application
40501-40502
Instrument server
UNICORN 6.1 Administration and Technical Manual 28-9817-68 AA
2 Installation and configurations
2.4 Network installation and configuration
2.4.4 Configure and set up the client computers
Port
For application
49152-65535
Instrument server
135
DCOM (flow schemes)
UNICORN 6.1 Administration and Technical Manual 28-9817-68 AA
87
2 Installation and configurations
2.4 Network installation and configuration
2.4.5 Install the UNICORN 6.1 Client/Instrument server software
2.4.5
Install the UNICORN 6.1 Client/Instrument server software
Introduction
The UNICORN 6.1 client and instrument server is installed using the Custom installation
option. The installation that is described in this section assumes that a UNICORN 6.1
database and license server is already installed and accessible on a network where the
client station resides.
Step 1 - Insert the installation
DVD
Follow the instructions in the table below to begin the installation:
Step
Action
1
Insert the installation DVD in your DVD drive.
Result: The UNICORN Installation wizard opens with a welcome dialog.
Tip:
2
88
If the DVD drive is not set up to allow automatic start,
browse the DVD contents and doubleclick the file UNICORNSetup.exe to initiate the installation.
Click the Start button.
UNICORN 6.1 Administration and Technical Manual 28-9817-68 AA
2 Installation and configurations
2.4 Network installation and configuration
2.4.5 Install the UNICORN 6.1 Client/Instrument server software
Step
Action
3
The UNICORN Installation Program is launched. Continue the installation
below.
Tip:
You can exit the installation at any point by clicking either the Close
or, in subsequent wizard steps, the Cancel button. However, if you do
this the installation will be incomplete and the software cannot be
used. You may also click the Back button in any installation step to
return to a previous step to change selections.
UNICORN 6.1 Administration and Technical Manual 28-9817-68 AA
89
2 Installation and configurations
2.4 Network installation and configuration
2.4.5 Install the UNICORN 6.1 Client/Instrument server software
Step 2 - Select type of installation
In the second step of the installation you decide what kind of installation you want to
make:
Step
Action
1
Select the installation type:
•
Full installation
which includes all the UNICORN software necessary for stand-alone
operation. (This installation option is described in Section 2.3.1 Install the
UNICORN software - Full installation, on page 33)
or
•
Custom installation
which allows you to install selected components.
2
90
Click the Custom installation button to proceed with this option, for a network client installation.
UNICORN 6.1 Administration and Technical Manual 28-9817-68 AA
2 Installation and configurations
2.4 Network installation and configuration
2.4.5 Install the UNICORN 6.1 Client/Instrument server software
Step 3 - License agreement
The next installation step shows the UNICORN 6.1 License Agreement text.
Step
Action
1
Read the license agreement carefully.
2
Select the I agree option.
3
Click the Next button to proceed.
UNICORN 6.1 Administration and Technical Manual 28-9817-68 AA
91
2 Installation and configurations
2.4 Network installation and configuration
2.4.5 Install the UNICORN 6.1 Client/Instrument server software
Step 4 - Select software
components
Select the software components to install:
Step
Action
1
Choose one of the following options
•
UNICORN Database and license server
(This installation option is described in Section 2.4.1 Install a UNICORN
database and license server, on page 57)
•
UNICORN Instrument server and UNICORN Software Client
(The installation option described in this section)
•
UNICORN Software Client
(For a remote station only. The installation steps for this option is similar
to the combined client and instrument server installation and it will not
be described separately in this manual.)
2
92
Click the Next button to proceed.
UNICORN 6.1 Administration and Technical Manual 28-9817-68 AA
2 Installation and configurations
2.4 Network installation and configuration
2.4.5 Install the UNICORN 6.1 Client/Instrument server software
Step 5 - Select installation folder
Select the installation folder for UNICORN:
Step
Action
1
By default, UNICORN will suggest the following installation folder:
C:\Program Files\GE Healthcare\UNICORN\
Either
•
accept this installation folder
or
•
2
click Browse and locate the folder you want to install in.
Note:
UNICORN will calculate the available diskspace for the selected installation folder. The space required for the installation is also shown.
Note:
UNICORN 6.1 cannot be installed on a compressed disk.
Click the Next button to proceed.
UNICORN 6.1 Administration and Technical Manual 28-9817-68 AA
93
2 Installation and configurations
2.4 Network installation and configuration
2.4.5 Install the UNICORN 6.1 Client/Instrument server software
Step 6 - Locate database and
install
Locate and select the UNICORN database.
Note:
This installation step assumes that you have already installed a
database server in the network, according to the instructions in
Section 2.4.1 Install a UNICORN database and license server, on page 57.
Step
Action
1
Type the database server computer name and (where applicable) the folder
where the database is located in the Database location field:
Note:
2
94
UNICORN may have identified the database location and
entered this by default. Sometimes the name of the
database server computer cannot be provided by
DNS/WINS. If that is the case, enter the IP adress of the
database host computer.
Click the Test connection button to verify that the communication between
the client station and the database is established.
UNICORN 6.1 Administration and Technical Manual 28-9817-68 AA
2 Installation and configurations
2.4 Network installation and configuration
2.4.5 Install the UNICORN 6.1 Client/Instrument server software
Step
Action
3
Click the Install button to initiate the installation with the settings selected
so far.
Result: The UNICORN software installation starts.
UNICORN 6.1 Administration and Technical Manual 28-9817-68 AA
95
2 Installation and configurations
2.4 Network installation and configuration
2.4.5 Install the UNICORN 6.1 Client/Instrument server software
Step 7 - Installation completed
The final wizard dialog shown below opens when the installation is complete and the
UNICORN Software Client and Instrument Server software is fully installed on the client
computer.
At this point you may
•
select to define a system (not applicable for a client only installation)
and/or
•
view an installation report.
Note:
The report can only be displayed at this point. If you proceed with
system definition, you will not be able to generate the report later.
If you have selected to proceed with a system definition, the Define System dialog will
automatically open when you click the Close button, which completes the installation
wizard.
Note:
96
If several database instances are used in a network installation, it is
recommended that each system is defined in only one of the database
instances.
UNICORN 6.1 Administration and Technical Manual 28-9817-68 AA
2 Installation and configurations
2.4 Network installation and configuration
2.4.5 Install the UNICORN 6.1 Client/Instrument server software
Installation summary report
When the installation is completed you may open an installation report in text format.
This report contains a list of all installed files, including size, version and date of creation.
This report may be used to verify that the installation is complete and that the correct
files are included.
Note:
During the UNICORN installation some of the default Windows firewall
settings and local security policies are modified to enable
communication between the client computer, the ÄKTA avant instrument
and the database server. The modified settings are listed at the end of
the report.
UNICORN 6.1 Administration and Technical Manual 28-9817-68 AA
97
2 Installation and configurations
2.4 Network installation and configuration
2.4.6 Define a system at installation
2.4.6
Define a system at installation
Instruction
After completing a UNICORN client installation, you can choose to proceed to define a
system if the computer is to be used as an instrument server for a locally connected
ÄKTA avant instrument. This is described in the table below.
Tip:
You can also define a system at a later time. This is described in
Section 3.1.3 Define a new system, on page 144.
Note:
If you also selected to configure an e-license you must first complete
that process before you can define a system.
Note:
To enable connection tests, the ÄKTA avant instrument should be turned
on during the system definition.
Step
Action
1
•
Select the Define system after software installation checkbox in the
last installation wizard dialog
and
•
Click the Close button.
Result: The Define System dialog opens.
(If you also selected to configure an e-license, this process will start first)
Note:
98
Before defining the system, ensure that the cable between
instrument and the correct network interface card is connected properly.
UNICORN 6.1 Administration and Technical Manual 28-9817-68 AA
2 Installation and configurations
2.4 Network installation and configuration
2.4.6 Define a system at installation
Step
Action
2
Enter a name in the System name field.
Note:
3
Enter the serial number for the instrument in the Instrument serial no field.
You will find this number on the labels either on the inside of the swing-out
toolbox or on the back of the instrument.
You can also retrieve the serial number of the instrument
by entering the IP address and make a connection test
as described below. If the connection test is successful,
the serial number will be entered automatically.
Tip:
4
The system name cannot be changed or edited after the
system has been defined.
Select how the instrument shall be identified for connections:
•
Enter the default Fixed IP address for the instrument (10.1.1.1).
Note:
Fixed IP address should always be used for instrument
identification. The default address shown above should be
used whenever the instrument is connected using a dedicated network interface card.
Serial numbers should only be used for instrument identification in very specific situations. Contact GE Healthcare
Service for advice if there are reasons to investigate if IP
address cannot be used or if the instrument will not be
connected using a dedicated network interface card.
5
Click the Connection Test button.
Result: The connection between the instrument server local station and the
instrument is verified.
Tip:
If the connection fails, check that the Default Gateway
address in the ÄKTA avant instrument settings corresponds to the default instrument server IP address. The
Default Gateway address is shown on the ÄKTA avant
instrument display, on the Settings page.
UNICORN 6.1 Administration and Technical Manual 28-9817-68 AA
99
2 Installation and configurations
2.4 Network installation and configuration
2.4.6 Define a system at installation
Step
Action
6
Select the appropriate instrument configuration from the Instrument Configuration droplist menu.
The list includes all instrument configurations currently in the UNICORN
database. To select a new instrument configuration:
7
•
Insert the instrument configuration CD in your CD-ROM drive.
•
Click the Browse button and navigate to the configuration file on the
CD.
•
Select the appropriate configuration file.
Click the Define System button.
Result: The system definition settings are saved and the new system is made
available as an active system.
100
UNICORN 6.1 Administration and Technical Manual 28-9817-68 AA
2 Installation and configurations
2.5 OPC settings for UNICORN flow scheme
2.5
OPC settings for UNICORN flow scheme
Introduction
The flow scheme in UNICORN 6.1 uses an industry standard called OPC, and is based on
DCOM (or Distributed COM) as the underlaying communication layer between client and
instrument server.
This means that DCOM must be configured properly for the ÄKTA avant flow scheme
picture shown on the client computer to be updated with live information from the
instrument server.
There are differences in how to configure the computer depending on if the used
operating system is Windows XP or Windows 7. There are also differences depending
on if the computers are within a Windows workgroup or a domain.
For detailed information about how to enable DCOM, see Component services, on page255.
Prerequisite installation
OPC Core Components are installed as part of the UNICORN 6.1 installation of prerequisite
software applications. The following instructions assume that the installation was
completed as intended.
Windows user names and
passwords
Unless a domain controller is used, all users must have exactly the same user name and
password on all computers running UNICORN. If a domain controller is used, the users
will be created at the domain controller and not on each computer. This eliminates the
need for synchronized user names and passwords.
UNICORN 6.1 Administration and Technical Manual 28-9817-68 AA
101
2 Installation and configurations
2.5 OPC settings for UNICORN flow scheme
Windows XP
Normally, the flow scheme in UNICORN 6.1 should be able to communicate with the
instrument server when running Windows XP in a domain. When Windows XP is used in
a workgroup, there is a need for some additional settings before the flow scheme will
work.
Step
Action
1
If there is a third party firewall 4 enabled on the instrument server:
•
Allow the OPCEnum service access
(The executable file is located in the System32 directory in the Windows
installation directory, typically c:\windows\system32)
•
Allow DCOM (port 135) access.
2
Make sure that the UNICORN clients and the instrument server are using
the same subnet mask for the computer IP adresses.
3
Set the Local Security Policy setting Network access: Sharing and security
module for local accounts to
•
Classic - Local users authenticate as themselves.
(Open Control Panel:Administrative Tools, click Local Security Settings
and locate this setting under Security Settings:Local Policies:Security
Options in the dialog.)
4
In the same dialog:
•
5
Make sure that the setting Network access: Let Everyone permissions
apply to anonymous users is enabled.
Make sure that the user account which is running the UNICORN client has
an equivalent account (using the same name and password) on the instrument server computer. A password is required and cannot be omitted.
DCOM configuration
The following settings should be applied to both the remote client and the instrument
server computers using the Component Services:
4
102
Exceptions for the Windows firewall are added by the UNICORN 6.1 installation program.
UNICORN 6.1 Administration and Technical Manual 28-9817-68 AA
2 Installation and configurations
2.5 OPC settings for UNICORN flow scheme
Step
Action
1
Open the Component Services dialog:
1
Choose Start:Run
2
type dcomcnfg in the Open field
and
3
2
3
4
Open the My Computer Properties dialog:
1
Click the + beside the Component Services object
2
Click the + beside the Computers object
3
Right-click on My Computer and choose Properties from the menu.
In the tab Default Properties:
1
Verify that Enable Distributed COM... is checked
2
Set Default Authentication Level to Connect
3
Set Default Impersonation Level to Identify
In the Default Protocols tab:
•
5
click OK.
Verify that Connection-oriented TCP/IP is on top of the list.
In the COM Security tab:
1
Click the Edit Default button in the Access Permissions field and allow
Everyone to have Local Access and Remote Access permissions.
2
Allow Anonymous logon to have Local Access and Remote Access
permissions.
3
Click the Edit Limits button in the Access Permissions field and allow
Everyone to have Local Access and Remote Access permissions.
4
Allow Anonymous logon to have Local Access and Remote Access
permissions.
5
Click the Edit Default button in the Launch and Activation Permissions
field and allow Everyone to have Local Launch, Remote Launch, Local
Activation and Remote Activation permissions.
6
Click the Edit Limits button in the Launch and Activation Permissions
field and allow Everyone to have Local Launch, Remote Launch, Local
Activation and Remote Activation permissions.
UNICORN 6.1 Administration and Technical Manual 28-9817-68 AA
103
2 Installation and configurations
2.5 OPC settings for UNICORN flow scheme
Step
Action
6
Verify the UNICORN Instrument Server DCOM settings:
1
Click the + beside My Computer.
2
Click the + beside the DCOM Config.
3
Locate UNICORN Instrument Server.exe in the list, right-click and choose
Properties from the menu.
4
Choose the Security tab.
5
Verify that Launch and Activation Permissions and Access Permissions
both are set to Use Default.
6
Click the Apply button (if changes have been made) or the OK button to
close the Properties dialog.
7
Close the Component Services dialog.
8
Restart the computers after the DCOM settings have been applied.
Windows 7
The User Account Control (UAC) feature in Windows 7, combined with restrictions applied
on DCOM when running UNICORN on Windows 7 computers, makes additional changes
to the configuration necessary to allow the flow scheme to communicate with the
instrument server. These settings can be applied to Windows 7 both in workgroups and
domains if needed.
Step
Action
1
If there is a third party firewall 5
enabled on the instrument server:
•
Allow the OPCEnum service access
(The executable file is located in the System32 directory in the Windows
installation directory, typically c:\windows\system32)
•
104
Allow DCOM (port 135) access.
2
Make sure that the UNICORN clients and the instrument server are using
the same subnet mask for the computer IP adresses.
5
Exceptions for the Windows firewall are added by the UNICORN 6.1 installation program.
UNICORN 6.1 Administration and Technical Manual 28-9817-68 AA
2 Installation and configurations
2.5 OPC settings for UNICORN flow scheme
Step
Action
3
Set the Local Policies:Security Options setting Network access: Sharing
and security module for local accounts to
•
Classic - Local users authenticate as themselves.
-
Type "Local Security Policy" in the Windows Start menu search field
and
-
click the Local Security Policy item that is displayed as the search
result.
-
Expand Security Settings:Local Policies:Security Options
-
Locate Network access: Sharing and security module for local accounts in the Policy list and change the setting if necessary
UNICORN 6.1 Administration and Technical Manual 28-9817-68 AA
105
2 Installation and configurations
2.5 OPC settings for UNICORN flow scheme
Step
Action
4
In the same dialog:
•
5
Make sure that the setting Network access: Let Everyone permissions
apply to anonymous users is enabled.
Make sure that the user account which is running the UNICORN client has
an equivalent account (using the same name and password) on the instrument server computer. A password is required and cannot be omitted.
Note:
This is necessary only when the UNICORN is used in a
workgroup, not when it is used in a domain.
Instrument server settings
The following settings should be applied to the instrument server computers using the
Component Services:
Step
Action
1
Open the Component Services dialog:
•
Type "Component Services" in the Windows Start menu search field
and
•
106
click the Component Services item that is displayed as the search result.
UNICORN 6.1 Administration and Technical Manual 28-9817-68 AA
2 Installation and configurations
2.5 OPC settings for UNICORN flow scheme
Step
Action
2
Open the UNICORN Instrument Server.exe Properties dialog:
1
Click the
beside the Component Services object
2
Click the
beside the Computers object
3
Click the
beside My Computer.
4
Click the
beside the DCOM Config.
5
Locate UNICORN Instrument Server.exe in the list, right-click and choose
Properties from the menu.
Note:
3
One or several DCOM configuration warnings may be displayed. Click Yes to acknowledge each one.
Add the built-in group Users (or Authenticated Users if the computer is used
in a domain) and set Launch and Activation Permissions for the group:
1
Choose the Security tab.
2
Choose the Customize option in theLaunch and Activation Permissions
field.
3
Click the Edit button.
4
Click the Add button in the Launch and Activation Permissions dialog.
5
Enter the group Users (or Authenticated Users if the computer is used
in a domain) in the Select Users, Computers, or Groups dialog and click
OK.
UNICORN 6.1 Administration and Technical Manual 28-9817-68 AA
107
2 Installation and configurations
2.5 OPC settings for UNICORN flow scheme
Step
Action
4
Set the permissions for the new group Users (or Authenticated Users) in the
Launch and Activation Permissions dialog. Select the group and click the
checkboxes to Allow
•
Local Launch
•
Remote Launch
•
Local Activation
and
•
Remote Activation
Click OK to apply and close the Launch and Activation Permissions dialog.
5
6
Add the built-in group Users (or Authenticated Users if the computer is used
in a domain) and set Access Permissions for the group:
1
Choose the Customize option in the Access Permissions field.
2
Click the Edit button.
3
Click the Add button in the Launch and Activation Permissions dialog.
4
Enter the group Users (or Authenticated Users if the computer is used
in a domain) in the Select Users, Computers, or Groups dialog and click
OK.
Set the permissions for the new group Users (or Authenticated Users) in the
Access Permission dialog. Select the group and click the checkboxes to Allow
•
Local Access
•
Remote Access
Click OK to apply and close the Access Permission dialog.
Click OK to close the UNICORN Instrument Server Properties dialog.
108
UNICORN 6.1 Administration and Technical Manual 28-9817-68 AA
2 Installation and configurations
2.5 OPC settings for UNICORN flow scheme
Step
Action
7
Adjust the limits globally on the instrument server computer:
1
Right-click on My Computer in the tree view in the left panel of the
Component Services dialog, and choose Properties from the menu.
2
Select the COM Security tab.
3
Click the Edit Limits button in the Access Permissions field and allow
Users (or Authenticated Users) to have Local Access and Remote Access
permissions.
Note:
The group Users (or Authenticated Users if the computer is used in a domain) may have to be added if it
is not already present.
Click OK.
4
Click the Edit Limits button in the Launch and Activation Permissions
field and allow Users (or Authenticated Users) to have Local Launch,
Remote Launch, Local Activation and Remote Activation permissions.
Click OK.
8
Click OK to close the My Computer Properties dialog.
9
Close the Component Services dialog and restart UNICORN.
(Normally you will not need to restart the computer)
UNICORN client computer settings
The following settings should be applied to the remote client computers using the
Component Services:
Step
Action
1
Open the Component Services dialog:
•
Type "Component Services" in the Windows Start menu search field
and
•
2
click the Component Services item that is displayed as the search result.
Open the My Computer Properties dialog:
1
Click the
beside the Component Services object
2
Click the
beside the Computers object
3
Right-click on My Computer and choose Properties from the menu.
UNICORN 6.1 Administration and Technical Manual 28-9817-68 AA
109
2 Installation and configurations
2.5 OPC settings for UNICORN flow scheme
Step
Action
3
In the tab Default Properties:
4
1
Verify that Enable Distributed COM... is checked
2
Set Default Authentication Level to Connect
3
Set Default Impersonation Level to Identify
In the Default Protocols tab:
•
5
Verify that Connection-oriented TCP/IP is on top of the list.
In the COM Security tab:
1
Click the Edit Limits button in the Access Permissions field and allow
Everyone to have Local Access and Remote Access permissions.
(If necessary, add Everyone by clicking the Add... button)
2
Allow Anonymous logon to have Local Access and Remote Access
permissions.
(If necessary, add Anonymous logon by clicking the Add... button)
Click OK.
3
Click the Edit Default button in the Access Permissions field and allow
Everyone to have Local Access and Remote Access permissions.
4
Allow Anonymous logon to have Local Access and Remote Access
permissions.
Click OK.
6
Close the Component Services dialog.
Select Yes to accept changing DCOM machine wide settings.
7
Restart UNICORN on the client computers.
(Normally you will not need to restart the computers)
110
UNICORN 6.1 Administration and Technical Manual 28-9817-68 AA
2 Installation and configurations
2.6 Firewall exceptions
2.6
Firewall exceptions
Introduction
If third party firewalls are used within the UNICORN network, the exceptions described
in this chapter must be set in order for UNICORN to operate properly. However, provided
that the Windows firewall is used, the UNICORN installation will normally configure the
firewall settings appropriately.
Note:
Firewall settings which concern the UNICORN flow scheme function
are listed in Section 2.5 OPC settings for UNICORN flow scheme, on
page 101 as well as here.
General firewall exceptions
Exceptions must be set for the following programs:
•
OPCEnum.exe
(usually found in C:\WINDOWS\system32)
•
UNICORNClient.exe
(usually found in C:\Program Files\GE Healthcare\UNICORN\bin)
Also, exceptions must be made for
•
the TCP and UDP port ranges 40500 to 40510
and
•
TCP port 135 (for DCOM communication as described in Section 2.5 OPC settings for
UNICORN flow scheme, on page 101)
•
UDP port 1434
UNICORN 6.1 Administration and Technical Manual 28-9817-68 AA
111
2 Installation and configurations
2.6 Firewall exceptions
Define firewall exceptions
Follow the instructions below to define firewall excpetions in the Windows Firewall:
Step
Action
1
Open the Windows Security Center.
(Choose menu item Start:All Programs:Accessories:System Tools:Security
Center in Windows XP)
2
•
Click Windows Firewall to open the settings dialog
and
•
112
choose the Exceptions tab.
UNICORN 6.1 Administration and Technical Manual 28-9817-68 AA
2 Installation and configurations
2.6 Firewall exceptions
Step
Action
3
Click the Add Program... button to open the Add a Program dialog:
4
•
Click the Browse button to locate and select the program files
or
•
select the program in the list
and
•
click the OK button to add the exception.
Perform this step for UNICORNClient.exe and OPCEnum.exe.
UNICORN 6.1 Administration and Technical Manual 28-9817-68 AA
113
2 Installation and configurations
2.6 Firewall exceptions
Step
Action
5
Click the Add Port... button in the Windows Firewall dialog, to open the Add
a Port dialog:
6
•
Select to add a TCP port
•
Enter a name in the Name field
•
Enter the Port number
and
•
Click the OK button to add the port exception.
Repeat step 5 and 6 to add exceptions for all TCP ports between 40500 and
40510.
7
•
Click the Add Port... button in the Windows Firewall dialog to open the
Add a Port dialog again.
•
Select to add a UDP port
•
Enter a name in the Name field
•
Enter the Port number
and
•
Click the OK button to add the port exception.
Repeat this step to add exceptions for all UDP ports between 40500 and
40510.
8
114
Repeat step 5 and 6 to add an exception for TCP port 135. Name this port
DCOM.
UNICORN 6.1 Administration and Technical Manual 28-9817-68 AA
2 Installation and configurations
2.6 Firewall exceptions
Step
Action
9
Click the OK button to close the Windows Firewall dialog and apply the
changes.
10
Close the Windows Security Center.
Instrument Server firewall
exceptions
In addition to the general exceptions listed above, computers running as UNICORN
instrument servers should have firewall exceptions for the following programs:
•
UNICORN Instrument Server.exe
(usually found in C:\Program Files\GE Healthcare\UNICORN\bin)
•
SystemInstallation.exe
(usually found in C:\Program Files\GE Healthcare\UNICORN\bin)
Note:
The Windows firewall exception created by the UNICORN 6.1
installation for the program SystemInstallation.exe is called
UNICORN System Creator.
Follow the instructions above to enter these exceptions.
Database Server firewall
exceptions
In addition to the general exceptions listed above, computers running as UNICORN
database servers should have firewall exceptions for the following programs:
•
Sqlservr.exe (usually found in C:\Program Files\Microsoft SQL
Server\MSSQL10.UNICORN\MSSQL\Binn)
•
gehealth.exe (usually found in C:\Program Files\GE
Healthcare\UNICORN\LicenseServer)
Note:
•
The Windows firewall exception created by the UNICORN 6.1
installation for the program gehealth.exe is called GE Healthcare
License Server Manager.
lmgrd.exe (usually found in C:\Program Files\GE
Healthcare\UNICORN\LicenseServer)
Note:
The Windows firewall exception created by the UNICORN 6.1
installation for the program lmgrd.exe is called GE Healthcare
Software Licensing Server.
UNICORN 6.1 Administration and Technical Manual 28-9817-68 AA
115
2 Installation and configurations
2.6 Firewall exceptions
Follow the instructions above to enter these exceptions.
Also, UDP port 1434 should be opened. Name this exception SQL Server Browser.
Note:
116
This port setting is a default for secure networks. If a higher level of
security is needed, other settings must be selected. Contact GE
Healthcare for advice.
UNICORN 6.1 Administration and Technical Manual 28-9817-68 AA
2 Installation and configurations
2.7 Upgrade UNICORN 6.0 to UNICORN 6.1
2.7
Upgrade UNICORN 6.0 to UNICORN 6.1
Introduction
The UNICORN 6.1 installation program will automatically identify if a UNICORN 6.0
installation is present on the computer when you attempt to install UNICORN 6.1. You
will have the options either to remove the old installation, or to upgrade to UNICORN 6.1
immediately.
Normally, it will be most convenient to upgrade and not to remove the older version first.
However, if you wish to modify the software configuration you may need to remove the
older version first and make a clean, new installation of UNICORN 6.1 with new settings.
When upgrading, the settings used for the older installation will be applied automatically.
In a network deployment it is essential that all installations sharing data are upgraded,
including all database servers, instrument servers and network clients.
UNICORN 6.1 Administration and Technical Manual 28-9817-68 AA
117
2 Installation and configurations
2.7 Upgrade UNICORN 6.0 to UNICORN 6.1
Upgrading UNICORN
Follow the instructions in the table below to perform the upgrade:
Step
Action
1
Insert the installation DVD in your DVD drive.
Result: The UNICORN 6.1 Installation wizard opens with a welcome dialog.
Tip:
2
118
If the DVD drive is not set up to allow automatic start,
browse the DVD contents and doubleclick the file UNICORNSetup.exe to initiate the installation.
Click the Upgrade Installation button.
UNICORN 6.1 Administration and Technical Manual 28-9817-68 AA
2 Installation and configurations
2.7 Upgrade UNICORN 6.0 to UNICORN 6.1
Step
Action
3
If the upgraded installation includes a database (i.e. is not only a network
client installation), you will be asked to backup the database.
•
Select Backup database before upgrade (default option)
•
Click the Browse button to locate and select a backup folder
(By default, the backup folder selected at the initial installation will be
suggested)
•
Click the Upgrade button to proceed.
Note:
4
Ensure that the database is not in use during the backup,
otherwise the backup may fail.
The upgrading process is initiated and proceeds automatically.
UNICORN 6.1 Administration and Technical Manual 28-9817-68 AA
119
2 Installation and configurations
2.7 Upgrade UNICORN 6.0 to UNICORN 6.1
120
Step
Action
5
After the upgrade is completed, a final wizard page opens. Click the Close
button to complete the upgrade and close the wizard.
UNICORN 6.1 Administration and Technical Manual 28-9817-68 AA
2 Installation and configurations
2.7 Upgrade UNICORN 6.0 to UNICORN 6.1
License Agreement
The first time you start UNICORN 6.1 after the upgrade, you will be asked to accept the
software license agreement. The agreement must be accepted at least at the first log
on in order for UNICORN 6.1 to start. However, you may select the Do not show this
during startup checkbox so that the license agreement is not displayed automatically
each time UNICORN 6.1 is started.
Database upgrade for UNICORN
6.1
The UNICORN 6.1 upgrade alternative will include all necessary conversions of the
UNICORN 6.0 database to the newer format. Once the upgrade has been performed on
the server computer where the database resides, no other conversion should be
necessary.
Methods and results that have been created and exported using UNICORN 6.0 can be
imported directly into the UNICORN 6.1 database without conversion. However, restoring
a backup of a UNICORN 6.0 database after the UNICORN 6.1 upgrade of the database
server will make it necessary to run the upgrade wizard again to perform the database
upgrade.
UNICORN 6.1 Administration and Technical Manual 28-9817-68 AA
121
2 Installation and configurations
2.7 Upgrade UNICORN 6.0 to UNICORN 6.1
Update instrument
configurations
After the upgrade has been completed, you should also import new, compatible
instrument configurations for your systems. Contact your GE Healthcare representative
for the most recent available instrument configuration CD.
Import new column list
After upgrading to UNICORN 6.1, a new list of predefined column types must also be
imported. This list can be found in the Misc folder of the UNICORN 6.1 installation DVD.
The table below describes how to import a new column list into the database:
Step
Action
1
In the Column Type Parameters tab in the Column Handling dialog, click
.
Result: The Import dialog opens.
2
Locate the zip file with the column list to be imported and click Open.
Result: The Import confirmation dialog opens, explaining what will will happen
when the zip file is imported.
3
Click Yes.
Result: The new list of predefined column types is imported into the database.
Service pack for SQL Server 2008
After the UNICORN 6.1 upgrade of the database you must install Service Pack 1 for
Microsoft SQL Server 2008. The service pack is available for download from the Microsoft
Download Center, at the following address:
•
http://www.microsoft.com/downloads/details.aspx?FamilyID=66ab3dbb-bf3e4f46-9559-ccc6a4f9dc19&displaylang=en
Follow the instructions on the webpage to perform the installation.
122
UNICORN 6.1 Administration and Technical Manual 28-9817-68 AA
2 Installation and configurations
2.8 Printers
2.8
Printers
Printer for PDF
When printing reports, lists and other items in UNICORN you will normally use the printers
that are defined in Windows for the client computer. The default Windows printer will
always be shown as the first choice in the Print dialogs.
Reports created in the Evaluation module can be saved in PDF format by choosing the
Save As PDF menu option from the Preview window. However, to save other reports as
PDF you must have a PDF printer installed on the computer where the report is printed.
For this you need a full installation of Adobe™ Acrobat™ or a similar software.
Set up a system printer
For system generated prints (e.g. printed reports generated by evaluation procedures),
you must define a default printer specifically for the instrument server computer. The
table below describes how to do this.
Step
Action
1
Find the name of a suitable network printer that is accessible for the instrument server client station.
•
The name is available in the General tab of the printer properties. You
can open the properties by right-clicking the printer in the Printers and
Faxes dialog. This dialog opens from the Control Panel in Windows.
Note:
2
The printer must be a proper network printer with access
for the "SYSTEM" user. All printers that are shared over the
network will not necessarily work. Verify the status of the
selected printer with the network administrator before you
proceed with this instruction.
Copy the printer name to the clipboard.
UNICORN 6.1 Administration and Technical Manual 28-9817-68 AA
123
2 Installation and configurations
2.8 Printers
Step
Action
3
The printer setting is edited in
•
\Program Files\GE Healthcare\UNICORN\bin\UNICORN
Instrument Server.exe.config
Note:
The exact search path depends on the location of the
UNICORN installation folder.
Locate the configuration file and open it in a text editor (e.g., Notepad).
4
Locate the entry <add key="SystemPrinterName" value="" />
5
Place the mouse pointer between the last quotes in the line and paste the
printer name there:
•
6
Save the configuration file and close Notepad.
7
Restart the computer.
Note:
124
<add key="SystemPrinterName" value="Printer Name"
/>
Do not make any other changes in this configuration file as this may
cause severe performance problems for UNICORN. Errors in this file
may make it impossible to run UNICORN at all.
UNICORN 6.1 Administration and Technical Manual 28-9817-68 AA
2 Installation and configurations
2.9 Remove a UNICORN 6.1 installation
2.9
Remove a UNICORN 6.1 installation
Introduction
This section describes how to remove a UNICORN installation. UNICORN can be removed
either using the installation DVD or the Windows Add or Remove Programs dialog.
Note:
When removing a UNICORN installation with a local database, you are
recommended to always take a backup of the database and save the
backup safely, somewhere else than in the regular backup folder.
Remove the installation
The table below describes how to remove the UNICORN 6.1 software installation using
the installation wizard:
Step
Action
1
Insert the UNICORN 6.1 installation DVD in the DVD drive.
Result: The UNICORN Installation wizard opens. The only available option is
to remove the installation.
UNICORN 6.1 Administration and Technical Manual 28-9817-68 AA
125
2 Installation and configurations
2.9 Remove a UNICORN 6.1 installation
Step
Action
2
Click the Remove Installation button.
Result: The next wizard dialog shows the installed UNICORN software components that will be removed if you proceed.
126
UNICORN 6.1 Administration and Technical Manual 28-9817-68 AA
2 Installation and configurations
2.9 Remove a UNICORN 6.1 installation
Step
Action
3
Click the Remove button.
Result:
•
If database and license server software is installed, the Select UNICORN
User and Logon Password dialog opens. Proceed with step 4 below
•
If the database and license server software is not installed, the software
components are removed at this point. A progress dialog will open,
showing the components that are removed. Proceed with step 6 below.
UNICORN 6.1 Administration and Technical Manual 28-9817-68 AA
127
2 Installation and configurations
2.9 Remove a UNICORN 6.1 installation
Step
Action
4
•
Select your user name from the UNICORN droplist menu
Note:
•
You must have administrator access rights to remove
a database.
Enter your logon password
and
•
Click the Next button
Result: The Backup Database dialog opens.
128
UNICORN 6.1 Administration and Technical Manual 28-9817-68 AA
2 Installation and configurations
2.9 Remove a UNICORN 6.1 installation
Step
Action
5
•
Select Yes to perform a backup.
•
Either accept the default backup destination or click the Browse button
to choose another destination.
•
Click the Remove button.
Result: A progress dialog opens. The installed UNICORN components shown
in the dialog are removed.
UNICORN 6.1 Administration and Technical Manual 28-9817-68 AA
129
2 Installation and configurations
2.9 Remove a UNICORN 6.1 installation
Step
Action
6
The final wizard dialog opens when the removal is completed. The dialog
shows the components that have been removed and, when applicable,
components that remain installed:
To finalize the removal
•
Click the Close button
and
•
restart the computer.
Note:
If the removal procedure is unable to access the database, you will
recieve an error message but you will still be able to proceed with the
removal. However, you will need to delete remaining database
components manually.
Note:
The removal may fail in Windows 7 due to insufficient privileges. In that
case it may help to turn off UAC temporarily.
Remaining UNICORN objects
after the installation is removed
After removing a UNICORN installation some parts will still remain in the installation
folder, for example logs. Database backups are also saved and not removed. If desired,
these objects must be removed manually.
130
UNICORN 6.1 Administration and Technical Manual 28-9817-68 AA
2 Installation and configurations
2.9 Remove a UNICORN 6.1 installation
Removing additional software
components
Some software components required to operate UNICORN cannot be removed
automatically by the installation wizard. This is because the same components may be
used for other purposes as well as for UNICORN. The components may also have been
updated after the original installation, and UNICORN can no longer determine that they
were part of the installation package. If needed, the components listed below must be
removed manually:
•
Microsoft .Net Framework 3.5 SP1 (including all language versions).
•
Microsoft Visual C++ 2005 Redistributable Package
•
Microsoft SQL Server 2008 Express Edition
•
MadCap Help Viewer
•
OPC core components
•
GE Healthcare Software Licensing Server
(Note that this may be used for other e-licensed software, for example DeCyder™)
The table below describes how to remove the components manually.
Step
Action
1
Open the Windows Control Panel.
2
Double-click the Add or Remove Programs icon.
Result: The Add or Remove Programs dialog opens. All programs installed
on the client computer are listed.
3
Select the software component from the list and click the Change/Remove
button.
4
Follow the instructions in the dialogs that open, until the software is removed.
UNICORN 6.1 Administration and Technical Manual 28-9817-68 AA
131
3 Configure systems and set up users and licenses
3
Configure systems and set up users
and licenses
Introduction
This chapter describes the administration aspects of a UNICORN 6.1 installation, for
example how to define systems and how to assign different access levels to the users.
Finally, some administrative operations for the license server are described.
In this chapter
This chapter contains these sections:
Section
132
See page
3.1 System administration
133
3.2 User setup
159
3.3 License server administration
187
UNICORN 6.1 Administration and Technical Manual 28-9817-68 AA
3 Configure systems and set up users and licenses
3.1 System administration
3.1
System administration
Introduction
This section describes mainly
•
how to edit system properties
•
how to maintain the Instrument Configurations
•
how to define systems (after installation)
•
how to view, edit and export log files of the UNICORN system activity
and
•
how to edit the default system settings for selected instruments.
Contents
This table describes the contents of this section:
Section
See page
3.1.1 System properties
134
3.1.2 Instrument Configurations
141
3.1.3 Define a new system
144
3.1.4 System Settings
147
3.1.5 UNICORN and System logs
152
UNICORN 6.1 Administration and Technical Manual 28-9817-68 AA
133
3 Configure systems and set up users and licenses
3.1 System administration
3.1.1 System properties
3.1.1
System properties
General guidelines
•
System properties are used to define the ÄKTA avant instruments in a UNICORN
installation. The system properties must be defined for each new instrument that is
installed.
•
The system properties will depend on the Instrument Configuration that is used. The
Instrument Configuration defines the instrument components that are available for
selection in UNICORN. (Installation of optional components is described in the "ÄKTA
avant and UNICORN 6.1 User Manual")
•
In a network installation, the system properties must be defined for each local
instrument server computer in the network.
Note:
Access rights to a system are controlled at the user administration level,
see Section 3.2.2 Access items, on page 165.
Important!
The UNICORN computer name
134
•
The computer name in the UNICORN software must be the same as the Windows
computer name. The Windows computer name is therefore automatically filled in
as the UNICORN instrument server name when you define a new system.
•
Only common alphabetical letters (a-z) and numbers should be used for computer
names.
•
If an instrument server computer is changed for some reason, you must edit the
corresponding system properties and change the computer name.
UNICORN 6.1 Administration and Technical Manual 28-9817-68 AA
3 Configure systems and set up users and licenses
3.1 System administration
3.1.1 System properties
Possible actions in the System
Properties dialog
System properties are shown in the System Properties dialog in the Administration
module.
•
Choose Tools:System Properties or click the System Properties icon to open the
dialog. See illustration below:
Note:
To access this dialog, you must belong to an Access Group with
System Properties access, see Section 3.2.2 Access items, on
page 165.
Possible actions
The table below describes the actions you can perform in the System Properties dialog.
Each action is described further on in this section.
If you want to...
then click the button
print the system properties for the selected system
Print
edit system properties
Edit
activate an inactivated system
Activate
deactivate a system
Deactivate
define a new system
Define System
(see Section 3.1.3 Define a new system, on page 144 for
details)
UNICORN 6.1 Administration and Technical Manual 28-9817-68 AA
135
3 Configure systems and set up users and licenses
3.1 System administration
3.1.1 System properties
If you want to...
then click the button
view, import or delete instrument configurations
Instrument Configurations
(see Section3.1.2 Instrument Configurations, on page141
for details)
Edit system properties
The table below describes how to edit the properties of a system:
Step
Action
1
•
Select a system in the System Properties dialog.
Note:
•
Only active systems can be edited.
Click the Edit button.
Result: The Edit dialog is displayed.
136
UNICORN 6.1 Administration and Technical Manual 28-9817-68 AA
3 Configure systems and set up users and licenses
3.1 System administration
3.1.1 System properties
Step
Action
2
Set up instrument configuration and server connection
•
Select the desired instrument configuration from the Instrument configuration droplist menu.
Click the Information button for details about the
configuration. Click the Import button to import a new
configuration. This is described in Section 3.1.2 Instrument Configurations, on page 141.
Tip:
•
Select the desired server computer from the Instrument server droplist
menu.
Choose the connection type:
-
Fixed IP address
or
-
Instrument serial no
(This is explained in Section 3.1.3 Define a new system, on page 144)
3
Set up instrument components
Select a Component type from the list.
Result: All available components of this type are shown in the Component
selection list.
•
Click the checkboxes to select or de-select components.
•
When applicable, choose the appropriate Property for a selected component.
(e.g. position Before sample pump or After injection valve for Air sensor
ext)
4
Click the OK button to apply the changes.
Activate or deactivate systems
Once a system is defined in a UNICORN 6.1 database, it will remain there and cannot be
deleted or removed. However, the system may either be activated or deactivated.
Activated systems
A system must be activated to be available for use. To be activated, the system must
include an assigned instrument server computer as well as the instrument, which is
identified either by a fixed IP adress or a serial number.
UNICORN 6.1 Administration and Technical Manual 28-9817-68 AA
137
3 Configure systems and set up users and licenses
3.1 System administration
3.1.1 System properties
When an instrument server is assigned to a system, it cannot be used to define another
active system. The instrument server can only be connected to one instrument at a time.
When activating a system, only free instrument servers will be available for selection.
Note:
If several database instances are in use a system shall never be defined
in more than one database instance. Doing so would make the system
logs incomplete and might cause inresolvable conflicts.
Note:
It is possible to define a deactivated system for an instrument server
which already has an assigned, active system. This option will be
suggested if you try to define a new system when an active system is
already defined. A new, inactivated system can be used for example
when converting and scaling methods for use with another database
than the one that it originally was created for. This is described in the
UNICORN 6.1 Method Manual.
Deactivated systems
When an instrument is taken out of use, for example for maintenance or repair, the
corresponding system should be deactivated in the System Properties dialog. The system
will remain in the list and it will be connected to the identity of the instrument. It will no
longer have an assigned instrument server and is not available for use.
If an instrument server computer is taken out of use, the system can be edited and the
instrument server computer name changed.
If an instrument is permanently taken out of use, the corresponding system should be
deactivated. The system cannot be used for a replacement instrument.
The table below describes how to deactivate and activate systems:
If you want to...
Then...
deactivate a system
•
select the system in the Systems list
•
click the Deactivate button
and
•
confirm that you want to deactivate the system.
Result: A confirmation message is shown. You can now
turn off the power to the instrument safely.
138
UNICORN 6.1 Administration and Technical Manual 28-9817-68 AA
3 Configure systems and set up users and licenses
3.1 System administration
3.1.1 System properties
If you want to...
Then...
activate a system
•
select the system in the Systems list
and
•
click the Activate button.
Result: The Activate dialog opens.
•
Choose the appropriate Instrument configuration
from the droplist menu
•
choose the appropriate Instrument server from the
droplist menu
and
•
click OK.
Result: A confirmation message is shown and the system
is now activated.
Print a system summary
You can print a total summary of a selected system from the System Properties dialog.
The table below describes how to do this:
Step
Action
1
•
Select the system in the Systems list
and
•
click the Print button.
Result: The Print dialog is displayed.
UNICORN 6.1 Administration and Technical Manual 28-9817-68 AA
139
3 Configure systems and set up users and licenses
3.1 System administration
3.1.1 System properties
Step
Action
2
•
Choose a printer from the Printer dropdown list
and
•
click the OK button.
Result: A summary report similar to the example below is printed on the selected printer:
Tip:
140
Print the report in landscape format. Some parts of the
report may not align properly if the report is printed in
portrait format.
UNICORN 6.1 Administration and Technical Manual 28-9817-68 AA
3 Configure systems and set up users and licenses
3.1 System administration
3.1.2 Instrument Configurations
3.1.2
Instrument Configurations
Introduction
This section explains some of the concepts where the UNICORN 6.1 Instrument
configurations for ÄKTA avant differ from corresponding configurations used in earlier
UNICORN versions.
The section also describes how to import new Instrument Configurations, with updated
or customized instructions and phase libraries. Finally, it describes how to delete
Instrument Configurations that are no longer in use and which are obsolete.
About Instrument Configurations
UNICORN is a common software platform for a number of different instrument types
and configuration. In previous versions, the system-specific parts of the software were
referred to as the Strategy. The Strategy contains the definitions for all the instructions,
settings and options relevant for a specific instrument version.
As a further development, UNICORN 6.0 introduced the Instrument Configuration, which
is used for ÄKTA avant instruments. This configuration includes a strategy but also other
elements which are listed in the table below:
Previous UNICORN instrumentconfigurations
ÄKTA avant instrument configuration
for UNICORN 6.1
Description
Strategy
Strategy
The software instruction set which controls the instrument.
Process Picture
Flow scheme
The graphic elements which are used to
build the flow schemes in the Method Editor and System Control modules.
Phase Library
The phase library contains predefined
phases and methods adapted to the
available options for the specific instrument configuration.
Embedded software
For ÄKTA avant, the hardware control
units (e.g. CU950) are replaced by software.
Note:
Instrument configurations for UNICORN 6.0 are not compatible with
UNICORN 6.1.
UNICORN 6.1 Administration and Technical Manual 28-9817-68 AA
141
3 Configure systems and set up users and licenses
3.1 System administration
3.1.2 Instrument Configurations
Import an Instrument
Configuration
The table below describes how to import an Instrument Configuration
Step
Action
1
Click the Instrument Configurations button in the System Properties dialog.
Result: The Instrument Configurations dialog opens.
2
Click the Import button.
Result: The Select Instrument Configuration Import Files dialog opens.
3
•
Locate and select the import files (the files are stored in a .zip archive)
•
Click the Open button.
Result: The new configuration files are uploaded into the database and the
configuration is available for selection. A progress dialog is displayed during
this process.
142
4
Select the new configuration from the Instrument configuration droplist
menu.
5
Click OK to apply the change and close the dialog.
UNICORN 6.1 Administration and Technical Manual 28-9817-68 AA
3 Configure systems and set up users and licenses
3.1 System administration
3.1.2 Instrument Configurations
You must edit the system properties and select the new instrument
configuration for each system that should use the new configuration.
Note:
Delete an Instrument
Configuration
The table below describes how to delete an obsolete Instrument Configuration.
Note:
You cannot delete an Instrument Configuration that is in use.
Step
Action
1
Click the Instrument Configurations button in the System Properties dialog.
Result: The Instrument Configurations dialog opens.
2
•
Select the obsolete Instrument Configuration
and
•
click the Delete button.
Result: After you confirm the operation, the obsolete configuration is deleted
from the database.
UNICORN 6.1 Administration and Technical Manual 28-9817-68 AA
143
3 Configure systems and set up users and licenses
3.1 System administration
3.1.3 Define a new system
3.1.3
Define a new system
Introduction
If you haven't defined a system at the UNICORN installation, or if you want to add a new
system at a later time, you can do this from the System Properties dialog in the
Administration module.
Note:
You can only define one active system for each instrument server. If
you replace an instrument you must first deactivate that system in
System Properties as described in Activate or deactivate systems, on
page 137.
It is possible to define a deactivated system for an instrument server
which already has an assigned, active system. This option will be
suggested if you try to define a new system when an active system is
already defined. A new, inactivated system can be used for example
when converting and scaling methods for use with another database
than the one that it originally was created for. This is described in the
UNICORN 6.1 Method Manual.
Instruction
The table below describes how to create a new system definition:
Note:
144
Before defining the system, ensure that the cable between instrument
and the correct network interface card is connected properly. To enable
connection tests, the instrument should be turned on during the system
definition.
UNICORN 6.1 Administration and Technical Manual 28-9817-68 AA
3 Configure systems and set up users and licenses
3.1 System administration
3.1.3 Define a new system
Step
Action
1
•
Click the Define System button.
Result: The Define System dialog opens.
2
Enter a name in the System name field.
Note:
The system name cannot be changed or edited after the
system has been defined.
3
Enter the serial number for the instrument in the Instrument serial no field.
You will find this number on the labels either on the inside of the swing-out
toolbox or on the back of the instrument.
4
Select how the instrument shall be identified for connections:
•
Enter the default Fixed IP address for the instrument (10.1.1.1).
Note:
Fixed IP address should always be used for instrument
identification. The default address shown above should be
used whenever the instrument is connected using a dedicated network interface card.
In some very specific situations the serial number can be
used for instrument identification. If that is the case, or if
the instrument will not be connected using a dedicated
network interface card, you should contact GE Healthcare
Services for advice.
5
Click the Connection Test button.
Result: The connection between the instrument server station and the instrument is verified.
UNICORN 6.1 Administration and Technical Manual 28-9817-68 AA
145
3 Configure systems and set up users and licenses
3.1 System administration
3.1.3 Define a new system
Step
Action
6
Select the appropriate instrument configuration from the Instrument Configuration droplist menu.
Tip:
7
The list includes all instrument configurations currently in
the UNICORN database. To select a new instrument configuration:
•
Insert the instrument configuration CD in your CD-ROM
drive.
•
Click the Browse button and navigate to the configuration file on the CD.
•
Select the appropriate configuration file.
Click the Define System button.
Result: The system definition settings are saved and the new system is added
in the System Properties dialog as an active system. The instrument server
computer must be restarted before the system can be used.
Note:
146
If several database instances are used, it is recommended that each
system is defined in only one of the database instances.
UNICORN 6.1 Administration and Technical Manual 28-9817-68 AA
3 Configure systems and set up users and licenses
3.1 System administration
3.1.4 System Settings
3.1.4
System Settings
Introduction
Each installed instrument has a set of default parameter values, called system settings,
that can be changed. The System Settings dialog in System Control is used to view and
edit the system settings for the currently selected instrument before the run is started.
This section describes how to edit the system settings, and gives an overview of available
system settings.
Note:
System settings depend on the instrument configuration. The system
settings shown in this section may differ from the settings that are
applicable for your specific instrument configuration.
Alternative paths for editing
System settings
The parameter values defined in System Settings are used as default values.
Some of the instructions listed in the system settings are also available as method and
manual instructions. When a run is started, the parameter values from the system
settings are valid. If the same instruction is executed from the method or manually during
a run, the parameter value of the new setting will be valid. Thus, it is always the parameter
value of the instruction that is executed the latest that will be applied. When the run is
ended, the parameter values are reset according to the system settings.
The effect of changing the system settings depends on where it is performed, as described
in the table below. This section only describes settings available from System:Settings.
Edit System Settings
Follow the instruction below to edit the System Settings.
Step
Action
1
In the System Control module, select System:Settings.
UNICORN 6.1 Administration and Technical Manual 28-9817-68 AA
147
3 Configure systems and set up users and licenses
3.1 System administration
3.1.4 System Settings
Step
Action
2
Select the instruction to edit from the list. Click the + symbol to show the instructions for each category.
3
Select settings and choose parameter values for the selected instruction.
Minimum and maximum values for each parameter are shown within
brackets by each field. Click OK.
4
To return to the default values defined in the instrument configuration, click
Set Parameters To Strategy Default Values.
Note:
The System Settings are changed to new default values according to
the above instruction. If you instead manually change any of these
values for a run in the Text Instructions pane in Method Editor, or in
the Manual Instructions dialog in System Control, it only affects the
current run. Then, the values set in System:Settings are restored after
the run.
System Settings parameters
The table below describes the parameters for each category and instruction.
Instruction
Parameters
UV
Alarm UV1: High and low alarm limits
Wavelength: Used wavelengths (max 3)
Noise reduction UV: Averaging time
148
UNICORN 6.1 Administration and Technical Manual 28-9817-68 AA
3 Configure systems and set up users and licenses
3.1 System administration
3.1.4 System Settings
Instruction
Parameters
Conductivity
Alarm conductivity: High and low alarm limits
Relative scale cond: Conversion from mS/cm to %
Cond temp compensation: Compensation factor and
Reference temperature
pH
Alarm pH: High and low alarm limits
Pumps and pressures
Alarm system pressure: Alarm limits for system pumps
Alarm sample pressure: Alarm limits for sample pump
Alarm delta column pressure: Alarm limits for delta column pressure
Alarm pre column pressure: Alarm limits for pre column
pressure
Wash settings: Flow rate and volume used in System and
Sample pump wash
Max flow during valve turn: Flow rates during valve turn
of Injection valve and Outlet valve
Pressure control parameters: P and I factor settings,
pressure control target value and minimum flow rate.
UNICORN 6.1 Administration and Technical Manual 28-9817-68 AA
149
3 Configure systems and set up users and licenses
3.1 System administration
3.1.4 System Settings
Instruction
Parameters
Air sensor
Alarm air sensors: Air sensors in Inlet valves (A, B or S,
enabled or disabled)
Alarm air sensor ext: External air sensor enabled or disabled
Air sensor sensitivity: Sensitivities (Normal or High) for
air sensors in Inlet valves (A, B or S)
Air sensor sensitivity ext: Sensitivity for external air sensor
Fraction collector
Fractionation settings: Fractionation mode (Accumulator
or DropSync). Fractionation order (Row-by-row, Columnby-column, Serpentine-row, Serpentine-column). When
DropSync is selected, only Serpentine can be selected.
Last tube filled: Action when last tube is filled (Pause,
fractionation to Outlet valve ports, or to waste)
Peak fractionation parameters: Parameters for Peak
fractionation (Mode: Level and/or Slope, Minimum peak
width, Start and End values)
Fraction collector temperature: Fraction collector temperature (On or Off, Target temperature settings between
6 and 20°C)
Fraction collector lamp: Lamps in Frac chamber on or
off
Cassette configuration: Automatic or Manual configuration. If Automatic is selected, a Quick scan and Full scan
will be performed when the frac drawer is closed to determine which type of cassettes and plates are used. If
Manual is selected, used plates and tubes in each tray
position are entered.
Delay volumes: Delay volumes between UV detector and
Frac/Outlet valve, and volume of the Flow restrictor and
pH flow cell.
150
UNICORN 6.1 Administration and Technical Manual 28-9817-68 AA
3 Configure systems and set up users and licenses
3.1 System administration
3.1.4 System Settings
Instruction
Parameters
Watch parameters: Parameters for Watch for UV, Cond,
pH, Flow and Pressure
Advanced
Constant pressure flow parameters: P (proportional) and
I (integral) factor settings for pressure control.
Method progressing flow: Defines the flow from which
the volume base is calculated. Can be set either to System
flow, Sample flow or Automatic. When Automatic is selected, the position of the injection valve determines if the
system flow or the sample flow is used.
Sample pump setting: If Yes is selected, a sample flow
may be run while the injection valve in in position Manual
load. Default setting is No.
Note:
The tubing must be arranged accordingly if a sample flow is run while the injection valve is in position Manual load.
Instrument display: Locked or Unlocked
Note:
Some of the Advanced instructions will
only be available if the option Advanced
instructions is selected in the Other
group of Component types in the System Properties.
Data collection: Maximum number of data points for each
parameter.
Note:
When the maximum number of data
points has been reached, data reduction
is performed by deleting every second
data point, and data collection is continued.
This is described further in Section A.3
Data sampling, on page 248
UNICORN 6.1 Administration and Technical Manual 28-9817-68 AA
151
3 Configure systems and set up users and licenses
3.1 System administration
3.1.5 UNICORN and System logs
3.1.5
UNICORN and System logs
Purpose
The UNICORN, system, run and result related logs provide the system administrator with
a full record of UNICORN usage and system activity.
The different types of logs
There are three types of logs:
•
UNICORN logs
which record all system independent events,
•
System logs
which record events related to specific systems
and
•
Run and Evaluation logs
which record events related to specific results. The Run log shows events from the
run connected to the result, and the Evaluation log shows the evaluation actions
that have been applied to the result.
The UNICORN and system logs are available in the UNICORN Administration module,
by clicking the UNICORN and System Log icon.
The Run and Evaluation logs are available in the Documentation dialog. This dialog is
opened from the System Control or the Evaluation module by clicking the View
Documentation icon.
152
UNICORN 6.1 Administration and Technical Manual 28-9817-68 AA
3 Configure systems and set up users and licenses
3.1 System administration
3.1.5 UNICORN and System logs
UNICORN and System Log dialog
The UNICORN and System Log dialog is illustrated below.
Tip:
Click the Refresh button to update the displayed events to the latest
records.
View selected log entries
By default, the UNICORN and System Log dialog will show all log entries, for UNICORN,
all systems and all users for a month before today's date. You can select specific log
entries for display, to be able to view only the items of interest. You can also combine
selections to narrow down the displayed items, for example to the log entries for a
specific user at a specific system on a specific date.
The table below describes how select specific log entries for display:
UNICORN 6.1 Administration and Technical Manual 28-9817-68 AA
153
3 Configure systems and set up users and licenses
3.1 System administration
3.1.5 UNICORN and System logs
If you want to view log
entries...
Then...
from a specific time period
•
click the down arrow by the From field and select the
starting date for the time period in the calender
and
for specific systems
•
click the down arrow by the To field and select the
ending date.
•
click the Select logs option button
and
from the UNICORN log
•
select one or several systems from the list below.
•
click the Select logs option button
and
for specific users
•
select UNICORN from the list below.
•
click the Select users option button
and
generated by the system
•
select one or several users from the list below.
•
click the Select users option button
and
•
154
select System from the list below.
UNICORN 6.1 Administration and Technical Manual 28-9817-68 AA
3 Configure systems and set up users and licenses
3.1 System administration
3.1.5 UNICORN and System logs
If you want to view log
entries...
Then...
for specific events
select one or several of the items below:
•
Security
(log on/log off entries, password changes etc.)
•
Data management
(folder, method and result activities, for example create, copy, changes etc.)
•
Manual and method runs
(run start and end, created results etc.)
•
System management and information
(connections, session start end end, create new, activate or deactivate systems etc.)
•
System Alarms, warnings and errors
(alarm and error descriptions, acknowledgement and
action records etc.)
•
System settings and calibration
(changed settings and calibration actions)
Long entries in the logs may sometimes be shown only in part, ending the entry with
four period characters (that is: "...."). Select the entry and double-click the Log Entry
Details button to view the remaining information. This button is enabled when the log
entry is selected. The detail information is shown in a separate dialog:
Tip:
The complete entries will be included in printed logs.
UNICORN 6.1 Administration and Technical Manual 28-9817-68 AA
155
3 Configure systems and set up users and licenses
3.1 System administration
3.1.5 UNICORN and System logs
Find specific log entries
You can search for specific log entry text by clicking the Find button and entering text
to search for in the Find what field of the Find dialog:
Export logs
You can export the selected log entries to an XML file by clicking the Export button. Using
the XML file format, the log entries can be imported into XML-based reporting systems.
Archive logs
To reduce the size of the logs, you can choose to archive older records. The archiving
procedure is part of the Database Management routines, and it is described in
Section 4.2.3 Archive data, on page 202. If needed, you may retrieve the archived logs by
using the Database Management retrieval procedure.
Note:
You can only retrieve logs to the same database that they were originally
archived from. That is, you cannot use the retrieval procedure to import
logs from one database to another.
Note:
It is a recommendation that all archived logs are saved on a different
hard drive than where the active database is stored.
Print the logs
The table below describes how to print selected log entries:
Step
Action
1
Select the log entries you want to include in the print.
2
Click the Print button.
Result: The Print dialog opens
156
UNICORN 6.1 Administration and Technical Manual 28-9817-68 AA
3 Configure systems and set up users and licenses
3.1 System administration
3.1.5 UNICORN and System logs
Step
Action
3
•
Select a printer from the dropdown list
•
If desired, click the Properties button and select printer settings
and
•
Click the OK button.
Result: The selected log entries are printed.
Run and Evaluation logs
Log information for specific runs and results can be found in the Documentation dialog,
available in the Evaluation and System Control modules.
The table below describes how to open the Documentation dialog:
Step
Action
1
Open the Evaluation module or the System Control module.
Note:
In Evaluation you must open a result to access the documentation which is included in that specific result. In System Control you can view the documentation for a run
while it is in progress.
UNICORN 6.1 Administration and Technical Manual 28-9817-68 AA
157
3 Configure systems and set up users and licenses
3.1 System administration
3.1.5 UNICORN and System logs
Step
Action
2
Click the View Documentation icon.
Result: The Documentation dialog is opened.
3
Select the Run Log or the Evaluation Log tab to view log entries from the
run or from the evaluation of the result:
Tip:
Select entry and feedback types to show only the entries
of interest.
You can also select to adjust the retention scale to a specific injection number.
158
UNICORN 6.1 Administration and Technical Manual 28-9817-68 AA
3 Configure systems and set up users and licenses
3.2 User setup
3.2
User setup
Introduction
Access to the UNICORN software is controlled by username and password authorization.
This is done from within UNICORN, where each authorized user is assigned to an access
group that determines which functions the user can perform.
Contents
The table below describes the contents of this section:
Section
See page
3.2.1 User access groups
160
3.2.2 Access items
165
3.2.3 Create a new user
167
3.2.4 User options
176
3.2.5 User passwords and account access limitations
180
3.2.6 Delete users and folders
185
UNICORN 6.1 Administration and Technical Manual 28-9817-68 AA
159
3 Configure systems and set up users and licenses
3.2 User setup
3.2.1 User access groups
3.2.1
User access groups
Introduction
This section describes
•
the purpose of access groups and access items
•
how to view and edit the access groups
Access groups types
A UNICORN installation has different access groups with different rights to perform
actions in the UNICORN system. Some access groups are predefined, for example the
Administrators group. New access groups may be created as needed, and the access
rights for each group may be edited to suit the duties for each user group.
The access items
The access items are used to assign rights to the access groups. How to assign rights
to the access groups is described in Edit or create new access groups below.
Access items are described further in Section 3.2.2 Access items, on page 165.
The User Setup dialog
From the User Setup dialog you can
•
see which access group each user belongs to
•
view the access level of each access group
•
edit or create new user access groups.
Note:
Other actions which can be performed from the User Setup dialog are
described in subsequent sections of this chapter.
Open the dialog
Choose Tools:User Setup or click the User Setup icon in the Administration module
when you want to display the User Setup dialog. See illustration below:
160
UNICORN 6.1 Administration and Technical Manual 28-9817-68 AA
3 Configure systems and set up users and licenses
3.2 User setup
3.2.1 User access groups
View the access groups
To view the access groups, you must have Administration module and User Setup
access. See Section 3.2.2 Access items, on page 165 for an explanation of the access items.
The table below describes how to view the access groups and their properties:
Step
Action
1
Choose Tools:User Setup or click the User Setup icon in the Administration
module.
Result: The User Setup dialog is displayed.
UNICORN 6.1 Administration and Technical Manual 28-9817-68 AA
161
3 Configure systems and set up users and licenses
3.2 User setup
3.2.1 User access groups
Step
Action
2
Click the Access Groups button.
Result: The Access Groups dialog is displayed:
3
Select a group in the left field to view its access items in the right field (Access
to).
Note:
The access items that are valid for the group have selected
checkboxes.
Edit or create new access groups
With UNICORN, you can create any number of access groups, all assigned to different
levels of access to UNICORN. For practical reasons, it is recommended to only use a
limited number of groups that correspond to the different job descriptions in your
organization.
The table below describes how to create new or edit existing access groups:
162
UNICORN 6.1 Administration and Technical Manual 28-9817-68 AA
3 Configure systems and set up users and licenses
3.2 User setup
3.2.1 User access groups
Step
Action
1
Choose Tools:User Setup or click the User Setup icon in the Administration
module.
Result: The User Setup dialog is displayed.
2
Click the Access Groups button.
Result: The Access Groups dialog is displayed.
3
In the Access Groups dialog you can perform all of the actions described
below:
Create a new group
•
Click the New button.
Result: A group is added to the list, with the name "New user group".
•
Enter a new name and choose access items as described below.
Change the name of a group
•
Select the group in the Access groups field of the dialog.
•
Click the Rename button.
•
Type the new name over the original name.
You cannot change the name of a predefined access
group.
Note:
Choose access items for a group
•
Select the group in the Access groups field of the dialog.
•
Select the checkboxes in the Access to field, to choose access items.
If you edit the definition of an access group to which
users are already assigned, the changes will apply to
all users in the group.
Note:
Delete a group
•
Select the group in the Access groups field of the dialog.
•
Click the Delete button.
•
Confirm that you want to delete the group in the dialog that opens.
Note:
4
You cannot delete the Administrator group.
Click the OK button to apply the changes.
Note:
Any changes concerning users that are logged on when
the change is made will be applied the next time they log
on to UNICORN.
UNICORN 6.1 Administration and Technical Manual 28-9817-68 AA
163
3 Configure systems and set up users and licenses
3.2 User setup
3.2.1 User access groups
Special conditions
Certain access items cannot be completely removed:
•
User Setup
At least one access group must have this access item. UNICORN will not allow you
to remove this access item from all access groups.
164
UNICORN 6.1 Administration and Technical Manual 28-9817-68 AA
3 Configure systems and set up users and licenses
3.2 User setup
3.2.2 Access items
3.2.2
Access items
What is an access item?
An access item specifies an action that the user is allowed to perform in the UNICORN
system. The access items are assigned to the user access groups in the Access Groups
dialog, see Section 3.2.1 User access groups, on page 160.
To view the access items in the Administration module,
•
choose Tools:User Setup
or
•
click the User Setup icon
and
•
click the Access Groups button in the User Setup dialog.
Result: The access items are listed in the Access to field.
Description of the access items
The table below describes each access item:
Access area
Access items in this area allow the user to
Administration
•
archive and to retrieve archive data
•
backup a database and to restore backups
•
release data objects that have been locked by a user
•
edit system properties
•
access UNICORN and system logs
•
perform user setup
•
create and edit method queues
Method Editor
UNICORN 6.1 Administration and Technical Manual 28-9817-68 AA
165
3 Configure systems and set up users and licenses
3.2 User setup
3.2.2 Access items
Access area
Access items in this area allow the user to
System Control
•
calibrate monitor settings
•
perform maintenance operations
•
run the system manually
•
run method queues
•
edit system settings
•
perform actions during method runs:
166
end methods
-
save partial runs 6
-
pause methods
-
run methods
Evaluation
•
create and rename curves
Other (general)
•
delete, copy and move files and folders
Note:
6
-
-
only in the user's own Home folder
-
in shared folders also
•
sign methods and results electronically
•
create and edit objects that are available to all users
(global objects, for example phases, evaluation procedures etc.)
•
import and export items, for example methods or results
A user group may have access to all items in any area, or only selected
items. User groups with specific duties may only have access to a certain
area and will then be unable to open or access the other UNICORN
software modules.
By default, partial runs will be saved. This access item allows the user to choose not to save a
partial run if desired.
UNICORN 6.1 Administration and Technical Manual 28-9817-68 AA
3 Configure systems and set up users and licenses
3.2 User setup
3.2.3 Create a new user
3.2.3
Create a new user
Introduction
This section describes how to create a new user and assign user properties, folder and
system access.
The Default user
A Default user is created when the system is installed. The Default user is assigned to
the Administrators access group with unrestricted access to all UNICORN functions.
You log on with this profile when you access a newly installed system for the first time.
Note:
The Default user should be deleted when regular user profiles have
been created.
The table below describes how to log on as the default user:
Step
Action
1
Start UNICORN.
2
•
Select user Default from the User name droplist menu.
•
Type the password default.
•
Click OK.
Note:
The Default user is the only user where the user name and
the password can be identical.
UNICORN 6.1 Administration and Technical Manual 28-9817-68 AA
167
3 Configure systems and set up users and licenses
3.2 User setup
3.2.3 Create a new user
The User Setup dialog
All user administration is performed in the User Setup dialog in the Administration
module. It is accessible only to authorized users (and the default user).
•
168
Choose Tools:User Setup or click the User Setup icon in the Administration module
when you want to display the User Setup dialog. See illustration below:
UNICORN 6.1 Administration and Technical Manual 28-9817-68 AA
3 Configure systems and set up users and licenses
3.2 User setup
3.2.3 Create a new user
Instruction
The table below describes how to create a new user:
Step
Action
1
Click the New button in the User Setup dialog.
Result: A New User is added to the Users list:
2
Enter information about the new user in the User Properties tab:
•
Type a user name in the User name field.
•
Type the full name of the user in the Full name field.
•
Type the job title of the user in the Job title field.
UNICORN 6.1 Administration and Technical Manual 28-9817-68 AA
169
3 Configure systems and set up users and licenses
3.2 User setup
3.2.3 Create a new user
Step
Action
3
Create a Home folder
•
Select the Folder Access tab.
•
Click the New Top Folder button.
Result: A folder called New Folder is added to the list.
•
Type a new name over the New Folder text, for example the name of
the new user.
•
Select the checkbox for the folder so it will be accessible for selection.
Select a Home folder
4
•
Select the User Properties tab again.
•
Click the droplist arrow in the Home folder field to display a list of the
accessible folders:
•
Select the home folder for the new user.
Click the droplist arrow in the Access group field and choose an access
group from the menu.
See also section Section 3.2.1 User access groups, on page 160.
5
•
Enter a New log on password.
•
Confirm the password by typing it again in the field below.
Note:
This password will be used only the first time the user logs
on. The user will be asked to enter a new password at that
time.
See section Change user passwords and user options for information about
additional password and account lock settings.
6
If the user will be authorized to sign electronically:
•
Enter a New signature password.
•
Confirm the password by typing it again in the field below.
Note:
170
The user will be asked to enter a new signature password
at the first log on.
UNICORN 6.1 Administration and Technical Manual 28-9817-68 AA
3 Configure systems and set up users and licenses
3.2 User setup
3.2.3 Create a new user
Step
Action
7
If desired, select the option to have UNICORN log off after a specified time
of inactivity.
Note:
8
UNICORN will log off after the selected time if no keyboard
entries or scanner inputs are made, or if the mouse has
not been moved. This will not disturb a method run in
progress.
Proceed to set folder and system access rights. This is described in Folder
and System Access below.
Home folders
General
Each user should be assigned to a home folder. This folder is a virtual storage for methods
and results created by the user and not accessible for example by browsing the Windows
folder structure. The home folder is valid only within the framework of the UNICORN
database.
The home folder is always a Top Folder. However, you may have any number of top
folders that are for common use and not assigned as home folders for specific users.
Top folders can only be created or deleted in the User Setup dialog.
Subfolders to the home folder
Each user may create any number of subfolders within the home folder (and any other
top folder to which the user has access) to arrange methods and results in a preferred,
logical folder structure. This can be done by the user in Navigator panes in all UNICORN
modules except the Administration module.
UNICORN 6.1 Administration and Technical Manual 28-9817-68 AA
171
3 Configure systems and set up users and licenses
3.2 User setup
3.2.3 Create a new user
Folder and System Access
The table below describes how to assign user access to additional folders and to systems:
Step
Action
1
•
Select the Folder Access tab in the User Setup dialog.
Result: The Folders list is displayed, showing all available home folders.
•
Click and select the checkbox for each folder that the user shall have
access to.
Note:
2
•
The user must have access to a folder to be able to copy,
move, save or delete files in the folder. The user must also
be assigned to an access group with read and write rights
to shared folders to be able to perform these operations.
Select the System Access tab.
Result: The Systems and instructions list is displayed, showing all
available systems and instructions.
•
Select the checkbox for each system that the user shall have full access
to, and proceed to apply the settings as described in Save the new user
entry below.
or
•
172
Click and select the checkboxes for systems that the user shall have
limited access to and proceed with step 3.
UNICORN 6.1 Administration and Technical Manual 28-9817-68 AA
3 Configure systems and set up users and licenses
3.2 User setup
3.2.3 Create a new user
Step
Action
3
Click the + symbol beside the checkbox for the system that you are assigning
to the user.
Result: The access options are expanded:
•
Select if the user should have View access to the system. (see Network
terms and general concepts, on page 10)
and/or
•
Select if the user should have Control access to the system.
If the user should have limited control rights, proceed with step 4 for each
system. If not, proceed to apply the settings as described in Save the new
user entry below.
4
Select the control options that the user will have to access each system:
•
To control the system Locally
(Control of the system from the local instrument server station)
•
To control the system Remotely
(Control of the system from any other client station in the network)
UNICORN 6.1 Administration and Technical Manual 28-9817-68 AA
173
3 Configure systems and set up users and licenses
3.2 User setup
3.2.3 Create a new user
Step
Action
5
Select actions that the user will be allowed to perform for each system:
•
Manual instructions
Select the manual instructions the user may perform, concerning
-
Pumps and pressure
-
Flow path
-
Monitors
-
Fraction collection
-
Alarms
-
Watch parameters
and
-
Other items.
Tip:
•
Each manual instruction set contains a number
of individual instructions that can be selected individually.
Calibration
Select the calibrations the user may perform, concerning
-
Conductivity monitor
Note:
Factory and/or user calibration can be allowed for
the conductivity monitor.
-
pH
-
Post column pressure
-
Pre column pressure
-
Sample pressure
and
6
174
System pressure.
Proceed to apply the settings as described in Save the new user entry below.
UNICORN 6.1 Administration and Technical Manual 28-9817-68 AA
3 Configure systems and set up users and licenses
3.2 User setup
3.2.3 Create a new user
Save the new user entry
After all user settings are completed, you can either
•
Click the Apply button to save the entered settings and continue working in the User
Setup dialog
or
•
Click the OK button to save the entered settings and close the dialog.
Print user settings
Click the Print button in the User Setup dialog to print a summary of the settings for a
selected user or for all users. The items included in the summary can be selected in the
Print dialog:
UNICORN 6.1 Administration and Technical Manual 28-9817-68 AA
175
3 Configure systems and set up users and licenses
3.2 User setup
3.2.4 User options
3.2.4
User options
Introduction
In the Options dialog, each user may select preferred individual View, Sound and
Evaluation settings. The Options dialog is available under the Tools menu in all UNICORN
modules. The changes will be applied at first when the user logs on the next time.
176
UNICORN 6.1 Administration and Technical Manual 28-9817-68 AA
3 Configure systems and set up users and licenses
3.2 User setup
3.2.4 User options
View options
The table below describes the View tab settings:
Command
Description
Prompt for
columns before
manual runs
If this option is selected, a prompt dialog will open before you
start a manual run, requesting that you select the column type
that will be used for the run. The maximum values for Pre column
pressure and Delta column pressure will then be set automatically.
Note:
Default overwrite
of baselines and
peak tables
Show negative
retentions
If this option is selected, new baselines and peak tables will
overwrite and replace older baselines and peak tables.
Note:
This only applies as default and the user may
override this selection as needed.
If this option is selected, negative retentions will be shown in
chromatograms in the Evaluation module. This means that
curve data before the injection point will be displayed, that is
before time or volume is zero. Deselect this option to hide curve
data before the injection point.
Note:
Fraction mark
height
If this option is selected, a manual run cannot
be started unless the pressure limits have been
set first.
The data is still recorded although it is not
shown when the result is displayed. The selection only applies as default and the user may
change this selection as needed.
The value in this field will determine the height of the fraction
marks in the chromatograms in the Evaluation module.
The height can be expressed as
•
Character heights
•
Percent of window height
(This options means that the mark height will be re-scaled
when the window is resized)
•
Pixels
Note:
UNICORN 6.1 Administration and Technical Manual 28-9817-68 AA
The value in this field will not be re-calculated
when you change how it is expressed. For example, if you change from Character heights
to Percent of window height, the value must
be increased substantially to avoid that the
marks will be extremely small.
177
3 Configure systems and set up users and licenses
3.2 User setup
3.2.4 User options
Command
Description
Injection mark
height
The value in this field will determine the height of the injection
marks in the chromatograms in the Evaluation module. It is
entered in the same manner as the Fraction mark height.
Logbook mark
height
The value in this field will determine the height of the logbook
marks in the chromatograms in the Evaluation module. It is
entered in the same manner as the Fraction mark height.
Pressure Unit
The selection will determine the pressure unit that will be used
in the results. The value can either be the default value determined by UNICORN or set to always be
•
MPa
•
bar
•
psi
OK
Click the OK button to apply the changes and close the dialog.
Cancel
Click the Cancel button to close the dialog without any changes.
Sounds options
The table below describes the Sounds tab settings:
Command
Description
System
Select the system you want to change sounds for from the droplist
menu.
Play sound for
Choose a sound from the corresponding droplist menu, to be played
for
•
Alarms
•
Warnings
•
Errors
•
End of method
Note:
178
The default settings for each instrument is Classic, which is the sound scheme used for older
versions of UNICORN.
OK
Click the OK button to apply the changes and close the dialog.
Cancel
Click the Cancel button to close the dialog without any changes.
UNICORN 6.1 Administration and Technical Manual 28-9817-68 AA
3 Configure systems and set up users and licenses
3.2 User setup
3.2.4 User options
Note:
The workstation computer must be equipped with a soundcard and
suitable speakers to play the system sounds.
Evaluation options
The table below describes the Evaluation tab settings:
Command
Description
Asymmetry Ratio
at
Set the peak height value (in percent of the total peak height)
where the Asymmetry Ratio will be calculated.
Resolution Algorithm
There are three different algorithms available to determine
the peak resolution. The algorithms are selected from the
droplist menu. By default, algorithm three is selected.
Note:
Refer to the UNICORN Evaluation Manual for
information about the Resolution Algorithms.
OK
Click the OK button to apply the changes and close the dialog.
Cancel
Click the Cancel button to close the dialog without any
changes.
UNICORN 6.1 Administration and Technical Manual 28-9817-68 AA
179
3 Configure systems and set up users and licenses
3.2 User setup
3.2.5 User passwords and account access limitations
3.2.5
User passwords and account access limitations
Introduction
User password authentication for log on and electronic signatures is an important feature
to ensure the security and integrity of the system. The general password policy is
determined at the installation of the UNICORN server (or at a Full Installation of a
stand-alone workstation).
This section describes
•
how to change the password for a selected user
•
how users change their own passwords
•
how to lock accounts and limit user log on access to UNICORN
•
how to set up administrator e-mail notifications for system messages.
The section also includes general rules and recommendations for UNICORN passwords.
Tip:
Password settings can be changed after the installation by using a
configuration tool. This tool is installed on the server computer and
can be accessed from the Windows Start menu under All Programs:GE
Healthcare:UNICORN:Configuration Tools:Change Installation
Settings.
Rules and recommendations for
UNICORN passwords
The list below summarizes rules and recommendations for UNICORN passwords:
180
•
The system can be set up to operate without required passwords.
•
The minimum number of password characters is set up at the installation.
•
Passwords can be any combination of letters and numbers.
•
Passwords are case sensitive.
•
Avoid using obvious passwords.
•
You cannot use the user name as password (except for the Default user).
•
Expiration times for passwords are set in the User Properties. However, passwords
should be changed regularly by the users even if the user profile is set up without a
password expiration time.
UNICORN 6.1 Administration and Technical Manual 28-9817-68 AA
3 Configure systems and set up users and licenses
3.2 User setup
3.2.5 User passwords and account access limitations
Change passwords for a selected
user
A user who has User Setup access (usually a system administrator) can change the
passwords for any user.
The table below describes how to change the passwords for a selected user:
Step
Action
1
•
Choose Tools:User Setup or click the User Setup icon in the Administration module.
Result: The User Setup dialog is displayed.
2
•
Select the user in the list.
Result: The User Properties tab is displayed for the selected user.
3
4
•
Type the new log on password in the New log on password and Confirm
log on password fields.
•
If desired, repeat this for the signature password.
•
Click the OK button.
Result: At the next log on, the user must enter this new password.
Note:
If the general password settings are changed, for example if the required
minimum password length is increased, it is important to set up a
mandatory password change at the next log on for all users.
UNICORN 6.1 Administration and Technical Manual 28-9817-68 AA
181
3 Configure systems and set up users and licenses
3.2 User setup
3.2.5 User passwords and account access limitations
How users change their own
passwords
When passwords have expired, the user will be required to enter new passwords at log
on. The user may also choose to change passwords at other times. The table below
describes how users may do this. The procedure to change expired passwords at log on
is similar.
Step
Action
1
Choose Tools:Change Passwords in any UNICORN module.
Result: The Change Passwords dialog opens.
2
•
Type the old log on password in the Current field under the Log on
password heading.
Note:
3
•
Type a new password in the New field.
•
Repeat the new password exactly in the Confirm new field.
To define a electronic signature password, repeat step 2 under the Signature
password heading.
Note:
4
182
The passwords will only be shown as asterisks.
The signature password cannot be the same as the log on
password.
Click OK.
UNICORN 6.1 Administration and Technical Manual 28-9817-68 AA
3 Configure systems and set up users and licenses
3.2 User setup
3.2.5 User passwords and account access limitations
Locking user accounts
A user account may be locked for log on either by UNICORN based on a set expiration
time, or manually by the system administrator. The user with a locked account will not
have access to UNICORN until another user unlocks the account. This user must be
assigned to an Access Group with User Setup access.
Note:
It is recommended that User Setup access is limited to administrators
and similar user groups only, to avoid unauthorized user property
changes, including the unlocking of locked accounts.
The table below describes how to lock a user account from access.
If...
Then...
you want to lock the user account manually
select the User account locked checkbox in the User
Properties for the user in question.
Result: At the next log on the user will be unable to access
UNICORN.
you want to lock the account after a set time
•
select the checkbox for Lock account on
•
click the down arrow by the date field and choose a
date in the pop-up calender.
Result: The account will automatically be locked at the
chosen date.
Tip:
You may select an option to have UNICORN generate an e-mail to a
specified administrator mail adress whenever a user account is locked.
This option is available only if a receiving mail adress has been set up.
The e-mail notification settings are described below.
E-mail notification setup
The table below describes how to set up an administrator e-mail account for automated
system messages when a user account is locked.
Step
Action
1
Choose Tools:User Setup or click the User Setup icon in the Administration
module.
Result: The User Setup dialog opens.
UNICORN 6.1 Administration and Technical Manual 28-9817-68 AA
183
3 Configure systems and set up users and licenses
3.2 User setup
3.2.5 User passwords and account access limitations
Step
Action
2
Click the E-mail Notification Settings button.
Result: The E-mail Notification Settings dialog opens.
3
Enter the e-mail adress for the mailbox that is monitored by the responsible
system administrator in the Send e-mails to field.
4
Enter the account settings for the e-mail account that will be used to send
the generated system messages.
Tip:
5
Since the same account will be used for all system messages regardless of the individual user, the most convenient solution may be to set up a common, specific account for this purpose.
Click the Test Notification E-mail button to test the settings.
Result: A test message will be generated and sent. An error message will be
displayed if the settings are incorrect.
Tip:
184
The checkbox for the option Notify by e-mail when a user account
is locked will now be available for selection. Remember to select the
checkbox to activate the notification.
UNICORN 6.1 Administration and Technical Manual 28-9817-68 AA
3 Configure systems and set up users and licenses
3.2 User setup
3.2.6 Delete users and folders
3.2.6
Delete users and folders
Introduction
This section describes
•
how to delete user accounts
•
how to delete special folders:
-
home folders with assigned users
-
top folders with shared access.
Delete a user
The table below describes how to delete a user:
Step
Action
1
Choose Tools:User Setup or click the User Setup icon in the Administration
module.
Result: The User Setup dialog is displayed.
2
•
Select the user from the Users list and click the Delete button.
Result: A confirmation dialog is displayed, asking you to verify that the
user has no active runs, or no runs placed in a system queue, before the
user account is deleted.
•
Click OK in the confirmation dialog, to confirm that the user can be
deleted.
Note:
3
Note:
You can delete all users except the last user with User
Setup access. This ensures that at least one user has the
right to perform administration functions.
Click the OK button to close the User Setup dialog.
When you delete a user, the user's home folder or method and result
files are not deleted.
UNICORN 6.1 Administration and Technical Manual 28-9817-68 AA
185
3 Configure systems and set up users and licenses
3.2 User setup
3.2.6 Delete users and folders
Delete special folders
Any user with User Setup access can delete top folders. However, a home folder cannot
be deleted if it is assigned to an active user. The conditions for deleting top folders are
described below:
A common top folder which is not an assigned home folder.
To delete a top folder that is not a home folder
•
ensure that the folder does not contain any object (deleting a folder with content is
not allowed)
•
select the folder in the Folder Access tab of the User Setup dialog
and
•
click the Delete button.
Note:
The Delete button will not be available if the folder is assigned as home
folder for an active user. You cannot delete an assigned home folder
by mistake.
A home folder to which a user is assigned
To delete a home folder to which a user is assigned
•
re-assign another home folder to the user (see Section 3.2.3 Create a new user, on
page 167)
or
•
delete the user first if this is the reason why the home folder should be deleted. (See
instructions above)
You can then proceed to delete this folder as any other top folder.
186
UNICORN 6.1 Administration and Technical Manual 28-9817-68 AA
3 Configure systems and set up users and licenses
3.3 License server administration
3.3
License server administration
Introduction
Access to UNICORN 6.1 is regulated by the number of valid e-licenses. The e-licenses
are floating, which means that the number of computer stations with UNICORN 6.1
installed may exceed the number of e-licenses, but the number of logged on stations
cannot.
The e-licenses are handled by the Software Licensing Server, which is installed on the
database server (i.e. the same computer as the database). The licensing server is included
in a stand-alone workstation installation. Normally, the license authentication will operate
without any user interaction. However, in some cases it may be necessary to use the
License Server Admin tool as described below.
Note:
The Software Licensing Server is common for several e-licensed products
from GE Healthcare. If other e-licensed products (for example DeCyder)
are already installed, the UNICORN 6.1 licenses will be added to the
previous installation
Verify the number of active and
available e-licenses
The table below describes how to use the License Server Admin tool to identify the
number of available licenses and determine how many that are in use.
Step
Action
1
Open the License Server Admin tool from the Windows Start:Programs
menu.
Normally, it is located under GE Healthcare:GE Healthcare Software Licensing
Server.
2
Click the Server Status tab.
UNICORN 6.1 Administration and Technical Manual 28-9817-68 AA
187
3 Configure systems and set up users and licenses
3.3 License server administration
Step
Action
3
Click the Perform Status Enquiry button.
Result: A status report similar to the illustration below is displayed:
4
Note:
188
Read the total number of issued licenses and the number currently in use
(in this case 20 licenses issued and 3 in use).
If several license servers are in use, you can enter the server name to
view only the licenses for a specific server. If you want to view the
information for a specific application only, you can enter that in the
Individual Feature field.
UNICORN 6.1 Administration and Technical Manual 28-9817-68 AA
3 Configure systems and set up users and licenses
3.3 License server administration
Add more e-licenses to the
license server
The table below describes how to add more licenses to the license server.
Step
Action
1
Choose the Configure e-License menu option from the Windows Start:Programs menu, under GE Healthcare:UNICORN:Configuration Tools.
Result: The e-License Configuration dialog opens:
2
Proceed to retrieve the added e-licenses as described in Section 2.3.2 Configure an e-license, on page 45.
Note:
3
It is important that the Ethernet address of the license
server computer is used, when the additional e-licenses
are retrieved.
Once the retrieval procedure is finished, open the License Server Admin
tool.
UNICORN 6.1 Administration and Technical Manual 28-9817-68 AA
189
3 Configure systems and set up users and licenses
3.3 License server administration
Step
Action
4
Click the Start/Stop/Reread tab.
5
Click the Stop Server button.
6
Click the Start Server button.
Result: The added licenses are registered and available for use.
Tip:
If it is impossible to obtain a license even though there should be
licenses available, it may help if the license server is re-started as
described above. If licenses are locked in error, restarting will enable
the server to register the licenses as available again.
Troubleshoot licensing problems
The table below describes how to use the Admin tool for a diagnosis when a license
cannot be obtained.
Step
Action
1
Click the Server Diags tab.
2
Enter the feature name, i.e. UNICORN_Main, in the Feature Name field.
3
Click the Perform Diagnostics button.
Result: A list of the license files is displayed, showing the status and if the license(s) can be checked out.
190
UNICORN 6.1 Administration and Technical Manual 28-9817-68 AA
3 Configure systems and set up users and licenses
3.3 License server administration
View license server debug logs
In case of problems when obtaining licenses, a debug log can be viewed by clicking the
View Log button in the Config Services tab. This information can provide useful input
to the GE Healthcare support staff.
UNICORN 6.1 Administration and Technical Manual 28-9817-68 AA
191
4 Database administration
4
Database administration
Introduction
This chapter describes the standard database solution used for data storage and the
maintenance procedures required to operate the database.
The chapter also contains a general instruction on how to upgrade the database server
software to editions with greater data handling capacity.
Contents
This chapter contains these sections.
Section
192
See page
4.1 Database overview
193
4.2 Database maintenance
194
4.3 SQL Server edition upgrade
213
UNICORN 6.1 Administration and Technical Manual 28-9817-68 AA
4 Database administration
4.1 Database overview
4.1
Database overview
About the UNICORN 6.1 database
Data storage in UNICORN 6.1 is handled by a database. The database is as such a
relational database and SQL (Structured Query Language) is the querying language used
for the retrieval, insertion, updating, deleting and general managing of the data.
The standard UNICORN 6.1 database server installation, both for a dedicated server in
a network environment and a stand-alone workstation, includes the distributable version
of Microsoft SQL Server Express. It is described in SQL Server Express facts below.
The installation and basic set up of the database is an integrated part of the installation
sequence for the options including the database server functions. It will not require any
user settings other than the initial selection of the option and selection of destination
folders for backup and archives.
Normally, the database maintenance functions offered by UNICORN will be sufficient
for the UNICORN administrator. Using management tools such as SQL Server
Management Studio should not be necessary and it is not recommended since improper
changes may corrupt the database.
SQL Server Express facts
The list below includes some facts about Microsoft SQL Server Express:
•
Primarily suited for smaller-scale applications
•
Up to 1 GB of server RAM can be utilized
•
Utilizes one single physical CPU
•
Operates databases up to 4 GB, excluding log files
UNICORN 6.1 Administration and Technical Manual 28-9817-68 AA
193
4 Database administration
4.2 Database maintenance
4.2
Database maintenance
Introduction
Once the database is installed and systems are running and producing data, it is essential
that routines and schedules for the back up and archiving of data are established. This
section describes how to perform these routines, and also how to import data from
earlier UNICORN versions.
Contents
This section contains these topics.
Section
194
See page
4.2.1 Database backup
195
4.2.2 Restore backup data
199
4.2.3 Archive data
202
4.2.4 Retrieve archived data
206
4.2.5 Release locked database objects
209
4.2.6 Import data from UNICORN 5.x and older versions
211
UNICORN 6.1 Administration and Technical Manual 28-9817-68 AA
4 Database administration
4.2 Database maintenance
4.2.1 Database backup
4.2.1
Database backup
Introduction
At the database server installation a target folder for the regular, scheduled backup was
set up. By default, backups were also scheduled at the installation. The default backup
settings are
•
daily backup
•
at 03:00 local time
•
in the selected target folder
•
with the last 14 recent backup files kept.
(when additional files are saved, the oldest backup is deleted)
This section describes how to verify or edit the current backup schedule settings. It also
describes how to perform manual backups between the scheduled backups.
Note:
It is recommended that the scheduled backups are stored on another
physical drive than where the active database is stored. If this is not
possible, it is recommended that the backup files are copied to another
physical drive or storage media at regular intervals.
UNICORN 6.1 Administration and Technical Manual 28-9817-68 AA
195
4 Database administration
4.2 Database maintenance
4.2.1 Database backup
Verify or edit the database
backup schedule
The table below describes how to schedule the database backup:
Step
Action
1
Click the Database Management icon in the Administration module.
Result: The Database Management dialog opens.
Tip:
2
The Backup tab shows the current schedule. If the settings
are suitable you can click the Close button at this point.
Click the Edit Backup Schedule button.
Result: The Edit Backup Schedule Wizard opens.
196
UNICORN 6.1 Administration and Technical Manual 28-9817-68 AA
4 Database administration
4.2 Database maintenance
4.2.1 Database backup
Step
Action
3
Click the Next button to open the next wizard dialog:
4
Select the frequency and the start time for the scheduled backups.
Note:
You can also select to disable the scheduled backups at
this point. For example, this is a necessary step before
changing the SQL Server installation. After a new SQL
Server edition is installed, the scheduled backups can be
restored.
Click the Next button to proceed.
5
Choose the number of backup files to keep.
Note:
You may choose to keep all files. However, depending on
the number of users and results that are created, this may
cause uncontrolled disk space problems.
Click the Next button to proceed.
6
The final wizard page shows a summary of the selected settings. Click the
Finish button to accept and apply the schedule.
Note:
The backup files will be named UNICORN_SCHEDULED_BACKUP_<Date>_<Time>.BAK by default.
UNICORN 6.1 Administration and Technical Manual 28-9817-68 AA
197
4 Database administration
4.2 Database maintenance
4.2.1 Database backup
Note:
It is recommended that another physical drive than where the active
database is stored is selected for the scheduled backups at the
installation of the UNICORN software. If this is not possible, it is
recommended that the backup files are copied to another physical drive
or storage media at regular intervals.
Note:
Ensure that the database server computer is turned on at the time when
the scheduled backup will occur. If it is not turned on and operational,
the backup will fail, it will not be postponed. This is specially important
for stand-alone workstations, which are more likely to be turned off
when not in use.
Manual backups
If necessary, you can make extra backups manually between the scheduled backups.
This is described in the table below.
Step
Action
1
Click the Database Management icon in the Administration module.
Result: The Database Management dialog opens.
2
Click the Backup Now button in the Backup tab.
Result: A Backup Now confirmation dialog opens.
3
Click the OK button to start the backup.
•
This process may take several minutes. A progress dialog will be displayed
while the backup is performed.
Result: A Backup confirmation dialog opens when the backup is completed.
The backup file will be named UNICORN_MANUAL_BACKUP_<Date>_<Time>.BAK by default.
4
Verify that the backup has been performed in the default folder and then
either
•
click the Close button
or
•
Tip:
198
click Go To Backup File to open the backup folder and access the files.
It is recommended that you either copy or move the backup files to
an external storage device to minimize the risk for loss of data. The
backup will include the UNICORN database content as well as a log
report about the backup action.
UNICORN 6.1 Administration and Technical Manual 28-9817-68 AA
4 Database administration
4.2 Database maintenance
4.2.2 Restore backup data
4.2.2
Restore backup data
Introduction
If necessary you may restore data from a previous backup, for example if data has been
deleted by mistake. The restored data will replace all the current data in the database
with the data generated up to the point of time when the backup was made. All changes
performed after the time of the backup will be lost.
You can use this procedure to move data from one database instance to another but
all data in the database instance where the backup is restored will be overwritten.
Note:
A database backup from UNICORN 6.0 cannot be restored and used in
UNICORN 6.1. To do this, you must first install UNICORN 6.0, restore the
version 6.0 database backup, and then perform an upgrade of the
database server to UNICORN 6.1. The restored version 6.0 database
will then automatically be upgraded to UNICORN 6.1 at the same time.
Restore backup data
The table below describes how to perform the restoration.
Step
Action
1
Click the Database Management icon in the Administration module.
Result: The Database Management dialog opens.
UNICORN 6.1 Administration and Technical Manual 28-9817-68 AA
199
4 Database administration
4.2 Database maintenance
4.2.2 Restore backup data
Step
Action
2
Click the Restore tab. All the available backup files are shown in the displayed
list.
Note:
3
You can select to show only backup files in the list. If this
option is de-selected, you will also see the backup log files.
Select the backup file to restore and click the Restore button.
Result: A warning dialog opens. This dialog suggests that you backup the
database before restoring the previous backup. This will ensure that all essential data is saved before it is replaced with the data from the backup.
200
UNICORN 6.1 Administration and Technical Manual 28-9817-68 AA
4 Database administration
4.2 Database maintenance
4.2.2 Restore backup data
Step
Action
4
Either
•
click the Yes button to backup before restoring
or
•
click the No button to proceed without making a new backup.
Result: A second warning dialog opens. This dialog shows the backup file
that will be restored and explains the implications for the current data. All
other UNICORN modules will be closed and no other actions may be performed during the restoration.
Note:
5
All other client computers connected to this database instance must be logged off from UNICORN during the
restoration.
Click OK to proceed.
Result: A progress dialog is displayed while the restoration is performed. The
process is completed when the dialog closes.
Note:
The Restore operation will reset the Default user in the Administrator
user group, with the password "default". To ensure access security, the
Default user should be deleted again, after each backup resoration.
UNICORN 6.1 Administration and Technical Manual 28-9817-68 AA
201
4 Database administration
4.2 Database maintenance
4.2.3 Archive data
4.2.3
Archive data
Introduction
When your database size reaches a level where performance is affected and the
remaining space is not enough for the immediate storage needs, you can archive selected
parts of the result data. This can either be the entire result contents from before a
specified date, or selected results. You can also archive logs. It is normally a good idea
to archive data that is not immediately needed at regular intervals.
Archiving will reduce the size of the database. It is not the same as exporting result data,
which will create copies of the results and not reduce the size of the database at all.
Archive data
The table below describes how to archive complete result data or logs:
Step
Action
1
Click the Database Management icon in the Administration module.
Result: The Database Management dialog opens.
202
UNICORN 6.1 Administration and Technical Manual 28-9817-68 AA
4 Database administration
4.2 Database maintenance
4.2.3 Archive data
Step
Action
2
Click the Archive tab.
The archive directory and a suggested archive file name are shown in the
dialog. The directory was selected at the installation and cannot be edited
here. The file name can be changed. The default name suggested by UNICORN will include the date of the archiving, and reflect if the selected content
will be results or logs.
3
Choose the data to be archived:
•
If you select Result files
-
then choose a latest date from the droplist calender
or
-
select Free selection and click the Pick Result button.
(this option is described in Archive selected results below)
If you select UNICORN and System logs
•
then choose a latest date from the droplist calender
and
•
select the log to archive - UNICORN or a system log - from the For log
list.
UNICORN 6.1 Administration and Technical Manual 28-9817-68 AA
203
4 Database administration
4.2 Database maintenance
4.2.3 Archive data
Step
Action
4
Click the Archive button.
Result: A warning dialog opens. This dialog suggest that you backup the
database before archiving the selected data.
Note:
5
It is recommended to always perform a backup before
archiving.
Either
•
click the Yes button to backup before restoring
or
•
click the No button to proceed without making a new backup.
Result: A progress dialog opens while the data is archived. Depending on
the selections above, this may take several minutes. When the archiving is
completed, a confirmation dialog opens.
6
Click the Close button to close the confirmation dialog.
It is recommended to save the archived data on another storage media
than where the active database is stored.
Note:
Archive selected results
The table below describes how to select individual results for archiving:
Step
Action
1
In the Database Management dialog: Archive tab
•
Select Result files
•
Select Free selection
and
•
click the Pick Result button.
Result: The Pick Result dialog opens.
204
UNICORN 6.1 Administration and Technical Manual 28-9817-68 AA
4 Database administration
4.2 Database maintenance
4.2.3 Archive data
Step
Action
2
In the Pick Result dialog:
•
Locate and select the result you want archive
and
•
3
Repeat step 2 until you have added all results you wish to archive to the list.
•
4
click the arrow button to add it to the To Archive list.
You can remove results from the list by selecting them and clicking the
Remove From List button.
Click the Archive button.
Result: A warning dialog opens. This dialog suggest that you backup the
database before archiving the selected data.
5
Either
•
click the Yes button to backup before restoring
or
•
click the No button to proceed without making a new backup.
Result: A progress dialog opens while the data is archived. Depending on
the selections above, this may take several minutes. When the archiving is
completed, a confirmation dialog opens.
6
Click the Close button to close the confirmation dialog.
UNICORN 6.1 Administration and Technical Manual 28-9817-68 AA
205
4 Database administration
4.2 Database maintenance
4.2.4 Retrieve archived data
4.2.4
Retrieve archived data
Introduction
Results and logs that have been archived can be retrieved from the archive and included
in the active database again. Individual results are selected from the archive directory,
not the entire archive. However when logs are retrieved, the entire log is restored.
Note:
You can only retrieve archived results and logs into the same database
that they were originally archived from. You cannot use this procedure
to migrate data from one database to another.
Tip:
Archived results can be shown in the Evaluation module Result
Navigator if you select the option show All. This can help you to locate
the archived results that you wish to retrieve. Archived results are
represented by a special icon:
Right-click the archived result and choose the Properties menu
command. Select the Result tab. The File Name shown here is the
name of the archive directory where you can find the archived result.
Retrieve archived results or logs
The table below describes how to retrieve archived data:
Step
Action
1
Click the Database Management icon in the Administration module.
Result: The Database Management dialog opens.
206
UNICORN 6.1 Administration and Technical Manual 28-9817-68 AA
4 Database administration
4.2 Database maintenance
4.2.4 Retrieve archived data
Step
Action
2
Click the Retrieve tab.
Note:
You can retrieve either archived results or logs. All archived
files will have the ending .arc. If the option Show only
archived files is selected you will only see these files. If you
de-select the option you will also see additional files ending
with .log. These log files record the archiving operations
and are not connected to the actual UNICORN results or
logs.
UNICORN 6.1 Administration and Technical Manual 28-9817-68 AA
207
4 Database administration
4.2 Database maintenance
4.2.4 Retrieve archived data
Step
Action
3
Select the archive file you want to retrieve and click the Retrieve button.
If you selected to retrieve a log:
•
The log is restored to the active database and a confirmation dialog is
shown.
(This completes the retrieving process)
If you selected to retrieve archived results:
•
The Pick Result dialog opens.
(You will then proceed with the steps below)
4
Select an archived result in the Archive file list and click the right arrow
button.
Result: The result is moved to the UNICORN database list. The destination
folder search path is shown in the list. You can remove selected results from
the UNICORN database list by clicking the left arrow button.
5
Click the Retrieve button in the Pick Result dialog.
Result: The results are restored to the active database and a confirmation
dialog is shown.
Note:
208
The retrieved results will be restored to the folder where they were
originally archived from. All archived material will however still be saved
in the archive.
UNICORN 6.1 Administration and Technical Manual 28-9817-68 AA
4 Database administration
4.2 Database maintenance
4.2.5 Release locked database objects
4.2.5
Release locked database objects
Introduction
Whenever a database object is opened in UNICORN, it will automatically be locked by
the user and write protected from all other users. This applies to all objects such as
methods, results, Design of Experiments etc. The automatic locking will ensure that
conflicting editing cannot be performed and saved simultaneously by several users.
However, if objects are not closed and UNICORN is logged off in an improper manner,
the locking may not be released. This may happen if UNICORN shuts down due to an
error. In such cases you may have to release the locked objects manually. This is described
below.
Note:
Make sure that the released object is not in use at the computer listed
in the dialog. Releasing an object that is actually in use may cause
unexpected results.
Release locked objects
The table below describes how to release locked database objects:
Step
Action
1
Click the Database Management icon in the Administration module.
Result: The Database Management dialog opens.
UNICORN 6.1 Administration and Technical Manual 28-9817-68 AA
209
4 Database administration
4.2 Database maintenance
4.2.5 Release locked database objects
Step
Action
2
Click the Release Objects tab.
3
Select the object you want to release and click the Release button.
Result: The Release Objects warning dialog opens, asking if you have verified
that the object is no longer in use by the listed user at the listed computer.
4
Click the Yes button to confirm.
Result:The lock is released and a confirmation dialog opens.
5
210
Click the OK button to close the dialog.
UNICORN 6.1 Administration and Technical Manual 28-9817-68 AA
4 Database administration
4.2 Database maintenance
4.2.6 Import data from UNICORN 5.x and older versions
4.2.6
Import data from UNICORN 5.x and older versions
Result migration from earlier
UNICORN
In versions of UNICORN older than 6.0, data was stored in a file structure and not in a
database. Due to the differences in format, results from these earlier versions cannot
be used directly in UNICORN 6.1. Old results must be imported and converted into the
database format.
In order for the import to work the results must be valid for UNICORN 5. That is, the result
must have been created in UNICORN 5 (any sub-version) and be openable without errors.
Results from ÄKTAexplorer and ÄKTApurifier can be imported. Other systems are not
supported.
It may be possible to import results from earlier versions if they are opened and saved
in UNICORN 5 before the import. However, it is likely that more data is excluded than if
the result was originally generated in UNICORN 5.
The purpose for the import is to enable comparison of results generated in UNICORN 5
and in UNICORN 6.1. It will not accomplish a complete data migration, fulfilling all
regulatory demands. Before any comparison, it is important to review each result after
the import, to verify that all essential data is included.
Import UNICORN 5 results
The table below describes how to import result data from UNICORN 5, in the Evaluation
module:
Step
Action
1
Select the destination folder where you want the imported results to be
shown in the Result Navigator Results tab.
2
Choose the File:Import:Entire Result menu command.
Result: The Import dialog opens.
3
Choose UNICORN 5.* Result Files(*.res) as format in the Files of type field.
4
Locate and select the result files in the navigation field
Tip:
You can select several results at once by using the shift
or Ctrl keys when selecting.
UNICORN 6.1 Administration and Technical Manual 28-9817-68 AA
211
4 Database administration
4.2 Database maintenance
4.2.6 Import data from UNICORN 5.x and older versions
Step
Action
5
Click the Open button
Result: The selected results are imported into the database and shown in
the Result Navigator in the selected destination folder.
212
UNICORN 6.1 Administration and Technical Manual 28-9817-68 AA
4 Database administration
4.3 SQL Server edition upgrade
4.3
SQL Server edition upgrade
Introduction
The SQL Server Express edition provided with the UNICORN 6.1 installation is suitable
for small workgroups operating only two to three instrument servers sharing the same
database. For organizations where larger groups of users need access to a common
database it is recommended that the SQL Server edition is upgraded. This section
describes how to perform an upgrade.
Prerequisites
The setup must be run by a user that is logged on as administrator. If the installation is
performed from a remote share, you must use a domain account with read and execute
permissions on the remote share.
Ensure that no other user is logged on to the database before the upgrade is performed.
Disable scheduled backups
before upgrading
Before upgrading you must disable the scheduled backups in your present database
installation. The table below describes how to do this:
Step
Action
1
Click the Database Management icon in the Administration module.
Result: The Database Management dialog opens.
2
Click the Edit Backup Schedule button.
Result: The Edit Backup Schedule Wizard opens.
3
Click the Next button to open the next wizard dialog.
4
Click and select the Disable backup schedule checkbox.
5
Click the Next button to proceed.
Result: The next wizard dialog shows a confirmation message that you have
disabled the backup schedule.
6
Click the Finish button to apply the settings.
7
Click the Close button to close the Database Management dialog.
UNICORN 6.1 Administration and Technical Manual 28-9817-68 AA
213
4 Database administration
4.3 SQL Server edition upgrade
Step
Action
8
Exit UNICORN before proceeding with the upgrade.
Upgrade the SQL Server edition
The table below describes how to perform the upgrade.
Note:
Some of the images in the instruction have been cropped and do not
show the available buttons on the bottom part of the dialog (OK, Next,
Back, Cancel, Help etc.).
Step
Action
1
Browse to the root folder where the installation files are and double-click
the file setup.exe
Result: The SQL Server Installation Center dialog opens.
2
214
Click the heading Maintenance in the left menu field.
UNICORN 6.1 Administration and Technical Manual 28-9817-68 AA
4 Database administration
4.3 SQL Server edition upgrade
Step
Action
3
Choose the Edition Upgrade maintenance option.
4
A Setup Support Rules dialog will open and run a discovery operation to
identify possible problems with the support file installation.
•
Click the OK button to proceed after this operation step is completed.
UNICORN 6.1 Administration and Technical Manual 28-9817-68 AA
215
4 Database administration
4.3 SQL Server edition upgrade
Step
Action
5
The discovery operation continues in a second dialog.
•
6
Click the Next button to proceed after this operation step is completed.
The Product Key dialog opens.
•
Select Enter the product key
and
•
enter the 25-character product key.
Click the Next button to proceed.
216
UNICORN 6.1 Administration and Technical Manual 28-9817-68 AA
4 Database administration
4.3 SQL Server edition upgrade
Step
Action
4
The License Terms dialog opens.
5
•
Read the license agreement
•
Select the checkbox to accept the terms
•
Click the Next button to proceed.
The Select Instance dialog opens.
•
Specify which SQL Server instance to upgrade
•
Click the Next button to proceed.
UNICORN 6.1 Administration and Technical Manual 28-9817-68 AA
217
4 Database administration
4.3 SQL Server edition upgrade
Step
Action
6
The Edition Upgrade Rules dialog opens. A configuration validation is performed before the upgrade can proceed.
•
7
After the validation is completed, click the Next button to proceed.
The Ready to upgrade edition dialog opens. A tree view of the selected installation options is shown.
•
Click the Upgrade button to proceed.
During the upgrading process, the services will be restarted to register the
new settings.
218
UNICORN 6.1 Administration and Technical Manual 28-9817-68 AA
4 Database administration
4.3 SQL Server edition upgrade
Step
Action
8
The Complete dialog opens. This dialog provides a link to a summary log
file.
•
Read the information in the log file and on the Complete page.
•
Click the Close button to close the wizard dialog.
•
Close the SQL Server Installation Center dialog.
•
If necessary (this will be listed in the summary) restart the server computer.
UNICORN 6.1 Administration and Technical Manual 28-9817-68 AA
219
4 Database administration
4.3 SQL Server edition upgrade
Actions after the upgrade
After the upgrade is finished, you must perform the following steps:
220
Step
Action
1
•
Open the Windows Services Control Manager.
(Control Panel:Administrative Tools:Services)
•
Locate and select the SQL Server Agent.
UNICORN 6.1 Administration and Technical Manual 28-9817-68 AA
4 Database administration
4.3 SQL Server edition upgrade
Step
Action
2
Right-click and choose the Properties menu item.
Result: The SQL Server Agent Properties dialog opens.
UNICORN 6.1 Administration and Technical Manual 28-9817-68 AA
221
4 Database administration
4.3 SQL Server edition upgrade
222
Step
Action
3
Choose the Automatic option from the Startup type menu.
UNICORN 6.1 Administration and Technical Manual 28-9817-68 AA
4 Database administration
4.3 SQL Server edition upgrade
Step
Action
4
Click the Log On tab and select to let the SQL Server Agent log on as Local
System account.
5
•
Click the Apply button to apply the changes.
•
Click OK to close the Properties dialog.
•
Close the Services Control Manager and the Administrative Tools dialogs.
6
Re-enable the scheduled database backup. This is described in Section 4.2.1
Database backup, on page 195.
Note:
Verify that the scheduled database backups are performed.
UNICORN 6.1 Administration and Technical Manual 28-9817-68 AA
223
5 Security
5
Security
Introduction
This chapter presents the security concepts and features of a UNICORN installation. The
concepts and features are good to know since they are also used in other parts of this
manual.
In this chapter
The table below describes the contents of this chapter:
Section
224
See page
5.1 Access security
225
5.2 Connection security
226
5.3 Data security
227
UNICORN 6.1 Administration and Technical Manual 28-9817-68 AA
5 Security
5.1 Access security
5.1
Access security
Purpose
The purpose of access security is to avoid unauthorized user access to the UNICORN
system.
Passwords to restrict access
User access is often restricted by means of a password. There are some password rules
that are important keep in mind:
•
The password must have a minimum number of characters. The minimum length is
defined when UNICORN is installed, see Section2.3 Stand-alone workstation installation
and configuration, on page 32.
•
The password should be changed regularly if access security is very important. See
Section 3.2.5 User passwords and account access limitations, on page 180.
Access groups
Each user is assigned to an access group that defines the operations that the user can
perform. The purpose of the access groups is to restrict access to sensitive functions in
UNICORN for users without the necessary qualifications or areas of responsibility to
operate these functions.
Access groups are described in Section 3.2.1 User access groups, on page 160.
Delete default user
When you install UNICORN, a default user with full access rights is automatically created.
For system security reasons the default user must be deleted when you have created
the site-specific users.
Maintain system security
To maintain system security, only the system administrator should be allowed to carry
out administrative routines such as user setup and system definitions.
UNICORN 6.1 Administration and Technical Manual 28-9817-68 AA
225
5 Security
5.2 Connection security
5.2
Connection security
Purpose
The purpose of connection security is to avoid conflicts regarding system control, so
that only one user at a time controls the chromatography system.
Control mode and View mode
connections
Two kinds of connection modes can be established with the UNICORN system:
•
Control mode connection: The user has full system control, that is control of the
chromatography system.
•
View mode connection: The user can view the process but not control it.
To prevent conflicts, the system can have only one control mode connection at a time,
that is only one user at a time can control the process.
Prevent unwanted system
control mode connections
To prevent other users from establishing a control mode connection to the system, a
user should establish a Control mode connection to the system. This will prevent any
other user from assuming control.
Note:
If a user leaves the system in a View mode connection, any other user
may establish a control mode connection to the system.
When to maintain control over a
system
It is recommended that control over systems are maintained when a user leaves the
system temporarily. When the system is controlled, the responsible user is identified in
the Connected Users dialog. A system which is left with no Control mode connection
has no identified responsible user.
226
UNICORN 6.1 Administration and Technical Manual 28-9817-68 AA
5 Security
5.3 Data security
5.3
Data security
Introduction
Data security prevents the loss of results of a run due to failure in the network
communication or the local station.
Contents
The table below describes the contents of this section:
Section
See page
5.3.1 Network communication failure - remote station
228
5.3.2 Network communication failure – local station
229
5.3.3 Local station communication failure
230
UNICORN 6.1 Administration and Technical Manual 28-9817-68 AA
227
5 Security
5.3 Data security
5.3.1 Network communication failure - remote station
5.3.1
Network communication failure - remote station
If the network communication
fails
If the network communication fails while a method is running, the remote station will
lose control of the system. Then the following will happen:
228
•
After 30 seconds, the remote station client is disconnected by the instrument server.
The run continues under the control of the instrument server. No other connected
client will be affected.
•
The remote station will display a message that it is disconnected. You can try to
connect again after a minute and if that fails, you must check the condition of the
general network connections.
UNICORN 6.1 Administration and Technical Manual 28-9817-68 AA
5 Security
5.3 Data security
5.3.2 Network communication failure – local station
5.3.2
Network communication failure – local station
If the network communication
fails between a local station and
the network
The table below describes what happens when the network communication fails between
a local station and the network.
Stage
Description
1
The local station will lose contact with the database server and other client
stations, but the contact with the locally connected instrument is maintained 7 .
Any remote station that is connected to this instrument will be disconnected
automatically after 30 seconds.
2
The run on the connected instrument continues as normal. Result data is
saved locally on the local station hard drive. If the local station tries to perform actions that require a database connection, an error message will be
displayed suggesting that UNICORN is restarted and a log on without
database connection is performed.
3
If the network connection isn't restored when the run is completed, the result
data is still saved locally pending a restored connection.
4
When the network connection is restored and a user tries to assume control
over the system, the user will be asked if the temporarily stored result data
should be uploaded into the database or discarded.
7
This assumes that the local station is equipped with two network interface cards.
UNICORN 6.1 Administration and Technical Manual 28-9817-68 AA
229
5 Security
5.3 Data security
5.3.3 Local station communication failure
5.3.3
Local station communication failure
If the network communication
fails between a local station and
the instrument
The table below describes what happens when the network communication fails between
a local, instrument server station and the ÄKTA avant instrument.
Stage
Description
1
The run will be terminated.
2
The result data is saved and the run log will show that the run was terminated
before it should have been completed.
3
A message is displayed at all connected client stations requesting a restart
of the instrument.
Note:
230
You must be connected in control mode to be able to restart
the system.
UNICORN 6.1 Administration and Technical Manual 28-9817-68 AA
6 Troubleshooting
6
Troubleshooting
Introduction
This chapter describes different operational scenarios which may arise in UNICORN and
their solutions or consequences.
Tip:
For additional advice concerning operational scenarios and possible
solutions, refer to the UNICORN Information Letter. The UNICORN
Information Letters are available at www.gelifesciences.com/unicorn.
Contents
This chapter contains these sections:
Section
See page
6.1 Troubleshooting: User, function or system access
232
6.2 Troubleshooting: Network access
236
6.3 Troubleshooting: Database functions
237
6.4 System Error Reports
238
UNICORN 6.1 Administration and Technical Manual 28-9817-68 AA
231
6 Troubleshooting
6.1 Troubleshooting: User, function or system access
6.1
Troubleshooting: User, function or system access
In this section
This section describes the following scenarios:
•
Log on access problems
•
Unable to access UNICORN functions
•
Unable to connect or locate systems or computer stations
User Access
Problem description
Solution
Username and password not
accepted
•
The UNICORN administrator should check if the
user account is locked.
(for example after too many unsuccessful log
on attempts)
232
•
The UNICORN administrator can try to set a
new password.
•
If a password reset does not work, the user
profile may have to be deleted and new profile
be created.
The log on dialog is inactive
and a password cannot be entered
1
Verify that no UNICORN window or module is
opened.
2
Restart Windows.
The license server cannot be
contacted or no licenses are
available
1
Verify that the available number of licenses
have not been exceeded
2
Restart the license server computer
An error message is displayed,
stating that a connection to
the e-license server cannot be
established.
This can happen if an incorrect Ethernet address
(MAC address) has been entered for the e-license,
causing a mismatch.
1
Verify that the e-license server is accessible
from the network.
2
Contact GE Healthcare for assistance in verifying the validity of the e-license.
UNICORN 6.1 Administration and Technical Manual 28-9817-68 AA
6 Troubleshooting
6.1 Troubleshooting: User, function or system access
Access to UNICORN functions
Problem description
Solution
UNICORN modules are not available
for selection in the Log On dialog.
•
Check that the modules in question are
not already open.
•
The UNICORN administrator should open
the User Setup in the Administration
module to verify that the user has access
to the modules in question.
Functions to which you do not have
access appear grey in the menus or
cannot be accessed
Choose Tools:User Setup in the Administration module to change the user profile access
rights as needed.
The Manual menu commands in the
System Control are grey, that is you
can establish a connection but
cannot control the system.
•
Check that no other user has a control
mode connection.
•
Check that you have access rights to control the system manually.
Methods or results cannot be edited
even though they are not used by
another user
Unlock the method or result using the
Database Management Release Objects
function in the Administration module.
This is described in Section 4.2.5 Release locked
database objects, on page 209.
The help viewer cannot be opened
using help buttons or the F1 key.
1
Open the MadCap help viewer from the
Windows desktop icon. This is described
in The help viewer application, on page 30.
2
Try the help button or F1 key again.
The Microsoft™ Office Document
Image Writer causes UNICORN to
terminate.
This writer application will not work. Choose
another option, for example a PDF writer application.
An error message is shown when a
run is started, stating that not
enough disc space is available.
1 GB of free disc space is required as headroom before a run can be started, to ensure
that all data can be accommodated.
UNICORN 6.1 Administration and Technical Manual 28-9817-68 AA
233
6 Troubleshooting
6.1 Troubleshooting: User, function or system access
System connections
Problem description
Solution
The connections are not available, i.e. the selection checkbox
is greyed out.
•
Check if system has been deactivated.
•
Check that the power to the chromatography
system is turned on.
•
Check the connection between the PC and the
chromatography system.
1
Switch off the chromatography system.
2
Quit UNICORN.
3
Shut down the instrument server computer.
4
Restart the chromatography system.
5
Restart the instrument server computer.
6
Log on to UNICORN.
•
Check that you have access rights to the system. Access rights are not automatically assigned for a newly defined system.
•
The system may not be active.
•
Log off and log on again for access rights
changes to be applied.
•
Check that the local computer to which the
system is connected is turned on and logged
on to the network.
•
Check that the computer from which you try
to establish a connection is logged on to the
network.
•
Check that the limit of five simultaneous connections to the system has not been exceeded.
The connections are not available even though
•
•
the connection between
the PC and chromatography system appears to be
correct
the power is turned on.
A system is not available when
you attempt to establish a connection.
You receive the error message
“Cannot connect to system...”
in a network installation.
You receive the error message
"Warning, system occupied"
when trying to connect.
234
This error message is displayed if a system is defined and active in two different database instances and is already connected in the other instance. It is not recommended to have a system
defined and active in more database instances
than one.
UNICORN 6.1 Administration and Technical Manual 28-9817-68 AA
6 Troubleshooting
6.1 Troubleshooting: User, function or system access
Problem description
Solution
You are connected to a system
but have no contact with the
instrument. The system hangs
at initialization.
•
Check that the instrument is turned on.
•
Check that all cable connections are intact.
•
Check that the system is configured correctly,
in System Properties and on the instrument
display.
•
If the above actions do not help, try to restart
both the instrument server computer and the
instrument.
Installation and de-installation
Problem description
Solution
An error message stating that your access
rights are insufficient appears when you
try to de-install UNICORN from the Windows 7 Add or Remove Programs dialog.
This is caused by Windows 7 UAC.
Turning off UAC may solve this problem.
If not, use the software removal procedure from the UNICORN 6.1 installation
DVD.
UNICORN 6.1 Administration and Technical Manual 28-9817-68 AA
235
6 Troubleshooting
6.2 Troubleshooting: Network access
6.2
Troubleshooting: Network access
In this section
This section describes the following scenario:
Windows XP computers cannot communicate properly within a Windows Workgroup.
Connection problems for
Windows XP computers in
Workgroups
236
Scenario
Solution
Connection between Windows
XP computers in a Windows
Workgroup is not working
properly.
This problem may be resolved by making an exception in the firewall settings and allow File and
printer sharing.
Note:
Use caution when applying this
solution as this may make the
computers more vulnerable for
malware, trojans or other attacks.
UNICORN 6.1 Administration and Technical Manual 28-9817-68 AA
6 Troubleshooting
6.3 Troubleshooting: Database functions
6.3
Troubleshooting: Database functions
In this section
This section describes the following scenarios
•
The database is unavailable
•
Database backup is not performed
Database functions
Problem description
Solution
The database is not available at log on
•
Wait a couple of minutes to allow the SQL Server
services to start and try to log on again.
(This may be necessary when logging on after a
computer re-start)
•
Verify in the Windows Services dialog that the SQL
Server and SQL Server Browser services are running properly.
•
Verify that the firewall settings allow access.
(See Section 2.4.3 Configure the network, on
page 78 for port settings)
The database cannot be located at the installation of
a client/instrument server
computer.
Sometimes the computer name of the database server
cannot be identified. In that case, enter the IP address
instead.
The scheduled database
backups are not performed
Re-set the scheduled backup in the Database backup
wizard.
If another SQL Server edition than SQL Server Express
is used, you may need to verify that the service SQLAgent has started.
UNICORN 6.1 Administration and Technical Manual 28-9817-68 AA
237
6 Troubleshooting
6.4 System Error Reports
6.4
System Error Reports
Introduction
The Generate System Error Report Wizard is used to generate problem reports. The
report can provide useful background information for the support staff when trying to
provide solutions to problems or suggestions for improved system performance.
Step 1: Create an error report
This table below describes how to activate the Generate System Error Report Wizard
and create a report:
Step
Action
1
•
Choose the Reports:Create System Error Report menu command in the
Administration module 8 .
Result: The Generate System Error Report Wizard opens.
Note:
•
8
238
If an error occurs during a method run you can also start
the wizard by clicking the Report button in the error message dialog.
Click the Next button.
You can also create an error report from System Control by choosing System:Create System
Error Report. A system must be connected. The report will be created for the connected system
and step 2 in the instruction above will be omitted.
UNICORN 6.1 Administration and Technical Manual 28-9817-68 AA
6 Troubleshooting
6.4 System Error Reports
Step
Action
2
The Select Systems dialog is displayed, showing all accessible systems.
In this and all subsequent dialogs you can always click
the Back button to return to previous dialogs and change
the entries.
Tip:
•
Select the system that the error is connected to.
•
Click the Next button.
Note:
3
If the problem is general, related to the UNICORN software
and cannot be connected to a specific system you do not
have to select a system in this step. Ensure that the empty
space above the first system is selected (as illustrated below) and click Next to proceed. However, it is an advantage
in subsequent troubleshooting if at least one system can
be referenced.
The Error Description dialog opens.
Add the following information:
•
A short description of the problem.
•
The circumstances under which the problem occurs.
•
The consequences of the problem.
Click the Next button.
UNICORN 6.1 Administration and Technical Manual 28-9817-68 AA
239
6 Troubleshooting
6.4 System Error Reports
Step
Action
4
The Error Reproducibility dialog opens.
•
Specify whether the problem is reproducible or not. Select one of these
alternatives:
•
-
Yes
(Provide a short description in the text box of how the problem can
be reproduced.)
•
-
No
-
Unknown.
Click the Next button.
Result: The File Attachment dialog opens.
5
Go to step 2 below.
Step 2: Attach example files
You can attach results, methods and/or UNICORN log files to the problem report.
The table below describes how to attach a file:
240
Step
Action
1
The File Attachments dialog box is displayed:
UNICORN 6.1 Administration and Technical Manual 28-9817-68 AA
6 Troubleshooting
6.4 System Error Reports
Step
Action
2
•
Depending on the character of the file to be attached, select the appropriate tab: Result, Method, System Log or UNICORN Log.
•
Attach a file:
-
Click the Add button.
-
Select a file in the dialog and click the Attach button.
Result: The selected file is added to the tab in the File Attachments dialog.
Tip:
To remove a file from the tab, select the checkbox and
click the Remove button.
When attaching the UNICORN Log, a separate dialog will open. Choose the
time period for the attached log.
UNICORN 6.1 Administration and Technical Manual 28-9817-68 AA
241
6 Troubleshooting
6.4 System Error Reports
Step
Action
3
To include more information in the report, select the appropriate check
boxes in the System information field.
Computer and Operating System information
A summary of the computer and operating system information, for example
type of processor, processor speed, RAM, hard disk capacity and printer.
Integrity check
When UNICORN is installed a checksum calculation is performed on the
stationary files (*.dll and *.exe) for the system. An integrity check means that
a new checksum calculation is performed for the same files in their folders.
This new calculated value is compared to the checksum value obtained
during installation. The results of the comparison are presented in the report
and any deviations are included.
•
Click the Next button.
Result: The Generate System Error Report dialog is displayed.
4
Go to step 3 below.
Step 3: Generate and save the
report
The table below describes how to generate and save the report.
Step
Action
1
By default, the report is saved as a zip file in the UNICORN folder on your
local computer.
If you want to save the report in another location, click the Browse button
and select a destination folder.
2
3
You also have these options:
•
Click the Preview button to open the report in Notepad.
•
Click the Print button to print the report without any preview.
•
Click the Finish button.
Result: The report is generated and saved and the wizard dialog closes.
242
UNICORN 6.1 Administration and Technical Manual 28-9817-68 AA
A Technical specifications
Appendix A Technical specifications
Introduction
This appendix describes
•
the UNICORN system recommendations
•
UNICORN’s capability to control chromatography systems
•
how UNICORN samples data from the chromatography systems.
Contents
The table below describes the contents of this appendix:
Section
See page
A.1 System recommendations
244
A.2 UNICORN 6.1 control capacity
246
A.3 Data sampling
248
UNICORN 6.1 Administration and Technical Manual 28-9817-68 AA
243
A Technical specifications
A.1 System recommendations
A.1
System recommendations
Introduction
This section describes some general technical specifications for UNICORN 6.1 computers.
General computer specifications
The table below describes the recommended computer specifications for a UNICORN
6.1 system operating with ÄKTA avant instruments:
244
Full installation
UNICORN
Remote client
UNICORN
Database and
E-license
Server
UNICORN
Instrument
Server and local client
Minimum
free disc
space
11 GB
1 GB
6 GB
5 GB
Minimum
available
RAM
3 GB (both
Windows XP
and Windows
7)
2 GB on Windows XP
2 GB on Windows XP
2 GB on Windows XP
3 GB on Windows 7
3 GB on Windows 7
3 GB on Windows 7
Disc format
NTFS
NTFS
NTFS
NTFS
Operating
systems including service packs
Windows XP
Professional ,
SP3
Windows XP
Professional ,
SP3
Windows XP
Professional ,
SP3
Windows XP
Professional ,
SP3
Windows 7
Professional
Windows 7
Professional
Windows 7
Professional
Windows 7 Professional
Operating
system language
English (US)
English (US)
English (US)
English (US)
Architecture
x86, Dual
Core (or more)
x86, Dual Core
(or more)
x86, Dual Core
(or more)
x86, Dual Core
(or more)
UNICORN 6.1 Administration and Technical Manual 28-9817-68 AA
A Technical specifications
A.1 System recommendations
Note:
1
•
UNICORN 6.1 is tested using an English operating system version.
Using other language versions of the operating system may cause
errors.
•
A screen resolution of 1280x1024 or better is recommended. Parts
of the UNICORN 6.1 user interface may not be displayed properly
using a lower resolution.
•
Changing the default font and font size in Windows may cause
problems in the UNICORN 6.1 user interface.
•
The Windows basic color scheme is recommended 1 .
•
Using the Windows 7 Aero color scheme is not recommended.
•
Windows power save features should be turned off to avoid conflicts
with system operations.
•
UNICORN 6.1 is not compatible with the Windows 7 feature High
DPI Awareness, which allows the graphic user interface to be scaled.
The interface scale must remain at 100% to avoid issues with
clipping and misaligning of parts of the UNICORN user interface.
Normally, the scale is set at 100% by default.
UNICORN must be closed when the color scheme is changed.
UNICORN 6.1 Administration and Technical Manual 28-9817-68 AA
245
A Technical specifications
A.2 UNICORN 6.1 control capacity
A.2
UNICORN 6.1 control capacity
Introduction
This section describes the capability of UNICORN 6.1 to control systems in stand-alone
installations and network installations.
Stand-alone installations
In a stand-alone installation the workstation computer can be connected to a single
ÄKTA avant instrument.
Network installations
The list below describes some basic facts and recommendations about network
installations:
246
•
Instruments should be locally linked to an instrument server computer, which is
linked to the network. It is strongly recommended that the instruments should not
be directly linked to the network 2 .
•
Each local station can be connected to a single ÄKTA avant instrument.
•
A database server can support between three to twenty clients 3 . This can be any
combination of local stations with connected chromatography instruments, and
remote stations in the network. The number of supported systems depend on the
server solution and the network workload 4 .
•
A client computer can locally control one and remotely another two ÄKTA avant
instruments. Alternatively, a client computer can control a total of three instruments
remotely.
2
Although it is possible to connect instruments directly to a network, this is not recommended
since it may have a negative impact on the communication between instrument and instrument
server. With a peer-to-peer connection between each instrument server and instrument, the
system operation is less vulnerable to network communication problems and the general
network traffic load is reduced.
3
The SQL Server Express version distributed with the standard UNICORN 6.1 installation is suitable
for up to three clients. For larger installations an upgrade of the SQL Server is recommended.
This is described in Section 4.3 SQL Server edition upgrade, on page 213.
4
For larger organizations where more systems than twenty are used, it is a recommendation
to use several servers with individual database instances, to avoid performance issues at peak
workloads.
UNICORN 6.1 Administration and Technical Manual 28-9817-68 AA
A Technical specifications
A.2 UNICORN 6.1 control capacity
•
Each chromatography system in UNICORN
-
can be controlled by only one active System Control module
-
can be viewed by four other System Control modules.
-
a total of five System Control modules may be connected to a single system in
view mode, provided that no one is connected in control mode.
UNICORN 6.1 Administration and Technical Manual 28-9817-68 AA
247
A Technical specifications
A.3 Data sampling
A.3
Data sampling
Data storage
Data from chromatography system monitors is stored temporarily in data buffers in the
local instrument server during a run. It is transferred from the buffers to the database
by UNICORN whenever a chromatogram is closed, that is when the New_Chromatogram
instruction is issued or the result file is closed.
Data is also saved in a runtime backup on the instrument server local hard drive during
a run, thus minimizing data loss in the event of power or communication failure.
Data buffer capacity
The capacity of the data buffer is up to 180000 data points for each curve. The maximum
number of data points may be set either to 18000, 54000 or 180000 data points. For
most curves, the default setting is 54000 points. For common applications, the default
setting will produce a resolution that is more than adequate.
Note:
The data buffer capacity is listed in the Data collection group of
System:Settings in the System Control module.
Effective sampling frequency
If a buffer is filled during a run, i.e 54000 points have been recorded, the number of points
is halved by deleting every second point, leaving 27000 data points of the curve data.
For subsequent sample points, every second point is dropped, thus halving the effective
sampling frequency. When the curve again reaches 54000 points the process is repeated
and the effective sampling frequency is halved once again. Now every fourth sampling
point will be recorded.
Note:
The real sampling frequency, i.e. the sampling frequency of the system,
never changes.
Ensure maximum resolution
To ensure maximum resolution for a crucial part of a run, issue a New_Chromatogram
instruction at the beginning of the part. This empties the data buffers, which will allow
the selected maximum number of data points (e.g. 54000) to be recorded from this part
of the run before the effective sampling frequency is reduced again.
248
UNICORN 6.1 Administration and Technical Manual 28-9817-68 AA
B Advanced system administration
Appendix B Advanced system
administration
Introduction
This appendix contains additional information that is relevant for UNICORN 6.1 network
deployments and details about Windows settings. It describes software settings and
selections necessary in order for the UNICORN client and server computers to operate
as intended in a network environment. Issues addressed include
•
Prerequisite application installations
•
Windows user names and passwords
•
Services and ports used
The appendix also includes instructions for how to uninstall UNICORN 6.1 and SQL Server
Express manually if the installation has become corrupted and cannot be uninstalled
using the normal procedures.
Contents
The table below describes the contents of this appendix:
Section
See page
B.1 User, client computer and database server set up
250
B.2 Manual uninstallation
269
UNICORN 6.1 Administration and Technical Manual 28-9817-68 AA
249
B Advanced system administration
B.1 User, client computer and database server set up
B.1
User, client computer and database server set up
Introduction
This appendix provides information about the Windows user setup and computer settings
necessary in network deployments. The appendix also contains information about basic
computer configuration and prerequisite installations. Note that these settings will
normally be performed as part of the normal installation procedure. Manual adjustments
should not be necessary.
Hard disk compression
The hard disks of the computers where UNICORN 6.1 is installed should not be
compressed.
Computer configuration with
Windows XP
Follow the instructions below to configure a Windows XP computer before installing
UNICORN:
Step
Action
1
Install Windows XP Professional. Ensure that Service Pack 3 is included in
the installation.
2
•
Select US English as the Language Option.
•
Set the regional settings to use the US standard for decimal delimiter,
which is a decimal point (".").
Install any additional hardware drivers that may be needed, for example
network, graphics, sound or chipset drivers.
See also "Install extra network cards" below.
3
250
Since a dual core computer is the recommended minimum for UNICORN
6.1, ensure that all cores of the processor are running.
UNICORN 6.1 Administration and Technical Manual 28-9817-68 AA
B Advanced system administration
B.1 User, client computer and database server set up
Step
Action
4
Install the following prerequisite applications in the exact order listed below 1 :
1
{912F19C1-DFD2-487F-A168-2E98B5FFC30E}\WindowsXP-KB942288v3-x86.exe
(Microsoft Windows Installer 4.5)
Note:
2
This installation will normally force a re-start of the
computer.
{FBAF5483-7C07-40A3-BD50-9B1FA8FDCA65}\dotnetfx35sp1.exe
(Microsoft .NET Framework 3.5 SP1)
Note:
3
This installation will normally force a re-start of the
computer.
{DA190F81-371E-49E3-A4DF-1E657E148FE5}\WindowsXP-KB926139v2-x86-ENU.exe
(Windows PowerShell 1.0)
4
{11BC222D-3482-4200-9C1A-1C004D2D6C2C}\msxml.msi
(Microsoft Core XML Services 4.0 SP2)
5
{11BC222D-3482-4200-9C1A-1C004D2D6C2C}\msxml6.msi
(Microsoft Core XML Services 6.0)
Note:
6
If MSXML 6.0 SP2 is already installed, this installation
may fail. If so, this step can be skipped and the newer
version will work as intended.
{E9D60B10-81E0-4ED1-A3D7-153977F29467}\vcredist_x86.exe
(Microsoft Visual C++ 2005 Redistributable Package)
7
{804B91BB-13B3-4299-ABEF-7589287A211E}\OPC Core Components
Redistributable (x86).msi
(OPC Core Components)
5
Verify that all cores of the processor are still running.
UNICORN 6.1 Administration and Technical Manual 28-9817-68 AA
251
B Advanced system administration
B.1 User, client computer and database server set up
Step
Action
6
Turn off Windows Update:
1
Open the Windows Control Panel (in Category View).
2
Choose Security Center.
3
Choose Automatic Updates.
Result: The Automatic Updates dialog opens.
4
Select the Turn off Automatic Updates option.
5
Click the OK button to apply the settings and close the dialog.
6
Close the Windows Security Center dialog.
Proceed with the next step without closing the Control Panel.
7
Disable power save mode:
1
Choose Performance and Maintenance in the Control Panel.
2
Choose Power Options.
Result: The Power Options Properties dialog opens.
8
1
252
3
Disable all power save settings.
4
Click the OK button to apply the settings and close the dialog.
5
Close the Performance and Maintenance dialog.
Turn off the Windows screen saver:
1
Right-click anywhere in the Windows desktop and choose Properties
from the shortcut menu.
2
Click the Screen Saver tab.
3
Choose [None] from the Screen Saver menu.
4
Click the OK button to apply the settings and close the dialog.
All listed prerequisites are available on the UNICORN 6.1 installation DVD in the
ISSetupPrerequisites folder.
UNICORN 6.1 Administration and Technical Manual 28-9817-68 AA
B Advanced system administration
B.1 User, client computer and database server set up
Computer configuration with
Windows 7
Follow the instructions below to configure a Windows 7 computer before installing
UNICORN:
Step
Action
1
Install Windows 7 Professional Edition.
2
•
Select US English as the Language Option.
•
Set the regional settings to use the US standard for decimal delimiter,
which is a decimal point (".").
Install any additional hardware drivers that may be needed, for example
network, graphics, sound or chipset drivers.
See also "Install extra network cards" below.
3
Since a dual core computer is the recommended minimum for UNICORN
6.1, ensure that all cores of the processor are running.
4
Install the following prerequisite applications in the exact order listed below 1 :
1
{E9D60B10-81E0-4ED1-A3D7-153977F29467}\vcredist_x86.exe
(Microsoft Visual C++ 2005 Redistributable Package)
2
{804B91BB-13B3-4299-ABEF-7589287A211E}\OPC Core Components
Redistributable (x86).msi
(OPC Core Components)
5
Verify that all cores of the processor are still running.
6
Turn off Windows Update:
1
Open the Windows Control Panel (in Category View).
2
Choose Windows update.
3
Choose Change settings.
Result: The Change settings dialog opens.
4
Select the Never check for updates option.
5
Click the OK button to apply the settings and close the dialog.
6
Click the Back button to return to the Control Panel.
Proceed with the next step without closing the Control Panel.
UNICORN 6.1 Administration and Technical Manual 28-9817-68 AA
253
B Advanced system administration
B.1 User, client computer and database server set up
Step
Action
7
For some graphic cards, the Windows 7 Aero color scheme will be selected
by default. If this is the case, the Windows 7 Aero color scheme must be
turned off manually:
1
Choose Appearance and personalization.
2
Choose Change the color scheme under Personalization.
Result: The Appearance Settings dialog opens.
3
Set the Color scheme to Windows 7 Basic
and
8
1
4
click the OK button.
5
Close the Control Panel.
Turn off the Windows screen saver:
1
Right-click anywhere in the Windows desktop and choose Properties
from the shortcut menu.
2
Click the Screen Saver tab.
3
Choose [None] from the Screen Saver menu.
4
Click the OK button to apply the settings and close the dialog.
All listed prerequisites are available on the UNICORN 6.1 installation DVD in the
ISSetupPrerequisites folder.
Windows user names and
passwords
Unless a domain controller is used, all users must have exactly the same user name and
password on all computers running UNICORN. If a domain controller is used, the users
will be created at the domain controller and not on each computer. This eliminates the
need for synchronized user names and passwords.
254
UNICORN 6.1 Administration and Technical Manual 28-9817-68 AA
B Advanced system administration
B.1 User, client computer and database server set up
Component services
The table below describes the steps for how to set up the Component Services settings
on a UNICORN computer.
My Computer Properties - Windows XP
Step
Action
1
•
Open the Administrative Tools dialog from the Windows Control Panel.
and
•
double-click the Component Services icon to open the dialog.
2
Select Component Services in the tree structure and expand the tree to
show My Computer.
3
Right-click My Computer and choose Properties to open the My Computer
Properties dialog.
UNICORN 6.1 Administration and Technical Manual 28-9817-68 AA
255
B Advanced system administration
B.1 User, client computer and database server set up
Step
Action
4
Click the Default Properties tab and select the following:
•
Enable Distributed COM on this computer
•
Default Authentication Level set to Connect
Note:
256
Client and server computers should all have corresponding
Default Authentication Level settings and be in the same
domain.
UNICORN 6.1 Administration and Technical Manual 28-9817-68 AA
B Advanced system administration
B.1 User, client computer and database server set up
Step
Action
5
Click the COM Security and click the Edit Default button in the Access Permissions field, to open the Access Permission dialog.
6
•
Add the group Everyone with permissions for Local Access and Remote
Access.
•
Click OK to apply and close the dialog.
•
Click the MSDTC tab
and
•
click the Security Configuration button.
UNICORN 6.1 Administration and Technical Manual 28-9817-68 AA
257
B Advanced system administration
B.1 User, client computer and database server set up
Step
Action
7
Select the following options in the Security Configuration dialog:
•
Network DTC Access
-
•
Allow Remote Clients
Transaction Manager Communication
-
Allow Inbound
and
•
Allow Outbound
Enable XA Transactions
8
Click OK to apply the changes and close the Security Configuration dialog.
9
Click OK to close the My Computer Properties.
Proceed with the UNICORN Instrument Server Properties settings described
below.
258
UNICORN 6.1 Administration and Technical Manual 28-9817-68 AA
B Advanced system administration
B.1 User, client computer and database server set up
My Computer Properties - Windows 7
Step
Action
1
•
Type "component services" in the Windows Start menu search field
and
•
click the Component Services item that is displayed as the search result.
2
Select Component Services in the tree structure and expand the tree to
show My Computer.
3
Right-click My Computer and choose Properties to open the My Computer
Properties dialog.
4
Click the Default Properties tab and select the following:
•
Enable Distributed COM on this computer
•
Default Authentication Level set to Connect
Note:
5
Client and server computers should all have corresponding
Default Authentication Level settings and be in the same
domain.
Click the COM Security and click the Edit Default button in the Access Permissions field, to open the Access Permission dialog.
•
Add the group Everyone with permissions for Local Access and Remote
Access.
•
Click OK to apply and close the dialog.
UNICORN 6.1 Administration and Technical Manual 28-9817-68 AA
259
B Advanced system administration
B.1 User, client computer and database server set up
Step
Action
6
•
Click the MSDTC tab
and
•
7
260
verify that Use local coordinator is selected.
Click OK to close the My Computer Properties.
UNICORN 6.1 Administration and Technical Manual 28-9817-68 AA
B Advanced system administration
B.1 User, client computer and database server set up
Step
Action
8
•
Under My Computer in Component Services, expand Distributed
Transaction Coordinator
•
right-click on Local DTC
and
•
select Properties
Result: The Local DTC Properties dialog opens.
UNICORN 6.1 Administration and Technical Manual 28-9817-68 AA
261
B Advanced system administration
B.1 User, client computer and database server set up
Step
Action
9
Click the Security tab and select the following options:
•
Network DTC Access
-
•
Allow Remote Clients
Transaction Manager Communication
-
Allow Inbound
and
•
262
-
Allow Outbound
-
No Authentication Required
Enable XA Transactions
10
Click OK to apply the changes and close the Local DTC Properties dialog.
11
Proceed with the UNICORN Instrument Server Properties settings described
below.
UNICORN 6.1 Administration and Technical Manual 28-9817-68 AA
B Advanced system administration
B.1 User, client computer and database server set up
UNICORN Instrument Server Properties
Step
Action
1
•
Select the DCOM Config folder
and
•
locate and select the UNICORN Instrument Server icon.
UNICORN 6.1 Administration and Technical Manual 28-9817-68 AA
263
B Advanced system administration
B.1 User, client computer and database server set up
Step
Action
2
Right-click the icon and choose Properties to open the UNICORN Instrument
Server Properties dialog.
3
•
Click the Security tab
•
Select Customize in the Launch and Activation Permissions field
and
•
264
click the Edit button to open the Launch Permission dialog.
UNICORN 6.1 Administration and Technical Manual 28-9817-68 AA
B Advanced system administration
B.1 User, client computer and database server set up
Step
Action
4
Select the SYSTEM user and choose Allow for all permissions:
Note:
Only the SYSTEM user should have Launch permissions.
UNICORN 6.1 Administration and Technical Manual 28-9817-68 AA
265
B Advanced system administration
B.1 User, client computer and database server set up
266
Step
Action
5
Select the Administrators user and choose Allow for the Local Activation
and Remote Activation permissions:
UNICORN 6.1 Administration and Technical Manual 28-9817-68 AA
B Advanced system administration
B.1 User, client computer and database server set up
Step
Action
6
Select the Everyone user and choose Allow for the Local Activation and
Remote Activation permissions:
7
•
Click OK to apply the changes and close the Launch Permissions dialog.
•
Click OK to close the UNICORN Instrument Server Properties dialog.
UNICORN 6.1 Administration and Technical Manual 28-9817-68 AA
267
B Advanced system administration
B.1 User, client computer and database server set up
Additional settings for database
servers running on Windows XP
If the database is running on a computer with Windows XP, the following setting must
also be set:
In setting...
Also choose...
Security Configuration:
Transaction Manager
Communication
No Authentication Required.
(Step 7 in instruction My
Computer Properties Windows XP above)
268
UNICORN 6.1 Administration and Technical Manual 28-9817-68 AA
B Advanced system administration
B.2 Manual uninstallation
B.2
Manual uninstallation
Introduction
This appendix contains instructions for how to remove a UNICORN 6.1 and/or SQL Server
installation manually in the event that the installation has become corrupt and cannot
be removed in a regular manner.
Remove a UNICORN 6.1
installation
The instruction below describes how to remove the UNICORN 6.1 installation:
Step
Action
1
Open the Windows Task Manager.
UNICORN 6.1 Administration and Technical Manual 28-9817-68 AA
269
B Advanced system administration
B.2 Manual uninstallation
Step
Action
2
Select and end the following processes:
•
UNICORN client
•
UNICORN instrumentserver
•
UNICORN Support Service
•
NextCU
•
VIDMain
Close the Windows Task Manager.
3
Execute the following command:
•
msiexec.exe /x {15F8765A-5854-4E3B-83EA-C38BBF390DCD} /qb
Result: A silent uninstallation is performed.
4
5
Remove the UNICORN backup task:
1
Open the Scheduled Tasks dialog from the Windows Control Panel.
2
Select the UNICORN backup task.
3
Click the Delete this item option in the Folder Tasks menu.
4
Close the Scheduled Tasks dialog.
Remove the folder C:\Program Files\GE Healthcare\UNICORN.
Note:
The actual search path to this folder depends on what was
selected at the UNICORN installation.
This folder can contain backup files, log files and error reports that you may wish to save for future reference.
6
270
Reboot the computer.
UNICORN 6.1 Administration and Technical Manual 28-9817-68 AA
B Advanced system administration
B.2 Manual uninstallation
Remove the UNICORN database
instance
The instruction below describes how to remove the UNICORN database instance using
the Windows Add or Remove Programs routine.
Note:
Some of the images in the instruction have been cropped and do not
show the available buttons on the bottom part of the dialog (OK, Next,
Back, Cancel, Help etc.).
NOTICE
If more than one database instance is installed on the computer
you must ensure that only the UNICORN database instance is
removed. Do not remove Setup Support Files, Native Client or any
SQL Server files, to ensure that the other database instances will
remain operable.
Step
Action
1
Start the Windows Control Panel and choose Add or Remove Programs.
2
Select Microsoft SQL Server 2008 and click the Change/Remove button.
UNICORN 6.1 Administration and Technical Manual 28-9817-68 AA
271
B Advanced system administration
B.2 Manual uninstallation
Step
Action
3
The SQL Server 2008 dialog opens.
•
4
A Setup Support Rules dialog will open and run a discovery operation to
identify possible problems with the maintenance operation.
•
272
Choose the Remove option.
Click the OK button to proceed after this operation step is completed.
UNICORN 6.1 Administration and Technical Manual 28-9817-68 AA
B Advanced system administration
B.2 Manual uninstallation
Step
Action
5
•
Select UNICORN as the Instance to remove features from
and
6
•
click the Next button to proceed.
•
Select Database Engine Services and SQL Server Replication
and
•
7
click the Next button to proceed.
Setup will run Removal Rules to identify possible problems with the removal.
•
Click the Next button to proceed after this operation step is completed.
UNICORN 6.1 Administration and Technical Manual 28-9817-68 AA
273
B Advanced system administration
B.2 Manual uninstallation
Step
Action
8
A summary of the removal operation will be shown.
•
9
The progression of the removal operation will be shown.
•
274
Click the Remove button to proceed.
Click the Next button to proceed after this operation step is completed.
UNICORN 6.1 Administration and Technical Manual 28-9817-68 AA
B Advanced system administration
B.2 Manual uninstallation
Step
Action
10
The Complete dialog opens. This dialog provides a link to a summary log
file.
•
Read the information in the log file and on the Complete page.
•
Click the Close button to close the wizard dialog.
•
Close the Add or Remove Program dialog.
UNICORN 6.1 Administration and Technical Manual 28-9817-68 AA
275
B Advanced system administration
B.2 Manual uninstallation
Uninstalling an existing instance
of SQL Server
The instruction below describes how to uninstall SQL Server if the procedure described
above cannot be used.
NOTICE
The uninstallation procedure below should only be used if the
UNICORN database instance is the only database instance installed
on the computer. The procedure described will cause all Microsoft
SQL Server-related entries to be completely deleted from the
computer.
Step
Action
1
Perform a backup of the Windows Registry.
2
Delete the registry keys listed below:
3
•
HKEY_LOCAL_MACHINE\SOFTWARE\Microsoft\Microsoft SQL Server
•
HKEY_LOCAL_MACHINE\SOFTWARE\Microsoft\MSSQLServer
•
Locate and select the key HKEY_LOCAL_MACHINE\SYSTEM\CurrentControlSet\Control\Session Manager.
•
If there is an entry ( of the Type REG_MULTI_SZ) named PendingFileRenameOperations:
1
Right-click the entry and choose the Modify menu command.
Result: The Edit Multi-String dialog opens.
•
2
Clear the Value data.
3
Click OK to close the dialog and update the Data column.
If there is a key HKEY_LOCAL_MACHINE\SYSTEM\CurrentControlSet\Control\Session Manager\FileRenameOperations:
1
Right-click the key and choose the Rename menu command.
2
Change the name to FileRenameOperations2.
Note:
276
After a successful installation, the name of this key
should be restored to FileRenameOperations.
UNICORN 6.1 Administration and Technical Manual 28-9817-68 AA
B Advanced system administration
B.2 Manual uninstallation
Step
Action
4
Delete the SQL Server related services from
•
HKEY_LOCAL_MACHINE\SYSTEM\CurrentControlSet\Services\MSSQL
For example
-
MSSQL$UNICORN
-
MSSQLFDLauncher$UNICORN
-
MSSQLServerADHelper100
-
SQLAgent$UNICORN
-
SQLBrowser
-
SQLWriter
5
Rename all folders on Microsoft SQL Server under C:\Program Files and in
any data drive.
6
Download the cleanup utility from http://support.microsoft.com/kb/290301
7
•
Install and run the utility, and select all the SQL Server and MSXML6 entries.
(Normally, there will be only three or four SQL Server entries - the illustration above shows the clean up of an advanced installation)
8
•
Click the Remove button.
•
Click the Exit button to close the utility.
Reboot the computer.
UNICORN 6.1 Administration and Technical Manual 28-9817-68 AA
277
B Advanced system administration
B.2 Manual uninstallation
Tip:
278
For more information refer to
http://msdn.microsoft.com/en-us/library/ms143412.aspx
UNICORN 6.1 Administration and Technical Manual 28-9817-68 AA
C Post installation settings
Appendix C Post installation settings
Introduction
This appendix describes various procedures that may be necessary to perform to ensure
proper operation after the installation of UNICORN 6.1. The need for these procedures
depend on the your network setup and/or the computer workstations.
Disk space for a database server
(standalone installation)
The free space of the disk or disk partition where the UNICORN archive and backup files
are going to be located should be at least 160 GB to avoid errors related to insufficient
disk space.
A database for one, or for several, systems that has been in use for an extended period
of time will contain large amounts of data. Backups corresponding to two weeks and
some archived data will therefore require a large amount of disk space. For this reason,
a minimum disk space of 160 GB should be reserved.
Windows update
Windows update may interfere with UNICORN and interrupt ongoing runs. To avoid this,
it is recommended that automatic updates are disabled. Run the updates manually on
the computer when UNICORN is not in use.
Anti-virus software
Anti-virus software may interfere with the operation of UNICORN and must be regulated
accordingly. It may be necessary to avoid any virus scan while runs are in progress in
order to avoid complications.
The following folders should not be scanned:
•
C:\Program Files\GE Healthcare\UNICORN\Logs
•
C:\Program Files\GE Healthcare\UNICORN\Database
•
C:\Program Files\GE Healthcare\UNICORN\Runtime Backup
•
C:\Program Files\GE Healthcare\UNICORN\Backup
UNICORN 6.1 Administration and Technical Manual 28-9817-68 AA
279
C Post installation settings
•
C:\Program Files\GE Healthcare\UNICORN\Archive
Note:
This assumes that UNICORN 6.1 has been installed in the default path
suggested by the installation program.
Disable Power Save
If the UNICORN computer enters standby or hibernation mode while a run is in progress,
the run will be interrupted and the ÄKTA avant system will lose its connection to UNICORN.
To avoid this, disable any power save mode settings in Windows. This is done by adjusting
the power save options in the Windows Control Panel.
Power save must also be disabled for the Network Interface Cards. This is described
below.
Note:
This process may differ slightly depending on the network card device
driver.
Windows XP
Step
Action
1
•
Open the Windows Control Panel
and
2
•
choose Network Connections.
•
Right-click the network connection for the Network Interface Card
and
•
choose Properties from the menu.
Result: The Properties dialog for the network connection opens.
3
Click the Configure button.
Result: The Properties dialog for the card opens.
4
•
Click the Power Management tab
and
•
5
280
De-select the Allow the computer to turn off this device to save power
option.
Click OK to apply the changes.
UNICORN 6.1 Administration and Technical Manual 28-9817-68 AA
C Post installation settings
Windows 7
Step
Action
1
•
Open the Windows Control Panel
•
choose Network and Internet.
and
•
Network and Sharing Center.
2
Click Change adapter settings in the left panel.
3
•
Right-click the network connection for the Network Interface Card
and
•
choose Properties from the menu.
Result: The Properties dialog for the network connection opens.
4
Click the Configure button.
Result: The Properties dialog for the card opens.
5
•
Click the Power Management tab
and
•
6
De-select the Allow the computer to turn off this device to save power
option.
Click OK to apply the changes.
Disable Automatic restart
Serious errors in Windows may cause the operating system to halt, to prevent possible
damage. This is usually caused by faulty drivers. When this occurs, a blue screen is
displayed with technical information in white text. The default setting for Windows is to
automatically restart after this blue screen is displayed. This is normally not the desired
behaviour, as the technical information is essential in order to diagnose the cause for
the error. It is a recommendation to disable the automatic restart function so that crash
codes can be saved. Follow the instructions below to disable the automatic restart
function:
Step
Action
1
•
Right-click on My Computer and choose Properties.
Result: The System Properties dialog opens.
UNICORN 6.1 Administration and Technical Manual 28-9817-68 AA
281
C Post installation settings
Step
Action
2
•
Select the Advanced tab
and
click the Settings button in the Startup and Recovery field.
Result: The Startup and Recovery dialog opens.
282
3
De-select the Automatically restart checkbox.
4
Click OK in all open dialogs to apply the changes and close the dialogs.
UNICORN 6.1 Administration and Technical Manual 28-9817-68 AA
C Post installation settings
Internet time synchronization
When UNICORN is run in a network environment there is a need to ensure that the time
of the connected computers is synchronized. In order to be able to compare time and
dates for items stored in the database, for example with timestamps in log files, all
UNICORN computers in the network must be on synchronized time.
If the company has an available Internet Time Server, it is preferable that the UNICORN
computers are set to automatically synchronize time using that server. If no company
Internet Time Server is available, then time.windows.com can be used as an alternative.
The instruction below describes how to set the Internet time synchronization option.
Step
Action
1
Double-click the time on the righthand end of the Windows taskbar.
Result: The Date and Time Properties dialog opens.
2
Select the Internet Time tab.
Note:
If this tab is not shown, it may have been disabled by Domain policies.
3
Select the Automatically synchronize with an Internet time server checkbox.
4
Enter the Internet Time Server in the Server field.
5
Click OK to apply the changes and close the dialog.
If the UNICORN computer is used for a standalone ÄKTA avant
installation in a workgroup and there is no access to
time.windows.com, de-select the Automatically synchronize with an
Internet time server checkbox.
Note:
Update paging file size
It is recommended that the paging file is twice the size of the main memory for a UNICORN
6.1 computer used with ÄKTA avant. The instruction below describes how to increase
the paging file size to an appropriate size:
Step
Action
1
•
Right-click on the My Computer desktop icon (or in Windows Explorer)
and choose Properties.
Result: The System Properties dialog opens.
UNICORN 6.1 Administration and Technical Manual 28-9817-68 AA
283
C Post installation settings
Step
Action
2
•
Select the Advanced tab
and
click the Settings button in the Performance field.
Result: The Performance Options dialog opens.
3
•
Select the Advanced tab
and
click the Change button in the Virtual memory field.
Result: The Virtual Memory dialog opens.
4
Set the Initial size (MB) and Maximum size (MB) for the paging file to twice
the size of the computer's memory.
For example, if the computer has 4 GB of memory, set the values to 8192
as shown in the illustration above.
284
UNICORN 6.1 Administration and Technical Manual 28-9817-68 AA
C Post installation settings
Step
Action
5
Click OK in all open dialogs to apply the changes and close the dialogs.
UNICORN 6.1 Administration and Technical Manual 28-9817-68 AA
285
D Additional computer setting changes
Appendix D Additional computer setting
changes
Introduction
This appendix contains instructions how to perform certain computer setting changes
after installation.
Changing installation settings
Certain installation settings can be changed by opening the Change Installation Settings
dialog from the Windows Start:Programs menu. This dialog is opened by choosing the
menu item
•
GE Healthcare:UNICORN:Configuration Tools:Change Installation Settings
In this dialog you can
286
•
Change folders for backup and archiving
•
Change the password settings for the UNICORN installaiton
•
Enable or disable the Column Logbook.
UNICORN 6.1 Administration and Technical Manual 28-9817-68 AA
D Additional computer setting changes
Changing standalone or
database server computer name
The instruction below describes the steps that must be completed if the name of the
computer which is used for a standalone or database server installation of UNICORN
6.1 is changed.
Step
Action
1
•
Open the System Properties dialog
(right-click on the My Computer desktop icon and choose the Properties
menu item)
and
•
2
select the Computer Name tab.
Click the Change button.
Result: The Computer Name Changes dialog opens.
3
•
Enter the new name in the Computer name field,
•
click OK in the open dialogs to apply the change,
and
•
4
5
restart the computer.
After the computer has restarted, open a Command Prompt window 5 .
In Windows XP, click the Start button and choose All Programs:Accessories:Command Prompt.
In Windows 7, click the Windows icon and choose All Programs:Accessories:Command Prompt.
You can also press and hold the Windows key and then press the letter R. Type cmd in the input
field and press Enter.
UNICORN 6.1 Administration and Technical Manual 28-9817-68 AA
287
D Additional computer setting changes
Step
Action
5
•
Change to the database directory:
C:\>cd C:\Program Files\GE Healthcare\UNICORN\Database
(The example above assumes that UNICORN was installed in the default
directory)
•
Run the RenameSQLServer.bat script:
C:\>RenameSQLServer.bat "old computer name"\UNICORN "new computer name"\UNICORN
(e.g. C:\>RenameSQLServer.bat HP14603418012\UNICORN
GE145010\UNICORN)
Note:
The following messages will be displayed, and should be
ignored:
•
System error 1060 has occurred.
The specified service does not exist as an installed
service.
•
The service name is invalid.
More help is available by typing NET HELPMSG 2185
These messages are displayed when the script tries to start
and stop the SQL Server database engine.
6
Reboot the computer.
7
To verify the name change, open a command prompt window and execute
the following command:
•
C:>sqlcmd -Slocalhost\UNICORN -Q"select @@servername
Result: The new name should be shown as in the example below:
GE145010\UNICORN
(1rows affected)
8
Start UNICORN and open the Administration module.
9
•
Open the System Properties dialog,
•
select the system
and
•
click the Edit button.
Result: The Edit system dialog opens.
288
UNICORN 6.1 Administration and Technical Manual 28-9817-68 AA
D Additional computer setting changes
Step
Action
10
Select the new server computer name from the Instrument server menu:
11
•
Click the OK button to perform the change
and
•
log off UNICORN.
12
Restart the computer.
13
•
Start and log on to UNICORN
and
•
connect to the instrument.
UNICORN 6.1 Administration and Technical Manual 28-9817-68 AA
289
D Additional computer setting changes
Changing computer names in a
distributed environment
The following instructions apply when changing computer names in a network
environment, i.e. not for a standalone system.
Changing computer name for a standalone or database server computer
If the database server name has been changed in a distributed environment, some
configuration files must be updated accordingly on the UNICORN instrument server and
UNICORN client computers:
Step
Action
1
Start UNICORN on the instrument server or client computer.
Result: UNICORN detects that the database cannot be located. The Log On
- No database is found dialog opens.
2
Click Locate Database, browse to the database server and select the appropriate database.
3
Restart the instrument server or client computer.
Changing name for a computer that serves as instrument server only
The instruction below describes the steps that must be completed if the name of a
computer, which is used as an instrument server in a distributed installation, is changed.
Step
Action
1
•
Change the name of the computer as described in "Changing standalone or database server computer name" above
and
•
reboot.
2
Start UNICORN and open the Administration module.
3
•
Open the System Properties dialog,
•
select the system
and
•
click the Edit button.
Result: The Edit system dialog opens.
290
UNICORN 6.1 Administration and Technical Manual 28-9817-68 AA
D Additional computer setting changes
Step
Action
4
Select the new server computer name from the Instrument server menu:
5
•
Click the OK button to perform the change
and
•
log off UNICORN.
6
Restart the computer.
7
•
Start and log on to UNICORN
and
•
connect to the instrument.
UNICORN 6.1 Administration and Technical Manual 28-9817-68 AA
291
D Additional computer setting changes
Moving a Workgroup PC to a
Domain after a UNICORN 6.1
installation
The instruction below describes the actions necessary to verify and edit the firewall
settings for proper operation after a UNICORN computer has been moved from a
Workgroup to a Domain:
Note:
292
The following instruction describes the Windows firewall. If another
firewall is used, the corresponding settings must be verified. The search
paths shown below are valid if UNICORN was installed in the default
directory.
Step
Action
1
Open the Windows Control Panel.
2
Open the Security Center.
3
Choose Windows Firewall.
UNICORN 6.1 Administration and Technical Manual 28-9817-68 AA
D Additional computer setting changes
Step
Action
4
•
Click the Exceptions tab
and
•
verify that the changes made to the Windows Firewall configuration
are still functional:
UNICORN 6.1 Administration and Technical Manual 28-9817-68 AA
293
D Additional computer setting changes
294
Step
Action
5
Click the Add Programs button and add the following programs to the Exceptions list if necessary:
Program
Search path
UNICORN Client
C:\Program Files\GE Healthcare\UNICORN\Bin\UNICORNClient.exe
UNICORN Instrument Server
C:\Program Files\GE Healthcare\UNICORN\Bin\UNICORN Instrument Server.exe
UNICORN System
Creator
C:\Program Files\GE Healthcare\UNICORN\Bin\SystemInstallation.exe
SQL Server for UNICORN
C:\Program Files\Microsoft SQL Server\MSSQL10.UNICORN\MSSQL\Binn\Sqlservr.exe
GE Healthcare Software Licensing
Server
C:\Program Files\GE Healthcare\eLicense server\gehealth.exe
GE Healthcare License Server Manager
C:\Program Files\GE Healthcare\eLicense server\lmgrd.exe
UNICORN 6.1 Administration and Technical Manual 28-9817-68 AA
D Additional computer setting changes
Step
Action
6
Ensure that the following ports are open for traffic for the specified networking protocols.
Port
Port
TCP 40500
UDP 40500
TCP 40501
UDP 40501
TCP 40502
UDP 40502
TCP 40503
UDP 40503
TCP 40504
UDP 40504
TCP 40505
UDP 40505
TCP 40506
UDP 40506
TCP 40507
UDP 40507
TCP 40508
UDP 40508
TCP 40509
UDP 40509
TCP 40510
UDP 40510
Click the Add Port button and add the ports to the Exceptions list if necessary.
UNICORN 6.1 Administration and Technical Manual 28-9817-68 AA
295
D Additional computer setting changes
Step
Action
7
Ensure that the following ports are open for traffic for the specified networking protocols.
Port
Port
UDP 50000
UDP 50001
UDP 50002
UDP 50003
UDP 50004
UDP 50005
UDP 50006
UDP 50007
UDP 50008
UDP 50009
TCP 135
UDP 1434
Click the Add Port button and add the ports to the Exceptions list if necessary.
8
Click OK to apply the changes and close the dialogs.
OPC settings for UNICORN flow scheme
If the UNICORN computer is not used for a standalone system, then settings regarding
OPC must be updated in order for the flow scheme to work properly. See Section 2.5 OPC
settings for UNICORN flow scheme, on page 101 for information about these settings.
Actions for cloned computers
If the Windows operating system for a UNICORN 6.1 computer is installed using a cloning
mechanism, the cloning must follow the guidelines for disk duplications of Windows XP
installations.
For more information see The Microsoft policy concerning disk duplication of Windows
XP installations (http://support.microsoft.com/default.aspx?scid=kb;EN-US;314828).
For more information about imaging and automated installations of different Windows
versions, see Microsoft Deployment Toolkit (MDT) 2010
(http://www.microsoft.com/downloads/details.aspx?
FamilyId=3BD8561F-77AC-4400-A0C1-FE871C461A89&displaylang=en).
296
UNICORN 6.1 Administration and Technical Manual 28-9817-68 AA
D Additional computer setting changes
General computer management
If the UNICORN computer is not supplied by GE Healthcare, it is a recommended practise
to check the computer vendor website to see if there are any known issues with the
computer, and that all computer drivers are up-to-date.
UNICORN 6.1 Administration and Technical Manual 28-9817-68 AA
297
Index
Index
A
Access groups
access items, 160
functions, 225
general description, 160
Access items
general description, 165
Administration areas
descriptions, 7
Administrator notification
e-mail settings for
automated system
messages, 183
Administrator responsibilities
prepare the network
environment, 8
prepare the program for
users, 8
C
Computer set up
connections, 86
install network interface
cards, 82
Connection
prevent other users from
control mode
connection, 226
D
Database maintenance
archive results or logs, 202
archive selected results, 204
disable scheduled
backup, 197, 213
import UNICORN 5
results, 211
manual database
backup, 198
release locked database
objects, 209
restore backup data, 199
retrieve archived results or
logs, 206
schedule backup, 196
298
Database upgrade
disable scheduled backup
before upgrade, 213
upgrade to another SQL
Server edition, 214
Data migration
import results from
UNICORN 5, 211
Data sampling
ensure maximum
resolution, 248
frequency, 248
storage, 248
Documentation
ÄKTA avant, 20
E
E-license
add more licenses, 189
re-start server when
licenses are locked, 190
troubleshooting, 190
use Admin tool to verify
available licenses, 187
F
Firewall settings
database and license
server, 80
exceptions, 111
instrument server
computer, 86
Folders
delete special folders, 186
H
Home folder
how to delete, 186
Home folders
general information, 171
I
Installation
overview of network
installation and
configuration, 24
UNICORN 6.1 Administration and Technical Manual 28-9817-68 AA
Index
overview of workstation
installation and
configuration, 23
Instrument Configurations
delete obsolete, 143
import new, 142
L
Local station
definition, 10
Logs
archive, 156
export, 156
print, 156
search for specific text, 156
types of logs, 152
UNICORN and System Log
dialog, 153
view selected UNICORN and
system log entries, 153
M
Maintenance
Generate system error
report, 238
N
Network administrator
responsibilities, 9
security responsibilities, 9
Network communication failure
between instrument server
and instrument, 230
between local station and
network, 229
remote station, 228
Network setup
general information, 13
local network for UNICORN
illustrated, 17
network control
capacity, 246
stand-alone workstation, no
UNICORN network,
illustration, 15
UNICORN network as part
of other LAN, illustrated, 18
Network terms
explanations, 10
UNICORN 6.1 Administration and Technical Manual 28-9817-68 AA
O
OPC settings
general, 101
Windows 7, 104
Windows XP, 102
Operating system settings
Component Services, 255
general Windows 7
configuration, 253
general XP
configuration, 250
Windows XP settings for
database servers, 268
P
Passwords
administrator change for
other user, instruction, 181
how users change their
own, 182
rules and
recommendations, 180
Printing
set up a default system
printer, 123
set up printer for PDF, 123
Problem reports
Generate system error
report, 238
R
Remote station
definition, 10
Report
System error report, 238
S
Software installation
configure e-licenses, 45, 70
define a system at
installation, 53, 98
help viewer application, 30
installation summary report
- custom installation, 97
installation summary report
- full installation, 44
installation summary report
- server installation, 69
299
Index
install UNICORN 6.1, custom
installation of client and
instrument server, 88
install UNICORN 6.1, full
installation, 34
install UNICORN, database
and license server, 58
other required software, 29
post installation
settings, 279
prerequisites for
installation, 26
remove an installation, 125
removing prerequisite
software, 131
UNICORN 6.1 upgrade
installation - software
license agreement, 121
upgrading UNICORN 6.0 to
UNICORN 6.1, 118
SQL Server
upgrading SQL Server
Express edition, 213
System administrator
responsibilities, 9
security responsibilities, 9
System Log
dialog illustration, 153
general description, 152
System properties
activate a system, 137
create a new system
definition, 144
deactivate a system, 137
edit a definition, 136
instrument server
name, 134
possible selections, 135
print a system
summary, 139
System recommendations
computer settings, 81
computer
specifications, 244
dual network interface
cards, 82
300
System Settings
edit the settings, 147
settings parameters, 148
T
Terminology
general and network
terms, 10
Troubleshooting
access to UNICORN
functions, 233
Connection problems in
Windows XP
Workgroups, 236
database functions, 237
system or computer
connections, 235
user access, 232
U
UNICORN Log
dialog illustration, 153
general description, 152
Uninstall
manual uninstallation of
damaged UNICORN
installation, 269
User access
password rules, 225
User accounts
locked for access, 183
User options
description of the Options
dialog, 176
evaluation options, 179
sounds options, 178
view options, 177
User properties
assign folder access, 172
assign system access, 172
create a new user, 169
delete a user, 185
home folders, 171
the Default user, 167
the User Setup dialog, 160
user access groups, 160
UNICORN 6.1 Administration and Technical Manual 28-9817-68 AA
For local office contact information, visit
www.gelifesciences.com/contact
GE Healthcare Bio-Sciences AB
Björkgatan 30
751 84 Uppsala
Sweden
www.gelifesciences.com/unicorn
GE, imagination at work and GE monogram are trademarks of General Electric
Company.
Drop Design, AxiChrom, DeCyder, UNICORN, ÄKTA, ÄKTAexplorer and ÄKTApurifier
are trademarks of GE Healthcare companies.
All third party trademarks are the property of their respective owners.
© 2009 - 2010 General Electric Company – All rights reserved.
First published Sep. 2009
All goods and services are sold subject to the terms and conditions of sale of
the company within GE Healthcare which supplies them. A copy of these terms
and conditions is available on request. Contact your local GE Healthcare
representative for the most current information.
UNICORN: Any use of this software is subject to GE Healthcare Standard Software
End-User License Agreement for Life Sciences Software Products.
GE Healthcare Europe GmbH
Munzinger Strasse 5, D-79111 Freiburg, Germany
GE Healthcare UK Limited
Amersham Place, Little Chalfont, Buckinghamshire, HP7 9NA, UK
GE Healthcare Bio-Sciences Corp.
800 Centennial Avenue, P.O. Box 1327, Piscataway, NJ 08855-1327, USA
GE Healthcare Japan Corporation
Sanken Bldg.3-25-1, Hyakunincho Shinjuku-ku, Tokyo 169-0073, Japan
imagination at work
28-9817-68 AA 08/2010