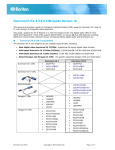
1
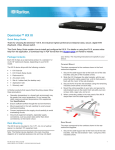
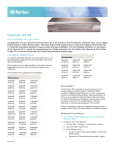
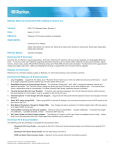
Dominion KX II Quick Setup Guide Thank you for your purchase of the Dominion® KX II, the industry's most full-featured, enterprise-class, secure, digital KVM (Keyboard, Video, Mouse) switch. This Quick Setup Guide explains how to install and configure the KX II. For details on using the KX II, access online help from the application, or download help in PDF format from the Support page on Raritan's website. Package Contents Each KX II ships as a fully-configured stand-alone product in a standard 1U (2U for DKX2-864) 19" rackmount chassis. Each KX II device ships with the following contents: 1 - KX II device 1 - KX II Quick Setup Guide 1 - Rackmount kit 2 - AC power cords 2 - Cat5 network cable 1 - Cat5 network crossover cable 1 - Set of 4 rubber feet (for desktop use) 1 - Application note 1 - Warranty card QS Rule In Raritan products that require Rack Mounting, please follow these precautions: Operation temperature in a closed rack environment may be greater than room temperature. Do not exceed the rated maximum ambient temperature of the appliances. See Specifications in online help. Ensure sufficient airflow through the rack environment. Mount equipment in the rack carefully to avoid uneven mechanical loading. Connect equipment to the supply circuit carefully to avoid overloading circuits. Ground all equipment properly, especially supply connections, such as power strips (other than direct connections), to the branch circuit. Note: The Raritan device depicted in the rack mounting diagrams is for example purposes only and may not depict your device. The mounting instructions are specific to your device. Forward Mount The steps correspond to the numbers shown in the front rackmount diagrams. 1. Secure the cable-support bar to the back end of the side brackets using two of the included screws. 2. Slide the KX II between the side brackets, with its rear panel facing the cable-support bar, until its front panel is flush with the “ears” of the side brackets. 3. Secure the KX II to the side brackets using the remaining included screws (three on each side). 4. Mount the entire assembly in your rack, and secure the side brackets' ears to the rack's front rails with your own screws, bolts, cage nuts, and so on. 5. When connecting cables to the rear panel of the KX II drape them over the cable-support bar. QS Rule Rack Mounting The KX II can be mounted in 1U (1.75", 4.4 cm) of vertical space in a standard 19" equipment rack. Dominion KX II Quick Setup Guide QSG-DKX2-v2.6.0-0N-E 255-62-4022-00-RoHS Rear Mount The steps correspond to the numbers shown in the rear rackmount diagrams. 1 1. Secure the cable-support bar to the front end of the side brackets, near the side brackets' “ears,” using two of the included screws. 2. Slide the KX II between the side brackets, with its rear panel facing the cable-support bar, until its front panel is flush with the back edges of the side brackets. 3. Secure the KX II to the side brackets using the remaining included screws (three on each side). 4. Mount the entire assembly in your rack and secure the side brackets' ears to the rack's front rails with your own screws, bolts, cage nuts, and so on. 5. When connecting cables to the rear panel of the user station or switch, drape them over the cable-support bar. The desktop background does not need to be completely solid, but desktop backgrounds featuring photos or complex gradients might degrade performance. Ensure that the server video resolution and refresh rate are supported by KX II, and that the signal is non-interlaced. See the KX II Online Help for a list of supported target server video resolutions. Mouse Settings Following are the mouse settings for various operating systems. These settings are configured on your target operating system unless otherwise indicated. See the KX II Online Help for details on configuring these mouse settings. Windows 7 and Windows Vista Mouse Settings Configure these mouse settings in Windows 7® and Windows Vista®: Configure the motion settings: QS Rule Step 1: Configuring Network Firewall Settings TCP Port 5000 Allow network and firewall communication on TCP Port 5000 to enable remote access to the KX II. Alternatively, configure the KX II to use a different TCP port, then allow communication on that port. TCP Port 443 Set the mouse motion speed setting to exactly the middle speed Disable the "Enhanced pointer precision" option Disable animation and fade effects: Animate controls and elements inside windows Animate windows when minimizing and maximizing Fade or slide menus into view Fade or slide ToolTips into view Fade out menu items after clicking Windows XP, Windows 2003, Windows 2008 Mouse Settings Configure these mouse settings in Windows XP®, Windows 2003® and Windows 2008®: Allow access to TCP Port 443 (Standard HTTPS) so you can access KX II via a web browser. Configure the Motion settings: TCP Port 80 Allow access to TCP Port 80 (Standard HTTP) to enable automatic redirection of HTTP requests to HTTPS. QS Rule Set the mouse motion speed setting to exactly the middle speed Disable the "Enhance pointer precision" option Disable the Snap To option Step 2: Configure the KVM Target Servers Disable transition effects: Target Server Video Resolutions For optimal bandwidth efficiency and video performance, KVM target servers running graphical user interfaces such as Windows®, Linux®, X-Windows, Solaris™, and KDE may require configuration. Windows 2000 Mouse Settings Dominion KX II Quick Setup Guide QSG-DKX2-v2.6.0-0N-E 255-62-4022-00-RoHS Deselect the "Use the following transition effect for menus and tooltips" option Configure these Windows 2000® mouse settings: 2 Configure the Motion settings: IBM AIX Mouse Settings Set the acceleration to None Set the mouse motion speed setting to exactly the middle speed Disable transition effects: Deselect the "Use the following transition effect for menus and tooltips" option Ensure that your video card is set to a supported resolution and that its output is VGA, not composite sync Configure these IBM AIX® mouse settings: Go to the Style Manager, click on Mouse Settings and set Mouse Acceleration to 1.0 and Threshold to 3.0 QS Rule Apple Mac Mouse Settings Step 3: Connect the Equipment Configure these Apple Mac® mouse settings: Absolute Mouse Synchronization is required for proper mouse synchronization on KVM target servers running a Mac® operating system. In order for Absolute Mouse Synchronization to work, a virtual media CIM is required. For a list of supported CIMs, see Supported Computer Interface Module (CIMs) Specifications. Once you have completed your KX II installation, set the Mac USB profile. If you do not set this profile, the mouse does synch in OS X. A. AC Power To do this, do one of the following: 1. Attach the included AC power cord to the KX II, and plug it into an AC power outlet. 2. For dual-power failover protection, attach the second included AC power cord to the KX II, and plug it into a different power source than the first power cord. 1. Connect to the Mac target from the Raritan KVM Client. 2. Select USB Profile > Other Profiles > Mac OS-X (10.4.9 and later). Or 3. In KX II, select Device Settings > Port Configuration, then click on the target name to open the Port page. 4. Expand 'Select USB Profiles for Port' section. 5. Select 'Mac OS-X (10.4.9) and later' from the Available box, then click Add to add it to the Selected box. 6. Click on 'Mac OS-X (10.4.9) and later' in the Selected box. This automatically adds it to the Preferred Profile drop-down. 7. Select 'Mac OS-X (10.4.9) and later' from the Preferred Profile drop-down, then check the checkbox under 'Set Active Profile As Preferred Profile'. Click OK to apply. Linux Mouse Settings Configure these Linux® mouse settings: (Standard Mouse Mode only) Set the mouse acceleration to exactly 1 and set the threshold to exactly 1. Enter the following command: xset mouse 1 1. This should be set for execution upon login. Sun Solaris Mouse Settings Configure these Sun® Solaris™ mouse settings: Connect the power supply(s): B. Modem Port (Optional) Please see the KX II Online Help for information on connecting modems. C. Network Port The KX II provides two Ethernet ports for failover purposes not for load-balancing. By default, only LAN1 is active, and the automatic failover is disabled. Enable network failover if you want LAN2 to use the same IP address should the KX II internal network interface or the network switch it is connected to become unavailable. To connect to the network: 1. Connect a standard Ethernet cable from the network port labeled LAN1 to an Ethernet switch, hub, or router. 2. To use the optional KX II Ethernet failover capabilities: a. Connect a standard Ethernet cable from the network port labeled LAN2 to an Ethernet switch, hub, or router. Enable 'Automatic Failover' on the KX II Network Configuration page. Set the mouse acceleration value to exactly 1 and the threshold to exactly 1 Dominion KX II Quick Setup Guide QSG-DKX2-v2.6.0-0N-E 255-62-4022-00-RoHS 3 Use a DCIM if you are connecting from the target server video port to the KX II. D. Local Access Port (Local PC) For access to target servers at the rack, use the KX II Local Access port. The Local Access port also provides a graphical user interface from the KX II Local Console for administration and target server access. While the Local Access port is required for installation and setup, it is optional for subsequent use. Note: The KX2-808, KX2-832 and KX2-864 also provide an Extended Local port labeled EXT LOCAL on the back of the device for access to target servers while at the rack. The Extended Local port is not required for the initial installation and setup. It is not enabled by default and is configured from the Local Console and the Remote Console. To connect the local port: Attach a multi-sync VGA monitor, mouse, and keyboard to the respective Local User ports using USB keyboard and mouse. The Local User and Extended Local ports are on the back panel of the KX II. Monitor - attach a standard multi-sync VGA monitor to the HD15 (female) video port Keyboard - attach either a standard keyboard to the Mini-DIN6 (female) keyboard port, or a standard USB keyboard to one of the USB Type A (female) ports Mouse - attach either a standard mouse to the Mini-DIN6 (female) mouse port, or a standard USB mouse to one of the USB Type A (female) ports E. Target Server Ports The KX II uses standard UTP cabling (Cat5/5e/6) to connect to each target server. For information on the supported distances between the KX II and target server, see Supported Target Server Connection Distance/Refresh Rate/Video Resolution in KX II Online Help. If you are using digital CIMs (DCIMs), review Digital CIM Target Server Timing and Video Resolution in KX II Online Help. To connect a target server to the KX II: 1. Use the appropriate CIM or DCIM. Attach the video connector of your CIM/DCIM to the video port of your target server. 2. Ensure that your target server's video is configured to a supported resolution and refresh rate. For Sun servers, ensure your target server's video card is set to output standard VGA (H-and-V sync) and not composite sync. 3. Attach the keyboard/mouse connector of your CIM/DCIM to the corresponding ports on your target server. Dominion KX II Quick Setup Guide QSG-DKX2-v2.6.0-0N-E 255-62-4022-00-RoHS 4. Attach the CIM/DCIM to an available server port on the back of the KX II using a standard, straight-through UTP (Cat5/5e/6) cable for CIMs, or standard USB cable for DCIMs. Note: The DCIM-USB G2 provides a small slide switch on the back of the CIM. Move the switch to P for PC-based USB target servers. Move the switch to S for Sun USB target servers. Power-cycle the CIM by removing the USB connector from the target server, then plugging it back in a few seconds later in order to apply the new switch position. QS Rule Step 4: Configure the KX II For the following steps, you must change the default password and assign the KX II its IP address at the Local Console. All other steps can be performed from either the Local Console, or from the KX II Remote Console via a supported web browser using the KX II's default IP address. Java 1.7™ is required to use the Java-based KX II Virtual KVM Client (VKC) and Multi-Platform Client (MPC).. Microsoft .NET® 3.5 (or later) is required to use KX II with the Microsoft Windows®-based Active KVM Client (AKC). Change the Default Password The first time you start the KX II, you are required to change the default password. To change the default password: 1. Once the unit has booted, enter the default username admin and password raritan. Click Login. 2. Enter the old password raritan, then enter and reenter a new password. Passwords can be up to 64 characters in length consisting of English, alphanumeric and special characters. 3. Click Apply. Click OK on the Confirmation page. Assign the KX II an IP Address To assign an IP address to the KX II: 1. Choose Device Settings > Network. The Network Settings page opens. 2. Specify a meaningful Device Name for your KX II device. Up to 32 alphanumeric and valid special characters, no spaces between characters. 3. Next, configure the IPv4, IPv6 and DNS settings. Configure the IPv4 Settings 1. In the IPv4 section, enter or select the appropriate IPv4-specific network settings: 4 a. Enter the IP Address if needed. The default IP address is 192.168.0.192. b. Enter the Subnet Mask. The default subnet mask is 255.255.255.0. c. Enter the Default Gateway if None is selected from the IP Auto Configuration drop-down. d. Enter the Preferred DHCP Host Name if DHCP is selected from the IP Auto Configuration drop-down. e. Select the IP Auto Configuration. The following options are available: None (Static IP) - This option requires you manually specify the network parameters. This is the recommended option because the KX II is an infrastructure device, and its IP address should not change. Select this option if you want to ensure redundant failover capabilities should the primary Ethernet port (or the switch/router to which it is connected) fail. If it fails, KX III fails over to the secondary network port with the same IP address, ensuring there is not interruption. DHCP - Dynamic Host Configuration Protocol is used by networked computers (clients) to obtain unique IP addresses and other parameters from a DHCP server. With this option, network parameters are assigned by the DHCP server. If DHCP is used, enter the Preferred host name (DHCP only). Up to 63 characters. (or the switch/router to which it is connected) fail. If it fails, KX III switches to the secondary network port with the same IP address, ensuring their is no interruption. If None is selected, the following Network Basic Settings fields are enabled: Global/Unique IP Address, Prefix Length, and Gateway IP Address allowing you to manually set the IP configuration. Router Discovery - use this option to automatically assign IPv6 addresses that have Global or Unique Local significance beyond that of the Link Local, which only applies to a directly connected subnet. 2. Next, configure DNS settings. Configure the DNS Settings 1. Select Obtain DNS Server Address Automatically if DHCP is selected and Obtain DNS Server Address is enabled. When Obtain DNS Server Address Automatically, the DNS information provided by the DHCP server will be used. 2. If Use the Following DNS Server Addresses is selected, whether or not DHCP is selected, the addresses entered in this section is used to connect to the DNS server. Enter the following information if the Following DNS Server Addresses is selected. These addresses are the primary and secondary DNS addresses used if the primary DNS server connection is lost due to an outage. a. Primary DNS Server IP Address b. Secondary DNS Server IP Address 3. When finished, click OK. 2. Next, configure IPv6 and/or DNS settings. Your KX II device is now network accessible. Configure the IPv6 Settings Name Your Target Servers 1. If using IPv6, enter or select the appropriate IPv6-specific network settings in the IPv6 section: a. Select the IPv6 checkbox to activate the fields in the section and enable IPv6 on the device. b. Enter a Global/Unique IP Address. This is the IP address assigned to the KX II. c. Enter the Prefix Length. This is the number of bits used in the IPv6 address. d. Enter the Gateway IP Address. e. Link-Local IP Address. This address is automatically assigned to the device, and is used for neighbor discovery or when no routers are present. Read-Only f. Zone ID. Identifies the device the address is associated with. Read-Only g. Select an IP Auto Configuration option: None (Static IP) - this option requires you manually specify the network parameters. This is the recommended option because the KX II is an infrastructure device, and its IP address should not change. To name the target servers: 1. Connect all of the target servers if you have not already done so. 2. Select Device Settings > Port Configuration, then click the Port Name of the target server you want to name. 3. Enter a name for the server up to 32 alphanumeric and special characters. Click OK. Specify Power Supply Autodetection The KX II provides dual power supplies. When both power supplies are used, the KX II automatically detects them and notifies you of their status. Additionally, both the Powerln1 and Powerln2 Auto Detect checkboxes are automatically selected on the Power Supply Setup page. If you are using only one power supply, you can enable automatic detection for only the power supply in use. Select this option if you want to ensure redundant failover capabilities should the primary Ethernet port Dominion KX II Quick Setup Guide QSG-DKX2-v2.6.0-0N-E 255-62-4022-00-RoHS 5 To enable automatic detection for the power supply in use: 1. Choose Device Settings > Power Supply Setup. The Power Supply Setup page opens. 2. If you are plugging power input into power supply number one (left-most power supply at the back of the device), select the Powerln1 Auto Detect option. 3. If you are plugging power input into power supply number two (right-most power supply at the back of the device), select the Powerln2 Auto Detect option. Click OK. If either of these checkboxes is selected and only power input is connected, the power LED on the front of the device is Red. Step 5: Launching the KX II Remote Console Log in to your KX II Remote Console from any workstation with network connectivity that has Microsoft .NET® and/or Java Runtime Environment™ installed. To launch the KX II Remote Console: 1. Launch a supported web browser. 2. Enter either: The URL - http://IP-ADDRESS to use the Java-based Virtual KVM Client Or http://IP-ADDRESS/akc for the Microsoft .NET-based Active KVM Client IP-ADDRESS is the IP address assigned to your KX II Configure Date/Time Settings (Optional) You can also use HTTPS, or the DNS name of the KX II assigned by your administrator (if applicable). Optionally, configure the date and time settings. The date and time settings impact SSL certificate validation if LDAPS is enabled. Use the Date/Time Settings page to specify the date and time for the KX II. There are two ways to do this: Manually set the date and time. Synchronize the date and time with a Network Time Protocol (NTP) server. To set the date and time: 1. Choose Device Settings > Date/Time. The Date/Time Settings page opens. 2. Choose your time zone from the Time Zone drop-down list. 3. Adjust for daylight savings time by checking the "Adjust for daylight savings time" checkbox. 4. Choose the method to use to set the date and time: User Specified Time - use this option to input the date and time manually. For the User Specified Time option, enter the date and time. For the time, use the hh:mm format (using a 24-hour clock). Synchronize with NTP Server - use this option to synchronize the date and time with the Network Time Protocol (NTP) Server. 5. For the Synchronize with NTP Server option: a. Enter the IP address of the Primary Time server. b. Enter the IP address of the Secondary Time server. Optional Note: If DHCP is selected for the Network Settings on the Network page, the NTP server IP address is automatically retrieved from the DHCP server by default. Manually enter the NTP server IP address by selecting the Override DHCP checkbox. 3. You are always redirected to the IP address from HTTP to HTTPS. 4. Enter your username and password. Click Login. Access and Control Target Servers Remotely The KX II Port Access page provides a list of all KX II ports, as well as the connected target servers, their status, and availability. Accessing a Target Server To access a target server: 1. On the KX II Port Access page, click the Port Name of the target you want to access. The Port Action Menu is displayed. 2. Choose Connect from the Port Action menu. A KVM window opens with a connection to the target. Switching between Target Servers To switch between KVM target servers: 1. While already using a target server, access the KX II Port Access page. 2. Click the port name of the target you want to access. The Port Action menu appears. 3. Choose Switch From in the Port Action menu. The new target server you selected is displayed. Disconnecting a Target Server To disconnect a target server: 6. Click OK. QS Rule On the Port Access page, click the port name of the target you want to disconnect from, then click Disconnect on Port Action menu when it appears. QS Rule Dominion KX II Quick Setup Guide QSG-DKX2-v2.6.0-0N-E 255-62-4022-00-RoHS 6 Step 6: Configuring the Keyboard Language (Optional) Note: This step is not required if you are using the US/International language keyboard. If you are using a non-US language, the keyboard must be configured for the appropriate language. 4. Enable the tiered devices. From the tiered device, choose Device Settings > Local Port Settings. 5. In the Enable Local Ports section of the page, select Enable Local Port Device Tiering. 6. In the Tier Secret field, enter the same secret word you entered for the base device on the Device Settings page. Click OK. QS Rule Additionally, the keyboard language for the client machine and the KVM target servers must match. Consult your operating system documentation for additional information about changing the keyboard layout. Step 8: Create and Install an SSL Certificate Raritan strongly recommends you install your own SSL Certificate in each KX II device. This security best practice reduces the number of Java™ warning messages, and avoids man-in-the-middle attacks. Changing the Keyboard Layout Code (Sun Targets) Use this procedure if you are using a DCIM-SUSB and want to change the keyboard layout to another language. To change the keyboard layout code (DCIM-SUSB only): It also prevents future Java versions and browser versions from blocking access to your KX II device. For information creating and installing SSL certificates, see SSL Certificates in online help. QS Rule 1. Open a Text Editor window on the Sun™ workstation. 2. Check that the Num Lock key is active. then press the left Ctrl key and the Del key on your keyboard, or select the option "set CIM keyboard/Mouse options" from the keyboard menu. The Caps Lock light starts to blink, indicating that the CIM is in Layout Code Change mode. The text window displays: Raritan Computer, Inc. Current keyboard layout code = 22h (US5 UNIX). Additional Information For more information about the KX II® and the entire Raritan product line, see Raritan's website (www.raritan.com). For technical issues, contact Raritan Technical Support. See the Contact Support page in the Support section on Raritan's website for technical support contact information worldwide. Raritan's products use code licensed under the GPL and LGPL. You can request a copy of the open source code. For details, see the Open Source Software Statement at (http://www.raritan.com/about/legal-statements/open-source-software-statement/) on Raritan's website. 3. Type the layout code desired (for example, 31 for the Japanese keyboard). Press Enter. 4. Shut down the device and power on once again. The DCIM-SUSB performs a reset (power cycle). 5. Verify that the characters are correct. QS Rule Step 7: Configure Tiering (Optional) The optional tiering feature allows you to use a KX II as your base device, then connect additional KX II's to it as tiered devices. You can then access servers and PX PDUs through the base both locally and remotely. See the Device Management section of the KX II Online Help for more information on this feature. To enable tiering: 1. From the base KX II tier device, select Device Settings > Device Services to open the Device Service Settings page. 2. Select Enable Tiering as Base. 3. In the Base Secret field, enter the secret shared between the base and the tiered devices. This secret is required for the tiered devices to authenticate the base device. Enter the same secret word for the tiered device. Click OK. Dominion KX II Quick Setup Guide QSG-DKX2-v2.6.0-0N-E 255-62-4022-00-RoHS 7