1
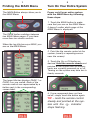
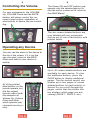
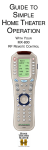
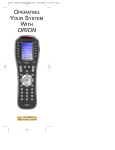
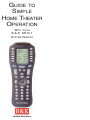
GUIDE TO
SIMPLE
HOME THEATER
OPERATION
WITH YOUR
B & K SR10.1
SYSTEM REMOTE
Thank you for purchasing
the B & K SR 10.1 System
Remote Control!
Table of Contents
Finding the MAIN Menu 1
Please use this manual as a guide to
operating your home theater after the
remote control is programmed by your
dealer for automated operation.
The SR10.1 remote control is preprogrammed at the factory to operate the
B & K component only. See your dealer for information on programming the
SR10.1 remote control.
GUIDE TO SIMPLE HOME THEATER OPERATION
© 2002 B & K Components Ltd. All rights
reserved.
B & K Components, Ltd. . 2100 Old Union
Road . Buffalo, New York 14227
1.800.543.5252 In NY: 716.656.0026
Fax: 716.656.1291
E-mail: [email protected] .
On the web: www.bkcomp.com
Turn On the System
2
Using the MAIN Menu
3
Select a New ACTIVITY 3
Select a DEVICE Only
4
Controlling the Volume
5
Operating Any Device
5
Using FAV - Favorites
7
Backlighting
9
Changing CONTRAST
9
Batteries
10
Cleaning the Screen
10
Warranty
12
Specifications
12
1
2
Finding the MAIN Menu
Turn On Your Entire System
The MAIN Button always takes you to
the MAIN Menu.
Power on/off your entire system
with the MAIN Menu by following
these steps:
1. Touch the MAIN button to make
sure that you are on the MAIN Menu.
It doesn’t matter which page of the
MAIN Menu is displayed.
The PAGE button switches between
two MAIN Menu pages IF you have
more than ten remote controls.
When the top title bar says MAIN, you
are on the MAIN Menu.
2. Point the the remote control at the
system (usually a repeating sensor
near the screen).
PAGE 1
3. Touch the On or Off button as
desired. Hold the remote steady and
pointed at the system until all components are correctly powered on or off.
Turning on the system may take ten to
twenty seconds.
The lower title bar displays PAGE 1 or
PAGE 2 as you switch. Each of the
remote controls are represented by a
button next to the corresponding
screen label.
4. If one component does not turn
on/off, simply touch the button again.
TIP – Hold the remote control
steady and pointed at the system until the
indicator
stops flashing.
3
Using the MAIN Menu
The MAIN Menu enables you to either
select a new Activity or simply select a
new Device to control.
When you select a new activity, the
remote control will issue a MACRO (a
timed sequence of many commands
from many different remote controls).
This MACRO was custom programmed for your system by your
installer. It will issue all of the commands necessary to switch the sound
and picture of your system.
When you select a device, the the
remote control becomes the remote
control you select WITHOUT affecting
the home theater.
4
Hold the remote
steady and
pointed at the
system until
the sound
and picture
have been
switched.
The MAIN Menu buttons issue
MACROS that reset the sound and
picture of your home theater to a new
activity.
TIP – Hold the remote control
steady and pointed at the system until the
indicator
stops flashing.
If the sound or the picture still are
not correct, repeat steps 1 - 4.
Select a New ACTIVITY
Select a DEVICE Only
1. Touch the MAIN button to make
sure that you are on the MAIN
Menu. Touch the PAGE button if you
don’t see the activity you want.
2. Point the the remote control at
the system (or at the repeating
INFRARED sensor if one is
installed).
3. Touch the activity button next to
the desired screen label. For example if you wish to watch a DVD
movie, touch the DVD button.
1. Touch the MAIN button to make
sure that you are on the MAIN
Menu. Touch the Page button if you
don’t see the activity you want.
2. Press and hold the MAIN button.
While holding the MAIN button
down, touch the button next to the
desired screen label. The remote
control will now display the name of
the selected device and all buttons
will operate the device, however, the
sound and the picture of your system have not been changed.
5
Controlling the Volume
For your convenience, the VOLUME
Up, VOLUME Down and the MUTE
buttons will always control the surround sound system, regardless of
what activity or device you are controlling.
6
The Power ON and OFF buttons now
operate only the selected device (to
turn the entire system on/off, return to
the MAIN Menu).
The ten screen labeled buttons are
now labeled with any commands
that do not fit one of the buttons with
printed labels.
Operating any Device
DVD
OPEN CLOSE
You can see the name of the device at
the top of the screen. If it is not the
one you want, return to the MAIN
Menu and select a new device or
activity.
DVD
OPEN CLOSE
All of the printed
label buttons on the
remote operate just
like the original
remote control (with
the exception of
Volume Up, Volume
Down and Mute
which operate your
surround sound system).
AUDIO VIDEO
ANGLE SCENE
TITLE
SUB
SKIP-
SKIP+
Up to 40 screen labeled buttons are
available for each device. To view
the additional buttons, press the
PAGE button to display additional
pages. The the remote control can
display up to four pages of screen
labeled buttons for each activity or
device! As you scroll through the
pages, notice that the bottom title
bar displays which page you are
viewing (PAGE 1, PAGE 2, etc.).
7
The thumbpad is a the remote control
exclusive control for both right and left
handed operators. When you are operating a device with any kind of onscreen menu, guide or display, the
thumbpad offers you easy one-handed
control with your thumb.
To SELECT or say OK, simply press
your thumb straight down. You’ll feel
the click as the OK/SELECT/ENTER
command is sent.
Using FAV - Favorites
The favorites menu is created uniquely
for you by your custom installer. The
screen labeled buttons now issue
timed sequences of commands that
will reset your system with one touch.
Typically, the favorites menu is programmed with one touch “shortcut”
buttons that issue all of the necessary
commands to change the channel of
your satellite dish or television. Thus,
instead of entering a two or three digit
number (which you must remember)
and the enter command, you simply
select the favorite button labeled HBO,
CNN, TNT etc.
The Favorite menu can be programmed
with any favorite activity. It is not limited
to channel favorites. Your custom
installer may invent a feature unique to
8
your system. Discuss any non-channel
favorite label with your installer, so that
you understand how to use it.
To use the FAVORITE Menu:
1. Press the FAV button. The top
title bar will now display FAV.
Use the FAV button and the PAGE
button to navigate through your various pages of FAVORITES. The FAV
button scrolls up from Page 1 to
Page 5, using the PAGE button
scrolls down from Page 5 to Page 1.
As you select a new page, the bottom title bar will display the page
number (page 1, page 2, etc.)
FAV
HBO
SHOW
CNN
ESPN
CNBC SPORT
DISCO LEARN
NICK
DISNY
To EXIT Fav and return to the last
activity/device selected, press the
MAIN button ONCE. To EXIT Fav
and go to the MAIN Menu, press the
MAIN button twice.
9
Backlighting
Turn on the backlighting by pressing
the LIGHT button on
the right side of the
the remote control
remote control. The
backlighting will stay
on briefly, then turn
off automatically. If
you wish to turn it off
without waiting, simply tap the LIGHT
button again.
10
Batteries
If the batteries are running low, the
screen will display a warning at the bottom of the screen whenever you press
the Power ON button. You may also
experience a slight drop in the operating
distance of either the SR 10.1 remote
control when the batteries are running
low.
Please replace all of the batteries with
fresh, new AAA batteries. Do not mix
old and new batteries.
The SR10.1 will retain all programming
even if the batteries are removed for
an extended period.
* Note that your battery life is reduced by how often you
use the backlighting.
Cleaning The Screen
Changing Contrast
Do not use abrasives or liquid cleaning
solutions!
Press and Hold BOTH the MAIN and
the UP thumbpad button at the same
time to make the screen DARKER.
Press and Hold BOTH the MAIN and
the DOWN thumbpad button at the
same time to make it LIGHTER.
Use a dry soft lint-free cloth to clean
the screen. Be careful not to use
excessive force. The screen is glass
and is easily breakable.
11
Warranty
The SR10.1 is covered against any
manufacturers defects or workmanship
for a period of one year from the date
of purchase. This warranty does not
cover the following items:
-Batteries, or damage to the remote
from faulty batteries.
-Damage from misuse, neglect, or acts
of nature.
-Products that have been modified or
incorporated into other products.
-Products purchased more than 12
months from the current date.
-Units purchasedfrom unauthorized
dealers or companies.
Specifications
Range: 40 to 60 feet, depending upon
components
Weight: 8 oz. (with batteries)
Size: 9.0” x 3.0” x 1.3”
Batteries: Four AAA Alkaline batteries
included
LCD Size: 1.4” x 2.1”
12
Notes
B & K Components, Ltd.
2100 Old Union Road . Buffalo, New York 14227
1.800.543.5252 In NY: 716.656.0026
Fax: 716.656.1291
E-mail: [email protected] .
On the web: www.bkcomp.com