1
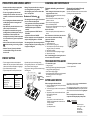
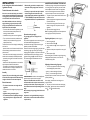
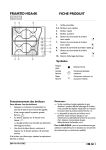
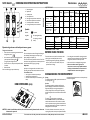
NUTID HGA4K GB
COOKING HOB OPERATING INSTRUCTIONS
Removable grates
2.
Rapid burner
3.
Auxiliary burner
Semi-rapid burners
Rear right semi-rapid burner control knob
Rear left semi-rapid burner control knob
Front left rapid burner control knob
Front right auxiliary burner control knob
5.
6.
7.
8.
Type of gas used
Symbols
Solid disc
Tap closed
Large flame
Max. opening/max. delivery
Small flame
Min. opening or reduced
delivery
Operation of gas burners with safety and electric ignition
To light one of the burners:
•
Press and turn the corresponding knob anticlockwise to
the large flame symbol
.
•
At the same time, keep the knob pressed against the
control panel until the burner ignites
.
The igniter spark will light the burner.
•
Once the burner is lit, keep the knob pressed for about
10 seconds.
•
Release the knob.
If the burner fails to light, repeat the above steps.
GB ES PT
INJECTOR TABLE
1.
4.
Destinations
Note:
The burner safety device shuts off the gas if the flame goes
out accidentally (sudden draughts, interruption in gas
delivery, boiling over of liquids, etc.).
The device must not be pressed for more than 15 sec. If the
burner does not stay alight after this time has elapsed, wait at
least one minute before trying to light it again.
Important:
CATEGORY II2H3+
Type of burner
Injector
marking
Nominal
Nominal
heating capacity consumption
kW
HOB DIMENSIONS (mm)
Reduced
heating
capacity kW
Gas pressure (mbar)
min.
nom.
max.
NATURAL GAS
(Methane)
G20
rapid
semi-rapid
auxiliary
128
104
78
3.00
1.90
1.00
286 l/h
181 l/h
95 l/h
0.60
0.35
0.30
17
20
25
LIQUEFIED
PETROLEUM GAS
(Butane)
G30
rapid
semi-rapid
auxiliary
87
70
50
3.00
1.90
1.00
218 g/h
138 g/h
73 g/h
0.60
0.35
0.30
20
28-30
35
LIQUEFIED
PETROLEUM GAS
(Propane)
G31
rapid
semi-rapid
auxiliary
87
70
50
3.00
1.90
1.00
214 g/h
136 g/h
71 g/h
0.60
0.35
0.30
25
37
45
Type of gas used
Model
configuration
Nominal heating
capacity
kW
Total nominal
consumption
Air necessary (m3) for the
combustion of 1 m3 of gas
G20 20 mbar
4 gas
7.80
743 l/h
9.52
G30 28-30 mbar
4 gas
7.80
567 g/h
30.94
G31 37 mbar
4 gas
7.80
557 g/h
23.80
POWER SUPPLY: 230V ~ 50Hz
BEFORE USING THE HOB
These instructions are only valid for the countries whose
symbol is given on the dataplate (under the hob).
• Keep the packing elements (plastic bags, polyurethane
foam, etc.) out of the reach of children, as they are a
potential source of danger.
• Use a detergent recommended for cleaning the stainless
steel hob and remove and deposits of fat or food. Before
using the hob, make sure to remove any stickers.
• Make sure the hob was not damaged during transport.
• Make sure installation and the gas/electrical
connections are carried out by a qualified technician
according to the Manufacturer's instructions and in
compliance with the current local regulations.
Improper use of the grates could scratch the hob: do not
place the grates upside down and/or slide them on the hob.
It is inadvisable to use:
•
cast iron grills or earthenware pots and pans
•
dissipators such as metal mesh etc.
•
two burners simultaneously for one container (e.g. fish
kettle).
IT
SAFEGUARDING THE ENVIRONMENT
Packing
The packing materials are 100% recyclable and marked with
the recycling symbol ( ).
Products
This appliance is marked in compliance with European
Directive 2002/96/EC on Waste Electrical and Electronic
Equipment (WEEE). By ensuring that this appliance is
correctly scrapped, the user can help prevent potentially
harmful consequences for the environment and the health of
people.
the household waste collection service or the shop where you
purchased the appliance.
The symbol
on the product or accompanying
documentation indicates that this product should not be
treated as domestic waste but must be taken to a suitable
centre for collection and recycling of electrical and electronic
equipment. Disposal must be carried out in compliance with
local regulations on waste disposal.
NOTES: If a hood is installed above the hob, refer to the hood assembly instructions for the correct
distance to be respected.
5019 619 01328/A
For further information on the treatment, recovery and
recycling of this product, contact your competent local office,
To ensure best use of the hob, please read these instructions carefully and keep them for future reference.
HBN 430
PRECAUTIONS AND GENERAL ADVICE
CLEANING AND MAINTENANCE
• Disconnect the hob from the power supply before
Cleaning the hob surface, grates and control
panel
•
•
•
•
•
•
any cleaning or maintenance operation.
The use of a gas appliance produces heat and
humidity in the room. Make sure the room is wellventilated, or install an extractor hood with exhaust
duct.
In case of prolonged use, additional ventilation may be
needed (opening a window or increasing the hood
extraction speed).
Keep children away from the hob when in use and
when its has just been switched off.
The appliance is not intended for use by people
(including children) with limited physical, sensory or
mental abilities or without experience and
knowledge of it, unless they are under the supervision
of or instructed in its use by a person responsible for
their safety.
After use, make sure the knobs are in the off position
, and close the main gas cock or the gas cylinder
valve.
Attention: The cover (if present) could break if
overheated. Before closing it, make sure all the
burners are off.
• Warning: The protective rubber feet on the grates
are a choking hazard for young children.
After cleaning the grates, make sure all the rubber
feet are correctly fitted.
Declaration of Conformity
put on the market in conformity with:
- safety requirements of “Gas” Directive 90/396/EEC;
- safety objectives of “Low Voltage” Directive
2006/95/EC (which replaces 73/23/EEC as
amended).
- protection requirements of “EMC” Directive
89/336/EEC;
- requirements of Directive 93/68/EEC.
• This hob is suitable for contact with foodstuffs and
complies with (EC) Regulation no. 1935/2004.
• This cooking hob (Class 3) has been designed only for
cooking food. Any other use (such as heating a room)
is improper and dangerous.
or lemon juice, etc., on the hob.
Stainless steel surface
• Clean with a specific product normally available on the
market.
Note: Continuous use of the hob may alter the colour
of the surface near the burners due the high
temperature of the flame.
Cleaning the burners
1. Lift and remove the cap.
2. Remove the burner by pulling it up.
3. Place the burner and cap in hot water with liquid
Note: To avoid damaging the electric ignition, do not
use it when the burners are not fitted.
different widths. Use pots and pans with bottoms the same
width as that of the burners and hotplate, or slightly larger.
• Only use flat-bottomed pots and pans.
• The pots and pans must not overlap the control panel.
• Cook vegetables, potatoes, etc. with a small amount of
water in order to reduce cooking time.
• Using a pressure-cooker gives a further reduction in energy
and cooking time.
NO!
from 24 to 26 cm
from 16 to 22 cm
from 8 to 14 cm
from 24 to 26 cm
from 16 to 35 cm
products or steel wool.
• Do not use steam cleaning equipment.
• Do not use flammable products.
• Do not leave acid or alkaline substances such as vinegar, salt
detergent. (Do not put in a dishwasher).
• If possible, keep the pan covered during cooking.
Rapid (9.1 cm)
Semi-rapid (6.4 cm)
Auxiliary (4.5 cm)
WOK (12 cm)
Fish kettle (23 cm x 4.5 cm)
• Do not use abrasive or corrosive products, chlorine
4. Rinse and dry thoroughly.
5. Make sure none of the burner openings are clogged.
6. Refit the burner and cap.
• The hob is equipped with burners and/or hotplate of
Pan width
supply and wait until it is cool.
• Wipe with a cloth moistened with hot water and soap or
Clean the hotplate when half-cold.
Wipe with a cloth moistened with water and salt, and finish
by rubbing with a cloth moistened with oil.
diluted liquid detergent.
• This cooking hob has been designed, constructed and
ENERGY SAVING
Burner
• Before cleaning the hob, disconnect it from power
Cleaning the electric hotplate (if present)
TROUBLESHOOTING GUIDE
1. The burner fails to ignite:
• Is the gas tap open?
• Has the supply of the town gas (methane) been suspended?
• Is the gas cylinder (liquefied gas) empty?
• Are the burner openings clogged?
• Were the flame-spreader and burner correctly positioned
after cleaning? (See the section “Cleaning and
maintenance”.)
2. The electric ignition does not work:
• Is there a power failure?
AFTER-SALES SERVICE
Before contacting the After-sales Service:
1. Check “Troubleshooting guide” to see if you can eliminate
the problem yourself
2. Turn the hob on again to check if correct operation has
been restored.
3. If the problem persists, contact the After-sales Service.
Give the following information:
• type of fault;
• hob model;
• service number (i.e. the number after the word
SERVICE on the dataplate under the hob and on the
warranty certificate);
• your full address;
• your telephone number.
If any repairs are required, contact an authorised service
centre, indicated in the warranty.
In the unlikely event that an operation or repair is carried out
by an unauthorised technician, always request certification
of the work carried out and insist on the use of original spare
parts.
Failure to comply with these instructions may
compromise the safety and quality of the product.
Whirlpool Europe S.r.l.
Viale G. Borghi, 27 - 21025
Comerio (VA)
Phone 0332.759111 Fax 0332.759268
www.whirlpool.eu
INSTALLATION
(to be read together with the enclosed national
regulations references)
Technical information for the Installer
If there is no oven under the hob (any oven installed
must be manufactured by Whirlpool and equipped with
a cooling system), insert a separator panel at a distance
of at least 20 mm from the bottom of the hob.
Note: Before installation, make sure the local gas
supply conditions (gas type and pressure) and hob
settings are compatible with those indicated on the
Product Sheet and on the dataplate
• The outer surfaces of the cabinets or appliances next to the
hob must be heat resistant (thermal protection “Y”)
according to national standards.
• Installation must comply with current local regulations.
• The air in the room where the hob is installed must be
sufficient for correct combustion of the gas (see the
separate Product Sheet).
The natural flow of air must occur through a suitable opening,
which must be:
- permanent, made on one of the external walls of the room
and communicating with the outside in an area free of
pollution sources;
- constructed to ensure that the openings on the inside and
outside cannot be intentionally or accidentally obstructed;
- protected by a metal grille or net that does not reduce its
working section;
- situated near the floor and positioned so as not to interfere
with the operation of the fume exhaust devices.
- This appliance is not connected to a fume exhaust device.
- Fume exhaust must occur through a suitable hood or fan
installed on the wall or on the window.
ADAPTATION TO DIFFERENT TYPES OF GAS
• When installing, provide for an omnipolar cut-out
switch with contact opening distance of at least 3
mm.
• If necessary, the power cable must only be replaced
with one having the same characteristics as the
original supplied by the manufacturer (type H05V2V2F - T90°C or H05RR-F). This operation must be carried
out by the After-Sales Service or a qualified technician.
L
Earth
(Yellow/Green)
N
Connection to the gas supply
The gas supply system must comply with local
regulations.
The specific local regulations for some countries are given in
the enclosed National Safety Regulations card.
If no information concerning the required country is given,
please ask your installer for more details.
Connection of the hob to the gas supply or gas cylinder must
be made using a rigid copper or steel pipe with fittings
complying with local regulations, or by means of a continuoussurface flexible stainless steel tube complying with local
regulations. Fit the gasket (B) in the elbow connection.
The maximum length of the flexible metal tube is 2 m.
Electrical connection
• The electrical connections must comply with local
regulations.
• The data relevant to the voltage and input are given on the
dataplate.
• Appliance earthing is compulsory by law.
• The manufacturer declines any liability for damage or
injury caused by failure to comply with the above
regulations.
Replacing the injectors (see table on page 1)
1. Remove the grates (A).
2. Remove the burner bodies (B).
3. Using a suitable wrench (C), unscrew the injector to be
replaced.
4. Replace it with the injector required for the new type of
gas.
5. Refit the injector in (D).
Before installing the hob, remember to apply the gas setting
label supplied with the injectors, so that it covers the
information already present
Adjusting minimum setting of gas taps
1. To ensure correct adjustment of the minimum setting,
remove knob (E) and proceed as follows:
• tighten (-) to decrease the height of the flame;
Assembly
Important: The power cable and plug must be suitable
for the hob's electrical input and the cable must be long
enough to allow the hob to be removed upwards.
If a different type of gas to that specified on the dataplate and
on the orange sticker at the top of the hob is used, the hob
must be adapted for this new function. The orange sticker
must be removed and glued in the instruction handbook,
which must be kept for the entire service life of the hob.
1. To replace to injectors, contact the After-Sales Service or
a qualified technician.
Injectors not supplied with the appliance must be ordered
from After-Sales Service.
2. Connect the hob to the gas shut-off cock with a pipe
suitable for the gas used, in compliance with current
regulations.
3. Adjust the minimum setting of the taps.
Note: For liquefied gas (G30/G31) the minimum adjustment
screws (by-pass) must be fully screwed down.
FOR BELGIUM ONLY: The elbow connection (A) on the
appliance must be replaced with the one supplied.
Important: If a flexible stainless steel tube is used, it
must be installed in such a way that it cannot touch any
movable part of the cabinet, but passes through a part
free of obstructions and can be inspected along its entire
length.
After connecting to the gas supply, check for leaks with
soapy water.
Important: In case of gradual difficulty in turning the
burners knobs, contact the authorised Service Centre
to replace the tap.
• loosen (+) to increase the height of the flame;
Adjustment must be carried out with the tap in minimum
position (small flame)
.
After adjusting, reinstate the seals with sealing wax or
equivalent material.
2. The primary air of the burners does not need adjusting.
After adjusting, light the burners and turn the knobs from
max.
to min. to check flame stability.
____________________________________________________________ ____________________________________________________________
____________________________________________________________ ____________________________________________________________
____________________________________________________________ ____________________________________________________________
____________________________________________________________ ____________________________________________________________
____________________________________________________________ ____________________________________________________________
____________________________________________________________ ____________________________________________________________
____________________________________________________________ ____________________________________________________________
____________________________________________________________ ____________________________________________________________
____________________________________________________________ ____________________________________________________________
____________________________________________________________ ____________________________________________________________
____________________________________________________________ ____________________________________________________________
____________________________________________________________ ____________________________________________________________
____________________________________________________________ ____________________________________________________________
____________________________________________________________ ____________________________________________________________
____________________________________________________________ ____________________________________________________________
____________________________________________________________ ____________________________________________________________
____________________________________________________________ ____________________________________________________________
____________________________________________________________ ____________________________________________________________
____________________________________________________________ ____________________________________________________________
____________________________________________________________ ____________________________________________________________
____________________________________________________________ ____________________________________________________________
____________________________________________________________ ____________________________________________________________
____________________________________________________________ ____________________________________________________________
____________________________________________________________ ____________________________________________________________
____________________________________________________________ ____________________________________________________________