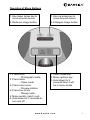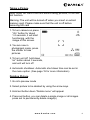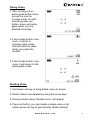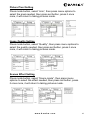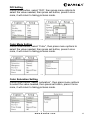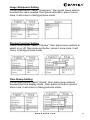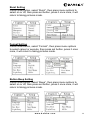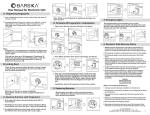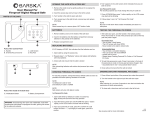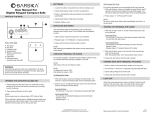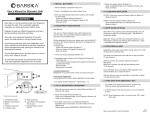
1
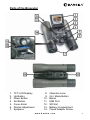
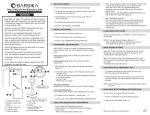
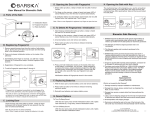
Point ‘n View
Binocular and Digital Camera
Owners Manual
www.barska.com
1
For more information about BARSKA®
and our optic products, please visit
www.barska.com
2
Table Of Contents
Features...................................................................................... 4
Specifications ............................................................................. 5
Basic Binocular Use ................................................................... 6
Operation of Menu Buttons ........................................................ 7
Taking/Deleting Pictures ............................................................ 8
Taking/Deleting Video ................................................................ 9
Settings
Picture Pixel .............................................................. 10
Image Quality .............................................................. 10
Scenes Effect .............................................................. 10
Expose Values ............................................................ 11
White Balance ............................................................. 11
ISO ............................................................................. 12
Color Mode ................................................................. 12
Color Saturation .......................................................... 12
Image Sharpness ........................................................ 13
Preview Function ......................................................... 13
Time Stamp ................................................................. 13
Burst ............................................................................ 14
Format ......................................................................... 14
Button Beep ................................................................. 14
Language .................................................................... 15
Automatic Shut Off ....................................................... 15
System Reset .............................................................. 15
Light Frequency ............................................................16
Date .............................................................................. 16
USB Online ...................................................................16
Using Binocular as a PC Camera
Installing CD ................................................................ 17
PC Cam ....................................................................... 18
Warranty Information....................................................................19
www.barska.com
3
Parts of the Binocular
*SD Card not included
1.
2.
3.
4.
5.
6.
7.
TFT LCD Display
Up Button
Down Button
Set Button
Focus Knob
Diopter Adjustment
Eyepiece
8.
9.
10.
11.
12.
13.
14.
Objective Lens
On / Mode Button
Barrel
USB Port
SD Slot
Battery Compartment
Tripod Adaptor Screw
www.barska.com
4
Product Specifications
Camera Specifications
1. Resolutions: 12.0MP
2. Image Size: Still image: 0.3MP---640*480
3.0MP--2048 x 1536
5.0MP--2560 x 1920
8.0MP--3264 x 2448
12.0MP--4032 x 3024
Movie: 30fps@QVGA / 20fps@VGA
3. Image Format: Still image –JPEG
Movie—AVI (no time limits)
4. Storage media : SD/MMC Memory Card (up to 16GB)
5. Zoom: 1x-4x
6. Exposure and White Balance : Automatic
7. Display:1.5” TFT LCD color Screen
8. Interface: USB 1.1
9. Power Supply: 4 - AAA Alkaline Batteries
10. Language: Traditional Chinese / Simplified Chinese English / France / Germany / Japanese / Spanish / Portuguese / Italian
Binocular Specifications
1. Magnification: 8x
2. Objective Lens: 32mm
3. Eye Relief: 14mm
4. Exit Pupil: 3.9mm
5. Angular Field of view: 6.3°
Included Accessories
- Installation CD
- User’s Manual
- Cleaning Cloth
- Pouch
- USB Cable
- Neck Strap
www.barska.com
5
Basic Binocular Use
1. If you wear eye glasses, fold down the eyecups and hold the
eyepieces up against your glasses.
2. Hold up the binocular to your eyes in the normal viewing
position, use both hands to hold each barrel firmly.
3. Pull the barrels apart or push the barrels together until you
see a single circular field with both of your eyes.
4. Choose your target object.
5. Looking with only your left eye, turn the focus knob until the
object you are looking is focused.
6. Looking with only your right eye, turn the diopter scale until
the object you are looking is focused.
7. Now, looking with both eyes, turn the focus knob to focus
on both far and near objects.
WARNING
NEVER USE YOUR BINOCULAR TO LOOK AT THE SUN
Looking at or near the sun will cause instant and
irreversible damage to your eyes.
www.barska.com
6
Operation of Menu Buttons
1. Use down arrow key to
move around menus
1. Use up arrow key to
move around menus
2. Reduces image button
2. Enlarges image button
1. Press once
- Photograph mode
2. Press twice
- Video mode
3. Press once more
- Preview photos
4. Press four times
- Taking mode
5. Menu switch (catch / set)
6. Hold down for 3 seconds to
turn unit off
1. Video mode key
2. Menu options key
3. Hold down for 2
seconds then it will
be in menu mode
www.barska.com
7
Taking a Picture
Note: Insert SD card to the unit before taking pictures, or unit will
not function.
Warning: The unit will be turned off when you insert or extract
memory card. Please make sure that the unit is off before
removing SD card
1. To turn camera on press
“On” button for about
1-2 seconds, it will start
functioning, with the
image of this screen.
2. You are now in
photograph mode, press
the shutter to take
pictures.
3. To turn unit off hold down
“on” button about 3 seconds,
and unit will turn off
4. Automatic shutdown: Automatic shut down time can be set in
the menu option. (See page 15 for more information)
Deleting Picture
1. Go into preview mode
2. Select picture to be deleted by using the arrow keys
3. Hold set button down “Delete menu” will appear
4. Press set button, you can delete a single image or all images
press set to permanently delete image(s)
www.barska.com
8
Taking Video
1. After turning unit on
press mode button twice,
you will be now be
in video mode. To start
recording press set
button, press set button
again when you are
finished recording.
2. Press mode button once
more, it will be in
preview video mode,
and will start the video
when you press the
shutter.
3. Press mode button once
more, it will return to the
photograph mode.
Deleting Video
1. Hold down set key to bring delete menu to screen
2. Select video to be deleted by using the arrow keys
3. Hold set button down “Delete menu” will appear
4. Press set button, you can delete a single video or all
videos press set key to permanently delete video(s)
www.barska.com
9
Picture Pixel Setting
Press mode button, select “size”, then press menu options to
select the pixel needed, then press set button, press it once
more, it will return to taking pictures mode.
→
Image Quality Setting
Press mode button, select “Quality”, then press menu options to
select the quality needed, then press set button, press it once
more, it will return to taking pictures mode.
→
Scenes Effect Setting
Press mode button, select “Scene mode”, then press menu
options to select the effect needed, then press set button, press
it once more, it will return to taking pictures mode.
→
www.barska.com
10
Expose Value Setting
Press mode button, select “EV”, then press menu options to
select the value needed, then press set button, press it once
more, it will return to taking pictures mode.
→
White Balance Setting
Press mode button, select “white balance”, then press menu
options to select the value needed, then press set button, press it
once more, it will return to taking pictures mode.
→
www.barska.com
11
ISO Setting
Press mode button, select “ISO”, then press menu options to
select the value needed, then press set button, press it once
more, it will return to taking pictures mode.
→
Color Mode Setting
Press mode button, select “Color”, then press menu options to
select the value needed, then press set button, press it once
more, it will return to taking pictures mode.
→
Color Saturation Setting
Press mode button, select “saturation”, then press menu options
to select the value needed, then press set button, press it once
more, it will return to taking pictures mode.
→
www.barska.com
12
Image Sharpness Setting
Press mode button, select “sharpness”, then press menu options
to select the value needed, then press set button, press it once
more, it will return to taking pictures mode.
→
Preview Function Setting
Press mode button, select “Preview”, then press menu options to
select on or off, then press set button, press it once more, it will
return to taking pictures mode.
→
Time Stamp Setting
Press mode button, select “stamp”, then press menu options
to select the time display mode , then press set button, press it
once more, it will return to taking pictures mode.
→
www.barska.com
13
Burst Setting
Press mode button, select “Burst”, then press menu options to
select on or off, then press set button, press it once more, it will
return to taking pictures mode.
→
Format Setting
Press mode button, select “Format”, then press menu options
to select cancel or execute, then press set button, press it once
more, it will return to taking pictures mode.
→
Button Beep Setting
Press mode button, select “Beep”, then press menu options to
select on or off, then press set button, press it once more, it will
return to taking pictures mode.
→
www.barska.com
14
Language Setting
Press mode button, select “Language”, then press menu options
to select the language needed, then press set button, press it
once more, it will return to taking pictures mode.
→
Auto Off Time Setting
Press mode button, select “Auto off”, then press menu options to
select the time Value, then press set button, press it once more,
it will return to taking pictures mode.
→
System Reset Setting
Press mode button, select “Sys. Reset”, then press menu options
to select cancel or execute, then press set button, press it once
more, it will return to taking pictures mode.
→
www.barska.com
15
Light Freq Setting
Press mode button, select “Light Freq”, then press menu options
to select the value needed, then press set button, press it once
more, it will return to taking pictures mode.
→
Date Setting
Press mode button, select “Date input”, then press menu options
to select off or set, then press set button, press it once more, it
will return to taking pictures mode.
→
USB Online Setting
Press mode button, select “USB”, then press menu options to
select PC Cam or Disk Drive, then press set button, press it once
more, it will return to taking pictures mode. (Installation of CD
must be done first see page 17)
→
www.barska.com
16
Installation
Before using the PC Cam, please make sure to install the CD
driver to the PC
1. Put the CD into the PC
CD-ROM, PC will read
the CD automatically.
2. Then you will find this
image on the computer
screen, please select
“NEXT” of each dialog
box, the PC will complete
installation gradually.
3. Wait until the last image
appears and press
“Finish” you have
finished installation.
4. Make sure your PC
is connected to the
binocular by the USB
cord to start this
software, or warning
window (below) will be
appear on the screen.
www.barska.com
17
5. Please select “option” then “preview” (see sample below), and
it will start the PC Cam function
Using PC Cam
1. When you select PC Cam, link the USB cable to the PC’s USB
slot, the PC will be in sync with the unit automatically, wait for
the video images to appear, the unit is now in sync with the
PC.
Note: Image may be hazy unless the photographic distance
of binocular is more than 60ft/18m away, not suitable for close
distance.
www.barska.com
18
1 YEAR LIMITED WARRANTY
BINOCULARS WITH DIGITAL CAMERA
BARSKA® Optics, as manufacturer, warrants this new precision optical product to be free of original
defects in materials and/or workmanship for the length of time specified by this warranty. This
warranty does not include damage caused by abuse, improper handling, installation, maintenance,
normal wear-and-tear, unauthorized repairs or modifications and tampering in anyway.
This warranty is limited to the original purchaser and is not transferable. This warranty applies only to
products purchased in the United States of America and Canada.
In the event of a defect within 30 days, the consumer must return the defective unit to the BARSKA
dealer (the place of purchase) at his/her own expense.
Beyond 30 days, BARSKA products should be sent to the following address for warranty repairs.
Products must be packed carefully and sturdily to prevent damage in transit, and returned freight
prepaid to:
BARSKA® OPTICS
1721 WRIGHT AVE.
LA VERNE, CA 91750
For additional and updated information
please visit our website at www.barska.com
Please email [email protected] or call 1-888-666-6769 for Return Merchandise Number (RMA#) before
any returns.
NOTE: All merchandise received without a valid RMA # will be returned to shipper at his/her own
expense.
Please include all of the following when returning BARSKA products for service and/or replacement:
1. Please write your complete details (Name, Address, Telephone #, E-mail address, RMA#, etc.)
2. Purchase receipt or Proof of Purchase. (Original/Copy)
3. A brief explanation of the defect.
4. A Check/Money Order of $25.00 to cover inspection, shipping and handling.
*Please allow 6-8 weeks for delivery.
This product will either be replaced or repaired at the discretion of the warrantor. If it's a discontinued
item, we will replace the product with an equivalent product. Should the repair not be covered by this
warranty, an estimate will be sent for your approval. Non-warranty repairs or refurbishing of your
optical products are always provided at a reasonable cost.
BARSKA® Optics shall not be liable for any consequential, incidental and/or contingent damages
whatsoever. This warranty supersedes all previous BARSKA® Optics warranties.
BC-105
4/04
© 2004 BARSKA®
www.barska.com
19
www.barska.com
© 2010 BARSKA®
BC155
20