1
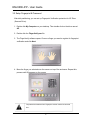
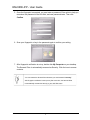
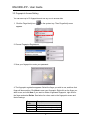
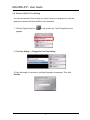
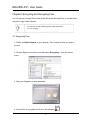
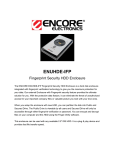
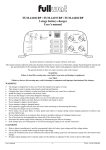
ENUHDE-IFP
Fingerprint Security HDD Enclosure
User Manual
ENUHDE-IFP - User Manual
Important Notice:
This manual is provided “as is” without warranty of any kind, either express or implied,
including but not limited to the implied warranties or conditions of merchantability or
fitness for a particular purpose. In no event shall we, its directors, officers, employees or
agents be liable for any indirect, special, incidental, or consequential damages (including
damages for loss of profits, loss of business, loss of use or data, interruption of business),
even if we have been advised of the possibility of such damages arising from any defect
or error in this manual or product.
Specifications and information contained in this manual are furnished for information use
only, and are subject to change at any time without notice, and should not be construed
as a commitment by us. We assume no responsibility or liability for any errors or
inaccuracies that may appear in this manual, including the products and software
described in it.
No part of this manual, including the products and software described in it, may be
reproduced, transmitted, transcribed, stored in a retrieval system, or translated into any
language in any form or by any means, except documentation kept by the purchaser for
backup purposes, without the express written permission of us.
Product warranty or service will not be extended if:
(1) The product is repaired, modified or altered, unless such repair, modification of
alteration is authorized in writing by us.
(2) The serial number of the product is defaced or missing.
Products and corporate names appearing in this manual may or may not be registered
trademarks or copyrights of their respective companies, and are used only for
identification or explanation and to the owners’ benefit, without intent to infringe.
z Windows, MS-DOS, and DirectX are registered trademarks of Microsoft
Corporation.
z Adobe and Acrobat are registered trademarks of Adobe Systems Incorporated.
The product name and revision number are both printed on the product itself. Manual
revisions are released for each product design represented by the digit before and after
the period of the manual revision number. Manual updates are represented by the third
digit in the manual revision number.
Copyright © 2009 ENCORE ELECTRONICS, INC. All Rights Reserved.
2
ENUHDE-IFP - User Manual
Contents:
Chapter1: Introduction ................................................................................................................................... 4
1.1 Features .................................................................................................................. 5
1.2 Requirements ......................................................................................................... 5
1.3 Specifications .......................................................................................................... 5
Chapter2: Physical Characteristics ................................................................................................................ 6
2.1 Product Views ......................................................................................................... 6
2.2 Package Contents .................................................................................................. 6
2.3 Hard Disk Drive Installation .................................................................................... 7
Chapter3: Getting Started .............................................................................................................................. 8
3.1 Partition Your Hard Disk Drive................................................................................ 8
3.2 Setup Fingerprint & Password .............................................................................. 10
3.3 Fingerprint Access Setting .................................................................................... 12
3.4 Password Access Setting ..................................................................................... 13
3.5 Access Validity Time Setting ................................................................................ 14
3.6 Using Your Hard Disk ........................................................................................... 15
3.7 Hiding the Secured Drive ...................................................................................... 15
3.8 Disconnect your Hard Disk ................................................................................... 15
Chapter4: Encrypting and Decrypting Files.................................................................................................. 16
4.1 Encrypting Files .................................................................................................... 16
4.2 Decrypting Files .................................................................................................... 17
Chapter5: Q&A ............................................................................................................................................ 18
3
ENUHDE-IFP - User Guide
Chapter1: Introduction
Thank you for purchasing our Fingerprint Security HDD Enclosure. This product is a hard
disk enclosure integrated with fingerprint verification technology to provide maximum
security for your data.
Featuring a USB 2.0 interface, this product offers true plug and play functionality,
providing a fast and efficient data transfer speed. The Fingerprint Security HDD
Enclosure is user-friendly and provides high security for your data backup needs.
Before partitioning a hard disk, make sure to make a backup to all the data stored on the
hard disk. All of the existing data will be erased during the partition process. Use the
software included on the supplied Setup CD to partition a hard disk.
Once you have partitioned a hard disk using the supplied software, the hard disk cannot
be used in any other HDD enclosures, it has to be partition again to work with other HDD
enclosures.
Please handle the hard disk with extra care. Do not shake or drop the hard disk. Keep
the hard disk away from an excessive heat or very close to heaters. Keep this product
away from water or moisture. Do not expose to temperature over 50 ºC.
Before opening the enclosure or inserting a hard disk, make sure you are properly
grounded to avoid the transfer of static electricity between you and the enclosure which
may damage electronic components.
4
ENUHDE-IFP - User Guide
1.1 Features
• Protect Sensitive Data with Fingerprint Access
• Safely Travel with Your Data
• Transport Music, Movies, Photos and Documents with Ease
• Easy to Use with Plug-and-Play Feature
1.2 Requirements
• Operating System: Windows® XP / 2000; Windows Vista®
• Available USB 2.0 port
• 2.5” IDE Hard Drive, up to 750GB
The Fingerprint Security HDD Enclosure works with both USB 1.1 and USB
2.0 ports. However, to achieve optimum performance, a USB 2.0 port is
required.
1.3 Specifications
Interface to PC:
USB 2.0, backward compatible wirh USB 1.X
Interface
2.5” IDE hard drive, up to 750GB
Data Transfer Rate:
Up to 480 Mbps
LED Indicator:
Power on & Data Access
Power Source:
USB port Bus power
External Power Source:
Supported (not include in the package)
Dimensions:
8x13x2 cm (WxHxL)
Supported OS:
Windows® XP / 2000; Windows Vista®
Unit Weight:
90 g
Environmental:
Operating Temperature:0°C~40 °C
Storage Temperature: -5°C~50°C
Operating Humidity: 0%~80% RH, non-condensing
Certification
CE, FCC, RoHS
5
ENUHDE-IFP - User Guide
Chapter2: Physical Characteristics
2.1 Product Views
1
2
3
5
4
1
LED Power Indicator
2
LED Activity Indicator
3
Fingerprint Scanner
4
Screw Cover
5
Mini USB Port
6
Power Port
Activity Indicator Status:
Status
Description
On (Red)
Power is on
Blinking (Green)
Data is being transferred
2.2 Package Contents
•
•
•
•
Fingerprint Security HDD Enclosure(without HDD)
USB “Y” cable
CD with Enclosure Initial Tool Software and User Manual
Soft slipcase
• Mini screwdriver
6
6
ENUHDE-IFP - User Guide
2.3 Hard Disk Drive Installation
1. Take off the screw cover as shown.
2. Remove the two screws fastening the cover.
3. Remove the cover.
4. Slide the hard disk into the enclosure as shown, until the
IDE connector sits firmly into place.
5. Replace the cover and fasten into place with the two
screws. Put back the screw cover.
7
ENUHDE-IFP - User Guide
Chapter3: Getting Started
3.1 Partition Your Hard Disk Drive
Before the hard disk drive can be use, it must be partitioned.
Before partitioning a hard disk, make sure to backup all the data stored on the
hard disk drive (if any). All existing data will be erased during the partition
process.
1. Connect the ENUHDE-IFP to any free USB port on your PC using the supplied
USB cable. Insert the supplied Setup CD in your CD-ROM drive.
2. Open Windows Explorer, locate your CD-ROM drive and double click the file
“Enclosure Initial Tool.exe”.
3. Drag the slider bar to resize the Public Drive and the Secured Drive. Then, click
Start.
8
ENUHDE-IFP - User Guide
4. A warning message appears. This is to remind you to back up any existing data.
Then click OK to begin partitioning the hard disk.
5. After partitioning is complete, the following message appears. Click OK to
complete the process.
6. Double click My Computer on your desktop. You will see that two disk drives are
added. The Secured Drive is named AP and the Public Drive is named Public. The
FingerVerify software is stored in AP Drive (Secured Drive).
For the Public Drive, you can rename it whatever you want instead of
“Public.”
9
ENUHDE-IFP - User Guide
3.2 Setup Fingerprint & Password
After disk partitioning, you can set up Fingerprint Verification protection for AP Drive
(Secured Drive).
1. Double click My Computer on your desktop. Then double click on the drive named
AP.
2. Double click the FingerVerify.exe file.
3. The FingerVerify software opens. Choose a finger you want to register for fingerprint
verification and click Next.
4. Move the finger you selected over the sensor on top of the enclosure. Repeat this
process until OK appears on the screen.
The protective membrane from Fingerprint scanner need to be removed
first. .
10
ENUHDE-IFP - User Guide
5. Once the fingerprint is accepted, you must enter a password. Enter a hint to help you
remember the password in the Hint field, and new password twice. Then click
Confirm.
6. Scan your fingerprint or key in the password again to confirm your setting.
7. After fingerprint verification is set up, double click My Computer on your desktop.
The Secured Drive is automatically renamed as Security. Click the icon to access
contents.
You can rename the Secured Drive whatever you want instead of “Security.”
After fingerprint verification is set up every first connection, the Secured Drive
is automatically renamed as Security or your new drive name.
11
ENUHDE-IFP - User Guide
3.3 Fingerprint Access Setting
You can save up to 10 fingerprints and use any one to access data.
1. Click the FingerVerify icon
appears.
in the system tray. Then FingerVerify menu
2. Choose Fingerprint Registration.
3. Scan your fingerprint or enter your password.
4. The fingerprint registration appears. Select the finger you wish to use, and then that
finger will become blue. Click Next to scan your fingerprint. Right click on the finger you
wish to use, and click New. If you want to delete a registered fingerprint, right click on
the finger and select Delete. See below for colors used on the fingerprint screen and
their meanings.
Finger
Color
Green
Blue
Beige
Description
Registered
Selected but not registered yet
Not selected
12
ENUHDE-IFP - User Guide
3.4 Password Access Setting
1. Click the FingerVerify icon
appears.
in the system tray. Then FingerVerify menu
2. Click User Setting => Choose Fingerprint Software Password Setting.
3. Enter hint, original password, and new password twice. Then click Confirm.
13
ENUHDE-IFP - User Guide
3.5 Access Validity Time Setting
You can set a period of time in which you have to scan your fingerprint or enter the
password to access the Secured Drive of the hard disk.
1. Click the FingerVerify icon
appears.
in the system tray. Then FingerVerify menu
2. Click User Setting => Fingerprint Live Time Setting.
3. Enter the length (in minutes) of verifying Fingerprint or password. Then click
Confirm.
14
ENUHDE-IFP - User Guide
3.6 Using Your Hard Disk
3.6.1 Accessing the Public Drive
1. Double click My Computer on your desktop.
2. You will see both Public and AP drives. Double click the Public Drive to get into
the Public Drive.
3.6.2 Accessing the Secured Drive
1. Double click My Computer on your desktop.
2. You will see both Public and AP drives. Double click the AP Drive.
3. Double click the FingerVerify.exe file to load the FingerVerify software. Follow all
the steps as the pop-up windows guide you.
3.7 Hiding the Secured Drive
1. Click the FingerVerify icon
appears.
in the system tray. Then FingerVerify menu
2. Click Exit.
3.8 Disconnect your Hard Disk
Double click the Safely Remove Hardware icon
in the system tray. Click on
the device you want to remove. When the “You may safely remove this device”
message appears, then you can disconnect it from your PC.
Please do not remove the hard disk during data transfer. Otherwise, the
data may be lost.
15
ENUHDE-IFP - User Guide
Chapter4: Encrypting and Decrypting Files
You can encrypt / decrypt files on both Public Drive and Secured Drive on this hard disk
using the Finger-Verify software.
You also can encrypt and decrypt files in other hard drives
on your computer.
4.1 Encrypting Files
1. Double click My Computer on your desktop. Then choose the files you want to
encrypt.
2. Click the Right mouse button, and then select Encrypting… from the context
menu.
3. Scan your fingerprint or enter password.
4. Once the file is encrypted, the file icon will change to
16
.
ENUHDE-IFP - User Guide
4.2 Decrypting Files
1. Double click My Computer on your desktop. Then choose the files you want to
encrypt.
2. Click the Right mouse button, and then select Decrypting from the menu that
appears.
3. Scan your fingerprint or enter password.
4. The file is decrypted and can be accessed as normal file.
17
ENUHDE-IFP - User Guide
Chapter5: Q&A
Q1: Why does the computer not recognize my hard disk?
Answer:
• Make sure the right USB port on the Y-cable is connected to your hard disk. Not
only plug the auxiliary power cable.
• If your hard disk is connected to a laptop or a bus hub (non-self powered hub),
you may need to connect the auxiliary power cable to provide enough power for
the hard disk.
• Make sure the USB port works properly. If you are not sure, please try another
USB port.
Your computer may not be able to recognize your hard disk if it has not been
partitioned yet. Please refer to “3.1 Partition Your Hard Disk” for more details.
Q2: Why is data transfer between the computer and the device slow?
Answer:
You may have connected your hard disk to a USB 1.1 port instead of a USB 2.0
port. The Fingerprint Security HDD Enclosure can work with both USB 1.1 port
and USB 2.0 port. However, we recommend you connecting the enclosure to a
USB 2.0 port to achieve optimum transfer rate.
18