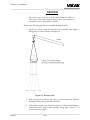
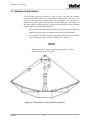
1
Series 8009
9-Meter Earth Station Antenna
Installation, Operation and Maintenance Manual
Manual Part No. 42S315F
February 2004
Notice
All Rights Reserved
The information contained in this document is proprietary to ViaSat, Inc.
This document may not be reproduced or distributed in any form without
the consent of ViaSat, Inc.
The information in this document is subject to change without notice.
ViaSat, Inc. assumes no responsibility for any errors that may appear in
this document and does not warranty any specific application.
Any product names mentioned herein are used for identification purposes
only, and may be trademarks and/or registered trademarks of their
respective companies.
In all correspondence with ViaSat, Inc. regarding this publication, please
refer to the Manual Part No. on the title page.
Copyright ® 2003, 2004 ViaSat, Inc.
All rights reserved. No part of this book may be reproduced in any form
or by any means without permission in writing from ViaSat, Inc.
Table of Contents
TABLE OF CONTENTS
Table of Contents .................................................................................................. iii
List of Figures ......................................................................................................... v
List of Tables ........................................................................................................... v
Safety Summary .................................................................................................... vi
1 General Information ...................................................................................... 1-1
1.1
Introduction.............................................................................................................1-1
1.2
Mount Description .................................................................................................1-1
1.3
Reflector Description..............................................................................................1-6
2 Installation....................................................................................................... 2-1
2.1
Introduction.............................................................................................................2-1
2.1
Unpacking and Inspection ....................................................................................2-1
2.1.1
Damage or Loss During Shipment.......................................................................2-1
2.1.2
What to do about Visible Loss or Damage .........................................................2-1
2.1.3
What to do about Concealed Damage.................................................................2-1
2.2
Equipment Return ..................................................................................................2-2
2.3
Safety ........................................................................................................................2-3
2.3.1
Emergency Plan ......................................................................................................2-3
2.3.2
General Mechanical Safety....................................................................................2-3
2.3.3
General Electrical Safety Summary......................................................................2-4
2.3.4
Resuscitation ...........................................................................................................2-4
2.4
System Assembly....................................................................................................2-5
2.4.1
Site Preparation.......................................................................................................2-5
2.4.2
Recommended Tools and Equipment .................................................................2-5
2.4.3
Fastener Information..............................................................................................2-7
2.4.4
Recommended Sequence of Assembly................................................................2-8
2.4.5
Preparation for Assembly .....................................................................................2-8
2.4.6
Assembly of Reflector, Spars and Subreflector ..................................................2-9
2.4.7
Mount Installation ................................................................................................2-20
42S315F
iii
Table of Contents
2.4.8
Grouting Baseplate to Foundation, Models 8009A and 8009AE ...................2-30
2.4.9
Reflector Mounting ..............................................................................................2-33
2.4.10
Optional Lightning Protection Installation.......................................................2-38
2.4.11
Optional Deicing Installation..............................................................................2-39
2.4.12
Electrical Installation............................................................................................2-39
2.4.13
Corrosion Protection ............................................................................................2-39
3 Operation......................................................................................................... 3-1
3.1
General.....................................................................................................................3-1
3.2
Satellite Pointing Procedure..................................................................................3-1
3.2.1
Elevation Pointing ..................................................................................................3-1
3.2.2
Azimuth Pointing ...................................................................................................3-1
3.2.3
Signal Peaking Procedure......................................................................................3-2
3.3
Subreflector Adjustment........................................................................................3-3
4 Maintenance.................................................................................................... 4-1
4.1
General.....................................................................................................................4-1
4.2
Periodic Maintenance ............................................................................................4-1
4.2.1
Weekly Maintenance..............................................................................................4-1
4.2.2
Monthly Maintenance............................................................................................4-1
4.2.3
Bi-Monthly Maintenance.......................................................................................4-2
4.2.4
Quarterly Maintenance..........................................................................................4-2
4.2.5
Yearly Maintenance................................................................................................4-5
4.3
Corrosion Protection ..............................................................................................4-6
4.3.1
Touch-up Painting of Non-Reflective Surfaces ..................................................4-6
4.3.2
Touch-Up Painting of Reflective Surfaces ..........................................................4-7
4.3.3
Fasteners ..................................................................................................................4-8
5 Drawings ......................................................................................................... 5-1
5.1
Introduction.............................................................................................................5-1
5.2
Drawing Index ........................................................................................................5-1
5.3
Parts Lists.................................................................................................................5-1
42S315F
iv
Table of Contents
LIST OF FIGURES
Figure 1-1. Typical Antenna System....................................................................................................1-2
Figure 1-2. Elevation and Azimuth Angle Stow Chart for High Wind Conditions .....................1-4
Figure 2-1. 9-Meter Antenna Reflector and Subreflector Alignment............................................2-18
Figure 2-2 Installing Leveling Nuts ..................................................................................................2-21
Figure 2-3 Rigging Lifting Points......................................................................................................2-25
Figure 2-4 Rigging Lifting Points......................................................................................................2-28
Figure 2-5. Hoisting Reflector and Spars ..........................................................................................2-34
Figure 2-6. Hoisting Feed....................................................................................................................2-36
Figure 3-1. Feed, Reflector, and Subreflector Distances ...................................................................3-3
Figure 3-2. Typical Antenna Patterns for Various Subreflector Position .......................................3-6
Figure 4-1. Lubrication Points (Sheet 1 of 2) ......................................................................................4-4
LIST OF TABLES
Table 1-1. Antenna Mount Configurations.........................................................................................1-1
Table 2-1. Tools and Equipment Required For Installation ..............................................................2-5
Table 2-2. Torque Values For Antenna Fasteners..............................................................................2-7
Table 2-3. Panel Rough Alignment....................................................................................................2-15
Table 2-4. Final Alignment Target Measurements - Sight Center of the Middle Diamond ......2-17
Table 2-5. 9-Meter Reflector Alignment Record ...............................................................................2-19
Table 4-1. Torque Values For Antenna Fasteners............................................................................4-10
Table 5-1. Drawing Index......................................................................................................................5-1
42S315F
v
Safety Summary
SAFETY SUMMARY
Notice
Any service, adjustment, maintenance, or repair of this product must be
performed only by authorized technical service personnel.
Prior to installation and use of this product review all safety markings and instructions.
When safety precautions or important information is presented in this manual, the
information will normally be presented just prior to the point where the hazard is likely
to be encountered.
The following symbols are used throughout this manual to bring attention to practices,
procedures, and conditions important to the safety of the operator and equipment or to
obtaining desirable results from the equipment.
This symbol warns of electrical shock hazards
to personnel. Failure to comply with the
instructions of such a warning may result in
severe injury or death resulting from electrical
shock.
This symbol warns of non-electrical hazards to
personnel.
Failure to comply with the
instructions of such a warning may result in
severe injury or death.
This symbol warns of hazards to equipment.
Failure to comply with the instructions of such
a caution may result in damage or destruction
of equipment.
This symbol is used to bring attention to
installation grounding requirements.
NOTE
42S315F
Notes are used to provide clarification, or to
alert the reader of possible erroneous results,
which may occur if a procedure is not
followed as written.
vi
Chapter 1 - General Information
Chapter 1
General Information
1.1 Introduction
This manual contains information needed to properly install, operate, and
maintain the Series 8009A 9-Meter Earth Station Antenna which provides
high quality receive/transmit and receive-only capabilities for both domestic
and international C-band or Ku-band applications. The antenna consists of a
9-meter shaped reflector, a shaped subreflector, and a linear or circular
polarized feed on a high-strength structural steel elevation-over-azimuth
mount.
This chapter of the manual contains general descriptions and specifications
on the mount, reflector, feed, and subreflector. Chapters 2 through 5 contain
information pertaining to antenna installation, operation, and maintenance.
1.2 Mount Description
The 9-Meter reflector can use any of three mounts, the Model 8009A (120°),
the Model 8009AE (120°) and the Model 8009AE (180°) mounts. The mount
configurations are described in Table 1-1. See Figure 1-1 for a typical antenna
system.
Table 1-1. Antenna Mount Configurations
Mount Description
Required Components
Model 8009A (120°)
Model 8009A (120°) foundation
Provides 160° total azimuth coverage, in three
overlapping 120° sectors
Model 8009A 15 ton elevation actuator
Model 8009AE (120°)
Model 8009AE (120°) foundation
Provides 180° total azimuth coverage, in three
overlapping 120° sectors
Model 8009AE 30 ton elevation actuator
Model 8009AE (180°)
Model 8009AE (180°) foundation
Provides 180° continuous azimuth coverage
Model 8009AE 30 ton elevation actuator
Model 8009A 20 ton azimuth actuator
Model 8009AE 30 ton azimuth actuator
Model 8009AE 30 ton azimuth actuator
42S315F
1-1
Chapter 1 - General Information
The Series 8009A antenna mounts provide two-axis (elevation-over-azimuth)
adjustment for pointing the antenna. In the elevation-over-azimuth
configuration, the antenna rotates about two axes, a vertical azimuth axis and
a horizontal elevation axis. Pointing to a geostationary satellite requires that
the antenna be moved to a specific angle about the azimuth axis, then to a
specific angle about the elevation axis. The required sighting angles for any
satellite are given in look-up tables which are readily available.
Figure 1-1. Typical Antenna System
The Model 8009A mount consists of a 168 inch [426 cm] tall structural tube
that is supported at the top by two legs which extend to the rear of the
antenna. The bottom of the tube is supported by a pivot bearing and is driven
at the ground level location by the azimuth actuator. The elevation actuator is
located atop the structural tube and behind the reflector hub. Both a single
speed and a variable speed motorized actuator option is available. The total
azimuth coverage is 160° in three overlapping 120° continuous sectors.
42S315F
1-2
Chapter 1 - General Information
Azimuth sector changes can be accomplished in two hours by disassembling
four bolts, repositioning the azimuth sector bars, and installing the four bolts
in a different hole pattern in the bottom ring of the structural tube. The
elevation axis will cover 0° to 90° in one continuous sector on antennas
without reflector de-icing.
NOTE
With optional hot air de-icing installed, the minimum
elevation angle is 5°.
The Model 8009A mount uses a 20-ton azimuth actuator and 15-ton elevation
actuator. This actuator combination will drive the antenna in a 96 km/h [60
mi/h] wind at the extended actuator condition. The survivability envelope
for the Model 8009A (120°) antenna mount is presented in Figure 1-2.
Survival at 90° elevation (stow) is 201 km/h [125 mi/h].
CAUTION
The ability of the Model 8009A antenna to survive high winds
depends upon the position of the antenna (elevation and
azimuth pointing angles) when high winds occur. Use Figure
1-2 to identify the survivability envelope in which the antenna
must be pointed to protect the azimuth actuator screw from
excessive column loading when winds above 112 km/h (70
mi/h) are expected.
The Model 8009AE 120° and 180° are extreme environment mounts
consisting of a 217 inch [551 cm] tall structural tube that is supported at the
top by two legs which extend to the rear of the antenna. The bottom of the
tube is supported by a pivot bearing and is driven at the ground level
location by the azimuth actuator. The elevation actuator is located atop the
structural tube and behind the reflector hub. A manual actuator, a motorized
single speed actuator and a variable speed actuator is available. Total
azimuth coverage for the Model 8009AE (120°) mount is 180° in three
overlapping 120° continuous sectors. Selecting an alternate sector can be
accomplished within (4) hours by reconfiguring the azimuth actuator location
to a different set of anchor bolts on the foundation.
42S315F
1-3
Chapter 1 - General Information
90°
Elevation Angle (Degrees)
80°
70° A
A
60°
B
50°
C
40°
30°
20°
10°
0°
C
B
-60°-50°-40°-30°-20°-10° 0° 10° 20° 30° 40° 50° 60°
Azimuth Angle (Degrees)
120° Azimuth Segment
Minimum Azimuth
Actuator Length
To stow the antenna
To Survive 160 KM/H
To Survive 121 KM/H
To Survive 112 KM/H
Maximum Azimuth
Actuator Length
Move the mount azimuth and elevation positions within the
maximum survivability envelope as indicated above Line A_A in
Chart above.
Move the mount azimuth and elevation positions within the
survivability envelope as indicated to the left of Line B_B in Chart
above.
Move the mount azimuth and elevation positions within the
survivability envelope as indicated to the left of Line C_C in
Chart above.
Antenna and Mount will survive in any azimuth and elevation
position
Figure 1-2. Elevation and Azimuth Angle Stow Chart for High Wind Conditions
42S315F
1-4
Chapter 1 - General Information
Total azimuth coverage for the Model 8009AE (180°) mount is 180°
continuous. The elevation axis for both the Model 8009AE 120° and 180°
antenna will cover 0° to 90° in one continuous sector. Elevation travel will not
be limited by reflector de-icing. The 30-ton azimuth actuator and 30-ton
elevation actuator will allow the antenna to survive 201 km/h [125 mi/h] at
any antenna orientation.
All manual drive actuators can be operated manually or with an auxiliary
power source such as a drill motor. All motorized actuators may also be
operated manually if required.
Grounding cables are provided to ensure system electrical grounding
between the antenna reflector and the antenna mount structure. Tapped
holes are provided in the mount base plates for attachment to a suitable
foundation grounding system.
Included as optional equipment on the mount are a ladder and work
platform assembly. These components provide safe and convenient access to
the feed electronics inside the antenna hub and to the elevation drive motor
for servicing and inspection. The ladder and platform are designed to be fully
compatible with OSHA specifications.
Each antenna foundation is an essential part of the antenna installation. The
foundation should be oriented so that the desired pointing angles can be
achieved and accurately maintained under maximum wind loads.
NOTE
The Model 8009A (120°), Model 8009AE (120°) and Model
8009AE (180°) require different foundation specifications. See
the appropriate foundation installation kit for the special
features required for each antenna option.
It is imperative that competent engineering assistance be engaged to assure
that the foundation is properly designed for the local site conditions and
building codes. The contractor does not imply or warrant that the foundation
design shown as typical on drawings in this manual, or other ViaSat
documents, is appropriate for any particular locality or site condition. The
structural steel mounts have been designed in accordance with the American
Institute of Steel Construction (AISC) specifications for Design, Fabrication,
and Erection of Structural Steel Buildings as presented in the Manual of Steel
Construction, eighth edition (copyright 1980).
42S315F
1-5
Chapter 1 - General Information
1.3 Reflector Description
The reflector, in combination with its shaped subreflector and feed system, is
optically designed to yield high efficiency. The reflector consists of
48 precision stretch-formed aluminum panels. The panels are bolted together
in the field to form a surface of revolution.
Each reflector assembly consists of a central hub assembly, to which are
attached the radial trusses, intercostals, and the reflector panels. Ample space
is provided inside the hub for mounting of redundant low-noise amplifiers
(LNAs) and switching equipment. The hub has an access cover on the rear
surface for convenient service and inspection of the feed electronics. Each
reflector panel is aligned independently to ensure accuracy. The radial
trusses support the panels and are locked together using the intercoastals.
The hub assembly includes a machined plate for attaching the inner row of
panels. All the panels are stretch-formed and have rigid back structures that
are riveted into place.
The reflector panels are finished with a high reflectance white paint applied
over a chromate conversion coating. (Other colors are available as options.)
This special paint diffuses solar radiation to minimize subreflector heating
from the reflector. The remainder of the equipment is primed and painted
with two coats of gloss enamel.
42S315F
1-6
Chapter 2 - Installation
Chapter 2
Installation
2.1
Introduction
This chapter provides instructions and guidelines for installing the 9-Meter
antenna system. General safety precautions and procedures are also
described.
2.1
Unpacking and Inspection
1. Inspect all shipping crates for visible damage.
2. Open the shipping crate and remove all packing material.
3. Inspect equipment for visible damage. While unpacking, carefully
compare bill of lading or packing lists with equipment received. If
equipment is missing, carefully check and sift through packing material
to confirm. If errors are confirmed, notify ViaSat and carrier as soon as
possible.
2.1.1 Damage or Loss During Shipment
When equipment is damaged or lost in transit, the delivering transportation
company is required by law to make notation of damage or loss on the
freight bill. The carrier, not the shipper, should be charged with all damage
or loss. If damage or loss during shipping occurs, contact the carrier of the
equipment. Save the shipping carton. The carrier's inspector must examine
the carton and complete an inspection report.
2.1.2 What to do about Visible Loss or Damage
Make a note of any loss or evidence of external damage on the freight bill or
receipt, and have it signed by the carrier's agent. Failure to adequately
describe such external evidence of loss or damage may result in the carrier
refusing to honor a damage claim. The form required to file such a claim will
be supplied by the carrier.
2.1.3
What to do about Concealed Damage
Concealed damage means damage which does not become apparent until the
unit has been unpacked. The contents may be damaged in transit due to
rough handling, even though the crate may not show external damage. If you
discover damage after unpacking the unit, make a written request for
inspection by the carrier's agent within 15 days of the delivery date, then file
a claim with the carrier since such damage is the carrier's responsibility. If
42S315F
2-1
Chapter 2 - Installation
you follow these instructions carefully, ViaSat guarantees its full support of
your claims to protect you against loss from concealed damage.
2.2
Equipment Return
ViaSat makes every reasonable effort to ensure that all items arrive safely and
in working order. When equipment is received, which is not in working
order, return the equipment to the factory for repair or replacement. Return
the equipment according to the following procedure. This procedure will
apply whenever equipment is returned for warranty or other services.
1. Notify ViaSat of the problem and request a Return Material
Authorization (RMA) number and shipping instructions. For a
current list of telephone and email contact information refer to
Information
section
of
the
ViaSat
internet
site
(http://www.viasat.com). Click on About Us, Contact Us and the link
to Satellite Ground Systems.
2. Tag or identify defective equipment and note defect and
circumstances, if any. If known, reference sales order, purchase order,
and date equipment was received.
3. Reship equipment in original shipping container or use a strong
shipping container to protect equipment during shipment.
4. Package equipment using shock-absorbing material around all sides
of equipment.
5. Seal container securely and mark outside of container FRAGILE.
42S315F
2-2
Chapter 2 - Installation
2.3
Safety
WARNING
Read and Understand all safety instructions before beginning
any work. Death or severe injury may result if personnel fail to
observe safety precautions.
2.3.1 Emergency Plan
Have an emergency plan. Know the procedures for obtaining first-aid and
fire-fighting assistance. Plan your work and maintain good housekeeping;
the safety and quality of the product are at stake.
2.3.2 General Mechanical Safety
These are general mechanical safety precautions that are not related to any
specific procedure. They are recommended precautions that personnel must
understand and apply.
Installation or maintenance of antennas may require persons to
work at elevated work stations. Whenever persons are working at
eight or more feet above ground and not on a guarded platform,
they should wear safety belts with at least one, and preferably
two, lanyards, with the exception that trained and qualified
persons may work up to 25 feet (7.6 m) if on an approved ladder.
In the sentence above, approved usually means that the ladder is
tied off once the person has climbed but before work begins.
Assembly and installation of the reflector should only be done
during fair weather and low wind conditions. Do not attempt to
erect the antenna in winds exceeding 25 mi/h (40 km/h). Injury
to personnel or damage to antenna may result if erection is
attempted in high winds.
After the panels are installed on the reflector assembly, the
reflector is very susceptible to moving during windy conditions.
Ensure the reflector is properly tied down until the reflector is
completely secured on the mount.
Overhead hazards, either because items may fall or because a
person may strike them unintentionally, are typical around
construction sites or during installation of large antennas. It is
prudent to adopt the following rules:
1.
42S315F
Never stand underneath anything while it is being hoisted.
2-3
Chapter 2 - Installation
2.
Always wear a hard hat if someone is above you.
2.3.3 General Electrical Safety Summary
These are general electrical safety precautions that are not related to any
specific procedure. These are recommended precautions that personnel must
understand and apply.
Ensure that all electrical tools and equipment are properly
grounded.
Avoid shorting circuits when using metal tools. Some circuits
have high current capability which, when shorted, will flash and
may cause burns and/or eye injury.
Remove all jewelry and exposed metal objects from body and
clothing before performing maintenance, adjustments, and/or
troubleshooting. Before working inside the equipment, remove all
power, unless power is required to perform procedures. Do not
replace parts with power on.
Replacement of fuses or other parts must be done using identical
types and ratings. Substitution of non-identical parts may cause
safety and fire hazards.
Servicing this equipment may require working with protective
covers removed and ac power connected. Extreme caution must
be exercised during these procedures.
2.3.4 Resuscitation
Personnel working with or near hazardous chemicals or voltages should be
familiar with modern methods of resuscitation.
42S315F
2-4
Chapter 2 - Installation
2.4
System Assembly
The assembly procedures presented in this section are based on the
assumption that a powered lifting device of adequate size and capacity is
used; therefore, the procedures given do not reflect consideration of
limitations in lifting and handling equipment that might be encountered at
any specific installation site. If a suitable crane is not available, it is possible
to assemble the entire antenna without heavy hoisting equipment, provided
sufficient manpower is available and a suitable elevated work platform can
be provided so that the reflector may be assembled in place on top of the
mount.
2.4.1 Site Preparation
A site should be selected and prepared in advance of the antenna installation.
Refer to the 9-Meter Earth Station Antenna Site Preparation Technical
Manual #42S314 for information needed to properly locate and install the
foundation for this antenna system.
2.4.2 Recommended Tools and Equipment
Table 2-1 lists the tools and equipment required for efficient and convenient
installation.
Table 2-1. Tools and Equipment Required For Installation
Quantity
Description
1 Set
Socket, 3/8-inch drive, including 3-inch extension
1 Set
Socket, 3/4-inch drive, including 3-inch extension
1 Set
Combination wrenches up to 1 5/8-inch size
1 Each
Socket, 1 1/2-inch diameter, 4-inch long; used for turning anchor bolts.
1 Each
Socket, 1 15/16-inch size, 4-inch long; used for turning anchor bolt nuts
1 Each
Socket, 1 5/8-inch size, 2-inch long
1 Each
Socket, 1 1/2-inch size
1 Each
0.25 inch diameter file
1 Each
1.0 inch flat file
1 Each
Deburring tool
3 Each
3/16-inch drill bit
1 Each
3/8-inch drill motor
1 Each
3/4-inch drill motor
1 Each
100-foot power cord
42S315F
2-5
Chapter 2 - Installation
Table 2-1. Tools and Equipment Required For Installation
Quantity
Description
4 Each
Straps, nylon, 30 feet long, minimum capacity 5000 pounds each, complete with
lifting ring and attachment hooks
1 Each
Hoist, lever-operated cable or chain; 2-ton minimum capacity
2 Each
Drift pin, large size for aligning 1-inch holes
2 Each
Drift pin, large size for aligning 3/8- and 1/2-inch holes
1 Each
Ball peen hammer, 24-ounce
1 Each
10-foot stepladder
1 Each
25-foot extension stepladder
1 Each
Torque wrench, 600 ft-lb
1 Each
Torque wrench, 6 to 75 ft-lb
2 Each
Wrench, spud, 1 5/8-inch size
1 Each
Mallet, rawhide
1 Each
Rope, 50-foot, 3/8-inch manila or nylon; used for tie line
1 Each
Theodolite (wild T2)
1 Set
Short focus lens (GV 01 - GV 04)
1 Each
Right angle eyepiece
1 Each
Battery light kit
1 Each
Q-Beam spot light (for reflector adjustment)
1 Each
Level (spirit or bubble)
1 Each
Level, surface
1 Each
Pry-bar
6 Each
Clamp, 8-inch, C-type
1 Set
Small/medium/large Allen wrenches
1 Each
Screwdriver, #2 Phillips
1 Each
Plum Bob and string
1 Each
Screwdriver, medium, straight slot
1 Each
Band cutter
1 Each
Gauge, thickness ranges from 0.010 to 0.030 inch
1 Each
Angle finder or magnetic base inclinometer
1 Each
Grease gun with cartridges
1 Each
Crane, approximately 20-tons with a 80-foot boom
42S315F
2-6
Chapter 2 - Installation
Table 2-1. Tools and Equipment Required For Installation
Quantity
Description
1 Each
Roll of masking tape or duct tape
1 Each
18.0-inch machine scale
2.4.3 Fastener Information
All threaded fasteners are galvanized, ASTM A325, high-strength, hexagonalhead screws (equivalent to SAE Grade 5) or stainless steel. The anchor bolts
used in the foundation are made of SAE Grade 5 steel or better.
Each fastener must be correctly tightened at final assembly to ensure that it
will carry its design load without working loose under vibration and will not
allow slippage or separation of joined members. Thus, the structural
integrity and pointing accuracy of the total antenna system depends upon the
proper installation of quality fasteners.
This manual specifies the required torque value for installation of all major
structural fasteners. Refer to Table 2-2 for the specific torque values for each
fastener.
Table 2-2. Torque Values For Antenna Fasteners
Fastener Size (SAE)
Torque (ft-lb) tolerance ±10%
Galvanized
Stainless
1/4-20
9 (12 Nm)
6 (8 Nm)
5/16-18
18 (24 Nm)
12 (16 Nm)
3/8-16
30 (40 Nm)
20 (26 Nm)
1/2-13
75 (100 Nm)
45 (60 Nm)
9/16-12
110 (149 Nm)
5/8-11
150 (203 Nm)
3/4-10
260 (353 Nm)
1 Anchor Bolts on
Model 8009A mounts
240 to 275 ft - lb (325 to
372 Nm)
1-1/4 Anchor Bolts on Model
8009AE mounts
360 to 440 ft - lb (488 to
596 Nm)
1-8 Anchor Bolts
600 (813 Nm)
42S315F
130 (176 Nm) (except as noted)
2-7
Chapter 2 - Installation
NOTE
The required torque value for the foundation anchor bolts may
not be accurately achieved by the turn-of-the-nut method. For
these bolts, an accurate torque value of 400 to 450 lb-ft (542 to
610 Nm) is required.
2.4.4 Recommended Sequence of Assembly
In order to ensure proper and trouble-free installation, the following
installation sequence is recommended. The sequence is designed to minimize
crane usage time. The crane is only required for items 3, 5, and 6.
1. Site Preparation
2. Assembly of Reflector, Spars and Subreflector
3. Assembly of Mount and Actuators
4. Grouting Base Plate to Foundation
5. Reflector Installation
6. Feed and Waveguide Installation
7. Electrical Installation
8. Limit Switch Adjustment Procedure.
2.4.5 Preparation for Assembly
Before beginning the assembly read and understand the following
instructions.
ViaSat guarantees the antenna specifications, provided that the reflector
assembly procedure is performed by an installation crew trained and
approved by ViaSat, Inc.
Carefully study the assembly drawings to understand how the complete
reflector is assembled. The assembly drawings included in this manual are
examples of typical reflector assemblies with motorized polarization drives
without a de-ice system.
Clockwise and counterclockwise are as observed by a person looking down
onto the front of the reflector while the hub is positioned with its rear side
towards the ground.
Before starting the assembly, verify the following:
42S315F
2-8
Chapter 2 - Installation
NOTE
Cleanliness of the precision mating parts that make up the
reflector assembly is essential to proper fit and reflector
surface accuracy. For this reason, only remove the reflector
parts from their crates or pallets as required.
•
Examine 48 reflector panels and 24 trusses in their crates.
•
Identify eight spar panels for the sub-reflector spar
mounting tab attached to the spar trusses.
•
Identify four spar trusses by the spar support clevis
welded to the tip end of the truss.
•
Examine the hub and note the orientation of the spar
trusses (see Drawing 517577)
2.4.6 Assembly of Reflector, Spars and Subreflector
The following procedure describes the complete assembly of the reflector
which includes the reflector hub, trusses, intercostals, spars, subreflector, and
panels.
The basic reflector assembly sequence is:
•
Install trusses and intercostals
•
Install spars and subreflector
•
Align trusses
•
Install reflector panels to trusses
•
Align Panels
•
Tighten fasteners
Assemble the reflector on the ground by the following steps.
CAUTION
If it is necessary to walk inside the reflector during assembly,
be sure to walk on the portion of the reflector closest to the
hub. Avoid putting weight on unsupported parts of the
reflector panels. Wear clean soft sole shoes or socks only.
Extra care should be taken to protect the painted panel
surface.
42S315F
2-9
Chapter 2 - Installation
2.4.6.1
Installation of Trusses and Intercostals
Refer to drawing 517577C, 9-Meter Reflector Assembly, for the following
procedure.
1. Remove hub assembly (item 31, drawing 517577) from packaging and
place in upright position on stable wooden blocks or timbers. Raise
the hub assembly at least 8 inches above the ground for working
clearance. (Refer to drawing 517055 for hub assembly information.)
CAUTION
When assembling the reflector on the ground, the trusses
should be installed by alternating from one side of the
reflector to the other. This will prevent an unbalanced
load that could cause the assembly to tip over.
2. Locate the jack mount ear on hub (item 3 drawing 517055 sheet 1,
zone D-1).
3. Attach strut (item 17 drawing 517577 sheet 4, zone B-6) at first
position clockwise from jack mount ear. Secure strut with one bolt
(item 25), two washers (item 27), and one nut (item 26). Secure
hardware finger tight.
4. Attach truss (item 23 drawing 517577 sheet 4, zone C-4) to hub using
one bolt (25), two washers (27), and one nut (26) and to strut using
four bolts (item 28), eight washers (item 30), and four nuts (item 29).
Secure hardware finger tight.
5. Attach next clockwise strut and truss assemblies as described in steps
3 and 4.
6. Install top inner intercostal (item 18 drawing 517557 sheet 4, zone B-6)
between two truss assemblies using two bolts (item 28), four washers
(item 30), and two nuts (item 29). Secure hardware finger tight.
7. Install bottom inner middle intercostal (item 19 drawing 517557 sheet
4, zone B-6) between truss strut assemblies using two bolts (item 28),
four washers (item 30), and two bolts (item 29). Secure hardware
finger tight.
8. Install top outer intercostal (item 20 drawing 517577 sheet 4, zone B-6)
between two truss assemblies using two bolts (item 28), four washers
(item 30), and two nuts (item 29). Secure hardware finger tight.
9. Attach next clockwise strut and truss assemblies as described in steps
3 and 4. Then install intercostals as described in steps 6 through 8.
42S315F
2-10
Chapter 2 - Installation
10. Attach strut (item 17 drawing 517577 sheet 4, zone B-6) at next
clockwise position. Secure strut with one bolt (item 25), two washers
(item 27), and one nut (item 26). Secure hardware finger tight.
11. Attach spar truss (item 22 drawing 517577 sheet 4, zone B-4) to hub using
one bolt (25), two washers (27), and one nut (26) and to strut using four bolts
(item 28), eight washers (item 30), and four nuts (item 29). Secure hardware
finger tight.
12. Install top inner intercostal (item 18 drawing 517577 sheet 4, zone B-6) and
left hand spar truss brace (item 21) to spar truss using bolt (item 33), two
washers (item 30), and nut (item 29). Secure hardware finger tight.
13. Install top inner intercostal (item 18 drawing 517577 sheet 4, zone B-6) to
other truss using bolt (item 28), two washers (item 30), and nut (item 29).
Secure hardware finger tight.
14. Install bottom inner intercostal (item 19 drawing 517577 sheet 4, zone B-6)
and left hand spar truss brace (item 21) to truss (without spar tab) using bolt
(item 33), two washers (item 30), and nut (item 29). Secure hardware
finger tight.
15. Install bottom inner intercostal (item 19 drawing 517577 sheet 4, zone B-6) to
spar truss using bolt (item 28), two washers (item 30), and nut (item 29).
Secure hardware finger tight.
16. Install top outer intercostal (item 20 drawing 517577 sheet 4, zone B-6)
between two truss assemblies using two bolts (item 28), four washers (item
30), and two nuts (item 29). Secure hardware finger tight.
17. Attach next clockwise strut and truss assemblies as described in steps 3 and
4. Then install intercostals and right hand spar truss braces as described in
steps 12 through 16. Secure hardware finger tight.
18. Attach next four clockwise strut and truss assemblies as described in steps 3
and 4. After each strut and truss assembly is installed, install intercostals as
described in steps 6 through 8. Secure hardware finger tight. Secure
hardware finger tight.
19. Attach next clockwise strut and spar truss assemblies as described in steps
10 and 11. Then install intercostals as described in steps 6 through 8. Secure
hardware finger tight. Secure hardware finger tight.
20. Attach next five clockwise strut and truss assemblies as described in steps 3
and 4. After each strut and truss assembly is installed, install intercostals as
described in steps 6 through 8. Secure hardware finger tight. Secure
hardware finger tight.
21. Attach next clockwise strut and spar truss assemblies as described in steps
10 and 11. Then install intercostals as described in steps 6 through 8. Secure
hardware finger tight.
42S315F
2-11
Chapter 2 - Installation
22. Attach next five clockwise strut and truss assemblies as described in steps 3
and 4. After each strut and truss assembly is installed, install intercostals as
described in steps 6 through 8. Secure hardware finger tight.
23. Attach next clockwise strut and spar truss assemblies as described in steps
10 and 11. Then install intercostals as described in steps 12 through 16.
Secure hardware finger tight.
24. Attach the last two clockwise strut and truss assemblies as described in steps
3 and 4. After each strut and truss assembly is installed, install intercostals
as described in steps 6 through 8. Secure hardware finger tight.
2.4.6.2
Installation of the Spars and Subreflector
Refer to drawing 517577C, 9-Meter Reflector Assembly, for the following
procedure. Study sheet 3 to understand how the subreflector and spars fit
together. Proceed with the assembly according to the following procedures:
1.
Assemble four spars (item 16 drawing 517577 sheet 3, zone B-2) to top spar
fitting (item 15) with 8 screws (item 8), 16 washers (item 9), and 8 nuts (item
10). Secure hardware finger tight.
2.
Attach the subreflector support frame (item 6 drawing 517577 sheet 3, zone
C-3) to the mounting frame (item 7) using three screws (item 8), six washers
(item 9), and three nuts (item 10) in the three adjusting slots. Secure
hardware finger tight.
3.
Attach three threaded rods (item 12 drawing 517577 sheet 3, zone B-4) to the
frames (items 6 and 7) using eight washers (item 9) and eight nuts (item 10)
on each rod. Secure hardware finger tight.
4.
Lift the frame assembly up to the spar assembly. Attach the mounting frame
(item 7 drawing 517577 sheet 3, zone B-4) to the spars using four screws
(item 8), eight washers (item 9), and four nuts (item 10). Secure hardware
finger tight.
42S315F
5.
Set the subreflector (item 5 drawing 517577 sheet 3, zone B-4) concave side
up on a padded surface for protection.
6.
Install a nut (item 13) and a washer (item 11) onto each threaded stud (item
14) approximately 1.5 inches [3.8 cm] from the end, and screw the same end
of each stud into one of the machined boss on the subreflector.
7.
Install a nut (item 13) onto each threaded stud (item 14) approximately 3
inches [7.6 cm] from the free end, and place a washer (item 11) over the end
of the stud and onto the nut.
8.
Lift the subreflector up to the support frame and insert the studs into the
corresponding holes in the frame. Secure the subreflector using three
washers (item 11) and three nuts (item 13).
9.
Choke a nylon strap around the spar assembly top fitting and attach it to the
lifting hook of the crane.
2-12
Chapter 2 - Installation
10. Hoist the spar and subreflector assembly into the reflector and align the
lower end of each spar with the attachment tab on a spar truss. Attach the
spars to the truss tabs as shown in drawing 517577 sheet 2, using four screws
(item 25), eight washers (item 27), and four nuts (item 26).
11. Torque all the fasteners used in the assembly and installation of the spars
and subreflector to the values corresponding to the correct sizes as indicated
on page 2-7.
2.4.6.3 Truss Alignment
Refer to drawing 517577C, 9-Meter Reflector Assembly, for the following
procedure.
1.
Install the theodolite mounting bracket onto the panel mounting ring in the
hub using three 3/8 inch screws. It will only mount one way due to the
dowel pins.
2.
Install the theodolite onto the mounting bracket. Level the theodolite over its
three feet using an 18-inch machine scale, measuring 16.850 inches [42.799
cm] up from the panel mounting ring. (See Figure 2-1.)
3.
Zero the azimuth scale of the theodolite while looking at the center of the
mounting bolt of the first truss to the hub.
4.
Set the theodolite elevation angle to 80°-19'-38". Focus on the 1/4" diameter
gage hole in the top of the end plate on the truss. Adjust the truss laterally
and vertically so that the gage hole is centered on the theodolite telescope
crosshairs. Tighten the mounting screws for the truss at the hub, and the
screws which attach the outer diagonal braces to the truss.
NOTE
The truss tip elevation may be as much as 0°10' lower than
the above setting, but should not be any higher.
5.
Set the azimuth angle of the next truss at 15° clockwise from the previous
truss. Set the elevation angle the same. Tighten the truss mounting screws
and the intercostals between the two trusses. Also tighten the inner diagonal
brace. Verify that the first truss remains as previously set.
6.
Set the remaining trusses as in step 5. Only the first truss and its two
adjacent trusses have diagonal braces attached to them.
7.
Assure that all truss and intercostal fasteners are torqued as specified in
Table 2-2 on page 2-7.
2.4.6.4 Installation of Reflector Panels
Refer to drawing 517577, 9-Meter Reflector Assembly, for the following
procedure.
42S315F
2-13
Chapter 2 - Installation
1.
Install four threaded rods (item 35) one in each hole on the inner truss pad
using two washers (item 9) and two nuts (item 10) on each rod. Install
another nut (item 10) 2 1/8-inches (5.4 cm) above pad on each rod. Place one
washer (item 9) on top of each nut. (These threaded rods will be used to
mount the panels.)
2.
Install two threaded rods (item 35) one in each hole on outer truss pad using
two washers (item 9) and two nuts (item 10) on each rod. Install another nut
(item 10) 1 1/2-inches (3.8 cm) above pad on each rod. Place one washer
(item 9) on top of each nut.
3.
Extend 4-foot lengths of 2 x 4 lumber from halfway out on trusses to the
ground. Clamp boards securely in place with "C" type clamps. This should
be done on every other truss to provide outrigger stability to the reflector
while it is being assembled.
CAUTION
As the reflector panels are assembled, the reflector will
become highly susceptible to wind forces; therefore, secure
the hub-truss assembly as indicated in the following step
before installing panels.
4.
Tie six equally spaced trusses to ground stakes using wire rope. Secure rope
to outermost junction on the lower main radial rib of the truss. Do not use a
mechanical device to tighten the ropes since this could damage the trusses.
This should prevent the reflector from overturning.
This tie-down
procedure is a mandatory precaution if the reflector is to be left on the
ground overnight and unattended.
NOTE
There are two tiers of 24 panels each for the 9-meter
antenna. The inner tier of panels is installed first, then the
outer tier.
42S315F
5.
Place inner panel (item 4) on threaded rods at position closest to hub as
shown in drawing.
6.
Secure outer portion of panel to rods using two flat washers (item 9) and two
nuts (item 10).
7.
Secure inner portion of panel to hub using washer (item 9) and screw (item
32).
2-14
Chapter 2 - Installation
8.
Roughly align panel by moving threaded rod up or down with nuts on truss.
Sight the outer corners of each panel using the theodolite and data provided
in Table 2-3. (This will minimize the final adjustments.) Set the outer edge
elevation angle to 87° - 26’ - 20”. Set the azimuth of the lateral edge of the
panels to 0° - 02’ each side of the 15° increments. Fully tighten the adjusting
nuts.
Table 2-3. Panel Rough Alignment
Panel Rough Alignment - 2 Tiers, 24 Panels each at 15° Sight side and
outer edges of panel at corner
Inner Panel
Outer Panel
Outer Edge Elevation
87-26-20
78-15-12
Side Edge 15° Increment ±
0-02-00
0-01-11
9.
Repeat steps 5 through 8 for the remainder of the panels on the inner row,
spacing panels 1/8 inch (0.32 cm) apart.
10. Starting at a spar tab position, place left spar panel (item 1) on threaded rods
spaced 1/8 inch (0.32 cm) out from inner panel. See drawing sheet 1.
11. Secure panel to rods using four washers (item 9) and four nuts (item 10).
12. Align panel surface flush to adjacent inner panel by moving threaded rod up
or down with nuts on truss. Align outer corners using theodolite. Refer to
Table 2-3.
13. Place right spar panel (item 2) on threaded rods at next clockwise position.
14. Secure panel to rods using four washers (item 9) and four nuts (item 10).
15. Align panel flush to adjacent panels by moving threaded rod up or down
with nuts on truss. Align outer corners using theodolite.
16. Place outer panel (item 3) on threaded rods at next counterclockwise
position.
17. Secure panel to rods using four washers (item 9) and four nuts (item 10).
18. Align panel flush to adjacent panels by moving threaded rod up or down
with nuts on truss. Align outer corners using theodolite.
19. Repeat steps 16 through 18 for the next four panels on the outer row.
20. Repeat steps 10 through 19 three times to complete outer row of panels.
2.4.6.5
Reflector Alignment
Refer to Figure 2-1 for clarification of alignment procedures. The theodolite
42S315F
2-15
Chapter 2 - Installation
mounting bracket, template arm, drill template, and setting data for
alignment are located in Alignment Kit #516212.
1.
Verify that the theodolite is still level with respect to the panel mounting
ring, at a height of 16.850 inches [42.799 cm].
2.
Pin the template arm to the tab on the slip ring below the theodolite
mounting plate.
NOTE
The splice plates and bushing plates must face away from
the surface of the reflector. Any kinks in the template
should be smoothed in order for the curve of the template
to follow the curve of the reflector.
3.
Attach section 1 of the drill template to template arm using two #8-32
screws. Attach section 2 of drill template to section 1 using two #8-32
screws. Section 3 of the template will not be used for the 9-meter reflector
alignment.
4.
At 3 inches to the left and right of each radial panel joint, drill #13 or 3/16"
holes in the panel surface using the 3rd, 4th, and 7th drill bushings in the
template. Assure that no burrs protrude into the holes or above the panel
surface.
5.
Install a theodolite target into each of the drilled holes in the reflector, fully
seated. The target should be rotated in the hole so that the flat surface
containing the white diamond shapes is facing toward the theodolite.
6.
Set the theodolite elevation angle at the appropriate value for the target row
being adjusted. The angles are given on a data sheet packed along with the
drill template in the alignment kit. If the data is missing from the kit, the
values in Table 2-4 may be used to obtain a reasonably accurate setting.
Table 2-4. Final Alignment Target Measurements
- Sight Center of the Middle Diamond
Target Row
42S315F
Target Location
Target Angle
1
Panel 1 Outside
87-50-20
2
Panel 2 Inside
86-47-48
3
Panel 2 Outside
78-29-24
2-16
Chapter 2 - Installation
7.
The Target Detail in Figure 2-1 shows the layout of the target. An ideal
setting will occur when the theodolite elevation crosshair is centered on the
middle diamond. Dimensions to other diamond points are given as an
indication of the adjustment required to obtain the ideal setting.
8.
Beginning at the inner row of targets and working outward in concentric
circles, adjust the panel corner adjustment below each target. After each
adjustment, fully tighten the adjusting nuts and recheck the setting.
CAUTION
Do not lean on or apply any weight to the theodolite
mounting bracket while setting a target. This will cause an
error in the adjustment.
9.
After final alignment, there should be no settings where the theodolite
elevation crosshair is more than halfway from the center to the tip of the
middle diamond. This represents 0.010 inches error.
10. Read and record the final readings of target elevations on the form in Table
2-5. Count the number of 0, 5 and 10 thousandths readings, and write these
down in the Summary under 'Count'. Follow the remainder of the
calculation portion of the table to determine the overall setting accuracy of
the reflector.
42S315F
2-17
Chapter 2 - Installation
Figure 2-1. 9-Meter Antenna Reflector and Subreflector Alignment
42S315F
2-18
Chapter 2 - Installation
Table 2-5. 9-Meter Reflector Alignment Record
Target #
1
2
3
4
5
6
7
8
9
10
11
Row 1
Row 2
Row 3
Readings
12
13
14
15
16
17
18
19
20
21
22
23
24
25
26
27
28
29
30
31
32
33
34
35
36
37
38
39
40
41
42
43
44
45
46
47
48
42S315F
Summary
Count
.000
=
.005
=
.010
=
Product Total
=
Divide by 144
=
Square Root
RMS
=
Customer
Site Location
Antenna Serial #
Performed By
Date
2-19
Product
0
Chapter 2 - Installation
2.4.6.6
Subreflector Alignment
1.
Apply a small amount of light grease or oil to the target mirror shaft. Screw the
target mirror into the hole in the apex of the subreflector a few turns. It does not
need to be tightened.
2.
Rotate the mirror so that the Crosshairs are aligned with the adjustment directions of
the subreflector mounting frame.
3.
Use the right angle lens set of the theodolite to set the theodolite elevation angle to 0°
(vertical) and view the mirror crosshairs. Rotate the theodolite azimuth to orient the
theodolite crosshairs even with the mirror crosshairs.
4.
Using the three threaded subreflector adjusting rods, adjust the distance of the
subreflector from the panel mounting ring to match the dimension given in Figure
2-1 for the appropriate antenna operational frequency band. Make the measurement
the same at the edge of the subreflector near each of the three rods.
5.
Focus the theodolite toward infinity until the theodolite telescope barrel becomes
visible in the mirror. Adjust the subreflector tilt using the three threaded
subreflector adjusting rods. The theodolite crosshairs should appear centered in the
end of the theodolite telescope barrel.
6.
Reduce the focal distance of the theodolite until the mirror crosshairs are clearly
visible. Adjust the lateral location of the subreflector until the mirror crosshairs and
the theodolite crosshairs coincide.
7.
Tighten all the subreflector adjusting fasteners. Verify that all adjustments have been
maintained.
8.
Remove the mirror from the subreflector.
9. Apply duct tape to the lower nuts on the three threaded subreflector adjusting rods
to maintain the tilt and focal length setting; then remove the upper nuts from the
threaded rods. Lower and remove the subreflector from the mounting frame and set
it aside until the reflector has been lifted onto the mount.
2.4.7 Mount Installation
The antenna foundation must be structurally adequate and provide suitable
anchor bolts located and installed per foundation plan. Refer to Site
Preparation manual, #42S314, for site preparation and foundation details for
the appropriate mount [Model 8009A (120°), Model 8009AE (120°) or Model
8009AE (180°)].
WARNING
All personnel atop the mount must use safety belts and have
all ladders properly and safely secured.
42S315F
2-20
Chapter 2 - Installation
2.4.7.1
Model 8009A Mount/Actuator Installation Procedure
NOTE
Procedures in this section are specifically for the Model 8009A.
If installing a Model 8009AE 120º see instructions given in
section 2.4.7.2 beginning on page 2-24. If installing a Model
8009AE 180º 9-Meter Antenna System see instructions given in
section 2.4.7.3 beginning on page 2-27.
Drawing 519054 provides the installation drawing for the 9-Meter 120°
mount/actuators. Refer to this drawing for clarification of the follow
procedure. The following steps are recommended for installing the antenna
mount and actuators on the foundation.
1.
Ensure the antenna foundation is structurally adequate and provides
suitable anchor bolts located per foundation plan 519920 before
installing the antenna mount.
2.
Locate (Qty 18) 1.0 inch galvanize washers (item 24) and (Qty 18) 1-8 UNC
galvanized nuts (item 25). Install one nut on each anchor bolt at
approximately 0.5 inch above the foundation surface. The 0.5 inch clearance
will be required for leveling the mount. Place one washer on top of each nut
as shown in Figure 2-2.
Foundation
0.5 inch clearance
Figure 2-2 Installing Leveling Nuts
42S315F
3.
Secure a nylon strap to the azimuth actuator assembly (item 5). Lift the
assembly with a crane and position over foundation anchor bolts. Locate
(Qty 4) 1.0 inch galvanized washers (item 24) and (Qty 4) 1-8 UNC
fluorocarbon nuts (item 26). Loosely install nuts and washers on anchor
bolts and remove the nylon strap.
4.
Secure a nylon strap to each leg (item 4) at approximately 87.0 inches from
the 1.0 inch base plate as shown on sheet 5 of Drawing 519054. Lift each leg
with a crane and position over foundation anchor bolts. Locate (Qty 8) 1.0
inch galvanized washers (item 24) and (Qty 8) 1-8 UNC fluorocarbon nuts
(item 26). Loosely install nuts and washers on anchor bolts and remove the
nylon strap.
2-21
Chapter 2 - Installation
NOTE
Complete steps 5 and 6 while the mount (item 1) is laying
horizontal on the ground.
5.
Refer to sheets 3 and 4 of drawing 519054. Attach (Qty 2) electrical
grounding cables (item 17) to ground cable brackets (items 15 and 16) with
.5-13 UNC screws, washers, and nuts (items 36, 37 and 38). Tighten 0.5 inch
hardware to 75 ft-lb (100 Nm).
6.
Secure a nylon strap to the elevation actuator assembly (item 10). Remove
the 1.5 inch retainer rings, 1.5 inch diameter clevis pin, and 1.38 inch washers
from assembly. Lift the assembly with a crane and position the jack clevis
over attachment point on mount (item 1) as shown on sheet 3 of Drawing
519054. Reassemble pivot pin through the clevis, bearing, bearing spacers,
washers and install retainer rings.
7.
Refer to 9-Meter Ladder and Platform Installation drawing 523079 , attach
the ladder and platform per the following procedure. If the optional ladder
is not to be installed proceed to step 13.
8.
Locate the ladder mount (item 1), ladder (item 2) ladder brace (item 3) and
ladder hanger (item 4). Loosely attach items to mount with 0.5-inch
hardware (items 10, 11, 12, 13, 14, and 15) as shown in drawing.
9.
Locate the platform step (item 7) and loosely attach to the mount and ladder
(item 2) with 0.5-inch hardware.
10. Position the platform (item 5) to the mount and ladder and attach with 0.5inch hardware as shown in drawing.
11. Attach platform brace (item 6) and rail brace (item 8) to mount with 0.5-inch
hardware.
12. Tighten all 0.5-inch hardware on ladder and platform to 75 ft-lb (100 Nm).
13. Refer to sheet 3 and note 5 on sheet 2 of drawing 519054. Secure a steel cable
to the mount attachment lifting point identified by note 5. Lift the mount
assembly (3500 lb or 1588 kg) with the crane approximately 39.0 inches (1
meter) and remove the upper shipping brace. Extra care shall be taken when
attaching the steel lifting cable to prevent damage to the ladder and platform
(if installed).
14. Secure the elevation actuator assembly, during lifting, with a nylon strap or
rope attached to the elevation actuator protection tube and 1.0 inch clearance
holes used for mounting shipping brace.
15. Place several wood blocks under the lower end of mount while lifting the
mount to a vertical position.
16. Refer to sheet 4 of drawing 519054. Remove the lower shipping brace .
42S315F
2-22
Chapter 2 - Installation
17. Place the lower azimuth pivot (item 3) over the foundation anchor bolts and
loosely install (Qty 6) 1.0 inch galvanized washers (item 24) and (Qty 6) 1-8
UNC fluorocarbon nuts (item 26).
18. Place a surface level on the top surface of the lower azimuth pivot pin and
adjust (3) equally spaced 1-8 UNC anchor nuts on the bottom side of the base
plate until the pivot is level. The other (3) bottom nuts should be lowered
slightly to avoid binding the base plate. Hold the bottom (3) nuts which are
in contact with the base plate fixed with a wrench and tighten (3) top nuts
against the base plate to 240 ft-lb (325 Nm).
19. Check the level to ensure the lower azimuth pivot pin is level.
20. Rotate the remaining (3) bottom nuts and (3) top nuts against the base plate.
Caution must be taken not to distort the leveled pin. Tighten all anchor nuts
to 240 to 275 ft-lb (325 to 372 Nm).
21. Install eye bolt (item 22) to upper azimuth pivot (item 2) as shown on sheet 3
of Drawing 519054. Attach a string to the eye bolt and suspend a plum bob
directly over the lower azimuth pivot as shown on sheet 5.
22. Attach upper azimuth pivot (item 2) to legs (item 4) with 1.0-inch hardware
(items 24, 25 and 27). Adjust the leg anchor bolts as require to install
hardware and secure a ground cable bracket (item 16) under one of the 1-8
UNC bolts. Tighten 1.0 inch hardware to 600 ft-lb (813 Nm).
23. Remove the crane from the mount.
24. Adjust the anchor bolt nuts securing the legs to the foundation as
required until the upper and lower pivot is plum (vertically aligned).
See sheet 5 of drawing 519054.
25. Attach wrench to the top and bottom 1-8 UNC foundation anchor
nuts and tighten to 240 to 275 ft-lb (325 to 372 Nm). Be sure to evenly
tighten the nuts so as not to distort the legs.
26. Loosen hose clamps as required and slide back the azimuth actuator
boot.
27. Extend the azimuth actuator screw by rotating the screw by the clevis
until the pin to pin jack length is greater than 64.0 inches (162.5 cm).
28. Remove the retainer rings and PVC spacers from the azimuth actuator
clevis pin.
29. Attach azimuth arm spacer and sector bars (items 6,7,8 and 9) to the
pivot pin and lower mount flange with 1-8 UNC galvanized hardware
as shown in sheets 6 and 7 of Drawing 519054.
30. Replace retainer rings to clevis pivot pin.
42S315F
2-23
Chapter 2 - Installation
31. Install (Qty 1) grease fitting (item 32) in clevis pivot pin as shown in
sheet 7, view B-B of Drawing 519054. Add grease to grease fitting and
pivot pin.
32. With a level placed directly on the jack screw adjust anchor bolts
until the actuator screw is level with the mount. Tighten 1.0 inch
hardware. Torque anchor pin nuts to a minimum of 240 ft-lb (325
Nm) to maximum of 275 ft-lb (372 Nm).
33. Replace boot and hose clamps.
2.4.7.2
Model 8009AE 120º Mount/Actuator Installation Procedure
NOTE
Procedures in this section are specifically for the Model
8009AE 120° Antenna Mount for Extreme Environment
9-Meter Antenna System. If installing a Model 8009A 9-Meter
Antenna System see instructions given in section 2.4.7.1
beginning on page 2-21. If installing a Model 8009AE 180º
9-Meter Antenna System see instructions given in section
2.4.7.3 beginning on page 2-27.
Drawing 517098 provides the installation drawing for the 9/11-Meter
Antenna 120° mount/actuators. Refer to this drawing for clarification of the
follow procedure. The following steps are recommended for installing the
antenna mount and actuators on the foundation.
1.
Ensure the antenna foundation is structurally adequate and provides
suitable anchor bolts as specified in the Site Preparation Manual
42S314 before installing the antenna mount.
2. Refer to sheet 2 of drawing 517098. Locate (Qty 20) 1.25 inch
galvanize washers (item 218) and (Qty 18) 1.25-7 UNC galvanized
nuts (item 219). Install one nut on each anchor bolt at approximately
0.5 inch above the foundation surface. The 0.5 inch clearance will be
required for leveling the mount. Place one washer on top of each nut
in Figure 2-2 on page2-21.
42S315F
3.
Refer to sheet 5 of drawing 517098. Secure a nylon strap to the azimuth
actuator assembly (item 17). Lift the assembly with a crane and position
over foundation anchor bolts. Locate (Qty 6) 1.25 inch galvanized washers
(item 218) and (Qty 6) 1.25-7 UNC nuts (item 219). Loosely install nuts and
washers on anchor bolts and remove the nylon strap.
4.
Refer to sheet 2 of drawing 517098. Locate (Qty 8) 1.25 inch galvanized
washers (item 218) and (Qty 8) 1.25-7 UNC (item 219). Secure a nylon strap
to each leg (item 2) at approximately the center. Lift each leg with a crane
and position over foundation anchor bolts. Loosely install four nuts and
2-24
Chapter 2 - Installation
washers to secure each leg on anchor bolts. Disconnect crane and remove
the nylon straps.
5.
Secure a nylon strap to the elevation actuator assembly (item 18). Remove
the cotter pins (item 16), clevis pin (item 21), spacers (item 22) and washers
(item 205) from assembly.
6.
Lift the assembly with a crane and position the jack clevis over attachment
point on mount (item 1) as shown on sheet 6 of Drawing 517098.
Reassemble pivot pin (item (21) through the clevis, with spacers (item 22)
and washers (item 205) and cotter pins (item 16).
7.
Attach the ladder and platform per the following procedure. If the optional
ladder is not to be installed proceed to step 9.
8.
Locate the ladder and platform parts and loosely attach to mount (item 1) as
shown on sheets 3 and 4 of drawing 517098. When ladder and platform are
attached tighten all 3/8-inch hardware on ladder and platform to 20 ft-lb (26
Nm).
9.
Secure the elevation actuator assembly with a nylon strap or rope attached to
the elevation actuator protection tube and 1.0 inch clearance holes used for
mounting shipping brace.
Secure a steel cable to the mount lifting points (identified by
10. Figure 2-3) using two shackles.
Lifting Points
Shipping Brace
Figure 2-3 Rigging Lifting Points
42S315F
2-25
Chapter 2 - Installation
11. Lift the mount assembly (3500 lb or 1588 kg) with the crane approximately
39.0 inches (1 meter) and remove the upper shipping brace. Extra care shall
be taken when attaching the steel lifting cable to prevent damage to the
ladder and platform (if installed).
12. Place several wood blocks under the lower end of mount while lifting the
mount to a vertical position.
13. Remove the lower shipping brace.
14. Place the lower azimuth pivot (item 3 on drawing 477697) over the
foundation anchor bolts and loosely install (Qty 6) 1.25 inch galvanized
washers (item 218) and (Qty 6) 1.25-7 UNC nuts (item 219).
15. Install (Qty 3) 3/4-10 X 3.0 screws into lower azimuth pivot base.
16. Place a surface level on the top surface of the lower azimuth pivot pin and
adjust (3) equally spaced 3/4-10 X 3.0 screws on the base plate until the pivot
is level. Tighten three of the six top nuts against the base plate to 240 ft-lb
(325 Nm).
17. Check the level to ensure the lower azimuth pivot pin is level.
18. Rotate the remaining (3) bottom nuts and (3) top nuts against the base plate.
Caution must be taken not to distort the leveled pin. Tighten all anchor nuts
to 240 to 275 ft-lb (325 to 372 Nm).
19. Install ¼-20 X 1.0 eye bolt to upper azimuth pivot (item 2 drawing 477697).
Attach a string to the eye bolt and suspend a plum bob directly over the
lower azimuth pivot (item 3 drawing 477697).
20. Attach upper azimuth pivot (item 2) to legs (item 4) with 1.0-inch hardware
(items 201, 202 and 203).
21. Adjust the leg anchor bolts as required to install hardware. Tighten 1.0 inch
hardware to 600 ft-lb (813 Nm).
22. Remove the crane from the mount.
23. Adjust the anchor bolt nuts and leveling screws to the foundation as
required until the upper and lower pivot is plum (vertically aligned).
24. Attach wrench to the top and bottom 1-8 UNC foundation anchor
nuts and tighten to 240 to 275 ft-lb (325 to 372 Nm). Be sure to evenly
tighten the nuts so as not to distort the legs.
25. Loosen hose clamps as required and slide back the azimuth actuator
boot.
26. Extend the azimuth actuator screw by rotating the screw by the clevis
until the pin to pin jack length is greater than 64.0 inches (162.5 cm).
42S315F
2-26
Chapter 2 - Installation
27. Remove the pin (item 214) and retainer ring (item 215) from the
azimuth actuator clevis pin.
28. Attach azimuth mount (item 1) to the actuator (item 17). Install pivot
pin and retaining ring (item 215).
29. Install grease fitting (item 216) in clevis pivot pin. Add grease to
grease fitting and pivot pin.
30. With a level placed directly on the jack screw adjust anchor bolts
until the actuator screw is level with the mount. Tighten 1.25 inch
hardware. Torque anchor pin nuts to a minimum of 360 ft-lb (488
Nm) to maximum of 440 ft-lb (596 Nm).
31. Replace boot and hose clamps.
2.4.7.3
Model 8009AE 180º Mount/Actuator Installation Procedure
NOTE
Procedures in this section are specifically for the Model
8009AE 180° Antenna Mount for Extreme Environment
9-Meter Antenna System. If installing a Model 8009A 9-Meter
Antenna System see instructions given in section 2.4.7.1
beginning on page 2-21. If installing a Model 8009AE 120º 9Meter Antenna System see instructions given in section 2.4.7.2
beginning on page 2-24.
Drawing 517097 provides the installation drawing for the 9-Meter Antenna
180° mount/actuators. Refer to this drawing for clarification of the follow
procedure. The following steps are recommended for installing the antenna
mount and actuators on the foundation.
42S315F
1.
Ensure the antenna foundation is structurally adequate and provides
suitable anchor bolts as specified in the Site Preparation Manual
42S314 before installing the antenna mount.
2.
Refer to sheet 2 of drawing 517097. Locate (Qty 20) 1.25 inch galvanize
washers (item 218) and (Qty 18) 1.25-7 UNC galvanized nuts (item 219).
Install one nut on each anchor bolt at approximately 0.5 inch above the
foundation surface. The 0.5 inch clearance will be required for leveling the
mount. Place one washer on top of each nut as shown in Figure 2-2 on page
2-21.
3.
Refer to sheet 5 of drawing 517097. Secure a nylon strap to the azimuth
actuator assembly (item 17). Lift the assembly with a crane and position
over foundation anchor bolts. Locate (Qty 6) 1.25 inch galvanized washers
(item 218) and (Qty 6) 1.25-7 UNC nuts (item 219). Loosely install nuts and
washers on anchor bolts and remove the nylon strap.
2-27
Chapter 2 - Installation
4.
Refer to sheet 2 of drawing 517097. Locate (Qty 8) 1.25 inch galvanized
washers (item 218) and (Qty 8) 1.25-7 UNC (item 219). Secure a nylon strap
to each leg (item 2) at approximately the center. Lift each leg with a crane
and position over foundation anchor bolts. Loosely install four nuts and
washers to secure each leg on anchor bolts. Disconnect crane and remove the
nylon straps.
5.
Secure a nylon strap to the elevation actuator assembly (item 18). Remove
the cotter pins (item 16), clevis pin (item 21), spacers (item 22) and washers
(item 205) from assembly.
6.
Lift the assembly with a crane and position the jack clevis over attachment
point on mount (item 1) as shown on sheet 6 of Drawing 517097.
Reassemble pivot pin (item (21) through the clevis, with spacers (item 22)
and washers (item 205) and cotter pins (item 16).
7.
Attach the ladder and platform per the following procedure. If the optional
ladder is not to be installed proceed to step 9.
8.
Locate the ladder and platform parts and loosely attach to mount (item 1) as
shown on sheets 3 and 4 of drawing 517097. When ladder and platform are
attached tighten all 3/8-inch hardware on ladder and platform to 20 ft-lb (26
Nm).
9.
Secure the elevation actuator assembly with a nylon strap or rope attached to
the elevation actuator protection tube and 1.0 inch clearance holes used for
mounting shipping brace.
10. Secure a steel cable to the mount lifting points (identified by Figure 2-4)
using two shackles.
Lifting Points
Shipping Brace
Figure 2-4 Rigging Lifting Points
42S315F
2-28
Chapter 2 - Installation
11. Lift the mount assembly (3500 lb or 1588 kg) with the crane approximately
39.0 inches (1 meter) and remove the upper shipping brace. Extra care shall
be taken when attaching the steel lifting cable to prevent damage to the
ladder and platform (if installed).
12. Place several wood blocks under the lower end of mount while lifting the
mount to a vertical position.
13. Remove the lower shipping brace.
14. Place the lower azimuth pivot (item 3 on drawing 477697) over the
foundation anchor bolts and loosely install (Qty 6) 1.25 inch galvanized
washers (item 214) and (Qty 6) 1.25-7 UNC nuts (item 215).
15. Install (Qty 3) 3/4-10 X 3.0 screws into lower azimuth pivot base.
16. Place a surface level on the top surface of the lower azimuth pivot pin and
adjust (3) equally spaced 3/4-10 X 3.0 screws on the base plate until the pivot
is level. Tighten three of the six top nuts against the base plate to 240 ft-lb
(325 Nm).
17. Check the level to ensure the lower azimuth pivot pin is level.
18. Rotate the remaining (3) bottom nuts and (3) top nuts against the base plate.
Caution must be taken not to distort the leveled pin. Tighten all anchor nuts
to 240 to 275 ft-lb (325 to 372 Nm).
19. Install ¼-20 X 1.0 eye bolt to upper azimuth pivot (item 2 drawing 477697).
Attach a string to the eye bolt and suspend a plum bob directly over the
lower azimuth pivot (item 3 drawing 477697).
20. Attach upper azimuth pivot (item 2) to legs (item 4) with 1.0-inch hardware
(items 201, 202 and 203).
21. Adjust the leg anchor bolts as required to install hardware. Tighten 1.0 inch
hardware to 600 ft-lb (813 Nm).
22. Remove the crane from the mount.
23. Adjust the anchor bolt nuts and leveling screws to the foundation as
required until the upper and lower pivot is plum (vertically aligned).
24. Attach wrench to the top and bottom 1-8 UNC foundation anchor
nuts and tighten to 240 to 275 ft-lb (325 to 372 Nm). Be sure to evenly
tighten the nuts so as not to distort the legs.
25. Attach azimuth mount (item 1) to the actuator (item 17) using ten 1.08 X 3 galvanized bolts (item 218) and 1.0 galvanized flat washers (item
219).
26. Install centering arm (item 23) as shown on sheet 5 of drawing.
42S315F
2-29
Chapter 2 - Installation
27. With a level placed directly on the jack screw adjust anchor bolts
until the actuator screw is level with the mount. Tighten 1.25 inch
hardware. Torque anchor pin nuts to a minimum of 360 ft-lb (488
Nm) to maximum of 440 ft-lb (596 Nm).
2.4.8 Grouting Baseplate to Foundation, Models 8009A and 8009AE
Grout is used between the concrete foundation surface and the four base
plates to ensure a rigid, load-bearing connection between the mount and the
foundation. It is important that the grout manufacturer's instructions be
followed. These instructions are packaged with the grout.
For convenience, the essentials of the procedure are repeated as follows:
The grout must be 1.0-inch thick minimum at all locations (see Figure 2-23).
Verify that each anchor bolt nut will have no less than two threads above the
nut. The normal ambient temperature range for good "early-strength"
grouting is 55°F to 80°F (13°C to 27°C). When temperatures at the job site are
outside this range, the procedures given here must be modified to
compensate for the high or low temperature. If the temperature is outside the
range, perform one of the following procedures before proceeding to the
grouting procedure.
2.4.8.1
Hot Weather Grouting
Temperatures above 80°F (27°C) accelerate hardening of the grout, reducing
the time that the grout remains workable after mixing; therefore, it is
necessary that either procedures be used which permit placing of the grout
more quickly, or the available working time increased by cooling the mixture
and the mount base plates.
If the first approach is taken, it is suggested that grout be mixed for each base
plate separately and poured immediately. Mixing time could be reduced to
one minute by use of an electric drill and mixing blade made of steel rod.
If the second approach is taken, grout working time may be increased by use
of cold materials, cool foundation, and base plates. This approach involves
the use of cold or iced water in the mix to keep the as-mixed temperature of
the grout under 70°F (21°C), preferably between 50°F and 55°F (10°C and
13°C).
In either case, the following practices are recommended:
1. Store bags of grout in as cool a place as practicable, but at least in the
shade. Avoid exposing the bags to dampness or rain.
2. Give extra attention to saturating the concrete foundation for 24 hours
before grouting. Heat and wind cause rapid evaporation; therefore,
the concrete should be wet liberally and frequently to prevent drying.
42S315F
2-30
Chapter 2 - Installation
Consider the use of windbreaks and sunshades to maintain
saturation.
3. Cool the base plates while saturating the foundation by covering the
plates with wet cloths and allowing evaporation to cool them.
2.4.8.2
Cold Weather Grouting
Temperatures below 55°F (13°C) slow the hardening process and keep the
grout in a flowable state long enough to permit settlement and bleeding.
Although grouting may be successfully accomplished at ambient
temperatures as low as 45°F (7°C), the rate of strength gain (hardening) is
slow and the required time on-site may be excessive. To minimize the curing
time that must be allowed before finally torquing the anchor bolt nuts, it is
recommended that the grout, mixing water, and mount base plates be
warmed to accelerate the curing process. The following procedure is
suggested:
1. Store bags of grout in a sheltered place so that the material will be at least
above freezing, but preferably above 45°F (7°C).
2. Measure the temperature of the base plate and foundation by placing a
thermometer on the surface and covering it with a piece of dry insulation
or dry rags. If the temperature is above 55°F (13°C) minimum, proceed
with grouting following the grouting procedures. If the temperature is
below 55°F (13°C), warm the base plate and foundation to bring the
temperature above the minimum, using the following methods:
a) Base plates may be warmed by use of infrared heat lamps or by
building a small enclosure around the base plate and introducing heat
from a convenient source. Warm the mixing water as necessary to
provide mixed grout at a temperature of 60°F (16°C) or above, but
avoid use of water hotter than 90°F (32°C).
b) After installing grout, maintain the temperature of the in-place grout
at 50°F (10°C) or above for a minimum of three hours to ensure
adequate grout hardness for final tightening of the anchor bolt nuts.
NOTE
Grout will not harden unless the temperature is
maintained above freezing. The minimum temperature is
40°F (4°C).
42S315F
2-31
Chapter 2 - Installation
2.4.8.3
Grouting Procedures
Perform the following procedures to grout the four base plates to the
foundation:
1. Wash work surface with water. Keep surface saturated with water for
at least 24 hours prior to grouting.
NOTE
Grouting must be completed within 10 minutes after
mixing.
2. Pour grout into a five gallon bucket or equivalent mixing container
and slowly add water. Stir the mix and add grout or water as required
to obtain a good paste.
NOTE
Be sure to mix enough grout to complete each pad at one
time. Once the grout begins to set, new grout will not bond
to the old grout.
3. Starting on one side of each base plate, use a small strip of wood to
work the grout between base plate and foundation. It is important
that the grout be worked from one side to the other to prevent air
from being trapped under each plate. Once the area under the plate is
full of grout, smooth the edges around each plate for best appearance.
4. Immediately after the grout is installed, cover all exposed grout with
clean wet rags (do not use burlap). Keep the rags moist for at least
two hours.
5. After the grout has cured for a minimum of six hours, turn the
leveling screws counterclockwise two to three turns to raise the screw
off the bearing surface. Tighten all anchor bolt nuts as follows:
42S315F
•
Model 8009A mount (1.0-inch diameter anchor bolts) to 240 to
275 ft-lb (325 to 372 Nm).
•
Model 8009AE mount (1.25-inch diameter anchor bolts) to 360
to 440 ft-lb (488 to 596 Nm).
2-32
Chapter 2 - Installation
CAUTION
Grout (item 18) must be installed between all base plates
and foundation surface to comply with the design loads
specified per drawing 519921.
2.4.9 Reflector Mounting
NOTE
The assembly and alignment of reflector must be completed
per instructions in paragraph 2.4.6 of this manual before
installing antenna hub to mount.
1. Prior to lifting the reflector and hub, swing the elevation actuator over to
a horizontal position toward the legs as shown on sheet 8 of drawing
519054. Place a wood block between the elevation actuator assembly and
mount as required to prevent damage to actuator assembly.
2. Prior to lifting the reflector and hub, install 0.5 inch eye bolt (item 39) and
(Qty 2) support plates (item 19) to hub assembly with 0.5 inch washers
and nut as shown on sheet 8 of drawing 519054.
3. Attach three 30 foot nylon lifting straps using three shackles (part no.
521993) to antenna hub as shown in Figure 2-5 for lifting the reflector
assembly with a crane. Use short straps, as shown in Figure 2-5, to choke
lifting straps near the subreflector mount and spars to prevent side forces
on spars during lifting.
4. Lift the assembled reflector and position hub over mount as shown in
sheets 8 and 9 of Drawing 519054. Install (Qty 2) elevation pivot pins
(item 11), with the tapered end toward the center of mount, through
bearing, spacers, and washers.
CAUTION
The pin (item 11) must be installed with the tapered end
toward the center of mount. Assembly problems will occur
with the elevation Limit Switch and Resolver package
installation if the tapered end is installed toward the outside.
42S315F
2-33
Chapter 2 - Installation
Figure 2-5. Hoisting Reflector and Spars
42S315F
2-34
Chapter 2 - Installation
5. Attach a rope to the elevation actuator protection tube and thread rope
through the eye bolt installed in step 2.
6. Swing the elevation jack toward the upper hub pivot and install (Qty 2)
pins (item 12) and retainer (item 13) with .25-20 UNC hardware as shown
in VIEW D-D sheet 9 of Drawing 519054.
7. Tighten .25 inch hardware to 9 ft-lb (12 Nm).
8. Add grease to grease fitting installed in pins (item 12).
9. Attach (Qty 1) grounding cable (item 17) to hub grounding bracket with
.5-inch hardware (items 36, 37 and 38) as shown in view C-C sheet 9 of
Drawing 519054. Attach other end of ground cable (item 17) to (Qty 1)
grounding bracket (item 16) with 0.5 inch hardware (items 36, 37 and 38).
10. Tighten 0.5 inch hardware to 75 ft-lb (100 Nm).
11. Attach grounding bracket to one of the upper shipping brace holes in the
mount with 1.0 inch hardware (items 24, 25 and 35).
12. Attach (Qty 1) grounding cable (item 17) to each leg base plate with 0.5
inch hardware (items 36 and 37) as shown on sheet 8 of Drawing 519054.
Attach other end of ground cable to ground lead provided by the
installing contractor.
2.4.9.1
Feed Installation
The 9-meter antenna has a large number of feed options therefore each feed is
shipped with a set of installation drawings specific to the model. Instructions
in this section are general and must be augmented by the installation
drawings.
To install feed and associated hardware, a 25-foot extension ladder is
required to enter the reflector. During this stage of the assembly, it will be
necessary for a person to enter the reflector. Always wear soft sole shoes
when working inside the reflector.
WARNING
Never use the crane to lift personnel into the reflector. Serious
injury could occur.
42S315F
2-35
Chapter 2 - Installation
CAUTION
Wear only soft-sole shoes or socks while inside the reflector.
Only step on the seams between panels where the structure is
strongest, never in the middle of a panel.
Perform the following procedure to install and align the feed:
1. Choke two nylon straps around the feed assembly and attach to
lifting hook of crane as shown in Figure 2-6.
Figure 2-6. Hoisting Feed
2. With one person inside the hub and one person inside the reflector,
carefully lift the feed up inside the reflector.
3. Orient feed properly (top of feed toward top of reflector) and attach to
polarization drive ring of hub assembly using eight 3/8-16 X 1.75
screws and flat washers.
42S315F
2-36
Chapter 2 - Installation
NOTE
To correct orient the feed refer to the feed installation
drawings. With linear feeds it is necessary to orient the
feed such that the vertical elements are positioned near the
center of the polarization drive. For circular feeds it is only
necessary to orient the feed so that waveguide ports can be
easily connected to the system waveguides without
excessive bending.
2.4.9.2
Installation of Subreflector to Subreflector Mounting Frame
The subreflector adjustment nuts was taped and the subreflector was
removed from the mounting frame. (Refer to step 9 of the subreflector
alignment procedure on page 2-20.) Reattach subreflector to mounting frame
with 3/4-10 nuts and washers as shown in Figure 2-1. Tighten 3/4-10
stainless steel nuts to 130 ft-lb [176 Nm].
2.4.9.3
Transformer Installation Inside Hub
A step down transformer must be installed inside the reflector hub when
using 3-phase electrical power other than 208V ac. Refer to Transformer
Installation Drawing number 521998 for detailed instructions.
2.4.9.4
Installation of Reflector Hub Cover
Refer to drawing 521988 for hub cover installation. The connector panel (Item
1) must be installed prior to installing the feed waveguide.
2.4.9.5
Installation of Feed Waveguide
Refer to the appropriate Waveguide Installation drawing. An index of
drawings is provided in tbd.
Transmit Waveguide Kit
Installation Drawing
C-Band, Standard Power, 2 Port RT Linear
724638-5001
C-Band, Standard Power, 4 Port Linear
521874
C-Band, Standard Power, 4 Port Circular
521876
C-Band, High Power, 4 Port Linear 800 MHz
721953
Ku-Band, Standard Power, 4 Port Linear
521875
DBS-Band, Standard Power, 4 Port Linear
578860
NOTE
42S315F
2-37
Chapter 2 - Installation
The customer interface to the transmit input ports are located
at the top of the leg brace of the mount. The interface flange
provided with the feed is WR-75 cover grooved flange or CPR137 grooved flange.
The customer interface to the receive ports is located inside the
reflector hub. Systems integrated with LNA packages must be
attached to the receive ports and supported to prevent
damage to the waveguide flanges. Holes are provided in the
rear hub cover for type F or type N connectors with male
threads.
2.4.10 Optional Lightning Protection Installation
For best lightning protection, air terminals should always be located at the
high point of the antenna and positioned within 10 degrees of true vertical.
The procedure for installing the optional lightning protection system on the
9-Meter antenna is as follows:
1. Mount brackets and lightning points on subreflector threaded rod as
shown in drawing 571224, sheet 2.
2. Mount brackets and lightning points on highest point of reflector as
shown in 571224, sheet 3.
3. Attach aluminum cable to lightning rod clamp on subreflector
structure after first stripping cable back 3 inches.
4. Clamp cable to one of the top two spars with cable ties.
5. Route cable to lightning rod clamp on reflector. Strip 3 inches of
insulation away and attach cable to clamp.
6. Locate bi-metal clamp on side of hub opposite ladder and attach with
copper end oriented toward bottom of reflector as shown in Figure 51.
7. Route cable to bi-metal clamp using flat clamps provided to secure
cable.
8. Cut off free end of aluminum cable, strip insulation back 3 inches, and
attach it to upper end of bi-metal clamp.
9. Strip insulation back 3 inches on copper cable and attach it to lower
end of bi-metal clamp.
10. Route copper cable to ground rod or to attachment point for
grounding system using flat clamps provided to secure cable. Be sure
to provide large service loops at elevation and azimuth pivot joints.
42S315F
2-38
Chapter 2 - Installation
2.4.11 Optional Deicing Installation
All components that are supplied with de-icing are wired to a junction box
located in the antenna hub. Run the cables from the components to the
junction box and consult the Controls manual supplied with the system for
additional installation and check-out procedures.
2.4.12 Electrical Installation
Controller, motors, limit switches, and wiring installation instructions are not
contained in this manual. Specific installation instructions will vary
depending on the actual controller and type of motors used for the 9M
antenna installation. Review the information received with the equipment for
specific installation instructions.
CAUTION
While adjusting limit switches, be careful not to let the
antenna run into any obstructions. Antenna mounts can be
damaged if design limits are exceeded before limit switches
are set. Be careful not to allow the TORQUETUBE™ to run
into the diagonal braces.
2.4.13 Corrosion Protection
After installation, the mount and antenna should be given a final paint touchup and an application of corrosion inhibitor at several points.
All painting should be done using a good quality commercial-grade paint
that is available in local hardware stores.
1. Apply gloss white paint to any surface of the mount that was paintdamaged during shipping or installation. Paint procedures are in the
maintenance section.
2. Spray paint the heads, nuts, and exposed ends of all installed
fasteners to seal the joints.
42S315F
2-39
Chapter 2 - Installation
Blank
42S315F
2-40
Chapter 3 - Operation
Chapter 3
Operation
3.1 General
With this elevation-over-azimuth mount, pointing the antenna is
accomplished by jogging the antenna in elevation and jogging antenna in
azimuth. The azimuth and elevation angles are first established
approximately by reference to the indicator provided for each axis, then
aligned precisely by peaking on a signal received from a satellite of known
position. In addition, the feed polarization and subreflector position are
adjusted on the basis of peak received signal.
3.2 Satellite Pointing Procedure
With the feed installed and the electronics operational, use the following
procedure for pointing at the desired satellite and peaking on the signal
using the motorized earth station antenna.
3.2.1 Elevation Pointing
a. Place a spirit level on the elevation frame. Adjust the elevation frame to
the 90-degree (zenith) position as indicated by the level, and adjust the
elevation position indicator to read 90 degrees.
b. Determine the required elevation angle.
c. Jog the elevation actuator in the extending direction until the desired
angle is reached.
3.2.2 Azimuth Pointing
a. Determine the required azimuth angle. (The zero mark on the azimuth
indicator corresponds to the foundation heading angle.)
b. Jog the azimuth actuator until the desired angle is reached.
pointing of the antenna is now complete.
42S315F
3-1
Initial
Chapter 3 - Operation
3.2.3 Signal Peaking Procedure
With the RF components functioning, perform the signal peaking procedure
as follows: (The initial setting of the elevation angle should be very nearly
correct, having been set to a horizontal reference.)
1. Jog the antenna in azimuth until the satellite signal is peaked.
2. Loosen and calibrate the azimuth angle indicator by adjusting and
fixing the pointer at the known azimuth angle of the satellite. Tighten
the screws holding the pointer and the indicator plate.
3. If fine adjustment of the elevation angle is required, jog the antenna
slightly in the elevation axis to peak on the satellite signal.
4. If required, loosen and calibrate the elevation indicator by adjusting
and fixing the pointer at the known elevation angle of the satellite.
Tighten the pointer screw.
5. Peak the feed polarization on the signal as follows:
a. Rotate feed until the signal peaks.
b. Monitor receiver C/N meter or a power meter.
c. Rotate the feed counterclockwise until the signal decreases by
1 dB. Record the signal level. Mark a line on the feed
mounting plate and a matching line on the hub.
d. Rotate the feed clockwise until the meter has passed through
the peak and has decreased to the level recorded in Step c.
Make a mark on the hub in line with the mark of the feed
mounting plate.
e. Measure the distance between the marks on the hub.
Calculate the mid-point between these marks. Rotate the feed
until the mark on the feed mounting plate is aligned with the
mid-point.
6. With the antenna peaked on a satellite signal, monitor the receiver
C/N meter or a power meter. Loosen the nuts which lock the studs
and adjust the subreflector spacing for maximum received signal. Use
a scale to verify that the three subreflector adjustment studs are
equally spaced from the support clamps. This will verify that the
subreflector is not skewed and consequently steering the antenna
beam away from the feed. After the maximum received signal is
obtained, torque all 3/4-inch hardware to 6 ft-lb.
If further
adjustment of the subreflector is required, refer to Subreflector
Adjustment procedure later in this section.
42S315F
3-2
Chapter 3 - Operation
3.3 Subreflector Adjustment
The following procedure should be used in the event that the antenna
performance demonstrates that a subreflector adjustment is necessary. The
purpose of the physical measurements to various points on the antenna is to
minimize any tilt, or lateral displacement of the subreflector with respect to
the main reflector surface and also to position the subreflector to its optimum
optical location along the adjustment axis.
1. Ensure all antenna hardware including mount parts are installed and
tightened properly prior to making any subreflector adjustment.
2. To establish a reference, measure the distance from the feed window
to the subreflector apex as shown in Figure 3-1, distance A.
NOTE
Measurement does not include the tuning plate or spacer.
The feed window should be flat.
Figure 3-1. Feed, Reflector, and Subreflector Distances
42S315F
3-3
Chapter 3 - Operation
3. If tilt was not adjusted using theodolite, measure the distance
between the edge of the subreflector and each corner of the feed horn
as shown in Figure 3-1, distance B. Using the subreflector adjustment
mechanism, adjust the subreflector until all four distances are equal;
this removes any tilt with respect to the feed.
4. If the translation off center was not adjusted using theodolite,
measure from the center of the subreflector to each spar pickup point
on the dish surface as shown in Figure 3-1, distance C. Any
convenient and repeatable measurement point is acceptable as long as
it is associated with the machined holes in the spars or the spar tabs.
These three measurements should be equal within 0.1-inch nominal.
If they are not equal, re-evaluation of the antenna geometry and
installation is necessary.
5. If necessary, the subreflector may now be adjusted toward or away
from the main dish with the subreflector adjustment mechanism. By
adjusting the support studs equally, the subreflector alignment is
maintained. Signal level monitoring equipment is necessary to
accurately set the subreflector for the highest gain and the deepest
radiation pattern nulls. The following equipment or its equivalent is
necessary:
•
Spectrum Analyzer
•
Power Meter
•
X-Y Recorder
•
Time Base
The radiation pattern (relative power versus off-axis angle) should be
recorded and evaluated for each adjustment of the subreflector.
Typical patterns at various subreflector positions which are identified
in Figure 3-2 show the changes which take place as the subreflector is
moved closer to the optimum focal position.
a. The first nulls to each side of the main beam will become
deeper and eventually bottom out at some level (See Figure 32). This level varies depending on the antenna, but should be
equal to or greater than 10 dB below the level of the first
sidelobe. The deepest null in the H-plane sometimes occurs at
a different subreflector position than in the E-plane. In this
case, the subreflector should be set at a compromise position
between the two planes (i.e., E-plane null depth approximately
equals the H-plane null depth).
b. The signal level of the main beam will also increase as the
subreflector is moved closer to the focal position. The power
meter can be used to monitor this change. The main signal
42S315F
3-4
Chapter 3 - Operation
level will peak at the antenna focus; however, this change will
not be as sensitive as the change in the null depths. Peak main
beam signal level and minimum first null depths should
coincide for the best subreflector position.
c. As the subreflector is adjusted toward the optimum focal
position, the first sidelobe levels should decrease and remain
symmetrical within 2 dB. The minimum sidelobe level will
occur approximately at the same subreflector position as the
highest signal level and lowest nulls. Should the sidelobes
become asymmetrical (greater than 2 dB), Step 3 above should
be repeated. It is recommended that after each adjustment of
the subreflector, the antenna azimuth and elevation
adjustments be re-peaked to compensate for any beam
steering due to axial misalignment.
42S315F
3-5
Chapter 3 - Operation
Figure 3-2 Typical Antenna Patterns for Various Subreflector Position
42S315F
3-6
Chapter 4 - Maintenance
Chapter 4
Maintenance
4.1
General
The 9-Meter Earth Station Antenna is designed for use in many different
environmental conditions. Several areas on the antenna require service at
various intervals to ensure the proper use and operation. Modification to the
suggested service intervals is expected pending customer operation and
environmental conditions.
The Model 8009A and the Model 8009AE mount azimuth pivot points are
designed with self-lubricated spherical bearings and require no lubrication.
The azimuth and elevation actuators contain a gearbox and a machine screw
mechanism which require periodic inspection and application of lubricant as
needed.
At no time should substitute parts be used in any repair of this antenna. Use
only authorized parts. Any alternations to the antenna not specifically
described in this instruction manual and not authorized by ViaSat may void
the warranty.
4.2
Periodic Maintenance
The suggested service intervals apply to a typical antenna installation and
may vary due to environmental conditions.
4.2.1 Weekly Maintenance
Ensure motorized antennas are driven in azimuth and elevation on a weekly
basis. Perform routine inspection and maintenance on waveguides. In areas
of heavy snow and ice, mounts should be inspected before movement for
excessive accumulation of ice, or damage may result.
4.2.2 Monthly Maintenance
Apply electrical power, as applicable, to azimuth actuator, elevation actuator,
and polarization drive assembly. Run each axis for two or three minutes in
the normal operating sector. Inspect drain holes in the actuator motors; holes
should be open for condensation drainage. Observe brake operation, if
applicable.
42S315F
4-1
Chapter 4 - Maintenance
CAUTION
If it has been some time since electrical power was applied to
the actuator motors, go to the antenna, remove all electrical
power, manually release the motor brake, and rotate motor
shaft. Once it is determined that the brake will release and the
shaft will turn freely, then apply electrical power to the
motors. Failure to check brake and shaft may result in motor
damage.
4.2.3 Bi-Monthly Maintenance
Perform the following procedures at least once every two months.
1. Remove resolver covers, inspect mechanical operation, and check for
condensation accumulation. If moisture exists, open all drain holes.
Apply a spray-type lubricant (WD-40 or equivalent) to all moving
parts. Secure covers.
2. Remove limit switch covers, inspect switch operation, and repair as
required. Secure covers.
3. Inspect polarization drive assembly, if applicable, and apply a spraytype lubricant (WD-40 or equivalent) to chain and drive sprocket.
Inspect feed chain for correct tension and lubricate if necessary with
spray-type lubricant. Ensure that feed rollers are all functional.
Inspect flexible transmit waveguide, if applicable, for fatigue. Check
limit switch operation. Inspect feed window for damage and replace
window as required.
4. Inspect all cotter pins and other devices used as pin retainers.
Replace if damaged or corroded; tighten if loose.
5. Inspect mount, reflector, and feed for loose or missing fasteners and
replace as required.
4.2.4 Quarterly Maintenance
Perform the following procedures at least once every three months.
1. Inspect azimuth machine screw in accordance with the following
procedure:
a. Extend actuator to full length.
b. Remove boot clamp at end of screw and slide boot back to
expose full length of screw.
42S315F
4-2
Chapter 4 - Maintenance
c. If the screw is coated with grease and the grease is in good
condition, no further action is required.
d. If the screw is not adequately coated, or if the grease is dry,
hard, or contaminated, the lubricant must be renewed. Do not
add new grease to old grease on the screw. Clean the screw of
old grease using a solvent. Dry the screw with clean cloths.
Apply a thin uniform film coating of one of the following lowtemperature, clay-based greases.
CAUTION
If one of the following low-temperature greases is
not used on the actuator machine screw, damage
to the screw or motor could occur.
•
•
•
Shell Aeroshell #7
Mobil Grease #28
Mobil SHC 634, in reducer
2. Apply grease to the azimuth and elevation jack housing and gearbox,
as required.
CAUTION
When lubricating grease fittings, care must be taken to
prevent excessive grease from damaging gearbox seals.
3. Apply low temperature grease to the following moving points (Refer
to Figure 4-1):
a. Azimuth actuator pivot pin
b. Azimuth actuator clevis pin
c. Elevation actuator pivot pins.
4. Apply white Rust-Oleum enamel to all mount hardware.
5. Apply spray type rust inhibitor to cavity above spherical bearing for
additional bearing protection.
6. Inspect feed window for damage, replace window as required (see
Radome Window Replacement Procedure toward the end of this
section). If window has moisture, dirt, or other foreign materials
present, clean as follows:
42S315F
4-3
Chapter 4 - Maintenance
a. Use a clean, lint-free cloth lightly moistened with a diluted
solution of mild soap and water to remove foreign material
from the radome. Wipe dry using a clean, dry lint-free cloth.
b. Remove dust from accessible areas.
Figure 4-1. Lubrication Points (Sheet 1 of 2)
42S315F
4-4
Chapter 4 - Maintenance
Figure 4-1. Lubrication Points (Sheet 2 of 2)
4.2.5 Yearly Maintenance
Perform the following procedures at least once every year.
1. Inspect foundation pad for structural cracks and repair as required.
2. Replace flexguide every third year.
42S315F
4-5
Chapter 4 - Maintenance
4.3
Corrosion Protection
Perform the following procedures after completing the installation and every
12 months thereafter.
a. Evaluate corrosion protection on all anchor bolts, mount hardware,
reflector hardware, feed hardware, and subreflector hardware. If
protective finish is damaged, clean with a wire brush, remove all rust,
and apply a coat of Rust-Oleum (or equivalent) primer and semi-gloss
white paint. To improve appearance, finish hardware attached to
anodized aluminum parts with Rust-Oleum (or equivalent) semigloss gray paint.
b. Evaluate corrosion protection on surface of mount support tube,
mount legs, actuators, resolver brackets, and limit switch brackets.
During initial antenna installation, the surface and edges of these
parts may receive scratches and will require additional protection. If
protective finish is damaged, clean with wire brush, remove all rust,
lightly sand with 320 grit (or finer) sandpaper and apply a coat of
Rust-Oleum (or equivalent) primer and semi-gloss white paint.
c. Evaluate corrosion protection on reflector surface, subreflector
surface, and spars. If paint is scratched, chipped, beginning to flake,
or just wearing thin, lightly sand with 320 grit (or finer) sandpaper
and apply a coat of Rust-Oleum (or equivalent) primer and semi-gloss
white paint.
4.3.1 Touch-up Painting of Non-Reflective Surfaces
If significant corrosion is found on any part of the antenna mount and
actuators, it should be repaired immediately as follows:
1. Material required:
a. Sandpaper -320 grit
b. Volatile solvent cleaner such as toluene, naphtha or lacquer
thinner
c. Rust-Oleum gloss white paint (unless a special color was used)
•
Available in Spray cans #2192 or Gallon cans #2766
d. Rust-Oleum Primer No. 1573 - for lightly rusted metal
e. Rust-Oleum Primer No. 769 - for heavily rusted metal
f.
42S315F
Heavy duty detergent
4-6
Chapter 4 - Maintenance
2. Application:
a. Wipe damaged portion of finish and surrounding area with
solvent. Do not allow solvent to stand on painted areas. Simply
wipe surface to remove oily deposits.
b. Wash area thoroughly with detergent, rinse thoroughly with
water, and allow to dry.
c. Sand area to remove rust and "feather" a smooth finish from
existing painted surface into areas to be repainted. Be sure to
remove all loose paint and rust.
d. Heavily rusted metal should be primed by completely covering
with Rust-Oleum Primer 769. Lightly rusted or bare metal should
be primed by completely covering with Rust-Oleum Primer 1573.
e. Primed areas are top-coated with Rust-Oleum gloss white paint.
f.
The paint application instructions on the respective cans should
be followed explicitly.
4.3.2 Touch-Up Painting of Reflective Surfaces
Use the following materials and procedure to repair and retouch scratches
and other finish problems such as corrosion and flaking.
1. Material required:
a. Solvent - toluene or naphtha
b. Detergent - household dishwashing soap
c. Thinner - XYLENE
d. Sandpaper - 320 grit wet/dry
e. Cheesecloth
f.
Paint Brush - width, 1-inch
g. Wash primer - MIL-P-14504
h. Zinc chromate - Fed. Spec. TT-P-1757 Composition G
i.
Top Coat:
Reflective Surfaces - Hi-Reflective Flat White
Harrison, 422W1502, (Flat White)
42S315F
4-7
Chapter 4 - Maintenance
2. Application:
a. Clean entire area around damaged portion with solvent cleaners
followed by thorough wash with detergent and water. Rinse well
and dry with clean cheesecloth. Do not recoat for 30 minutes or
until surface is completely dry.
b. Damaged coatings may be repaired by fairing the damaged edges
with 320 grit or finer sandpaper. Primer system must be
reapplied if damage extends into the bare metal.
c. If recoating is to be accomplished in ambient temperatures higher
than 100 degrees Fahrenheit, top coating shall be thinned with
XYLENE. If coating appears too dry or grainy, add up to 50
percent mineral spirits to slow the evaporation rate.
NOTE
The top coat may be thinned in ratios up to two
parts paint to one part thinner.
d. If repriming is required, apply a thin coat of wash primer and
allow to dry for 15 to 30 minutes. Apply a full coat of zinc
chromate primer and allow to dry for 2 hours. If surface is not
smooth after drying, sand with 320 grit paper lubricated with
toluene. Remove dust using a tack cloth (cheesecloth lightly
coated with toluene).
4.3.3 Fasteners
The fasteners need to be checked to make sure they are in place and have not
loosened. If a fastener is found to be loose, or there is cause to check all the
fasteners, use a torque wrench to obtain the proper bolt tension. Torque
values are given in Table 2-2 and repeated in Table 4-1 which follows.
NOTE
Galvanized ATM A325 high-strength structural bolts should
not be reused. Retightening previously tightened bolts, which
have been loosened by the tightening of adjacent bolts, is not
considered to be a reuse.
If a fastener should fail and it does not appear to be a result of corrosion,
please notify ViaSat as soon as possible.
42S315F
4-8
Chapter 4 - Maintenance
NOTE
All galvanized fasteners, nominal size 1/2-inch and larger, are
high-strength structural fasteners meeting the American
Society for Testing and Materials (ASTM) A325 specification.
If for some reason one has to be replaced, it is imperative that
one be obtained that meets the ASTM A325 specification. If
unable to locate, contact the factory for either a suggested
source or a replacement.
CAUTION
All structural joints have been designed using ASTM A325
high-strength structural fasteners. If a fastener is substituted
that does not meet this specification, failure could occur.
If corrosion of a fastener becomes evident, it should be corrected immediately
as follows:
1. Determine extent of corrosion. If base material of fastener is
corroded, replace with identical size and type. Refer to drawings
parts list for fastener size and type.
2. Remove any corrosion from the fastener (if reused) and surrounding
area with a wire brush.
3. Clean parts with toluene or naphtha solvent.
4. After fastener is tightened and paint is dry enough to be recoated,
spray fastener head, washers and nut with white paint (or
appropriate top coat).
In the case of extensive corrosion of a fastener (i.e., the base material is
corroded), replace with identical size and type (SAE Grade 5 steel). Refer to
drawing parts list for fastener size and type.
42S315F
4-9
Chapter 4 - Maintenance
Table 4-1. Torque Values For Antenna Fasteners
Fastener Size (SAE)
Torque (ft-lb) tolerance ±10%
Galvanized
Stainless
1/4-20
9 (12 Nm)
6 (8 Nm)
5/16-18
18 (24 Nm)
12 (16 Nm)
3/8-16
30 (40 Nm)
20 (26 Nm)
1/2-13
75 (100 Nm)
45 (60 Nm)
9/16-12
110 (149 Nm)
5/8-11
150 (203 Nm)
3/4-10
260 (353 Nm)
1 Anchor Bolts on Model 8009A
mounts
240 to 275 ft - lb (325 to
372 Nm)
1-1/4 Anchor Bolts on
Model 8009AE mounts
360 to 440 ft - lb (488 to
596 Nm)
1-8 Anchor Bolts
600 (813 Nm)
130 (176 Nm) (except as
noted)
NOTE
The required torque value for the foundation anchor bolts may
not be accurately achieved by the turn-of-the-nut method. For
these bolts, an accurate torque value of 400 to 450 lb-ft (542 to
610 Nm) is required.
42S315F
4-10
Chapter 5 - Drawings
Chapter 5
Drawings
5.1
Introduction
This chapter provides assembly drawings, schematic diagrams and parts
listings. Drawings are presented in hierarchical order with the highest order
drawings shown first.
5.2
Drawing Index
A drawing index is provided in Table 5-1. The drawing number, revision,
drawing title and page location of each drawing is included in the index. A
dash in the revision column indicates the original release of the drawing.
5.3
Parts Lists
The parts lists in this chapter describe the parts referenced or illustrated by
the assembly drawings. Use the information to identify and requisition
parts, and as an aid in disassembly/assembly procedures. Parts lists in this
chapter are arranged in numerical order by assembly number. When a
drawing has a parts list on the drawing, the parts list may not be repeated in
this chapter.
Table 5-1. Drawing Index
Drawing
Rev.
Title
Page
9-Meter Reflector and Hub
517577
517055
521998
521988
514618
523091
523092
C
E
A
A
C
-
ASSY, REFLECTOR,SUBREFL,SPARS, 9M, INSTL
HUB ASSY, MOTORIZED, 208 VOLT, 60 HZ, 9M
INSTL DWG- TRANSFORMER, MTZ PLZN 9/11M
HUB COVER INSTALLATION
POL. DRIVE ASSY,208 VOLT,60 HZ
ASSY,TRANSFORMER-380V TO 220V 9/11 METER
ASSY,TRANSFORMER-415V TO 220V 9/11 METER
5-3
5-8
5-11
5-15
5-18
5-21
5-23
Model 8009A
9-Meter 120º Mount Installation Drawings
519054
523079
519929
42S315F
A
C
INSTALLATION DRAWING, 9M 120º MOUNT/ACTUATORS
DWG. INSTALLATION,LADDDER PLATFORM
ASSY,MOUNT-STD 9M 120 DEG GALV/PAINTED
5-1
5-25
5-34
5-38
Chapter 5 - Drawings
Table 5-1. Drawing Index
Drawing
Rev.
Title
Page
Model 8009AE 120º
9-Meter Extreme Environment 120º Mount Installation Drawings
517098
477697
A
D
INSTALLATION DWG 9/11M 1200 MT/ACTUATRS
ASSY, MT, 9M EXTM & 11M (120 DEG)
5-40
5-46
Model 8009AE 180º
9-Meter Extreme Environment 180º Mount Installation Drawings
517097
476309
A
D
INSTALLATION DWG 9/11M 180º MOUNT/ACTUAT
ASSY, MOUNT-9M EXTM & 11M (180 DEG)
5-49
5-55
9-Meter Feed Installation Drawings
514687
514688
517525
521874
521875
550847
521876
578860
721953
724638-5001
B
A
A
A
B
A
-
INSTL DWG- FEED 8009A-C-4P
DWG FEED INST 8009A K 4P
"DWG, INSTALL,FEED ,9/11 C ,4P,CIRCULAR
"DWG.,INSTL.4P, C LINEAR ,9.0
DWG. INSTALLATION 4P,KU ,LINEAR, 9.0
DWG,INSTL,W/G-4P,C-BAND LINEAR,9M EX/11M
WG INSTL-9M STD C-BAND 4P CIRC FD
WAVEGUIDE INSTL,DWG,WR62,XMT,4P LIN FD
WAVEGUIDE INSTL-9M C-BAND 5KW 4P LINEAR
WAVEGUIDE INSTLN,9M C-BND,RT LINEAR FEED
5-58
5-60
5-62
5-64
5-69
5-75
5-79
5-83
5-88
5-93
Optional Lightning Protection
517224
A
INSTALLATION,LIGHTENING PROTECTION 9/11
5-98
Actuators
477503
477506
480239
482052
511956
512585
517246
517562
519903
519911
521973
521974
42S315F
C
C
D
E
B
C
D
F
A
A
B
C
ASSY,ACT,AZ,120 DEG SINGLE SPEED
ACTR SUB SSP 1 HP 208V 60 HZ
ASSY,ACT,AZ,120 DEG VARIABLE SPEED
ASSY,ACT,AZ 180 DEG, VARIABLE SPEED
ASSY,ACT,EL,SINGLE SPEED
ASSY,ACT,EL,VARIABLE SPEED
ACTUATOR ASSY ELEVATION-SINGLE SPEED 9 M
ACTUATOR,ASSY,AZ-SINGLESPEED 7M/9M
PIVOT ASSEMBLY, UPPER AZIMUTH, 9 M
PIVOT ASSEMBLY, LOWER AZIMUTH 9 METER
ACTUATOR ASSY,EL-9M 8862 VARIABLE SPEED
ACTUATOR ASSY,AZ-VARIABLE SPEED 7M/9M
5-2
5-101
5-103
5-109
5-111
5-117
5-119
5-121
5-123
5-125
5-127
5-129
5-132