1
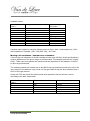
1
© Van de Leur Audio
Manual Van de Leur Audio 002
Introduction .................................................................................................................... 3
Guarantee ...................................................................................................................... 3
Safety ............................................................................................................................. 3
Environmental warning ................................................................................................... 3
Unboxing ........................................................................................................................ 3
Installation ...................................................................................................................... 3
First use ......................................................................................................................... 4
Front panel ..................................................................................................................... 4
Rear panel...................................................................................................................... 4
Phono stage ................................................................................................................... 5
Direct out / Home theatre pass through .......................................................................... 5
Switching ON/OFF ......................................................................................................... 5
Remote control ............................................................................................................... 6
Troubleshooting ................................................................................................................. 7
Remote control does not function ................................................................................... 7
Other issues and troubleshooting ................................................................................... 7
Specifications Van de Leur Audio 002 ............................................................................... 8
Appendix Manual 002 .......................................................................................................10
Tube replacement .........................................................................................................10
Phono stage MC adaption (dealer only) ............................................................................10
Load impedance ............................................................................................................10
Moving coil resistance / internal wire resistance ............................................................11
2
© Van de Leur Audio
Manual Van de Leur Audio 002
Introduction
Carefully read this manual before using the product. Use this manual to correctly setup your
audio equipment. All the functions and abilities of this product will be described in the next
pages.
Guarantee
All Van de Leur Audio products are built with extreme care. When encountering a problem
with this product, read the trouble shooting pages to solve your problem. Contact your
supplier for further support or questions.
Van de Leur Audio products are sold with a five-year warranty (tubes excluded). Warranty is
void when conducting changes to products.
Safety
The amplifier complies to the directives 2006/95/EG and 2004/108/EG and has the
marking.
Do not open the amplifier. The amplifier contains AC parts that may pose a threat to your
health. Use the amplifier solely for indoor entertainment purposes.
Always connect the amplifier to a grounded electrical outlet. The amplifier is only suitable for
use on a mains voltage of 230 volts/50 Hz. Use the provided net cord. Grounding the
amplifier is safe and ensures ultimate audio experience.
Please switch off the amplifier when not used for an extended period of time. Use the switch
on the rear panel.
Environmental warning
This product contains components that are harmful to the environment and components that
are recyclable. When disposing of this product, pay attention to the local laws and guidelines.
Unboxing
Always check the packaging for external damage. In the event of damage, please contact
your supplier. Open the box at the top. Do not use sharp tools to cut the box or tape as you
might damage the product. Do not dispose of the box, as your product can only be shipped
safe in it. Carefully lift the product out of the box.
Installation
Check the amplifier for any visible damage. In the event of damage to the amplifier, contact
your supplier. Make sure the amplifier is plugged into a 230 volts/50 Hz mains supply.
Ensure that there is enough ventilation room. Avoid contact with liquids. Do not install the
amplifier next to sources of interference or heat.
3
© Van de Leur Audio
Manual Van de Leur Audio 002
First use
Before first use, ensure volume control is fully turned to the left and that the power switch on
the rear is set to off (O). Connect the pre amplifier to a power amplifier (like Van de Leur
Audio 402) and connect all audio sources. All connections on the amplifier are unbalanced
(cinch) plugs. Use high quality cables for optimal safety and audio performance.
After connecting all the sources, connect the amplifier to your power source. Make sure the
power connection is solid and can not be disconnected accidental. Switch the power on with
the switch on the rear panel (position I). The LED on the front will light RED. Touch the
power button on the front to power on the amplifier. The LED will turn LIGHT BLUE during
start up. After approximately 30 seconds, the amplifier will be active and the LED will turn
BLUE.
LED RED – Power is connected, amplifier is turned off.
LED LIGHT BLUE – Amplifier is powering on, start up phase, no audible sound.
LED BLUE – Amplifier is fully powered on.
Front panel
Volume is controlled by the large knob on the front panel. Turn it to the right to increase
volume. Turn it to the left to decrease volume. You can also use the provided remote control
to control volume.
Balance is controlled by the smaller knob next to the volume control. Use this to correct
small balance issues in your setup. The stereo focus will shift according to the position of the
knob.
Input selection is controlled with the far most right selector. Turn the knob to the right input
to enable audible sound from this input.
P – Phonostage playback (both MM/MC)
2, 3, 4 and 5 – Line inputs corresponding to similar named inputs rear panel
D – Direct out (home theatre pass through)
Power switch is operated by touch. Firmly press your finger on the button to switch on or off.
Headphones can be plugged in to the left headphone socket indicated: Phones. Use jack
plug. Output is switched off when operating in headphone playback.
Rear panel
Power socket IEC connector. Use this socket to connect your amplifier to mains. The
compartment underneath the input contains a fuse, including a spare fuse. Do not open this
compartment while having the amplifier connected to mains. Remove the power cord before
opening this compartment.
Power switch is located next to the IEC connector, use switch to fully turn off power.
4
© Van de Leur Audio
Manual Van de Leur Audio 002
Power amplifier output is indicated by AMP. Pay attention to left and rights channels
indicated by L & R on top of the outputs.
Recorder output is indicated by REC. This output skips volume control. Use to connect
amplifier to a recording device.
Direct out is located underneath the power outputs labelled by: DIRECT OUT. Use this input
to connect a second preamplifier or processor to your setup.
Inputs 2-5 are used to connect line-level inputs devices like a CD player or other audio
device. Do not connect turntable/record players to this inputs.
Phono input is located to the left. Use the MM or MC input according to the used cartridge.
Switch the selector to the right position (MM/MC). Use the screw on the amplifier to connect
your turntable to GROUNDS.
Phono stage
The phono stage is prepared for both MM and MC cartridges. It is possible to adapt the
circuitry of MC to the according cartridge. Inform at your supplier for possibilities. Always use
the grounds connector on the rear panel to ensure optimal audio performance. When not
correctly connected noise and buzz can arise.
Warning: do not connect MM cartridges to MC input.
Direct out / Home theatre pass through
It is possible to connect a second preamplifier or audio processor to the 002. Connect your
second device to the DIRECT OUT input and switch the input selector to D. The signal will
be transferred directly to AMP OUT, without volume control or any modification. This feature
enables you to use your power amplifier on multiple sources. Make sure the 002 is turned on,
pass through will not function when switched off.
Switching ON/OFF
Although the pre amplifier is protected against wrongful use, please pay attention to the
following rules.
Always first switch your preamplifier on and wait till the LED lights BLUE. After this, switch on
the rest of your equipment. Reverse this order when switching off.
When not using the amplifier for an extended period of time, switch off the amplifier with the
switch on the rear panel (position O).
5
© Van de Leur Audio
Manual Van de Leur Audio 002
Remote control
Use the remote control to control volume from distance. The remote contains two buttons.
The upper one increases volume, the lower one reduces volume. The LED on the remote
indicates correct functioning. When the amplifier does not respond on button press and the
LED does not light up, the battery needs to be replaced.
To replace the battery, carefully remove the bottom cover by removing the four screw with a
Philips head screwdriver. Carefully remove the battery from the container and replace it with
a battery of the same type (CR2032). After replacement, replace the cover and firmly tighten
the four screws.
The remote operates by infrared (IR). When using the remote, make sure the front of the
remote points to the IR receiver on the amplifier, which is located on top of the POWER
button. When the LED lights up, but the amplifier does not respond, move the remote closer
to the amplifier and ensure IR visibility.
6
© Van de Leur Audio
Manual Van de Leur Audio 002
Troubleshooting
No LED glow from front panel power switch.
The LED of the power switch located at the front panel doesn’t illuminate.
- Make sure the power cord is connected properly to an active power source.
- The fuse is broken. Replace the fuse with the spare fuse located in the compartment
underneath the power inlet. Make sure the amplifier is switched off and that the power cord
has been removed. If the cause of the broken fuse is not clear, contact your supplier. (please
check p. 4)
No audible sound
The amplifier has been switched on, but there is no audible sound.
- Ensure the LED of the front power switch is illuminated blue. If red, touch the switch to
switch the amplifier on. The LED should be illuminated blue.
- Ensure all other equipment is functioning correctly.
- Ensure the input selector is switched to the right input.
- Ensure that the amplifier is switched on when using Direct Out.
- Ensure the phono input selector on the rear is correctly set.
- Volume is fully turned to the left.
Interfering noise
When correctly installed, the amplifier should be quiet when not receiving audio signal. It can
occur that audible interference or ground loops can be heard. These sound like hums,
crackles or beeps.
- Check all the cables. Use high quality shielded cables and connect as advised by your
supplier.
- Ensure ground connection. Always proper ground the amplifier.
- Remove sources of interference next to the equipment and cables.
- Avoid groundloops. They occur when connected devices do not use the same ground point.
Try to detach unnecessary equipment.
Remote control does not function
The amplifier does not respond to the remote control.
- Ensure the battery of the remote is in good condition.
- Ensure the IR received of the amplifier is visible to the IR transmitter of the remote.
- Ensure the amplifier is fully switched on (BLUE LED).
- When still not functioning, fully switch off the amplifier for five minutes.
Other issues and troubleshooting
Contact your supplier or Van de Leur Audio for all questions or problems related to
troubleshooting. Check Vandeleuraudio.com for up to date contact information.
7
© Van de Leur Audio
Manual Van de Leur Audio 002
Specifications Van de Leur Audio 002
8
© Van de Leur Audio
Manual Van de Leur Audio 002
9
© Van de Leur Audio
Manual Van de Leur Audio 002
Appendix Manual 002
Tube replacement
Vacuum tubes will wear over time. This is normal and doesn’t signal any malfunctions.
Symptoms of wear can be audible sounds, like ‘whistling’ and high volume audible noise.
To replace the tubes, fully switch off the amplifier and remove the power cable. Pause for ten
minutes, in order for the amplifier to fully discharge and thus prevent unwanted electrical
discharge.
Remove the cover of the amplifier by removing the 6 visible screws. Use a matching 2,5mm
Allan key.
Ensure that the tubes have cooled before touching them. Otherwise, they may cause burn
injuries. The amplifier has been fitted with 6 vacuum tubes. Two E88CC in the front, for the
line stage. Four ECC81 in the back for the phono stage. Only replace the tubes with ones of
the same type.
Do not touch the tubes with bear hands; always use a piece of cloth to prevent direct contact.
Pull the tube out of its socket by pulling straight up. Do not bend or twist the tube. It may
require some effort as tubes fit tightly into their sockets. Replace the tube by placing it in the
same socket. Check for the right position of the pins underneath the tube. Do not use any
force as it may cause damage.
Put the cover back on the amplifier when you are done with replacing the tubes and connect
the amplifier back to its power source.
Phono stage MC adaption (dealer only)
The MC (moving coil) stage can be adapted to the used cartridge. This can cause a major
improvement in sound quality. The adaption requires soldering, solely to be done by
professionals. Note: MM (moving magnet) does not require adaption.
Load impedance
Check the specifications of the used MC cartridge on load impedance. The phonostage can
be adjusted up to a load of 344 Ohm, after which no adaption is required.
The load impedance of the MC cartridge can be adapted on the phono stage by adding two
resistors on the input circuit board, which is mounted on the rear panel. The resistors must
be soldered on the soldering islands located next to the MC10 step up transformers. Note:
there are no resistors mounted after delivery (unless specified). Use metal film resistors of
0.25 watt or precision wire wound resistors for ultimate result. Solder the right value resistor
according to the table or formula indicated underneath.
10
© Van de Leur Audio
Manual Van de Leur Audio 002
Available values:
Load impedance
(Ohm)
344 and higher
300
250
200
150
50
30
20
10
Rin (= resistor to be placed)
None
2345
915
478
267
58.5
32.9
21.2
10.3
Rin according to
E12 reeks
2k2
1k2 + 3k9 parallel
470
270
56 + 2.7 in series
33
22
15 + 33 parallel
Calculate other values by using the following formula: Rin = (344 * load impedance) / (344 –
load impedance). Example: (344 * 150) /344-150) = 267 Ohm
Moving coil resistance / internal wire resistance
If the moving coil resistance of the MC cartridge is lower than 20 Ohm (check specifications),
another adjustment of the phono stage is recommended. This adaption prevents the ‘ringing
effect’. There need to be placed two resistors and two capacitors for this adaption. Solely to
be done by professionals.
The soldering islands are located next to the MC10 step up transformers and to the left of the
input selector. One between input 3 and 4 of the right channel and the other between input 4
and 5 of the right channel.
Solely use 0.25 watt metal film resistors and mica capacitors and put the two in series
according to the table underneath.
Internal resistance cartridge
(Ohm)
3
5
10
15
20 and higher
11
© Van de Leur Audio
Rc (to be placed resistor)
Cc (to be placed capacitor)
15k
18k
18k
47k
none
150 pF
120 pF
100 pF
47 pF
none
Manual Van de Leur Audio 002