1
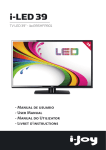
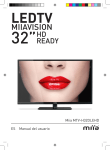
MANUALUL UTILIZATORULUI 22/24” LED TV SET MODEL: LT-2204AB MODEL: LT-2402AB Cuprins Introducere Avertizare Atenţie Prezentarea aparatului Telecomanda Afişarea meniului pe ecran Specificaţii Probleme în funcţionare Avertizare ATENŢIE PERICOL DE ELECTROCUTARE NU DESCHIDEŢI ATENŢIE: PENTRU A EVITA PERICOLUL DE ELECTROCUTARE NU DESCHIDEŢI CARCASA APARATULUI. NU ÎNCERCAŢI SĂ REPARAŢI DUMNEAVOASTRĂ APARATUL. LUAŢI LEGĂTURA CU UN CENTRU DE SERVICE AUTORIZAT. Acest simbol avertizează utilizatorul asupra pericolului de electrocutare. Nu încercaţi să demontaţi aparatul. Orice reparaţie sau verificare trebuie efectuată numai de către personalul calificat de la centrele de service autorizate. Acest simbol avertizează utilizatorul asupra prezenţei unor instrucţiuni importante referitoare la funcţionarea şi întreţinerea aparatului. -2- Atenţie Atenţie Acest aparat este sub tensiune în timpul funcţionării. Nu demontaţi carcasa acestuia. Orice reparaţii sau verificări trebuie efectuate numai de către personalul calificat de la centrele de service autorizate. Atenţie Pentru a preveni pericolul de incendiu sau electrocutare, nu expuneţi aparatul la acţiunea umezelii. Atenţie Nu introduceţi obiecte străine prin fantele de ventilaţie ale aparatului. Nu stropiţi aparatul cu apă sau alte lichide. Atenţie Nu expuneţi aparatul în lumina directă a soarelui sau în apropierea unor surse de căldură. Nu aşezaţi aparatul pe alte aparate care emană căldură, cum ar fi de exemplu video playere, amplificatoare audio etc. Nu blocaţi fantele de ventilaţie situate în partea din spate a aparatului. Ventilaţia este foarte importantă pentru o funcţionare corectă. Nu aşezaţi aparatul pe cablul de alimentare. -3- AC SWITCH Telecomanda : Apăsaţi acest buton pentru a porni aparatul din modul standby sau pentru a îl trece în modul standby. : Apăsaţi acest buton pentru anularea sonorului sau pentru revenirea sonorului. NICAM/A2: În modul TV, apăsaţi acest buton pentru a selecta modul stereo. ASPECT: Apăsaţi pentru a modifica formatul de imagine. PMODE: Selectaţi modul pentru imagine. SMODE: Selectaţi modul pentru sunet. 0-9: Selectaţi şi comutaţi canalele prin apăsarea butoanelor cu cifre 0 - 9. -/--: Pentru a comuta între o cifră şi două cifre. : pentru a comuta între canalul actual şi canalele vizionate anterior. DISPLAY: Afişarea informaţiilor pe ecran, cum ar fi numele canalului. FREEZE: Acest buton nu este disponibil. AUTO: Reglarea automată a imaginii în modul PC. RED, GREEN, YELLOW, BLUE: Corespund diverselor elemente care apar colorate în meniu. SLEEP: Setarea funcţiei de oprire automată. SOURCE: Apăsaţi pentru a schimba sursa de semnal. ENTER: Accesaţi opţiunea selectată sau executaţi operaţiunea selectată. MENU: Apăsaţi pentru a accesa meniul principal, în vederea reglării diverselor opţiuni. EXIT: Ieşire din meniul afişat pe ecran. CH-/CH+: Modificarea canalului. VOL-/VOL+: Reglarea volumului. NR: Acest buton nu este disponibil. SYSTEM: Apăsaţi pentru a selecta sistemul de sunet. TEXT: Apăsaţi pentru a accesa modul teletext. (Utilizat numai pentru Europa) REVEAL: Apăsaţi pentru a vizualiza informaţiile ascunse de pe pagina de teletext. Apăsaţi din nou pentru a ascunde informaţia. SIZE: Afişarea părţii superioare, a părţii inferioare a paginii de teletext sau a paginii complete, pentru o mai bună vizualizare. INDEX: Apăsaţi acest buton pentru a merge la pagina index. HOLD: Apăsaţi pentru a menţine afişată o pagină pe ecran. S.PAGE: Are funcţia SUBCODE în cadrul textului, în modul teletext. 6 Afişarea meniului pe ecran Imagine Puteţi selecta tipul de imagine ce corespunde cel mai bine programului urmărit. 1. Apăsaţi butonul “MENU” pentru a accesa afişarea meniului pe ecran. Apoi apăsaţi butoanele “/” pentru a selecta meniul “Picture”. Accesaţi meniul “Picture” prin apăsarea butonului “” . 2. Apăsaţi butoanele “/” pentru a selecta “Picture Mode” şi apăsaţi butoanele “/” pentru a selecta modul de afişare a imaginii. 3. Apăsaţi butoanele “/” pentru a selecta “Brightness” şi apăsaţi butoanele “/” pentru a regla luminozitatea. 4. Apăsaţi butoanele “/” pentru a selecta “Contrast” şi apăsaţi butoanele “/” pentru a regla contrastul. 5. Apăsaţi butoanele “/” pentru a selecta “Saturation” şi apăsaţi butoanele “/” pentru a regla saturaţia. 6. Apăsaţi butoanele “/” pentru a selecta “Sharpness” şi apăsaţi butoanele “/” pentru a regla claritatea. 7. Apăsaţi butoanele “/” pentru a selecta “Hue” şi apăsaţi butoanele “/” pentru a regla tonalitatea culorii. Observaţie: Această caracterstică este disponibilă numai pentru NTSC 8. Apăsaţi butoanele “/” pentru a selecta “Scale” şi apăsaţi butoanele “/” pentru a selecta formatul imaginii. 9. Apăsaţi butonul “Menu” pentru a reveni la meniul principal. 7 Sonor Puteţi selecta tipul de sonor, în funcţie de ceea ce ascultaţi. 1. Apăsaţi butonul “MENU” pentru a accesa afişarea meniului pe ecran. Apoi apăsaţi butoanele “/” pentru a selecta meniul “Sound”. Accesaţi meniul “Sound” prin apăsarea butonului “” . 2. Apăsaţi butoanele “/” pentru a selecta “Sound Mode” şi apăsaţi butoanele “/” pentru a selecta modul sonor. 3. Apăsaţi butoanele “/” pentru a selecta “Volume” şi apăsaţi butoanele “/” pentru a regla volumul. 4. Apăsaţi butoanele “/” pentru a selecta “Bass” şi apăsaţi butoanele “/” pentru a regla sunetele joase. 5. Apăsaţi butoanele “/” pentru a selecta “Treble” şi apăsaţi butoanele “/” pentru a regla sunetele înalte. 6. Apăsaţi butoanele “/” pentru a selecta “Balance” şi apăsaţi butoanele “/” pentru a regla echilibrarea sonorului. 7. Apăsaţi butonul “Menu” pentru a reveni la meniul principal. 8 Canal Puteţi realiza reglajele dorite în modul TV. 1. Apăsaţi butoanele “/” pentru a selecta “Auto Tune” şi apăsaţi butonul “” pentru căutarea automată a canalelor. Apoi apăsaţi butonul “MENU” sau “EXIT” pentru a părăsi acest meniu. 2. Apăsaţi butoanele “/” pentru a selecta “Manual Tune” şi apăsaţi butonul “” pentru a accesa căutarea manuală a canalelor. 3. Apăsaţi butoanele “/” pentru a selecta “Fine Tune” şi apăsaţi butoanele “/” pentru a realiza reglajele fine, pentru o recepţie cât mai bună a canalelor. 4. Apăsaţi butoanele “/” pentru a selecta “Skip” şi apăsaţi butoanele “/” pentru a activa sau dezactiva opţiunea de trecere peste un canal. Apăsaţi butoanele “/” pentru a selecta “Program Editor” şi accesaţi meniul “Program Editor” prin apăsarea butonului “”. a. NAME: Utilizaţi butoanele “ ” “” “” “” pentru a alege canalul pe care doriţi să îl denumiţi. Apăsaţi butonul “roşu” pentru a accesa această operaţie. Apoi utilizaţi butoanele “” “” pentru a selecta pentru editare cifre şi utilizaţi butoanele “ ” “” pentru a selecta caractere. Apăsaţi din nou butonul “roşu” pentru a confirma numele sau apăsaţi butonul „verde” pentru a anula această operaţiune. b. DELETE: Utilizaţi butoanele “ ” “” “” “” pentru a alege canalul pe care doriţi să îl ştergeţi. Apăsaţi butonul „verde” şi canalul selectat va fi şteres. C.INSERT : Utilizaţi butoanele “” “” “” “” pentru a alege canalul pe care doriţi să îl inseraţi. Apăsaţi butonul „galben” pentru a accesa această operaţie. Apoi apăsaţi butoanele“” “” “” “” pentru a alege canalul pe care doriţi să îl inseraţi. Apăsaţi butonul „roşu” pentru a confirma inserarea canalului sau apăsaţi butonul „verde” pentru a anula această operaţiune. 5. Apăsaţi butoanele “/” pentru a selecta meniul “Sound .SYS” şi apăsaţi butoanele “/” pentru a selecta modul de sunet BG / DK / I 6. Apăsaţi butonul “Menu” pentru a reveni la meniul principal. 9 Funcţii 1. Apăsaţi butonul “MENU” pentru a accesa afişarea meniului pe ecran. Apoi apăsaţi butoanele “/” pentru a selecta meniul “Function”. Accesaţi meniul “Function” prin apăsarea butonului “” . 2. Apăsaţi butoanele “/” pentru a selecta meniul “Language” şi apăsaţi butoanele “/” pentru a selecta limba în care doriţi să fie afişat meniul pe ecran. 3. Apăsaţi butoanele “/” pentru a selecta “Blue Back” şi apăsaţi butoanele “/” pentru a selecta activarea sau dezactivarea fundalului de culoare albastră. 4. Apăsaţi butoanele “/” pentru a selecta “TTX Language” şi apăsaţi butoanele “/” pentru a selecta West,East,Russian,etc. 5. Apăsaţi butoanele“/” pentru a selecta meniul “Color Temp” şi apăsaţi butoanele “/” pentru a selecta temperatura culorii. Apăsaţi butoanele “/” pentru a selecta una dintre opţiunile “User-R”, “User-G”, “User-B” şi apăsaţi butoanele “/” pentru a accesa sub-meniul din care utilizatorul poate regla temperatura de culoare. 6. Apăsaţi butoanele “/” pentru a selecta “Reset” şi apăsaţi butonul “” pentru a realiza funcţia de resetare. 7. Apăsaţi butonul “Menu” pentru a reveni la meniul principal. 10 PC 1. Apăsaţi butonul “MENU” pentru a accesa afişarea meniului pe ecran. Apoi apăsaţi butoanele“/” pentru a selecta meniul “PC”. Accesaţi meniul “PC” prin apăsarea butonului “” . 2. Apăsaţi butoanele “/” pentru a selecta “Clock” şi apăsaţi butoanele “/” pentru a seta ceasul. 3. Apăsaţi butoanele “/” pentru a selecta “Phase” şi apăsaţi butoanele “/” pentru a regla faza. 4. Apăsaţi butoanele “/” pentru a selecta meniul “H Position” şi apăsaţi butoanele “/” 5. pentru a regla poziţionarea pe orizontală. Apăsaţi butoanele “/” pentru a selecta “V Position” şi apăsaţi butoanele “/” pentru a regla poziţionarea pe verticală. 6. Apăsaţi butoanele “/” pentru a selecta meniul “Auto Adjust” şi apăsaţi butonul “” pentru a realiza reglajele automate. 7. Apăsaţi butonul “Menu” pentru a reveni la meniul principal. 11 Specificaţii INTRARE RGB Model Rezoluţie Frecvenţă Frecvenţă orizontală verticală (KHz) (HZ) DOS 720x400 31,5 70 VGA 640x480 31,5 60 SVGA 800x600 37,9 60 XGA 1024x768 48,4 60 WXGA 1920x1080 67,5 60 INTRARE HDMI Model Rezoluţie Frecvenţă orizontală (KHz) Frecvenţă verticală (HZ) VGA 640 x 480 31,47 59,94 480i 720 x480i 15,73 59,94/60 576i 720 x 576i 15,63 50 480p 720 x480p 31,47 59,94/60 576p 720 x 576p 31,26 50 720p 1280 x 720p 37,50 50 44,96 59,94/60 28,13 50 33,75 59,94/60 56,25 50 67,5 59,94/60 1080i 1080p 1920 x 1080i 1920 x 1080p 12 INTRARE COMPONENT VIDEO (YPbPr) Mod Rezoluţie Frecvenţă orizontală (KHz) Frecvenţă verticală (HZ) 480i 720 x480i 15,73 59,94/60 576i 720 x 576i 15,63 50 480p 720 x480p 31,47 59,94/60 576p 720 x 576p 31,26 50 720p 1280 x 720p 37,50 44,96 50 59,94/60 1080i 1920 x 1080i 28,13 33,75 50 59,94/60 1080p 1920 x 1080p 56,25 50 67,5 59,94/60 13 Probleme în funcţionare Înainte de a lua legătura cu un centru de service autorizat, verificaţi dacă problema poate fi rezolvată pe baza recomandărilor din tabelul de mai jos. PROBLEMĂ REZOLVARE ●Verificaţi dacă ştecherul cablului de alimentare Aparatul TV nu porneşte este introdus în priză. ●Bateriile din telecomandă sunt descărcate. Înlocuiţi bateriile. ●Verificaţi cablul de interfaţă dintre TV şi antena/cablul TV. Fără imagine, fără sonor ●Apăsaţi butonul de pornire de pe telecomandă. ●Apăsaţi butonul SOURCE de pe telecomandă, apoi apăsaţi butoanele “▲/▼” pentru a selecta sursa TV. ●Verificaţi cablul de interfaţă dintre TV şi antena/cablul TV. Imagine neclară, sonor OK ●Comutaţi pe un alt canal, este posibil să aibă probleme canalul vizionat în momentul respectiv. ●Reglaţi luminozitatea/contrastul din meniul pentru imagine. Sonor neclar ●Deplasaţi la distanţă faţă de TV orice echipament cu infraroşu. Panoul TFT LED conţine sub-pixeli pentru producerea cărora este necesară o tehnologie complexă. Cu toate acestea, este posibil ca pe ecran să existe câţiva pixeli mai luminoşi sau mai întunecaţi. Aceştia nu influenţează performanţele produsului. 14 Eliminarea echipamentelor electrice şi electronice folosite Semnificaţia simbolului din figura alăturată, este că acest produs nu trebuie tratat ca un deşeu menajer. Vă rugăm, eliminaţi acest echipament la punctul de colectare pentru reciclarea deşeurilor de echipamente electrice şi electronice. În Uniunea Europeană şi în alte ţări europene, sistemele de colectare pentru produsele electrice şi electronice folosite care sunt separate. Prin asigurarea că eliminarea acestui produs este făcută corect, veți ajuta la prevenirea unui potenţial mediu periculos pentru sănătatea umană, lucru care ar putea fi provocat de manipularea necorespunzătoare a deşeurilor provenite din acest produs. Reciclarea materialelor va ajuta la conservarea resurselor naturale. Prin urmare, vă rugăm să nu aruncaţi echipamentele electrice şi electronice alături de deşeurile menajere. Pentru mai multe informaţii detaliate despre reciclarea acestui produs, vă rugăm să contactaţi biroul local, serviciul pentru eliminarea deşeurilor sau magazinul din care aţi cumpărat produsul. Pentru mai multe informaţii şi condiţii de garanţie, vă rugăm să vizitaţi: www.akai.com.ro 15 USER’S MANUAL 22/24” LED TV SET MODEL: LT-2204AB MODEL: LT-2402AB Contents Introduction Warning Caution Main Unit Description Remote Control OSD basic adjustment Specifications Trouble Shooting Introduction Thank you very much for your purchase of our product of LCD TV. It serves as a normal colour TV and PC monitor. To enjoy your set to the full from the very beginning, read this manual carefully and keep it handy for ready reference. INSTALLATION ① Locate the receiver in the room where direct light does not strike the screen. Total darkness or a reflection on the picture screen can cause eyestrain. Soft and indirect lighting is recommended for comfortable viewing. ② Allow enough space between the receiver and the wall to permit ventilation. ③ Avoid excessively warm locations to prevent possible damage to the cabinet or premature component failure. ④ This TV receiver can be connected to AC180-240V~ 50/60HZ ⑤ Do not install the receiver in a location near heat sources such as radiator, air ducts, direct sunlight, or in a place somewhere like close compartment and close area. Do not cover the ventilation openings when using the set. ⑥ The indicator light will last 3 to 4 seconds to go out after cutting off the electricity, during this period, you cannot repower it on until the indicator light goes out, thanks a lot for your attention! -1- Warning CAUTION RISK OF ELECTRIC SHOCK DO NOT OPEN CAUTION: TO AVOID THE RISK OF ELECTRIC SHOCK. DO NOT REMOVE COVER (OR BACK). NO USER- SERVICEABLE PARTS INSIDE. REFER SERVICING TO QUALIFIED SERVICE PERSONNEL. This symbol is intended to alert the user to avoid the risk of electric shock, do not disassemble this equipment by anyone except a qualified service personnel. This symbol is intended to alert the user to the presence of important operation and maintenance instructions in the literature accompanying the equipment. -2- Caution Caution High voltages are used in the operation of this product. Do not remove the back cabinet from your set. Refer servicing to qualified service personnel. Caution To prevent fire or electrical shock hazard, Do not expose the main unit to moisture. Caution Do not drop or push objects into the television cabinet slots or openings. Never spill any kind of liquid on the television receiver. Caution Avoid exposing the main unit to direct sunlight and other source of the heat. Do not stand the television receiver directly on other products which give off heat. E. g. video cassette players, Audio amplifiers . Do not block the ventilation holes in the back cover. Ventilation is essential to prevent failure of electrical component. Do not squash power supply cord under the main unit. -3- Caution Caution Never stand on, lean on, push suddenly the product or its stand. You should pay special attention to children. Caution Do not place the main unit on an unstable cart stand, shelf or table. Serious injury to an individual, and damage to the television, may result if it should fall. Caution When the product is not used for an extended period of time, it is advisable to disconnect the AC power cord from the AC outlet. Caution The LED panel used in this product is made of glass. Therefore, it can break when the product is dropped or applied with impact. Be careful not to be injured by broken glass pieces in case the LED panel breaks. 4 Main unit description Control Panel Key Function VOL- : Volume down. VOL+ : Volume up. CH- : TV channel down. CH+ : TV channel up. MENU : Press to select the main menu. TV/AV : Select the input signal. POWER : Switch on when at standby mode or enter the standby mode. TV Terminal Connections 1. HDMI input terminal. 2. VGA input terminal of simulation signal of PC. 3. PC AUDIO terminal. 4. SCART input terminal. 5. HEADPHONE output terminal. 6. Component input terminal. 7. Video input terminal. 8. AUDIO input terminal. 9. Antenna/close circuit TV network port Power Input Configuration AC SWITCH 5 Remote control : Press this button to switch on the TV when at standby mode or enter standby mode. : Press this button to mute or restore sound. NICAM/A2: In the TV condition, press this key to select the stereo mode. ASPECT: Press to select the different picture size. PMODE: Select picture mode. SMODE: Select sound mode. 0-9: Select and switch to a channel using 0 - 9. -/--: Switch the program digit. : Switch back and front between the current and previous channels. DISPLAY: Display TV information on the LED TV screen such as channel and channel label. FREEZE: This button is not available. AUTO: Adjust the picture automatically in pc mode. RED, GREEN, YELLOW, BLUE: Correspond to the different colored subjects. SLEEP: Set the sleep timer. SOURCE: Press to change signal source. ENTER: Enter the selected option or execute the selected operation. MENU: Press this button to enter the main menu for various optional adjustable setting. EXIT: Exit the OSD (On-screen display). CH/CH: Change the channel up and down. VOL/VOL: Adjust the volume. NR: This button is not available. SYSTEM: Press to select the sound system. TEXT: Press to enter the Teletext mode. (Used for European region only) REVEAL: Press this button to reveal the hidden information in Teletext page. Press again to hide the information. SIZE: Display the top, bottom or all of page to read easily in Teletext mode. INDEX: Press this button to go to the index page. HOLD: Freeze a multi-page passage on screen in Teletext mode. S.PAGE: Carry out the function of SUBCODE in the text while enter the text display mode 6 OSD basic adjustment Picture You can select the type of picture, which best corresponds to your viewing. 1. Press the “MENU” button to enter the OSD menu. Then press “/” button to select the “Picture” menu. Enter the “Picture” menu by pressing “” button. 2. Press “/” button to select “Picture Mode” and press the “/” button to select the picture mode. 3. Press “/” button to select “Brightness” and press the “/” button to enter brightness adjustment menu to adjust brightness. 4. Press “/” button to select “Contrast” and press the “/” button to enter contrast adjustment menu to adjust contrast. 5. Press “/” button to select “Saturation” and press the “/” button to enter saturation adjustment menu to adjust saturation. 6. Press “/” button to select “Sharpness” and press the “/” button to enter sharpness adjustment menu to adjust sharpness. 7. Press “/” button to select “Hue” and press the “/” button to enter hue adjustment menu to adjust hue. Note: The item hue is only for NTSC 8. Press “/” button to select “Scale” and press the “/” button to select the scale mode. 9. Press the “Menu” button to return to upper-menu. 7 Sound You can select the type of sound, which best corresponds to your listening. 1. Press the “MENU” button to enter the OSD menu. Then press “/” button to select the “Sound” menu. Enter the “Sound” menu by pressing “” button. 2. Press “/” button to select “Sound Mode” and press the “/” button to select the sound mode. 3. Press “/” button to select “Volume” and press the “/” button to enter volume adjustment menu to adjust volume. 4. Press “/” button to select “Bass” and press the “/” button to enter bass adjustment menu to adjust bass. 5. Press “/” button to select “Treble” and press the “/” button to enter treble adjustment menu to adjust treble. 6. Press “/” button to select “Balance” and press the “/” button to enter balance adjustment menu to adjust balance. 7. Press the “Menu” button to return to upper-menu. 8 Channel You can make the desired adjustment in the TV mode. 1. Press “/” button to select “Auto Tune” and press the “” button to do auto search. Then press “MENU” or “EXIT” button to exit. 2. Press “/” button to select “Manual Tune” and press the “” button to enter manual tune adjustment menu to do manual tuning, 3. Press “/” button to select “Fine Tune” and press the “/”button to enter fine tune adjustment menu to adjust for best tuning. 4. Press “/” button to select “Skip” and press the “/”button to select skip the channel on or off. 5. Press “/” button to select “Program Editor” item and enter the “Program Edito” menu by pressing “” button. a. NAME: Use the “ ” “” “” “” buttons to choose the channel which you want to name. Press the “red” button to enter the operation. Then use the “” “” buttons to select the edited digit and use the “ ” “” buttons to select the character. Then press the “red” button again to confirm the name and press the “green” button to cancel this operation. b. Delete: Use the “ ” “” “” “” buttons to choose the channel which you wanted to delete. Press the “green” button, and then the channel will be deleted. c. Insert : Use the “” “” “” “” buttons to choose the channel which you want to insert. Press the “yellow” button to enter the operation. Then use the “” “” “” “” buttons to choose the channel which you want to insert with. Press the “red” button to confirm the insert operation and press the “green” button to cancel this operation. 9 6. Press “/” button to select “Sound .SYS” menu and press the “/” button select the sound mode such as BG / DK / I 7. Press the “Menu” button to return to upper-menu. Function 1. Press the “MENU” button to enter the OSD menu. Then press “/” button to select the “Function” menu. Enter the “Function” menu by pressing “” button. 2. Press “/” button to select “Language” menu and press the “/” button to select the OSD language which you desire. 3. Press “/” button to select “Blue Back” and press the “/”button to select the blue background on or off. 4. Press “/” button to select “TTX Language” and press the East,Russian,etc. 5. Press “/” button to select “Color Temp” menu and press the “/” button to select the color temp. Press the “/” button to select one of “User-R”, “User-G”, “User-B” and press the “/” button to enter sub-menu to adjust user color temp. 6. Press “/” button to select “Reset” and press the “” button to do reset function. 7. Press the “Menu” button to return to upper-menu. 10 “/”button to select West, PC 1. Press the “MENU” button to enter the OSD menu. Then press “/” button to select the “PC” menu. Enter the “PC” menu by pressing “” button. 2. Press “/” button to select “Clock” and press the “/” button to enter clock adjustment menu to adjust clock. 3. Press “/” button to select “Phase” and press the “/” button to enter phase adjustment menu to adjust phase. 4. Press “/” button to select “H Position” menu and press the “/” button to enter H Position adjustment menu to adjust H Position. 5. Press “/” button to select “V Position” and press the “/” button to enter V Position adjustment menu to adjust V Position. 6. Press “/” button to select “Auto Adjust” menu and press the “” button to do auto adjustment. 7. Press the “Menu” button to return to upper-menu. 11 Specifications RGB INPUT Horizontal Vertical Frequency(KHz) Frequency(HZ) 720x400 31.5 70 VGA 640x480 31.5 60 SVGA 800x600 37.9 60 XGA 1024x768 48.4 60 WXGA 1920*1080 67.5 60 Model Resolution DOS HDMI INPUT Model Resolution Horizontal Frequency (KHz) Vertical Frequency (HZ) VGA 640 x 480 31.47 59.94 480i 720 x480i 15.73 59.94/60 576i 720 x 576i 15.63 50 480p 720 x480p 31.47 59.94/60 576p 720 x 576p 31.26 50 37.50 50 44.96 59.94/60 28.13 50 33.75 59.94/60 56.25 50 67.5 59.94/60 720p 1080i 1080p 1280 x 720p 1920 x 1080i 1920 x 1080p 12 COMPONENT VIDEO (YPbPr) INPUT Mode Resolution Horizontal Frequency (KHz) Vertical Frequency (HZ) 480i 720 x480i 15.73 59.94/60 576i 720 x 576i 15.63 50 480p 720 x480p 31.47 59.94/60 576p 720 x 576p 31.26 50 720p 1280 x 720p 37.50 44.96 50 59.94/60 1080i 1920 x 1080i 28.13 33.75 50 59.94/60 1080p 1920 x 1080p 56.25 67.5 50 59.94/60 13 Trouble Shooting Before consulting service personnel, check the following chart for a possible cause of the trouble you are experiencing and for a solution. PROBLEM TV will not turn on SOLUTION ●Make sure the power cord is plugged in. ●The batteries in the remote control may be exhausted replace the batteries. ●Check the interface cable between TV and No picture, no sound antenna/cable TV. ●Press the power button on the remote. ●Press the SOURCE button the remote, then press the “▲/▼”button repeatedly to select the TV source. ●Check the interface cable between TV and Poor picture, sound OK antenna/cable TV. ●Try another channel, the station may have broadcast difficulties. ●Adjust the brightness/contrast in the Video menu. Audio noise ●Move any infrared equipment away from the TV. The TFT LED panel uses a panel consisting of sub pixels which requires sophisticated technology to produce. However, there may be few bright or dark pixels on the screen. These pixels will have no impact on the performance of the product. 14 Disposal of used electrical and electronic equipment The meaning of the symbol on the material, its accessory or packaging indicates that this product shall not be treated as household waste. Please, dispose of this equipment at your applicable collection point for the recycling of electrical and electronic equipments waste. In the European Union and Other European countries which there are separate collection systems for used electrical and electronic product. By ensuring the correct disposal of this product, you will help prevent potentially hazardous to the environment and to human health, which could otherwise be caused by unsuitable waste handling of this product. The recycling of materials will help conserve natural resources. Please do not therefore dispose of your old electrical and electronic equipment with your household waste. For more detailed information about recycling of this product, please contact your local city office, your household waste disposal service or the shop where you purchased the product. For more information and warranty conditions, please visit: www.akai.com.ro 15