1
Operating Instructions and Parts Manual
Electrical
MOTOR
Protect the pump
from freezing during
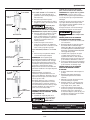
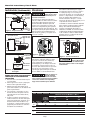
Figure 7 - Electrical Connections
winter conditions.
Operation
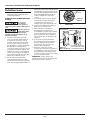
PRIMING THE SHALLOW WELL PUMP
To prevent damage
to the pump, do NOT
start motor until pump has been filled
with water.
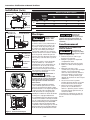
Figure 6 - Voltage Selector
Select the proper size wire and
fuse (Chart 3). Time delay fuses are
recommended over standard fuses for
motor circuit protection. All pump
motors have built-in automatic overload
protection that will prevent damage to
the motor due to overheating.
Do NOT connect to
electric power supply
until unit is permanently grounded.
Connect ground wire to approved
ground then connect terminal provided.
Maintenance
Disconnect power
and release all
pressure from the system before
attempting to install, service, relocate
or perform any maintenance. Lock the
power disconnect in the open (OFF)
position. Tag the power disconnect
to prevent unexpected application of
power.
3
L2
The voltage of power supply must match
the voltage of the pump. All above
ground well pumps are factory wired for
115 volts. The motors can be converted to
230 volts by turning the voltage selector
to the desired voltage (See Figure 6). Use
a needle nose pliers to pull the selector
out approximately 1/4”, rotate and then
reinsert in correct position.
LINE
1
L1
Risk of electrical
shock. This pump is
designed for indoor installation only.
GROUND
SCREW
1. Remove prime plug (Figure 3 on page
3).
2. Fill pump and piping completely full
of water.
3. Replace the prime plug.
4. Open a faucet to vent the system.
5. Start the motor. Water will pump in
a few minutes. If pump fails to prime
in 5 minutes, stop motor and refill
pump with water. Priming time is
proportional to the amount of air in
inlet pipe.
6. Let the system operate for several
minutes to flush all pipes.
7. Close faucet and allow pump to build
pressure in tank. When the pressure
reaches the cut-out setting, the
motor will stop.
The system is now in operation and will
automatically cycle on demand.
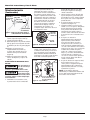
DRAINING THE PUMP
Drain openings are provided on all
models. To drain the pump:
1. Remove drain plug and prime plug to
vent the system (see Figure 5 on page
3).
2. Drain all piping to a point below the
freeze line.
DRAINING THE TANK
Conventional tanks can be drained by
opening an outlet at the lowest point
in the system. Remove plug or the air
volume control to vent the tank.
Precharged tanks force virtually all
the water from the tank when system
pressure is released. No draining is
necessary.
RESTARTING PUMP
If the pump has been serviced, drained
or has not been used for some time,
be sure there is water in the pump
housing (volute) and the piping to the
well. There must be water in the pump
housing (volute) at all times when
the pump is running to avoid internal
damage of seal members.
A metal underground water pipe or well
casing at least 10 feet long makes the
best ground electrode. If plastic pipe or
insulated fittings are used, run a wire
directly to the metal well casing or use
a ground electrode furnished by the
power company.
There is only one proper ground
terminal on the unit. The terminal(s) is
located under the pressure switch cover,
is painted green and is identified as
GRD. The ground connection must be
made at this terminal (Figure 7). The
ground conductor must not be smaller
than the circuit conductors supplying the
motor.
Disconnect power
and release all
pressure from the system before
attempting to install, service, relocate or
perform any maintenance.
CHART 3 - RECOMMENDED FUSING & WIRING DATA - 60 HZ MOTORS
Distance in Feet
From Meter to Motor
HP
1/2
3/4
1
www.waynepumps.com
0
51
101
to
to
to
100
200
Dual
Element
Fuse
250V
50
115
20
14
12
10
230
10
14
14
14
115
20
14
12
8
230
10
14
14
14
115
20
14
12
8
230
10
14
14
14
VOLT
4
Wire Size