1
SWS Systems
Maintenance (Continued)
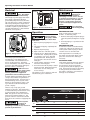
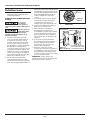
WATERLOGGED TANKS:
CONVENTIONAL
When a tank system has an inadequate
ratio of air and water, the pump will
start and stop often and eradically.
1. Disconnect the power to the pump.
2. Open the lowest faucet in the system
to release all pressurized water in the
system.
3. Prime the pump (Priming the Shallow
Well Pump on page 4).
4. Reconnect the power to the pump.
NOTE: As the pump refills the tank with
water, the air volume control supplies
the tank with the correct air to water
ratio for the system to operate. If the
air volume control is good, the pump
will shut off at the desired cut-off and
will be adjusted correctly.
WATERLOGGED TANKS: PRECHARGED
If a precharged tank becomes waterlogged,
the bladder is normally leaking or broken.
1. Test the tank by depressing the air
valve. The air valve will expel water
if the bladder is broken.
2. If broken, replace the tank.
NOTE: Once a bladder is leaking or
broken, the bladder cannot be repaired.
The tank must be replaced.
LUBRICATION
The bearings used in the pumps are
lifetime lubricated at the factory and
require no additional lubrication.
Disconnect power and
release all pressure
from the system before attempting to install,
service, relocate or perform any maintenance.
1. Disconnect power to the pump.
2. Open a faucet nearest the tank and
allow all water to drain from the tank.
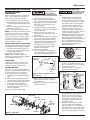
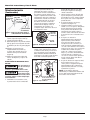
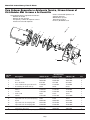
3. Remove the four cap screws holding
the pump housing (volute) to the
motor (Figure 8).
4. Separate the pump housing (volute)
from the motor to expose the diffuser
and the seal plate.
5. Remove the two cap screws and
diffuser from the seal plate to expose
the impeller.
6. Remove the small end cap on the end
of the motor opposite the impeller.
7. With a large screwdriver, keep the
shaft from rotating and remove the
impeller by hand (standard right
hand thread). Be sure to hold onto
the seal plate when removing the
impeller from the shaft.
8. Remove the seal plate.
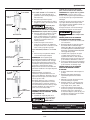
9. Pry the rotating shaft seal member
(including stainless collar and rubber
seal) from the impeller (Figure 9).
ROTATING
SHAFT SEAL
MEMBER
SEAL
PLATE
IMPELLER
INSTALLING NEW SHAFT SEAL
Before handling shaft
seal parts wipe hands
clean. Dirt or grease MAY damage the
seal.
1.
2.
Wet the inside of the seal cavity
on seal plate and the rubber cup
enclosing the new ceramic seat with
cooking oil. Be careful not to scratch
the ceramic surface of the seal seat
and push seat enclosed in rubber
into seal cavity on seal plate. Use a
cardboard washer to protect polished surface when pushing against
ceramic seat with any object. Be sure
to remove cardboard washer.
Carefully slip seal plate over shaft. Do
not disturb seal position in seal plate.
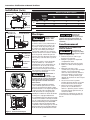
The seal plate must be orientated
during assembly so the two screw holes
are on a horizontal line across the
motor shaft (Figure 10). This placement
should be done to ensure proper
draining and priming.
SCREW
HOLES
MOTOR
SHAFT
Figure 10 - Seal Plate Replacement
3.
RUBBER
SEAT RING
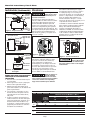
PRECHARGED TANK
Some air is lost through the bladder in
any tank. To prevent tank failure, check
the tank precharge on a yearly basis.
1. Disconnect power to the pump, so
water does not refill the precharged
tank.
2. Open a faucet nearest the tank and
allow all water to drain from the tank.
3. Measure the tank precharge at the
valve stem using a tire gauge.
4. If necessary, adjust the precharge
with an air pump 28 - 30 psi on 1/2,
3/4 and 1 HP pumps.
5. Reconnect power to the pump.
CAP SCREWS
REMOVING OLD SHAFT SEAL
4.
CERAMIC
SEAT
Place rotating shaft seal member in
position on impeller and press into
place. Take care not to press against
polished seal surface.
Position impeller on shaft and
tighten securely (Figure 11).
SEAL PLATE
Figure 9 - Removing Shaft Seal and
Ceramic Seat
10. Push or pry the ceramic seat, and
rubber seat ring free from the seal
plate (Figure 9).
11. Remove loose particles from impeller
hub and seal plate.
MOTOR
IMPELLER
SEAL
SEAT
Figure 11 - Motor Shaft
5.
SEAL PLATE
DIFFUSER
CAP SCREWS
PUMP
HOUSING
(VOLUTE)
MOTOR
IMPELLER
VENTURI
6.
SEAL
PLATE
SEAL
FACE
MUST
BE CLEAN FOR
PROPER SEAL
Secure diffuser to seal plate using
the two cap screws. Be sure the
arrow on the front of the diffuser
is pointing up and the screws are
orientated on a horizontal line as
described in Step 2.
Carefully position pump housing
(volute) gasket over the diffuser
onto the seal plate. In all shallow
well applications care must be taken
that the o-ring is clean and properly
positioned on the venturi. Cleaning
Figure 8 - Shaft Seal
5
www.waynepumps.com