1
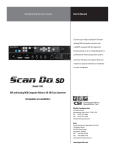
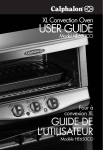
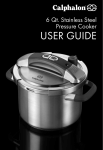
XL Digital Convection Oven
USER GUIDE
Model HE700CO
Thank you for choosing a Calphalon XL Digital Convection Oven.
The Calphalon Kitchen Electrics collection features our exclusive
Opti-Heat System. Designed to provide accurate temperature control
and even heat delivery, Opti-Heat ensures that foods cook evenly and
thoroughly, for reliable results you can count on – every time.
We know you are excited to begin using your convection oven; this User
Guide is designed to help you make the most of your new appliance.
Be sure to carefully review this guide before using your convection oven and
keep it handy for future reference should you have any questions about
your convection oven’s operation.
TABLE OF CONTENTS
Safety Instructions...................................................................................................page 1
Getting to Know Your Convection Oven.........................................................page 5
Parts & Features.................................................................................................................. Operating Your Convection Oven.....................................................................page 6
Before the First Use............................................................................................................ Setting the Controls............................................................................................................ Tips for Successful Operation............................................................................page 13
Bake.......................................................................................................................page 13
Broil.......................................................................................................................page 16
Toast..................................................................................................................... page 18
Bagel.....................................................................................................................page 21
Pizza..................................................................................................................... page 23
Cookies................................................................................................................ page 25
Cleaning and Care................................................................................................ page 28
Before Cleaning................................................................................................................. Cleaning the Crumb Tray.................................................................................................. Cleaning the Convection Oven........................................................................................ Storage...................................................................................................................... page 29
Frequently Asked Questions............................................................................ page 30
Warranty.................................................................................................................. page 32
Recipes....................................................................................................................... page 34
NOTE: If you have additional questions or concerns, or wish to return
product(s), please contact Calphalon Customer Service at
1-800-809-7267. Please do not return this product to the store.
SAFETY INSTRUCTIONS
The safety instructions appearing in this guide are not meant to cover
all possible situations that may occur. Caution must be exercised when
installing, maintaining or operating this appliance. Contact your dealer,
distributor, service agent or manufacturer with any issues you do not
understand.
Recognize Safety Messages
Always read and obey the safety messages included in this guide. Look for
the following safety symbols, which will alert you to potential hazards.
WARNING
WARNING – Hazards or unsafe practices which COULD result in severe
personal injury or death.
CAUTION
CAUTION – Hazards or unsafe practices which COULD result in minor
personal injury.
ATTENTION!
ATTENTION! The convection oven may emit a light smoke and/or odor as
it heats up during the first few minutes of operation. This is due to residual
oils left over from the manufacturing process; this is common for any type or
brand of convection oven and is not a defect. This will dissipate quickly and
is not a reason for concern.
1
IMPORTANT SAFEGUARDS
When using electrical appliances, basic safety precautions should always
be observed, including the following:
1. READ ALL INSTRUCTIONS in this guide before attempting to operate
your appliance.
2. Do not touch hot surfaces. Appliance surfaces are hot during and after
use. To prevent burns or personal injury, use handles and knobs and
hot pads or oven mitts.
3. To protect against electrical shock do not immerse the convection oven,
cord or plug in water or other liquids.
4. Close supervision is necessary when any appliance is used by or
near children.
5. Unplug from outlet when not in use and before cleaning. To disconnect,
remove the plug from the outlet. Allow to cool before putting on or
taking off parts.
6. Do not operate any appliance with a damaged cord or plug or
after the appliance malfunctions, is dropped or damaged. Contact
Calphalon Customer Service at 1-800-809-7267 for
examination, repair, or adjustment.
7. Use only the accessories supplied with this convection oven. Using
attachments not recommended or sold by Calphalon may
cause injuries.
8. Do not use outdoors.
9. Do not let the cord hang over the edge of a table or counter, touch hot
surfaces, or become knotted.
10. Do not place the convection oven on or near a hot gas, electric or
induction burner, or in a heated oven.
11. Extreme caution must be used when moving an appliance containing
hot oil or other hot liquids. Use extreme caution when removing pans,
dishes and/or accessories containing hot oil or other hot liquids.
12. This product is designed for household use only. Do not use appliance
for other than intended purpose.
13. Oversized foods or metal utensils must not be inserted in the convection
oven as they may create a fire or risk of electric shock.
14. A fire may occur if the convection oven is covered, touching or near
any flammable material, including fabrics, wall coverings, towels,
curtains, or like materials when in operation. Do not store any item on
top of the appliance when in operation.
15. Do not clean the convection oven with metal scouring pads. Pieces
can break off the pad and touch electrical parts, creating a risk of
electric shock.
2
16. Extreme caution should be exercised when using containers or baking
pans constructed from materials other than metal or glass.
17. Do not store any materials, other than manufacturers recommended
accessories, in this oven when not in use.
18. Do not place any of the following materials in or under the oven: paper
towels, cardboard, paper or plastic.
19. Do not cover crumb tray or any part of the oven with metal foil. This
will cause overheating of the oven.
20.In case of malfunction, the convection oven may be turned off by
pressing the Start/Cancel button. Once turned off, carefully unplug the
cord from the outlet. Do not unplug the convection oven by pulling on
the power cord. Always grasp the plug and pull to disconnect.
21. Do not use convection oven as a source for heat or for drying.
22.The appliance must only be used in the upright position, never lying
down, tilted or upside down. Always use the convection oven on a dry,
level surface. Never operate the convection oven near the edge of a
countertop or table.
23.Empty the crumb tray regularly. Remove the power plug from the outlet
and cool before cleaning. Failure to do so may result in a fire hazard.
24.Do not use the convection oven without the clean, dry crumb tray
in place.
25.This appliance is not intended for use by children or other persons,
without assistance or supervision, if their physical, sensory or mental
capabilities prevent them from using it safely.
26.Remove and safely discard any packing materials before using the
convection oven for the first time.
27. Never leave the convection oven unattended when in use.
28.Do not allow hot surfaces of the convection oven to come in contact
with countertops or tables.
29.When operating the convection oven keep a minimum distance of
4” (10 cm) of space on both sides of the appliance. This allows for
air circulation.
30.Carefully follow the Cleaning and Care instructions on page 28
when cleaning your convection oven to avoid risk of injury or
shock hazards.
SAVE THESE INSTRUCTIONS FOR
FUTURE REFERENCE.
NOTE: If this convection oven malfunctions during use, immediately press the
Start/Cancel button to cancel the cycle. Unplug the power cord from the electrical
outlet. Do not use or attempt to repair the convection oven. Contact Calphalon
Customer Service at 1-800-809-7267 for examination, repair, or adjustment.
3
ELECTRICAL REQUIREMENTS
CAUTION
Avoid Electric Shock
This product has a polarized power cord plug, meaning one blade on the
plug is wider than the other. The plug will fit into a polarized electrical outlet
only one way. To reduce the risk of electrical shock, do not force the plug
into an outlet. If the plug won’t fit into the outlet, reverse the plug. If it still will
not fit into the outlet, contact a qualified electrician to modify the outlet. Do
not modify the cord plug in any way.
This appliance is equipped with a 3-prong grounding plug for your
protection against shock hazard and it should be plugged directly into a
properly grounded receptacle. Do not cut or remove the grounding
prong from this plug. If the plug fails to fit into an existing outlet,
contact a qualified electrician to update the outlet.
Short Cord Instructions
Your Calphalon convection oven has a short power supply cord as a safety
precaution to prevent personal injury or property damage resulting from
becoming entangled with a longer cord. Do not allow children to be near
this appliance without adult supervision. Longer detachable extension cords
are available and may be used if care is exercised in their use.
If an extension cord is used:
The extension cord must be a grounding-type 3-wire cord. A short powersupply cord should be used to reduce the risk resulting from becoming
entangled in or tripping over a longer cord. Extension cords are available
and may be used if care is exercised in their use. If an extension cord is
used, the marked electrical rating of the cord set or extension cord should
be at least as great as the electrical rating of the appliance and the cord
should be arranged so that it will not drape over the countertop or tabletop
where it can be pulled on by children or tripped over unintentionally.
SAVE THESE INSTRUCTIONS FOR
FUTURE REFERENCE.
4
GETTING TO KNOW YOUR
CONVECTION OVEN
1
2
3
4
5
6
7
8
10
9
11
DECREASE
12
13
15
14
Parts and Features
1.
2.
3.
4.
5.
6.
7.
8.
9.
Brushed, Stainless Steel Exterior – Durable and sleek
High Performance Bronze Nonstick Interior – For easy cleaning
Heavy Gauge Oven Rack – With three optional positions
Convection Fan – Circulates warm air around foods for superior baking results
LCD Panel – Features an easy-to-read, illuminated display
Time Remaining – Two hour digital timer displays the cooking time
Real Time Temperature Display – Indicates set temperature of oven
Start/Cancel Button – Starts or cancels a cooking cycle
Mode – Indicates a choice of six cooking modes: Bake, Broil, Toast, Bagel, Pizza
and Cookies
10. Defrost Button – For defrosting and cooking your favorite frozen foods; customized for
specific cooking modes
11. Convection Button – Activates the convection fan for baking
12. Time/Slices Knob – Selects the desired cooking/toasting time - based on minutes or
number of bread slices
13. Temp/Shade Knob – Selects the desired cooking temperature (ranging from
150˚F/65˚C to 450˚F/232˚C) or darkness level (ranging from a low of one to a
high of nine).
14. Nonstick Baking Pan – This 9 x 10 inch pan is specially designed for use in the
convection oven
15. Crumb Tray – Removes for easy clean up
5
INCREA
OPERATING YOUR CONVECTION OVEN
Before the First Use
1. Carefully remove the convection oven from the packaging and place
on counter near a suitable electrical outlet. (See page 4 for information
regarding Electrical Requirements.)
2. Remove any stickers or temporary labels on the convection oven and
any packing materials inside the oven.
3. Place the convection oven on a clean, dry, sturdy surface that is clear
from any potentially flammable materials.
4. Before the first use, wash the oven rack and nonstick baking pan in
warm soapy water.
5. Plug the power cord into a suitable 120 V electrical outlet away from
the edge of a counter or table. The oven will chime, the start button will
blink indicating it is awaiting input.
6. When powered on, default settings for the convection oven are
displayed. The oven is set to Bake for 10 minutes at 350˚F with the
convection function activated.
7. Continue with steps for “Setting the Controls”.
CAUTION
To reduce the risk of electric shock, insert the polarized plug (with one
blade wider than the other) into a polarized outlet. If the plug does not fit
into the outlet completely, reverse the plug. If it still does not fit, contact a
qualified electrician. Do not attempt to modify the plug in any way.
WARNING
Fire may occur if the convection oven is covered, touching or near any
flammable materials, including fabrics, wall coverings, towels, curtains, or
like materials when in operation.
6
Setting the Controls
The First Use
ATTENTION
For the first use, we suggest preheating the convection oven without food to
burn off any oils used in the manufacturing process. The oven may emit a
light smoke or odor as it heats up during the first few minutes of operation.
This will dissipate quickly and is not a reason for concern.
1. When powered on, default settings for the convection oven are
displayed. The oven is set to Bake for 10 minutes at 350˚F with the
convection fan activated.
2. Turn the Temp/Shade knob to the right to select the highest setting
450˚F.
3. Press Start.
4. Allow the empty convection oven to complete the 10 minute baking
cycle while any light smoke or odor dissipates.
Sleep Mode: While setting the controls, please NOTE that if the
convection oven sits for three minutes without being activated, it will go into
Sleep mode. To bring the oven out of Sleep Mode, press any button.
Step 1: CHOOSE A RACK POSITION
Top: BROIL
Middle: TOAST, BAGEL
PIZZA, COOKIES
Bottom: BAKE
7
Based on the desired cooking mode, move the rack, if needed, to the
appropriate position:
Top rack position – Broil
Middle rack position* – Toast, Bagel, Pizza and Cookies
Bottom rack position – Bake
*NOTE: The middle rack has a safety hook to prevent the rack from falling
out when removed. To remove the rack, tilt upward and pull forward. The
reverse process is needed to reinstall the rack.
Allow at least ½-inch of space between the pan of food and the heating
elements. Adjust the rack position, as needed, to allow proper clearance.
Make sure the rack is level and securely in place before moving to Step 2.
Step 2: SELECT A MODE
When powered on, default settings for the convection oven are displayed.
The oven is set to Bake for 10 minutes at 350˚F with the convection fan
active. Once a cooking mode is selected, a default time and temperature for
that setting is displayed. These settings may also be changed to suit
your needs.
Press the Mode button and select one of
six cooking modes:
Bake – Choose for traditional baked goods, as well as for roasted meats,
fish, poultry and vegetables.
Broil – Choose for broiling small cuts of meat, fish or poultry, and for browning crumb toppings or melting cheese on top of foods.
Toast – Choose for toasting slices of bread, as well as bread products such as toaster pastries and waffles.
Bagel – Choose for toasting only the cut sides of bagels or English muffins.
Pizza – Choose for baking either fresh or frozen pizzas.
Cookies – Choose for baking fresh or frozen cookies.
8
Step 3: SELECT CONVECTION OR DEFROST MODES (Optional)
Convection
If desired, press the Convection button to activate the
convection fan.
NOTE: The Convection option is available when
using the following modes: Bake, Pizza and Cookies.
The convection fan circulates warm air in the oven, which browns foods and
creates a golden crust on baked goods. Using convection helps create more
even baking results.
Defrost
If desired, press the Defrost button for frozen foods.
DECREASE
NOTE:
Defrost is available when using theDECREASE
following INCREASE
modes: Pizza, Cookies, Toast or Bagel.
INC
Choose defrost if you are cooking/toasting a frozen food such as frozen
bagels, pastry strudels, and pizza. The Defrost setting is customized for each
cooking mode selected. The Defrost setting extends the cooking cycle to
bake/toast frozen foods. Additional cook time may be required by the user.
Step 4: CHOOSE THE TIME
DECREASEDECREASE
INCREASE
INCREASE
DECREASE
INCREASE
Bake, Broil, Pizza and Cookies –
Turn the Time/Slices knob to select the desired
cook time. The time may be adjusted in one
minute increments up to a maximum of two hours.
Turn the knob to the right to increase the time and
to the left to decrease the time.
Toast or Bagel – Turn the Time/Slices knob to
select the number of bread slices. You may select
up to six slices. Turn the knob to the right to increase the number of slices
and to the left to decrease the number of slices.
9
Step 5: CHOOSE THE TEMPERATURE
DECREASE
INCREASE
Bake, Pizza and Cookies – Turn the
Temp/Shade knob to select the desired
temperature, which is displayed in five degree
increments from 150˚F to 450˚F. Turn the knob
to the right to increase the temperature and to the
left to decrease it.
Broil – Turn the Temp/Shade knob to select
either HI or LO broil.
Toast or Bagel – Turn the Temp/Shade knob to select the desired level
of browning, with shade one being the lightest and shade nine being the
darkest. Turn the knob to the right to increase the level of darkness and to
the left to decrease it.
Real Time Temperature Display – The convection oven is equipped
with real time temperature feedback. The LCD will display the current oven
temperature during the pre-heating phase in order to communicate the
pre-heat progress of the oven.
Once the oven temperature stabilizes to the desired set point, the oven will
no longer display real time temperature feedback. The temperature control
of the oven is designed to be highly accurate in order to achieve optimal
cooking results.
As a result, you will hear the thermostat turning on and off periodically
indicating that the oven is maintaining accurate temperature control.
Step 6: BEGIN COOKING
For Bake, Broil, Pizza or Cookie Modes:
1. Press Start to begin preheat. Preheating will flash on the display until the selected oven temperature is reached.
2. Insert food once chime sounds and temperature/
preheat is no longer blinking on the oven display.
Time starts automatically.
10
Place food on baking pan or oven rack. Place food on the 9 x 10
inch nonstick baking pan supplied with the convection oven. Or, select a
pan that fits within the oven cavity up to a 9 x 13-inch pan. Do not use
over-sized pans that touch the oven walls or keep the door from closing.
Open the oven door and, carefully place the baking pan on the oven rack.
Be sure to allow at least ½-inch of space between the pan of food you are
inserting and the heating elements.
Close oven door. Using the handle, and being careful not to touch hot
surfaces, securely close the oven door.
Remove food once timer ends and chime sounds.
For Toast or Bagel Modes:
1. Insert toast or bagels directly on oven rack (bagels should face cut side up). Be sure to allow at least ½-inch of space between the food you are inserting and the heating elements. Close oven door. Using the handle,
and being careful not to touch hot surfaces, securely close
the oven door.
2. Press Start to begin the toasting process.
3. Remove toast or bagels once timer ends and
chime sounds.
WARNING
Inserting oversized foods, metal utensils or materials of any kind may cause
risk of fire or electric shock.
Sleep Mode
CREASE If the convection oven sits for three minutes and the flashing Start/Cancel
button is not pressed, the convection oven will go into Sleep mode. To bring
the oven out of Sleep mode, touch any button.
11
Step 7: CHANGING/CANCELING A COOKING CYCLE
Changing a Cycle
Mode – You may not change the cooking mode while
the oven is operating. Instead, turn the oven off by
pressing the Start/Cancel button. Then reset the controls
as desired.
DECREASE INCREASE
DECREASE INCREASE
Time/Slices and Temp/Shade – To change
these settings while the oven is operating, simply
turn the corresponding knobs to select the desired
setting.
Defrost and Convection – To activate
or deactivate these settings while the oven is
CREASE DECREASE INCREASEoperating, press the corresponding button.
Canceling a Cycle
If you need to turn off the convection oven for
any reason while cooking, simply press the Start/
Cancel button. To disconnect the convection oven,
be sure to grasp the plug securely, rather than the
power cord, when removing it from the outlet.
WARNING
If this convection oven malfunctions during use, immediately press the
Start/Cancel button to cancel the cycle. Unplug the power cord from
the electrical outlet. Do not use or attempt to repair the convection oven.
Contact Calphalon Customer Service at 1-800-809-7267 for
examination, repair, or adjustment.
12
TIPS FOR SUCCESSFUL OPERATION
As you become familiar with your convection oven, we want to share a few
suggestions for baking, roasting, broiling and toasting common foods.
BAKE
How it Works
When choosing Bake mode, the top and bottom
heating elements cycle on and off, maintaining a
constant temperature to bake foods from above
and below.
When to Use This Setting
Choose for traditional baked items such as cakes,
breads and muffins, as well as for roasted meats, fish, poultry and vegetables.
•Preheat –Yes
•Rack Position – Bottom
•Recommended Baking Pans – Metal and glass baking pans are suggested. The nonstick 9 x 10-inch Calphalon baking pan
provided with the convection oven works well for many foods. Other
pans that fit inside the oven are 9 x 13-inch baking pans, 6-cup muffin
tins, 9-inch pie plates, 9-inch bread pans, 8-inch square baking pans, and
small baking sheets.
Options
Convection Mode
Choose this mode if you are baking items such as breads, two-crust pies
or muffins. Also select convection when roasting vegetables, fish, poultry
or meat.
The convection fan circulates warm air in the oven, which browns foods and
creates a golden crust on baked goods. Using convection helps create more
even baking results.
13
The optional Defrost setting is not available while using the Bake mode. If
you try to select this option the convection oven will chime three times to
indicate this setting is not active during the Bake mode.
Setting the Controls for Baking
1. Make sure the convection oven is properly plugged in and ready for
operation. (See Electrical Requirements on page 4 for
further instructions.)
2. Place the oven rack in the bottom position. Check to make sure the rack
position allows at least ½-inch of space between the pan of food and
the heating element.
3. When powered on, default settings for the convection oven are
displayed. The oven is set to Bake for 10 minutes at 350˚F with the
convection function activated.
4. Turn the Time/Slices knob to select the desired cooking time. Turn right
to increase the time and left to decrease the time. The time may be set in
1 minute increments up to a maximum of two hours.
5. Turn the Temp/Shade knob to select the desired oven temperature. Turn
right to increase the temperature and left to decrease it. The temperature
may be set in 5 degree increments from a minimum of 150˚F to a
maximum of 450˚F.
6. Press the Start/Cancel button. The oven begins preheating. Preheating
will flash on the display until the selected oven temperature is reached.
7. Once preheated, the oven will chime, the desired temperature will
illuminate on the display, and the timer will begin counting down.
8. Insert the food into the oven on a baking pan.
Recommended Baking Times and Temperatures
Times and temperatures are the same as for traditional ovens. Simply follow
the package directions and recipe instructions for recommended baking
times and temperatures. Refer to our baking chart (shown next page) for
general guidelines.
14
Baking Chart
Food
Approx. Time
Approx. Temperature
Muffins
13 to 20 minutes
400˚F
Biscuits/shortcakes
10 to 15 minutes
450˚F
Quick breads
50 to 55 minutes
350˚F
Scones
10 to 15 minutes
400˚F
Yeast breads
35 to 40 minutes
375˚F
Cakes (4 round)
20 to 25 minutes
325˚F
Pork tenderloin
20 to 25 minutes (or until 160˚F medium)
425˚F
Boneless, fully-cooked ham
27 to 33 minutes per lb.
325˚F
Boneless chicken breast halves (4 oz)
30 minutes
(or until 165˚F)
375˚F
Chicken legs or thighs
40 to 50 minutes
(or until 165˚F)
350˚F
Cornish hens
50 to 60 minutes
350˚F
Fresh fish fillets
(per ½-in. thickness) 4 to 6 minutes
(or until it flakes with a fork)
450˚F
Root vegetables, chopped
30 to 40 minutes
425˚F
Baked potatoes
45 minutes
400˚F
15
BROIL
How it Works
When choosing Broil mode, the top heating
elements cycle on and off to cook foods from
the top down. Broil with the door open for short
cooking times, less than 10 minutes, to add
crispness to items like open-faced sandwiches
and nachos. Broil with the door closed for tender
items like fish.
When to Use This Setting
Select Broil for small cuts of meat, fish or poultry, and for browning crumb
toppings or melting cheese on casseroles or garlic bread.
•Preheat – Yes
•Rack Position – Top or Middle (allowing at least ½-inch between the
pan of food and the upper heating elements).
•Recommended Broiling Pans – Metal baking pans are suggested
for broiling. The nonstick 9 x 10-inch Calphalon baking pan provided with
the convection oven works well for many foods. You may also use other
shallow baking pans suitable for broiling.
WARNING
Avoid a fire hazard by choosing suitable pans for broiling meats. Broiled
meats accumulate juices while cooking. Choose broiling pans with sides
to catch the drippings and prevent them from spilling into the bottom of the
convection oven. Make sure there is at least ½-inch of clearance between
the pan of food and the heating elements.
Options
The optional Defrost and Convection settings are not available while using
the Broil mode. If you try to select these options the convection oven will
chime three times to indicate these settings are not active during the
Broil mode.
16
Setting the Controls for Broiling
1. Make sure the convection oven is properly plugged in and ready for
operation. (See Electrical Requirements on page 4 for
further instructions.)
2. Place the oven rack in the top position. Check to make sure the rack
position allows at least ½-inch of space between the pan of food and
the heating element. If there is not enough space, move the pan to the
middle rack position.
3. When powered on, default settings for the convection oven are
displayed. The oven is set to Bake for 10 minutes at 350˚F with the
convection function activated.
4. Press the Mode button to select the Broil setting.
5. A default time and temperature of 3 minutes on HI broil appear.
6. If desired, turn the Time/Slices knob to adjust the cooking time, as
needed. Turn right to increase the time and left to decrease the time. The
time may be set in 1 minute increments up to a maximum of 2 hours.
7. Turn the Temp/Shade knob to select the desired broil setting of either HI
or LO. HI broil is 400˚F and LO broil is 300˚F.
8. Press the Start/Cancel button. The oven begins preheating. Preheating
will flash on the display until the selected broil temperature is reached.
9. Once preheated, the oven will chime, the desired broil setting will illuminate on the display, and the timer will begin counting down.
10. Insert the food into the oven on a baking pan.
11. Leave the door open slightly (where it catches) during broiling for short cooking times to add crispness.
Recommended Broiling Times and Temperatures
Times and temperatures are the same as for traditional ovens. Simply follow
the package directions on your favorite foods or recipe instructions from
cookbooks for recommended broiling times and temperatures.
Turn the foods over halfway through broiling to brown on both sides
and cook throughout.
17
HI broil – Use for denser foods such as hamburger patties, steaks, and
pork chops.
LO broil – Use for more delicate broiling such as chicken breast halves,
and fresh fish filets.
Broiling Chart
Food
Approx. Time
Approx. Temperature
Beef steaks (¾-inch) (1-inch)
4 to 5 minutes per side
6 to 7 minutes per side
(or until 145˚F)
HI broil
Fresh hamburger
patties (¾-inch)
6 to 7 minutes per side
(or until 160˚F)
HI broil
Pork chops (¾-inch)
4 to 5 minutes per side
(or until 160˚F)
HI broil
Boneless chicken
breast halves (4 oz)
10 to 15 minutes per side
(or until 165˚F)
LO broil
Fresh fish filets (1-inch)
6 to 8 minutes per side
(or until flakes with fork)
LO broil
TOAST
How it Works
When choosing Toast mode, the top heating
elements toast foods from above and the bottom
heating elements.
When to Use This Setting
Choose for toasting slices of white, wheat and
whole grain breads. Also select this mode for
toasting bread products such as toaster pastries
and waffles.
18
• Preheat – No
• Rack Position – Middle
• Recommended Pans for Toasting – A pan is not needed for
toasting. To allow proper toasting of bread slices, waffles and toaster
pastries from both top and bottom, place directly on the oven rack
provided with the convection oven.
Tips for Preparing Bread/
Bread Products for Toasting
•Begin by selecting uniform slices of bread or bread products to toast at
the same time. This will ensure even browning.
•Make sure slices of bread, waffles or pastries fit comfortably in the
convection oven. The oven is designed to hold a maximum of six standard
slices of bread.
•When toasting less than four slices of bread, make sure that the slices are
positioned directly over the heating elements and not across the middle of
the oven rack.
•Use caution when toasting pastries or strudels. Quickly inspect the
pastries to make sure they do not have any leaking filling that may drip
out when warm.
Options
Defrost mode
Choose Defrost if you are toasting frozen foods such as waffles or pastries.
The Defrost setting extends the cooking cycle to toast frozen foods.
The optional Convection setting is not available to use during the Toast
mode. If you try to select this option the convection oven will chime to
indicate this setting is not active during the Toast mode.
Setting the Controls for Toasting
1. Make sure the convection oven is properly plugged in and ready for
operation. (See Electrical Requirements on page 4 for
further instructions.)
2. Place the oven rack in the middle position. The middle rack position has
a safety hook to prevent the rack from falling out when it is removed.
To remove the rack, tilt upward and pull forward. The reverse process is
needed to reinstall the rack.
19
3. When powered on, default settings for the convection oven are
displayed. The oven is set to Bake for 10 minutes at 350˚F with the
convection function activated.
4. Press the Mode button to select the Toast setting.
5. A default setting of four slices and a darkness level four appears.
6. If toasting a frozen bread or bread product, press the Defrost button. It
will illuminate when activated. (Learn more about the Defrost mode as
described above under Options.)
7. Turn the Time/Slices knob to adjust the number of slices, as needed.
Turn right to increase the number of slices and left to decrease.
The number may be set as low as one slice or as high as six slices.
8. If desired, turn the Temp/Shade knob to select the level of darkness.
Choose between a minimum of level one (for lightest browning) and a
maximum of level nine (for the darkest browning).
9. Insert the bread/bread products into the oven directly on the oven rack.
10.Press the Start/Cancel button.
11.The display will show the toasting time remaining.
Recommended Toasting Times and Temperatures
As you become familiar with your convection oven, we want to share a few
suggestions for toasting common breads and bread products.
Suggested Convection Oven Settings
The following chart is meant to serve as a general guide for choosing the
appropriate convection oven settings. You can experiment to identify your
preferred toasting setting.
Toasting Chart
20
Type of Bread
Setting (for medium browning)
White sandwich breads
Shade level four
Wheat or rustic breads
Shade level six
Toaster pastry tarts
Shade level four
Frozen waffles
Shade level six and Defrost
Frozen toaster pastries/scrambles
Shade level four and Defrost
BAGEL
How it Works
When choosing the Bagel mode, the upper
heating elements toast foods on top and the
bottom heating elements cycle on and off to
warm them on the bottom.
When to Use This Setting
Choose for toasting the cut sides of dense, sliced
bread products such as bagels or
English muffins.
•Preheat – No
•Rack Position – Middle
•Recommended Pans for Toasting – A pan is not needed for
toasting. To allow proper toasting of bread products such as bagels or
English muffins, place them directly on the oven rack provided with the
convection oven. Slice the bagels and/or English muffins in half and place
on the oven rack with the cut sides facing up.
Tips for Preparing Bagels and/or
English Muffins for Toasting
•Begin by selecting uniform slices of bagels or English muffins to toast at
the same time. This will ensure even browning.
•Make sure slices of bagels and/or English muffins fit comfortably in
the convection oven. The oven is designed to hold the equivalent of a
maximum of six bagel halves.
•When inserting bagels and/or English muffins in the convection oven,
position the cut sides facing up.
Options
Defrost mode
Choose Defrost if you are toasting frozen bagels or English muffins. The
Defrost setting extends the cooking cycle to toast frozen foods. Additional
cook time may be required by the user.
21
The optional Convection setting is not available to use during the Bagel
mode. If you try to select this option the convection oven will chime three
times to indicate this setting is not active during the Bagel mode.
Setting the Controls for Bagel Mode
1. Make sure the convection oven is properly plugged in and ready for
operation. (See Electrical Requirements on page 4 for
further instructions.)
2. Place the oven rack in the middle position. The middle rack position has
a safety hook to prevent the rack from falling out when it is removed.
To remove the rack, tilt upward and pull forward. The reverse process is
needed to reinstall the rack.
3. When powered on, default settings for the convection oven are
displayed. The oven is set to Bake for 10 minutes at 350˚F with the
convection function activated.
4. Press the Mode button to select the Bagel setting.
5. A default setting of four slices and a darkness level four appears.
6. If toasting a frozen bread product, press the Defrost button. It will
illuminate when activated. (Learn more about the Defrost mode as
described above under Options.)
7. If desired, turn the Time/Slices knob to adjust the number of slices, as
needed. Turn right to increase the number of slices and left to decrease
the number. The number may be set as low as one slice or as high as
six slices.
8. If desired, turn the Temp/Shade knob to select the level of darkness.
Choose between a minimum of level one (for lightest browning) and a
maximum of level nine (for the darkest browning).
9. Insert the bagels or muffins, cut sides facing up, into the oven directly on
the oven rack.
10.Press the Start/Cancel button.
11.The oven control will show the toasting time remaining as it begins to
count down.
Recommended Toasting Times and Temperatures
As you become familiar with your convection oven, we want to share a few
suggestions for toasting bagels and English muffins. You can experiment to
identify your preferred toasting setting.
22
Bagel Chart
Type of Bread Product
Setting (for medium browning)
Bagels (sliced) Shade level four
English muffins (sliced) Shade level seven
PIZZA
How it Works
When choosing Pizza mode, the top and bottom
heating elements cycle on and off maintaining a
constant temperature to bake pizza from above
and below.
When to Use This Setting
Choose for baking either fresh or frozen pizzas.
This button sets the convection oven for a baking
mode designed specifically for pizzas.
•Preheat – Yes
•Rack Position – Middle
•Recommended Baking Pans – Metal baking pans are suggested,
such as pizza pans and small baking sheets. For a crisper crust, bake
directly on the oven rack.
Options
Defrost and Convection modes
Choose Defrost if you are cooking a frozen pizza. Defrost is customized to
bake a crisper pizza. Additional cook time may be required by the user.
Choose Convection if you want the convection fan to operate, creating
more even baking results. The convection fan circulates warm air in the
oven, which browns foods and creates a golden crust on baked items.
23
Setting the Controls for Pizza
1. Make sure the convection oven is properly plugged in and ready for
operation. (See Electrical Requirements on page 4 for further
instructions.)
2. Place the oven rack in the middle position. The middle rack position has
a safety hook to prevent the rack from falling out when it is removed.
To remove the rack, tilt upward and pull forward. The reverse process is
needed to reinstall the rack.
3. When powered on, default settings for the convection oven are
displayed. The oven is set to Bake for 10 minutes at 350˚F with the
convection function activated.
4. Press the Mode button to select the Pizza setting.
5. If desired, activate or deactivate the Defrost or Convection options by
pressing the corresponding buttons. They illuminate when activated.
(Learn more about Defrost and Convection modes as described above
under Options.)
6. The default setting for pizza is set to Bake for 20 minutes at 400˚F.
Defrost is the default setting.
7. Turn the Time/Slices knob to select the desired cooking time. Turn right
to increase the time and left to decrease the time. The time may be set
in one minute increments up to a maximum of two hours.
8. Turn the Temp/Shade knob to select the desired oven temperature.
Turn right to increase the temperature and left to decrease it. The
temperature may be set in 5 degree increments from a minimum of
150˚F to a maximum of 450˚F.
9. Press the Start/Cancel button. The oven begins preheating. Preheating
will flash on the display until the selected oven temperature is reached.
10. Once preheated, the oven will chime, the desired temperature will
illuminate on the display, and the timer will begin counting down.
11. Insert the pizza into the oven on a pizza pan, baking sheet or directly
on the oven rack.
Recommended Baking Times and Temperatures
Times and temperatures are the same as for traditional ovens. Simply follow
the pizza package directions and homemade pizza recipe instructions for
recommended baking times and temperatures. Refer to our baking chart
(shown next page) for general guidelines.
24
Pizza Chart
Food Approx. Time
Approx. Temperature
12-inch frozen pizza
20 minutes
400˚F
12-inch fresh pizza
15 to 18 minutes
400˚F
Frozen single serve deep dish pizza
20 to 25 minutes375˚F
Frozen single serve
thin crust pizza
Frozen French bread pizza
Frozen individual
pizza calzone
13 to 15 minutes375˚F
Refrigerated fresh
unbaked pizza
12 to 18 minutes425˚F
Refrigerated unbaked calzone
25 to 30 minutes375˚F
20 to 25 minutes400˚F
40 minutes425˚F
COOKIES
How it Works
When choosing Cookies mode, the top and
bottom heating elements cycle on and off,
maintaining a constant temperature to bake
cookies from above and below.
When to Use This Setting
Choose for baking cookie dough. This mode sets
the convection oven with the ideal baking cycle
for your favorite cookies.
•Preheat – Yes
•Rack Position – Middle
25
•Recommended Baking Pans – Metal baking pans are suggested.
For baking cookies, a small baking sheet works well, or the 9 x 10-inch
nonstick baking pan provided with your Calphalon convection oven.
Options
Defrost and Convection modes
Choose Defrost if you are baking frozen foods. The Defrost setting is
customized to gently thaw frozen cookies and extend cooking time.
Additional cook time may be required by the user.
Choose Convection if you want cookies that have a crisp, golden crust on
the outside.
The convection fan circulates warm air in the oven, which beautifully browns
baked goods. Using convection helps create more even baking results.
Setting the Controls for Cookies
1. Make sure the convection oven is properly plugged in and ready for
operation. (See Electrical Requirements on page 4 for
further instructions.)
2. Place the oven rack in the middle position. The middle rack position has
a safety hook to prevent the rack from falling out when it is removed.
To remove the rack, tilt upward and pull forward. The reverse process is
needed to reinstall the rack.
3. When powered on, default settings for the convection oven are
displayed. The oven is set to Bake for 10 minutes at 350˚F with the
convection function activated.
4. Press the Mode button to select the Cookies setting.
5. The default setting for cookies is set to convection Bake for 11 minutes at
350˚F.
6. If desired, activate or deactivate the Defrost or Convection options by
pressing the corresponding buttons. They illuminate when activated.
(Learn more about Defrost and Convection modes as described above
under Options.) When Defrost is selected, three additional minutes are
added to the cooking time.
7. Turn the Time/Slices knob to select the desired cooking time. Turn right
to increase the time and left to decrease the time. The time may be set in
one minute increments up to a maximum of two hours.
26
8. Turn the Temp/Shade knob to select the desired oven temperature.
Turn right to increase the temperature and left to decrease it. The
temperature may be set in 5 degree increments from a minimum of
150˚F to a maximum of 450˚F.
9. Press the Start/Cancel button. The oven begins preheating. Preheating
will flash on the display until the selected oven temperature is reached.
10.Once preheated, the oven will chime, the desired temperature will
illuminate on the display, and the timer will begin counting down.
11.Place cookie dough on the baking sheet, allowing space for cookies to
spread while baking.
12.Insert the baking sheet into the oven.
Recommended Baking Times and Temperatures
Times and temperatures are the same as for traditional ovens. Simply follow
the package directions for purchased cookie dough and recipe instructions
for homemade cookie dough. Refer to our baking chart (shown below) for
general guidelines.
Cookie Chart
Food
Approx. Time
Approx. Temperature
Pre-packaged cookies
11 minutes
350˚F
Drop cookies
8 minutes
375˚F
Shaped cookies
7 minutes
375˚F
Cut out cookies
7 minutes
375˚F
Filled cookies
10 minutes
375˚F
Brownies
18 to 25 minutes
350˚F
27
CLEANING AND CARE
WARNING
Unplug convection oven before cleaning. Failure to do so may result in risk
of serious injury and electric shock.
Before Cleaning
1. CANCEL – Press the Start/Cancel button if convection oven is still in
operation.
2. UNPLUG – Carefully unplug the convection oven’s power cord from
the electrical outlet by firmly grasping the plug.
3. COOL – Let the convection oven, oven rack, and baking pan cool
completely before attempting any cleaning. The crumb tray will be hot
after operating.
Cleaning the Crumb Tray
•Locate the crumb tray in the front of the convection oven at the base of
oven door.
•Using the handle, pull out the cooled crumb tray and discard
the crumbs.
•If needed, wash the crumb tray. Wash by hand using warm water and
mild detergent. Rinse and dry with a soft cloth.
•Make sure the crumb tray is completely dry before placing it back in the
convection oven.
•Reinsert the crumb tray, making sure to push it in completely. CAUTION
Do not operate the convection oven without the crumb tray in place. Do
not cover crumb tray or any part of the oven with metal foil. This will cause
overheating of the oven.
28
Cleaning the Convection Oven
•The 9 x 10-inch baking pan provided with the convection oven is
dishwasher safe.
•Wash the oven rack and crumb tray by hand using warm water and mild
detergent. Rinse and dry with a soft cloth.
•Use a damp cloth to wipe the inside and outside of the oven with a clean,
damp cloth.
•If desired, polish the body of the convection oven with cleansers
specifically designed for stainless steel surfaces. Avoid spraying cleaners
directly into the convection oven. Apply the cleaners on a towel prior to
wiping the unit.
•Do not immerse the convection oven in water during cleaning.
•Do not use abrasive cleaning products or cleansers, since they may
scratch the surface of the convection oven.
•Metal utensils will damage the nonstick coating. Use only nonmetal,
temperature resistant utensils such as wood or silicone.
CAUTION
Do not clean the convection oven with metal scouring pads. Pieces can
break off the pad and touch electrical parts, creating a risk of electric shock.
STORAGE
Store the convection oven upright on a clean, dry level surface. Do not
store anything on top of the convection oven.
Do not store any materials, other than manufacturers recommended
accessories, in this oven when not in use.
Always clean the convection oven by removing all crumbs prior to storing.
29
FREQUENTLY ASKED QUESTIONS
I hear a slight clicking noise while the oven is operating. Is
this a malfunction? No, the convection oven is equipped with real time
temperature feedback. The LCD will display the current oven temperature
during the pre-heating phase in order to communicate the pre-heat progress
of the oven. Once the oven temperature stabilizes to the desired set point,
the oven will no longer display real time temperature feedback. The
temperature control of the oven is designed to be highly accurate in order
to achieve optimal cooking results. As a result, a slight clicking noise will
be heard periodically indicating that the oven is maintaining accurate
temperature control.
I am pressing the Convection button, but it is not illuminating.
The convection oven chimes three times, but the convection
mode doesn’t seem to activate. What am I doing wrong? You
may be trying to select Convection while using the Broil, Toast or Bagel
modes. The convection mode is not available (or needed) during these
settings. Simply continue setting the controls without the convection
mode selected.
The same is true of trying to select the Defrost option while using Broil or
Bake. This option is not available. So, if you press the Defrost button when
setting the oven to Bake or Broil, it will chime three times to alert you that this
setting is not available.
While setting the controls for a cooking cycle, it appears the
display went dark. Is this a malfunction? If the convection oven is
allowed to sit inactive for 3 minutes, it will go into Sleep mode. This could
happen if you set the cooking cycle but forget to touch the flashing Start/
Cancel button to begin cooking. To wake up the control panel and reset it,
touch any button.
30
Why do some types of bread brown more than others when
using the same shade selection? This could be due to a several
factors. The moisture, texture, temperature, sugar content and thickness of
the slices can all affect levels of browning.
In general, fresher breads have more moisture and brown slower than
breads that are a bit drier and are closer to their expiration date. Room
temperature bread will brown quicker than refrigerated or frozen bread.
And, thin, light textured breads brown quicker than densely textured, thick
sliced breads.
While waiting for the oven to preheat for toasting a bagel, I
noticed that after a few minutes, the oven automatically shut
off. Why did this happen? Actually, preheating is not required for the
Toast and Bagel modes. So, insert your bagel in the oven before pressing
the Start/Cancel button, since the toasting cycle begins immediately.
I noticed that the heating elements inside my oven keep going
on and off. Is this a sign that it may be malfunctioning? It is
normal for the heating elements to cycle on an off to maintain a selected
temperature in the oven cavity.
My food isn’t completely warm. Why did this happen? For best
results, insert food immediately after preheating is complete to allow for
optimal results.
31
WARRANTY
Register your Convection Oven - It’s Easy!
Please register your product to ensure that we have the correct information
in our system for any warranty inquiries. Retain the original sales
receipt. Without registering your product or having the
original sales receipt, we will consider the warranty start date
to be the date of manufacture.
Taking a few moments to register your product greatly expedites warranty
inquiries and helps us continue to develop new products and services that
make your culinary experience even better. Please contact Calphalon
Customer Service for complete details.
Limited One Year Warranty
Calphalon will repair or replace any convection oven found defective in
material or workmanship within one year of the original purchase with
the original sales receipt. This warranty applies when the convection
oven is put to normal household use and is operated and cared for
according to the instructions. This excludes damage from misuse or
abuse, such as improper cleaning, neglect, accident, alteration, fire,
theft, or use in a commercial establishment. Minor imperfections, surface
markings as a result of shipping, and slight color variation are normal.
This warranty excludes all incidental and consequential damages,
except in those states that do not allow the exclusion or limitation of
these damages. Without an original sales receipt or having registered
your product with Calphalon, the warranty start date will be considered
the date of manufacture. This warranty gives you specific legal rights,
and you may have other rights that vary from state to state.
32
Customer Service
We at Calphalon want to hear from you. If you have a question, comment,
or a recommendation that will help us help you, please contact us via our
web site, phone, fax or mailing address.
Please do not return the product to the store. Please contact
us directly with questions or comments about your convection
oven. Thank you!
Web site
www.calphalon.com
Write Us
Calphalon Customer Service
PO Box 583 Toledo, Ohio 43697-0583
(Please, DO NOT send returns to this address)
Toll Free Phone
1-800-809-7267
(Monday-Friday 8:00am – 5:00pm EST)
Fax
419-666-2859
33
RECIPES
Citrus Shrimp and Artichokes
Ingredients
Serves 3 to 4 as an appetizer
Marinade:
½ cup fresh lime juice
¼ cup orange marmalade
3 cloves fresh garlic, minced
2 tablespoons fresh orange zest
¼ cup chopped cilantro
¼ cup garlic infused olive oil
2 tablespoons soy sauce
½ teaspoon dried red chili flakes
Zest of 1 lime
Shrimp:
1½ pounds large (10-12 ct.) shrimp, peeled and deveined with tails left
intact
1 (15 ounce) can artichoke hearts, well drained and cut in half
2 teaspoons olive oil
Sprigs of cilantro for garnish
6 small bamboo skewers soaked in lemon water
Method:
Combine the marinade ingredients in a medium bowl.
Place the shrimp and artichokes into a half gallon storage bag. Add all but
1/3 cup of marinade to the shrimp. The reserved marinade can be used as a
dipping sauce when serving. The shrimp should marinate for at least 1 and
no more than 2 hours. After marinating, thread the shrimp and artichokes
onto the skewers, 3 shrimp and 3 artichoke halves per skewer.
Position the oven rack in the middle slot with the rack oriented upwards.
Preheat your Calphalon XL Convection Oven for 5 minutes on Broil.
Place the skewered shrimp into the convection oven and Broil the shrimp for
2 to 3 minutes on each side. Serve with dipping sauce.
34
Open Face Roast Beef and Cheddar Melt
Ingredients: (per sandwich)
Serves 1
1 slice of marble rye bread
1 teaspoon olive oil
2 teaspoons horseradish mayonnaise
6 ounces lean, medium-rare roasted beef, sliced thin
1 cup (4 ounces) coarsely grated cheddar cheese
Method
Brush one side of the bread with the olive oil. Place the oil brushed side of
the bread down on the work surface. Spread the side facing up with the
mayonnaise. Place the roasted beef in loose layers over the mayonnaise
and top with the grated cheddar. Place the sandwich on a baking pan.
Position the oven rack in the lower slot with the rack oriented upwards.
Set your Calphalon XL Convection Oven to Toast on “Medium”. Place
the sandwich in the oven and toast until the cheese is bubbling and golden.
35
Asian Style Roast Chicken
Ingredients:
Serves 2 to 4
1 (3 to 3¼ pounds) whole chicken
Salt, to taste
½ medium onion, cut into ½-inch cubes
1 medium lemon, cut into ½-inch cubes
2 (3-inch) cinnamon sticks, broken
3 large cloves garlic, crushed
2 teaspoons five spice powder
1 teaspoon salt
1 tablespoon vegetable oil
2 tablespoons fresh lemon juice
Zest of 1 large lemon
2 cloves garlic, minced
1 tablespoon hoisin sauce
1 tablespoon soy sauce
1 teaspoon toasted sesame seed oil
Method:
Preheat your Calphalon XL Convection Oven to 350 degrees. Choose
convection if you want the convection fan to operate, creating more even
baking results.
Rinse the chicken inside and out and pat dry. Sprinkle some salt into the
cavity of the chicken. Fill the cavity of the chicken with the onion, lemon,
cinnamon and garlic.
In a medium bowl, combine remaining ingredients. Drizzle about 1/3 of the
mixture into the cavity of the chicken. Pour the remaining mixture over the
exterior of the chicken, brushing or rubbing to make sure the entire surface
is covered. Place on the broiler pan and cook for 1 hour and 10 minutes to
1 hour and 20 minutes on the Bake setting or 55 to 60 minutes on the Bake
setting with convection fan activated. Pierce one of the thighs with a meat
thermometer to test for doneness. The thermometer should register 160 to
165° F or cook until the juices run clear when you pierce the thigh with a
knife. Remove from the oven and cool for 15 minutes prior to carving. Serve
with stir-fried or steamed vegetables and long grain brown rice.
36
Dried Cherry and White Chocolate Blondies
Ingredients:
Makes 12 to 15 squares
Butter for interior of 9x13-inch baking pan
1 cup dried, tart cherries
8 tablespoons Cognac
1 cup lightly packed light brown sugar
1 cup unsalted butter, softened
2 large eggs
¾ cup dark corn syrup
2 tablespoons Cognac
2 cups all purpose flour
½ teaspoon baking powder
¼ teaspoon salt
1 cup white chocolate morsels
Method:
Position the oven rack in the lower slot with the rack oriented upwards.
Preheat your Calphalon XL Convection Oven to 350 degrees. Butter the
interior of a shallow 9x13-inch pan. Place the 8 tablespoons Cognac into a
small sauce pan or butter warmer. Add the cherries and simmer until most of
the Cognac has been absorbed. Reserve.
Mix the brown sugar, butter, eggs, corn syrup and 2 tablespoons Cognac in
a large bowl.
In another bowl combine the flour, baking powder and salt. Add the flour
mixture to the corn syrup mixture. Add the cherries and white chocolate
morsels. Combine thoroughly. Pour the batter into the prepared pan. Bake
for 25 minutes or until the batter forms a light crust and just begins to set.
Remove from the oven and cool for a few minutes. Cut into squares
and serve.
Serving suggestion – White Chocolate Drizzle:
½ cup white chocolate morsels
2 teaspoons whipping cream
Bring the cream to a simmer in a small sauce pan or butter warmer. Whisk
in the morsels. Drizzle over the top of the blondie before cutting. (Make sure
the blondie is completely cooled before drizzling).
37
© 2011