1
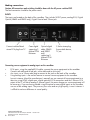
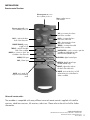
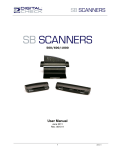
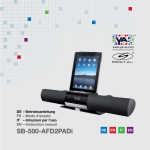
SB800
SB650
SB500
Instruction Manual
Safety Instructions
1. 2. 3. 4. 5. 6. 7. 8. 9. 10.
11.
12.
13.
14.
Read these instructions completely prior to use or hook-up.
Keep these instructions for future reference. Record Model Number_______________ and Serial Number _____________________
Understand and heed all warnings.
Follow all instructions.
Do not use soundbar or subwoofer near water, rain or high moisture.
Clean only with a dry cloth. Never use solvents. A microfiber cloth is recommended.
Do not block any of the ventilation openings. See Instructions.
Do not install near heat sources such as stoves, radiators and amplifiers.
Use only with supplied power sources, with polarized power cord.
Protect power cord from being walked on or pinched. Do not have cord stretched taut.
Use only connections and auxiliary equipment suggested by manufacturer.
Unplug this system during lightning storms or when left unattended for extended periods.
Use an ILS-120 to protect from surges, over/under voltages and lightning strikes.
Refer service to qualified service personnel.
The exclamation point within an equilateral triangle is intended to alert the
user to the presence of important operation or maintenance instructions.
The lightning flash with arrowhead symbol within an equilateral triangle
is intended to alert the user to the presence of non insulated dangerous
voltages within the product’s enclosure that may be sufficient magnitude
to constitute a risk of electric shock to people.
WARNING
TO REDUCE THE RISK OF
ELECTRIC SHOCK, DO NOT
EXPOSE THIS EQUIPMENT
TO RAIN OR MOISTURE
CAUTION
TO REDUCE THE RISK OF ELECTRIC SHOCK,
DO NOT REMOVE COVER OR BACK. NO
USER-SERVICABLE PARTS INSIDE. REFER TO
QUALIFIED SERVICE PERSONNEL.
The BLUETOOTH® word mark and logos are registered trademarks owned by Bluetooth SIG, Inc.
www.currentaudio.com
2
1890 Cordell Court, Suite 105., El Cajon, CA 92020 • 866-927-7181
©2014 Current Audio - All Rights Reserved.
Rev. 01, 06/14
Thank you for purchasing the Current Audio Home Theater Soundbar.
Please read this manual thoroughly before making any connections or applying AC power. This manual
applies to the SB800, SB650 and SB500 Soundbar Systems. Follow the instructions in this manual. It
will allow you to obtain the maximum performance and listening pleasure from your new soundbar.
Please retain this manual to use as a future reference.
Supplied accessories
The boxes include the following equipment and accessories:
• (1) Soundbar
• (1) 100 - 240VAC to 18VDC power supply
• (1) RCA stereo audio cable
• (1) 3.5mm stereo audio cable
• (1) Hand held remote control unit
• (1) 2.4GHz wireless MegaBass unit with power cord (SB800 & SB650 only)
• (1) Wall mounting brackets with screws
• (2) Table Top Mounting feet
• (1) Instruction Manual
SB800 Specifications
Soundbar Power
60 Watts RMS
120 Watts Peak
Subwoofer Power
80 Watts RMS
180 Watts Peak
Total Power
140 Watts RMS
300 Watts Peak
SPL
103.6dB
Sound Mode
3 Enhanced DSP Surround Modes
Speakers
8 Speakers. 6 2.5” Midrange Drivers and 2 1.25” Tweeters
Subwoofer
2.4GHz 8” Long Throw Ported Woofer
BLUETOOTH®
Connectivity for iPhone, Android, MP3 and PC
Audio Inputs
Digital Optical, Digital Coaxial RCA, 3.5mm
Frequency Response
20 Hz to 20 kHz
Soundbar Dimensions (weight)
39
9/16
Subwoofer Dimensions (weight)
17
1/8
” (1005mm) x 3
”(435mm) x 8
” (89mm) x 3
1/2
” (84mm) 9lbs
5/16
”(221mm) x 14
11/16
”(362mm) 21 lbs
1/4
SB650/500 Specifications
Soundbar Power
40 Watts RMS
80 Watts Peak
Subwoofer Power (SB650 only)
60 Watts RMS
135 Watts Peak
Total Power
100 Watts RMS
215 Watts Peak
SPL
102dB
Sound Mode
3 Enhanced DSP Surround Modes
Speakers
6 Speakers. 4 2.5” Midrange Drivers and 2 1.25” Tweeters
Subwoofer (SB650 only)
2.4GHz 6.5” Long Throw Ported Woofer
Audio Inputs
Digital Optical, Digital Coaxial, RCA, 3.5mm
Frequency Response
25 Hz to 20 kHz
Soundbar Dimensions (weight) (SB650 only)
39
9/16
Subwoofer Dimensions (weight)
16
3/8
” (1005mm) x 3
” (416mm) x 7
” (89mm) x 3
1/2
” (84mm) 9lbs
5/16
” (200mm) x 13” (330mm) 17lbs
7/8
www.currentaudio.com
1890 Cordell Court, Suite 105., El Cajon, CA 92020 • 866-927-7181
©2014 Current Audio - All Rights Reserved.
Rev. 01, 06/14
3
Soundbar SB800, SB650 and SB500 by Current Audio
The SB800, SB650 and SB500 Soundbar describes the latest digital technology in amplified speaker
sound bars with a powerful wireless amplified subwoofer by Current Audio. The powerful subwoofer
can be located anywhere in the room. This is the perfect Home Theater System with a wide sound
stage. The system comes with a handheld remote to control power, switch inputs and adjust sound
fields. The slim depth and sleek design blends with all flat LED/LCD TV models.
Features and Connections for Soundbar
Rear panel of Soundbar
1.
2.
3.
4.
5. 6. RCA - analog inputs, left and right analog stereo input
COAXIAL digital input - supports 2 channel or PCM bitstreams
OPTICAL digital input - supports 2 channel or PCM bitstreams (SB800/SB650 models only)
AUX IN - 3.5mm audio jack for TV, MP3, computers, mobile devices, etc
Power switch - rear panel switch to cut power for service or hook-up
Input power jack - connect the 18VDC power supply here
1
2
Rear panel of Subwoofer (SB800 and SB650 only)
7. Match button and status LED - used to sync the
Soundbar with the wireless subwoofer
8. Power mode - power ON or OFF
9. Input power jack - connect 100 - 240VAC 2
conductor power cord here
3
4
5
6
7
8
9
www.currentaudio.com
4
1890 Cordell Court, Suite 105., El Cajon, CA 92020 • 866-927-7181
©2014 Current Audio - All Rights Reserved.
Rev. 01, 06/14
INSTALLATION
Getting started
Soundbar placement
Where to locate Soundbar
Either mount the soundbar on a flat horizontal surface centered in front of the TV or surface wall mount
the soundbar on the wall via the key hole slots. Use proper wall anchors to support the weight of the
soundbar.
TV
Where to locate subwoofer
Install the wireless subwoofer preferably near the front wall next to an electrical outlet. The power cord
is the only wire needed for hook-up. Corner placement will give an added bass boost.
www.currentaudio.com
1890 Cordell Court, Suite 105., El Cajon, CA 92020 • 866-927-7181
©2014 Current Audio - All Rights Reserved.
Rev. 01, 06/14
5
Making connections
Caution: All connections and switching should be done with the AC power switched OFF.
The final connection should be the power cords.
INPUTS
The inputs are located on the back of the soundbar. They include 18VDC power, analog RCA, Digital
Optical (SB650 and SB800 only), Digital Coaxial and 3.5mm jack
Connect red and black
stereo RCA plug from TV
Coax digital
supporting 2
channel PCM
Bitstream
Optical digital
cable (SB650
and SB800
only)
supporting 2
channel PCM
Bitstream
3.5mm stereo plug
from mobile device,
TV, etc.
Connecting source equipment to analog inputs on the soundbar:
•
•
•
RCA inputs, using the supplied RCA cables, connect the source equipment to the soundbar.
Connect red cable end to red jack, white cable end to white jack.
Aux input, use a 3.5mm male plug to connect to the jack on the back of the soundbar.
Using analog inputs is the easiest manner to connect source equipment to the soundbar.
In most instances (check the manufacturer’s manual) you can connect all source equipment to a
television using HDMI, digital coax, digital optical or RCA connections and the 3.5mm or RCA
output of the TV will be an analog 2 channel signal. No menu changes on source equipment will
be necessary. If you are having trouble using the optical or coax digital inputs on the soundbar
use one of the analog inputs. They are very low noise and very high quality, in most instances it
is difficult to notice a difference in sound quality.
www.currentaudio.com
6
1890 Cordell Court, Suite 105., El Cajon, CA 92020 • 866-927-7181
©2014 Current Audio - All Rights Reserved.
Rev. 01, 06/14
INSTALLATION
Making connections (cont.)
Connecting with BLUETOOTH® devices (SB800 only):
•
Press the BLUETOOTH® button on the remote control until the blue LED on the soundbar
is visible.
•
Take the BLUETOOTH® active device (laptop, phone, tablet, etc) and turn on the BLUETOOTH®
function.
•
Scan for devices and you will find the soundbar.
•
Pair or connect with the soundbar.
•
Play the music as desired.
Connecting the soundbar with the wireless subwoofer:
•
In most cases this is not necessary. The subwoofer is paired with the soundbar from the factory.
However, if necessary take the following steps to connect the soundbar to the subwoofer
wirelessly.
•
Continuously press the Match button on the remote control until the LED is visibly blinking on the
soundbar.
•
While the LED is still blinking on the soundbar, continuously press the button on the rear of the
subwoofer next to the blue LED until the LED starts to blink. Use of a paper clip or similar item
will be necessary to access the button.
•
When the LED on the subwoofer blinks and the LED is still blinking on the soundbar, release the
button on the subwoofer and the two will connect to each other.
•
It may take a few seconds for this connection to be made. Repeat the process as necessary to
make the connection.
Connecting source equipment to an Optical (SB800/SB650 models only) or Coax Digital input on the
soundbar:
•
Both digital optical and digital coax inputs on the soundbar support 2 channel or PCM digital
bitstreams.
•
All source equipment must be set to either 2 channel or PCM output.
•
No sound will be present on the soundbar if this setting is not made when the digital optical or
digital coax input is used on the soundbar.
•
If you connect your equipment (satellite/cable box, BluRay player, etc) to your TV via HDMI
cables and then connect the TV to the soundbar via digital coax or digital optical connection
you must set each source device to 2 channel or PCM output.
•
Shown below are some examples of setting source equipment to 2 channel or PCM mode. Most
equipment is similar, please consult your owner’s manual for exact instructions.
•
DirecTV satellite receivers:
o
Select the menu button on the remote control
o
Select settings
o
Select audio settings
o
Under audio settings select Dolby Digital and Select OFF
o
Press exit on the remote
www.currentaudio.com
1890 Cordell Court, Suite 105., El Cajon, CA 92020 • 866-927-7181
©2014 Current Audio - All Rights Reserved.
Rev. 01, 06/14
7
INSTALLATION
Making connections (cont.)
•
Dish Network satellite receivers:
o
Select the menu button on the remote control
o
Select settings
o
Select audio settings
o
Select PCM Only
o
Press save
o
Press exit on the remote
•
Most common cable box receivers:
o
Select the menu button on the remote control
o
Select settings
o
Select audio settings
o
Select stereo output
o
Select exit
o
If there is no option for audio settings use the RCA or 3.5mm inputs
o
Please consult your cable box receiver manufacturer’s manual if the information above is
not correct
•
Most common BluRay players:
o
Without a disc in the player select the home button or main menu button on the remote
control. You want to choose the setup menu for the player not a disc
o
In most cases you will use the arrow keys on the remote control to navigate to a settings
icon or menu selection
o
Select audio setup
o
Select PCM audio or 2 channel output
o
If the BluRay player has an option to select PCM down sampling mode then press ON or
YES to allow PCM down sampling
o
If the BluRay player has an option to select down-mixing mode then select normal stereo
mode
o
Please consult your BluRay player manufacturer’s manual if the information above is no
correct
•
Most common televisions:
o
Select the menu button on the remote control
o
Select settings
o
In some instances select speaker settings or TV sound output
o
Turn off the TV speakers. Some manufacturers will not allow sound to be output from the
TV outputs when the TV speakers are actively playing
o
Select audio, audio format or sound settings. The names vary by manufacturer
o
Ensure that the audio format for digital output or the SPDIF output is set to 2 channel or
PCM mode
o
Press exit or the menu again to return to the home screen
o
If there is no sound from the soundbar when using the digital output from the TV use the
RCA or 3.5mm inputs to connect to the soundbar
o
Please consult your television manufacturer’s manual if the information above is not
correct
www.currentaudio.com
8
1890 Cordell Court, Suite 105., El Cajon, CA 92020 • 866-927-7181
©2014 Current Audio - All Rights Reserved.
Rev. 01, 06/14
INSTALLATION
Remote control functions
Discrete power on, turns
the soundbar power on
Mute, toggles mute on
and mute off
Discrete power off, turns
the soundbar power off
VOL +, increases the volume
level of the soundbar
BASS -, reduces the bass
level of the subwoofer
POWER TOGGLE, power
toggle on/off
TREBLE -, reduces the treble
level of the soundbar
MATCH, to connect or “pair” the
soundbar to the subwoofer
AUDIO, RCA input
AUX, 3.5mm input
BASS +, increases the bass
level of the subwoofer
VOL -, decreases the volume
level of the soundbar
TREBLE +, increases the treble
level of the soundbar
BLUETOOTH®, used to connect or pair the
soundbar to mobile devices with
BLUETOOTH® (SB800 only)
COAXIAL, digital coaxial input
OPTICAL, digital optical input
(SB800/SB650 only)
NIGHT, night mode, reduces
the level of the subwoofer
MUSIC, music mode, flat
response normal listening
mode
MOVIE, movie mode, this is a DSP
enhanced movie sound effects for
wider soundfield
Universal remote codes:
The soundbar is compatible with many different universal remote controls supplied with satellite
receivers, cable box receivers, AV receivers, televisions. Please refer to the on-line link for further
information.
www.currentaudio.com
1890 Cordell Court, Suite 105., El Cajon, CA 92020 • 866-927-7181
©2014 Current Audio - All Rights Reserved.
Rev. 01, 06/14
9
Trouble
Possible Cause
Possible Solution
Unit not plugged into AC power
Check that the rear power switch on the soundbar is
turned on. The LED lights on the soundbar and on the
power supply for the soundbar should be visible.
Audio cable not properly connected
Check cable connections. Replace cable. Check if
connected to proper inputs.
Audio cable not properly connected
Connect a phone or other similar device to the 3.5mm
jack on the rear of the soundbar. If sound is present
check all cables, connectors and source devices. Fault
may be with one of them. If the problem is with the
coaxial or optical digital input then try to use an
analog input. If the analog input works then check the
menu settings in the equipment for 2 channel or PCM
operation.
Master power switch on rear
Place master power switch to on.
Front power switch
Switch from standby to on
Change to proper input
Change from any input back to desired input.
Optical input has 2 channel signal
Insure TV/DVD is set to 2 channel audio out.
No audio from
subwoofer
Soundbar and subwoofer not matched
Repeat match sequence
Volume turned down
Turn up sub volume
Remote control not
responding correctly
Remote not directed to receive window
Aim remote to receive window on soundbar.
Remote too far from soundbar
Move to within 8 meters of soundbar
Remote batteries weak or dead
Change batteries
No sound
For further assistance please contact us at:
USA 1-866-927-7181
This product conforms to all EU Directive requirements as
applicable by law. The complete Declaration of Conformity
can be found at compliance.currentaudio.com
Limited 1 Year Warranty
Current Audio, LLC soundbars are warranted to be free from defects in materials and/or workmanship to the original retail
purchaser for a period of 1 year, provided the equipment was purchased and installed from a Current Audio authorized dealer
or distributor.
In the event of defective materials and/or workmanship, Current Audio, LLC will repair or replace, at its option, the defective
product at no charge to the purchaser. In order to make claim under this warranty and to obtain performance of any obligation
under warranty, please contact Current Audio, LLC or your authorized distributor. Instructions will be given on how to return
the defective product to Current Audio, LLC. Returned products must be shipped prepaid. Proof of purchase must be provided
with the product.
The warranty does not apply to damage not resulting from defective materials and or workmanship while in the possession of
the original consumer or due to unreasonable use by the original owner, which includes but not limited to improper installation, negligence, unauthorized repair or modification, or aesthetic deterioration from the environment. Products purchased by
internet or unauthorized sources will void the warranty and not be honored.
Current Audio, LLC is not liable for any incidental or consequential damages, so the above limitations or inclusion may not
apply to you. This warranty gives you specific legal rights, and you may have other rights, which vary from state to state within
the United States.
www.currentaudio.com
10
1890 Cordell Court, Suite 105., El Cajon, CA 92020 • 866-927-7181
©2014 Current Audio - All Rights Reserved.
Rev. 01, 06/14
NOTES