1
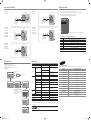
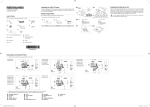
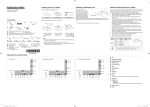
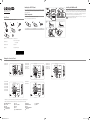
4 Quick Setup Guide Installing the LED TV Stand 1 The 32” and larger LED TVs have swivel stands. You can set these stands so that the TVs swivel 20 degrees left and right or 90 degrees left and right. The 26” LED TVs do not have swivel stands. To register this product please visit www.samsung.com/register. C j x4 onYYlh[^W|~ (M4 X L12) onYYlh[^Zr~ 6 0 Installing the Wall Mount Kit 2 Top View $ Front B A Stand Components 1 EA B 1 EA C 3 x8 (M4 X L12) 4 5 6 Stand Guide Stand DO NOT USE DO NOT USE CHEMICALS GREASE OIL j onY]lh[^Ww~ (Correct assembly) SideonZYlh[^Ww~ View onY]lh[^Zr~ onY]lh[^\y~ onZYlh[^\y~ onZ^lh\^Ws~ on[Wlh\^Ws~ 3 @ # Place a soft cloth over the table to protect the TV, and then@place the TV on the cloth screen side down. 1 Do not install your Wall Mount Kit while your TV is turned on. It may result in personal injury due to electric shock. Insert the Stand Guide into the slot of TV bottom side. (Incorrect assembly) $ 6 9 5 8 # 0 ! 4 Screws 4 8 HDMI IN3 A 3 DO NOT USE ✎✎ ✎✎ ! Rear The accessories may differ depending on the model. 2 1 5 When installing the stand, use the provided components and parts. List of Parts ✎✎The accessories may differ depending on the model. 7 ATTENTION Wall mount items (sold separately) allow you to mount the TV on a wall. For detailed information on installing the wall mount, see the instructions provided with the Wall Mount items. Contact a technician for assistance when installing the wall mounted bracket. Samsung Electronics is not responsible for any damage to the product or injury to yourself or others if you select to install the TV on your own. 4 7 x4 C (M4 X L12) 2 4 4 1 Remote Control & Batteries (AAA x 2) 2 Power Cord 3 Data Cable 4 • Owner’s Instructions • Safety Guide 6 Screws 5 8 4 6 5 1 @ 9 6 0 5 ! 8 # 5 ! 4 1 3 @ @ 5 8 5 ! 4 8 1 3 @ 0 ! 9 5 8 3 0 4 1 4 onZYhh[^Zw~ HG32AA473PW 7 onY]hh[^Zw~ onZYhh[^Zw~ 9 5 8 # 9 6 0 HDMI IN3 6 PC IN # 7 2USB / CLONING 3 0 8 ^ DATA @ 9 RJP 0 COMPONENT IN / AV IN % 2 ^ (The models of not on[Whh\^Ws~ supporting SCART) 5 ! 8 # 4 9 5 8 6 # 4 0 & 7 4 7 % 2 ^ 7 % 3 Power Input % 2 3 @ 2 ^ 3 @ 6 9 5 8 PILLOW OUT 9 5 ! 8 PILLOW OUT # 4 0 6 # 4 7 7 4 4 3 @ 7 6 # ! @ # $ % 4 1 @ 4 1 @ Power Input EXT (RGB) HEADPHONE JACK HP-ID COMMON INTERFACE AUDIO OUT 3 9 5 8 9 5 8 6 # ^ PILLOW OUT & AV IN1 HDMI IN3 # @ PILLOW OUT 4 @ HG40AA570LW onZ^hh\^Ws~ @ ! 6 HDMI IN3 4 ! 1 0 % onY]hh[^Zw~ onZYhh[^Zw~ 4 0 6 & # 4 7 0 & % 2 3 % 2 3 7 4 0 ! 9 5 7 6 PILLOW OUT I IN3 [QSG]BN68-04282A-ENG.indd 1 1 3 HDMI IN3 2 5 8 3 4 4 onZ^hh\^Ws~ on[Whh\^Ws~ 0 ➣➣ Whenever off. you connect an external device to your TV, make sure that power on the unit is turned onY]hh[^Ww~ 7 to the cable. onZ^hh\^Ws~ ➣➣ When connecting an external!device, match the color of the connection terminal on[Whh\^Ws~ onZYhh[^Ww~ 6 VARIABLE AUDIO OUT VOL-CTRL ANT IN HDMI IN 1(DVI), 2, 3 PC/DVI AUDIO IN 7 HG32AA470PW 3 9 ! 7 6 4 7 4 4 0 @ ! Power Input # 4 3 5 8 # 2 5 8 onY]hh[^Zw~ onZYhh[^Zw~ 1 4 $ 6 6 PILLOW OUT 4 $ @ 9 HG26AA473PW onY]hh[^Zw~ # @ 9 5 8 0 $ #6 onY]hh[^Zw~ onZYhh[^Zw~ HG26AA470PW $ HDMI IN3 9 1 4 # 3 @ 3 2 7 9 1 2 3 4 5 4 onY]hh[^Ww~ onZYhh[^Ww~ 2 ^ 7 ! Power Input j onY]lh[^Ww~ onZYlh[^Ww~ onY]lh[^Zr~ HG26EA470PW onY]lh[^\y~ onZYlh[^\y~ HG32EA470PW j onZ^lh\^Ws~ HG26EA473KW onY]lh[^Ww~ on[Wlh\^Ws~ onZYlh[^Ww~ HG26EA475RW onY]lh[^Zr~ HG32EA475RW onY]lh[^\y~ HG37EA570LW onZYlh[^\y~ onZ^lh\^Ws~ HG40EA570LW on[Wlh\^Ws~ onY]hh[^Ww~ onZYhh[^Ww~ 8 HDMI IN3 # 0 7 Power Input $ 6 ! HG40AA570LW onY]hh[^Ww~ (The models of onZYhh[^Ww~ supporting SCART) 0 HDMI IN3 j onYYlh[^W|~ onYYlh[^Zr~ 6 # HDMI IN3 $ @ 5 8 HG32AA475RW 0 3 9 HG26AA475RW j onYYlh[^W|~ onYYlh[^Zr~ % 4 7 8 2 HG22EA470UW # @ ! 4 @ HDMI IN3 1 3 HDMI IN3 ➣➣ The product color and shape may vary depending on the model. 8 HDMI IN3 ! HDMI IN3 j onY]lh[^Ww~ onZYlh[^Ww~ onY]lh[^Zr~ j onY]lh[^\y~ onY]lh[^Ww~ onZYlh[^\y~ onZYlh[^Ww~ onZ^lh\^Ws~ onY]lh[^Zr~ on[Wlh\^Ws~ onY]lh[^\y~ onZYlh[^\y~ onZ^lh\^Ws~ on[Wlh\^Ws~ Viewing the Connection Panel 4 7 7 $ 5 BN68-04282A-01 BN68-04282A 6 4 0 ! 4 4 # 0 $ 8 Holder-Wire Stand HG22EA473KA 6 9 HDMI IN3 7 Stand 3 @ onY]hh[^Ww~ onZYhh[^Ww~ 0 HDMI IN3 5 Guide Stand j onYYlh[^W|~ onYYlh[^Zr~ j onYYlh[^W|~ onYYlh[^Zr~ 6 1 HDMI IN3 8 HDMI IN3 7 2012-03-28 �� 11:19:21 onY]hh[^Ww~ onZYhh[^Ww~ onY]hh[^Ww~ onZYhh[^Ww~ Connecting the TV with STB j onYYlh[^W|~ onYYlh[^Zr~ HG22EA470UW ETH MODEM Mixed Channel Map Mixed Channel Map is a function to mix Air and Cable channels. [ If there are no Cable channels, you can use this item as channel sorting. ] HG26AA473PW TV Rear Panel HG22EA473KA TV Rear Panel HG32AA473PW Data Cable ETH MODEM ETH MODEM Data Cable ETH MODEM onY]hh[^Zw~ ETH MODEM onZYhh[^Zw~ onY]hh[^Zw~ Hotel Server onZYhh[^Zw~ STB(Set Top Box) Hotel Server STB(Set Top Box) or SBB(Set Back Box) PILLOW OUT PILLOW OUT - Mixed channel Map, Channel Editor and Channel Auto Store are newly placed in Hotel Option Menu. - Mixed channel Map should be ON in order to mix Air and Cable channels. - Use Channel Editor to sort the channels as user-desired channel numbers. Hospitality Mode Standalone SIRCH SI Vendor OFF Service Power On Channel or SBB(Set Back Box) MyChannel Menu OSD Operation Clock Music Mode HG26EA470PW HG26AA470PW TV Rear Panel HG32EA470PW HG32AA470PW j j onY]lh[^Ww~ onY]lh[^Ww~ onZYlh[^Ww~ onZYlh[^Ww~ onY]lh[^Zr~ Data Cable ETH MODEM onY]lh[^Zr~ onY]lh[^\y~ ETH MODEM onY]lh[^\y~ onZYlh[^\y~ onZYlh[^\y~ onZ^lh\^Ws~Hotel Server onZ^lh\^Ws~ on[Wlh\^Ws~STB(Set Top on[Wlh\^Ws~Box) or SBB(Set HG26EA473KW HG26EA475RW HG32EA475RW HG37EA570LW HG40EA570LW External Device TV Rear Panel External Source Bathroom Speaker Eco Solution HG40AA570LW Logo/Message (The models of not supporting SCART) ETH MODEM ETH MODEM onZ^hh\^Ws~ on[Whh\^Ws~ onZ^hh\^Ws~ Hotel Server on[Whh\^Ws~ Cloning Simple Steps for channel mixing under Stand-alone Mode STB(Set Top Box) or SBB(Set Back Box) Back Box) <Depending on model and region, some menu items may not exist> Data Cable Step Broad Outline 1 Turn on ‘Mixed Channel Map’ in Hotel Option Menu 2 Operate ‘Channel Auto Store’ in Hotel Option Menu (Antenna Source : Air + Cable) 3 Enter ‘Channel Editor’ in Hotel Option Menu 4 Compile a table related to the final channel lists you want to have HG40AA570LW 5 Rearrange channels with TOOLS Button based on the table you compiled (The models of supporting SCART 6 HG26AA475RW TV Rear Panel HG32AA475RW onY]hh[^Ww~ onY]hh[^Ww~ onZYhh[^Ww~ onZYhh[^Ww~ ETH MODEM Press EXIT or RETURN Button to exit. Data Cable ETH MODEM <For better comprehension, please refer to the following details> Hotel Server STB(Set Top Box) or SBB(Set Back Box) Specifications Hotel Plug & Play ETH MODEM MODEM Hotel Plug & Play is a function that automaticallyETHperforms onY]hh[^Zw~ Setup and Picture mode SetuponY]hh[^Zw~ once. onZYhh[^Zw~ –– Hotel Plug & Play is available only one time when power is first turned ON. onZYhh[^Zw~ PILLOW OUT the Hotel mode selection, Country Setup, Clock Items PILLOW OUT TV System –– After setting up first TV and Clone TV to USB –– Next TV only needs to exit Hotel Plug & Play, connect USB, then Clone USB to TV. ❑❑ Speaker out UI Scenario ● Interactive After Plug & Play is completed, TV will be set to standalone mode. ● Standalone Plug & Play Standalone mode is set. Next ● Standalone Only If Standalone Plug & Play is onZ^hh\^Ws~ selected TV will enter the RF mode. ETH MODEM ETH MODEM Setup > Menu Language onZ^hh\^Ws~ on[Whh\^Ws~ on[Whh\^Ws~ E Select the language you want to use. Select English as the menu language. ● Hrvatski ● Čeština ● Dansk Setup > Country Select Country. ● Serbia Next ● Slovakia ● Slovenia ● Nederlands ● Switzerland ● English ● United Kingdom Setup > Auto Tuning (1/5) E Set the country to United Kingdom. Previous Next Let's find and store channels on your TV. How do you receive programming? ● I use an aerial cable. Selecting Aerial cable means all the channels available through your RF cable will be stored. (Auto Tuning necessary) Input Previous Next ● I use a cable or satellite service. E <Depending on Region, this step may not exist.> –– After selecting the country in the country menu, some models may proceed with an additional option to setup the pin number. –– If you forget the PIN code, in the Hotel menu, select the SERVICE → TV Reset. And set the pin code again in the Plug & Play. Data Set Auto Tuning search options. Digital & Analogue Digital Analogue Air ● ● ● Cable ● ● ● After Searching the channels. Previous Next Skip E Setup > Clock (1/2) Set the Clock Mode. Set the current time automatically using the time from the digital broadcast. ● Auto Previous Next ● Manual Skip Setup > Picture Mode Select Picture Mode. ● Standard [QSG]BN68-04282A-ENG.indd 2 Phone Jack output BTL Sound output Audio out 500mVrms Phone Jack, Monitor out Customer Care Centre AUSTRIA 800-112233 FINLAND 0771-400002 FRANCE 0825-022082 01805-471101 Component Y, Pb, Pr, Audio-L/R GERMANY PC D-sub, Audio-L/R HUNGARY 0640-985985 A/V Audio Video Jack ITALIA 800-194194 EXT Scart Jack NETHERLANDS 015-2197000 POLAND 0-801-B2BSAM (222726) PORTUGAL 808-B2BSAM DATA Compatible with the HDMI Specifications 75 ohm Unbalanced, Din Jack , F Jack RJ-12 RJP RS232 Operating temperature 10°C ~ 40°C (50°F ~ 104°F) Operating Humidity 10% ~ 80% Storage Temperature -20°C ~ 45°C (-4°F ~ 113°F) Storage Humidity 5% ~ 95% VHF/UHF/CATV Jack Pack Only, TeleAdapt RJP Only non-condensing SPAIN 0902024-010 UNITED KINGDOM +44 (0) 845 8414141 SOUTH AFRICA 0860-SAMSUNG (726-7864) U.A.E 800-SAMSUNG (726-7864) 8000-4726 non-condensing ✎✎Design and specifications are subject to change without prior notice. ✎✎For information about power supply, and more about power consumption, refer to the label attached to the product. E ● Dynamic Country 4W mono 8 ohm SPK' Antenna Setup > Auto Tuning (2/5) Contact SAMSUNG WORLDWIDE If you have any questions or comments relating to Samsung products, please contact the SAMSUNG customer care centre. 22inch : 3W x 2 26inch : 5W x 2 Variable Audio HDMI Skip Comment 32inch / 37inch / 40inch : 10W x 2 Audio out If Standalone Only is selected Setup > Start Easy Set up Specification PAL, SECAM, DVB-TC Previous The terms HDMI and HDMI High-Definition Multimedia Interface, and the HDMI Logo are trademarks or registered trademarks of HDMI Licensing LLC in the United States and other countries. Next 2012-03-28 �� 11:19:26