1
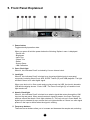
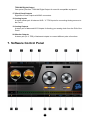
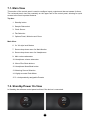
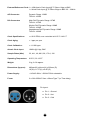
Owner’s Manual
1
Contents
1. Safety Notes 5
2. Introduction 6
3. Features 7
4. Installation Guide 8
5. Front Panel Explained 9
6. Rear Panel Explained 11
7. Software Control Panel 12
7.1. Main View 13
7.2. Standby/Power On View 13
8. Advanced Notes 14
9. Ground Loop Hum and Noise 14
10. Additional Information 14
11. Calibration Mode 14
12. In The Box 15
13. Technical Specifications 15
14. Antelope Audio Support Resources
17
3
1. Safety Notes
To reduce the risk of electrical shocks, fire, and related hazards:
●● Do not remove screws, cover, or cabinet. There are no user serviceable parts inside.
Refer servicing to qualified service personnel.
●● Do not expose this device to rain, moisture or spillover of liquid of any kind.
●● Should any form of liquid or a foreign object enter the device, do not use it. Switch off
the device and then unplug it from the power source. Do not operate the device again
until the foreign object is removed or the liquid has completely dried and its residues fully
cleaned up. If in doubt please consult the manufacturer.
●● Do not handle the power cables with wet hands!
●● Make sure the device is switched off when plugging/unplugging it to/from the power
source.
●● Avoid placing things on the cabinet or using the device in a narrow and poorly
ventilated place which could affect its operation or the operation of other closely located
components.
●● If anything goes wrong, turn off the device first and then unplug the power. Do not
attempt to repair the device yourself: consult authorized service personnel or your dealer.
●● Do not install near any heat sources such as radiators, stoves, or other apparatus
(including amplifiers) that produce heat.
●● Do not use harsh chemicals to clean your Unit. Clean only with specialized cleaners for
electronics equipment.
●● Connect all your devices before powering your Unit.
●● Check the voltage selector on the power inlet. Ensure that it is properly adjusted to
match the Pure2.
●● Your unit should always be un-racked when travelling or in a flight case
●● The device is designed to operate in a temperate environment, with a correct Operating
Temperature of:
0-50 °C, 32-122 °F
5
2. Introduction
Thank you for purchasing the Pure2
Pure2 is a mastering-grade 24-bit 192 kHz AD/DA 2-channel converter and master clock that
includes a relay-controlled volume attenuator. It features Antelope Audio’s world-renowned
Acoustically Focused Clocking (AFC) technology, and also utilizes pristine analog circuitry, driven
by a proprietary multi-stage linear power supply for unsurpassed digital clarity and analog realism.
The relay-based stepped attenuator allows for exceptional accuracy when monitoring through
speakers, with perfect L/R balance, even at lower volume levels. A superb headphone amp
features its own high-quality DA Conversion.
An intuitive software control panel for Mac OS or Windows provides users the ability to manage
all facets of the device operation. Pure2 is also configurable via the front panel with user-definable
presets.
Several Word Clock outputs ensure Pure2 can be the master clock for an entire studio. For those
seeking the highest level of performance, the unit can also be locked to Antelope’s legendary 10M
Atomic Clock.
A flexible set of connectivity options like S/PDIF, TOSLINK, AES, and USB provide abundant
compatibility with other professional equipment.
For further information, you can also visit our support area online for the FAQ, Help Desk and to
register your product at: www.antelopeaudio.com
Enjoy working with the new Pure2!
All the best,
The Antelope Team
6
3. Features
●● A complete palette of inputs and outputs
●● Precise stepped relay volume control
●● Extremely flexible routing
●● A/D converter with optimized overloads handling
●● D/A converter with dual DAC architecture
●● High-end headphone amp with a dedicated D/A converter
●● Relay-based analog volume control for accurate monitoring
●● Master clock with 4th generation of Antelope’s AFC jitter management
●● A user friendly desktop application available for both Windows and OSX
7
4. Installation Guide
It only takes a few moments to harness the benefits of the Pure2 sound.
Follow these simple steps to connect the Pure2 to your system setup:
1. Connect to the AC power source via AC Mains Outlet.
Check and adjust the voltage selector!
2. Connect your choice of Analog/Digital Inputs and Outputs on the rear panel of the device
and make sure the headphone jack is inserted securely in the front panel input.
3. Turn on the device by pressing the power button on the front panel or in the software
control panel once you have opened it.
4. Connect your USB cable to the Pure2 and your computer. The guest operating system
will recognize the new output audio device (Pure2). You should redirect sound from the
computer to your newly indicated output – Pure2.
Mac OS:
In your Apple Menu, go to System Preferences and choose Sound, Select the Output
tab and select Pure2 from the list.
Windows:
Click on your PC’s START menu, then select:
SETTINGS / CONTROL PANEL / SOUNDS & AUDIO DEVICES / AUDIO and ensure
that the Pure2 is selected as default audio device.
5. Install the software control panel and audio driver from the Antelope Audio website.
8
5. Front Panel Explained
1. Power button
Toggles standby/operation state
When you press & hold the power button the following ‘Options’ menu is displayed:
- Device Info
- Brightness
- Input Trim
- Output Trim
- Reset
- Screen Saver
- 10M Calibration
2. Oven Clock light
When lit, this indicates Pure2 is clocked by it’s own internal clock.
3. Lock light
When lit, this indicates Pure2 is locked to an incoming digital signal via rear panel
connectors including Word Clock, AES, S/PDIF Toslink (14) and USB playback. The light
will flash if there is no valid digital signal.
When your device is in Oven mode and you play a track via USB, the clock is slaved to
USB and the display shows: “Clock: USB”. The Oven Clock light (2) is lit and the Lock
light remains off.
4. Atomic Clock light
When lit, this indicates Pure2 is locked to an atomic signal that enters through the 10M
input on the rear panel. When an active atomic signal is present, the Oven Clock light
switches off and the Atomic Clock light switches on. This only occurs in Oven Mode. If a
digital input is selected for sync source the Lock light switches on if there is a valid signal
present in the input or blinks when the signal is missing.
5. Frequency buttons
These two arrow buttons allow you to increase and decrease the sample rate, selecting
9
from: 32kHz, 44.1kHz, 48kHz, 88.2kHz, 96kHz, 176.4kHz, 192kHz. The current
frequency is indicated on the display (6) when adjusting.
Press and hold the ‘frequency up’ button to see the routing table and press and hold to
return to the main display view.
6. Display
Multi-function display that shows Sample Rate on the left and volume levels for the
inputs on the right. It displays independently assignable sources that are adjustable from
the software control panel.
Note: Be aware that there might be a protective film over the display, which dims the
illumination – feel free to remove it.
7. Rotary control
This large stepped attenuator has the ability to adjust levels for analog outputs (19) and
headphone output (10). The level is shown on the display (6) when adjusting, with a
range of -95dB to 0dB with 0.05dB steps. By clicking the Rotary control you can mute
the currently selected output.
Press the Rotary control to enter the sub-menu and rotate to navigate through the
available options.
8. Volume Select button
This allows you to select if the Rotary control is adjusting the monitor outputs or the
headphone outputs.
Press and hold for 2 seconds, to enter the device control menu. This button also acts as
a cancel selection button when navigating the sub-menus of the device.
9. Preset buttons
Three Preset buttons store and recall your ‘favorite’ set-ups. Save your presets by
clicking and holding for 2 seconds. This can also be done via the software control panel
by holding the Command key for Mac / Control key for Windows while clicking on the
preset.
10.Headphone Output
A ¼” TRS Stereo Headphone jack for connecting headphones for a wide range of
impedances
10
6. Rear Panel Explained
11. Mains Power Connection
Pure2 has a voltage select option and must be adjusted before powering up.
The IEC connector supports ~110V @ 60Hz/ ~220V @ 50Hz. The user should enable
the device to accommodate the appropriate mains voltage for their country.
12.WC Input
BNC connector used to accept Word Clock reference
13.10M Input
This BNC Input Connector allows the Pure2 to receive timing reference from an Atomic
Clock such as the Antelope 10M, to increase the Oscillator accuracy. The atomic device
becomes the primary timing reference, thus providing better sample accuracy, more
detailed sound and greater stability.
14.Digital Inputs
S/PDIF Input
One Coaxial digital input on RCA connector using the S/PDIF connectivity standard
TOSLINK Input
One Optical connector using the TOSLINK connectivity standard
AES/EBU Input
One XLR connector-type Inputs using the 110 Ω AES/EBU connectivity standard
15.USB Hi-Speed
Hi-Speed USB (up to 480Mbits). The Pure2 uses USB connector Type B and operates
up to 192kHz sample rate with custom Antelope drivers on both Windows and OSX.
16.De-Jittered Outputs
AES/EBU
One ‘jitter-free’ XLR connector-type output for compatible equipment using the 110 Ω
AES/EBU connectivity standard.
S/PDIF Digital Output
One coaxial ‘jitter-free’ S/PDIF Output on RCA connector
11
TOSLINK Digital Output
One optical ‘jitter-free’ TOSLINK Digital Output for use with compatible equipment
17.Word Clock Outputs
Eight Word Clock Outputs with BNC connectors.
18.Analog Inputs
A combo stereo pair of balanced XLR / ¼” TRS Inputs for connecting Analog sources to
the Pure2.
19.Analog Outputs
A stereo pair of balanced XLR Outputs for feeding your analog chain from the D/A of the
Pure2.
20.Monitor Outputs
A stereo pair (2x ¼ TRS) of balanced outputs to connect different pairs of monitors.
7. Software Control Panel
12
7.1. Main View
This section of the control panel is used to configure inputs, outputs and also set names for them.
The universal panel view sits constantly on the upper half of the control panel, allowing for quick
access to the most important features.
Top bar:
1. Standby button
2. Sample Rate select
3. Clock Source
4. Tab Selection
5. Options Panel, Minimize and Close
Main View:
6. 2 x VU style level Meters
7. Source drop-down menu for Main Monitor
8. Source drop-down menu for Headphones
9. Main volume attenuator
10.Headphone volume attenuator
11. Mono/ Dim/ Mute buttons
12.Headphone Mono/Mute button
13.Metering Source Selection
14.Highly accurate Peak Meter
15.3 x Independently assignable Presets
7.2. Standby/Power On View
In Standby, the software control panel confirms if the device is connected.
13
8. Advanced Notes
Proper Digital Audio cables should be used for S/PDIF and AES/EBU: Avoid using standard
analog audio cables for digital signal. Even though they might look the same, they are not
designed for digital audio and performance will be compromised.
●● AES/EBU use 110 Ω shielded twisted-pair digital cables.
●● S/PDIF use 75 Ω coaxial (video) cables.
●● WC uses 75 Ω BNC cables. And please do not exceed 6 meters in length.
As for Analog Cables, please use:
●● Standard high quality cables with XLR connectors;
●● Standard high quality cables with TRS connectors.
Connectivity Chart: Included in the box.
9. Ground Loop Hum and Noise
The design of Pure2 minimizes the possibility of ground loop hum and noise. However, we
recommend the use of short cables and balanced connections for all the audio signals of your
system. All power cables of the system should be connected to a dedicated outlet box or power
conditioner unit to avoid ground current noise affecting the audio signal path. It’s also advisable to
keep signal and power cables separate.
10. Additional Information
Additional information regarding operating systems, audio software and media players will be
updated through the support area at www.antelopeaudio.com
11. Calibration Mode
The Pure2 can be calibrated periodically in order to calibrate the accuracy of the internal clock by
connecting it to the 10M Atomic Clock. This is not something that necessarily needs to be done
very often, but if desired please follow these instructions:
●● Connect a 10M device to Pure2 via the dedicated 10M input;
●● Power on the 10M and wait until it reaches operating temperature;
●● With the Pure2 powered up, press and hold the Power button (1)
●● Rotate the Rotary control to navigate to the ‘10M Calibration’ option.
●● Confirm the selection by pressing the Rotary control (7)
●● The Calibration screen appears showing the Oven Temperature and AC Lock status.
14
●● Wait for the sign Locked. Error value will now be displayed at the bottom of the screen
●● Wait for the calibration to take place;
●● When the Err. Number becomes stable, press the Rotary control (7) again to end the
calibration;
●● You will see “DONE” displayed on the LCD screen. You may exit the menu pressing the
Volume Select button (8).
12. In the box
●● Pure 2 Converter & Clock
●● Owner’s Manual
●● Connectivity Chart
●● Warranty Card
●● 1 USB Cable
●● 1 AC Power Cable
13. Technical Specifications
Inputs:
Analog Inputs: 1 x Combo Balanced Analog (XLR / ¼ TRS) factory calibrated
to +20dBu
Digital Inputs: 1 x AES/EBU on XLR (32kHz to 192kHz) @ 110 Ohms terminated
1 x S/PDIF on RCA (32kHz to 192kHz) @ 75 Ohms terminated
1 x TOSLINK on optical fiber: up to 96kHz
Outputs: Analog Outputs: 1 x Stereo pair of Balanced XLR Outputs from D/A Converter (Main
Output) is factory calibrated to 20dBu and user adjustable
from 8dBu to 26dBu
1 x Stereo pair Balanced Outputs for monitors (2 x ¼ TRS)
1 x ¼ TRS Front Headphones 20dBu
Digital Outputs: 1 x AES/EBU on XLR (32kHz to 192kHz) @ 110 Ohms terminated
1 x S/PDIF on RCA (32kHz to 192kHz) @ 75 Ohms terminated
1 x TOSLINK on optical fiber: up to 96kHz
USB I/O:
USB 2.0 Hi-Speed; Data stream up to 480Mbits/192kHz,
4 channels I/O playback/record, Type B
15
External Reference Clock:1 x 10M Atomic Clock Input @ 75 Ohms 1Vpp on BNC
1 x Word Clock Input @ 75 Ohms 3Vpp on BNC 32 - 192kHz
A/D Converter:
Dynamic Range 122dB
THD+N -105dB
D/A Converters
Main DAC Dynamic Range 127dB
THD+N -107dB
Monitor DAC Dynamic Range 120dB
THD+N -103dB
Headphones DAC Dynamic Range 120dB
THD+N -100dB
Clock Specifications
<+/-0.02 PPM, oven controlled at 64.5°C/ 148.1°F
Clock Aging:
< 1 ppm per year
Clock Calibration:
< +/-0.001 ppm
Atomic Clock Input:
10MHz @ 1Vpp, BNC
Sample Rates (kHz):
32, 44.1, 48, 88.2, 96, 176.4, 192
Operating Temperature: 0-50°C, 32-122°F
Weight:
3 kg, 6.6 lb approx.
Dimensions (Approx):
483mm(W) x 44mm(H) x 220mm (D)
19”(W) x 1.75”(H) x 8.66”(D)
Power Supply:
~110VAC 60Hz/ ~220VAC 50Hz selectable
Fuses:
2 x 0.8A 250VAC 5mm x 20mm Type T (or Time delay)
Pin layout:
●● Pin 1 – Ground
●● Pin 2 – Hot
●● Pin 3 - Cold
16
14. Antelope Audio Support Resources
Antelope Audio offers a range of services and support resources for your Antelope hardware,
firmware and software control panels.
FAQ
Several categories of frequently asked questions are available on the website:
http://www.antelopeaudio.com/en/support
Telephone Support
Phone line is for general inquiries and technical support: +1 734 418 8661
Hours of Operation: 7:00 a.m. - 3:00 p.m. (EST)
Help Desk
A ticketing system ensures a 24-hour response time:
www.antelopeaudio.com/en/support/help-desk
Live Chat
Connect with a customer support agent directly via the website:
http://www.antelopeaudio.com/en/support
Click on Antelope Tab on the right-hand side of the webpage
Hours of Operation: 7:00 a.m. - 3:00 p.m. (EST)
Support Documents and Software
A web resource with all device manuals, datasheets and software:
http://www.antelopeaudio.com/en/support/downloads
Control Panel Newsfeed
The software control panel for Pure2 incorporates a newsfeed at the bottom, which displays all new
updates and relevant information:
You Tube Page
Tutorial videos, interviews, user cases and promos for forthcoming products:
http://goo.gl/yfOmZf
Web Blog
Regular blog posts will update you on the latest user cases with the Pure2:
http://www.antelopeaudio.com/blog/en/category/blog-summary/
17
Version 1.0 / 21.11.2014