1
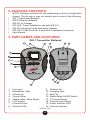
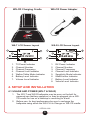
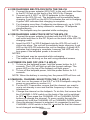
WS-series
Wireless Audio System
User Manual
Table of Contents
1. IMPORTANT SAFETY INSTRUCTIONS
2. PACKAGE CONTENTS
3. PART NAMES AND FUNCTIONS
4. SETUP AND INSTALLATION
2
4
4
6
5. BASIC OPERATION
9
6. TROUBLESHOOTING
7. SPECIFICATIONS & FEATURES
8. WARRANTY
10
11
13
4.1 USAGE AND POWER (WS-T & WS-R)
6
4.2 RECHARGING BELTPACKS WITH THE WS-CH
7
4.3 RECHARGING A BELTPACK WITH THE WS-CR
7
4.4 POWER ON AND OFF (WS-T & WS-R)
7
4.5 MANUAL CHANNEL SELECTION (WS-T & WS-R) 7
4.6 AUTO CHANNEL SELECTION (WS-T & WS-R) 8
4.7 CONNECTING TO THE AUDIO INPUTS (WS-T) 8
4.8 CONNECTING HEADPHONES (WS-R) 8
4.9 SETTING VOLUME (WS-T & WS-R) 8
5.1 WS-T OPERATION 5.2 WS-R OPERATION 9
9
WS-series Wireless Audio
System
Thank you for purchasing the Califone® WS-series Wireless Audio
System.
We encourage you to visit our website www.califone.com to register
your product for its warranty coverage, to sign up to receive our
newsletter, download our catalog, and learn more about the complete
line of Califone® audio visual products, including portable and installed
wireless PA systems, multimedia players and recorders, headphones
and headsets, computer peripheral equipment, visual presentation
products and language learning materials.
califone.com
1
1. IMPORTANT SAFETY INSTRUCTIONS
Before using this product, read the instruction manual for important safety
information. Please retain this manual for future reference and warranty
information.
Troubleshooting & Servicing
Do not attempt to service or repair the device yourself. Refer all servicing
to qualified service personnel. Do not attempt to modify the device in any
way. Doing so could invalidate your warranty.
Moisture and heat sources
Do not use this apparatus near water (for example, sinks, baths, pools) or
expose it to rain, moisture, dripping or splashing liquids. Do not expose
the unit to high temperatures, high humidity or direct sunlight.
Cleaning
When cleaning the device, please use a soft, dry cloth. Never use
benzene, paint-thinner, or other chemicals on the device.
Location
Place the device in stable location, so it will not fall causing damage to
the device or bodily harm.
Intended use
The product may only be used with the original parts intended for it. The
product may only be used in closed and dry rooms. The intended use
includes adherence to the specified installation instructions. The
manufacturer accepts no liability for damage arising due to improper use.
califone.com
2
WARNING: Changes or modifications to this unit not expressly approved
by the party responsible for compliance could void the user’s authority to
operate the equipment.
IMPORTANT
This device complies with Part 15 of the FCC Rules. Operation is subject
to the following two conditions:
(1) This device may not cause harmful interference, and (2) this device
must accept any interference received, including interference that may
cause undesired operation.
The unit’s circuitry may cause interference to nearby radios. To prevent
interference, either switch the unit off or move away from the affected
radio.
NOTE: This equipment has been tested and found to comply within the
limits for a class B digital device, pursuant to Part 15 of the FCC Rules.
These limits are designed to provide reasonable protection against
harmful interference in a residential installation. This equipment
generates, uses and can radiate radio frequency energy and, if not
installed and used in accordance with the instructions, may cause
harmful interference to radio communications. However, there is no
guarantee that interference will not occur in a particular installation. If this
equipment does cause harmful interference to radio or television
reception, which can be determined by turning the equipment off and on,
the user is encouraged to try to correct the interference by one or more of
the following measures:
•
•
•
•
Reorient or relocate the receiving antenna.
Increase the separation between the equipment and receiver.
Connect the equipment into an outlet on a circuit different from
that to which the receiver is connected.
Consult the dealer or an experienced radio / TV technician for
help.
NOTE: Shielded cables may be required to be used with this unit to ensure compliance with the Class B FCC limits.
califone.com
3
2. PACKAGE CONTENTS
•
NOTE: Package contents will vary depending on the kit configuration
chosen. The kit may or may not contain one or more of the following:
WS-T Transmitter Beltpack
WS-R Receiver Beltpack
WS-CH 4x Charger
WS-CHP Power Adapter for use with WS-CH
WS-CR Charging Cradle with power adapter
WS-CS12 Case (Includes 2 keys and 6 headphone pouches)
User Manual
•
•
•
•
•
•
•
3. PART NAMES AND FUNCTIONS
WS-T Transmitter Beltpack
1
2
15
16
3
11
4
5
6
7
8
9
12
13
14
10
1.
2.
3.
4.
5.
6.
7.
8.
Line Input
Microphone Input
Volume Up
Voume Down
Walkie-talkie / Mute Button
LCD Screen
Channel Down
Power On/Off
9. Channel Up
10. Charging Jack
11. Belt Clip
12. Walkie-talkie On/Off Switch
13. TX Power Switch
14. Channel Lock Switch
15. Power Indicator LED
16. Hole for Lanyard
califone.com
4
WS-R Receiver Beltpack
2
1
3
15 11
4
5
6
7
8
9
85dB LIMITER
WS-R
900MH zAudio Receiver
ON/OFF
SENSITIVIT Y CHANNE LLOCK
LOW/HI
ON/OFF
12
13
10
1.
2.
3.
4.
5.
6.
7.
8.
Power Indicator LED
Headphone Output
Headphone Output
Volume Up
Voume Down
LCD Screen
Channel Down
Power On/Off
14
9. Channel Up
10. Charging Jack
11. Belt Clip
12. 85 dB Limiter On/Off Switch
13. RX Sensitivity Switch
14. Channel Lock Switch
15. Hole for Lanyard
WS-CH 4x Charger
WS-CHP Power Adapter
CHARGING
WS-CH
WS-series CHARGE R
califone.com
5
WS-CR Charging Cradle
CHARGING
WS-CR Power Adapter
WS-CR
CHARGING CRADLE
WS-T LCD Screen Layout
1
WS-R LCD Screen Layout
1
5
6
2
2
3
5
3
4
6
7
4
8
7
1.
2.
3.
4.
5.
6.
7.
TX Power Indicator
Channel Number
Channel Frequency
Channel Lock Indicator
Walkie-Talkie Mode Indicator
Battery Level Indicator
Volume Level Indicator
1.
2.
3.
4.
5.
6.
7.
8.
RX Power Indicator
Channel Number
Channel Frequency
Channel Lock Indicator
Sensitivity Mode Indicator
85dB Limiter Indicator
Battery Level Indicator
Volume Level Indicator
4. SETUP AND INSTALLATION
4.1 USAGE AND POWER (WS-T & WS-R)
1. The WS-T and WS-R beltpacks may be worn on the belt for
personal use (battery operation) or may be plugged into a WSCR cradle for use on a tabletop or mounting to a wall.
2. Before use, for best performance be sure to recharge the
beltpacks using either the WS-CH 4x Charger or WS-CR cradle.
califone.com
6
4.2 RECHARGING BELTPACKS WITH THE WS-CH
1. Connect the power adapter (WS-CHP) to the wall outlet and then
to the DC IN jack on the back of the WS-CH 4x Charger.
2. Connect up to 4 WS-T or WS-R beltpacks to the charging
leads on the WS-CH unit. The beltpacks will immediately begin
charging. A red LED on the WS-CH indicates the unit is charging.
A green LED indicates that charging is complete.
3. For charging more than 4 beltpacks simultaneously, up to 3 WSCH chargers may be daisy-chained to recharge 12 beltpacks
simultaneously.
NOTE: The beltpack may be operated while recharging.
4.3 RECHARGING A BELTPACK WITH THE WS-CR
1. Connect the power adapter (included with the WS-CR) to the
wall outlet and then to the DC IN jack on the back of the WS-CR
charging cradle.
2. Insert the WS-T or WS-R beltpack into the WS-CR unit until it
clicks into place. The unit will immediately begin charging. A red
LED on the WS-CR indicates the unit is charging. A green LED
indicates that charging is complete; however, the LED will only
turn green if the beltpack power is turned off.
NOTES:
• The beltpack may be operated while recharging.
• The cradle can be hung on the wall using standard screws.
4.4 POWER ON AND OFF (WS-T & WS-R)
1. To turn on the beltpack power, hold the power button for 2-3
seconds. The LCD will light up with the current settings. The
power LED on the top of the beltpack will light green.
2. To turn off the beltpack power, hold the power button for 2-3
seconds.
NOTE: When the battery is running low, the power LED will turn red.
4.5 MANUAL CHANNEL SELECTION (WS-T & WS-R)
1. First, turn on the power of the WS-T or WS-R beltpack using the
power on procedure in section 4.4.
2. For the WS-T transmitter, ensure that the channel you want to
use is not already in use and that the frequency is clear of any
interference.
3. Change the channel on the beltpack. To do this, first ensure that
the CHANNEL LOCK switch on the back of the unit is switched
to OFF .Then press the CHANNEL UP or CHANNEL DOWN
buttons to change the channel. To move quickly through the
channel list, hold the CHANNEL UP or CHANNEL DOWN button.
4. Once the desired channel is selected, it’s suggested to put the
CHANNEL LOCK switch in the ON position so that the channel
is not changed accidentally.
califone.com
7
4.6 AUTO CHANNEL SELECTION (WS-T & WS-R)
1. First, power on all of the WS-T and WS-R beltpacks to be set on
the same channel. Use the power on procedure in section 4.4.
2. For the WS-T, ensure that the channel you want to use is not
already in use and that the frequency is clear of any interference.
3. Change the channel of the WS-T transmitter to the desired
channel using the procedure in section 4.5.
4. To automatically connect each WS-R receiver to the same
channel as the WS-T, follow this procedure for each WS-R:
5. Ensure that the “CHANNEL LOCK” switch on the back of the unit
is switched to OFF.
6. Position the WS-R within one foot of the WS-T transmitter to
connect to.
7. Simultaneously press the CHANNEL UP and
CHANNEL DOWN buttons and hold for > 3
seconds. The WS-R will now search for the
transmitter.
8. Once successfully connected to the transmitter channel, the LCD
will stop flashing. The channel should now be set to the same
one as the WS-T.
9. Continue this process until all WS-R beltpacks have been set to
the WS-T channel.
4.7 CONNECTING TO THE AUDIO INPUTS (WS-T)
1. To transmit audio from a microphone, connect the 3.5mm plug of
the electret microphone into the mic jack.
2. To transmit audio from the line/headphone output from a media
player/computer/etc. connect a 3.5mm adapter cable from the
line output of the device to the line input jack on the WS-T.
4.8 CONNECTING HEADPHONES (WS-R)
1. Up to two headphones can be connected to each WS-R
beltpack.
2. Use the VOLUME UP/DOWN buttons to adjust the volume to
the desired level. Both headphone outputs are affected by the
volume control.
4.9 SETTING VOLUME (WS-T & WS-R)
NOTE: Tapping the volume button will change the volume
incrementally, while holding down the button will result in a
continuous increase or decrease.
1. Increase the volume on the WS-T.
califone.com
8
2.
3.
4.
5.
Decrease the volume to minimum on the WS-R.
Connect the headphones to the PHONE jack.
Increase the volume on the WS-R to the desired listening level.
To enable the 85 dB SPL limiter, switch the 85dB LIMITER switch
on the back of the unit to the ON position. The LCD should
display the “85 dB” indicator to indicate it’s enabled.
CAUTION: Avoid excessive volume for long periods of time as
this can result in hearing damage.
CAUTION: The 85 dB SPL Limiter will only work with
headphones/headsets specifically sold by Califone for use with
the WS-series products. Check with Califone to see if your
heaphone/headset is compatible with this feature.
5. BASIC OPERATION
5.1 WS-T OPERATION
TRANSMITTER POWER
The transmitter power of the WS-T can be adjusted using the
TX Power switch on the back of the unit. If there is interference
from other devices, the switch may be adjusted to the HIGH or LOW
setting. Switch between the settings to achieve the desired range
and audio quality.
NOTE: Due to FCC regulations, only the LOW setting should be
used in the USA.
WALKIE-TALKIE FUNCTION
The transmitter may also function as a walkie-talkie. On the
back of the unit, switch the walkie-talkie setting to ON. Then, press
the side button while speaking to transmit sound. Audio will only be
transmitted while the walkie-talkie button is pressed.
5.2 WS-R OPERATION
SENSITIVITY
The sensitivity of the WS-R can be adjusted using the sensitivity
switch on the back of the unit. If there is interference from other
devices, the switch may be adjusted to the HIGH or LOW setting. Switch between the settings to achieve the desired range
and audio quality. califone.com
9
6. TROUBLESHOOTING
Issue
Resolution
The unit does not power on.
Hold the Power button for 2-3 seconds. If
the unit still does not power on, the unit
may need to be recharged.
The channel will not change.
Check the back of the unit and make sure
the channel lock is set to OFF.
The walkie-talkie does not work.
Check the back of the unit and make sure
the walkie-talkie function is set to ON.
The audio does not work.
Check that the WS-T walkie-talkie switch
is set to OFF. Or if it is ON, make sure to
press the walkie-talkie button to transmit
audio.
On the receiver, the volume does not
increase sufficiently.
Set the volume on both the transmitter
and the receiver.
califone.com
10
7. SPECIFICATIONS & FEATURES
System Specs
Operational Range
Low TX Power / Low RX Sens.: > 100 feet **
Low TX Power / High RX Sens.: > 200 feet **
High TX Power / Low RX Sens.: > 200 feet **
High TX Power / High RX Sens.: > 300 feet **
** Line-of-sight required. Range may be much
lower due to obstructions and interference.
Frequency Response (Mic/Line Inputs)
100 Hz - 8 kHz +/- 3dB
THD + N% (Mic/Line Inputs)
<3%
WS-T Transmitter
Transmitter Channels / Frequency
Range
16 channels
902 - 928 MHz
Power Requirements
Uses 3.7 V / 1800 mAh Li-Ion battery.
Transmit Channels
1 Channel (Mono)
Output Power
Low: 5 mW
High: 10 mW
Sensitivity (Mic Input)
50 mV
Sensitivity (Line Input)
250 mV
Usage Time
> 11 hours
Battery Recharge Time
< 13 hours
S/N Ratio
> 60 dB
Product Dimensions
4” x 3” x 1.25”
Product Weight (incl. accessories)
5 oz
WS-R Receiver
Receiver Channels / Frequency Range
16 channels
902 - 928 MHz
Receiver Sensitivity
Low: -85 dBm
High: -95 dBm
Power Requirements
Uses 3.7 V / 1800 mAh Li-Ion battery.
Usage Time
> 7 hours
Battery Recharge Time
< 13 hours
Product Dimensions
4” x 3” x 1.25”
Product Weight (incl. accessories)
5 oz
califone.com
11
WS-CH 4x Charger
Features / Description
Charges up to 4pcs WS-T or WS-R.
Power Requirements
WS-CHP Power adapter: 100-240VAC~5060Hz switching-type power adapter with DC
5V/6A output
DC IN Jack ID / OD
2.0 / 5.5 mm
Recharging Lead Plugs ID / OD
1.35 / 3.5 mm
Recharging Lead Length
4”
Product Dimensions
3.75” x 2.75” x 1.75”
Product Weight (incl. accessories)
4 oz (WS-CH) + 11 oz (WS-CHP) = 15 oz (Total)
WS-CR Charging Cradle
Features / Description
Charges one WS-T or WS-R.
Power Requirements
Included 100-240VAC~50-60Hz switchingtype power adapter with DC 5V/1A output
DC IN Jack Type
1.35 / 3.5 mm
Product Dimensions
4.5” x 3.25” x 4.5”
Product Weight (incl. accessories)
6 oz
WS-CS12 Case
Features / Description
•
•
•
•
•
Carries up to 12pcs WS-T or WS-R +
1pc WS-CR (w/ adapter) + 4pcs WS-CH
+ 1pc WS-CHP + 12pcs headphones +
microphone accessories.
1.5” Wheels
Retractable handle
Keyed Locks (Includes 2 keys)
6 pouches for headphones and
accessories
Product Dimensions
21.5” x 15.5” x 9.25”
Product Weight
10 lbs
califone.com
12
8. WARRANTY
Califone warrants this product to be free from defective material
and workmanship for one year from the purchase date. Our “Project
Intercept” Customer Satisfaction program will replace defective parts and
repair malfunctioning equipment under this warranty when the defect
occurs under normal use.
All Damage Claims Must Be Made With the Freight Carrier
Notify the freight carrier immediately if you observe any damage to the
shipping carton or product. Repack the unit in the carton and await
inspection by the carrier’s claim agent. Notify your dealer of the pending
freight claim.
Returning Your Unit for Service or Repairs
Should your unit require service, contact our Customer Service
Department online at califone.com/techsupport or via email warranty@
califone.com or by phone at 800-722-0500 / 818-407-2400 to first obtain
an RA (Return Authorization) number before returning it to Califone. The
unit must be returned to our factory via prepaid transportation only after
the factory issues an RA number, which must be clearly written on the
outside of the box.
califone.com
13
Califone® International, Inc.
1145 Arroyo Avenue, #A
San Fernando, CA 91340 USA
Toll Free 800.722.0500 | Toll Free Fax 877.402.2248
International Customers call 818.407.2400 or Fax 818.407.2405
califone.com
Califone WS-series Rev 01 0110