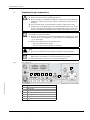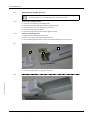
1
OPERATING INSTRUCTIONS GMS810-/GMS811-FIDOR Hydrocarbon Analyzer (FID) for Continuous Flue Gas Monitoring Installation Operation Maintenance Document Information Document ID Title: Part No.: Version: Release: Warning Symbols Operating Instructions GMS810-/GMS811-FIDOR 8013911 1-0 2014-02 Hazard (general) Hazard by voltage Described Product Product name: GMS810-/GMS811-FIDOR Hazard by explosive substances/mixtures Manufacturer SICK AG Erwin-Sick-Str. 1 Phone: Fax: E-mail: · 79183 Waldkirch · Germany +49 7641 469-0 +49 7641 469-1149 [email protected] Hazard by corrosive substances Hazard by unhealthy substances Place of Manufacture SICK AG Poppenbütteler Bogen 9b · 22399 Hamburg · Germany Hazard by laser radiation Original documents The English edition 8013911 of this document is an original document of the manufacturer. SICK AG assumes no liability for the correctness of an unauthorized translation. Please contact the publisher in case of doubt. Legal information Subject to change without notice. © SICK AG. All rights reserved. Warning Levels HAZARD Immediate hazard which will result in severe personal injury or death. WARNING Risk or hazardous situation which could result in severe personal injury or death. CAUTION Hazard or unsafe practice which could result in less severe or minor injuries and/or property damage. 2 GMS810-/GMS811-FIDOR · Operating Instructions · 8013911 V 1-0 · © SICK AG Information Symbols Important technical information for this device Important information on electrical or electronic functions Supplementary information Link to information at another place Nice to know GMS810-/GMS811-FIDOR · Operating Instructions · 8013911 V 1-0 · © SICK AG 3 Contents 4 Contents 1 Important Information . . . . . . . . . . . . . . . . . . . . . . . . . . . . . . . . . . . . . . . . . . . . . . . 7 1.1 Main hazards . . . . . . . . . . . . . . . . . . . . . . . . . . . . . . . . . . . . . . . . . . . . . . . . . . . . . . . . . . . . . . . . 8 1.2 1.2.1 1.2.2 Intended use . . . . . . . . . . . . . . . . . . . . . . . . . . . . . . . . . . . . . . . . . . . . . . . . . . . . . . . . . . . . . . . . 8 Purpose of the device . . . . . . . . . . . . . . . . . . . . . . . . . . . . . . . . . . . . . . . . . . . . . . . . . . . . . . 8 Installation location . . . . . . . . . . . . . . . . . . . . . . . . . . . . . . . . . . . . . . . . . . . . . . . . . . . . . . . . 8 1.3 Responsibility of user . . . . . . . . . . . . . . . . . . . . . . . . . . . . . . . . . . . . . . . . . . . . . . . . . . . . . . . . . 9 1.4 Additional documentation/information . . . . . . . . . . . . . . . . . . . . . . . . . . . . . . . . . . . . . . . . . 9 2 Product Description . . . . . . . . . . . . . . . . . . . . . . . . . . . . . . . . . . . . . . . . . . . . . . . . . . 11 2.1 Product identification . . . . . . . . . . . . . . . . . . . . . . . . . . . . . . . . . . . . . . . . . . . . . . . . . . . . . . . . 12 2.2 2.2.1 2.2.2 2.2.3 Characteristics of FIDOR . . . . . . . . . . . . . . . . . . . . . . . . . . . . . . . . . . . . . . . . . . . . . . . . . . . . . Method of operation . . . . . . . . . . . . . . . . . . . . . . . . . . . . . . . . . . . . . . . . . . . . . . . . . . . . . . Functional units . . . . . . . . . . . . . . . . . . . . . . . . . . . . . . . . . . . . . . . . . . . . . . . . . . . . . . . . . . Measuring principle . . . . . . . . . . . . . . . . . . . . . . . . . . . . . . . . . . . . . . . . . . . . . . . . . . . . . . . 2.3 Interfaces . . . . . . . . . . . . . . . . . . . . . . . . . . . . . . . . . . . . . . . . . . . . . . . . . . . . . . . . . . . . . . . . . . 15 2.4 2.4.1 2.4.2 Remote control . . . . . . . . . . . . . . . . . . . . . . . . . . . . . . . . . . . . . . . . . . . . . . . . . . . . . . . . . . . . . 15 Ethernet . . . . . . . . . . . . . . . . . . . . . . . . . . . . . . . . . . . . . . . . . . . . . . . . . . . . . . . . . . . . . . . . . 15 Modbus. . . . . . . . . . . . . . . . . . . . . . . . . . . . . . . . . . . . . . . . . . . . . . . . . . . . . . . . . . . . . . . . . . 15 2.5 SOPAS ET (PC program) . . . . . . . . . . . . . . . . . . . . . . . . . . . . . . . . . . . . . . . . . . . . . . . . . . . . . . 16 2.6 Gas flow plan . . . . . . . . . . . . . . . . . . . . . . . . . . . . . . . . . . . . . . . . . . . . . . . . . . . . . . . . . . . . . . . 17 2.7 2.7.1 2.7.2 2.7.3 2.7.4 Information on operating gases . . . . . . . . . . . . . . . . . . . . . . . . . . . . . . . . . . . . . . . . . . . . . . 18 Instrument air . . . . . . . . . . . . . . . . . . . . . . . . . . . . . . . . . . . . . . . . . . . . . . . . . . . . . . . . . . . . 18 Combustion air . . . . . . . . . . . . . . . . . . . . . . . . . . . . . . . . . . . . . . . . . . . . . . . . . . . . . . . . . . . 18 Fuel gas . . . . . . . . . . . . . . . . . . . . . . . . . . . . . . . . . . . . . . . . . . . . . . . . . . . . . . . . . . . . . . . . . 18 Test gas . . . . . . . . . . . . . . . . . . . . . . . . . . . . . . . . . . . . . . . . . . . . . . . . . . . . . . . . . . . . . . . . . 18 2.8 2.8.1 2.8.2 Sample gas . . . . . . . . . . . . . . . . . . . . . . . . . . . . . . . . . . . . . . . . . . . . . . . . . . . . . . . . . . . . . . . . . 19 Heated line . . . . . . . . . . . . . . . . . . . . . . . . . . . . . . . . . . . . . . . . . . . . . . . . . . . . . . . . . . . . . . 19 Sample gas filter . . . . . . . . . . . . . . . . . . . . . . . . . . . . . . . . . . . . . . . . . . . . . . . . . . . . . . . . . 19 3 Installation and Connection 3.1 Scope of delivery . . . . . . . . . . . . . . . . . . . . . . . . . . . . . . . . . . . . . . . . . . . . . . . . . . . . . . . . . . . . 22 3.2 Installing . . . . . . . . . . . . . . . . . . . . . . . . . . . . . . . . . . . . . . . . . . . . . . . . . . . . . . . . . . . . . . . . . . . 22 12 13 13 14 . . . . . . . . . . . . . . . . . . . . . . . . . . . . . . . . . . . . . . . 21 3.3 Fitting . . . . . . . . . . . . . . . . . . . . . . . . . . . . . . . . . . . . . . . . . . . . . . . . . . . . . . . . . . . . . . . . . . . . . . 22 3.4 3.4.1 3.4.2 3.4.3 3.4.4 3.4.5 3.4.6 Preparing the gas connections . . . . . . . . . . . . . . . . . . . . . . . . . . . . . . . . . . . . . . . . . . . . . . . Connecting the instrument air . . . . . . . . . . . . . . . . . . . . . . . . . . . . . . . . . . . . . . . . . . . . . Connecting the combustion air . . . . . . . . . . . . . . . . . . . . . . . . . . . . . . . . . . . . . . . . . . . . . Connecting the fuel gas (hydrogen) . . . . . . . . . . . . . . . . . . . . . . . . . . . . . . . . . . . . . . . . . Connecting the test gases . . . . . . . . . . . . . . . . . . . . . . . . . . . . . . . . . . . . . . . . . . . . . . . . . Connecting the sample gas . . . . . . . . . . . . . . . . . . . . . . . . . . . . . . . . . . . . . . . . . . . . . . . . Connecting the gas outlet . . . . . . . . . . . . . . . . . . . . . . . . . . . . . . . . . . . . . . . . . . . . . . . . . 3.5 Electrical installation . . . . . . . . . . . . . . . . . . . . . . . . . . . . . . . . . . . . . . . . . . . . . . . . . . . . . . . . 26 3.6 Signal connections . . . . . . . . . . . . . . . . . . . . . . . . . . . . . . . . . . . . . . . . . . . . . . . . . . . . . . . . . . 27 3.7 CAN bus. . . . . . . . . . . . . . . . . . . . . . . . . . . . . . . . . . . . . . . . . . . . . . . . . . . . . . . . . . . . . . . . . . . . 29 3.8 Ethernet interface . . . . . . . . . . . . . . . . . . . . . . . . . . . . . . . . . . . . . . . . . . . . . . . . . . . . . . . . . . . 29 3.9 Connecting the power supply . . . . . . . . . . . . . . . . . . . . . . . . . . . . . . . . . . . . . . . . . . . . . . . . . 29 23 24 24 24 24 25 25 GMS810-/GMS811-FIDOR · Operating Instructions · 8013911 V 1-0 · © SICK AG Contents 4 Start-up 4.1 4.1.1 4.1.2 Preparation . . . . . . . . . . . . . . . . . . . . . . . . . . . . . . . . . . . . . . . . . . . . . . . . . . . . . . . . . . . . . . . . . 32 Check . . . . . . . . . . . . . . . . . . . . . . . . . . . . . . . . . . . . . . . . . . . . . . . . . . . . . . . . . . . . . . . . . . . . 32 Procedure . . . . . . . . . . . . . . . . . . . . . . . . . . . . . . . . . . . . . . . . . . . . . . . . . . . . . . . . . . . . . . . . 32 4.2 Start up the FIDOR . . . . . . . . . . . . . . . . . . . . . . . . . . . . . . . . . . . . . . . . . . . . . . . . . . . . . . . . . . 32 5 Operation . . . . . . . . . . . . . . . . . . . . . . . . . . . . . . . . . . . . . . . . . . . . . . . . . . . . . . . . . . . . . . . 33 5.1 5.1.1 5.1.2 Controls and indicators/displays . . . . . . . . . . . . . . . . . . . . . . . . . . . . . . . . . . . . . . . . . . . . . . 34 Status, LEDs. . . . . . . . . . . . . . . . . . . . . . . . . . . . . . . . . . . . . . . . . . . . . . . . . . . . . . . . . . . . . . 34 Assignment of buttons. . . . . . . . . . . . . . . . . . . . . . . . . . . . . . . . . . . . . . . . . . . . . . . . . . . . . 35 5.2 5.2.1 5.2.2 5.2.3 5.2.4 5.2.5 5.2.6 5.2.7 5.2.8 5.2.9 Menu tree . . . . . . . . . . . . . . . . . . . . . . . . . . . . . . . . . . . . . . . . . . . . . . . . . . . . . . . . . . . . . . . . . . 36 Main menu . . . . . . . . . . . . . . . . . . . . . . . . . . . . . . . . . . . . . . . . . . . . . . . . . . . . . . . . . . . . . . . 36 FIDOR menus . . . . . . . . . . . . . . . . . . . . . . . . . . . . . . . . . . . . . . . . . . . . . . . . . . . . . . . . . . . . . 38 Measuring display. . . . . . . . . . . . . . . . . . . . . . . . . . . . . . . . . . . . . . . . . . . . . . . . . . . . . . . . . 41 “List” measuring display . . . . . . . . . . . . . . . . . . . . . . . . . . . . . . . . . . . . . . . . . . . . . . . . . . . 41 Diagnostic . . . . . . . . . . . . . . . . . . . . . . . . . . . . . . . . . . . . . . . . . . . . . . . . . . . . . . . . . . . . . . . . 42 Parameter . . . . . . . . . . . . . . . . . . . . . . . . . . . . . . . . . . . . . . . . . . . . . . . . . . . . . . . . . . . . . . . . 45 Adjustment . . . . . . . . . . . . . . . . . . . . . . . . . . . . . . . . . . . . . . . . . . . . . . . . . . . . . . . . . . . . . . . 48 Maintenance . . . . . . . . . . . . . . . . . . . . . . . . . . . . . . . . . . . . . . . . . . . . . . . . . . . . . . . . . . . . . 51 Factory setting . . . . . . . . . . . . . . . . . . . . . . . . . . . . . . . . . . . . . . . . . . . . . . . . . . . . . . . . . . . . 53 5.3 5.3.1 Starting important operating sequences . . . . . . . . . . . . . . . . . . . . . . . . . . . . . . . . . . . . . . . 55 Check and adjustment with test gas . . . . . . . . . . . . . . . . . . . . . . . . . . . . . . . . . . . . . . . . 55 6 Shutdown . . . . . . . . . . . . . . . . . . . . . . . . . . . . . . . . . . . . . . . . . . . . . . . . . . . . . . . . . . . . . . . 57 6.1 Preparations for shutdown . . . . . . . . . . . . . . . . . . . . . . . . . . . . . . . . . . . . . . . . . . . . . . . . . . . 58 . . . . . . . . . . . . . . . . . . . . . . . . . . . . . . . . . . . . . . . . . . . . . . . . . . . . . . . . . . . . . . . . . 31 6.2 Shutdown procedure. . . . . . . . . . . . . . . . . . . . . . . . . . . . . . . . . . . . . . . . . . . . . . . . . . . . . . . . . 58 6.3 Disposal . . . . . . . . . . . . . . . . . . . . . . . . . . . . . . . . . . . . . . . . . . . . . . . . . . . . . . . . . . . . . . . . . . . . 58 7 Scheduled Maintenance . . . . . . . . . . . . . . . . . . . . . . . . . . . . . . . . . . . . . . . . . . . . 59 7.1 7.1.1 Maintenance intervals . . . . . . . . . . . . . . . . . . . . . . . . . . . . . . . . . . . . . . . . . . . . . . . . . . . . . . . 60 Maintenance by the user . . . . . . . . . . . . . . . . . . . . . . . . . . . . . . . . . . . . . . . . . . . . . . . . . . 60 7.2 Necessary technical knowledge for maintenance work . . . . . . . . . . . . . . . . . . . . . . . . . . 60 7.3 7.3.1 7.3.2 7.3.3 Description of maintenance work . . . . . . . . . . . . . . . . . . . . . . . . . . . . . . . . . . . . . . . . . . . . . 60 Visual check . . . . . . . . . . . . . . . . . . . . . . . . . . . . . . . . . . . . . . . . . . . . . . . . . . . . . . . . . . . . . . 60 Adjustment after maintenance . . . . . . . . . . . . . . . . . . . . . . . . . . . . . . . . . . . . . . . . . . . . . 60 Replacing the sample gas filter . . . . . . . . . . . . . . . . . . . . . . . . . . . . . . . . . . . . . . . . . . . . . 61 8 Clearing Malfunctions . . . . . . . . . . . . . . . . . . . . . . . . . . . . . . . . . . . . . . . . . . . . . . . 63 8.1 Necessary technical knowledge for repairs . . . . . . . . . . . . . . . . . . . . . . . . . . . . . . . . . . . . . 64 8.2 8.2.1 Replacement of fuses. . . . . . . . . . . . . . . . . . . . . . . . . . . . . . . . . . . . . . . . . . . . . . . . . . . . . . . . 64 Mains fuse . . . . . . . . . . . . . . . . . . . . . . . . . . . . . . . . . . . . . . . . . . . . . . . . . . . . . . . . . . . . . . . 64 8.3 Blinking measuring display and yellow LED. . . . . . . . . . . . . . . . . . . . . . . . . . . . . . . . . . . . . 64 8.4 Failure . . . . . . . . . . . . . . . . . . . . . . . . . . . . . . . . . . . . . . . . . . . . . . . . . . . . . . . . . . . . . . . . . . . . . 65 8.5 FID does not ignite/burn . . . . . . . . . . . . . . . . . . . . . . . . . . . . . . . . . . . . . . . . . . . . . . . . . . . . . 65 8.6 Error messages . . . . . . . . . . . . . . . . . . . . . . . . . . . . . . . . . . . . . . . . . . . . . . . . . . . . . . . . . . . . . 66 GMS810-/GMS811-FIDOR · Operating Instructions · 8013911 V 1-0 · © SICK AG 5 Contents 6 9 Technical Documentation . . . . . . . . . . . . . . . . . . . . . . . . . . . . . . . . . . . . . . . . . . 69 9.1 9.1.1 9.1.2 Approvals . . . . . . . . . . . . . . . . . . . . . . . . . . . . . . . . . . . . . . . . . . . . . . . . . . . . . . . . . . . . . . . . . . 70 Conformity . . . . . . . . . . . . . . . . . . . . . . . . . . . . . . . . . . . . . . . . . . . . . . . . . . . . . . . . . . . . . . . 70 Electrical protection. . . . . . . . . . . . . . . . . . . . . . . . . . . . . . . . . . . . . . . . . . . . . . . . . . . . . . . 70 9.2 Heated line . . . . . . . . . . . . . . . . . . . . . . . . . . . . . . . . . . . . . . . . . . . . . . . . . . . . . . . . . . . . . . . . . 71 9.3 Dimensions. . . . . . . . . . . . . . . . . . . . . . . . . . . . . . . . . . . . . . . . . . . . . . . . . . . . . . . . . . . . . . . . . 72 9.4 Technical data . . . . . . . . . . . . . . . . . . . . . . . . . . . . . . . . . . . . . . . . . . . . . . . . . . . . . . . . . . . . . . 73 GMS810-/GMS811-FIDOR · Operating Instructions · 8013911 V 1-0 · © SICK AG Important Information GMS810-/GMS811-FIDOR 1 Important Information Subject to change without notice Main hazards Main operating information Intended use Own responsibility GMS810-/GMS811-FIDOR · Operating Instructions · 8013911 V 1-0 · © SICK AG 7 Important Information 1. 1 Main hazards Overview of important safety information: WARNING: Hazards by explosive or combustible gases. Do not use the FIDOR for measuring explosive or combustible gases. WARNING: Risk of explosions due to leaky lines The FID is supplied with hydrogen. Risk of explosions due to leaky lines. Do not cover the enclosure cover. Do not operate the FIDOR in closed rooms OR install a hydrogen sensor (H2 sensor) (< 25% LEL) 1. 2 Intended use 1.2.1 Purpose of the device FIDOR is a total hydrocarbon analyzer (FID) for continuous measurement of the total concentration of organically bound carbon. The sample gas is extracted at the sampling point and fed through the analysis system (extractive measurement). FIDOR was tested for suitability according to DIN EN 15267 for continuous monitoring of emissions of organically bound carbon according to: ● 13th BImSchv (FICA) and TI Air ● 17th BImSchv (FICA) 1.2.2 Installation location The operating unit and analyzer unit are generally designed for indoor operation. These devices should not be exposed to direct atmospheric influences (wind, rain, sun). Such influences can damage the devices and negatively affect the measuring accuracy. Subject to change without notice WARNING: Explosion hazard in potentially explosive atmospheres Do not use the FIDOR in potentially explosive atmospheres. 8 GMS810-/GMS811-FIDOR · Operating Instructions · 8013911 V 1-0 · © SICK AG Important Information 1.3 Responsibility of user Intended users The FIDOR may only be operated by qualified persons who, based on their device-specific training and knowledge as well as knowledge of the relevant regulations, can assess the tasks given and recognize the hazards involved. Correct use Use the FIDOR only as described in these Operating Instructions. The manufacturer bears no responsibility for any other use. Carry out the specified maintenance work. Do not remove, add or change any components in or on the device unless such changes are officially allowed and specified by the manufacturer. Otherwise – The device could become dangerous. – Any warranty by the manufacturer becomes void. Special local requirements In addition to these Operating Instructions, follow all local laws, technical rules and company-internal operating directives applicable at the respective installation location of the device. Keeping documents These Operating Instructions and the System Documentation must be: Available for reference. Passed on to new owners. 1.4 Additional documentation/information The following documents are applicable in addition to these Operating Instructions: Subject to change without notice Instructions delivered with the System Documentation ● Operating Instructions Control Unit (BCU) ● Operating Instructions GMS800 I/O Module ● Documentation on individual settings ● Installation Plan ● Operating Instructions SCU ● Technical Information BCU Additional instructions (optional) ● Operating Instructions Gas Sampling Probe ● Operating Instructions Instrument Air Conditioning System GMS810-/GMS811-FIDOR · Operating Instructions · 8013911 V 1-0 · © SICK AG 9 Subject to change without notice Important Information 10 GMS810-/GMS811-FIDOR · Operating Instructions · 8013911 V 1-0 · © SICK AG Product Description GMS810-/GMS811-FIDOR 2 Product Description Subject to change without notice Device features Functional principle Device description GMS810-/GMS811-FIDOR · Operating Instructions · 8013911 V 1-0 · © SICK AG 11 Product Description 2. 1 Product identification Product name: Manufacturer: ● ● GMS810-/GMS811-FIDOR SICK AG Poppenbütteler Bogen 9b, 22399 Hamburg, Germany GMS810-FIDOR: FIDOR in 19“ enclosure with integrated operator panel (BCU). GMS811-FIDOR: FIDOR in 19“ enclosure and external operator panel (BCU). Type plate The type plate is located at the rear of the housing. 2. 2 Characteristics of FIDOR FIDOR is a hydrocarbon analyzer for continuous monitoring of flue gases in industrial combustion plants (emission measuring system). The FIDOR operates in extractive mode, i.e. the measured gas is withdrawn from the gas duct using a gas sampling probe and fed to the analysis system via a heated line. Fig. 1 View of extractive measuring system GMS810-FIDOR Subject to change without notice The enclosure is an enclosure that can be fitted in a 19" rack or a suitable outer housing. 12 GMS810-/GMS811-FIDOR · Operating Instructions · 8013911 V 1-0 · © SICK AG Product Description 2.2.1 Method of operation The FIDOR operates independently. ● Automatic ignition of the flame and regulation of the operating pressures. ● Automatic start-up. ● The FIDOR signals an uncertain operational states with status indicators. The FIDOR remains in Measuring mode. ● Should a malfunction occur, the FIDOR switches automatically to “Failure”. The heated line and the sample gas path in the FIDOR are automatically purged with instrument air in this state. The operational states are signaled by status signals. FIDOR measures the total of all hydrocarbons. Measurement is not component-specific. The measurement signal is approximately proportional to the number of organically bound C atoms of the hydrocarbons in the sample gas. A different sensitivity to the hydrocarbon atoms is reflected by the response factor. Electronic pressure regulators keep the sample gas inlet and outlet pressure constant. The combustion air and the fuel gas are also regulated to constant flows with electronic controllers. The sample gas is suctioned in with an ejector pump. After device switch-on and reaching the nominal temperatures (detector and external heating), the partial vacuums are regulated. Combustion air and hydrogen are then regulated and the flame ignited. 2.2.2 Functional units FIDOR contains the following independent functional units: ● The "Basic Control Unit" (BCU) that manages the FID and contains the operator panel. ● The FID for analyzing the measured component. The functional unit FID is independent and has its own menu structure on the operator panel with own parameter setting, own password level etc. Subject to change without notice Functions of the Basic Control Unit (BCU) ● As higher level control unit, the BCU itself provides the operator panel to operate the FIDOR. ● The BCU reads the measured values of the FID. ● The settings of the BCU and the measured values calculated by the BCU can be viewed and set (with password protection) using the “Basic Control Unit” menu item. Functions of the FID analyzer ● The FID records measured values. ● The measured values and settings of the FID can be viewed and parameters set (with password protection) using menu item “FIDOR”. GMS810-/GMS811-FIDOR · Operating Instructions · 8013911 V 1-0 · © SICK AG 13 Product Description 2.2.3 Measuring principle Fig. 2 Measuring principle Combustion air (Instrument air) Sample gas ● ● ● ● ● The FIDOR uses a flame ionization detector (FID) for measuring the hydrocarbons. A hydrogen flame supplied by fuel gas and combustion air burns in the FID. The sample gas is routed into this flame. The hydrocarbons contained in the sample gas are split; the produced hydrocarbon fragments are ionized. A stream of ions forms in the electric field and this electrical stream is measured. The measuring signal is proportional to the number of the listed, non-oxidized hydrocarbon atoms. Hydrocarbon atoms which are already oxidized are only partially detected. CO and CO2 are ineffective. The quantitative correlation between the measurement signal and the hydrocarbon concentration in the sample gas is determined by performing reference measurements with test gases which do not contain any hydrocarbons (zero gas) or of which the hydrocarbon concentration is known exactly (reference gas – e.g. 80 ppm propane in air). Only a small portion of the sample gas is burnt for analysis, the major portion is diluted with instrument air and combustion air and routed outside via the exhaust gas line. Subject to change without notice ● Fuel gas 14 GMS810-/GMS811-FIDOR · Operating Instructions · 8013911 V 1-0 · © SICK AG Product Description 2.3 Interfaces The following interfaces are available for the FIDOR: ● Ethernet ● CAN Option: RS485/422 (Modbus RTU) via the CAN bus plug ● Analog and digital interfaces (depending on version). The analog and digital interfaces are part of the GMS800 I/O module. The GMS800 I/O module can be optionally installed in the rear cover of the 19"enclosure or be connected externally using the CAN bus. Operating Instructions “GMS800 I/O Module” The parameters of the GMS800 I/O module are set with SOPAS ET or the BCU user interface. 2.4 Remote control 2.4.1 Ethernet Protocol: ● Modbus TCP/IP. Operation via SOPAS ET (option) Operator menus and measured value displays are also available on an external PC via Ethernet for user comfort (with the engineering tool SOPAS ET Operating Instructions “SCU”). 2.4.2 Modbus Modbus® is a communication standard for digital controls to connect a »Master« device with several »Slave« devices. The Modbus protocol defines the communication commands only but not their electronic transfer; therefore it can be used with different digital interfaces (for FIDOR: Ethernet). Subject to change without notice Further information: “BCU” Technical Information GMS810-/GMS811-FIDOR · Operating Instructions · 8013911 V 1-0 · © SICK AG 15 Product Description 2. 5 SOPAS ET (PC program) Additionally, SOPAS ET can be used to set FIDOR parameters. SOPAS ET runs on an external PC connected via the Ethernet interface to the FIDOR. Subject to change without notice More information on SOPAS ET Technical Information “FIDOR” 16 GMS810-/GMS811-FIDOR · Operating Instructions · 8013911 V 1-0 · © SICK AG Product Description Gas flow plan Fig. 3 Gas flow plan Subject to change without notice 2.6 GMS810-/GMS811-FIDOR · Operating Instructions · 8013911 V 1-0 · © SICK AG 17 Product Description 2. 7 Information on operating gases This Section contains general information on operating gases. Quality of operating gases p. 74, »Gas supply« 2.7.1 Instrument air The instrument air is used as: ● Induction air for the ejector. ● Control air for pressure control. ● Combustion air for the FID (for the “internal catalyst” option). 2.7.2 Combustion air Instrument air (for measuring range > 500 mgC/m3). ● Internal catalyst (option) (for measuring range <= 500 mgC/m3). ● External catalyst (for measuring range <= 500 mgC/m3). ● 2.7.3 Fuel gas Hydrogen. Recommendation: Monitor the pressure of the combustion gas with a pressure monitor which emits an electric signal at a certain minimum pressure (e.g. 10 bar). ● 2.7.4 Test gas Zero gas: From internal catalyst or external. ● Reference gas: – Recommendation: Propane in synthetic air. – Concentration: Approx. 75% of full scale reading. Recommendation: Monitor the pressure of the reference gas with a pressure monitor which emits an electrical signal at a certain minimum pressure (e.g. 10 bar). Subject to change without notice ● 18 GMS810-/GMS811-FIDOR · Operating Instructions · 8013911 V 1-0 · © SICK AG Product Description 2.8 Sample gas NOTICE: Risk of corrosion The sample gas must not corrode the internal gas path. 2.8.1 Heated line NOTICE: Risk of condensation No condensation should occur in the heated line. Condensation can corrupt the measurement result and the condensate can obstruct the heated line and the gas filter. Prevent thermal bridges when connecting the heated line and the sample gas probe. If the temperature in the heated line could drop below the dew point of the sample gas: – Always heat the heated line to a temperature above the dew point The sample gas is suctioned in by the heated sample gas connection 2.8.2 Sample gas filter Subject to change without notice The FIDOR has an internal sample gas filter. ● Material: Sintered metal (CrNi steel). ● Pore size: 20 μm. GMS810-/GMS811-FIDOR · Operating Instructions · 8013911 V 1-0 · © SICK AG 19 Subject to change without notice Product Description 20 GMS810-/GMS811-FIDOR · Operating Instructions · 8013911 V 1-0 · © SICK AG Installation and Connection GMS810-/GMS811-FIDOR 3 Installation and Connection Subject to change without notice Installation Assembly GMS810-/GMS811-FIDOR · Operating Instructions · 8013911 V 1-0 · © SICK AG 21 Installation and Connection 3. 1 Scope of delivery Please see the delivery documents for the scope of delivery. 3. 2 Installing WARNING: Risk of explosions due to leaky lines The FID is supplied with hydrogen. Risk of explosions due to leaky lines. Do not cover the enclosure cover. Do not operate the FIDOR in closed rooms OR install a hydrogen sensor (H2 sensor) (< 25% LEL) Connection to the gas supply may only be performed by skilled persons who, based on their technical training and knowledge as well as knowledge of the relevant regulations, can assess the tasks given and recognize the hazards involved. Also follow all local laws, technical rules and company-internal operating directives applicable at the respective installation location of the device. The persons performing installation are responsible for the preparation of the installation location. ● Take the ambient conditions ( p. 74) into account. ● Enclosure dimensions p. 72, §9.3. ● Set up the FIDOR (in a low-vibration environment whenever possible). ● Provide a suitable installation location for the test gas cylinders. Note: Observe local regulations for the installation of gas cylinders. ● Provide a suitable installation location for the pressure regulator unit and (optionally) the instrument air conditioning system. ● Provide a conditioning system. ● Channel off the exhaust gas without pressure. 3. 3 Fitting Subject to change without notice Fit the FIDOR in a 19" rack or a suitable outer housing. ● Use rails which support the enclosure. Do not attach the FIDOR just to the front panel; otherwise it will be damaged. ● If a further device is installed above the FIDOR: Leave 4 cm spacing between the devices. 22 GMS810-/GMS811-FIDOR · Operating Instructions · 8013911 V 1-0 · © SICK AG Installation and Connection 3.4 Preparing the gas connections WARNING: Hazards through leaky gas path ● Health risk when noxious sample gas leaks out. ● Risk of damage to the FIDOR and adjacent equipment if the sample gas is corrosive or could create corrosive liquids in combination with water (e.g. humidity). ● The measured values could possibly be wrong if the gas path is leaky. The gas lines to the FIDOR may only be laid by skilled persons who, based on their training and knowledge as well as knowledge of the relevant regulations, can assess the tasks given and recognize the dangers involved. Contaminated operating gases can corrupt the measured values and damage the analyzer unit and the catalyst. Observe the information on the operating gases and comply with the specifications of the operating gases ( p. 18, »Information on operating gases« and p. 74, »Gas supply«). Ensure that the gas pipes to the FID are clean: – Free from particles (dust, chips) – Free from hydrocarbons (grease, oil, solvents). CAUTION: Risk of explosion when combustible or explosive sample gas is used Do not use the FIDOR for measuring combustible or explosive gases. Fit a pressure monitor to the fuel gas pressure cylinder. Signal output, for example, at 10 bar residual pressure (option). Use a leak detector to check the H2 supply leak tightness. Fig. 4 Gas connections 8 1 2 3 4 5 6 Subject to change without notice 7 1 2 3 4 5 6 7 8 Instrument air inlet Combustion air inlet Fuel gas inlet Zero gas inlet Reference gas inlet Sample gas outlet (zero gas or reference gas) Exhaust gas outlet Sample gas inlet GMS810-/GMS811-FIDOR · Operating Instructions · 8013911 V 1-0 · © SICK AG 23 Installation and Connection 3.4.1 Connecting the instrument air Connect the instrument air supply to the FIDOR. 3.4.2 Connecting the combustion air Connect the combustion air if an external combustion air supply is used 3.4.3 Connecting the fuel gas (hydrogen) Recommendation: – Fit a pressure monitor on the fuel gas cylinder which monitors the cylinder pressure and emits a signal at a certain residual pressure (e.g. 10 bar). – If the FIDOR is integrated in an enclosed system cabinet: Install an H2 flow limiter for the fuel gas supply in the system cabinet and, if required, install a hydrogen sensor (H2 Sensor) (< 25% LEL). Lay the lines. – Only use analytically pure tubes made of copper or stainless steel. – Do not contaminate the insides of tubes during assembly Connect the fuel gas to the “Fuel gas” connection. ● WARNING: Risk of explosions The screw fitting for the fuel gas supply contains a flow limiter. ● The fuel gas inlet is marked “Fuel Gas”. Do not modify this screw fitting. Do not connect the fuel gas supply to any other screw fitting. Connecting the test gases 3.4.4.1 Zero gas Connect the zero gas. 3.4.4.2 Reference gas Recommendation: Monitor the feed pressure of the reference gas with a pressure monitor which emits an electric signal at a certain minimum pressure (e.g. 10 bar). Connect the signal of the pressure monitor with the “External signal failure” control input. Connect the reference gas. Subject to change without notice 3.4.4 24 GMS810-/GMS811-FIDOR · Operating Instructions · 8013911 V 1-0 · © SICK AG Installation and Connection 3.4.5 Connecting the sample gas If the sample gas pressure is more than 150 hPa (mbar) higher than the ambient pressure: Install a bypass line (e.g. T-form screw connection) from which the FIDOR can draw the sample gas. If the sample gas contains large quantities of dust: Install an external dust filter in the sample gas supply line (preliminary filter, coarse filter). 1 Lay the heated line from the sampling probe to the FIDOR. 2 Screw on the heated line. – Use protection against bends (the sample gas connection on the FIDOR may not be loaded with the weight of the heated line). The direction of the protection against bends can be adapted to the operating position: p. 61, §7.3.3.2 – Always take the lowest permissible curvature radius of the pipe into account (refer to the technical specifications of the heated line). – Prevent thermal bridges to the heated line (e.g. at the securing points). Use an insulating cover (assembly p. 61, §7.3.3.2) and sheath the connection points with the insulation hose. 3.4.6 Connecting the gas outlet CAUTION: Noxious and aggressive exhaust gases. Exhaust gases can contain components harmful to health or irritating. Lead the measuring system gas outlets outdoors or into a suitable flue. Do not connect the exhaust gas line with the exhaust gas line of sensitive subassemblies (e.g. cooler). Aggressive gases could damage these subassemblies as a result of diffusions. Observe information from the plant operator. Lay the exhaust gas line in a suitable manner. The gas outlet must be open to the ambient pressure. Do not bend or crimp exhaust gas lines. Subject to change without notice Condensate accrues in the exhaust gas line. Use a suitable hose line (PTFE) to run the condensate outlet into an open condensate container or a waste disposal line. Lay the line so that it always runs downwards. Keep the line opening free from any blockages or liquids. Protect the line from frost. Connect the tube to the gas outlet (screw connection as delivered). GMS810-/GMS811-FIDOR · Operating Instructions · 8013911 V 1-0 · © SICK AG 25 Installation and Connection 3. 5 Electrical installation WARNING: Health risk by voltage The preparation of the FIDOR may only be performed by skilled electricians who, based on their technical training and knowledge as well as knowledge of the relevant regulations, can assess the tasks given and recognize the hazards involved. The wiring system to the power source of the system must be installed and fused according to the relevant regulations. Fig. 5 Electrical connections 1 2 5 4 3 Ethernet CAN bus Mains connection Connection of external heating Signal connections Subject to change without notice 1 2 3 4 5 26 GMS810-/GMS811-FIDOR · Operating Instructions · 8013911 V 1-0 · © SICK AG Installation and Connection Signal connections 3.6 More information Operating Instructions “GMS800 IO Module”. Parameter setting SOPAS ET Terminal Pin X3 1 2 3 4 5 Function Name ground GND control input common control input 0 DIC 6 control input 1 7 control input 2 8 control input 3 9 control input 4 10 control input 5 11 control input 6 Subject to change without notice X4 12 control input 7 1 relay contact 1 normally open 2 relay contact 1 common 3 relay contact 1 normally closed 4 relay contact 2 normally open 5 relay contact 2 common 6 relay contact 2 normally closed 7 relay contact 3 normally open 8 relay contact 3 common 9 relay contact 3 normally closed 10 relay contact 4 normally open 11 relay contact 4 common 12 relay contact 4 normally closed DI1 N3M01DI01 (DI04) DI2 N3M01DI02 (DI04) DI3 N3M01DI03 (DI04) DI4 N3M01DI04 (DI04) DI5 N3M02DI01 (DI04) DI6 N3M02DI02 (DI04) DI7 N3M02DI03 (DI04) DI8 N3M02DI04 (DI04) Significance Explanation E.g. external maintenance switch in cabinet door Adjustment lock Blocks adjustment. Evaluation of an external OK sigExternal ready signal nal / activation via Options menu Evaluation of an external mainteExternal maintenance request nance request signal / activation signal via the Options menu Evaluation of an external failure External failure signal signal / activation via the Options menu / e.g. external catalyst Start of zero point adjustment Zero point adjustment is started. Start of zero and reference Zero and reference point adjustpoint adjustment ment is started. Reserved Not used Maintenance switch DO1 N3M03DO01 (DO04) Failure / malfunction NAMUR (Failure) DO2 N3M03DO02 (DO04) Maintenance request NAMUR (Maintenance request) DO3 N3M03DO03 (DO04) Check NAMUR (Check) DO4 N3M03DO04 (DO04) Uncertain NAMUR (Uncertain) GMS810-/GMS811-FIDOR · Operating Instructions · 8013911 V 1-0 · © SICK AG 27 Installation and Connection 11 (–) Analog output 4 12 (+) analog output 4 (0/2/4 … 20 mA) 28 Name Significance Explanation DO5 N3M04DO01 (DO04) Measuring Measured value OK DO6 N3M04DO02 (DO04) Adjustment Adjustment running DO7 N3M04DO03 (DO04) Maintenance mode Maintenance mode active DO8 N3M04DO04 (DO04) Measuring range ID AO3 Identification of active measuring range from analog output AO3 GND AI1 N3M07AI01 (AI02) Reserved Not used AI2 N3M07AI02 (AI02) Reserved Not used AO1 N3M05AO01 (AO02) Measured value AO2 N3M05AO02 (AO02) Measured value AO3 N3M06AO01 (AO02) Set measured value AO4 N3M06AO02 (AO02) Set measured value Output of measured value in the set unit and set measuring range. Parameter setting via FIDOR Output of measured value in the set unit and set measuring range. Parameter setting via FIDOR The measured value output is set to two measuring ranges 15/30 (automatic switchover). Parameter setting via BCU/SCU The measured value output is set to two measuring ranges 15/30 (automatic switchover). Parameter setting via BCU/SCU GMS810-/GMS811-FIDOR · Operating Instructions · 8013911 V 1-0 · © SICK AG Subject to change without notice Terminal Pin Function X5 1 relay contact 5 normally open 2 relay contact 5 common 3 relay contact 5 normally closed 4 relay contact 6 normally open 5 relay contact 6 common 6 relay contact 6 normally closed 7 relay contact 7 normally open 8 relay contact 7 common 9 relay contact 7 normally closed 10 relay contact 8 normally open 11 relay contact 8 common 12 relay contact 8 normally closed X7 1 ground 2 3 (+) analog input 1 (0 … 20 mA) 4 (+) analog input 2 (0 … 20 mA) 5 (–) analog output 1 6 (+) analog output 1 (0/2/4 … 20 mA) 7 (–) analog output 2 8 (+) analog output 2 (0/2/4 … 20 mA) 9 (–) Analog output 3 10 (+) analog output 3 (0/2/4 … 20 mA) Installation and Connection 3.7 CAN bus The remote control used is set at the factory depending on the order. To exchange the remote control: Please contact SICK Customer Service. More information Technical Information “FIDOR”. FIDOR can be connected with a CAN bus to SICK devices (SCU, BCU, I/O modules). If no device is connected to the CAN bus socket of the FIDOR: Connect the attached terminating resistor to the CAN bus socket. 3.8 Ethernet interface The risk of undesired access (“hackers”) to the FIDOR is inherent when operating the FIDOR via Ethernet. Only operate the FIDOR with firewall protection. Procedure Connect the Ethernet Socket on the FIDOR: RJ45. 3.9 Connecting the power supply CAUTION: Hazards caused by electric voltages Only let the work described in the following be carried out by skilled electricians who are familiar with potential risks and are able to avoid them. NOTICE: Before signal connections are established (also with plug connections): Disconnect the FIDOR and all connected devices from the mains (switch off). Otherwise the internal electronics can be damaged. Subject to change without notice 1 Compare the supplied mains voltage with the information on the type plate. – If the voltages do not match: Please contact SICK Customer Service. 2 Connect the power supply. GMS810-/GMS811-FIDOR · Operating Instructions · 8013911 V 1-0 · © SICK AG 29 Subject to change without notice Installation and Connection 30 GMS810-/GMS811-FIDOR · Operating Instructions · 8013911 V 1-0 · © SICK AG Start-up GMS810-/GMS811-FIDOR 4 Start-up Subject to change without notice Start-up Assessment of error-free function GMS810-/GMS811-FIDOR · Operating Instructions · 8013911 V 1-0 · © SICK AG 31 Start-up 4. 1 Preparation 4.1.1 Check Check with a leak detector: Are the external hydrogen supply and the hydrogen connection gas-tight? After a longer period of standstill (several weeks), also check: Instrument air supply and fuel gas supply available and clean? Gas pressures. Sample gas outlet free from any blockages? Sampling probe ready for operation? 4.1.2 Procedure 1 Start the peripheral devices (e.g. heated line, sampling probe, catalyst). If necessary, wait until they are ready for operation (e.g. warming up time). 2 Check the availability of the operating gases (quality, pressure, stock). 3 Switch on the operating gases. 4. 2 Start up the FIDOR 1 The FIDOR starts when the power supply is switched on. 2 The green “POWER“ LED on the display of the FIDOR signals that supply voltage is present. – If the green LED does not light: – Is the mains switch on the rear of the FIDOR switched on? – Check firm seating of the power plug on the rear of the FIDOR. – Check the fuse in the mains switch ( p. 64, §8.2). 3 “SICK“ is displayed on the screen. 4 FIDOR heats up. This can take up to 45 minutes depending on the peripheral devices. 5 The flame ignites automatically. 6 The Measuring display is then displayed ( p. 34, Fig. 6). 7 To go to the menu for the FIDOR: – Press “MEAS”. – Press “Menu”. – Select FIDOR. 8 As long as the measuring system has not yet reached its operational state (e.g.: The operating temperature has not yet been reached): – Display: “FIDOR:Heating”. – Status “Check”. 9 Measuring operation: – Only the green “POWER” LED lights. – Display: “FIDOR:MEASURING” ( p. 34, Fig. 6). – When the yellow LED lights: p. 64, §8.3. 10 Final stability: After approx. 1 h. 32 GMS810-/GMS811-FIDOR · Operating Instructions · 8013911 V 1-0 · © SICK AG Subject to change without notice Controls p. 34, §5.1 Operation GMS810-/GMS811-FIDOR 5 Operation Subject to change without notice Controls Status signals Menu structure Menus GMS810-/GMS811-FIDOR · Operating Instructions · 8013911 V 1-0 · © SICK AG 33 Operation 5. 1 Controls and indicators/displays Fig. 6 Operating and display elements (exemplary display) Status bar FIDOR:MEASURING Main menu 1 2 3 8 “POWER” LED .1 POWER Language User level BCU FIDOR .\ Back Current menu with menu level (numeric) FAILURE Classification LEDs ( p. 34, §5.1.1 ) MAINTENANCE REQUEST Enter Current menu tree Contrast setting (<MEAS>button) MEAS <MEAS> button Menu-specific buttons Status, LEDs. LED POWER FAILURE MAINTENANCE REQUEST Status Maintenance request Maintenance mode Check Uncertain Failure 34 Significance/possible causes The FIDOR is switched on, mains voltage is available. The FIDOR is in “Failure” state. The FIDOR is in “Maintenance request” state and/or the “Maintenance mode” state has been activated manually. LED Significance Yellow Irregularities (e.g. deviation during adjustment too high) that require a review of the cause. Yellow The FIDOR is switched to “Maintenance mode” via the menu or program. The status bar shows: “FIDOR:Maintenance”. Yellow Initializing, adjustment, etc. Yellow Measurement is uncertain Red Failure Status signal Maintenance request Check Check --Failure GMS810-/GMS811-FIDOR · Operating Instructions · 8013911 V 1-0 · © SICK AG Subject to change without notice 5.1.1 Operation 5.1.2 Assignment of buttons Button Significance <MEAS> button <MEAS> Returns to the Measuring display from any menu (except “Diagnostic”). – All inputs not completed with <Save> are discarded. – If the FIDOR is set to “Maintenance”: Pressing the <MEAS> button does not affect the “Maintenance” state. If the MEAS button is pressed for more than 2 seconds: A menu for contrast setting is shown Menu-specific buttons <Menu> Leads to the main menu. If the <Menu> button is not shown: Press <MEAS> first. <Back> Leads to the higher level menu. All inputs not completed with <Save> are discarded. <Enter> Opens the selected menu. <Save> Saves changed parameters. <Start> Starts the displayed action. <Set> Saves the value. Moves/scrolls downward. Diag is shown only when there is a message. When this button is pressed, the current message is shown. More information on diagnosis p. 42, §5.2.5 Subject to change without notice <Diag> Moves/scrolls upward. When digits are entered: Next higher digit. Move to the right in the line. GMS810-/GMS811-FIDOR · Operating Instructions · 8013911 V 1-0 · © SICK AG 35 Operation 5. 2 Menu tree 5.2.1 Main menu More information on the operating philosophy of the Basic Control Unit (BCU) Operating Instructions “GMS800 BCU”. Several analyzers can be connected to the control unit. To go to the menu for the FIDOR: 1 Press <MEAS>. The Measuring display is displayed as a “List”. THC 9.38 mgC Menu Update interval: Approx. every second. 2 Press <MEAS>. 3 Select “FIDOR”. Main menu 1 2 3 8 Language User level BCU (control unit) FIDOR Enter Subject to change without notice Back p. 37, §5.2.1.1 p. 37, §5.2.1.2 p. 37, §5.2.1.3 p. 38, §5.2.2 36 GMS810-/GMS811-FIDOR · Operating Instructions · 8013911 V 1-0 · © SICK AG Operation 5.2.1.1 Language .1 Language English Deutsch 1 Select the required language. 2 Close with <Save> .\ Save Back 5.2.1.2 User level Menus which allow changes to the measurement sequence are protected with a password. .2 User level 1 Auth. operator 2 Service 3 Log off 1 Select the required level. 2 Close with <Enter> A password prompt is shown. .\ Enter Back Entering the password .2.2 Auth. operator 1 Enter the password. 2 Close with <Save> XXXX Subject to change without notice .\User level Back Character selection. Save The password for the “Auth. operator” level is: “HIDE” (default) ● When no button is pressed, the password level is reset after 30 minutes (default). ● 5.2.1.3 BCU Operation of BCU Operating Instructions “GMS800 BCU” GMS810-/GMS811-FIDOR · Operating Instructions · 8013911 V 1-0 · © SICK AG 37 Operation 5.2.2 FIDOR menus Depending on operating state and user level not all menu items are displayed. 38 Menu tree Explanation Measured value Bar graph Line recorder Diagnostic Operating mode Measuring Uncertain Check Maintenance mode Process Subprocess Maint.req signals Maint. request Failure signals Failure Low temp.detected Logbook Counters Hardware pA-amplifier Digital input Digital output Temperature Pressure Voltage Current Power Telediagnostic Maint. request Failures Monitoring Start state Maint. request. 1-8 Failure 1-8 Language Parameter Meas. display End value End value Meas. unit ppmC3 Meas. unit mgC Analog output Reference gas Value Unit Ref.gas Sample gas Sample gas spec. Name Num. org.C Mol. weight Resp. fact. p. 41, §5.2.3 p. 42, §5.2.5 p. 42, §5.2.5.1 p. 43, §5.2.5.2 p. 43, §5.2.5.3 p. 43, §5.2.5.4 p. 44, §5.2.5.5 p. 46, §5.2.6.3 p. 46, §5.2.6.4 p. 46, §5.2.6.5 GMS810-/GMS811-FIDOR · Operating Instructions · 8013911 V 1-0 · © SICK AG Subject to change without notice p. 45, §5.2.6 p. 45, §5.2.6.1 p. 45, §5.2.6.2 Subject to change without notice Operation Measuring point Name Gas timing Sample gas Zero gas Average ZG Ref.gas Average RG Purge time Application area Adjustment Adjustment results Act. Zero ZDrift abs. ZDrift rel. Act. Ref. RDrift abs. RDrift rel. Last Zero ZDrift abs. ZDrift rel. Last Ref. RDrift abs. RDrift rel. Zero + reference Start adj. Process M. value Zero Start adj. Process M. value Reference Start adj. Process M. value Abort adjustment Abort adj. Process M. value Adjustment time Adjustment time Adjustment days Restart cycle Drift reset Maintenance Ignition Ignition start Flame Process Maintenance mode Set maint. mode Exit maint. mode GMS810-/GMS811-FIDOR · Operating Instructions · 8013911 V 1-0 · © SICK AG p. 46, §5.2.6.6 p. 47, §5.2.6.7 p. 47, §5.2.6.8 p. 48, §5.2.7 p. 48, §5.2.7.1 p. 48, §5.2.7.2 p. 49, §5.2.7.3 p. 49, §5.2.7.4 p. 49, §5.2.7.5 p. 49, §5.2.7.6 p. 49, §5.2.7.7 p. 50, §5.2.7.8 p. 51, §5.2.8 p. 51, §5.2.8.1 p. 51, §5.2.8.2 39 Operation p. 52, §5.2.8.3 p. 52, §5.2.8.4 p. 52, §5.2.8.5 p. 53, §5.2.9 p. 53, §5.2.9.1 p. 53, §5.2.9.2 p. 54, §5.2.9.3 Subject to change without notice Test gas (only in maintenance mode) Zero gas Reference gas Test gas off Standby (only in maintenance mode) Set standby Exit standby Configurations Save user setup Load user setup Load factory setup Factory setting Device information Serial number Location ID Version SOPAS FW Options Line voltage Power Not used Int.ready Ext.ready E.maint.req. Ext.failure MMode=MReq Pr. adaption Heated line Learn mode Nominal 40 GMS810-/GMS811-FIDOR · Operating Instructions · 8013911 V 1-0 · © SICK AG Operation 5.2.3 Measuring display Menu: FIDOR/Measuring List (default) THC 9.38 mgC Bar graph Line recorder FIDOR:MEASURING FIDOR:MEASURING Hg 0 - 10 µg/m3 9,38 THC % 0 mg 15 100 1 50 60 Menu 5.2.4 Menu t Menu “List” measuring display Display of measured values in tabular form. The “List” measuring display is shown: ● Automatically after the start of the system. ● When the <MEAS> button is pressed. Update interval: Approx. every second. “Bar graph” measuring display Display of measured value in bar format. Update interval: Approx. every second. 5.2.4.2 “Line recorder” measuring display Display of measured value in the time diagram. The y-axis is always scaled to 0 - 100% of the indicating range. (The indicating range is shown below the component). Subject to change without notice 5.2.4.1 GMS810-/GMS811-FIDOR · Operating Instructions · 8013911 V 1-0 · © SICK AG 41 Operation 5.2.5 Diagnostic Menu: FIDOR/Diagnostic This menu shows the operating mode. FIDOR:MEASURING Diagnostic 1 2 3 4 5 .4.2 p. 42, §5.2.5.1 p. 43, §5.2.5.2 p. 43, §5.2.5.3 p. 43, §5.2.5.4 p. 44, §5.2.5.5 Operating mode Logbook Counters Hardware Telediagnostic .\FIDOR Back 5.2.5.1 Enter Operating mode Menu: FIDOR/Diagnostic/Operating mode This menu shows the operating mode. Significance Yes = measurement in progress. No = no measurement. Uncertain Yes = measured value is uncertain ( p. 34, §5.1.1). No = measured value is certain. Check Yes = “Check” status is active ( p. 34, §5.1.1). No = “Check” status is not active. Maintenance mode Yes = device is in “maintenance mode” ( p. 34, §5.1.1). No = device is not in “maintenance mode”. Process Display of current device process, e.g. “MEASURING”. Subprocess Display of current subprocess (e.g.: WARM UP). Maint.req signals Counter how often “maintenance request” was initiated. Maintenance Yes = “Maintenance request” status is active ( p. 34, §5.1.1). request No = “Maintenance request” status is not active. Failure signals Counts how often “Failure” was initiated. Failure Yes = “Failure” status is active ( p. 34, §5.1.1). No = “Failure” status is not active. Low temp.detected Yes = temperature is not plausible. No = temperature is plausible. Subject to change without notice Menu item Measuring 42 GMS810-/GMS811-FIDOR · Operating Instructions · 8013911 V 1-0 · © SICK AG Operation 5.2.5.2 Logbook Menu: FIDOR/Diagnostic/Logbook FIDOR:MEASURING Logbook .4.2.2.1 1/3 09-01-01 08:25 The currently existing messages are shown in this menu (Logbook SOPAS ET). ● ● Failure On #1: Pressure ● Current message / number of existing messages Date of occurrence (yy-mm-dd). Time of occurrence (hh:mm). Error message (error number and plain text). (List of messages p. 66, §8.6). .\FIDOR/Diagnostic/Logbook Back 5.2.5.3 Counters Menu: FIDOR/Diagnostic/Counters This menu shows the operating hours counter. Menu item Operating 5.2.5.4 Hardware Menu: FIDOR/Diagnostic/Hardware This menu shows current FIDOR-internal values and states. Menu item pA-amplifier Digital input Subject to change without notice Significance Operating hours [hours] (“operation” means: Device is on). Submenu – – – – – – – – – – – Meas. val. Range Unit Meas.out mgC lin. mgC raw pA State Offset Offset Compress air – Fuel gas – Test gas Digital output – – – – – – Int. ready SD-card CAN-Adr. Ignition plug SOV zero gas SOV reference gas Significance pA-amplifier (measurement amplifier) – Actual measured value – Actual measuring range – Actual unit – Actual output current for actual measured value – Actual measured value in mgC linearized – Actual measured value in mgC (raw value) – Actual current of pA-amplifier in picoampere – State of pA measurement amplifier (OK or FAIL) – Offset of pA-amplifier in counts – Offset of pA-amplifier (internal unit) – Compressed air pressure switch (ON/OFF) ON: Compressed air available – Fuel gas pressure switch (ON/OFF) ON: Fuel gas available – Test gas pressure switch (ON/OFF) ON: Test gas available – Internally ready/not ready – SD-card is inserted/not inserted – Internal CAN address of the FIDOR – ON (ignited), OFF (not ignited) – Zero gas solenoid valve ON (open)/OFF (closed) – Reference gas solenoid valve ON (open)/OFF (closed) GMS810-/GMS811-FIDOR · Operating Instructions · 8013911 V 1-0 · © SICK AG 43 Operation Menu item Temperature Pressure Voltage Current Power Telediagnostic Menu: FIDOR/Diagnostic/Telediagnostic This menu shows an internal diagnosis (for service purposes). Menu item Maintenance request Failures Monitoring Start state Maint.req. xx Failures xx Language 44 Significance – Actual flame temperature – Actual temperature of analysis chamber – Actual temperature of heated line – Actual temperature of catalyst – Not used – Actual temperature of pA amplifier – Actual temperature of electronics board – Actual pressure detector – Actual sample gas inlet pressure – Actual combustion air pressure – Actual fuel gas pressure – Actual control air pressure – Pressure difference P3-P2 – Actual suction voltage – Actual value of 3.3 V voltage supply – Actual value of 5 V voltage supply – Actual value of 24 V voltage supply – Actual ignition current of glow filament in A – Heating output of pA-amplifier – Heating output of detector – Heating output of heated line – Heating output of internal catalyst – Power of electronics – Total power – Maximum allowed power Significance – Short form of message (for a detailed description, see menu further on). – – – – – – Short form of message (for a detailed description, see menu further on). Status tracking of start process. State saved after power-On. Actual pending maintenance requests. Actual pending causes for failure. Language of telediagnostic error messages (German or English). GMS810-/GMS811-FIDOR · Operating Instructions · 8013911 V 1-0 · © SICK AG Subject to change without notice 5.2.5.5 Submenu – Flame – Detector – Line – Catalyst – Pt100-4 – pAA – Electronics – P1 – P2 – P4 – P5 – P3 – P3-P2 – Suction – 3.3V – 5V – 24V – Ignition – pAA – Detector – Line – Catalyst – Electric – Total – Maximum Operation 5.2.6 Parameter Menu: FIDOR/Parameter FIDOR:MEASURING Parameter 1 2 3 4 5 6 7 8 .4.3 p. 45, §5.2.6.1 p. 45, §5.2.6.2 p. 46, §5.2.6.3 p. 46, §5.2.6.4 p. 46, §5.2.6.5 p. 46, §5.2.6.6 p. 47, §5.2.6.7 p. 47, §5.2.6.8 Meas. display End value Reference gas Sample gas Sample gas spec. Measuring point Gas timing Application area .\FIDOR Back 5.2.6.1 Measured values Menu: FIDOR/Parameter/Meas. display Menu item Decimal places 5.2.6.2 Enter Significance Number of decimal places Enter with <Set>, <>, <Save>. End value Menu: FIDOR/Parameter/End value This menu serves to set the parameters for the end value. FIDOR:MEASURING End value .4.3.2 1 End value 3 Meas. unit ppmC3 5 Meas. unit mgC 10 Analog output .\FIDOR Back Subject to change without notice Menu item End value Meas. unit ppmC3 Meas. unit mgC Analog output Enter Significance Input of end value. Enter with <Set>, <>, <Save.> The measuring unit is predefined (input see below). Input of measuring unit ppmC3. Save with <Set>. Input of measuring unit mgC. Save with <Set>. Mode: Analog output: 0-20 mA or 4-20 mA. Enter with <>, <Save>. Activation: – Measuring: Analog output is active only during “Measuring”. – Meas.+Adjust: Analog output is active during “Measuring” and “ADJUSTMENT”. – Always: Analog output is always active. GMS810-/GMS811-FIDOR · Operating Instructions · 8013911 V 1-0 · © SICK AG 45 Operation 5.2.6.3 Reference gas Menu: FIDOR/Parameter/Reference gas This menu is used to define the reference gas. Menu item Value Unit Ref.gas 5.2.6.4 Sample gas Menu: FIDOR/Parameter/Sample gas Menu item Sample gas user defined 5.2.6.5 Significance Name of sample gas (propane, methane, ethane, user defined). Enter with <>, <Save>. Sample gas spec. Menu: FIDOR/Parameter/Sample gas spec. If the settings are to be changed: “Sample gas user defined” must be selected in menu FIDOR/Parameter/Sample gas. Menu item Name Num. org.C Mol. weight Resp. fact. 5.2.6.6 Significance Concentration of reference gas. The reference gas concentration should be approx. 80% of the end value set. Enter with <Set>, <>, <>, <Save>. Unit of reference gas. Enter with <>, <Set>. Reference gas (e.g. propane). Enter with <>, <Set>. Significance Name. Enter with <Set>, <>, <>, <Save>. Number of C atoms of the sample gas molecule. Enter with <Set>, <>, <>, <Save>. Molecular weight of sample gas. Enter with <Set>, <>, <>, <Save>. Response factor of sample gas. Enter with <Set>, <>, <>, <Save>. Measuring point Menu: FIDOR/Parameter/Measuring point Significance Name of measuring point. Enter with <Set>, <>, <>, <Save>. Subject to change without notice Menu item Name 46 GMS810-/GMS811-FIDOR · Operating Instructions · 8013911 V 1-0 · © SICK AG Operation 5.2.6.7 Gas timing Menu: FIDOR/Parameter/Gas timing Menu item Sample gas Zero gas Average ZG Ref.gas Average RG Purge time 5.2.6.8 Significance Purge time [s] with sample gas after adjustment completion until the measured value is released again. Enter with <Set>, <>, <>, <Save>. Purge time [s] with zero gas after activation of zero gas during adjustment. The averaging time then starts. Enter with <Set>, <>, <>, <Save>. Averaging time with zero gas in seconds after activation of zero gas when the measured value is recorded for zero point calibration. Enter with <Set>, <>, <>, <Save>. Purge time [s] with reference gas after activation of reference gas during adjustment. The averaging time then starts. Enter with <Set>, <>, <>, <Save>. Averaging time [s] for reference gas during reference gas adjustment. Purge time [s] with zero gas after adjustment completion until the measured value is released. Enter with <Set>, <>, <>, <Save>. Application area Menu: FIDOR/Parameter/Application area Significance List with predefined measuring tasks. The entry menus above are limited accordingly when a measuring task is selected. Enter with <>, <Save>. Possible are (Internal setting) – SMG Factory (Emission) – EMI (Process) – Process (Lower explosion limit) – LEL (Threshold limit value) – TLV Subject to change without notice Menu item Application GMS810-/GMS811-FIDOR · Operating Instructions · 8013911 V 1-0 · © SICK AG 47 Operation 5.2.7 Adjustment Menu: FIDOR/Adjustment FIDOR:MEASURING Adjustment 1 2 3 4 5 6 7 8 3 Adjustment results Zero + reference Zero Reference Abort adjustment Adjustment time Restart cycle Drift reset p. 48, §5.2.7.1 p. 48, §5.2.7.2 p. 49, §5.2.7.3 p. 49, §5.2.7.4 p. 49, §5.2.7.5 p. 49, §5.2.7.6 p. 49, §5.2.7.7 p. 50, §5.2.7.8 .\FIDOR Back Adjustment results Menu: FIDOR/Adjustment/Adjustment results This menu shows the adjustment results. Menu item Act. Zero ZDrift abs. ZDrift rel. Act. Ref. RDrift abs. RDrift rel. Last Zero ZDrift abs. ZDrift rel. Last Ref. RDrift abs. RDrift rel. 5.2.7.2 Zero + reference Menu: FIDOR/Adjustment/Zero + reference Start an automatic zero and reference point adjustment. Menu item Start adj. Process M. value 48 Significance Date of actual zero point adjustment. Time of actual zero point adjustment. Absolute zero point drift since last adjustment. Limit value as default. Message created when exceeded. Relative zero point drift since last adjustment. Limit value as default. Message created when exceeded. Date of actual reference point adjustment. Time of actual reference point adjustment. Absolute reference point drift since last adjustment. Limit value as default. Message created when exceeded. Relative reference point drift since last adjustment. Limit value as default. Message created when exceeded. Date of previous zero point adjustment. Time of previous zero point adjustment. Absolute drift since factory adjustment. Relative drift since previous zero point adjustment. Date of previous reference point adjustment. Time of previous reference point adjustment. Absolute drift since factory adjustment. Relative drift since previous reference point adjustment. Significance 1 Select menu item. 2 Start zero and reference point adjustment with <Set>. Actual device process (e.g. “ADJUSTMENT”). Actual measured value GMS810-/GMS811-FIDOR · Operating Instructions · 8013911 V 1-0 · © SICK AG Subject to change without notice 5.2.7.1 Enter Operation 5.2.7.3 Zero point Menu: FIDOR/Adjustment/Zero Start an automatic zero point adjustment. Menu item Start adj. Process M. value 5.2.7.4 Significance Start zero point adjustment with <Set>. Actual device process (e.g. “ADJUSTMENT”). Actual measured value. Reference point Menu: FIDOR/Adjustment/Reference. Start an automatic reference point adjustment. Menu item Start adj. Process M. value 5.2.7.5 Abort adjustment Menu: FIDOR/Adjustment/Abort adjustment Abort adjustment Menu item Abort adj. Process M. value 5.2.7.6 Significance Start reference point adjustment with <Set>. Actual device process (e.g. “ADJUSTMENT”). Actual measured value. Significance Abort adjustment with <Set>. Actual device process (e.g. “ADJUSTMENT”). Actual measured value. Adjustment time Menu: FIDOR/Adjustment/Adjustment time This menu is used to set the adjustment times. Menu item Adjustment time Submenu – Activated – HH – MM Adjustment days – Mo. zero – Mo. reference Subject to change without notice – Tu. zero Significance Activation/deactivation of adjustment times. Input of hours. Input of minutes. Select the respective day and set with <Set>. Monday zero point. 0 = off, 1 = weekly, 2 = every two weeks, etc. Monday reference point. 0 = off, 1 = weekly, 2 = every two weeks, etc. Tuesday zero point. 0 = off, 1 = weekly, 2 = every two weeks, etc. etc. 5.2.7.7 Restart cycle Menu: FIDOR/Adjustment/Restart cycle. This menu is used to reinitialize the adjustment cycle. Menu item Restart cycle Significance Restarts the adjustment cycle. 1 Select “Restart cycle”. 2 Confirm with <Set>. GMS810-/GMS811-FIDOR · Operating Instructions · 8013911 V 1-0 · © SICK AG 49 Operation 5.2.7.8 Drift reset Menu: FIDOR/Adjustment/Drift reset. This menu resets the drift. Significance Reset the relative drift. 1 Select “Drift reset”. 2 Confirm with <Set>. Subject to change without notice Menu item Drift reset 50 GMS810-/GMS811-FIDOR · Operating Instructions · 8013911 V 1-0 · © SICK AG Operation 5.2.8 Maintenance Menu: FIDOR/Maintenance FIDOR:MEASURING Maintenance .4.5 1 Ignition p. 51, §5.2.8.1 2 Maintenance mode p. 51, §5.2.8.2 3 Test gas p. 52, §5.2.8.3 (only in Maintenance mode) 4 Standby p. 52, §5.2.8.4 (only in Maintenance mode) 5 Configurations p. 52, §5.2.8.5 .\FIDOR Back 5.2.8.1 Enter Ignition Menu: FIDOR/Maintenance/Ignition The FID ignites automatically during start-up. This menu serves to start ignition manually. Menu item Ignition start Flame Process Significance Start the ignition manually. 1 Select “Ignition start”. 2 Confirm with <Set>. Shows whether flame is burning. Actual device process (e.g. “MEASURING”). If the FID does not ignite p. 65, §8.5 5.2.8.2 Maintenance mode Menu: FIDOR/Maintenance/Maintenance mode The operating state “Maintenance” can be activated/deactivated in this menu. In “Maintenance” only the maintenance state ( p. 34, §5.1.1) is signalled, FIDOR continues to work as usual. Significance 1 Select the desired maintenance state. 2 Confirm with <Set>. When Maintenance mode is exited: It takes approx. 30 seconds for the Maintenance mode to finish. Subject to change without notice Menu item Set maint. mode Exit maint. mode GMS810-/GMS811-FIDOR · Operating Instructions · 8013911 V 1-0 · © SICK AG 51 Operation Test gas Menu: FIDOR/Maintenance/Test gas Zero and reference gas can be activated in this menu. An adjustment is not performed. Menu item Zero gas Reference gas Test gas off 5.2.8.4 Process M.value M.value Test gas off Process M.value M.value Significance Select the desired state and confirm with <Set>. Configurations Menu: FIDOR/Maintenance/Configurations This menu is used to save and load the configuration. Menu item Save user setup Load user setup Load factory setup 52 Process M.value M.value Ref. gas Duration Time limit Significance To switch on the zero gas: <Set>. Selection: “Infinite” or “Limited”. Enter with <Set>, <>, <>, <Save>. Unit: [s]. Deactivation is then automatic. Actual device process (e.g. “MEASURING”). Measured value in selected unit. Is continuously updated. Is continuously updated. To switch on the reference gas: <Set>. Selection: “Infinite” or “Limited”. Enter with <Set>, <>, <>, <Save>. Unit: [s]. Deactivation is then automatic. Actual device process (e.g. “MEASURING”). Measured value in selected unit. Is continuously updated. Is continuously updated. To switch off the reference gas: <Set>. Actual device process (e.g. “MEASURING”). Measured value in selected unit. Is continuously updated. Is continuously updated. Standby Menu: FIDOR/Maintenance/Standby The operating state "Standby" is activated/deactivated in this menu. Standby: The flame is switched off, the device is heated further and purged with zero gas. Menu item Set standby Exit standby 5.2.8.5 Subitem Zero gas set Duration Time limit Significance Save the user setup. Load the saved user setup. Load the factory setup. Select the desired action and confirm with <Set>. GMS810-/GMS811-FIDOR · Operating Instructions · 8013911 V 1-0 · © SICK AG Subject to change without notice 5.2.8.3 Operation 5.2.9 Factory setting Menu: FIDOR/Factory setting FIDOR:MEASURING Factory setting .4.6 1 Device information p. 53, §5.2.9.1 7 Options p. 53, §5.2.9.2 8 Heated line p. 54, §5.2.9.3 .\FIDOR Back 5.2.9.1 Device information Menu: FIDOR/Factory setting/Device information This menu contains general device information. Menu item Serial number Location ID Version SOPAS FW 5.2.9.2 Significance Serial number. Name of measuring location. Internal identification number. Version number. SOPAS version. Firmware version. Options Menu: FIDOR/Factory setting/Options Menu item Line voltage Power – Catalyst – Line – Not used Int. ready Subject to change without notice Enter Ext.ready E.maint.req. Ext.failure MMode=MReq Pr. adaption Significance Shows the mains voltage set on the FIDOR. If the shown voltage is not identical with the available mains voltage: Please contact SICK Customer Service. Shows how the heating is set (fixed). Selection of connected heating: Catalyst, heated line or none. Setting whether internal signal is to be evaluated. Yes: Internal available. No: No signal evaluation. External signal (input): Yes: Signal evaluation. No: No signal evaluation. External signal (input): Yes: Signal evaluation. No: No signal evaluation. External signal (input): Yes: Signal evaluation. No: No signal evaluation. Setting: When device is in Maintenance mode: Should a maintenance request be generated (Yes/No). For pressure adaption: Please contact SICK Customer Service. GMS810-/GMS811-FIDOR · Operating Instructions · 8013911 V 1-0 · © SICK AG 53 Operation 5.2.9.3 Heated line Menu: FIDOR/Factory setting/Heated line Significance Yes: Start automatic determination of heating control parameters. Input of nominal value of the temperature of the heated line [°C]. Enter with <Set>, <>, <>, <Save>. Subject to change without notice Menu item Learn mode Nominal 54 GMS810-/GMS811-FIDOR · Operating Instructions · 8013911 V 1-0 · © SICK AG Operation 5.3 Starting important operating sequences 5.3.1 Check and adjustment with test gas Step 1 2 3 4 Reference p. 23, §3.4 p. 51, §5.2.8.2 p. 46, §5.2.6.3 p. 47, §5.2.6.7 p. 48, §5.2.7.2 Subject to change without notice 5 Action Connect zero and reference gas. Switch device to “Maintenance”: Menu Maintenance/Maintenance mode/Maintenance mode. Set reference gas parameters: Menu Parameter/Reference gas. If necessary, set gas timing parameters: Menu Parameter/Gas timing. Start zero and reference point adjustment: Menu Adjustment/Zero + reference GMS810-/GMS811-FIDOR · Operating Instructions · 8013911 V 1-0 · © SICK AG 55 Subject to change without notice Operation 56 GMS810-/GMS811-FIDOR · Operating Instructions · 8013911 V 1-0 · © SICK AG Shutdown GMS810-/GMS811-FIDOR 6 Shutdown Subject to change without notice Switching the FIDOR off Shutting the FIDOR down Transport Disposal GMS810-/GMS811-FIDOR · Operating Instructions · 8013911 V 1-0 · © SICK AG 57 Shutdown 6. 1 Preparations for shutdown Purge the sample gas path with a dry neutral gas. 6. 2 Shutdown procedure 1 Close off the test gas supply. 2 Close off the fuel gas supply. – The flame goes out. FIDOR (and sample gas sampling, if applicable) are automatically purged with zero gas. 3 Purge for a minimum of 10 minutes. 4 Interrupt sample gas sampling. 5 Close off the instrument air supply. 6 Shut off the zero gas supply (if installed). 7 Switch the FIDOR off 6. 3 Disposal The device can be disposed off as industrial waste. Observe the relevant local conditions for the disposal of industrial waste. Subject to change without notice The following subassemblies contain substances that may have to be disposed of separately: ● Electronics: Capacitors, rechargeable batteries, batteries. ● Display: Liquid of LC display. 58 GMS810-/GMS811-FIDOR · Operating Instructions · 8013911 V 1-0 · © SICK AG Scheduled Maintenance GMS810-/GMS811-FIDOR 7 Scheduled Maintenance Subject to change without notice Maintenance plan GMS810-/GMS811-FIDOR · Operating Instructions · 8013911 V 1-0 · © SICK AG 59 Scheduled Maintenance 7. 1 Maintenance intervals 7.1.1 Maintenance by the user Maintenance intervals depend on the individual application. Maintenance work Reference W Q1 H1 Y1 Check measured values for plausibility Visual inspection Perform adjustment[2] Check exhaust gas line[3] Replace sample gas filter as required --- p. 60, §7.3.1 p. 55, §5.3.1 --- p. 61, §7.3.3 x x x x x x x [1] x x x x [1]W = weekly Q = quarterly, H = half-yearly, Y = yearly. [2]Have performed by skilled persons. [3]If deposits occur. 7. 2 Necessary technical knowledge for maintenance work WARNING: Risk of explosions Only technicians with special FIDOR training are allowed to perform maintenance tasks on the FIDOR. Use original SICK spare parts only. 7. 3 Description of maintenance work WARNING: Risk of burns The sensor block and the sample gas filter are hot when in operation (approx. 200 °C). This also applies to the surfaces. Wear protective gloves. Keep dismantled, hot components away from electrical components and cables and leave to cool at a protected place. 7.3.1 Visual check Gas supply function correct / gas resources are adequate (refer to pressure indication) for – Instrument air – Fuel gas – Test gas ● Heating of the heated line (if installed) is functioning. ● No LED (except the green LED) lights and no measured value flashes. 7.3.2 Adjustment after maintenance Perform adjustment (zero and reference point) after performing maintenance ( p. 55, §5.3.1). 60 GMS810-/GMS811-FIDOR · Operating Instructions · 8013911 V 1-0 · © SICK AG Subject to change without notice ● Scheduled Maintenance 7.3.3 Replacing the sample gas filter NOTICE: Perform work on the sample gas filter only when it is cold. 7.3.3.1 Remove the sample gas filter 1 Unscrew 2 screws of the insulating cover. 2 Remove insulating cover and protection against bends. 3 Unscrew 4 screws of the sample gas inlet block. 4 Remove sample gas inlet block. 5 Remove O-ring and filter from sample gas inlet block. 7.3.3.2 Install the sample gas filter 1 Place filter into sample gas inlet block. 2 Place a new O-ring into sample gas inlet block. 3 Screw sample gas inlet block (1) tight in the desired direction with 4 screws. Fig. 7 Protection against bends and insulating cover 2 3 1 4 Screw protection against bends (2) tight with 2 screws. 1 Screw insulating cover (3) tight with 2 screws. Installed sample gas inlet Subject to change without notice Fig. 8 GMS810-/GMS811-FIDOR · Operating Instructions · 8013911 V 1-0 · © SICK AG 61 Subject to change without notice Scheduled Maintenance 62 GMS810-/GMS811-FIDOR · Operating Instructions · 8013911 V 1-0 · © SICK AG Clearing Malfunctions GMS810-/GMS811-FIDOR 8 Clearing Malfunctions Subject to change without notice Fuses Status messages Implausible measuring results FID does not ignite GMS810-/GMS811-FIDOR · Operating Instructions · 8013911 V 1-0 · © SICK AG 63 Clearing Malfunctions 8. 1 Necessary technical knowledge for repairs WARNING: Risk of explosions Only technicians with special FIDOR training are allowed to perform maintenance tasks on the FIDOR. Use original SICK spare parts only. 8. 2 Replacement of fuses CAUTION: Hazards caused by electric voltages Only let the work described in the following be carried out by skilled electricians who are familiar with potential risks and are able to avoid them. Disconnect the device from the mains. FIDOR contains several fuses. If the POWER LED does not light despite connected supply voltage and switched on mains switch: Check the fuses in the power plug ( p. 64, §8.2.1). If the nominal temperature of the detector is not reached and the ambient temperature is displayed, this could be caused by the tripping of the internal temperature monitor or a defective heating. Contact SICK Customer Service 8.2.1 Mains fuse The mains fuse is in the equipment switch (rear of device). Fuse 8 A medium time-lag, 5x20 Fig. 9 Replacement of fuse 8. 3 Blinking measuring display and yellow LED When the measuring display and the yellow LED are blinking: Status “Maintenance request”, “Failure” or “Uncertain operating state” is active: 1 Press “Menu”. 2 Go to the “FIDOR” menu. 3 Select the “Diagnostic” menu. 4 Select the “Operating mode” menu. 5 Check the error cause. 64 GMS810-/GMS811-FIDOR · Operating Instructions · 8013911 V 1-0 · © SICK AG Subject to change without notice Mains voltage 115 V and 230 V Clearing Malfunctions 8.4 Failure Should a malfunction occur, the FIDOR switches automatically to “Failure”. In this state: ● The red status indicator lights. ● A status signal is set. ● The sample gas path (including sampling probe) is purged with zero gas. ● A relevant error message is displayed on the operator panel and entered in the logbook. If you cannot clear the error: Contact SICK Customer Service. If it was possible to clear the error without switching the FIDOR off, the FIDOR switches automatically to Measuring mode. 8.5 FID does not ignite/burn Malfunction FID does not ignite Fuel gas contaminated or pressure varies Information Ensure correct fuel gas supply. Ignite repeatedly until the flame is burning. Ensure correct fuel gas supply (clean tubes). Subject to change without notice FID goes out “repeatedly” Possible cause Fuel gas supply not available or pressure too low Air in the fuel gas line GMS810-/GMS811-FIDOR · Operating Instructions · 8013911 V 1-0 · © SICK AG 65 Clearing Malfunctions Error messages Message Failure I2C Press.module Software Watchdog Setup Start timeout Flame Zero point Ref. point Heating Catalyst Suction voltage 66 Possible cause Possible clearance Pressure control communi- Switch device off/on. cation error. Software error / program- Switch device off/on. ming error. Load user setup. Load factory setup. Internal fault. Switch device off/on. Check options. Load user setup. Load factory setup. Parameter settings are Switch device off/on. incorrect. Check parameter settings. Load user setup. Load factory setup. Timeout at the start (e.g. Trigger ignition. defective heating). Check utility gases. Check options. Check temperatures and pressures. Switch device off/on. Flame not burning / went Check utility gases. off. Check exhaust gas hose for contamination/damage. Trigger ignition. Zero point adjustment not Switch zero gas manually and check displayed values. possible or If required, check test gas line. drift limit failure exceeded. Check sample gas inlet block for correct assembly. Start zero point adjustment again. Check quality of fuel gas and, if applicable, of zero gas and combustion air. If necessary, check zero gas and combustion air conditioning (catalyst). Reference point adjustSwitch reference gas manually and check displayed ment not possible or values. drift limit failure exceeded. If required, check test gas line. Check sample gas inlet block for correct assembly. Start reference point adjustment again. Check quality of fuel gas and, if applicable, of combustion air. If applicable, check combustion air conditioning (catalyst). Check reference gas supply. Heating fault of analyzer Check temperatures and, if necessary, wait until temheating or of heated mea- peratures are regulated. surement amplifier. Check ambient temperature. Ensure air circulation. Switch device off Allow to cool down. Switch device on. Heating fault of integrated Check options. catalyst. Check catalyst temperature and, if necessary, wait until temperature is regulated. Suction voltage fault. Switch device off/on. GMS810-/GMS811-FIDOR · Operating Instructions · 8013911 V 1-0 · © SICK AG Subject to change without notice 8. 6 Clearing Malfunctions Message Pressure EEPROM Possible clearance Check utility gases. Check utility gas lines. Check pressures. Remove heated line/sample gas sampling and check function. Check/replace sample gas filter. Switch device off/on. Check quality of zero gas, fuel gas and combustion air. Switch test gas and check displayed values. Perform adjustment. Check parameter settings. Load user setup. Load factory setup. Heated line Heating fault of heated line. Check options. Check temperature of heated line and, if applicable, wait until temperature is regulated. External failure Digital input: External signal Check options whether function is desired. failure. Check initiator of external signal. Signal ready Digital input: External signal Check options whether function is desired. ready. Check initiator of external signal. SCI1/RS232 Internal fault. Switch device off/on. SCI2/RS232 Internal fault. Switch device off/on. Glow plug Glow plug not working cor- Please contact SICK Customer Service. rectly. Maintenance request Maintenance mode Maintenance mode is acti- Exit maintenance mode after maintenance work. vated. Setup not released Parameter setting not Please contact SICK Customer Service. released. Logbook Logbook error. Switch device off/on. Zero point Drift limit exceeded warn- Switch zero gas manually and check displayed values. ing. If required, check test gas line. Check sample gas inlet block for correct assembly. Start zero point adjustment again. Check quality of fuel gas and, if applicable, of zero gas and combustion air. If necessary, check zero gas and combustion air conditioning (catalyst). Ref. point Drift limit exceeded warn- Switch reference gas manually and check displayed ing. values. If required, check test gas line. Check sample gas inlet block for correct assembly. Start reference point adjustment again. Check quality of fuel gas and, if applicable, of combustion air. If applicable, check combustion air conditioning (catalyst). Measured value Subject to change without notice Possible cause Working pressures cannot be regulated. Sample gas flow too low / too high. Process pressure outside specification. Sample gas filter blocked. Pressure control defective. Parameter memory hardware error. Measured value not plausible. Measured value overflow/ underflow. GMS810-/GMS811-FIDOR · Operating Instructions · 8013911 V 1-0 · © SICK AG 67 Clearing Malfunctions Message Heating Possible cause Heating warning of analyzer heating or of heated measurement amplifier. Catalyst Heating warning of integrated catalyst. Suction voltage warning. Working pressures cannot be regulated. Sample gas flow too low / too high. Process pressure out of specification. Sample gas filter blocked. Pressure control incorrect. Digital input: External main- Check options whether function is desired. tenance request signal Check initiator of external signal. SD-card not available. Please contact SICK Customer Service. Suction voltage Pressure Ext.maint.request SD-Card Messages Measuring Check Maintenance mode Z.+R.adjustment Zero adjustment Ref.adjustment For information. For information. For information. For information. For information. For information. For information. Subject to change without notice Uncertain Measuring mode. Functional check. Maintenance mode. Zero and reference point adjustment. Zero point adjustment. Reference point adjustment. Uncertain state. Possible clearance Check temperatures and, if necessary, wait until temperatures are regulated. Check ambient temperature. Ensure air circulation. Switch device off Allow to cool down. Switch device on. Check catalyst temperature and, if necessary, wait until temperature is regulated. Please contact SICK Customer Service. Check utility gases. Check utility gas lines. Check pressures. Remove heated line/sample gas sampling and check function. Check/replace sample gas filter. 68 GMS810-/GMS811-FIDOR · Operating Instructions · 8013911 V 1-0 · © SICK AG Technical Documentation GMS810-/GMS811-FIDOR 9 Technical Documentation Subject to change without notice Dimensions Technical Data GMS810-/GMS811-FIDOR · Operating Instructions · 8013911 V 1-0 · © SICK AG 69 Technical Documentation 9. 1 Approvals 9.1.1 Conformity The technical design of this device complies with the following EU directives and EN standards: ● EU Directive NSP 2006/95/EC ● EU Directive EMC 2004/108/EC Applied EN standards: ● EN 61010-1, Safety requirements for electrical equipment for measurement, control and laboratory use ● EN 61326, Electrical equipment for measurement, control and laboratory use - EMC requirements 9.1.2 Electrical protection Insulation: Protection class 1 according to EN 61010-1. ● Measuring category II in accordance with EN61010-1. ● Contamination: The device operates safely in an environment up to degree of contamination 2 according to EN 61010-1 (usual, nonconductive contamination and temporary conductivity by occasional moisture condensation). Subject to change without notice ● 70 GMS810-/GMS811-FIDOR · Operating Instructions · 8013911 V 1-0 · © SICK AG Technical Documentation 9.2 Heated line Fig. 10 Line Fig. 11 Connection Pin 1 2 3 4 5 6 PE Assignment Heating Heating Pt100 monitoring Pt100 monitoring Pt100 control Pt100 control Protective conductor The pin numbers can be found on the plug. Subject to change without notice Description The heated line has a PTFE or stainless steel core with an outer diameter of 6 mm and an inner diameter of 4 mm. The PTFE core is either fitted securely with stainless steel armoring or is replaceable. The heating consists of high-quality heating conductor alloys which are sheathed with temperature-resistant insulation materials. The heating conductors are protected against humidity and braided with protective conductors. A PT 100 resistor is installed for controlling the temperature. A second sensor is built in for monitoring the temperature according to VDE. The outer sheath consists of plastic or optionally of steel braiding. Application conditions PTFE as well as stainless steel is resistant against numerous media. The most important exceptions are: – PTFE swells when exposed to hydrocarbons containing fluorine and to oils. – Alkali metals in molten or dissolved form and with brown discoloration affect PTFE. – Halogens effect a transformation. – Stainless steel can be affected by acidic gases. GMS810-/GMS811-FIDOR · Operating Instructions · 8013911 V 1-0 · © SICK AG 71 Technical Documentation Dimensions 9. 3 483 (19) X4 X7 X5 101.5 (4) X3 37,75 (1.5) 177 (7) 465 (18.3) 29 29 29 29 29 (1.14) (1.14) (1.14) (1.14) (1.14) 221 (8.7) 145 (5.7) 72 120 (4.7) 42 (1.65) Subject to change without notice 348 (13.7) 444 (17.5) Dimensions in mm GMS810-/GMS811-FIDOR · Operating Instructions · 8013911 V 1-0 · © SICK AG Technical Documentation 9.4 Technical data End range set delivered system documentation. Measured values[1] Measuring principle Measuring component Concentration unit Smallest measuring range Largest measuring range Tested measuring range[2] Flame ionization detector Total hydrocarbon (CnHm) mg org. C/m3, mg/m3, ppm, ppm C1, ppm C3, % by volume % LEL, % TLV 0 .. 15 mg org. C/m3, 0 .. 100 000 mg org. C/m3, 0 .. 15 mg C/m3 0 .. 50 mg C/m3 0 .. 150 mg C/m3 0 .. 500 mg C/m3 [1]FIDOR continues to display measured values when the measuring range is exceeded. The specified precision is achieved only in the calibrated measuring range. [2]Certified measuring range according to DIN EN 15267-3. Time behavior Warming up time Setting time t90[1] < 1 h (at room temperature) 2.5 s [1]At the sample gas inlet Measuring behavior Zero drift[1] Sensitivity drift[1] Reproducibility Repeatability Detection limit Linearity < 3% rel. in maintenance interval[2] 1% of full scale reading 1% of full scale reading 0.05 mg orgC 2% of full scale reading Subject to change without notice [1] With daily zero point adjustment [2]Maintenance interval = 12 weeks Device features Design Rack units Weight Heating temperature – Detector – External heating (optional) Sample gas flow Sample gas input pressure 19" slide-in enclosure 4 RU (plus 1 RU for thermal balance) 17 kg (37.5 lbs) 180 °C (356 °F) 60 .. 250 °C (140 .. 480 °F) (adjustable) Approx. 120 l/h 90 .. 110 ... 0.9 kPa 1.1 bar) GMS810-/GMS811-FIDOR · Operating Instructions · 8013911 V 1-0 · © SICK AG 73 Technical Documentation Ambient conditions Ambient temperature +5 … +40 °C (40 ... 104 °F) Storage temperature –20 … +70 °C (0 ... 160 °F) Relative humidity Max. 95% (without condensation) Ambient air pressure: 900 … 1100 hPa (mbar)[1] Degree of protection IP 40, for indoor use Allowable contamination: Degree of contamination 2 [1]If the pressure is different: Consult SICK Customer Service and perform a pressure adaption, if required. Power supply Mains voltage: – Electronics – Heating Mains frequency Power input: – Electronics – Detector heating – External heating Device connector mains fuse Gas supply Gas 90 .. 240 VAC (multi-range power supply unit) 115 VAC or 230 VAC (optionally) 47 .. 63 Hz Max. 50 VA Max. 350 VA Max. 300 VA For 115 V and 230 V: 8 A, medium time-lag, Type 5x20 (replaceable fusible cutout) Quality Particle size max. 1 m, oil content max. 0.1 mg/m3, pressure dew point max. –40 °C. Fuel gas H2 > 5.0 – Measuring range > 500 mgC/m3: instrument air – Measuring range <= 500 mgC/m3: Combustion air Internal catalyst (option) – Measuring range <= 500 mgC/m3: External catalyst Zero gas Catalyst or external – Recommendation: Propane in synthetic air. Reference gas – Concentration: Approx. 75% of full scale reading. Instrument air Flow Input pressure 1000 l/h 400 ± 20 kPa (4 ± 0.2 bar) Connection[1] 60 ml/min. 20 ml/min. 250 l/h G 1/8" 300 ± 20 kPa (3 ± 0.2 bar) 300 l/h Subject to change without notice [1]Screw connections as supplied 74 GMS810-/GMS811-FIDOR · Operating Instructions · 8013911 V 1-0 · © SICK AG I nd e x Keywords A Adjustment . . . . . . . . . . . . . . . . . . . . . . . . . . . . . . . . - Menu . . . . . . . . . . . . . . . . . . . . . . . . . . . . . . . . . . . Approvals . . . . . . . . . . . . . . . . . . . . . . . . . . . . . . . . . . Assignment of buttons . . . . . . . . . . . . . . . . . . . . . . . C CAN bus . . . . . . . . . . . . . . . . . . . . . . . . . . . . . . . . . . . - Connection . . . . . . . . . . . . . . . . . . . . . . . . . . . . . . . Check (status) . . . . . . . . . . . . . . . . . . . . . . . . . . . . . . Combustion air . . . . . . . . . . . . . . . . . . . . . . . . . . . . . - Connection . . . . . . . . . . . . . . . . . . . . . . . . . . . . . . . Connecting the sample gas . . . . . . . . . . . . . . . . . . . Contrast . . . . . . . . . . . . . . . . . . . . . . . . . . . . . . . . . . . Controls . . . . . . . . . . . . . . . . . . . . . . . . . . . . . . . . . . . 55 48 70 35 15 29 34 18 24 25 34 34 Diag (button) . . . . . . . . . . . . . . . . . . . . . . . . . . . . . . . 35 Diagnostic (menu) . . . . . . . . . . . . . . . . . . . . . . . . . . 42 Dimensions . . . . . . . . . . . . . . . . . . . . . . . . . . . . . . . . 72 Display . . . . . . . . . . . . . . . . . . . . . . . . . . . . . . . . . . . . 34 Disposal . . . . . . . . . . . . . . . . . . . . . . . . . . . . . . . . . . . 58 Documentation (more detailed) . . . . . . . . . . . . . . . . . 9 Electrical installation . . . . . . . . . . . . . . . . . . . . . . . . Error (ignition) . . . . . . . . . . . . . . . . . . . . . . . . . . . . . . Error messages . . . . . . . . . . . . . . . . . . . . . . . . . . . . . Ethernet . . . . . . . . . . . . . . . . . . . . . . . . . . . . . . . . . . . - Connection . . . . . . . . . . . . . . . . . . . . . . . . . . . . . . . F Failure (status) . . . . . . . . . . . . . . . . . . . . . . . . . . . . . Flow plan . . . . . . . . . . . . . . . . . . . . . . . . . . . . . . . . . . Fuel gas . . . . . . . . . . . . . . . . . . . . . . . . . . . . . . . . . . . - Connection . . . . . . . . . . . . . . . . . . . . . . . . . . . . . . . Fuse . . . . . . . . . . . . . . . . . . . . . . . . . . . . . . . . . . . . . . 26 65 66 15 29 34 17 18 24 64 G Gas connections . . . . . . . . . . . . . . . . . . . . . . . . . . . . 23 Gas flow plan . . . . . . . . . . . . . . . . . . . . . . . . . . . . . . 17 H Heated line . . . . . . . . . . . . . . . . . . . . . . . . . . . . . . . . 19 - Connection . . . . . . . . . . . . . . . . . . . . . . . . . . . . . . . 71 I Laying the gas lines . . . . . . . . . . . . . . . . . . . . . . . . . 23 LED (status) . . . . . . . . . . . . . . . . . . . . . . . . . . . . . . . . 34 Logbook . . . . . . . . . . . . . . . . . . . . . . . . . . . . . . . . . . . 16 M D E L Indicators . . . . . . . . . . . . . . . . . . . . . . . . . . . . . . . . . 34 Installation . . . . . . . . . . . . . . . . . . . . . . . . . . . . . . . . 22 Installation location . . . . . . . . . . . . . . . . . . . . . . . . . . 8 Instrument air . . . . . . . . . . . . . . . . . . . . . . . . . . . . . . 18 - Connection . . . . . . . . . . . . . . . . . . . . . . . . . . . . . . . 24 Intended use . . . . . . . . . . . . . . . . . . . . . . . . . . . . . . . . 8 Interfaces . . . . . . . . . . . . . . . . . . . . . . . . . . . . . . . . . 15 Maintenance . . . . . . . . . . . . . . . . . . . . . . . . . . . . . . . Maintenance intervals . . . . . . . . . . . . . . . . . . . . . . . Maintenance mode (status) . . . . . . . . . . . . . . . . . . . Maintenance request (status) . . . . . . . . . . . . . . . . . Meas (button) . . . . . . . . . . . . . . . . . . . . . . . . . . . . . . Measuring display . . . . . . . . . . . . . . . . . . . . . . . . . . . Measuring principle . . . . . . . . . . . . . . . . . . . . . . . . . Menu tree . . . . . . . . . . . . . . . . . . . . . . . . . . . . . . . . . Modbus . . . . . . . . . . . . . . . . . . . . . . . . . . . . . . . . . . . 51 60 34 34 35 41 14 36 15 N No ignition . . . . . . . . . . . . . . . . . . . . . . . . . . . . . . . . . 65 P Parameter (menu) . . . . . . . . . . . . . . . . . . . . . . . . . . 45 Product characteristics . . . . . . . . . . . . . . . . . . . . . . 12 Product identification . . . . . . . . . . . . . . . . . . . . . . . . 12 R Reference (menu) . . . . . . . . . . . . . . . . . . . . . . . . . . . 48 Reference gas (menu) . . . . . . . . . . . . . . . . . . . . . . . 52 Remote control . . . . . . . . . . . . . . . . . . . . . . . . . . . . . 15 S Sample gas filter . . . . . . . . . . . . . . . . . . . . . . . . . . . . - Replacing . . . . . . . . . . . . . . . . . . . . . . . . . . . . . . . . Save/load user setups . . . . . . . . . . . . . . . . . . . . . . . Scope of delivery . . . . . . . . . . . . . . . . . . . . . . . . . . . Signal connections . . . . . . . . . . . . . . . . . . . . . . . . . . SOPAS ET . . . . . . . . . . . . . . . . . . . . . . . . . . . . . 15 Standby (menu) . . . . . . . . . . . . . . . . . . . . . . . . . . . . Start-up . . . . . . . . . . . . . . . . . . . . . . . . . . . . . . . . . . . Status bar . . . . . . . . . . . . . . . . . . . . . . . . . . . . . . . . . Status LEDs . . . . . . . . . . . . . . . . . . . . . . . . . . . . . . . . Switch off . . . . . . . . . . . . . . . . . . . . . . . . . . . . . . . . . . Switch on . . . . . . . . . . . . . . . . . . . . . . . . . . . . . . . . . . T Technical data . . . . . . . . . . . . . . . . . . . . . . . . . . . . . Test gas . . . . . . . . . . . . . . . . . . . . . . . . . . . . . . . . . . . - Connection . . . . . . . . . . . . . . . . . . . . . . . . . . . . . . . Test gas (menu) . . . . . . . . . . . . . . . . . . . . . . . . . . . . Test gas feed . . . . . . . . . . . . . . . . . . . . . . . . . . . . . . . Transport . . . . . . . . . . . . . . . . . . . . . . . . . . . . . . . . . . Type plate . . . . . . . . . . . . . . . . . . . . . . . . . . . . . . . . . GMS810-/GMS811-FIDOR · Operating Instructions · 8013911 V 1-0 · © SICK AG 19 61 52 22 27 16 52 32 34 34 58 32 73 18 24 52 55 22 12 75 In dex U Uncertain - Status . . . . . . . . . . . . . . . . . . . . . . . . . . . . . . . . . . . 34 Z Zero (menu) . . . . . . . . . . . . . . . . . . . . . . . . . . . . . . . . 48 Zero gas (menu) . . . . . . . . . . . . . . . . . . . . . . . . . . . . 52 76 GMS810-/GMS811-FIDOR · Operating Instructions · 8013911 V 1-0 · © SICK AG I nd e x GMS810-/GMS811-FIDOR · Operating Instructions · 8013911 V 1-0 · © SICK AG 77 8013911/2014-02/V1-0/ISubject to change without notice Australia Phone +61 3 9457 0600 1800 334 802 – tollfree E-Mail [email protected] Belgium/Luxembourg Phone +32 (0)2 466 55 66 E-Mail [email protected] Brasil Phone +55 11 3215-4900 E-Mail [email protected] Canada Phone +1 905 771 14 44 E-Mail [email protected] Česká Republika Phone +420 2 57 91 18 50 E-Mail [email protected] China Phone +86 4000 121 000 E-Mail [email protected] Phone +852-2153 6300 E-Mail [email protected] Danmark Phone +45 45 82 64 00 E-Mail [email protected] Deutschland Phone +49 211 5301-301 E-Mail [email protected] España Phone +34 93 480 31 00 E-Mail [email protected] France Phone +33 1 64 62 35 00 E-Mail [email protected] Great Britain Phone +44 (0)1727 831121 E-Mail [email protected] India Phone +91–22–4033 8333 E-Mail [email protected] Israel Phone +972-4-6881000 E-Mail [email protected] Italia Phone +39 02 27 43 41 E-Mail [email protected] Japan Phone +81 (0)3 3358 1341 E-Mail [email protected] Magyarország Phone +36 1 371 2680 E-Mail [email protected] Nederland Phone +31 (0)30 229 25 44 E-Mail [email protected] SICK AG | Waldkirch | Germany | www.sick.com Norge Phone +47 67 81 50 00 E-Mail [email protected] Österreich Phone +43 (0)22 36 62 28 8-0 E-Mail [email protected] Polska Phone +48 22 837 40 50 E-Mail [email protected] România Phone +40 356 171 120 E-Mail [email protected] Russia Phone +7-495-775-05-30 E-Mail [email protected] Schweiz Phone +41 41 619 29 39 E-Mail [email protected] Singapore Phone +65 6744 3732 E-Mail [email protected] Slovenija Phone +386 (0)1-47 69 990 E-Mail [email protected] South Africa Phone +27 11 472 3733 E-Mail [email protected] South Korea Phone +82 2 786 6321/4 E-Mail [email protected] Suomi Phone +358-9-25 15 800 E-Mail [email protected] Sverige Phone +46 10 110 10 00 E-Mail [email protected] Taiwan Phone +886 2 2375-6288 E-Mail [email protected] Türkiye Phone +90 (216) 528 50 00 E-Mail [email protected] United Arab Emirates Phone +971 (0) 4 88 65 878 E-Mail [email protected] USA/México Phone +1(952) 941-6780 1 (800) 325-7425 – tollfree E-Mail [email protected] More representatives and agencies at www.sick.com