1
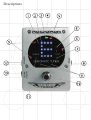
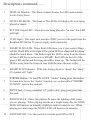
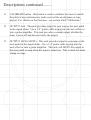
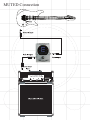
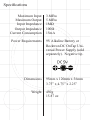
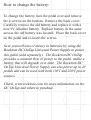
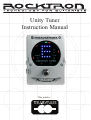
Unity Tuner
Instruction Manual
This pedal is:
Compliance
Your Unity Tuner™ pedal has been tested and complies with the following
Standards and Directives as set forth by the European Union:
Council Directive(s):
89/336/EEC
Standard(s):
EN55013, EN50082-1
Electromagnetic Compatibility
This means that this product has been designed to meet stringent guidelines
on how much RF energy it can emit, and that it should be immune from other
sources of interference when properly used. Improper use of this equipment
could result in increased RF emissions, which may or may not interfere with
other electronic products.
To insure against this possibility, always use good shielded cables for all
audio input and output connections. This will help insure compliance with the
Directive(s).
For more information about other Rocktron products, please see your local
dealer or one of our importers closest to you (listed on the Rocktron website
(www.rocktron.com).
Read all instructions contained in this manual.
Keep these instructions
Heed all warnings
Follow all instructions.
Do not use this apparatus near water.
Clean with dry cloth
Copyright © 2011 GHS Corporation
All Rights Reserved.
Precautions
Refer all service to qualified service personnel. Servicing is required when
the apparatus has been damaged in any way, such as power supply or plug
is damaged, liquid has been spilled or objects have fallen into the apparatus
or if the apparatus has been exposed to rain or moisture, does not operate
normally or has been dropped.
DO NOT ATTEMPT TO SERVICE THIS EQUIPMENT. QUALIFIED
PERSONNEL SHOULD SERVICE THIS EQUIPMENT ONLY. DO
NOT MAKE ANY INTERNAL ADJUSTMENTS OR ADDITIONS TO
THIS EQUIPMENT AT ANY TIME OR TAMPER WITH INTERNAL
ELECTRONIC COMPONENTS AT ANY TIME. FAILURE TO FOLLOW THESE INSTRUCTIONS MAY VOID THE WARRANTY OF THIS
EQUIPMENT AS WELL AS CAUSING A SHOCK HAZARD.
OPERATING TEMPERATURE
Do not expose this unit to excessive heat. This unit is designed to operate
between 32 F and 104 F (0 C and 40 C). This unit may not function properly under extreme temperatures.
Do not block any ventilation openings (if applicable). Install in accordance
with the manufacturer’s instructions.
Do not install near any heat sources such as radiators, heat registers, stoves
or other apparatus (including amplifiers) that produce heat.
This product is not equipped with a plug or cable. This pedal runs on a 9
Volt Battery, if a 9Volt DC adapter is the used please follow adapter manufacturer’s operation instructions.
Only used attachments/accessories specified by the manufacturer.
Do not use this product with any case, stand tripod, bracket or table that
is not specified by the manufacturer. Insure that the case, stand, tripod,
bracket etc. is properly adjusted and setup (follow all instructions). Extra
care and caution should be taken to avoid tip over and injury.
Unplug this apparatus during lightening storms or when unused during long
periods of time.
Introduction:
Congratulations on your purchase of the Rocktron Unity Tuner.
The Unity Tuner is a true “on-stage” tuner for any gig. The Unity
Tuner’s large LED NOTE display makes it easy to see what note
you are tuning, even from a distance. Several Red LEDs are also
used to help you easily determine if you are sharp or flat and by
how much.
A unique feature to the Unity Tuner are the photocells. These
photocells sense the lighting situation you are playing in and
adjust the brightness of the LED Note Display to accommodate
that lighting. When you are playing outside on a sunlit stage,
the photocells sense that the area is bright and increase the LED
intensity making the LEDs brighter and easier to see. The opposite
effect happens when playing on a dark, low light situation. The
photocells sense that the lighting is low and dim the LED Note
Display making it easier on the eyes.
The Unity Tuner is equipped with a “STROBE” function for those
who require extremely accurate tuning. The STROBE function is a
sensitive tool that really allows you to dial in the exact tuning.
Two outputs are provided as well. The jack marked “OUTPUT”
provides a constant signal path to other effects or amps when you
turn on the tuner. This allows you to hear what you are tuning
through your amp. When the “OUTPUT (MUTE)” is used, the
Unity Tuner cuts the signal to the next effect or amp and allows you
to tune in silence, This is a very useful on-stage tool.
You are now ready to tune in all playing situations!
Descriptions
Descriptions continued.........
1
DISPLAY Window - This black window houses the LEDs and controls
for the Unity Tuner
2
NOTE LED BANK - This bank of blue LEDs will display the note being
played or tuned.
3
IN TUNE Green LED - when the note being played is “in tune” this LED
will light.
4
9VDC Input - This input jack provides 9VDC power to the pedal from the
Rocktron DC OnTap 9V power supply (sold separately).
5
SHARP/FLAT LEDS - These Red LEDs show you if your note is Sharp
or Flat. Red LEDs to the right of the green LED are sharp and the string
should be tuned down. The farther right the LED is away from the Green
in Tune LED the more the note is SHARP. Red LEDs to the left of the
green LED are flat and the string should be tuned up. The farther left the
LED is away from the Green in tune LED the more the note is flat.
6
SHARP/FLAT Indicator - If the note being played is “sharp” the “sharp”
(#) symbol will “light.”
7
STROBE Button - To turn ON or OFF “strobe” tuning press this button.
To learn how to use the “strobe” function, see section called “STROBE
TUNING” later in this manual.
8
INPUT Jack - Using a standard 1/4” guitar cable, plug your guitar into
this jack.
9
PHOTOCELLS - These two photocells sense the lighting of the venue
you are playing. When playing outside on a bright sunny day, the NOTE
LEDs will increase in intensity slightly to make it eaiser to see. When
playing on a dark stage the NOTE LEDs will decrease in intensity.
10
FOOTSWITCH - Use this switch to turn the pedal ON or OFF
Descriptions continued.........
11
CALIBRATE button - this button is used to calibrate the tuner to match
the pitch of any instrument or audio source (like an old piano or tape
player). For details on this function - see section titled “Calibration.”
12
OUTPUT Jack - This jack provides output to your amp or the next pedal
in the signal chain. Use a 1/4” guitar cable to plug into the next effect or
into a guitar amplifier. This jack provides a contant output whether the
tuner is on or off and does not mute the output.
13
OUTPUT JACK (MUTE)- This jack provides output to your amp or the
next pedal in the signal chain. Use a 1/4” guitar cable to plug into the
next effect or into a guitar amplifier. This jack will MUTE the output to
the next pedal or amp when the tuner is turned on. This is ideal for silent
tuning on stage.
MUTED Connection
CONSTANT Connection
Tuning Instructions:
Step 1 - plug the guitar/bass into the tuner - see “connections” section.
Step 2 - play a note on your guitar. Pluck your E string, if needed, adjust your
tuning machine on your instrument until the letter “E” appears in the NOTE
Display window.
Step 3 - if your note is flat - the “FLAT” LEDs to the left of the IN TUNE green
LEDs will light. The farther away the red LED is from the green IN TUNE LED
the more flat the tuning is. If a Flat LED is lit, tune your string up. During this
process the LEDs will begin to light and move closer to the green IN TUNE
LED.
Step 4 - if your note is sharp - the “SHARP” LEDs to the right of the IN TUNE
green LEDs will light. The farther away the red LED is from the green IN
TUNE LED the more sharp the tuning is. If a sharp LED is lit, tune your string
down. During this process the LEDs will begin to light and move closer to the
green IN TUNE LED.
Step 5 - Continue with step 3 or step 4 until the flat or sharp LEDs are not lit
and the green “IN TUNE” LED lights. At this point the string is in tune.
Step 6 - Continue steps 2-5 but using your other strings on your guitar or bass.
Tuning Instructions - STROBE:
The STROBE function of the UNITY Tuner is extremely senstive.
Step 1 - plug the guitar/bass into the tuner and press the “STROBE” button. At
this point the RED LEDs will appear to rotate counter clockwise.
Step 2 - play a note on your guitar. Pluck your E string, if needed, adjust your
tuning machine on your instrument until the letter “E” appears in the NOTE
Display window.
Step 3 - if your note is flat - the red LEDs will appear to be rotating counter
clockwise, showing you that the note being played is flat. The faster the LEDs
rotate counter clockwise, the more flat the tuning is. Tune your string up. During this process the rotation of the LEDs will appear to slow down as you approach being in tune. When the LEDs don’t appear to be rotating and the green
IN TUNE LED lights, then the note is in tune.
Step 4 - if your note is sharp - the red LEDs will appear to be rotating clockwise, showing you that the note being played is sharp. The faster the LEDs
rotate clockwise, the more sharp the tuning is. Tune your string down. During
this process the rotation of the LEDs will appear to slow down as you approach
being in tune. When the LEDs don’t appear to be rotating and the green IN
TUNE LED lights, then the note is in tune.
Step 5 - Continue with step 3 or step 4 until the flat or sharp LEDs don’t appear
to be rotating and the green “IN TUNE” LED lights. At this point the string is
in tune.
Step 6 - Continue steps 2-5 but using your other strings on your guitar or bass.
Calibration:
To match the pitch of any instrument or audio source (like an old piano or tape
player) press the “Calibrate” button while simultaneously playing the note on
the instrument. (Note: you might have to first tune one string on the guitar or
bass by ear to match the actual note if the piano is out of standard tuning or if
the tape player you are playing along with runs slower or faster than normal).
Once you have one note on the guitar tuned to the source - simply play that
note on the guitar - while the note is “ringing” press the Calibrate button. The
tuning pitch of the tuner will automatically be shifted to match the pitch of the
audio source. Release the button and tune the remaining strings as normal with
the tuner. The tuner at this point has automatically adjusted the tuning range to
match that pitch. To reset the tuner to standard 440Hz pitch turn off the tuner
and then back on again with the footswitch (see controls - point 6).
Hints and Tips:
The Unity Tuner is sensitive, so it is not necessary to strike your string very
hard. Standard string attack will work. Additionally, if you are in a loud
environment try using harmonics to tune your instrument. Lightly touch the
string over the 12th fret of your instrument and pick the string with normal pick
attack. This will create a harmonic. It will work on all strings. The MUTED
Output is ideal for tuning in live situations. This allows you to tune without everyone in the audience hearing you tune. Additionally, this will mute the signal
going to your amplifier which will help you keep down noise generated if you
are using a high gain amplifier.
As with all stomp boxes, when you are not using it, unplug all cables to prolong
battery life.
Specifications
Maximum Input
Maximum Output
Input Impedance
Output Impedance
Current Consumption
Power Requirements
Dimensions
Weight
3.8dBu
5.8dBu
1MΩ
100Ω
15mA
9V Alkaline Battery or
Rocktron DC OnTap Universal Power Supply (sold
separately). Negative tip.
95mm x 120mm x 56mm
3.75” x 4.75” x 2.25”
450g
15.87 oz
How to change the battery:
To change the battery, turn the pedal over and remove
the 4 screws on the bottom. Remove the back cover.
Carefully remove the old battery and replace it with a
new 9V Alkaline battery. Replace battery in the same
area as the old battery was located. Place the back cover
on the pedal and re-insert the screws.
Save yourself tons of money in batteries by using the
Rocktron DC OnTap Universal Power Supply to power
this pedal (sold separately). The Rocktron DC OnTap
provides a constant flow of power to the pedal, unlike a
battery that will degrade over time. The Rocktron DC
OnTap Universal Power Supply can also power up to 20
pedals and can be used with both 110V and 220V power
sources.
Check, www.rocktron.com for more information on the
DC OnTap and where to purchase.
Rocktron - A Division of GHS Corporation
2813 Wilber Ave
Battle Creek MI 49037
USA
www.rocktron.com
[email protected]
tel: 1-269-968-3351
rev. 060711
2011.1