
1
Welcome Message
Welcome Message
Thank you for choosing a DP-P2, the High Definition Digital TV Recorder.
The DP-P2 supports the true dual-tuner PVR features for the broadcasting programs in HD (MPEG2 1080i).
And you can now pause, rewind and record the pay TV with the line-input. You don’t need any tape or DVD for recording.
The DP-P2 supports the IceTV Interactive so that you can schedule programs from your PC or mobile phone.
The DP-P2 also supports all the ways of watching the multimedia content with your PC and Internet;
The USB ports and the networking feature combining with DivX playback, you can play any multimedia content with no external device.
With a DP-P2, you don’t have to bring your PC to your living room any more. And you will share valuable time and experience with your family.
To enjoy all the new features of the DP-P2, please make sure that the latest firmware is installed on
your system. In the new firmware, new features which are not described in this manual can be added
and some features described in this manual can be altered or removed for the best performance and
users’ experiences.
Please visit our website, www.beyonwiz.com.au, to get new information of the firmware and features.
i
Precaution
Precaution
Read this manual carefully before using this product. The cautions
z
Do not repair, disassemble or modify this apparatus yourself. It can
described below contain important information about safety, and are
cause fire or electric shock. If internal checking or maintenance is
categorized into: Danger, Warning and Notice. The company will not be
needed, please contact your service center or agency.
responsible for accidents or damage resulting from careless handling by
z
Do not block or cover any ventilation opening. A fire can result from
overheating.
the user.
z
Turn off and unplug the power as quickly as possible during electric
storms. Failure to do so can result in fire or electric shock.
DANGER
z
possible during electric storms. Failure to do so can result in fire or
If the user mishandles the product, there is loss of life risk or
electric shock.
critical injury.
z
z
it is damaged, please turn off the power and remove the plug from
the power outlet, fire or electric shock may occur.
non-specified A/C outlet, it can result in fire or electric shock.
The product must not be exposed to water or liquid of any kind, or be
exposed to drips or splashes. It can result in fire or electric shock.
z
Do not place heavy objects, including the product itself, on top of the
power cord. If it is damaged, it can result in fire or electric shock.
z
Do not place metal objects on top of the apparatus. If metal objects
fall onto the apparatus, it could result in fire or electric shock.
ii
Do not drop the apparatus (for example by putting it in a place where
it may fall) or subject it to impact. The product might be damaged. If
Connect the power cord only to A/C outlets as specified by the user
manual or product specification. If the power code is connected to a
z
Remove the antenna’s power plug from the outlet as quickly as
z
Never touch the power cord with wet hands. It can result in an
electric shock.
Precaution
WARNING
If the product is mishandled, the user might receiver a serious
NOTICE
If the product is mishandled, it might cause minor damage.
or minor injury. Damage or loss to the user’s property may also
occur.
z
If the apparatus becomes marked, clean it gently with a soft cloth or
towel. Never use chemical solvents such as benzene, thinner, acetone
z
The product must not be exposed to water or liquid. If the apparatus
or other solvents. The surface of the apparatus might become
is exposed to drips or splashes, it might cause a problem that may
discoloured and the paint might peel.
not be repairable.
z
z
z
z
z
Do not repair, disassemble or modify this apparatus yourself. It can
Do not place or keep the apparatus in the following situations. Doing
so might cause problems.
be seriously damaged, possibly beyond repair.
- Where it is too hot or cold.
Turn off the power and unplug the power cord as quickly as possible
- Where there is high humidity.
during electric storms. The apparatus may be damaged.
- Where there are excessive temperatures, for example in front of
Remove the antenna’s power plug from the outlet as quickly as
air-conditioners or heating vents.
possible during electric storms; otherwise the apparatus might be
- Where there is dust or soot.
damaged.
- In confined areas where the heat cannot be released.
Data recorded in the HDD may be lost due to a shock, lightening or
- Where it is exposed to direct sunlight.
electricity failure. The user must back up his or her own data, and the
z
Turn the apparatus off and unplug the power cord if the unit is to be
unused for a long period of time.
company does not take any responsibility for failure to do so.
z
Do not place heavy objects on top of this apparatus. It might cause
malfunction or damage.
z
If the apparatus is so seriously damaged that it cannot be repaired,
or has stopped working altogether, dispose of it properly in
accordance with the local laws or regulations in your area.
iii
Precaution
About the internal hard disk drive
The internal hard disk drive (HDD) is a fragile piece of equipment.
Please use the apparatus within the guidelines below to protect against
possible HDD failure or to protect against accidental loss.
This symbol is intended to alert the user to the presence of
uninsulated “dangerous voltage” within the product’s enclosure
that may be of sufficient magnitude to constitute a risk of
electric shock to persons.
z
Do not move the apparatus whilst it is on.
z
Install and use the apparatus on a stable, level surface.
z
Do not block the top ventilation holes.
z
Do not use the apparatus in excessively hot or humid places, or in
places that may be subject to sudden changes in temperature.
This symbol is intended to alert the user to the presence of
Sudden changes in temperature can cause condensation to from
important operating and maintenance (servicing) instructions
in the literature accompanying the appliance.
inside the apparatus. This can be a cause of HDD failure.
z
Whilst the apparatus is switched on, do not unplug it from the wall
socket or switch the electricity off from the circuit breaker.
z
Do not move the apparatus immediately after switching it off.
z
If there is a power failure whilst the apparatus is on, some data on
the HDD might be lost.
z
The HDD is very delicate. If used improperly or in an unsuitable
environment, the HDD may fail after a few years of use. Signs of
problems include playback unexpectedly freezing and noticeable block
noise (mosaic) in the picture. Sometimes there will be no warning
signs of HDD failure. If the HDD fails, no playback of recorded
material will be possible. In this case the HDD needs to be replaced
by a qualified technician.
iv
Precaution
Copyright
This manual is protected by copyright laws.
Copy, use, reproduction of this manual in part or whole without beyonwiz's
prior written permission is prohibited.
Disclaimer
The manufacturers, distributors and agents are not liable to any kind of
damage caused by the use of the information contained in this manual.
The instruction and descriptions which this manual contains are based on the
time of this manual's production.
The manufacturer constantly updates it with new functions and technology.
All the specifications are subject to change without prior notice.
Trademarks
HDMI, the HDMI logo and High-Definition Multimedia Interface are
trademarks or registered trademarks of HDMI Licensing LLC.
Manufactured under the license from Dolby Laboratories. "Dolby" and the
"double-D" symbol are trademarks of Dolby Laboratories.
The USB-IF Logos are trademarks of Universal Serial Bus Implementers
Forum, Inc.
v
Contents
Contents
Welcome Message
i
4. Recommended Configuration
13
4-1. Case 1: Connecting DP-P2 to TV with HDMI
13
4-2. Case 2: Connecting DP-P2 to TV with S-VIDEO
13
Precaution
ii
Contents
2
1. Package Contents
1
6-1. Connection Using a Network Router
15
6-2. Direct Connection to the PC
16
2. Introduction
3
6-3. Direct Connection to Internet
17
1. DP-P2 Highlights
3
2. Front Panel
4
2-1. Buttons
4
2-2. Slot Door
4
2-3. Front Display Window
4
3. Rear Panel
5
4. Remote Control
6
4-1. Operating DP-P2
6
4-2. Operating Other Beyonwiz Products
7
4-3. Operating TV set
8
4-4. Remote Control HEXA Code
3. How to Connect
10
11
1. Connect to TV
11
2. A/V Inputs
12
3. A/V Bypass
12
5. Antenna Connection
14
6. Ethernet Connection
15
4. Quick Setup
1. Start Quick Setup
1-1. Quick Setup of Video Output Format
1-2. Basic Operation
2. Configuration
19
19
20
21
24
2-1. Time Setting
24
2-2. A/V Output Setting
26
2-3. Service Scan
28
2-4. A/V Input
30
3. Network
31
3-1. Ethernet Setting
31
3-2. Automatic Configuration
32
3-3. Manual Configuration
33
3-4. Ice Guide
34
3-5. WizPNP
35
3-6. Windows Sharing
37
Contents
5. STB & PVR Function
39
1. Basic STB Function
39
1-1. Service Change
39
1-2. Information Box
42
1-3. Volume Level Adjust
43
1-4. Soundtrack Change
43
2. Contents Playback
74
2-1. Movie Playback
74
2-2. Music Playback
78
2-3. Photo Playback
79
2-4. Play-list
80
7. File Management
83
1-5. Subtitle and Teletext Service
44
1-6. Sleep Timer
45
1. Rename
83
46
2. Delete
84
2-1. Service List Edit
46
3. Backup to USB Storage
85
2-2. Favorite Group
47
4. Backup to PC via Network
88
5. Edit Recording File
89
8. Internet Service
91
9. Advanced Setup
93
2. Service Edit
3. PVR Functions
49
3-1. Time-shifting
49
3-2. A-B Repeat
51
3-3. Bookmark
51
3-4. Instant Recording
53
3-5. Timer
58
1. Miscellaneous
93
3-6. Recording Conflict
62
1-1. Favorite
94
4. EPG (Electronic Program Guide)
65
1-2. OSD
96
4-1. EPG with Multiple Services
65
1-3. Access Control
98
4-2. EPG with Single Service
66
4-3. Service Change and Recording
67
6. File Playback Function
1. Exploring Contents
69
69
1-4. Preference
2.
Management
99
102
2-1. F/W Upgrade
102
2-2. HDD
105
2-3. Initialize
108
Contents
10. Troubleshooting Guide
110
Specification
a
Warranty Conditions
b
WEEE Information
c
Contact Beyonwiz
d
Package Contents
1. Package Contents
The following elements are included in the gift box.
Please check all package contents before using your product.
z
DP-P2
z
Remote Control (BR-02)
z
Batteries of
the Remote Control
(AAA size x2)
.
z
User Manual
z
RCA Audio/Video Cable
z
Component (Y/Pb/Pr) Video Cable
z
Ethernet Cable
1
This page intentionally left as blank.
2
Introduction
2. Introduction
1. DP-P2 Highlights
World first HD PVR feature
The DP-P2 can record two HD (1080i) programs concurrently while
you enjoy the time-shifting features. It can also pause, rewind and
record a pay TV with the A/V input.
Dual Tuner
DVB-T Compliant with Internal Loop through
Video Output
Composite, S-Video, Component (Y, Pb, Pr), HDMI
Audio Output
2ch RCA for analog audio
IceTV Interactive support
(Dolby Digital stereo decoding)
You can get 7-day the EPG (Electronic Program Guide) from IceTV
Coaxial and Optical S/PDIF, Digital audio in HDMI
(www.icetv.com.au)
and
schedule
programs
based
on
the
EPG
A/V Input*
2ch RCA for stereo audio input
information. You can even schedule programs from your PC or mobile
phone.
Composite, S-Video
Interface
10/100 Ethernet Port
2 USB Host Ports (USB 2.0 Compliant)
Memory Card Slots: SD, CF, MMC and Memory Stick
HD Multimedia player
With USB host ports and networking, the most frequently used ways of
Multimedia
Movie: mkv, wmv, avi, mpg, vob, mp4, asf, tp, trp
sharing contents, the DP-P2 gives unlimited flexibility to access and play
Playback
Music: mp3, wma, aac, ac3
multimedia content.
Colour Theme on your taste
The DP-P2 provides 10 different colour themes for OSD (On-screen
Display) on your taste.
Photo: bmp, jpeg, png
* If you connect other A/V device such as a set-top box for a pay-TV
service to these input ports, you can record or enable time-shifting
functions for the pay-TV service with the DP-P2. Please refer to 3. How
to Connect and get the recommended configurations.
3
Introduction
2. Front Panel
2-1. Buttons
2-2. Slot Door
Five buttons are placed on the front panel.
A slot door is placed on the right side of the front panel. If you open this
z
z
z
STANDBY Button: it switches the DP-P2 between the operation and
door, you can find the following ports;
standby modes.
z
CHANNEL Buttons: the top and bottom parts of the circular button
USB: you can connect a USB storage device which is compatible to
the USB standard specification.
work as the channel-up and channel-down buttons.
z
CF Card: you can connect a CF-type memory card.
VOLUME Buttons: the left and right parts of the circular button work
z
SD/MMC/Memory Stick: you can connect either SD-type or MMC-type
as the volume-down and volume-up buttons.
memory card. You can also connect a Memory Stick.
Standby Button
Channel, Volume Buttons
2-3. Front Display Window
The front display window gives you easy way to check the status of the
DP-P2.
Front Display Window
Front Panel
4
Slot Door
(USB, CF Card, SD/MMC/Memory Stick)
Introduction
1
2
Indicates hard disk space used.
Lights when there is no space left on the HDD.
Lights when there is no time information.
3
Lights when a timer recording is programmed in standby mode.
4
Lights when the signal comes out via HDMI.
5
Lights when the signal is High Definition (will be implemented).
6
Indicates the resolution of video output.
7
Lights when the video output is in Progressive Scan mode.
8
Lights when Ethernet connection is set up and enabled.
9
Lights when USB devices or memory cards is connected.
10
Indicates operation mode (TV or Radio).
11
Indicates the current recording status.
12
Lights when Time Shift is enabled.
13
Indicates playback of content with light on the outer circle and
revolving on the inner circle.
14
Indicates the audio format of content.
Lights on FR and FL when the audio output is set to stereo.
15
3. Rear Panel
1. ANT IN
5. OPTICAL AUDIO
9. ETHERNET
2. RF LOOP OUT
6. S-VIDEO*
10. USB
3. HDMI
7. COMPONENT (Y/Pb/Pr)
11. ANALOG A/V INPUT**
4. COXIAL AUDIO
8. ANALOG A/V OUTPUT*
* These ports can also bypass the external signals connected to the
analog A/V input ports. You can control these ports with the AV
bypass button.
** These ports are for connecting other A/V device such as a set-top
box for a pay-TV service.
Lights on all indicators when the audio output is 5.1CH.
No light when the audio output is Pass-through.
5
Introduction
4. Remote Control
4-1. Operating DP-P2
In order to operate the DP-P2 with the enclosed remote control, please
select STB mode by pressing the STB button. The red backlight
beneath the STB button lights when you press a button in this mode.
The below picture and right table show the function of each button on
the remote control.
1
STANDBY
2
AV bypass
3
4
5
6
7
8
9
10
11
12
13
14
15
16
17
18
19
STB
TV/RADIO
TV-OUT
TV
SETUP
WizTV
LIVE
File PLAY
VOL +/CH +/MUTE
INFO
FAV
GUIDE
POP-UP
LIST
EXIT
UP/DOWN/LEFT/
RIGHT
OK
RECALL
RED
GREEN
YELLOW
BLUE
0~9
SLEEP
ZOOM
PLAY
STOP
PAUSE
SLOW FWD
REW
FF
PREV
NEXT
REC
SUBTITLE
TELETEXT
SOUNDTRACK
20
21
22
23
24
25
26
27
28
29
30
31
32
33
34
35
36
37
38
39
40
41
6
Switch the DP-P2 between Operation and Standby mode.
Change the Composite, S-Video and Analog Audio outputs to
the AV bypass mode
Set Remote Control to Work for the DP-P2.
Change to TV mode or Radio mode.
Change Video Output. (Refer to page 17. for more information)
Control standard TVs with remote control.
Go to SETUP Menu.
Go to Internet Service. (for future use)
Go to Live TV.
Go to File Play.
Adjust the volume. (Increase/Decrease)
Change TV or Radio Service.
Enable or disable the Audio output.
Show service information.
Show Favorite Service List.
Show EPG (Electronic Program Guide).
Show advanced menus of the current mode.
Show Service List.
Return to the previous menu or Cancel.
Move the indicator on the menu mode.
Select an item on the menu or Confirm.
Recall the previously viewed (or listened) service.
Optional function key
Optional function key
Optional function key
Optional function key
Numeric buttons.
Set sleep time of the DP-P2.
Zoom-in or Zoom-out.
Play Content.
Stop playback.
Pause playback.
Slow Forward.
Rewind.
Fast Forward.
Go to the previous track or file, and continue playing.
Go to the next track or file, and continue playing.
Start recording.
Change Subtitle language.
Show Teletext.
Change Soundtrack language.
Introduction
4-2. Operating Other Beyonwiz Products
The enclosed remote control (Product code: BR-02) is designed to
operate the DP-P2 only. To operate other Beyonwiz products of DP-S1,
DP-P1 and DP-H1, which are designed to be operated with a remote
control of BR-01, you have to change its operating mode; please press
and hold the numeric button 1 for 5~6 seconds while pressing the OK
button. The red backlight beneath the TV button blinks three-times if
the remote control changes its operating mode successfully.
If you want to return the operating mode of the remote control to
operate the DP-P2, please press and hold the numeric button 2 for 5~6
seconds while pressing the OK button. The red backlight beneath the
TV button blinks three-times if the remote control changes its operating
mode successfully.
7
Introduction
4-3. Operating TV set
2) Manual Set
The enclosed remote control can also be used to control a TV set
You can set your remote control with 3-digit code manually. Please look
provided by major TV manufacturers. In order to operate a TV with the
at the following table and find the brand of your TV.
enclosed remote control, please select TV mode by pressing the TV
Turn on your TV then press and hold the TV button until the red-
button. The red backlight beneath the TV button lights when you press
backlight turns on. Please point the remote control at your TV and enter
a button in this mode.
the 3-digit code with the NUMERIC buttons. Wait until the red-
There are two ways to program the remote control to work with your TV,
backlight blanks three times. If your TV turns off automatically, your
automatic code search or manual set.
remote control is ready to use for your TV. If your TV does not turns off,
press the TV button and enter another code from the table under that
1) Automatic Code Search
Please turn on your TV then press and hold the TV button until the red-
brand.
208
223
224
218
253
backlight turns on. Please point the remote control at your TV and click
261
286
307
325
329
the UP button. After the red-backlight of the TV button blinks, please
410
422
423
206
207
208
215
218
229
231
232
236
238
240
244
253
256
286
287
292
298
299
300
301
304
305
306
307
309
3123
314
315
316
317
325
358
367
381
382
383
384
399
405
406
407
410
411
wait at least 3 seconds to check your TV turns off or not. If your TV
turns off automatically, your remote control is ready to use for your TV.
If your TV does not turns off, please repeat clicking the UP button until
your TV turns off. Once your TV turns off after you click the UP button,
please press the OK button. The TV button blinks three times to
indicate that the remote control is set.
8
FUJITSU
HITACHI
Introduction
JVC
207
212
247
264
323
z
385
LG
NEC
PANASONIC
PIONEER
SAMSUNG
NOTE
208
215
224
229
253
286
307
344
374
385
387
410
412
205
207
208
215
224
229
248
253
286
389
208
210
211
212
213
214
216
220
230
236
237
239
242
244
245
255
258
260
278
279
286
307
309
384
410
208
244
246
286
287
307
374
376
380
410
205
206
208
209
215
216
218
224
229
253
260
270
277
286
287
296
325
337
374
410
If your TV brand is not listed on above, please visit the following
website to get the correct code if available: www.beyonwiz.com.au.
z
Your remote will not always be compatible with all branded televisions.
If this remote doesn’t work or no code exists, please obtain the
original remote from the manufacture of your TV.
412
SHARP
207
209
230
245
384
SONY
206
207
208
225
230
264
272
285
286
329
424
426
430
208
258
286
345
405
THOMSON
9
Introduction
4-4. Remote Control HEXA Code
The below picture and right table inform you to set your own remote
control to operate the DP-P2. The coding system used for the DP-P2 is
the NEC type.
1
2
3
4
5
6
7
8
9
10
11
12
13
14
15
16
17
18
19
20
21
22
23
24
25
26
27
28
29
30
31
32
33
34
35
36
37
38
39
40
41
10
STANDBY
AV bypass
STB
TV/RADIO
TV-OUT
TV
SETUP
WizTV
LIVE
FILE PLAY
VOL +/CH +/MUTE
INFO
FAV
GUIDE
POP-UP
LIST
EXIT
UP/DOWN/
LEFT/RIGHT
OK
RECALL
RED
GREEN
YELLOW
BLUE
0/1/2/3/4/
5/6/7/8/9
SLEEP
ZOOM
PLAY
STOP
PAUSE
SLOW FWD
REW
FF
PREV
NEXT
REC
SUBTITLE
TELETEXT
SOUNDTRACK
0xBE010AF5
0xBE0140BF
N/A
0xBE0155AA
0xBE0142BD
N/A
0xBE0107F8
0xBE0152AD
0xBE0108F7
0xBE0144BB
0xBE0102FD 0xBE0103FC
0xBE0100FF 0xBE0101FE
0xBE010CF3
0xBE010DF2
0xBE0109F6
0xBE0143BC
0xBE011AE5
0xBE014CB3
0xBE011CE3
0xBE014EB1 0xBE014FB0 0xBE0153AC 0xBE0154AB
0xBE011FE0
0xBE011EE1
0xBE014DB2
0xBE010DF2
0xBE010EF1
0xBE010FF0
0xBE0110EF 0xBE0111EE 0xBE0112ED 0xBE0113EC 0xBE0114EB
0xBE0115EA 0xBE0116E9 0xBE0117E8 0xBE0118E7 0xBE0119E6
0xBE011BE4
0xBE0150AF
0xBE014BB4
0xBE014AB5
0xBE0146B9
0xBE0106F9
0xBE0145BA
0xBE0148B7
0xBE0104FB
0xBE0105FA
0xBE015EA1
0xBE0147B8
0xBE0151AE
0xBE0149B6
How to Connect
3. How to Connect
1. Connect to TV
Depending on your A/V equipment including TV set which you would like
To connect your DP-P2 to your TV or audio system, you have the
to connect to, there are various ways you can connect the DP-P2 and
following options;
A/V equipment. To make the best connections, please refer to the
manual of your TV set, stereo system or other equipment which you
z
S/PDIF Digital Audio output (COAXIAL, OPTICAL)
would like to connect to.
z
2 CH Analog Audio output
To get true HD quality of HD content, we recommend you to connect
your display with a HDMI cable. The HDMI supports standard, enhanced
or high-definition video and multi-channel audio in a single cable.
If your TV set does not support HDMI but has a DVI input, a HDMI to
DVI converter can be purchased separately. (In this case, audio signal
output through the HDMI interface is disabled.)
If you do not have a high definition display, you can connect the DP-P2
and A/V equipment via other connection options.
To connect your DP-P2 to your TV set or display, you have the following
options; the following order of video connection is based on the quality.
z
HDMI (the cable can be purchased separately)
z
Component (Y/Pb/Pr)
z
S-VIDEO (the cable can be purchased separately)
z
Composite (VIDEO)
NOTE
z
The Composite, S-VIDEO and Analog Audio output ports can also
bypass the external signals connected to the analog A/V input ports.
You can control these ports with the AV bypass button.
11
How to Connect
2. A/V Inputs
3. A/V Bypass
The DP-P2 has A/V input ports for connecting other A/V device such as
In the standby mode, the DP-P2 is designed to bypass the video and
a set-top box. You can record or enable the time-shifting functions for a
audio signals from the external A/V device connected to the A/V input
pay-TV service with the DP-P2.
ports to TV set through the Composite, S-VIDEO and Analog Audio
output ports. If you do not want to utilize the PVR functions for the
external A/V device, you don’t have to turn on the DP-P2 or re-arrange
the A/V cables.
You can control the operating mode of the Composite, S-VIDEO and
Analog Audio output ports with the AV bypass button while the DP-P2
is in the operating mode; once the DP-P2 turns on and operates, the
Composite, S-VIDEO and Analog Audio output ports transmit the A/V
signals from the DP-P2 itself. You can change these ports to bypass the
A/V signals from the external A/V device connected to the A/V input
ports, please press the AV bypass button.
NOTE
z
Please refer to Chapter 5. STB & PVR Functions to utilize the timeshifting functions for the external A/V device.
12
How to Connect
4. Recommended Configuration
4-1. Case 1: Connecting DP-P2 to TV with HDMI
4-2. Case 2: Connecting DP-P2 to TV with S-VIDEO
If you connect the DP-P2 to TV set with the HDMI connection, please
If you connect the DP-P2 to TV set with the S-VIDEO (or Composite)
connect the DP-P2 and the TV set with the S-VIDEO (or Composite) and
connection, you can watch the external A/V signal without turning on
Analog Audio ports, too. Because the DP-P2 can bypass the A/V signals
the DP-P2; the DP-P2 bypasses the signals from the external A/V device
from the external A/V device connected to the DP-P2 with the S-VIDEO
connected to the A/V input ports to the S-VIDEO output port. You can
(or Composite) and Analog Audio ports.
control the operating mode of the S-VIDEO (Composite) output port
with the AV bypass button while the DP-P2 is in the operating mode.
13
How to Connect
5. Antenna Connection
Please connect your TV Antenna to the DP-P2.
z
Antenna In (connecting to the roof Antenna)
z
RF LOOP OUT (only for bypassing the signal to another device)
NOTE
z
Two tuners are connected internally: You don’t need to connect them
with a additional cable.
14
How to Connect
6. Ethernet Connection
6-1. Connection Using a Network Router
In order to utilize the DP-P2 fully, it is strongly recommended to
As shown in the picture, you have to connect the DP-P2 to the router
connect the DP-P2 to the home network with a network router.
with an Ethernet cable included in the box. If you purchase a router
For this connection, the following equipments are required;
with a DP-P2 and have no experience of connecting a router with a PC,
please refer to user’s manual of the router and connect the DP-P2 to the
z
A router with a built-in network switch.
router as an additional PC. If the router has the DHCP (Dynamic Host
z
An Ethernet cable.
Configuration Protocol) server feature and it is enabled, all the
z
A PC with Windows XP operating system.
configurations for networking will be set automatically and the DP-P2 is
ready to use. For more information of configuring LAN, please refer to
Chapter 4. Quick Setup, which illustrates how to configure the LAN port.
15
How to Connect
6-2. Direct Connection to the PC
With this configuration, you can share contents with a PC through home
If your PC has the DHCP server feature and it is enabled, all the
network but the DP-P2 can not access to Internet. For this connection,
configurations for networking will be set automatically and the DP-P2 is
the following equipment is required;
ready to communicate with your PC. If you want to get more
information to configure your PC as a DHCP server, please contact
z
A PC with Windows XP operating system.
Microsoft Corp. If your PC does not have the DHCP server feature, you
z
A crossed Ethernet cable.
have to disable the DHCP feature and set IP (Internet Protocol)
information manually for the DP-P2 and PC. Chapter 4. Quick Setup,
illustrates how to configure the LAN of the DP-P2 manually.
Crossed Ethernet Cable
16
How to Connect
6-3. Direct Connection to Internet
With this configuration, you can not share contents with a PC through
home network. For this connection, a crossed Ethernet cable (not
included in the box) is required. The most ISP (Internet Service
Provider) services DHCP feature. Therefore, you can connect your DPP2 to Internet with a crossed cable and enjoy it. If you have to
configure your DP-P2 manually, please contact your ISP for more
information.
Internet
Crossed Ethernet Cable
17
This page intentionally left as blank.
18
Quick Setup
4. Quick Setup
This chapter guides you through the basic set up of the DP-P2 so that
NOTE
you can experience its basic feature. In order to enjoy the DP-P2 fully,
z
please refer to Chapter 9. Advanced Setup.
If the front display shows “Service Scan”, you have to scan the
broadcasting services first. Please refer to the next section of
scanning services.
1. Start Quick Setup
If A/V and antenna connection is complete, press the STANDBY button
to start. The front display window will show “Welcome”, “Loading” and
“Start” successively.
If you turn on the DP-P2 for the first time after purchasing, there will be
no digital broadcasting services stored in the DP-P2, it will switch to
SETUP MENU automatically by showing “Service Scan” on the front
display window. Otherwise, you can enter SETUP MENU by pressing the
SETUP button.
If there is a list of the digital broadcasting services stored in the DP-P2,
the front display window will display the service name such as “TEN
Digital” when it is ready to use.
19
Quick Setup
1-1. Quick Setup of Video Output Format
If the front display window indicates that the DP-P2 is ready to use but
NOTE
nothing displays on the TV screen, you have to adjust the format and
z
The TV-OUT button is developed so that you can configure the video
resolution of the video output by pressing the TV-OUT button. The
output of the DP-P2 when you can not see anything on the TV screen
default video output is in a SD PAL (576i) format. You can switch the
because the video formats do not match each other.
video output to a SD NTSC (480i), HD PAL (720p), HD NTSC (720p),
z
Most TV sets support the PAL format in Australia..
HDMI PAL (1080i), HDMI NTSC (1080i), PAL HDMI Auto, NTSC HDMI
z
The front display window indicates the current video format as you
press the TV-OUT button.
Auto, HDMI PAL (576p) and HDMI NTSC (480p) format successively
with the TV-OUT button. Please refer to the following information to
z
configuration change to become effective.
adjust the video output to each of the video connection types.
z
Composite/S-VHS: SD PAL or SD NTSC
z
Component: HD PAL or HD NTSC
z
HDMI: PAL HDMI Auto, NTSC HDMI Auto, HDMI PAL or HDMI NTSC
20
Please allow 3 seconds after pressing the TV-OUT button for the
z
It is strongly recommended that you again configure the video format
more precisely in the Setup menu.
Quick Setup
1-2. Basic Operation
1) Enter and Exit Setup Menu
You can enter the SET-UP MENU with the SET-UP button on the remote
control and exit to watch the TV program with the EXIT button.
2) Setup Menu Structure
The SET-UP menu is grouped in four parts: CONFIGURATION, NETWORK,
MISCELLANEOUS and MANAGEMENT. Firstly, you have to choose one of
these categories (main category) which are placed on the top menu (a
horizontal bar) as graphical icons. As you select it with the LEFT/
RIGHT buttons, the left menu (a vertical bar) displays different subcategories according to your selection on the top menu. If you choose
one category on the left menu with the UP/DOWN buttons, the items
z
LEFT/RIGHT buttons: Select an item on the top menu. (Horizontal)
belong to the sub-category will be listed on the item list. You can enter
z
UP/DOWN buttons: Select an item on the left menu. (Vertical)
the item list with the OK button to adjust the configuration. In the item
z
OK button: Enter the item list.
list, the LEFT/RIGHT/ UP/DOWN buttons will not work for changing
z
EXIT button: Exit from the item list.
your selection on the top or left menus: these buttons are used to
choose an item on the item list to change its configuration. You can exit
from the item list with the EXIT button.
21
Quick Setup
3) How to Change Configuration
In the setup menu, there are several ways to change the configuration.
z
Setup using the NUMERIC buttons: The NUMERIC buttons are used
This manual explains how to change the configuration, here are three
to set a configuration with numbers such as time information. You can
cases which are used frequently.
also move the cursor to left or right with the LEFT of RIGHT buttons
whilst you are editing the configuration. You can set the change with
z
Selection on a pop-up menu: You can choose an option on the pop-up
the OK button or cancel it with the EXIT button.
menu. If you press the OK button, the pop-up menu will be displayed.
Select one option with the UP/DOWN buttons and press the OK
button. If you do not want to change settings, press the EXIT button.
The pop-up menu will disappear.
NOTE
z
You can also use the CH +/- buttons to increase or decrease the
value instead of typing with the NUMERIC buttons.
22
Quick Setup
z
On-screen keyboard: If you need to input alphabetic characters, an
on-screen keyboard will be displayed. You can move the cursor with
the UP/DOWN/LEFT/RIGHT buttons and select the letters with the
OK button. The RECALL button works as a backspace key. You can
also clear your inputs by selecting “Clear All” with the OK button on
the screen. You can move the cursor to left or right with the YELLOW
or BLUE buttons.
After the input, you can save it by selecting “Save & Exit” with the
OK button. If you do not want to save, please press the EXIT button.
NOTE
z
If you need to input numbers, please use the NUMERIC buttons on
the RCU.
z
Please refer to the alphabets printed on the NUMERIC buttons.
If you need to input upper case characters, please press the RED
button. You can return to lower case characters with the RED button.
If you need to input special characters, please press the GREEN
You can also type alphabet characters with the NUMERIC buttons.
z
You can configure the order of the NUMERIC buttons on the
miscellaneous setup menu; alphabet first or number first.
button. The screen keyboard turns to special characters. You can also
exit and return to small characters with the GREEN button.
23
Quick Setup
2. Configuration
2-1. Time Setting
Please set the current date and time. The date and time information will
z
“DD/MM/YYYY”, “MM/DD/YYYY” or “YYYY/MM/DD” on a pop-up menu.
be the reference for the timer recording. Therefore, you have to
(DD-day, MM-month, YYYY-year)
configure the time and date information precisely. You can also select
preferred date and time formats. The following picture illustrates the
Date Format: Please select a display format for the date either
z
Time Format: Please select how to display the time: either a 12-hour
format or a 24-hour format. You will get a pop-up menu if you press
items which you configure to set the time and date.
the OK button.
z
Time Offset: Time offset means the difference between GMT and your
local time zone. Under the “AUTO” mode, you don’t need to set the
time offset because the DP-P2 will set this automatically by the region
and the status of daylight-saving.
z
Current Time: Under the “AUTO” mode, current date and time will be
displayed and you can not change it.
z
Daylight Saving: You can enable or disable the daylight saving and
change the time-offset.
z
Region: Please select your region of living to set the time-offset
properly.
z
Mode: You can select how to set the date and time. Please press the
OK button then you get a pop-up menu. You can choose one with the
UP/DOWN buttons and select it with the OK button.
24
Quick Setup
z
Current Time: Under the “MANUAL” mode, you have to set the date
and time manually using the numeric buttons or CH +/- buttons.
NOTE
z
Under the “AUTO” mode, the GMT information can be received
automatically from DTV station when you turn on the DP-P2 and
watch a program. Please note that some DTV stations don’t send the
GMT information or send wrong information.
z
Your selected date and time format will be applied to all the date and
time displayed on the graphical menus.
z
Under the “MANUAL” mode, you have to set the date and time
information manually. To change the date and time, please press the
OK button and set with the NUMERIC buttons. You can save it with
the OK button. If you want to modify before you save it, please use
the UP/DOWN/ LEFT/RIGHT buttons to place the cursor on the
digit you want to change. You can also use the CH +/- buttons to
increase or decrease the value.
z
Time Offset: Under the “MANUAL” mode, you have to set the timeoffset manually. For example, the time zone of Sydney, Australia is
GMT + 10:00 and +10:00 is the time offset of Sydney.
25
Quick Setup
2-2. A/V Output Setting
You have to set the video and audio configuration according to your TV
1) Video Outputs
z
support the PAL format in Australia.
set. Please make sure the video and audio port of the DP-P2 is
connected to your TV set.
z
z
Resolution: If you select the HDMI or Component for Video output,
you have to set the resolution.
outputs with pop-up menu. Please press the OK button to get a pop-up
menu for each item.
Video Output: Please select one option in the list according to the way
to connect the DP-P2 to your TV set.
The A/V Output menu consists of two parts; the video output and the
audio output. You can change the configuration of the video and audio
Video Type: You can select either PAL for NTSC format. Most TV sets
z
TV Aspect Ration: Please select either 4:3 or 16:9 according to your
TV screen ratio.
NOTE
z
The component video output supports SD (576i for PAL and 480i for
NTSC), 480p, 576p, 720p and 1080i.
z
If you set the video output resolution as HD (more than 576p), the
composite and S-Video outputs will be disabled automatically.
z
Please note that your TV set can not display anything if you set the
resolution of the video outputs higher than the maximum resolution
that your TV set can accept.
z
26
The HDMI outputs the audio in digital format as well.
Quick Setup
2) Audio Outputs
3) Colour Setting
The DP-P2 supports Dolby Digital decoding so that it can decode and
You can adjust the colour output of the DP-P2.
output the Dolby sound through the RCA connectors. It also supports
digital outputs with optical and coaxial ports.
z
Audio Format: The DP-P2 has 2ch analog audio outputs for a stereo
speaker system. But it can transmit audio signal up to 5.1ch through
digital audio outputs if the content has 5.1ch audio source. If you
only have a stereo speaker system, you have to set the audio format
as 2ch. In this case the DP-P2 down mixes the 5.1ch audio signals to
a stereo audio signal. If you connect a 5.1ch speaker system to the
DP-P2 through the digital audio outputs, please choose 5.1ch for the
best performance. In order to decode an audio source with an
external audio decoder system, set the audio format as pass-through.
z
S/PDIF Output: Enables the digital audio output through the coaxial
and optical ports.
The three options mean;
z
Brightness
z
Contrast
z
Saturation
You can adjust each option with LEFT or RIGHT button.
27
Quick Setup
2-3. Service Scan
z
Antenna DC (+5V) Power: You can supply DC (+5V, max. 100mA)
Before watching a broadcasted program, you need to scan all the
power to the indoor antenna through the antenna cable. Please make
services first. The scanned services will be stored in the non-volatilize
sure that your external antenna is an active type, which means that
memory. Therefore you don’t have to scan the service again unless you
the antenna requires external DC power to enhance the sensitivity,
delete all the information of the service stored in the memory. If there
before you supply DC power to the antenna.
are no services scanned previously, the service scan page will be
z
Scanning Range: You can scan over all channels (VHF and UHF) by
selecting the “FULL” option. If you want to scan over specific
presented automatically.
channel(s), please select the “PARTIAL” option. In this case, you have
to set the start and end channels manually.
z
Start Channel: This menu will be enabled when you choose the
“PARTIAL” option. Please press the OK button to select the start
channel.
z
End Channel: This menu will also be enabled when you choose the
“PARTIAL” option. The end channel must be greater than the start
channel.
z
Signal Quality Bar: Two horizontal bars indicate the signal quality of
the start and end channels. The leftmost rectangular changes from
black to yellow if the tuner locks the signal properly.
You can select the options for each item with a pop-up menu. Please
DANGER
press the OK button to get a pop-up menu.
z
IF THE ANTENNA IS PASSIVE TYPE, THE DC POWER WILL DAMAGE
THE ANTENNA AND THE DP-P2 ITSELF.
28
Quick Setup
z
Start Scan: After selecting your scanning range, you can “start
NOTE
scanning”. Select Start Scanning and then press the OK button. On
z
You can not select an end channel smaller than the start channel.
the screen, the scanning window appears and displays the process.
z
If you scan over all the channels with the “FULL” option, the previous
service information including the service list information and your
favorite lists will be erased automatically.
z
If the full-scanning operation performs, the timer sets will be
removed.
z
If you scan over specific channel(s) with the “PARTIAL” option, you
can add the new service to your previous channel list.
Now, you are ready to watch live television by pressing the LIVE button.
29
Quick Setup
2-4. A/V Input
You need to configure the A/V input ports according the external A/V
device connected to the DP-P2.
z
Input: The DP-P2 can receive either the Composite or S-VIDEO signal
at a time. Therefore you need select one of these according to the
video input connection.
z
Video Type: You need to set the video type according to the external
A/V device.
z
A/V Input: You can enable or disable the A/V input ports; if the A/V
input is enabled, a new service named with “950 A/V Input” will be
listed on the service list. You can watch and enable the PVR functions
to the external A/V signals by selecting the 950 service.
30
Quick Setup
3. Network
The DP-P2 supports an Ethernet interfaces. This section will guide you
how to configure the network interfaces.
3-1. Ethernet Setting
The first step is to enable the Ethernet interface. You can select this in
the Network Device menu. You will get a pop-up menu by pressing the
OK button. If you want to use the Ethernet interface, please select the
“LAN” option. If you select “Disable” option, the Ethernet interface will
be disabled even though you configure it properly.
31
Quick Setup
3-2. Automatic Configuration
If you enable the Ethernet interface by selecting the “LAN” option on
the “Network Device” menu, all the items to be configured for the
Ethernet interface will be displayed.
You can also get the pop-up window and check the current effective
configuration of the Ethernet interface with the GREEN button.
z
DHCP: If you want to get the all the configuration from the router and
set automatically, please select the “Enable” option. In this case, the
rest of the items are disabled to select because you don’t have to
configure them manually. You can apply the change by pressing the
RED button. A pop-up window displays the effective configuration of
the Ethernet interface when you press the RED button.
32
Quick Setup
3-3. Manual Configuration
If you select the “Disable” option in the “DHCP”, you have to input the
z
interface but you can not change it.
IP address manually.
z
IP Address: You can input the address with the NUMERIC buttons
NOTE
and the LEFT/RIGHT buttons. You can move to the next item of
z
You can configure the following items in the same way; Subnet Mask,
You have to press the RED button to make your changes and
configurations for the network interface to take effect.
Subnet Mask with the DOWN button.
z
MAC Address: This will display the MAC address of the Ethernet
z
If you set the DHCP function to enable, the rest of the settings can
not be changed. However they still have the previous configuration to
Gateway, Primary DNS Server IP and Secondary DNS Server IP.
help you set these easily set the DHCP function is enabled next time.
z
The effective configuration of the Ethernet is always displayed as a
pop-up window by pressing the GREEN button.
z
To use the DHCP function for the DP-P2, your router should support
the DHCP function. Please check the manual and the configuration of
your router.
You can apply the changes by pressing the RED button. A pop-up
window displays the effective configuration of the Ethernet interface
when you press the RED button.
33
Quick Setup
3-4. Ice Guide
The DP-P2 supports IceTV service through the Internet. If you have an
z
displayed and you can enter your ID of IceTV account.
IceTV account, please set your account to utilize the service on your DPP2.
Owner ID: If you press the OK button, on-screen keyboard will
z
Password: If you press the OK button, the on-screen keyboard will
displayed and you can enter your password.
z
Check User Info: You can check if your account information is valid or
not.
z
Select Device: Please select a device which you set on the IceTV website, www.icetv.com.au.
NOTE
z
For more information about IceTV, please visit www.icetv.com.au, or
refer to Chapter 5. STB & PVR Function and find out how you can
utilize the 7-day EPG (Electronic Program Guide) using the IceTV
service.
z
z
Ice Guide: you can setup the way you get the EPG information; if you
select “Enable” for this option, the DP-P2 gets and updates EPG with
information from IceTV service. If you select “Disable” option, the DPP2 will update the EPG with the information from the broadcasting
station only.
34
Most
broadcasters
don’t
provide
7-day
guide.
Therefore
we
recommend you use IceTV guide if you wish to have a weekly guide.
z
You can schedule programs on DP-P2 from your PC or mobile phone.
Please visite www.icetv.com.au for this service.
Quick Setup
3-5. WizPNP
The WizPNP enables to share the recording files with other beyonwiz
NOTE
products or PCs.
z
You need an application software for your PC to connect to the DP-P2.
Please visit to www.beyonwiz.com.au and download “WizFX” software.
z
The WizPNP server can not get a file from a WizPNP client.
z
The WizPNP client can play recording files from a WizPNP server.
Please refer to Chapter 6. File Playback Function for details.
WARNING
z
If multiple WizPNP clients connect to a WizPNP and stream recording
files from the WizPNP server, the operation of the WizPNP can be slow.
The above picture illustrates how the WizPNP functions;
z
WizPNP Server: if you set the DP-P2 as a WizPNP server, you can
access to the DP-P2 with the other beyonwiz products which enables
the WizPNP client. You can also access to the DP-P2 with your PC,
witch has the WizFX software.
z
WizPNP Client: if you set the DP-P2 as a WizPNP client, you can
access to another beyonwiz product, which enables the WizPNP server,
and play recording files on it.
35
Quick Setup
1) Set as WizPNP Client
2) Set as WizPNP Server
You can set the DP-P2 as a WizPNP client; please select the “Client”
You can set the DP-P2 as a WizPNP server; please select the “Server”
menu with the OK button and select “Enable” with the OK button. You
menu with the OK button and select “Enable” with the OK button. You
can also disable the WizPNP client function by selecting “Disable” with
can also disable the WizPNP server function by selecting “Disable” with
the OK button.
the OK button.
The following options will be enabled to set if you enable the WizPNP
server function;
z
Name: this name is used to indicate the WinPNP server.
z
Port: this is 5-digit number, which has maximum value as 65534.
Please do not change this as long as the DP-P2 works properly.
36
Quick Setup
3-6. Windows Sharing
You can set account information of the ID and password to share files in
the shared folder on your PC, which is blocked to access for the “Guest”
account and requires an ID and password to access.
You also have to set account information to backup the recording files
on the DP-P2 to the PC via network; the “Guest” account is not allowed
to copy files to the shared folder.
37
This page intentionally left as blank.
38
STB & PVR Function
5. STB & PVR Function
The DP-P2 supports various ways of enjoying multimedia contents and
it groups its features in three parts; the first group is STB (Set-top Box)
and PVR (Personal Video Recorder) functions, the second group is file
1. Basic STB Function
1-1. Service Change
playback functions including playback of recorded programs with PVR
function, and the last group is Internet services which will be updated
1) Change between TV and Radio Services
later.
You can watch TV services or listen to radio services with the DP-P2.
This chapter describes the functions of STB and PVR. You can access
The TV/RADIO button changes the operation mode.
this operating with the LIVE button on the remote control in any
operating mode.
39
STB & PVR Function
2) Change Service with Service List
The service list contains all the broadcasting services you can receive.
You can also edit the service list in the list view. This will be explained in
You can get the service list as a pop-up menu by pressing the LIST
the later section.
button and select a service with the UP/DOWN buttons.
NOTE
z
You can hide the help message and extend the service list with the
RED button. If you want to display the help message, please press
the RED button again.
z
If you enable the A/V input in the Setup menu, a new service named
with “950 A/V Input” will be listed on the service list. You can watch
and enable the PVR functions to the external A/V signals by selecting
the 950 service.
Only the TV services will be listed under the TV service mode and only
the radio services will be listed under the radio service mode. You can
check the operating mode from the message placed on the top of the
service list: “TV service” or “Radio Service”. The LEFT and RIGHT
buttons work as page-up and page-down respectively. If you want to
hide the service list menu, press the EXIT button.
40
STB & PVR Function
3) Other Ways to Change Service
As in conventional TV sets, you can change a service which you want to
NOTE
watch or listen to in the following ways;
z
If you change a service continuously with the CH+ or CH- button,
only the information box will be changed according to your command:
z
Service Change with the CH+/CH- buttons: As you press the CH+ or
You can watch the changed service 3 seconds after you press the last
CH- button, the next or previous service will be selected.
z
Service Change with Numeric Buttons: You can change to a certain
To record two programs simultaneously, two tuners are allocated for
service directly with numeric buttons. For example, if you press 1, 4,
the recording. Therefore, you can only change to a limited number of
and 6 buttons consecutively and then the OK button, service 146 will
services whilst the two programs are being recorded.
be displayed on the screen.
z
button.
z
z
When selecting channels using the numeric buttons. Make sure you
Recall the Previously Viewed Service: the RECALL button returns to
know the channel number you wish to select as all channels fall on a
the previously viewed service.
different number in each state. Eg: channel 10 isn’t always on
number 10 in the digital network.
41
STB & PVR Function
1-2. Information Box
You can check the information of a service and the program using three
information boxes; the information box contains specific information of
a current service and program. The extended information box contains
more details about the current program. And the recording information
box shows the recording status. You can check these by pressing the
INFO button and cancel it by pressing the EXIT button. The followings
screen shot shows what the information box looks like.
Additional Service Icon
1. Service number
13. Subtitle support
2. Service name
14. Multiple audio language or
3. Channel number
audio format support
4. Channel frequency
15. Teletext support
5. Favorite group is selected.
16. Dolby audio support
6. Current program duration
17. One program is recording.
7. Current program name
18. Two programs are recording.
8. Next program duration
19. Current service is recording.
9. Next program name
20. Watching time-shifted position.
10. Censorship support
21. Signal quality
11. Locked Service
22. Current time
12. Pay service
42
Recording & Time-shifting Information
STB & PVR Function
1-3. Volume Level Adjust
1-4. Soundtrack Change
With the VOL+/VOL- buttons, you can adjust the volume level of the
If the current TV program provides more than one language or audio
analog audio output. The MUTE button will turn off the analog and
format, i.e. MPEG audio and Dolby audio, together, you can select one
digital audio outputs.
and change to that setting whilst you are watching a TV program.
Pressing the SOUNDTRACK button on the remote control will pop up a
list box contains the languages and audio formats you can choose.
Please select an item with the UP/DOWN buttons and press the OK
button to change it. You can cancel and hide the pop-up list by pressing
the EXIT button.
NOTE
z
You can not control the volume level of the digital audio outputs if you
set the audio format as “pass-through”. Therefore you have to use
the remote control of an audio decoder (such as an amplifier) to
adjust the volume level if you are using digital audio out.
43
STB & PVR Function
1-5. Subtitle and Teletext Service
1) Subtitle Service
2) Teletext Service
If you want to view subtitles on the screen, please press the SUBTITLE
The teletext is a free service broadcasted by TV stations which gives the
button. To display the subtitle, please select “Enable” and press the OK
latest information on news, weather, television programs, share prices
button. You can hide the subtitle by selecting “Disable” with the OK
and many other topics. As the teletext service is optional, it does not
button. You can also change the subtitle language if the program
mean that all TV programs include teletext information. The DP-P2
provides more than one subtitle language. Please select a language with
support teletext service by emulating a teletext interpreter. The
the UP/DOWN buttons and press the OK button.
TELETEXT button displays the teletext pages. You can get more
information from the teletext service with the RED, GREEN, YELLOW,
BLUE and NUMERIC buttons.
NOTE
z
The subtitle function will not work if the service provider does not
provide a subtitle service.
44
STB & PVR Function
1-6. Sleep Timer
You can set the DP-P2 to turn off automatically at a specific time. Press
NOTE
the SLEEP button to set the timer. The DP-P2 will only turn off after a
z
recording has finished even if you set it to turn off before the
The pop-up menu also contains the above functions of the Subtitle
Language, Sound Track, Teletext and Sleep timer.
completion of the current recording(s). To cancel the timer, please press
the SLEEP button successively until you set time as “0 min”.
45
STB & PVR Function
2. Service Edit
2-1. Service List Edit
z
You can edit the service list if you want. The followings illustrate the
Lock/Unlock: For your privacy, you can protect certain service from
unauthorized access. If you lock a marked service with the GREEN
editing functions you can use to edit a service list.
button, you have to enter the 4-digit PIN code to watch the service.
The LOCK icon implies that the marked service is locked. To unlock a
service, you have to enter a 4-digit PIN code after pressing the
GREEN button.
z
Delete: You can delete the marked service from the service list. Press
the YELLOW button to delete. You have to re-scan if you want to
watch the deleted service(s) again.
46
STB & PVR Function
2-2. Favorite Group
Favorite group is your personal collection of TV or radio services. You
can organize up to 20 groups including three default groups.
1) Favorite Group Edit
Before you use the favorite service groups, you have to organize them.
Please refer to Chapter 8. and organize your own favorite group(s).
2) Select Service on Favorite Group
Once you organize favorite groups, you can change the services that
belong to a certain favorite group. You can display the list of favorite
groups with the FAV button. As you see in the picture, the left column
contains your favorite groups and the right column displays the services
belong to the favorite group. Please select a favorite group in the left
NOTE
z
column with the UP/DOWN buttons and press the OK button. Then the
cursor moves to the right column. On the right column, the services
belong to the favorite group that was selected on the left column will be
You can also use the LEFT/RIGHT buttons to move to the “Favorite
Group” column or “Favorite Service” column.
z
You can exit from the favorite group with the EXIT button.
3) Add Current Service to Favorite Group
displayed. You can select a service with the UP/DOWN buttons. If you
want to change to a certain service, please press the OK button on that
highlighted service.
You can add the service you are watching to a favorite group. Please
display the favorite list with the FAV button and select a group where
you want to add the current service. Please press the YELLOW button
to add.
47
STB & PVR Function
4) Service Change on Favorite Group
If you change services using the service list when you select a favorite
You can also exit from the favorite list by pressing the RED button when
group, the service list will show the services belong to that favorite
the favorite list is displayed.
group. You can change among these services on the list.
If you want to exit from a favorite group and list up all services
available in the service list, please press the BLUE button when the
service list is displayed.
If you change services with the CH+/CH- buttons, it also changes
among the services that belong to the favorite group you selected. The
information box will indicate which favorite group is selected.
48
STB & PVR Function
3. PVR Functions
The major functions of a PVR are time-shifting and recording. If you
z
the picture at time-shifted position.
want to play a recorded program, please use the multimedia contents
playback function with the FILE PLAY button on the remote control.
STOP button will skip and jump to the live position when you watch
z
SLOW FWD button will play the recording in slower speed. The speed
Chapter 6. File Playback Function will illustrate how you can play the
will change to x1/2, x1/4, x1/8, x1/16 and x1/32 speed according to
recorded program and edit it.
each press of the SLOW FWD button.
With the DP-P2, you can utilize all the PVR functions such as time-
z
REW button rewinds backward with x2, x4, x8, x16 and x32 speed.
shifting, recording and timer recording for the external A/V signals. You
z
FF button plays forward with x2, x4, x8, x16 and x32 speed.
can enjoy this in the same ways describe in this section by selecting the
new service of “950 A/V Input”.
The status of trick-mode operation will be displayed on the screen.
3-1. Time-shifting
You can pause and resume live TV program, and even rewind and replay
it. The time-shifting function is enabled all the time unless you disable it
in the Setup menu. The DP-P2 keeps 2-hour recording buffer of TV
program by utilizing the HDD storage. The buffer will reset if you
change to another service. The trick-mode operations such as rewinding,
fast-forwarding, pause and resuming are provided.
z
PLAY
button changes to normal playback mode whilst other trick
mode is enabled such as PAUSE, FF or REW.
z
PAUSE button will hold the picture until you select play again with
the PLAY button.
49
STB & PVR Function
You can jump to a certain position with the LEFT/RIGHT/UP/DOWN
You can also display the progress bar with the OK button. The OK
buttons.
button can also hide the progress bar.
z
LEFT/RIGHT buttons skips and moves backward or forward 15
seconds at a time respectively. You can also jump to a certain position
with these buttons: The anchor mark moves backward or forward
NOTE
z
watching a third service, the time-shift function for the third program
whilst you are holding down the LEFT or RIGHT button respectively.
will be disabled automatically.
You can play and watch from the anchored position by releasing the
button.
z
UP button skips and moves forward 10%.
z
DOWN button skips and moves backward 10%.
You will see the progress bar if you press the LEFT/RIGHT/UP/
DOWN buttons.
If two services are being recorded simultaneously and you are
z
The time-shift buffer will be initialized if you change to other services
or go to File Play, wizTV or Setup mode.
z
If there is less than 10 seconds of history in the time-shifting buffer
after initialization, the trick-mode operation can not work.
z
If the time-offset is less than 10 seconds from the live, the timeshifting function may not work properly and play the live on the
screen.
50
STB & PVR Function
3-2. A-B Repeat
3-3. Bookmark
The DP-P2 can play a certain section (A-B) repeatedly.
You can set bookmarks to retrieve it easily.
Please activate the progress bar with the OK button. Place the lower
z
RED button sets a bookmark at the current point.
anchor mark at the start position and press the YELLOW button. A new
z
Green button seeks and plays from the bookmarked position.
anchor mark with “A” will indicates the start position. Move the lower
anchor mark at the end position and press the YELLOW button. A new
anchor mark with “B” will be displayed and stat to play from “A” to “B”
automatically.
The DP-P2 will play A-B repeatedly until you press the YELLOW button
and cancel it.
51
STB & PVR Function
If you want to set multiple bookmarks, it is better to activate the
The BLUE button will display a list of bookmarks. Please select one item
progress bar with the OK button. To set a bookmark, please place the
and press the OK button. The DP-P2 starts to play from the selected
anchor mark on the position you want to play and press the RED button.
position.
A dot mark indicates that one bookmark is set.
If you want to delete a bookmark, please press the YELLOW button on
If you press the GREEN button, the bookmark icon moves to the next
the bookmark-list.
bookmarked position and starts to play from this position.
NOTE
z
Maximum 64 bookmarks can be set to one program.
z
New bookmark can’t be set in 5 seconds position from the existing
bookmark (position).
52
STB & PVR Function
3-4. Instant Recording
1) Start Recording
You can record the current service and store it in the HDD instantly by
z
Starting Point: You can select the starting point of recording with the
pressing the REC button. The following picture shows options you can
LEFT/RIGHT buttons when the time-shift function is enabled. If the
choose when you record a program.
time-shift function is disabled, you can only record from the current
time.
Live: Start recording from the time when you press the REC button.
Current Program: Record only the current program even if there is
a previous program stored in the time-shift buffer.
All: Record all the programs in the time-shift buffer.
z
File Lock: You can lock the recording file if you want. The LEFT/
RIGHT buttons will change this option.
z
File Name: The recording will be stored on the HDD as a file with the
name of the current program but you can change the file name if you
want. If you press the OK button, an on-screen keyboard will pop up
and you can enter a new file name.
z
Duration: You can change the duration of recording with the LEFT
and RIGHT buttons. The default is 120 minutes.
After setting all options, please press the REC button on the remote
control or choose “Accept” button on the screen to start recording. If
you want to cancel the recording, press the EXIT button on the remote
control or “Cancel” button on the screen.
53
STB & PVR Function
NOTE
z
If you disable the time-shifting function, you can’t record a program
from the time-shifting buffer. Therefore you can only choose a single
option of “Live” when you intend to record a program.
z
If there is only one program in the time-shift buffer, two options of
“Current Program” and “All” have the same meaning. Therefore
option “Current Program” does not appear.
z
The star(*) mark on the file name indicates that the DP-P2 will assign
the file name as the program name automatically. If you change the
file name with a screen keyboard, the star(*) mark will be removed
automatically.
z
You can record a radio program using the same procedure.
54
z
If two programs are being recorded, you can’t record another
program. In this case, the following warning message will pop up.
STB & PVR Function
2) Trick Mode Operation
If you are watching a program whilst it is being recorded, you can
perform the same trick mode operations including “A-B Repeat”, which
are explained in the previous sections, even though you are recording
two programs simultaneously. For more information of trick-mode
operating, please refer to the previous sections.
55
STB & PVR Function
3) Pause/Resume and Stop Recording
If you want to skip recording for a certain period of time, i.e.,
NOTE
commercial advertisements, please press the REC button whilst you are
z
watching the recording service.
Once a pop-up page appears, please press the PAUSE button. You can
resume recording with the PAUSE button.
To stop a recording before it stops automatically after the duration,
please press the STOP button when the recording control pop-up is
displayed.
56
You cannot pause recording if you are watching at time-shifted
position.
STB & PVR Function
4) Change Recording Options whilst Recording
You can change the duration of a recording or file name after the
Please select a recording item with the UP/DOWN buttons to change.
recording has started. You can also lock or unlock the recording file
If there is one recording, only one item will be displayed.
whilst you are recording the service. Press the POP-UP button and
select “Recording Information” with the OK button.
z
You can change the duration with the LEFT or RIGHT button.
z
You can change the file name with the RED button. An on-screen
keyboard will be displayed to edit the file name.
z
You can change the locking status of the recording file with the
GREEN button.
NOTE
z
You can stop the recording with the STOP button.
z
You can change to the recording service with the OK button.
z
The clock mark implies the recording comes from a timer recording.
57
STB & PVR Function
3-5. Timer
You can set programs which you would like to record to HDD. The timer
function can also be used to turn on the DP-P2 and watch the set
program or transmit the picture to an external recording device such as
a VCR (Video Cassette Recorder) according to your timer reservations.
You can set up to a maximum 100 timers.
1) View Timer List
You can view and check all of the timer information; modifying or delete
a timer and add a new timer to the timer list. Please choose “Timer List”
in the pop-up menu which you can access with the POP-UP button.
NOTE
58
z
The timers are arranged by the start date and time.
z
The timer being recorded is listed on the top.
STB & PVR Function
2) Add New Timer
To add a timer, please press the RED button to display a menu on the
screen. A new pop-up window will appear to configure the timer.
You can configure the following items with your preference for a new
time record.
z
Date: Set start date of recording. Move cursor with the LEFT/RIGHT
buttons and change date with the NUMERIC buttons.
z
Start Time: Set start time. Move cursor with the LEFT/RIGHT
buttons and change time with the NUMERIC buttons.
z
Service: You can select a service to record. The default service is the
z
buttons.
current service that you are watching. If you want to change it,
please press the OK button: a list of services will be displayed and
you can select a service with the UP/DOWN buttons then press the
OK button. If you want to record a radio service, press the
TV/RARIO button to change the list to the radio services.
Duration: Set duration of the recording with the LEFT/RIGHT
z
Recurrence: You may set a series of timers by choosing Recurrence
option. You can choose the following options with the LEFT/RIGHT
buttons as your preference; Once, Daily, Weekend, Weekday, and
Weekly.
59
STB & PVR Function
3) Edit Timer
z
z
z
Mode: If you would like to watch a certain program or transfer it to an
You can modify a timer setting such as service, start date, start time,
external recorder instead of recording it to HDD, please choose “View”
duration, recurrence and mode. Please choose a timer with the
option with the LEFT/RIGHT buttons. If you want to record a
UP/DOWN buttons on the timer list and press the OK button to change.
program, please select “Record” option.
You can modify a setting the same way as described in the previous
File Name: You can change the file name of the record. The OK
section of adding a new timer. Select “Accept” with the OK button to
button displays an onscreen keyboard to change the file name.
change the setting. Choose “Cancel” with OK button or press the EXIT
File Lock: You can lock the recording file. Set this option with the
button to cancel the modification and exit.
LEFT/RIGHT buttons.
Finally, you can save and finish a timer by selecting “Accept” on the
screen. If you want to cancel the timer and exit, please select “Cancel”
or press the EXIT button.
60
STB & PVR Function
4) Delete Timer
5) Turn On and Off the DP-P2 according to Timer
Select a timer which you want to delete with the UP/DOWN buttons
If a timer starts when the DP-P2 is in standby mode, the DP-P2 is
and press the GREEN button. A pop-up confirmation will appear and
turned on automatically and performs its operation according to the
choose “Yes” with the OK button. If you do not want to delete a timer,
timer. Once the timer is ended, a pop-up message will appear to ask if
choose “No” with the OK button or press EXIT.
you are operating the DP-P2 or not. If there is no confirmation to turn
off, the DP-P2 will be turned off and go into standby mode. If you want
to use the DP-P2 continuously, select “No” on the screen and press the
OK button. You can also cancel it by pressing the EXIT button. If you
are watching a program and a timer recording has started you can not
put the DP-P2 into standby until the recording has finished or is stopped
by the user.
NOTE
z
If the AC power is not supplied to the DP-P2 properly, it can not
perform the timer recording. If a timer fails due to this reason, this
timer remains in the timer-list for you to check it.
NOTE
z
You cannot edit or delete a timer which is being recorded.
z
After the AC power is back from a blackout whilst the DP-P2 is
recording a program according to a timer, it restarts the timer
recording if it has to do.
61
STB & PVR Function
3-6. Recording Conflict
1) Duplication When a New Timer Sets
The DP-P2 can record up to two programs simultaneously. If you intend
You can not add a new timer to record three programs at the same time.
to record more than two programs simultaneously, a warning pop-up of
If this occurs, a pop-up list is displayed to show the list of duplicated
duplication will be displayed.
timers if a new timer is entered as duplication.
The following cases indicate when duplication occurs;
z
A new timer intended to be set conflicts with existing timers: set
three timers at the same time.
z
A new recording starts according to a timer whilst two programs are
being recorded.
z
A new timer overlaps with a current recording because the timer also
records the same service with the recording.
NOTE
z
When you set a new timer, the DP-P2 checks if the new timer conflicts
only with exiting timers: it does not check if the new timer conflicts
z
with recordings set by instant recording option.
In order to add a new timer, please delete one group of timers displayed
In this case, the DP-P2 checks conflict when the timer starts.
in the duplication timer list. You can choose a group with the
LEFT/RIGHT buttons.
If you don’t want to delete all of the previously set timers, please
reorganize (delete some of the previously set timers) the previous set
timers and make sure they don’t duplicate to a new timer. Press the
EXIT button to cancel adding a new timer and reorganize the timers in
the timer list.
62
STB & PVR Function
2) When New Recording Starts
3) New Timer Overlaps Existing Timer
If a new recording starts according to a timer whilst the DP-P2 records
Because the DP-P2 checks recording conflict only with timers when you
two programs simultaneously, the following pop-up will be displayed.
set a new timer, you can set a new timer which records and overlaps
the same program being recorded. In this case, conflict will occur when
a new recording starts according to the timer.
There are two options you can choose if duplication occurs: you can
stop one of the current recordings to let a new recording start. Else you
can cancel the new recording or timer recording and let the current two
You can stop the existing recording and start new recording by pressing
recording finish properly.
the OK button. If you do not want to start a new recording, please
To stop one of the current recordings and start a new recording, choose
press the EXIT button.
a recording to cancel with the UP/DOWN buttons and press the OK
button. If you don’t want to stop any recordings, press the EXIT and
cancel the new recording.
63
STB & PVR Function
NOTE
z
The new recording has higher priority than the existing recordings.
Therefore, when a new recording starts it will stop one of the existing
recordings,
which
ends
earlier
respectively,
if
there
are
no
confirmation or cancellation.
z
You may not notice the warning message so make sure you organize
the timer list properly specifically if you are recording a very
important program.
64
STB & PVR Function
4. EPG (Electronic Program Guide)
4-1. EPG with Multiple Services
The EPG (Electronic Program Guide) is a time table of TV programs
This EPG shows 6 services at a time. The vertical axis implies services
which show upcoming programs on a network. The EPG information is
and the horizontal axis implies time. You can move the cursor and
supplied by TV broadcasters as an optional service, therefore the DP-P2
explore the programs with the UP/DOWN/LEFT/RIGHT buttons; the
can not provide a full EPG if some broadcasters do not provide this
UP/DOWN buttons change service. Therefore the cursor will move
information.
upward or downward according to the UP/DOWN buttons. The
The DP-P2 supports a full 7-day EPG provided as a subscription from
LEFT/RIGHT buttons change time, and the cursor will move to left or
IceTV. Please visit the IceTV website, www.icetv.com.au, to get your
right accordingly.
trial account and refer to Chapter 8 to organize it on your DP-P2.
The DP-P2 supports two types of EPG interface which will be explained.
You can enter the EPG with the GUIDE button and change the EPG type
with the RED button. If you want to exit from the EPG, please press the
EXIT button.
You can check the information of a program on the message window
when you place the cursor on the program.
You can move the cursor with the GREEN, YELLOW and BLUE buttons
instead of pressing the UP or DOWN button continuously.
65
STB & PVR Function
4-2. EPG with Single Service
This EPG shows only one service at a time. You can change to the
NOTE
multiple-service EPG with the RED button. Programs are listed vertically
z
The thumb-nail window displays the program you watched before you
by time. Therefore you can move cursor to the previous or next
entered the EPG. The screen will not change when you change the
program with the UP/DOWN buttons. If you want to review another
service or program with the UP/DOWN/LEFT/RIGHT buttons in
service, press the LEFT/RIGHT buttons to change.
order to prevent from refreshing the time-shifting buffer.
You can check the information of a program on the message window
when you place the cursor on the program.
You can move the cursor with the GREEN, YELLOW and BLUE buttons
instead of pressing the UP or DOWN button continuously.
66
STB & PVR Function
4-3. Service Change and Recording
1) Service Change and Instant Recording
If you press the OK button whilst the cursor is placed on the current
NOTE
program (not a future program), a new pop-up will be displayed. Please
z
unless you cancel one of two recordings.
select “Watch” option to watch the selected program on the thumb-nail
screen. To record the select program, please select “Record” option.
Whilst two programs are being recorded, you can not watch the third
z
The shaded types of service name indicate that you can not watch it.
z
You can not watch a program if it is already finished or scheduled to
show in the future.
z
You can also set a instant recording with the REC button.
z
The recording, which is set in the EPG, starts from the current time
and ends at the end of the current program automatically.
z
The “R” mark on the service name indicates that the current program
in the marked service is being recorded.
67
STB & PVR Function
2) Set timer recording
If the cursor is placed on a future program, the REC or OK button sets
If you set a timer on the EPG, the recurrence of the timer sets as
a timer and the colour of types changes to red to indicate that the
“Once” automatically. You can change the recurrence or edit the timer
program is reserved to be recorded. If a certain cell in the EPG has red
with the REC button in the EPG.
colour, that program is reserved to be recorded. If you press the OK
button once again, the sell changes from red to blue to indicate that the
selected program is reserved to watch instead of recording it. You can
also cancel the timer with the OK button.
68
NOTE
z
If a timer does not cover the full program, the red colour with lower
colour saturation will be displayed on the cell.
File Playback Function
6. File Playback Function
This chapter covers all functions regarding playing multimedia contents.
The DP-P2 can play movie, music and photo files stored in the internal
hard disk drive, PCs on the home network, USB storage devices, and
memory cards. You can also play the recording contents in this mode.
You can enter this operation mode with the File PLAY button.
1. Exploring Contents
To provide a user-friendly interface, the main menu is structured in
three parts; the first part is a top (horizontal) menu where you can
select a type of contents to play. The second part is a left (vertical)
menu where you can select a storage or device where the contents are
1) Step 1: Select Content Type
stored. The last part is a file list where you can view and select files and
With the LEFT/RIGHT buttons, you can select a content type you want
folders.
to play. If you select “Movie” icon on the top menu, only the movie files
The following picture shows the main menu and illustrates the structure.
will be displayed on the screen even though a folder or device contains
A step-by-step explanation will be provided to help you understand its
other type of contents such as music or photo. You can also choose
operation.
“Music” or “Photo” icon with the LEFT/RIGHT buttons.
69
File Playback Function
2) Step 2: Select Storage
With the UP/DOWN buttons, you can select a device to access. As you
select a device, folders and files stored in that device will be listed on
the screen. There are five icons on the left menu and each icon has the
following meanings:
z
HDD: You can access the internal hard disk drive by choosing “HDD”
icon. The recorded programs of TV and Radio will be stored in the
“Recording” folder. If you want to play a TV program, please place the
cursor on the “Movie” icon. For the Radio program, please place the
cursor on the “Music”.
z
Network: A list of PCs or network devices connected to your home
network will be listed if you select this icon. You can also see the
WizPNP server in the list when you enable the WizPNP client function
and there exist a WizPNP server device on your home network.
In order to scan and update PCs connected to your home network,
please press the RED button to. Please be sure that the device has at
least one shared folder to access and share contents.
You can scan a specific network device with its IP address. Please
press the GREEN button and enter the IP address of the device.
70
File Playback Function
The “PC” icon indicates the PC and the “STB” icon indicates the
NOTE
WizPNP server.
z
If there is no device listed on the screen after scanning, please check
the network connection and make sure its set and configured properly.
z
If you want to clear the list of network devices, Please press the
YELLOW button.
z
USB: You can access any USB devices connected to the DP-P2 by
selecting “USB” icon on the left menu. If there is more than one USB
devices, all the devices will be listed on the screen.
z
Memory Card: If you insert a memory card to the DP-P2, you can
z
The USB device must be compatible with the USB 2.0 standard.
access to it with this icon.
The top icon on the left menu implies a play-list where you can put files
temporarily as your preference. You can organize one play list per each
content type; movie, music and photo. This will be explained in greater
detail in the following section.
71
File Playback Function
WARNING
z
Each USB port can supply maximum of 500mA to the external device.
Connecting devices consuming more than 500mA can damage the
DP-P2 if there is no additional power supplier to the USB device.
z
The USB device should be detached properly to prevent the DP-P2
from unstable operation or damage. Please press the RED button to
detach the selected USB device properly.
72
File Playback Function
3) Step 3: Exploring Folders and Files
Once you select a content type, i.e., “Movie” and storage or device, i.e.,
NOTE
“Network”, press the OK button to enter the list of folders and/or files
z
There are two operation modes for exploring contents; in the first
(the file list). In the file list, the UP/DOWN buttons move the cursor
operation mode, you can select an icon (content type) on the top
upward or downward to select a folder or file. The CH+ and CH-
menu with the LEFT/RIGHT buttons and an icon (device) on the left
buttons work as the PageUp and PageDown buttons respectively.
menu with the UP/DOWN buttons. The second operation mode you
Please remember that the UP/DOWN buttons do not change your
can enter with the OK button is selecting a folder or file.
selection of the storage type, i.e., “HDD” on the left menu in this
z
You can change the content type whilst you are exploring in the list
operation mode. If you want to change the storage type, you have to
menu with the LEFT/RIGHT buttons without exiting from it. However
exit from the file list with the EXIT button.
you can not change a device on the left menu with the UP/DOWN
You can play content with the OK or PLAY button. More information of
buttons unless you exit.
playback by content types will be supplied later.
73
File Playback Function
2. Contents Playback
2-1. Movie Playback
To play a movie, please select the “Movie” icon on the top menu and
NOTE
select what you want to play on the file list; as explained in the
z
format.
previous section, select a device or storage on the left menu with the
OK button to enter the file list. You can choose a file or folder with the
z
If you want to play the previous or next file as you are watching a
movie, please press the PREV or NEXT button.
UP/DOWN buttons on the file list. Once you choose a file, please press
the PLAY or OK button to play the file.
It takes a few minutes to start playing depending on the content
z
A certain movie content could not play as it depends on the content
format.
z
If you are recording a service, the playback of high-definition movie
content can be limited.
z
The DP-P2 plays the successive files in the same folder after playing a
file unless you press the STOP button.
74
File Playback Function
1) Trick Mode
Powerful trick-operation is supported whilst you watching a movie.
z
PLAY button will display a time-bar. It changes to the normal
playback mode whilst other trick mode is enabled such as PAUSE, FF
or REW.
z
PAUSE button will hold the picture until you play again with the
PLAY button.
z
SLOW FWD button will play in slower speed than the normal speed.
The speed will change to x1/2, x1/4, x1/8, x1/16 and x1/32 speed
according to each input of the SLOW FWD button.
z
REW button rewinds backward with x2, x4, x8, x16 and x32 speed.
z
FF button plays forward with x2, x4, x8, x16 and x32 speed.
z
LEFT button skips and moves backward in 15 seconds. You can also
NOTE
jump to a certain position with the LEFT button. The anchor mark
z
moves backward whilst you are pressing the LEFT button. You can
The trick mode operation can not always be supported as it depends
on the content format.
play and watch from the anchored position by releasing the LEFT
button.
z
RIGHT button skips and moves forward 15 seconds. You can also
jump to a certain position with the RIGHT button. The anchor mark
moves forward whilst you are pressing the RIGHT button. You can
watch from the anchored position by releasing the RIGHT button.
75
File Playback Function
2) A-B Repeat
The DP-P2 can play a certain section (A-B) repeatedly.
NOTE
z
Please activate the progress bar with the OK button. Place the lower
anchor mark at the start position and press the YELLOW button. A new
anchor mark with “A” will indicates the start position. Move the lower
anchor mark at the end position and press the YELLOW button. A new
anchor mark with “B” will be displayed and stat to play from “A” to “B”
automatically.
The DP-P2 will play A-B repeatedly until you press the YELLOW button
and cancel it.
76
The “A-B Repeat” function does not work for some types of content.
File Playback Function
3) Subtitle
The DP-P2 can decode and display subtitles from a subtitle file. To play
z
UP/DOWN buttons whilst the subtitle control window is displayed.
a movie with subtitle, please copy the subtitle file to the same folder of
the movie file and give the same file name as the movie file. The DP-P2
Subtitle Position: You can adjust the position of the subtitle with the
z
Time Sync: If the subtitle is out of sync, you can adjust the sync with
the LEFT/RIGHT buttons.
automatically display subtitle when you play a movie with the OK or
PLAY button.
NOTE
z
z
The DP-P2 support the following subtitle formats; smi, sub and srt.
Enable and Disable Subtitle: You can hide the subtitle if you do not
want to display. Please press the SUBTITLE button and press the OK
button. You can also display the subtitle in the same manner.
77
File Playback Function
2-2. Music Playback
You can play music the same way you play a movie; please select the
“Music” icon on the top menu to play music. You can utilize the same
trick operation for playing music which is described in the previous
section for playing a movie.
You can play the previous or next file with the PREV or NEXT button.
NOTE
z
The DP-P2 plays all music files in a folder repeatedly unless you press
the STOP button.
78
File Playback Function
2-3. Photo Playback
z
Show and Hide Help Message: If you press the INFO button, a help
message will be hided. You can also display the help message with
To play photo files, please select the “Photo” icon on the top menu.
the INFO button.
z
Rotation: You can rotate the photo with the RED and GREEN buttons.
z
Change Interval: You can change the time interval in the auto slide
show. As you press the UP and DOWN buttons, the time interval will
be changed.
Once the DP-P2 play a photo file, it will play all photos in the folder
successively.
z
Auto and Manual Slide Show: The default playback mode is auto but
you can stop the auto-slide show with the PAUSE button and resume
with the PLAY button. In the manual mode, you can change to the
z
previous slide with the LEFT or PREV buttons and change to the next
NOTE
slide with the RIGHT or NEXT buttons.
z
Stop Slide Show: You can stop the slide show and go back to the list
menu with the STOP button.
The DP-P2 plays all photo files in a folder continuously unless you
press the STOP button under the auto-slideshow mode.
z
The rotating operation can not support some photo formats.
79
File Playback Function
2-4. Play-list
The play-list is a personal collection of multimedia contents, which
NOTE
stores the list of files temporarily. You can organize a separate play-list
z
for each content type: movie, music and photo.
If you can not put a folder on the play-list, you have to select all files
of a folder and put them to the play-list.
1) Add File to Play-list
You can organize a play-list and enjoy the contents. Please place the
cursor on a file you want to put to the play-list and press the YELLOW
button: the file will be listed on the play-list. If you want to put more
than one file to a play-list at once, choose files with the BLUE button
one by one and press the YELLOW button. “Check” icon indicates that
the file is selected.
80
2) View Files in Play-list
You can check files in the play-list by selecting the “PLAY-LIST” icon on
the left menu with the OK button. Files in the play-list will be listed on
the screen.
File Playback Function
3) Play from play-list
4) Remove File from Play-list
You can play files in the play-list by pressing the OK or PLAY button. If
You can remove a file from the play-list with the YELLOW button the
you change to the previous or next file in the play-list, press the PREV
same way as adding a file to a play-list. Select the “PLAY-LIST” icon on
or NEXT button.
the left menu and choose a file which you want to remove from the
play-list. You can also use the BLUE button to remove more than one
file at once.
81
This page intentionally left as blank.
82
File Management
7. File Management
1. Rename
You can rename a recording file stored on the onboard HDD. Please
select a file on the FLIE PLAY menu and press the POPUP button. A list
NOTE
z
You can not rename more than one file with the same name at the
of extended menus will be displayed. Please select “Rename” menu with
same time. Therefore, the “Rename” menu will be disabled if you
the OK button.
select more than one file.
You can edit the file name with the on-screen keyboard. Please select
“Save&Exit” with the OK button after editing. You can cancel editing
and exit with the EXIT button.
83
File Management
2. Delete
You can delete the recording files stoned on the onboard HDD. Please
NOTE
select a file on the FLIE PLAY menu and press the POPUP button. A list
z
You can delete more than one file at the same time. Please select files
of extended menus will be displayed. Please select “Delete” menu with
to delete with the BLUE button. The check mark indicates that the file
the OK button.
is selected. You can also unselect the file with the BLUE button.
A pop-up window will be displayed to get your confirmation to delete.
Please select “Yes” with the OK button to delete. Otherwise, please
select “No” to cancel.
84
File Management
3. Backup to USB Storage
You can copy or move the recording files to a USB storage device such
The estimated time information is displayed and you can decide if you
as a USB HDD. Please select a file on the FLIE PLAY menu and press the
proceed or cancel according to the time information.
POPUP button. A list of extended menu will be displayed. Please select
“Copy to” or “Move to” menu with the OK button.
NOTE
z
A USB storage device is not included in the gift box.
z
The USB storage device should be formatted with the DP-P2. The
instruction is described in Chapter 9. Advanced Setup.
85
File Management
If you confirm, two options will be displayed. Please select “USB” with
The USB storage devices connected to the DP-P2 will be listed. Please
the OK button. The USB storage devices connected to the DP-P2 will be
select one with the OK button.
listed. Please select “USB” with the OK button.
NOTE
z
86
If you want to create a new folder, please press the GREEN button.
File Management
The RED button will copy or move the files to the selected folder. A
progress-bar indicates the status.
NOTE
z
If you cancel to copy or move files, please press the EXIT button.
z
In order to watch a TV program, please press the LIVE or RECALL
button.
87
File Management
4. Backup to PC via Network
You can also copy or move the recording files to a PC connected to your
All the network devices connected to your home network will be listed.
home network. Please select a file on the FLIE PLAY menu and press the
Please select one with the OK button.
POPUP button. A list of extended menu will be displayed. Please select
“Copy to” or “Move to” menu with the OK button. All the remaining
procedure is same as copying to the USB storage. Please select
“Network” with the OK button.
All the rest sequences are same as copying or moving files to the USB
storage.
NOTE
z
The shared folder on your PC should permit for the network users to
change files on the PC.
z
You can also backup the recording files from the DP-P2 with the
WizFX software. Please visit to www.beyonwiz.com.au and download
the WizFX software.
88
File Management
5. Edit Recording File
You can edit the recording file whilst you play a recording file on the
z
Cut out: you can cut and delete the selected part.
FILE PLAY menu.
z
Save a copy as: you can make a copy for the selected part.
z
Crop: you can cut and delete the unselected part.
z
Cut and Save: you can cut out the selected part from the original file
and make a new file with the selected part.
A progress bar indicates the status.
Please activate the progress bar with the OK button. Place the anchor
mark at the start position and press the YELLOW button. A new anchor
mark with “A” will indicates the start position. Move the anchor mark at
the end position and press the BLUE button. A pop-up menu will be
displayed.
89
This page intentionally left as blank.
90
Internet Service
8. Internet Service
The DP-P2 is designed to support various Internet services, however
this will be updated at a later time. You can get the latest information
for the DP-P2 by visiting the website, www.beyonwiz.com.au.
91
This page intentionally left as blank.
92
Advanced Setup
9. Advanced Setup
As an extension to Chapter 4. Quick Setup, this chapter illustrates how
to configure your DP-P2. The MISCELLANEOUS and MANAGEMENT parts
will be explained. In this chapter as they were the remaining two items
that were not explained previously.
1. Miscellaneous
The setup menu is grouped in four parts: CONFIGURATION, NETWORK,
MISCELLANEOUS and MANAGEMENT. The first two groups are explained
in Chapter 4. In this chapter the last two parts will be illustrated.
As explained before, press the SET-UP button to enter the setup menu.
As you select MISCELLANEOUS icon on the top menu, three items of
Favorite, Access Control and Preference will be listed on the left menu
bar.
93
Advanced Setup
1-1. Favorite
Before using the favorite service groups, you have to organize them.
A favorite group can not contain TV services and radio services together.
The edit page consists of three columns: “Group”, “Fav. Service” and “All
Therefore, you have to specify as TV or radio group when you make a
Service”. Once you enter into the list with the OK button, you can place
new group. TV and RADIO icons indicate the property of each group.
the cursor on one of the three columns with the LEFT and RIGHT
z
buttons.
press the RED button when the cursor is placed on the “Group”
column, a screen-keyboard pops up and you can input the group
1) Group
The first column contains the list of your favorite groups. You can
Add Group: You can add a new group with the RED button. If you
name.
z
organize up to 20 favorite groups.
Rename: To change the name of the existing group, press the GREEN
button after placing the cursor on the group. a screen-keyboard pops
up and you can modify the name.
z
Remove: Press the YELLOW button to delete a group. If you press
the YELLOW button, a confirmation pop-up screen will display to get
your confirmation to delete. If you do not want to delete a group,
press the EXIT button.
z
Move: You can organize the order of the favorite groups with the
BLUE button.
NOTE
You can also add a new group, and delete or rename an existing group.
z
A favorite group can contain only one type of services; TV or radio.
z
When you add the first service to a new favorite group, the favorite
group becomes a TV group or radio group depending on the first
service type.
94
Advanced Setup
2) Favorite Service
3) All Service
According to your selection of the favorite group in the first column, the
The third column shows all services which you can access. This list
services belonging to the favorite group will be displayed on the second
shows all the service of TV or radio. With the TV/RADIO button, you
column. You can remove a service from the favorite group with the OK
can change this list to TV service list or radio service list. If you want to
button.
add a service to a certain favorite group, select a favorite group in the
first column and select a service in the third column with the OK button.
You can check if the service is added successfully on the second column.
95
Advanced Setup
1-2. OSD
1) Help Box Display
2) Transparency
You can hide the help box which is displayed with the service list. If you
You can set the transparency of the OSD. Please press the OK button to
set this option as “Hide”, the help box does not appear when you press
display the options of the transparency. After selecting an option with
the LIST button.
the UP and DOWN buttons, please press the OK button to set the
change.
96
Advanced Setup
3) Colour Theme
The DP-P2 provides 10 colour themes on your taste.
97
Advanced Setup
1-3. Access Control
You can set a PIN number to access certain set-up menus. After setting
2) Access Control
a PIN number, you have to re-enter the PIN number to enter the menu
You can lock the following setup menus.
again.
1) Set PIN Number
You can set 4-digit PIN number with the NUMERIC buttons. For safety,
you have to enter the number twice to set a new PIN number.
z
Censorship: If you set this, you have to enter the PIN number when
you watch a program with higher censorship level.
z
Start-up: If you set this, you have to enter the PIN number when you
turn on the DP-P2.
z
Setup Menu: If you set this, you have to enter the PIN number when
you access to Setup menu.
NOTE
z
The default PIN number is 0000.
98
Advanced Setup
z
z
Time Setting Menu: If you set this, you have to enter the PIN number
1-4. Preference
when you change the time and date setting.
1) Time-shifting
Network Configuration Menu: If you set this, you have to enter the
PIN number when you change the network configuration.
z
Service Scan Menu: If you set this, you have to enter the PIN number
to scan service.
z
Factory Setting Menu: If you set this, you have to enter the PIN
If you don’t want to use the time-shifting function, you can disable it.
Please select “Time-shifting” and press the OK button. You can select
“Disable” on the pop-up menu screen. The default configuration is
“Enable”.
number to set your DP-P2 as factory-default setting.
To change the configuration, press the OK button to get a pop-up menu
to change the configuration. Please select with the UP/DOWN buttons
and press the OK button to select. If you do not want to change, press
the EXIT button.
NOTE
z
To enable the time-shifting function temporary, please press the
PAUSE button whilst you watch a TV program. After this, you can use
all of the trick-mode operations.
99
Advanced Setup
2) Soft Padding
The soft-padding function is designed to set additional time to the
The Pre-padding means the additional time set prior the program and
recording period if you set a timer on the EPG menu.
the Post-padding means the additional time set after the program.
100
Advanced Setup
3) Keyboard Order
Event though timer-conflict occurs according to the soft padding, timer-
You can enter numbers or alphabet characters with the NUMERIC
conflict message does not display; the DP-P2 will resolve conflicts
buttons. If you set the Keyboard order as “ABC2”, the NUMERIC button
automatically according to the soft-padding priority.
will enter in the following sequence; A Æ B Æ C Æ 2. . If you set the
Keyboard order as “2ABC”, the NUMERIC button will enter in the
following sequence; 2 Æ A Æ B Æ C.
If the period of soft-padding is longer than the period of the adjacent
timer therefore the soft-padding is ignored.
101
Advanced Setup
2. Management
You can upgrade or initialize your DP-P2 in this menu.
2-1. F/W Upgrade
1) Firmware Information
2) Firmware Upgrade
You can upgrade your DP-P2 with the latest firmware. Please visit the
Before upgrading the firmware, you can check the information and last
website, www.beyonwiz.com.au, for firmware information. If you wish
update. Press the OK button to get the information: System Identity,
to upgrade please download the latest firmware.
Firmware Version and Last Update. You can exit with the EXIT button.
The DP-P2 can upgrade firmware which is stored on a PC in the home
network, memory card or USB device.
102
Advanced Setup
If you select the “Network” option, the PCs and network devices
If you select the “Memory Card” or “USB” option, a list view will be
connected to your home network will be displayed. If you can not see
displayed.
any device on the list view, please press the RED button to scan the
devices.
You can also scan a specific network device with its IP address. Please
press the GREEN button and enter the IP address.
103
Advanced Setup
Please select the firmware on the file list and press the OK button to
start. It takes several minutes to complete upgrading. Please make sure
that your DP-P2 is NOT turned OFF until it finishes upgrading.
NOTE
z
If you cannot visually see the firmware upgrading from your PC or
device, please check the network configuration of your PC and DP-P2.
104
Advanced Setup
2-2. HDD
1) HDD Information
2) HDD Format
If you select this menu with the OK button, a pop-up window will
You can delete all files on the HDD. If you select this menu with OK
display a summary of the internal HDD. You can also check the usage of
button, a confirmation pop-up displays. If you select “OK” on the screen
the HDD. To close the pop-up window, press the EXIT button.
and press the OK button, the DP-P2 will restart and format the HDD
automatically. If you do not want to format the HDD, please select “No”
on the screen and press the OK button, or press the EXIT button.
NOTE
z
You have to wait until the DP-P2 formats the HDD successfully, it
takes several minutes. The front display shows the status. Do NOT
TURN OFF the unit until this function has finished
105
Advanced Setup
3) Check HDD
If the DP-P2 is turned off improperly, it is strongly recommended to
check the onboard HDD. Please press the OK button to check the HDD.
NOTE
z
When you turn the DP-P2 on after it is turned off improperly, a
warning message guide you to check the onboard HDD. It takes
several minutes to check the HDD.
z
Whilst the DP-P2 checks the onboard HDD, the PVR functions are
disabled and you can only watch TV service or listen radio service.
106
Advanced Setup
4) Format USB Storage
In order to copy the recording files to a USB storage device, it should be
WARNING
formatted first. Please select “Format USB HDD” menu with the OK
button. A list of USB storage devices will be displayed. Please press the
z
If you format the USB storage device, all the data stored in the USB
storage device will be erased.
OK button to format the selected one. It takes several minutes to
format.
NOTE
z
Even though the USB storage device is formatted with a PC, it should
be re-formatted with the DP-P2.
z
If you don’t want to use the USB storage device as a backup device
and you just want to play the multimedia files in the USB storage
device, you don’t have to format it with the DP-P2.
107
Advanced Setup
2-3. Initialize
1) Clear Service Information
2) Factory Setting
You can clear all the service information. If you select this with the OK
If factory setting is selected, the DP-P2 will erase all information and
button, a pop-up window will be displayed to get your confirmation. If
reset itself to the factory configuration. If you select this with the OK
you select “YES” all services will be deleted and you will have to rescan
button, a pop-up window will display to get your confirmation. If you
them again. Otherwise select “NO” or press the EXIT button to return
select “YES” the DP-P2 will reset all data to the factory configuration.
to the initialize menu.
Otherwise select “NO” or press the EXIT button to return back to the
initialize screen.
108
Advanced Setup
3) Clear IceGuide Disk Cache
The EPG information from the IceTV is stored on the HDD. You can clear
the EPG information and receive the data from the IceTV server.
109
Troubleshooting Guide
z
10. Troubleshooting Guide
Make sure that the antenna cable is correctly
connected to the product.
The remote with the DP-P2 can control other brands. If you wish to
z
Check the brightness level of TV.
z
Check if the channel is currently on air.
z
Check if the TV is set to the correct input
Before contacting Beyonwiz Technical Support, please check the
corresponding to the product’s video output
following Troubleshooting Guide and try all possible solutions for your
connections (eg. AV1, Component, HDMI etc).
problem. If the product does not work normally after completing the
following troubleshooting suggestions, please contact your local product
z
Has a Service Scan been performed?
z
Check that the product’s video output settings
distributor or service centre.
are configured correctly to suit your display
It is recommended that you check your product’s firmware version in
resolution. (Press the TV-OUT button on the
the Setup menu (Setup\Management\Firmware) and upgrade to the
Remote Control to advance through the various
most recent firmware version available from the Beyonwiz website,
video output resolution options, or configure
www.beyonwiz.com.au, before troubleshooting.
this via the Setup menu.
Setup\Configuration\A/V Output)
Problem
Possible Solutions
No message is
z
displayed on the
front panel display
Poor picture &
sound quality
Check the main power cable and ensure that it
z
device (eg. a lamp).
Make
interference.
z
Use a good quality 75ohm coaxial cable to
connect the antenna to the product.
Make sure that the product is in Operation
Mode.
z
Avoid positioning the unit near a mobile phone
or microwave oven as these devices may cause
power
z
Check the signal strength and signal quality
indicators on the product’s onscreen display
sure
that
the
connected to the TV.
110
z
Check that there is power available at the
power outlet by plugging in another electrical
z
Has an antenna been connected to the correct
port on the rear of the product?
is plugged into a suitable power outlet.
or product has no
No picture
z
AV
Cable
is
firmly
(by pressing the INFO button on the Remote
Control) to ensure that the received signal
Troubleshooting Guide
strength and/or quality is optimal.
No sound, or poor
z
sound
z
z
If not,
front panel of the DP-P2 has been removed.
please contact an authorized antenna service
Remote control
agent or licensed contractor to seek advice
does not operate
control, the Remote control's emitter should
concerning improving your TV reception.
TV
directly point towards the product's Remote
z
Check the Volume status of the product, TV
control receiver.
and other audio device/s.
z
Check the battery of the Remote control.
Check the Mute status of the product, TV and
z
Ensure that the correct mode is selected on the
other audio device/s.
remote control i.e. STB mode if operating the
Check that the audio output connections on the
DP-P2 or TV mode if operating the TV.
product have been connected to the correct
z
Remote control
z
z
Has
the
Remote
control
been
input connectors on the TV and/or other audio
programmed to operate your TV?
device/s.
(See page 7 of this Guide)
Check that the product’s audio output settings
Timers
configured in the Setup menu are correct.
recording
are
not
z
correctly
Check to ensure that the timers have been set
correctly.
(Setup\Configuration\A/V Output)
z
Check if more than two timers are overlapped.
To manipulate the product with the supplied
z
Check if the power supply to the product has
does not operate
Remote control, the Remote control's infrared
the DP-P2
emitter should directly point towards the
I can’t connect to
infrared receiver of the product.
my network via
z
Check the batteries of the Remote control.
LAN
z
Ensure that the correct mode is selected on the
z
To manipulate the equipment with Remote
been disconnected.
z
Check to ensure that the Ethernet (LAN) cable
is connected to the correct port on the rear of
the product.
z
Is the correct type of Ethernet cable being
Remote control i.e. STB mode if operating DP-
used for your network connection?
P2 or TV mode if operating the TV.
(i.e. a “straight-through” or “crossover” cable?)
If the Remote control range seems to be
z
Have
the
LAN
settings
been
correctly
limited, check to ensure that the protective
configured in the product’s Setup Menu?
plastic layers (for shipping protection) on the
(Setup\Network\Setting)
111
Troubleshooting Guide
z
EPG data is not
z
present in the
Guide, or the EPG
z
Check to ensure that the other devices on your
Unable to use “trick
network are configured correctly to connect
mode” functions
with another network device.
with live TV
z
Check if Time Shift is enabled.
(Setup\Miscellaneous\Preferences)
z
Ensure the Time Shift buffer contains enough
data to execute the desired function.
Do you have an account subscription with an
EPG data provider? (eg. Ice TV)
Unable to play
Check with your provider to ensure that your
media files
z
Check if the media files are in a format that is
supported by the product.
Check if the media files are playable on
data in the Guide is
account subscription is current and that your
incorrect for my
account is correctly configured for your region.
another device or if there may be some issue
Have you correctly configured the product with
or error with the actual media files.
region
z
your provider’s account subscription details?
Is
the
product
correctly
configured
and
connected to a network device that can
regularly access the internet to receive EPG
data from your provider?
The picture looks
z
Check if the product has been configured to
squashed or
display the correct TV Aspect Ratio.
too wide
(Setup\Configuration\A/V Output)
z
Check if the TV has been configured to display
the correct TV Aspect Ratio. (see your TV user
guide for information)
Unable to access
z
Check if system settings on the product have
Setup Menu
been locked with a PIN.
options
(Setup\Miscellaneous\Access Control)
112
z
If the media files are stored on a disc, check if
the disc is scratched or needs cleaning.
(Setup\Network\Ice Guide)
z
z
Troubleshooting Guide
This page intentionally left as blank.
113
Specification
Specification
Video & Audio Decoding
Main System
Main Processor
HDD
RISC CPU
320GB
Tuner & Channel Decoder
Dual Tuner
Tuner Input Conn.
Tuner Loop-through Conn.
Frequency Range
Signal Level
Aerial Supply
DVB-T Compliant (Internal Loop-through)
IEC 169-2 Female Type
IEC 169-2 Male Type
174~230MHz, 470~860MHz
-20 ~ -80dBm
5V, max. 100mA
Composite, S-Video, Component
HDMI w/ HDCP
2 Ch RCA
Coxial, Optical (S/PDIF, Pass-through)
Extended Interface & Slots
Ethernet
USB Host
Memory Card Slots
Front Panel
VFD
RTC
10/100 Ethernet Port
2 USB Host Ports (USB 2.0 Compliant)
SD/MMC/MS/CF Card
Input Voltage
Type
Power Consumption
Protection
Alphanumeric Display
Real-time Clock
100~240VAC, 50/60Hz
SMPS
Max. 40W
Separate Internal Fuse
Lightning Protection
Physical Specification
Size
Weight
z
a
MPEG-2 up to 1080i
MPEG-4.2 720p
MPEG-4.10 up to 1080i
MPEG-1 Layer I, II, III (MP3)
Dolby Digital Stereo Decoding
Dolby & DTS Pass-through
Power Supply
Video & Audio Output
Analog Video Output
Digital Video Output
Analog Audio Output
Digital Audio Output
MPEG-2 Video
MPEG-4.2 Video for DivX
MPEG-4.10 (H.264) Video
MPEG Audio
Dolby Audio
Pass-through
390x60x295 mm
3.7Kg
Specifications are subject to change without prior notice.
Warranty Conditions
Warranty Conditions
1. Where required by Beyonwiz only the original invoice/receipt issued by the dealer will be accepted as proof of purchase.
2. Beyonwiz may reject warranty claims on equipment which it believes to be illegally acquired or when the “owner” is unable to provide proof of purchase
or where security labels or serial numbers have been tampered with or removed.
3. The warranty covers only defects in the material and workmanship of the product for a period of 12 months from the date of original purchase.
4. This warranty is on “Return to Base” basis. The owner is responsible for the delivery of the equipment to the point of purchase and for collecting the
repaired or replaced equipment from the same location.
5. The warranty is void if failures arise as a result of any of the following. i) Abuse, misuse, physical impact, normal wear and tear. ii) Alteration or repairs
carried out with out written authorization from Beyonwiz. iii) Upgrade that are not registered by Beyonwiz iv) Operating or maintained other than in
accordance with the manual supplied.
6. This equipment will not be considered defective as a result to incompatibility with other equipment or accessories other than the ones supplied with the
unit at the time of purchase.
7. This unit should be returned in its original carton and protective packaging or alternatively in a packing suitable to prevent damage. Beyonwiz will not
accept any responsibility for goods damaged whilst the goods are in transit.
8. Repair or replacement under the terms of this warranty does not give the right to extension or a beginning of a new warranty period. Repairs or
replacements may be carried out with functionally equivalent reconditioned parts or equivalent part. Parts that have been replaced become the property
of Beyonwiz.
9. The customer acknowledges that no promise representation or undertaking has been given by Beyonwiz or its dealer in relation to equipment other than
as contained in this warranty.
10. A service charge will apply if the fault is not covered within the conditions of this warranty or if there is no fault found. The charge will be based on the
current market rate.
11. Beyonwiz is not liable for any other loss other than the unit itself.
12. Nothing contained in this warranty shall be read or applied so as to affect the right of the consumer in relation to the provisions of the trade practices
act or other statutory rights provided by legislation of the state or territory. In the absence of applicable legislation this warranty will be purchases sole
and exclusive remedy and neither Beyonwiz nor its distributors or agents shall be liable for any incidental or consequential damages for breach of any
express or implied warranty of this equipment.
b
WEEE Information
WEEE Information
Correct Disposal of This Product
(Waste Electrical & Electronic Equipment)
This marking shown on the product or its literature, indicates that it should not be disposed with other household
wastes at the end of its working life. To prevent possible harm to the environment or human health from
uncontrolled waste disposal, please separate this from other types of wastes and recycle it responsibly to promote
the sustainable reuse of material resources.
Household users should contact either the retailer where they purchased this product, or their local government
office, for details of where and how they can take this item for environmentally safe recycling.
Business users should contact their supplier and check the terms and conditions of the purchase contract.
This product should not be mixed with other commercial wastes for disposal.
c
Contact Beyonwiz
Contact Beyonwiz
Beyonwiz Australia
[email protected]
www.beyonwiz.com.au
Some features and information in this manual may differ slightly from the product itself due to firmware version and changes made after printing.
d


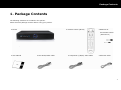

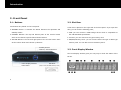
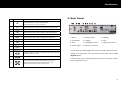

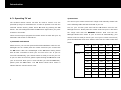
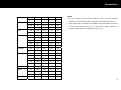

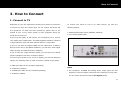
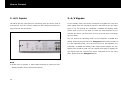
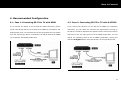
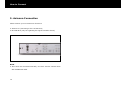
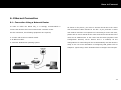


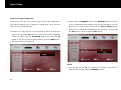
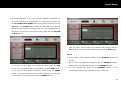
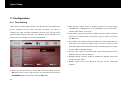

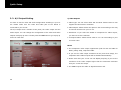
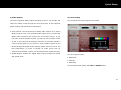

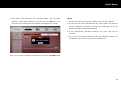


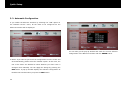


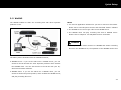


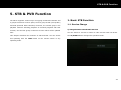
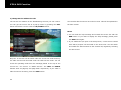

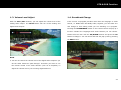
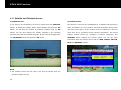
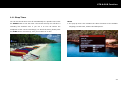

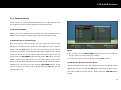
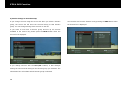
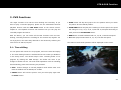
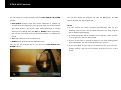

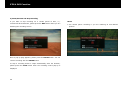
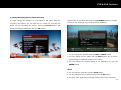

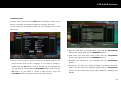


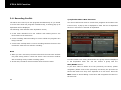


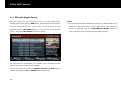
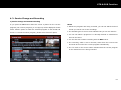
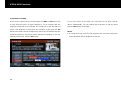
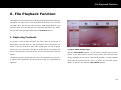


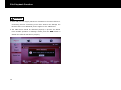
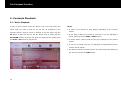

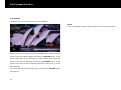

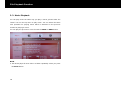
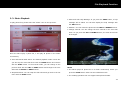
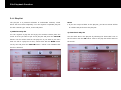


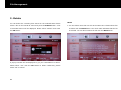


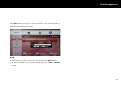


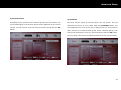
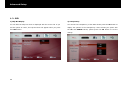
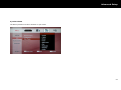
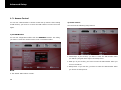

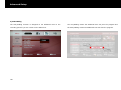
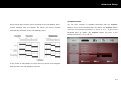
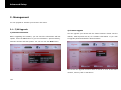

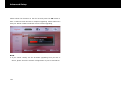

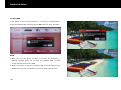
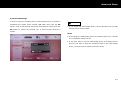
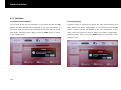
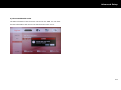
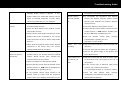
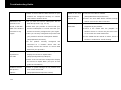

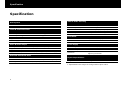
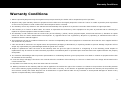


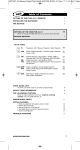
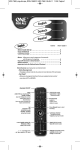
![[color=orange]THIS IS A GUIDE ON REPLACING CAPACITORS IN](http://vs1.manualzilla.com/store/data/007379770_1-0cd8feb544c0f47df80b77b27322076c-150x150.png)