Download Beyonwiz DP-Lite User guide
Transcript
DP-Lite USER GUIDE Version 1.52_Eng Welcome Message Welcome Message Thank you for choosing a beyonwiz DP-Lite, the epicentre of your home entertainment network. The DP-Lite supports all the features of a conventional digital broadcasting receiver or STB (Set-Top Box) and PVR (Personal Video Recorder). As well as the dual DVB-T digital tuners, the DP-Lite also enables you to listen to or watch multimedia content from: Storage devices attached to the integrated USB (Universal Serial Bus) connectors Network devices from your PC, home network and/or the Internet You can play almost any multimedia content from any connected storage device. With a DP-Lite, you don’t have to bring your PC to your living room to enjoy your PC or Internet based content on the big screen. You can be free to share your valuable time and experience with your family. To enjoy the newest features available on your DP-Lite, make sure that the latest firmware is installed. Note that with new firmware some features, which are not described in this manual, may be added and some features described in this manual may be altered or removed. These changes are usually made to give you the best performance and user experience. Visit our website, http://www.beyonwiz.com.au/, to get updated information about firmware and features. i Precaution Precaution Read this manual carefully before using this product. The cautions Do not repair, disassemble or modify this product yourself. Doing so described below contain important information about safety, and are can cause a fire or electric shock. categorized into: Danger, Warning and Notice. maintenance is needed, please contact your local beyonwiz service beyonwiz will not be centre or agency. responsible for accidents or damage resulting from careless handling by the user. If internal checking or Do not block or cover any ventilation holes or openings. A fire can result from overheating. electric storms. Failure to do so can result in a fire or electric shock. DANGER If the user mishandles the product, there is a risk of loss of life Connect the power cord only to A/C outlets as specified by the user may fall) or subject it to impact as the product may be damaged. If the product is damaged, turn off the power and remove the plug from The product must not be immersed in water or liquid of any kind. Do not place heavy objects, including the product itself, on top of the power cord. If the cord is damaged, it can result in fire or electric shock. Do not place metal objects on top of the product. If metal objects fall into the product, it could result in a fire or electric shock. ii Do not drop the product (for example by putting it in a place where it non-specified A/C outlet, it can result in fire or electric shock. result in a fire or electric shock. shock. manual or product specification. If the power code is connected to a The product must not be exposed to drips or splashes. Doing so can Remove the antenna cable from the outlet as quickly as possible during electric storms. Failure to do so can result in a fire or electric or critical injury. Turn off and unplug the power cord as quickly as possible during the power outlet, as a fire or electric shock may occur. Never touch the power cord with wet hands. electric shock. It can result in an Precaution WARNING If the product is mishandled, the user might receiver a serious or minor injury. Damage or loss to the user’s property may also NOTICE If the product is mishandled, it might cause minor damage. occur. towel. Never use chemical solvents such as benzene, thinner, The product must not be exposed to water or liquid. If the product is acetone or other solvents. The surface of the product might become exposed to drips or splashes, it might cause a problem that may not discoloured and the paint might peel. be repairable. If the product becomes marked, clean it gently with a soft cloth or Do not repair, disassemble or modify this product yourself. It can be Do not place or keep the product in the following locations. Doing so might cause problems. seriously damaged, possibly beyond repair. Where it is too hot or cold. Turn off the power and unplug the power cord as quickly as possible Where there is high humidity. during electric storms. The product may be damaged. Where there are excessive temperatures, for example in front of during electric storms; otherwise the product might be damaged. Where there is dust or soot. Data recorded in the HDD may be lost due to a shock, lightening or In confined areas where heat build-up cannot be dissipated. electricity failure. The user must back up his or her own data, and Where it is exposed to direct sunlight. air-conditioners or heating vents. Remove the antenna cable from the outlet as quickly as possible the company does not take any responsibility for failure to do so. Turn the product off and unplug the power cord and remove the batteries from the remote control if the unit is to be unused for a long period of time. Do not place heavy objects on top of this product. It might cause a malfunction or damage. If the product is so seriously damaged that it cannot be repaired, or has stopped working altogether, dispose of it properly in accordance with the local laws or regulations in your area. iii Precaution About the internal hard disk drive The internal hard disk drive (HDD) is a fragile piece of equipment. Please use the product within the guidelines below to protect against possible HDD failure or to protect against accidental data loss. This symbol is intended to alert the user to the presence of un-insulated “dangerous voltage” within the product’s enclosure that may be of sufficient magnitude to constitute a risk of electric shock to persons. Do not move the product whilst it is on. Install and use the product on a stable, level surface. Do not block the top ventilation holes. Do not use the product in excessively hot or humid places, or in places that may be subject to sudden changes in temperature. This symbol is intended to alert the user to the presence of Sudden changes in temperature can cause condensation to from important operating and maintenance (servicing) instructions in the literature accompanying the product. inside the product. This can be a cause of HDD failure. Whilst the product is switched on, do not unplug it from the wall socket or switch the electricity off at the wall switch or the circuit breaker. Do not move the product immediately after switching it off. If there is a power failure whilst the product is on, some data on the HDD might be lost. The HDD is very delicate. If used improperly or in an unsuitable environment, the HDD may fail after a few years of use. Signs of problems include playback unexpectedly freezing and noticeable block noise (mosaic) in the picture. Sometimes there will be no warning signs of HDD failure. If the HDD fails, no playback of recorded material will be possible. In this case the HDD needs to be replaced by a qualified technician. iv Precaution Copyright This manual is protected by copyright laws. Copy, use, reproduction of this manual in part or whole without beyonwiz's prior written permission is prohibited. Disclaimer The manufacturers, distributors and agents are not liable for any kind of damage caused by the use of the information contained in this manual. The instruction and descriptions which this manual contains are based on the time of this manual's production. The manufacturer constantly updates it with new functions and technology. All the specifications are subject to change without prior notice. Trademarks HDMI, the HDMI logo and High-Definition Multimedia Interface are trademarks or registered trademarks of HDMI Licensing LLC. Manufactured under the license from Dolby Laboratories. "Dolby" and the "double-D" symbol are trademarks of Dolby Laboratories. The USB-IF Logos are trademarks of Universal Serial Bus Implementers Forum, Inc. v Contents Contents 4. Quick Setup Welcome Message Precaution i ii 1. Package Contents 3 2. Introduction 5 1. DP-Lite Highlights 5 2. Front Panel 2-1. Buttons 3. Rear Panel 6 6 6 4. Remote Control 4-1. Operating DP-Lite 4-2. Operating TV set 4-3. Remote Control HEXA Code 7 7 8 10 3. How to Connect 12 1. A/V Connection 1-1. Video Connection 1-2. Audio Connection 2. Antenna Connection 12 12 13 13 3. Ethernet Connection 3-1. Wired Connection Using a Network Router (LAN) 3-2. Direct Connection to a PC 3-3. Direct Connection to Internet 14 14 15 16 1. Start Quick Setup 1-1. Quick Setup of Video Output Format 1-2. Basic Operation 2. Configuration 2-1. Time Setting 2-2. A/V Output Setting 2-3. Service Scan 2-4. LiDiC (Line-in Digital Converter – available separately) 3. Network 3-1. Enable Ethernet 3-2. Ethernet Setting 3-3. Ice Guide 3-4. WizPNP 3-5. Windows Sharing 5. STB & PVR Function 1. Basic STB Function 1-1. Service Change 1-2. Information Box 1-3. Volume Level Adjust 1-4. Soundtrack Change 1-5. Subtitle and Teletext Service 1-6. Sleep Timer 2. Service Edit 2-1. Service List Edit 2-2. Favorite Group 18 18 18 19 22 22 23 25 27 28 28 29 31 32 34 35 35 35 38 39 39 40 41 42 42 43 Contents 3. PVR Functions 3-1. Time-shifting 3-2. Instant Recording 3-3. Timer 3-4. Trick Mode Operation 3-5. Recording Control 3-6. Timer Conflict 4. EPG (Electronic Program Guide) 4-1. EPG with Multiple Services 4-2. EPG with Single Service 4-3. Service Change and Recording 6. File Playback 45 45 46 48 53 54 56 58 58 59 60 62 1. Exploring Contents 62 2. Contents Playback 2-1. Movie Playback 2-2. Music Playback 2-3. Photo Playback 2-4. Playlist 67 67 72 72 73 7. File Management 76 1. Add Folder 76 2. Delete 77 3. Auto Delete 78 4. Rename 78 5. Copy / Move 79 6. Edit Recording File 82 8. Internet Service 83 9. Advanced Setup 85 1. Miscellaneous 1-1. Favorite 1-2. OSD 1-3. Access Control 1-4. PVR 1-5. File Player 1-6. Preference 2. Management 2-1. Firmware 2-2. HDD 2-3. Initialize 85 85 87 88 90 94 95 96 96 98 101 10. Troubleshooting Guide Specification Warranty Conditions WEEE Information Contact beyonwiz 103 a b c d This page intentionally left as blank. 1. Package Contents The following items are included in the box. Please check all package contents before using your product. DP-Lite Remote Control Batteries (AAA size x2) USB cable (male/female type) User Manual RCA Audio/Video Cable Component (Y/Pb/Pr) Video Cable Ethernet Cable 3 This page intentionally left as blank. 4 Introduction 2. Introduction 1. DP-Lite Highlights As a HD (High Definition) multimedia epicentre, the DP-Lite supports Dual Tuner DVB-T Compliant with Internal Loop through various ways of connecting to HD TVs and audio systems; HDMI port Video Output Composite, S-Video, Component (Y, Pb, Pr), HDMI Audio Output 2ch RCA for analog audio output combining with HD video decoders, which support MPEG-2, MPEG-4, H.264 and WMV9, give you the true HD digital A/V experience. Dolby Digital stereo decoding Moreover, by supporting USB host ports and networking, the most frequently used ways of sharing contents, the DP-Lite gives unlimited flexibility to access and play multimedia content. Coaxial and Optical S/PDIF Output, HDMI Interface 10/100 Ethernet Port 1 USB Host Ports (USB 2.0 Compliant) Multimedia Movie: mkv, wmv, avi, mpg, vob, mp4, asf, tp, trp, ts Playback Music: mp3, wma, aac, ac3 Photo: bmp, jpeg, png 5 Introduction 3. Rear Panel 2. Front Panel 2-1. Buttons Five buttons are placed on the front panel. STANDBY Button: it switches the DP-Lite between the operation and standby modes. CHANNEL Buttons: the top and bottom parts of the circular button work as the channel-up and channel-down buttons. 1. RF ANTENNA IN 5. OPTICAL AUDIO 9. 2 CH AUDIO VOLUME Buttons: the left and right parts of the circular button work 2. RF LOOP OUT 6. COMPOSITE VIDEO 10. ETHERNET as the volume-down and volume-up buttons. 3. HDMI 7. S-VIDEO 11. USB 4. COXIAL AUDIO 8. COMPONENT (Y/Pb/Pr) Standby Button Channel, Volume Buttons Front Panel 6 Introduction 4. Remote Control 4-1. Operating DP-Lite In order to operate the DP-Lite with the enclosed remote control, please select STB mode by pressing the STB button. The red backlight beneath the STB button lights when you press a button in this mode. The picture below and table on the right show the function of each button on the remote control. 1 2 3 4 5 6 7 8 9 10 11 12 13 14 15 16 17 18 19 20 21 22 23 24 25 26 27 28 29 30 31 32 33 34 35 36 37 38 39 40 41 STANDBY N/A STB TV/RADIO TV-OUT TV SETUP WizTV LIVE File PLAY VOL +/CH +/MUTE INFO FAV GUIDE POP-UP LIST EXIT UP/DOWN/LEFT/ RIGHT OK RECALL RED GREEN YELLOW BLUE 0~9 SLEEP ZOOM PLAY STOP PAUSE SLOW FWD REW FF PREV NEXT REC SUBTITLE TELETEXT SOUNDTRACK Switch the DP-Lite between Operation and Standby mode. Left for later use. Change to STB mode. Select either TV or Radio while in STB mode. Change Video Output. (Refer to page 17 for more information) Control standard TVs with this remote control. Go to SETUP Menu. Go to Internet Service. Go to Live TV. Go to File Player. Adjust the volume. (Increase/Decrease) Change TV or Radio Service. (Up/down) Enable or disable the Audio output. Show service information. Show Favorite Service List. Show EPG (Electronic Program Guide). Show advanced menus of the current mode. Show Service List. Return to the previous menu or Cancel. Move the indicator on the menu mode. Select an item on the menu or Confirm. Recall the previously viewed (or listened) service. Optional function key, and set bookmark Optional function key, and play from the bookmarked position. Optional function key, and A-B Repeat Optional function key Numeric buttons. Set sleep timer. Zoom-in or Zoom-out, and change aspect ratio. Play content. Stop playback. Pause playback, pause live TV Slow Forward. Rewind. Fast Forward. Go to the previous track or file, and continue playing. Go to the next track or file, and continue playing. Start recording, and manage active recordings. Change Subtitle language. Show Teletext. Change Soundtrack language. 7 Introduction 4-2. Operating TV set 2) Manual Set The enclosed remote control can also be used to control a TV set You can set your remote control with 3-digit code manually. Check the provided by major TV manufacturers. In order to operate a TV with the following table and find the brand of your TV. enclosed remote control, please select TV mode by pressing the TV Turn on your TV then press and hold the TV button until the red- button. The red backlight beneath the TV button lights when you press backlight turns on. Point the remote control at your TV and enter the a button in this mode. 3-digit code with the NUMERIC buttons. Wait until the red-backlight There are two ways to program the remote control to work with your TV, blanks three times. automatic code search or manual set. control is ready to use with your TV. If your TV turns off automatically, your remote If your TV does not turns off, press the TV button and enter another code from the table under that 1) Automatic Code Search Turn on your TV then press and hold the TV button until the red- brand. 208 223 224 218 253 backlight turns on. Point the remote control at your TV and then click 261 286 307 325 329 the UP button. After the red-backlight of the TV button blinks, wait at 410 422 423 206 207 208 215 218 229 231 232 236 238 240 244 253 256 286 287 292 298 299 300 301 304 305 306 307 309 3123 314 315 316 317 325 358 367 381 382 383 384 399 405 406 407 410 411 least 3 seconds to check if your TV turns off or not. If your TV turns off automatically, the remote control is ready to use with your TV. If your TV does not turns off, repeat clicking the UP button until your TV turns off. Once your TV turns off when you click the UP button, press the OK button. The TV button blinks three times to indicate that the remote control is set. 8 FUJITSU HITACHI Introduction JVC 207 212 247 264 323 385 LG NEC PANASONIC PIONEER SAMSUNG NOTE 208 215 224 229 253 286 307 344 374 385 387 410 412 205 207 208 215 224 229 248 253 286 389 208 210 211 212 213 214 216 220 230 236 237 239 242 244 245 255 258 260 278 279 286 307 309 384 410 208 244 246 286 287 307 374 376 380 410 205 206 208 209 215 216 218 224 229 253 260 270 277 286 287 296 325 337 374 410 If your TV brand is not listed in the table, visit the following website to get the correct code, if available: http://www.beyonwiz.com.au/ . The remote control will not always be compatible with brands of televisions. If this remote doesn’t work, or no code exists, continue to use the original remote from the manufacture of your TV. 412 SHARP 207 209 230 245 384 SONY 206 207 208 225 230 264 272 285 286 329 424 426 430 208 258 286 345 405 THOMSON 9 Introduction 4-3. Remote Control HEXA Code The picture below and table on the right provide you with information to allow you to program your own programmable remote control to operate the DP-Lite. The coding system used for the DP-Lite is the NEC type. 1 2 3 4 5 6 7 8 9 10 11 12 13 14 15 16 17 18 19 20 21 22 23 24 25 26 27 28 29 30 31 32 33 34 35 36 37 38 39 40 41 10 STANDBY EJECT STB TV/RADIO TV-OUT TV SETUP WizTV LIVE FILE PLAY VOL +/CH +/MUTE INFO FAV GUIDE POP-UP LIST EXIT UP/DOWN/ LEFT/RIGHT OK RECALL RED GREEN YELLOW BLUE 0/1/2/3/4/ 5/6/7/8/9 SLEEP ZOOM PLAY STOP PAUSE SLOW FWD REW FF PREV NEXT REC SUBTITLE TELETEXT SOUNDTRACK 0xBE000AF5 0xBE0040BF N/A 0xBE0055AA 0xBE0042BD N/A 0xBE0007F8 0xBE0052AD 0xBE0008F7 0xBE0044BB 0xBE0002FD 0xBE0003FC 0xBE0000FF 0xBE0001FE 0xBE000CF3 0xBE000DF2 0xBE0009F6 0xBE0043BC 0xBE001AE5 0xBE004CB3 0xBE001CE3 0xBE004EB1 0xBE004FB0 0xBE0053AC 0xBE0054AB 0xBE001FE0 0xBE001EE1 0xBE004DB2 0xBE000DF2 0xBE000EF1 0xBE000FF0 0xBE0010EF 0xBE0011EE 0xBE0012ED 0xBE0013EC 0xBE0014EB 0xBE0015EA 0xBE0016E9 0xBE0017E8 0xBE0018E7 0xBE0019E6 0xBE001BE4 0xBE0050AF 0xBE004BB4 0xBE004AB5 0xBE0046B9 0xBE0006F9 0xBE0045BA 0xBE0048B7 0xBE0004FB 0xBE0005FA 0xBE005EA1 0xBE0047B8 0xBE0051AE 0xBE0049B6 Introduction This page intentionally left as blank. 11 How to Connect 3. How to Connect 1-1. Video Connection 1. A/V Connection Depending on the A/V equipment you own, there are various ways you can connect the DP-Lite. To choose the best connection option, please To connect your DP-Lite to your TV or display, the following options are available (in order from highest to lowest quality); refer to the manual of equipment you would like to connect to. HDMI (high definition compatible) To get High Definition playback of High Definition content, we Component (Y/Pb/Pr) (high definition compatible) recommend you connect your high definition display with a HDMI cable. S-VIDEO HDMI supports standard, enhanced or high-definition video and multi- Composite channel audio in a single cable (HDMI cable can be purchased NOTE separately). If your TV set does not support HDMI but has a DVI input, a HDMI to Only one video connection will be active at a time. DVI converter can be purchased separately (in this case, audio signal All cables can be purchased separately. output through the HDMI interface is disabled). If you do not have a high definition display, you can connect the DP-Lite and A/V equipment via other connection options. NOTE High Definition playback components connections. 12 is only possible through HDMI or How to Connect 1-2. Audio Connection To connect your DP-Lite to your TV or audio system, the following options are available; S/PDIF digital audio output (COAXIAL or OPTICAL) 2 CH stereo analogue audio output 2. Antenna Connection Connect your TV Antenna to the DP-Lite as follows; Antenna In (connecting to the roof Antenna) RF LOOP OUT (only for bypassing the signal to another device) NOTE The DP-Lite’s two tuners are connected internally, so only one antenna cable is required. 13 How to Connect 3. Ethernet Connection 3-1. Wired Connection Using a Network Router (LAN) In order to fully utilize the DP-Lite, it is strongly recommended that you As shown in the picture, connect the DP-Lite to the router with Ethernet connect the DP-Lite to your home network via a network router. cable included in the box. If you purchase a router with a DP-Lite and For this connection, the following equipment is required; have no experience of connecting a router with a PC, please refer to A router either with a built-in network switch or an external switch. user’s manual of the router and connect the DP-Lite to the router in the An Ethernet cable (provided). same manner as an additional PC. If the router has the DHCP (Dynamic Host Configuration Protocol) server feature and it is enabled, all the configurations for networking will be set automatically and the DP-Lite is ready to use. For more information on configuring LAN, please refer to Chapter 4 “Quick Setup” 14 How to Connect 3-2. Direct Connection to a PC If your PC has the DHCP server feature and it is enabled, all the With this configuration, you can share contents with a PC but the DP- configurations for networking will be set automatically and the DP-Lite Lite cannot access the internet. is ready to communicate with your PC. If your PC does not have the For this connection, the following equipment is required; DHCP server feature, you must disable the DHCP feature and set IP A PC with an Ethernet connection (Network Interface Card) (Internet Protocol) information manually for the DP-Lite and PC. For An Ethernet crossover cable. more information on manually configuring DHCP, please refer to Chapter 4 “Quick Setup”. Crossed Ethernet Cable 15 How to Connect 3-3. Direct Connection to Internet With this configuration, you cannot share contents with a PC through your home network. For this configuration, you will need to connect the DP-Lite to your ADSL Modem or Cable Modem with an Ethernet crossover cable (not included in the box). Most ISPs (Internet Service Provider) support DHCP. Therefore, you can connect your DP-Lite directly to your gateway with a crossed cable. If your ISP does not support DHCP you will need to manually configure your DP-Lite, please contact your ISP for more information. Internet Crossed Ethernet Cable 16 This page intentionally left as blank. 17 Quick Setup 4. Quick Setup This chapter guides you through the basic set up of your DP-Lite so that you can utilise its basic features. In order to utilize the advanced features of the DP-Lite, refer to Chapter 9 “Advanced Setup”. The default video output is SD PAL (576i). Press the TV-OUT button successively to switch the video output to SD NTSC (480i), HD PAL (720p), HD NTSC (720p), HDMI PAL (1080i), HDMI NTSC (1080i), PAL HDMI Auto, NTSC HDMI Auto, HDMI PAL (576p) and HDMI NTSC (480p) formats. Select the video output to suit your chosen video connection 1. Start Quick Setup type, as follows; Composite: SD PAL or SD NTSC If A/V and antenna connections are complete, press the STANDBY S-VIDEO: SD PAL or SD NTSC button to start. Component: HD PAL or HD NTSC HDMI: PAL HDMI Auto, NTSC HDMI Auto, HDMI PAL or HDMI NTSC 1-1. Quick Setup of Video Output Format If you can already see a picture on your TV screen, you can skip this section and go on to the next section “Basic Operation”. If nothing is displayed on the TV screen, firstly check that your TV is set to the correct video input channel as selected in the “Video Connection” section in Chapter 3 (refer to your TV’s user manual for instructions on how to do this). Secondly, you need to adjust the format and resolution of the video output to suit your TV. Since you are currently unable to access this setting through the set-up menu, a TV-OUT button is provided on the remote control unit (RCU). 18 NOTE Allow 3 seconds after pressing the TV-OUT button for the configuration change to become effective. Once you have a picture displaying on your TV screen, it is recommended that you verify your video format configuration in the Setup menu (see “A/V Output Setting” section later in this chapter). Quick Setup 1-2. Basic Operation 1) Enter and Exit Setup Mode You can enter the setup mode by pressing the SET-UP button on the remote control. To return to the previous operation mode (e.g. STB/PVR or File Playback), press the EXIT button. 2) Setup Menu Structure The setup menu is grouped into four main categories (represented by icons across the top of the screen): Configuration (“Config.”), Network, Miscellaneous (“Misc.”) and System. Firstly, choose one of these main categories using the LEFT/RIGHT buttons. As you select a main LEFT/RIGHT buttons: Select a main category UP/DOWN buttons: Select a sub-category OK button: Enter the item list (UP/DOWN to select an item, OK to category, a list of sub-categories will be displayed on the left side of the screen. When you choose a sub-category with the UP/DOWN buttons, access the item’s configuration options). EXIT button: Exit from the item list. the items belonging to the sub-category will be listed in the item list. Press the OK button to enter the item list, and use the UP/DOWN buttons to select an item in the item list. To access the configuration options for an item, press the OK button. press the EXIT button. NOTE To exit from the item list While in the item list, the LEFT/RIGHT buttons can still be used to navigate through the top menu. This chapter explains only the Configuration and Network categories of the setup menu. The remaining categories Miscellaneous and System will be explained in Chapter 9 “Advanced Setup”. 19 Quick Setup 3) How to Change Configuration In the setup menu, there are several ways to change configuration. Setup using the NUMERIC buttons: The NUMERIC buttons are used to set configuration with numbers such as time information. You can Here are three examples of configuration changes frequently used. also move the cursor to the left or right by using the LEFT/RIGHT buttons while you are editing the configuration. Press the OK button Selection in a pop-up menu: If you press the OK button, a pop-up menu will be displayed. to apply the change, or cancel it with the EXIT button. Use the UP/DOWN buttons to select an option and press the OK button to apply this setting. If you decide not to change settings, press the EXIT button to close the pop-up menu. NOTE You can also use the CH +/- buttons to increase or decrease the value instead of typing with the NUMERIC buttons. 20 Quick Setup On-screen keyboard: If you need to input alphabetic characters, a If you need to input special characters, press the GREEN button. “Keyboard Input” pop-up window will be displayed. The screen keyboard now displays special characters. You can return You can move the cursor with the UP/DOWN/LEFT/RIGHT buttons and select the letters with the OK button. backspace key. to small characters by pressing the GREEN button again. The RECALL button works as a You can also clear your inputs by selecting “Clear” You can move the cursor one place to the left or right by using the YELLOW or BLUE buttons respectively. After the input, you can save it by selecting “Save & Exit” with the OK button. If you do not want to save, please press the EXIT button. If you need to input upper case characters, press the RED button. You can return to lower case characters by pressing the RED button again. NOTE If you need to input numbers, use the NUMERIC buttons on the RCU. You can also type alphabet characters with the NUMERIC buttons. Refer to the alphabets printed on the NUMERIC buttons. You can configure the order of the NUMERIC buttons to be alphabet first or number first (see “Keyboard Order” section in Chapter 9). 21 Quick Setup AUTO – the time and date information is received automatically from the digital broadcast signal when you turn on the DP-Lite. 2. Configuration MANUAL – the time and date information is set by you, and maintained by the DP-Lite’s internal clock. 2-1. Time Setting NETWORK – the time and date information is received from the NTP(Network Time Protocol) server. The date and time information is used to start timer recordings. Therefore, you need to configure the time and date information Please note if choosing AUTO mode that broadcasters can occasionally precisely. transmit the wrong time and date information, and this can cause You can also select preferred date and time formats. The following picture illustrates the items which you configure to set the problems with recording schedules. time and date. Date Format: Select a display format for the date either “DD/MM/YYYY”, “MM/DD/YYYY” or “YYYY/MM/DD” from the pop-up menu. (DD-day, MM-month, YYYY-year) Time Format: Select your preferred time format, either 12-hour or 24-hour format. Time Offset (for MANUAL mode only): Set the difference between GMT and your local time zone e.g. Sydney and Melbourne = +10:00. Current Time (for MANUAL mode only): Set the current date and time. Daylight Saving (for AUTO mode only): Enable or disable Daylight Saving time-offset. GMT offset is showing in Time Offset. Mode: Select how to obtain the date and time information. Choose either of the following options; Region: (for AUTO mode only): Select your region so that the correct NOTE Your selected date and time format will be applied to all date and time displays in the graphical menus. 22 Quick Setup 2-2. A/V Output Setting 1) Video Outputs You need to set the video and audio configurations to suit your TV and format in Australia. audio equipment. Make sure the video and audio connections on the DP-Lite are correctly connected to your TV and audio equipment (see Video Output: Select the connection type used to connect your DPLite to your TV set in the “Video Connection” section in Chapter 3. the “A/V Connection” section in Chapter 3). The A/V Output menu consists of two parts; video output and audio Video Type: Select either PAL or NTSC format. PAL is the standard Resolution: If you select HDMI or Component for video output, set the resolution to suit the resolution of your TV screen. output. TV Aspect Ratio: select either 4:3 or 16:9 to suit the aspect ratio of your TV screen. NOTE Component video output supports SD (576i for PAL and 480i for NTSC), 480p, 576p, and HD 720p and 1080i. If you set the video output resolution to HD (i.e. more than 576p), the composite and S-Video outputs will be disabled automatically. If you set the video output resolution higher than the maximum resolution that your TV set can accept, your TV will not display a picture (refer to your TV’s user manual). If you set the HDMI output as Auto, the DP-Lite configures the best format of HDMI suitable for your TV set automatically. Some TV sets do not support the auto-configuration function. In this case, you must set the resolution manually. HDMI outputs audio in digital format as well. 23 Quick Setup 2) Audio Outputs 3) Colour Setting The DP-Lite supports 2ch audio via the RCA connectors on the rear of You can adjust the colour output of the DP-Lite. the unit and will decode and output Dolby Digital via a built in decoder. It also supports digital outputs with optical and coaxial ports. Audio Format: Select one of the following options to suit your chosen audio connection in the “Audio Connection” section in Chapter 3; 2ch – for stereo speaker connections. passthrough – to use an external audio decoder (e.g. amplifier). S/PDIF Output: Select “Enable” if using the digital audio output through the coaxial and optical ports. Dolby D Compression: Select either of the following options; Line Mode – recommended for most users. RF Mode – recommended for when audio is connected directly to the TV using RF cables. The three options are brightness, contrast and saturation. Use the UP/DOWN buttons to select each option, and adjust the setting with NOTE If you set the audio format to 2ch, the DP-Lite mixes down 5.1ch audio source to 2ch audio. If the content of a channel broadcasted has 2ch audio source, the DPLite cannot expand the 2ch audio source to 5.1ch audio format. Therefore, you will only hear sound from the front speakers even though you have connected a 5.1ch speaker system. 24 the LEFT/RIGHT buttons. You can restore all colour settings to the factory default values by pressing the RED button. To apply your chosen settings, use the UP/DOWN buttons to select “Accept” and press OK. To cancel the new settings, select “Cancel” and press OK, or press the EXIT button. Quick Setup 2-3. Service Scan Before you can watch a broadcasted service, you need to scan for services first. Antenna DC (+5V) Power: You can supply DC (+5V, max. 100mA) power to the antenna through the antenna cable. The scanned services will be stored in non-volatile Make sure that Therefore you don’t have to scan for services again unless your antenna is an active type (i.e. the antenna requires external DC you delete services stored in memory. If no services stored in memory, power to enhance the sensitivity) before you supply DC power to the the service scan page will be presented automatically. antenna. memory. Scanning Range: Select either of the following options; FULL - scans all VHF and UHF channels. PARTIAL - scans only a specific channel or channel range (requires setting start and end channels manually). Start Channel (for PARTIAL scanning range only): Select the first channel of your required scanning range. End Channel (for PARTIAL scanning range only): Select the last channel of your required scanning range. Signal Quality Bar: Two horizontal bars indicate the signal quality of the start and end channels. The leftmost rectangle changes from black to yellow when the tuner locks the signal properly. DANGER IF THE ANTENNA IS A PASSIVE TYPE, ENABLING THE DC POWER MAY DAMAGE THE ANTENNA AND THE DP-Lite. 25 Quick Setup Start Scan: After selecting your scanning range, select Start Scanning NOTE and then press the OK button. On the screen, the scanning window You cannot select an end channel smaller than the start channel. appears and displays the progress. If you perform a “FULL” service scan, your previous service list, favorite groups and all timer settings will be deleted. If you perform a “PARTIAL” service scan, the new service will be added to your current service list. Once scanning is complete, you are ready to watch live television by pressing the LIVE button. 26 Quick Setup 2-4. LiDiC (Line-in Digital Converter – available separately) The LiDiC can receive either Composite or S-VIDEO signals from one or LiDiC: You can enable or disable the LiDiC. When the LiDiC is two external A/V devices simultaneously, and pass these signals enabled, new services named “950 LiDiC 1” and “951 LiDiC 2” will through to the DP-Lite. appear in the service list. You need to configure the LiDiC to suit the connected external A/V device(s) as follows; You can watch and enable the PVR functions for external A/V signals by selecting the 950 or 951 service. Display: Select either of the following options; Full: Displays incoming video signal as 16:9 aspect ratio. Centre: Displays incoming video signal as 4:3 aspect ratio. Input 1: Select either Composite or S-VIDEO to suit the connection of the external A/V device connected to Input 1 of the LiDiC. Video Type 1: Select either PAL or NTSC to suit the video output of the external A/V device connected to Input 1 of the LiDiC. Input 2: Select either Composite or S-VIDEO to suit the connection of the external A/V device connected to Input 2 of the LiDiC. Video Type 2: Select either PAL or NTSC to suit the video output of the external A/V device connected to Input 2 of the LiDiC. NOTE Refer to the LiDiC user manual for more information about connecting external A/V devices to the DP-Lite. 27 Quick Setup 3. Network The DP-Lite supports an Ethernet (LAN) interfaces. This section will guide you on how to configure the network interfaces. 3-1. Enable Ethernet The first step is to enable the Ethernet interface. In the Network Device menu, select the “LAN” option. NOTE If you select “Disable”, the DP-Lite will not appear as a networked device on your network. 28 Quick Setup 3-2. Ethernet Setting 1) Automatic Configuration If you have selected “LAN” as your network interface, all items to be configured for the Ethernet interface will now be displayed. Press EXIT to close the “LAN Status” pop-up window. DHCP: If you want all configuration options to be set automatically from your router, select the “Enable” option. subsequent settings options are disabled. In this case, all NOTE up window to check your settings. Then press the RED button to update the LAN settings. A “LAN Status” pop-up window will now appear to show you the updated LAN settings. You can also press the GREEN button to open the “LAN Status” pop- In order to use the DHCP function for the DP-Lite, your router must support DHCP (refer to your router’s user manual). 29 Quick Setup 2) Manual Configuration If you set “DHCP” to “Disable”, you must input the network settings Then press the RED button to update the LAN settings. A “LAN Status” manually. Use the NUMERIC and LEFT/RIGHT buttons to configure pop-up window will now appear to show you the updated LAN settings. the following items; Press EXIT to close the “LAN Status” pop-up window IP Address: enter a 12-digit IP address. Subnet Mask: enter a 12-digit subnet mask. NOTE Gateway: enter a 12-digit gateway. Primary DNS Server IP: enter a 12-digit primary DNS server IP preceding 0s to make it 12 digits in length e.g. an address of address. “192.168.0.1” must be entered as “192.168.000.001”. Secondary DNS Server IP: enter a 12-digit secondary DNS server IP If an address you need to input does not have 12 digits, use The MAC Address setting will display the MAC address of the Ethernet interface, but you cannot change it. address. You can also press the GREEN button to open the “LAN Status” popup window to check your settings. If you change the DHCP setting to “Enable”, the manual settings no longer apply, however they will still display the previously set configuration values. 30 Quick Setup 3-3. Ice Guide The DP-Lite supports IceTV service through the Internet. If you have Owner ID: Enter your user ID for your IceTV account. an IceTV account, and wish to utilise this service on your DP-Lite, you Password: Enter your password for your IceTV account. must configure the following items; Check User Info: Press the OK button to check if your IceTV account information is valid. Select Device: Select the correct device name which you have set on the IceTV web-site (http://www.icetv.com.au). NOTE For more information about IceTV, visit www.icetv.com.au, or refer to the “EPG (Electronic Program Guide)” section in Chapter 5 to find out how you can utilise the 7-day EPG using the IceTV service. You can schedule timer recordings on your DP-Lite from your PC or mobile phone. Visit www.icetv.com.au for more information regarding this service. Ice Guide: Select “Enable” to allow the DP-Lite to get and update the electronic program guide (EPG) from the IceTV service. If you select “Disable”, the DP-Lite will only update the EPG with the data supplied by the broadcaster of the currently viewed service. 31 Quick Setup 3-4. WizPNP WizPNP enables sharing of recorded files with other beyonwiz products and PCs. The following picture illustrates how WizPNP functions; 1) Set as WizPNP Client Setting the DP-Lite as a WizPNP client allows access to another beyonwiz product which has been enabled as a WizPNP server, so the DP-Lite can play files in the server. You can set the DP-Lite to be a WizPNP client, a WizPNP server, or both client and server simultaneously. To set the DP-Lite as a WizPNP client, select “Enable” in the “Client” menu. For information regarding how to play files in a WizPNP server, see Chapter 6 “File Playback Function”. WARNING If multiple WizPNP clients connect to a WizPNP server and stream You can disable the WizPNP client function by selecting “Disable” in the contents files from the WizPNP server, the operation of WizPNP may “Client” menu. be slow. 32 Quick Setup 2) Set as WizPNP Server Setting the DP-Lite as a WizPNP server allows access from another beyonwiz product which has been enabled as a WizPNP client, so the client can play files in the DP-Lite. It also allows your PC to access the To set the DP-Lite as a WizPNP server, select “Enable” in the “Server” menu. The following settings are available for configuring; Name: This name is used to identify the WizPNP server. The default name is “beyonwiz”. DP-Lite in order to transfer files. To change the server name, press the OK button and use the “Keyboard Input” pop-up window to enter your desired name. Port: This is 5-digit number, which has maximum value as 65534. The default number is 49152. You should not change this number unless you experience difficulty with the WizPNP server function. You can disable the WizPNP server function by selecting “Disable” in the “Server” menu. NOTE For your PC to connect to the DP-Lite you will require a software application “WizFX” to be installed on your PC. Visit the beyonwiz website (www.beyonwiz.com.au) to download the “WizFX” software application and user instructions. 33 Quick Setup 3-5. Windows Sharing The DP-Lite can access files in a shared folder on your PC. This function requires configuration in the following situations; NOTE The PC’s “Guest” account cannot be used to copy files from the DP- (i) if the PC’s “Guest” account requires a username and password, or Lite to a shared folder on the PC. To perform this function, a (ii) if a PC user account other than the “Guest” account is used. different PC user account must be used, and the DP-Lite’s “Windows Sharing” function configured accordingly. In these cases, you must configure the following settings; Default UserName: Use the “Keyboard Input” pop-up window to enter the username of your PC user account. Default Password: Use the “Keyboard Input” pop-up window to enter the password of your PC user account. 34 STB & PVR Function 5. STB & PVR Function The DP-Lite supports various ways of enjoying multimedia content. These functions are divided into three parts: (i) STB (Set-top Box) and PVR (Personal Video Recorder) functions, (ii) file playback functions, including playback of programs recorded with the PVR function, and (iii) internet services (not yet active). This chapter describes the STB and PVR functions. Now that your DPLite is set up (see Chapter 4 “Quick Setup”), your unit will automatically start up in this mode. If you are using the DP-Lite in another operating mode, you can return to the STB/PVR mode by pressing the LIVE button on the remote control. If the TV picture appears to be showing in the wrong aspect ratio, press the ZOOM button to swap between 16:9 and 4:3 modes. 1. Basic STB Function 1-1. Service Change NOTE 1) Change between TV and Radio Services You can watch TV services or listen to radio services with the DP-Lite. Press the TV/RADIO button to switch between TV and radio services. The aspect ratio is only changed temporarily when using the ZOOM button. The aspect ratio will return to its default setting (see “Video Outputs” section in Chapter 4) upon changing services or entering File Playback or Setup modes. 35 STB & PVR Function 2) Change Service with Service List The service list contains all the broadcasting services your DP-Lite can If your service list is very long, you can scroll through the list quickly by Press the LIST button to display the service list, as shown using the LEFT/RIGHT buttons to skip up and down one page receive. below; respectively. To hide the service list window, press the EXIT button. NOTE You can extend the service list window by hiding the help bar showing along the bottom of the screen. Press the RED button to swap between hiding and showing the help bar. You can also edit the service list to rename, delete or lock services (see “Service List Edit” section later in this chapter). If you have enabled the LiDiC in the Setup menu (see “LiDiC” section in Chapter 4), services named “950 LiDiC 1” and “951 LiDiC 2” will appear in the service list. You can watch and enable the PVR functions for external A/V signals by selecting the 950 or 951 services. The service list window is titled “TV Service” or “Radio Service”, depending on which service mode you are currently using, and will list all available TV or radio services accordingly. Select a service by using the UP/DOWN buttons, and press the OK button to change to that service. 36 STB & PVR Function 3) Other Ways to Change Service There are other ways of changing services, as follows; CH+/CH- buttons: Press the CH+ or CH- buttons to change to the NOTE next or previous service in the service list. only the information box will be updated to show your planned NUMERIC buttons: Use the NUMERIC buttons to change to a service service change. consecutively and then press OK. The service will then change 3 seconds after your last button press. directly e.g. to change to service 146, press the 1, 4, and 6 buttons If you press the CH+ or CH- button continuously to change service, When the DP-Lite is recording two programs simultaneously, both RECALL button: Press the RECALL button to return to the previously tuners are allocated for the recordings. viewed service. change to a limited number of services during this time. Electronic Program Guide (EPG): You can change services by using Therefore you can only When selecting channels using the numeric buttons, make sure you the EPG (see “EPG (Electronic Program Guide)” section later in this know the channel number you wish to select. Channels can appear chapter). on a different number in each state, e.g. Channel 10 is not always on number 10 in the digital network. 37 STB & PVR Function 1-2. Information Box You can view information about the current service and the current program using two information boxes, both accessed by using the button. The first press will show an information box containing details of the current service, current program title and its recording status (if applicable). A second press will show an additional information box containing the synopsis of the current program. If the synopsis is too long to fit in the information box, use the DOWN button to see the additional text. A third press of the button will hide both information boxes, as will the EXIT button at either stage. The following screen shots show the layout of the information boxes, and the meaning of each symbol which may appear. Additional Service Icon 1. Service number 13. Subtitle support 2. Service name 14. Multiple audio language or 3. Channel number audio format support 4. Channel frequency 15. Teletext support 5. Favorite group is selected. 16. Dolby Digital audio support 6. Current program duration 17. One program is recording. 7. Current program name 18. Two programs are recording. 8. Next program duration 19. Current service is recording. 9. Next program name 20. Watching time-shifted position. 10. Censorship support 21. Signal quality 11. Locked Service 22. Current time 12. Pay service 38 Recording & Time-shifting Information STB & PVR Function 1-3. Volume Level Adjust 1-4. Soundtrack Change Use the VOL+/VOL- buttons respectively to increase or decrease the If the current TV program provides more than one language or audio level of the analogue and the digital audio outputs. The MUTE button format (e.g. MPEG audio and Dolby audio together), you can change the will turn off both the analogue and digital audio outputs. setting while you continue to watch the program. You can Press the cancel the mute function by pressing the MUTE button a second time, SOUNDTRACK button to show a list of the languages and audio or by pressing either of the VOL+/VOL- buttons. formats available. Use the UP/DOWN buttons to select your desired setting and then press OK to change it. To hide the list, press the SOUNDTRACK button a second time, or press EXIT. NOTE If you have set the audio format to “passthrough” (see “Audio Outputs” section in Chapter 4), you cannot control the volume level of the digital audio outputs set to AC3 or Dolby Digital 5.1 audio. In these cases, you must use the remote control of your audio decoder (e.g. amplifier) to adjust the volume level. 39 STB & PVR Function 1-5. Subtitle and Teletext Service 2) Teletext Service 1) Subtitle Service If you wish to view subtitles for the program, press the SUBTITLE button to display a list of available languages. Use the UP/DOWN buttons to select your desired language and then press OK. subtitles function will now be activated. The To turn off the subtitles function, press the SUBTITLE button again, select “Disable” from the list and press OK. Teletext is a free service broadcast by TV stations which gives the latest information on many topics such as news, weather, television programs and share prices. As the teletext service is optional, not all TV programs include teletext information. The DP-Lite supports teletext services by emulating a teletext interpreter. Press the TELETEXT button to display the teletext pages. Use the RED, GREEN, YELLOW, BLUE and NUMERIC buttons to access additional information from the teletext service. NOTE You cannot use the subtitle function if the service provider does not provide a subtitle service. 40 STB & PVR Function 1-6. Sleep Timer The sleep timer can be used to set the DP-Lite to turn off automatically NOTE at a specific time. To set a timer, press the SLEEP button repeatedly until your desired time delay is displayed. If one or more recordings The Subtitle Language, Sound Track, Teletext and Sleep timer functions can also be accessed by pressing the POP-UP button. are still active when the sleep timer delay is reached, the DP-Lite will remain on until the completion of the recording(s). To cancel the sleep timer, press the SLEEP button again repeatedly until the time delay of “0 min.” is displayed. 41 STB & PVR Function 2. Service Edit 2-1. Service List Edit You can edit the service list to lock, delete or rename services. Press The editing functions available are as follows; the LIST button to show the service list, then use the UP/DOWN buttons to select a service. Lock/Unlock: For your privacy, you can protect a service from unauthorised access. PIN code. Press the GREEN button and enter a 4-digit A ‘lock’ symbol will now appear alongside the service name to indicate that this service is locked. Users must enter the 4digit PIN code in order to watch a locked service. To unlock a service, repeat the procedure by pressing the GREEN button and entering the 4-digit PIN code. Delete: You can delete an unwanted service from the service list. Press the YELLOW button to remove it from the list. Rename: You can change the service name from that given by the broadcaster. Press the button to display the “Keyboard Input” pop-up window and enter your desired name (see “On-screen Keyboard” section in Chapter 4). NOTE A deleted service can only be re-instated to the service list by performing a service scan (see “Service Scan” section in Chapter 4). 42 STB & PVR Function 2-2. Favorite Group A favorite group is your personal collection of TV or radio services. Up to 20 favourite groups can be created. 1) Favorite Group Edit To start, you must create your favorite groups in the Setup menu (see “Favorite” section in Chapter 9). 2) Select Service on Favorite Group To select a service that belongs to a favorite group, press the FAV button. Two windows will appear. The left window lists your favorite groups and the right window displays the services which belong to that group. Select a favorite group in the left column with the UP/DOWN buttons and press OK. The cursor then moves to the right column. Select a service with the UP/DOWN buttons and press OK to change to this service. NOTE 3) Add Current Service to Favorite Group You can add the service you are watching to a favorite group. Press You can also use the LEFT/RIGHT buttons to move to the “Favorite the FAV button to display the favorite list and use the UP/DOWN Group” column or “Favorite Service” column. buttons to select a favorite group. To add the current service to this You can exit from the favorite group by pressing EXIT. favorite group, press the YELLOW button. 43 STB & PVR Function 4) Service Change on Favorite Group Select a service in a favorite group using step 2 above. You can now To exit from a favorite group and show all services available in the change services within this favorite group in the following ways; service list, press the BLUE button when the service list is displayed. LIST button: The service list will now only show the services which belong to the current favorite group. Use the UP/DOWN and OK You can also exit from the favorite list by pressing the RED button when the favorite list is displayed. buttons as usual to change among these services on the list. CH+/CH- buttons: Pressing the CH+ or CH- buttons will change to the next or previous service as listed in the current favorite group. NOTE When viewing a service, the information box indicates which favorite group is currently selected 44 STB & PVR Function 3. PVR Functions The major functions of a PVR are time-shifting and recording. This allows you to pause or rewind live TV, and even to go back and make a recording of events that have already happened. NOTE To perform these functions, the DP-Lite utilises the internal hard disk drive (HDD). The time-shift buffer will be deleted if you change to another service or enter the File Play, Setup or WizTV modes. If two services are being recorded simultaneously and you are watching a third service, the time-shift function for the third service 3-1. Time-shifting will be disabled automatically. The DP-Lite retains all received broadcast data from the current service up to a maximum of 2 hours on the internal HDD. seconds of data in the time-shift buffer. This time-shift buffer allows you to; When your current position in the time-shift buffer is less than 10 seconds from the live broadcast position, you will be automatically (i) pause a live TV program and resume watching it later, and (ii) rewind a live TV program and replay it. Trick-mode operations are not available if there is less than 10 jumped to the live broadcast position. The time-shift function can be disabled in the Setup menu (see “Time-shifting” section in Chapter 9). The following functions can be used with the time-shift buffer, in the The time-shift function is not available for radio services same manner as if you were watching a recorded file; Trick mode: allows fast-forward, rewind, pause, skip and jump. Bookmark: allows returning to a chosen position easily. A-B Repeat: allows playing a chosen section repeatedly. For detailed information about these functions, see the “Movie Playback” section in Chapter 6. 45 STB & PVR Function 3-2. Instant Recording To record the current service and store it on the HDD instantly, press Starting Point: Select the starting point of the recording. Use the LEFT/RIGHT buttons to select one of the following options; the REC button. A recording will start, and a “Recording” window will appear with various options to configure your recording. Live: Record from the current position (default setting). Current Program: Record only the current program, even if there is a previous program stored in the time-shift buffer. All: Record all programs in the time-shift buffer. File Lock: You can lock the recording file to prevent unauthorised access and deletion. Your 4-digit PIN access code will be required to play or delete a locked file (see “Set PIN Number” section in Chapter 9). The default setting is “Unlock”. Use the LEFT/ RIGHT buttons to select “Lock”. File Name: Set the file name of the recording. The default recording file name is the name of the program 40 minutes from the current time, as provided by the service broadcaster or your service provider. To change the file name, press OK to display the “Keyboard Input” Use the UP/DOWN buttons to select each recording option you wish to change. The recording options are as follows; pop-up window and enter your desired name (see “On-screen Keyboard” section in Chapter 4). Duration: Set the recording duration. The default recording duration After setting all recording options, use the UP/DOWN buttons to select is 70 minutes. “Accept” and press OK, or press the REC button again. If you wish to You can reduce or extend the duration of the recording with the LEFT and RIGHT buttons respectively. 46 cancel the recording, select “Cancel” and press OK, or press EXIT. STB & PVR Function NOTE If there is only one program in the time-shift buffer, the options “Current Program” and “All” have the same meaning, therefore the If two recordings are already in progress, you cannot record another program. In this case, a warning message will be displayed. You must stop one of these recordings in order to record the current “Current Program” option will not appear. If the time-shift function has been disabled in the Setup menu (see “Time-shifting” section in Chapter 9), you cannot record a program program (see “Pause/Resume and Stop Recording” section later in this chapter). from the time-shift buffer. In this case, the only starting position you can choose is “Live”, therefore the “Current Program” and “All” options will not appear. The asterisk(*) mark on the file name indicates that the DP-Lite has assigned the program name automatically. If you change the program name by using the on-screen keyboard, the asterisk(*) mark will be automatically removed. You can record a radio program using the same procedure. 47 STB & PVR Function 3-3. Timer You can set the DP-Lite to automatically record programs by setting timers. The timer function can also be used to automatically change service in order to view an important program, or to transmit the picture to an external recording device such as a VCR (Video Cassette Recorder). There are two methods of creating timers, as follows; via Timer List: requires the recording details to be individually set. via EPG (Electronic Program Guide): sets the recording details automatically. This section explains the Timer List method. The EPG method will be explained in the “EPG (Electronic Program Guide)” section later in this chapter. 1) View Timer List The timer list is used to view a list of all the timers you have created. To view the timer list, press the POP-UP button, and then press OK. To close the timer list, press EXIT. NOTE The timers are arranged by the start date and time. A timer is shown in dark grey if it is currently active (i.e. recording). You can set a maximum of 100 timers. 48 STB & PVR Function 2) Add New Timer To set a new timer, press POP-UP then OK to display the timer list. Then press the RED button to display the “Add Timer” window, as shown below. Start Time: Set the start time of the recording. Move the cursor with the LEFT/RIGHT buttons and change the time with the CH+/CHbuttons or by using the NUMERIC buttons. You can configure the following items; Duration: Set the recording duration. The default recording duration Service: Select the service you wish to record. The default setting is is 70 minutes. the service that you are currently viewing. To change it, press OK to recording with the LEFT and RIGHT buttons respectively. You can reduce or extend the duration of the display the service list. Use the UP/DOWN buttons to select your desired service, and then press OK. To record a radio service, press NOTE the TV/RADIO button to change to the radio service list. After changing the date, start time or duration, pressing the OK Date: Set the start date of the recording. Move the cursor with the button or moving to the next line will update the file name and end LEFT/RIGHT buttons and change the date with the CH+/CH- time when applicable. buttons or by using the NUMERIC buttons 49 STB & PVR Function Recurrence: Set the recurrence of the recording (if any). Use the LEFT/RIGHT buttons to select one of the following options; Auto Delete: You can set automatic deletion function to automatically delete unwanted files that are older than the specified time. Use the LEFT/RIGHT buttons to select one of the following options; Once: A one-off event with no recurrence (default setting). Daily: Record every day. Never: Set not to delete. Weekend: Record on Saturday and Sunday only. After X days: Delete after days you set. Weekday: Record from Monday to Friday only. Weekly: Record on the same day every week. File Name: Set the file name of the recording. The default file name To save the settings for the timer, use the UP/DOWN buttons to select “Accept” and press OK. To cancel the timer, select “Cancel” and press OK, or press EXIT. is the name of the scheduled program as provided by the service broadcaster or your service provider. To change the file name, press OK to display the “Keyboard Input” pop-up window and enter your desired name (see “On-screen Keyboard” section in Chapter 4). Mode: Select the timer function. The default setting is “Record”, where the program will be recorded to the HDD. If you would prefer to automatically change service in order to view the program or transfer it to an external recorder, use the LEFT/RIGHT buttons to select “View”. File Lock: You can lock the recording file to prevent unauthorised access and deletion. Your 4-digit PIN access code will be required to play or delete a locked file (see “Set PIN Number” section in Chapter 9). The default setting is “Unlock”. Use the LEFT/ RIGHT buttons to select “Lock”. 50 NOTE If the new timer overlaps two existing timers at the same time point a recording conflict will occur (see “Timer Conflict” section later in this chapter). 
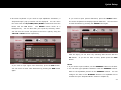
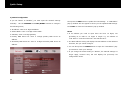
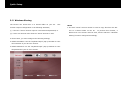
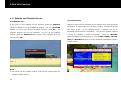
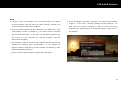
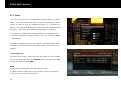
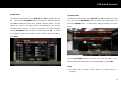
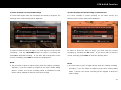
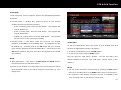
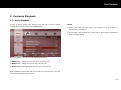
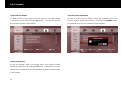
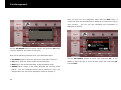
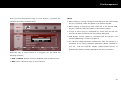
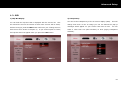
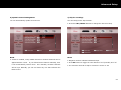
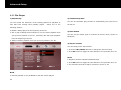
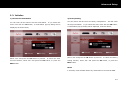
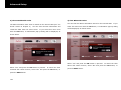
STB & PVR Function 3) Edit Timer 4) Delete Timer To modify an existing timer, press POP-UP then OK to display the timer To delete an existing timer, press POP-UP then OK to display the timer list. Then use the UP/DOWN buttons to select your desired timer and list. Then use the UP/DOWN buttons to select your desired timer and press OK to display the “Edit Timer” window, as shown below. You can press the GREEN button. A confirmation dialog will appear, as shown modify any setting in the same manner as described in the previous below. “Add New Timer” section. To save the changes to the timer settings, use the UP/DOWN buttons to select “Accept” and press OK. To cancel the changes to the timer settings, select “Cancel” and press OK, or press EXIT. Use the LEFT/RIGHT buttons to select “Yes” and press OK. If you decide to keep the timer, select “No” and press OK, or press EXIT. NOTE You cannot edit or delete a timer which is currently active i.e. recording. 51 STB & PVR Function 5) Power Off during Recording If you attempt to put the DP-Lite into standby mode while a recording is If a timer starts while the DP-Lite is in standby mode, the DP-Lite will in progress, a “Power Off” dialog will be displayed, as shown below. turn on automatically and perform its operation until the timer has completed. If remote control activity is detected during this period, the DP-Lite will remain on so you can continue to use it without interruption, otherwise it will return to standby mode. NOTE If AC power is not supplied to the DP-Lite properly (e.g. a power blackout), it cannot perform a timer recording. If a timer fails due to this reason, this timer remains in the timer list as notification. If AC power is restored within a timer’s duration, the timer will become active immediately and recording will begin. internal clock of the DP-Lite will lose it’s time setting, and all timers You can then choose from the following options; will fail until the time setting is restored (see “Time Setting” section in Later: the DP-Lite will return to standby mode when the current Chapter 4). recording(s) have completed. Yes: the current recording(s) are stopped and the DP-Lite goes into standby mode immediately. No: the standby mode procedure is cancelled and the DP-Lite remains on. Use the LEFT/RIGHT buttons to select your desired option and press OK. 52 If AC power is not supplied for a long period i.e. several hours, the If you do not respond to the “Power Off” pop-up dialog, the DP-Lite will behave as if you selected “Later”, and return to standby mode when the recording is finished STB & PVR Function 3-4. Trick Mode Operation If you are watching a service while it is being recorded, or change to a service which is already being recorded, you can perform the same trick-mode operations as for time-shifting and file playback (see “Movie Playback” section in Chapter 6). This applies even if the time-shift function has been disabled in the Setup menu (see “Time-shifting” section in Chapter 9). 53 STB & PVR Function 3-5. Recording Control 1) Pause/Resume and Stop Recording To pause recording for a period of time (e.g. to skip commercial To hide the recording control menu, press EXIT. advertisements), press the REC button while you are watching the service being recorded. A “Recording Control” window will be displayed, NOTE as shown below. You cannot pause recording if you are watching the program at a time-shifted position, as shown below. You can perform the following functions; Pause recording: Press the PAUSE button to pause recording. When you are ready to resume recording, press the PAUSE button again. Stop recording: Press the STOP button to stop a recording before the set recording duration has elapsed. 54 STB & PVR Function 2) Change Recording Options while Recording You can change some of the recording options even after the recording has started. Press the POP-UP button and use the DOWN button to select “Recording Information”, and then press OK. You can now change the following recording options; Duration: To change the duration, press the LEFT or RIGHT button. File Name: To change the file name press the RED button. File Lock: To change the lock status of the recording file, press the GREEN button. See “Instant Recording” or “Add New Timer” sections earlier in this The “Recording Information” window will now be displayed, containing one or two current recordings. Use the UP/DOWN buttons to select the recording you wish to change. chapter for a detailed explanation of these recording options. NOTE You can stop the recording instantly by pressing the STOP button. You can view the service being recorded by pressing the OK button. The clock mark indicates the recording is due to a timer. Extending the duration of a timer so that it overlaps two existing timers at the same time point will cause a timer conflict (see “Timer Conflict” section next in this chapter). 55 STB & PVR Function 1) New Timer Overlaps Two Existing Timers 3-6. Timer Conflict The DP-Lite can record two programs simultaneously. If you attempt to record more than two programs simultaneously, a timer conflict warning message will be displayed. A timer conflict occurs in the following You cannot add a new timer to record three programs at the same time. If you attempt to do so, a timer conflict dialog is displayed to show the conflicting timers, as shown below. situations; A new timer overlaps with two existing timers at some point. A timer begins while two recordings are already in progress. A timer begins while a recording is already in progress on the same service. NOTE When you set a new timer, the DP-Lite will only check for conflicts with existing timers. It will not check if the new timer conflicts with recordings started by the instant recording method, and will only do this check when the timer is ready to begin. In order to add the new timer, you must delete one group of timers displayed in the list. Use the LEFT/RIGHT buttons to select a group of timers and press OK to delete that group. If you decide not to proceed, press EXIT, and the new timer will be cancelled. NOTE You may find that re-organising your existing timers to remove overlaps where possible will solve many timer conflict problems. 56 STB & PVR Function 2) Timer Overlaps Two Current Recordings 3) Timer Overlaps Current Recording on Same Service If a new timer begins while two recordings are already in progress, the If a timer overlaps a current recording on the same service, the following timer conflict dialog will be displayed: following timer conflict dialog will be displayed: In order to allow the timer to begin, you must stop one of the current In order to allow the timer to begin, you must stop the current recordings. Use the UP/DOWN buttons to select a recording and press OK to stop that recording. If you don’t wish to stop either of the recording by pressing the OK button. If you don’t wish to stop the current recording, press EXIT to cancel the pending timer. current recordings, press EXIT to cancel the pending timer. NOTE The new timer is given a higher priority than the existing recordings. Therefore, if you are unable to respond to the timer conflict dialog within 1 minute, the current recording which is scheduled to finish sooner will be stopped to allow the new timer to begin. NOTE The new timer is given a higher priority than the existing recording. Therefore, if you are unable to respond to the timer conflict dialog within 1 minute, the current recording will be stopped to allow the timer to begin 57 STB & PVR Function 4. EPG (Electronic Program Guide) 4-1. EPG with Multiple Services The EPG (Electronic Program Guide) is a table which displays current This EPG shows multiple services simultaneously in a timeline format. and upcoming TV programs. The DP-Lite stores up to 7 days of EPG Services are listed vertically in the left column, and their corresponding data. The data can be provided in one of the following ways; programs appear in the same row underneath the appropriate time Transmitted by the TV service broadcasters. Supplied by IceTV subscription service (requires internet connection – see “Ice Guide” section in Chapter 4). width of each cell indicates the program’s scheduled broadcast time and duration. The program you are currently viewing is shaded in medium blue, and programs currently broadcasting on other services are shaded The data can be presented in two different styles, showing multiple services or showing a single service. columns. Each program title is contained in a cell, and the position and To display the EPG, press the GUIDE button. The service you are currently viewing will continue to in light blue. The upper left section of the screen displays detailed information for each program, including scheduled start and finish times and program synopsis. be shown in a small window in the top right corner of the screen. Press the RED button to swap between the two EPG styles. To hide the EPG, press the GUIDE button again, or press EXIT. NOTE The EPG always opens in the style you last used, with the current time or current program showing as the first entry. If you are currently viewing a service using the favorite group function, the EPG will only show the services contained in the current favorite group, and in the order you selected when you set it up (see “Favorite Group” section earlier in this chapter). When using the EPG data transmitted by the TV service broadcasters, the DP-Lite cannot provide a full 7-day EPG if some broadcasters do not provide this information. 58 Use the UP/DOWN/LEFT/RIGHT buttons to move the cursor around the screen. If you move beyond the limits of the table, the UP/DOWN STB & PVR Function buttons will scroll through any additional services, and the LEFT/RIGHT buttons will scroll through earlier and later timeslots. You can also move rapidly through the timeslots, as follows; Jump forward 24 hours: press the YELLOW button. Jump backward 24 hours: press the GREEN button. Jump to the current timeslot or program: press the BLUE button. To view the full synopsis of a program, press the button. To hide the full synopsis, press the button again, or press EXIT. NOTE The EPG can display up to 3 hours of historical data i.e. programs Use the LEFT/RIGHT buttons to view the data for the previous or next which have already finished screening. However the DP-Lite can only service respectively. Use the UP/DOWN buttons to move the cursor begin storing this data from the moment you turn it on. through the programs. If you move beyond the limit of the table, the 8 services or 12 events EPG are displayed without help box. Help box UP/DOWN buttons will scroll through earlier and later timeslots. You can be hide in the OSD menu. can also move rapidly through the timeslots, as follows; 4-2. EPG with Single Service Jump forward 24 hours: press the YELLOW button. Jump backward 24 hours: press the GREEN button. Jump to the current timeslot or program: press the BLUE button. This EPG shows only one service at a time in a list format. The right column contains the program name, and the left column displays the To view the full synopsis of a program, press the button. To hide the corresponding scheduled broadcast start and finish times. The full synopsis, press the button again, or press EXIT. program currently being broadcast is shaded in medium blue. The lower right section of the screen displays detailed information for each NOTE program, including program synopsis. Historical EPG data is limited to 3 hours (see previous section). 59 STB & PVR Function 4-3. Service Change and Recording The procedure for changing service and setting timers differs, NOTE services you can view will be limited. Services which are unavailable depending on your chosen setting for “EPG Action” in the Preference for viewing will be shaded in dark grey. menu (see “EPG Action” section in Chapter 9). 2) Instant Recording 1) Service Change To instantly begin recording a program currently broadcasting, place To change services, perform the appropriate procedure as follows; the cursor on any current program (those shaded light blue or For EPG Action = “Change Svc”, place the cursor on any program medium blue) and press the REC button. The program will now be scheduled on your desired service (current or future program). shaded pink, and an ‘R’ icon will be displayed alongside the service For EPG Action = “Set Timer”, place the cursor on the program name to indicate that the service is being recorded. currently broadcasting on your desired service (shaded light blue). Now press the OK button. If two programs are being recorded simultaneously, the number of The service showing in the small window will be changed accordingly. The recording will automatically stop when the scheduled finishing time of the program is reached, plus any padding which may be applied (see “Soft Padding” section in Chapter 9). 60 STB & PVR Function 3) Set timer To set a timer for a future program, perform the appropriate procedure as follows; For EPG Action = “Change Svc”, place the cursor on your desired program and use the following functions; To set a recording timer: Press the REC button. The program will now be shaded red. To set a viewing timer: Press the PLAY button. The program will To delete an existing timer: Press the STOP button. The program now be shaded blue. will now return to the normal grey shading. For EPG Action = “Set Timer”, place the cursor on your desired program. Press OK to set a recording timer. The program will now be shaded red. A second press of the OK button will set a viewing timer, and the program will now be shaded blue. A third press of the 4) Edit timer To edit an existing timer, place your cursor on your desired timer and perform the appropriate procedure as follows; OK button will delete the timer and return the program to the normal To edit a recording timer, press the REC button. grey shading. To edit a view timer, press the PLAY button. This will open the “Edit Timer” window. NOTE When EPG Action = “Set Timer”, the REC, PLAY and STOP buttons You can now make your desired changes to the timer (see “Edit Timer” section earlier in this chapter). can still be used to set and delete timers. Timers set via the EPG are created with a recurrence setting of “Once”. You must edit the timer if you wish to change the recurrence e.g. for a NOTE weekly timer. You can create and edit a timer quickly by pressing the REC button twice for a recording timer or the PLAY button twice for a view timer. If a program is only partially covered by a timer, it is shaded in pink for a recording timer or pale blue for a view timer. 61 File Playback 6. File Playback This chapter covers all functions regarding playing multimedia content. The DP-Lite can play movie, music and photo files from the following 1. Exploring Contents The File Playback menu is structured in three parts; as follows; you select the device where the content is stored. storage devices; internal hard disk drive (HDD). USB storage devices e.g. external HDDs. memory cards. shared folders on a networked PC. networked storage devices e.g. NAS. other beyonwiz products set up as a WizPNP server. To enter File Playback mode, press the FILE PLAY button. To return to the previous operation mode (e.g. STB/PVR or Setup), press the EXIT button. 62 Device menu: A vertical menu on the left side of the screen where Content menu: A horizontal menu along the top of the screen where you select the type of content to play. File list: A list in the centre of the screen where you can view and select files and folders. The following picture shows the File Playback menu and illustrates the structure; File Playback To scan and update the list of PCs connected to your home network, 1) Step 1: Select Content Type press the RED button. Use the UP/DOWN buttons to select the type of storage device you wish to access, as follows: HDD: This is the internal hard disk drive. It contains two pre-set folders, as follows; recording: Stores your recorded TV and Radio programs. contents: Stores other media files you have transferred onto the internal HDD from external sources. You can create additional folders on the internal HDD to organise your media files (see “Add Folders” section in Chapter 7). Network: This will show the following networked devices; PCs connected to your home network. You can also scan for a specific network device. Press the GREEN Networked storage devices e.g. NAS. button, enter the IP address of the device and select “OK”. WizPNP servers. NOTE Ensure that the PC you wish to access has at least one shared folder set up to allow access and to share contents. For WizPNP servers to be visible, you must enable the WizPNP Client function (see “WizPNP” section in Chapter 4). 63 File Playback NOTE The networked devices are shown with icons to identify the type of If there is no network device listed on the screen after scanning, device. A PC icon indicates a PC and a set-top box icon indicates a check the network connections and make sure the device is set and WizPNP server, as shown in the following screenshot; configured properly. You can clear the list of network devices by pressing the YELLOW button and selecting “Yes”. USB: This will show all USB devices currently connected to the DPLite. The top icon of the left menu (i.e. above “HDD”) represents a playlist function. chapter. 64 This will be explained in the “Playlist” section later in this USB devices must be compatible with the USB 2.0 standard. When you enter File Playback mode, the device selected is always the device you last used. File Playback 2) Step 2: Select Content Type WARNING Each USB port can supply a maximum of 500mA to the external device. Connecting devices consuming more than 500mA can damage the DP-Lite if there is no additional power supplied to the Use the LEFT/RIGHT buttons to select the type of content you wish to play, as follows; device. USB device. The USB device should be detached properly to prevent the DP-Lite experiencing any unstable operation or damage. button to detach the selected USB device properly. All media icon: This will show all media files contained in the selected Video camera icon: This will show only the video files contained in the selected device. Press the RED Headphones icon: This will show only the audio files contained in the selected device. Still camera icon: This will show only the photo files contained in the selected device. NOTE When you enter File Playback mode, the content type selected is always the content type you last used. 65 File Playback 3) Step 3: Select File(s) You must now select the file(s) you wish to play. Press the OK button To choose a particular selection of files, select a desired file and press the BLUE button. A tick will appear in the box alongside the selected file. Repeat this procedure for the remainder of your selection. to enter the File list. Locate the file(s) you wish to play by using the following functions; UP/DOWN buttons: Selects the previous or next folder or file in the list. CH+/CH- buttons: Jumps to the previous page or next page of folders and files. UP FOLDER button: shows the contents of the parent folder. OK button (when folder selected): shows the contents of the selected folder. OK button (when file selected): plays the selected file (see next section “Contents Playback” for more information). Press the OK button to begin playback of the selected files. Any files without a tick alongside them will be skipped. NOTE To change to a different storage device, you must first exit from the File list by pressing the EXIT button. You can change the content type while you are exploring in the File list by using the LEFT/RIGHT buttons i.e. there is no need to exit from the File list. If you accidentally select the wrong file with the BLUE button, pressing the BLUE button a second time will remove the tick. 66 File Playback 2. Contents Playback 2-1. Movie Playback To play a movie, locate your chosen video file (see previous section NOTE “Exploring Contents”) and press the OK button. Some video files will not play if the content is in a format not supported by the DP-Lite. It may take a few seconds for a video file to start playing, depending on the content format. During playback, you can use the following functions; PREV button: Jumps to the previous file in the File list. NEXT button: Jumps to the next file in the File list. STOP button: Stops playback and returns to the File list. When playback reaches the end of the video file, the next file in the File list will automatically begin playing. 67 File Playback You can also skip or jump to a different position in the video file, as 1) Trick Mode follows; During playback, the following trick mode operations are available; LEFT button: skip backward 15 seconds. RIGHT button: skip forward 15 seconds. UP button: jump forward 10% of the total length of the file. DOWN button: jump backward 10% of the total length of the file. PAUSE button: Freezes the picture until you press PAUSE a second time, or the PLAY button. REW button: Plays backwards at x2 speed. The rewind speed will increase with each additional press of this button, to x4, x8, x16 and A progress bar will briefly appear when you perform any skip or jump. x32 speed. A red position marker shows your current position in the file FF button: Plays forward at x2 speed. The play speed will increase with each additional press of this button, to x4, x8, x16 and x32 speed. SLOW FWD button: Plays forward in slow motion at x1/2 speed. The play speed will decrease with each additional press of this button, to x1/4, x1/8, x1/16 and x1/32 speed. PLAY button: Reverts back to normal playback speed after using any of the above trick-modes. The current trick-mode operation will be displayed on the screen. You can also display the progress bar at any time by pressing the OK button. To hide the progress bar, press the OK button again, or EXIT. NOTE The trick mode operation cannot always be supported as it depends on the content format. 68 File Playback 2) Bookmark Bookmarks can be placed at any position in the video file. This enables You can also set multiple bookmarks. you to return to a chosen position easily. will create a bookmark at the current position. To see the location of Each press of the RED button all bookmarks, open the progress bar by pressing the OK button. Each bookmark position is indicated by a dot mark above the progress bar. Each press of the GREEN button will make playback jump to the next bookmark position. The progress bar shows which bookmark position you are currently playing from, indicated by a ‘book’ icon above the corresponding dot mark. If necessary, use trick-mode or skip/jump functions to move to your desired position in the video file. To set a bookmark at this position, press the RED button. To play from the bookmarked position, press the GREEN button. 69 File Playback 3) A-B Repeat To display a list of all bookmarks placed, press the BLUE button. Use the UP/DOWN buttons to select a bookmark. position, press OK. The DP-Lite can play a chosen section of the video file repeatedly. To play from this To delete the selected bookmark, press the YELLOW button. You can hide the bookmark list by pressing the BLUE button again, or EXIT. Move the red position marker to your desired starting position by using the trick-mode functions (see “Trick Mode” section earlier in this chapter). Now press the YELLOW button. The progress bar will appear, and a yellow position marker “A” will be displayed to indicate the start position. Move the red position marker to your desired end NOTE position and press the YELLOW button again. Another yellow position The bookmark function is only available for beyonwiz recorded files. marker “B” will be displayed to indicate the end position. Playback will A maximum of 64 bookmarks can be set for each video file. immediately begin from position “A” to position “B” automatically. The A new bookmark cannot be set within 5 seconds of time position from OK or EXIT button can be used to hide the progress bar during the an existing bookmark. playback. This section will be played repeatedly until you press the YELLOW button a third time to cancel this function. NOTE 70 The “A-B Repeat” function is not available for some video file formats. File Playback 4) Subtitle The DP-Lite can decode and display subtitles from a subtitle file. To play a movie with subtitles, ensure the subtitle file has the same name You can change the subtitle settings, as follows; as the video file, and then copy the subtitle file into the same folder as the video file. Subtitles will now automatically be displayed when you begin playback of the video file. To change the subtitle settings, press the SUBTITLE button to display the “Subtitle Control” menu. Subtitle State: Press the OK button to switch between hiding and showing the subtitles. Subtitle Position: Use the UP/DOWN buttons to move the position of the subtitles up or down respectively. Time Sync: If the subtitles are not in time with the video, use the LEFT/RIGHT buttons to make the subtitles appear earlier or later respectively Font Size: Press YELLOW button to change the size of font. To close the “Subtitle Control” menu, press the SUBTITLE button again, or the EXIT button. NOTE The DP-Lite supports the following subtitle formats: smi, sub and srt. 71 File Playback 2-2. Music Playback 2-3. Photo Playback Music files are played in the same manner as video files. The same file To view a photo, locate your chosen picture file(s) (see previous section selection functions, playback functions and trick-mode operations apply. “Exploring Contents”) and press the OK button. See the previous sections “Exploring Contents” and “Movie Playback” for details. NOTE Some audio files will not play if the content is in a format not The DP-Lite automatically begins a slide show. After a set duration, the supported by the DP-Lite. next photo in the File list will be shown If you wish to play a selection of audio files located in different folders or devices, use the Playlist function (see “Playlist” section later in this chapter). 72 File Playback During viewing, you can use the following functions; 2-4. Playlist LEFT or PREV button: Jumps to the previous photo in the File list. The playlist is a personal collection of multimedia content that stores a RIGHT or NEXT button: Jumps to the next photo in the File list. temporary list of files. GREEN button: Rotates the current photo 90 clockwise. media content type: movie, music and photo. RED button: Rotates the current photo 90 anti-clockwise. PAUSE button: Pauses the slide show. PLAY button: Resumes the slide show. To create a playlist or add a file to the existing playlist, select your UP/DOWN button: Increases or decreases the duration of each desired file(s) (see previous section “Exploring Contents”) and press the photo during the slide show (can choose from 1 second to 1 minute). YELLOW button. The selected file(s) are now added to the playlist. STOP button: Stops the slide show and returns to the File list. button: Swaps between hiding and showing the help bar. You can organize a separate playlist for each 1) Add File to Playlist NOTE NOTE Folders cannot be added to the playlist - you must select all the files inside the desired folder and add them to the playlist. The rotation function is not available for some picture file formats. 73 File Playback 2) View Files in Playlist 4) Remove File from Playlist To check the files in the playlist, select the ‘Playlist’ icon (above “HDD” To remove a file from the playlist, select the unwanted file(s) (see in the Device menu) and press the OK button. The File list will now previous section “Exploring Contents”) and press the GREEN button. show all files currently in the playlist. The selected file(s) are now removed from the playlist. 3) Play from playlist To play the playlist, select your desired file(s) (see previous section “Exploring Contents”) and press the OK button. Playback occurs in the same manner as detailed in the corresponding “Playback” section earlier in this chapter. 74 File Playback This page intentionally left as blank. 75 File Management 7. File Management The DP-Lite has several functions to help you organise your media files. These functions allow you to; (i) create folders on the internal hard disk drive (HDD). (ii) rename and delete files and folders. (iii) backup your media files to a PC or external storage device. (iv) delete or move files to a PC or external storage device to free up space on your internal HDD. (v) transfer media files from your PC or external storage device to the DP-Lite’s internal HDD. These functions are only available for the following devices; the internal hard disk drive (HDD). a networked PC or storage device. a USB storage device Use the “Keyboard Input” pop-up window to enter your desired name (see “On-screen Keyboard” section in Chapter 4). NOTE 1. Add Folder “contents” folders at the root level of the internal HDD. In File Play mode, display the File list where the new folder is to be created (see “Exploring Contents” section in Chapter 6). POPUP button to display the “Pop-up Menu” window. button to select “New Folder”. 76 You cannot create new folders alongside the “recording” and Press the Press the OK You can create a new folder during setting up a move or copy function (see “Backup” sections later in this chapter). To create new folders in a networked PC, ensure that your PC user account has write permissions for the desired location. File Management 2. Delete NOTE To delete files or folders in a storage device, select the unwanted file(s) or folder(s) in the File list (see “Exploring Contents” section in Chapter 6). Press the POPUP button to display the “Pop-up Menu” window. You can press the GREEN button a second time to confirm the delete function, instead of selecting “Yes”. You can only delete folders which are empty. If you wish to delete a folder with contents, you must delete all the files from the folder first. Press the OK button to select “Delete” and press the OK button. You cannot delete a file which is currently being recorded (shown with an “R” icon). You must stop the recording first (see “Recording Control” section in Chapter 5). To delete a file or folder in a networked PC, ensure that your PC user account has write permissions for their location. You cannot delete the pre-set “recording” and “contents” folders in the internal HDD. A pop-up dialog will be displayed to confirm the deletion. Use the LEFT/RIGHT buttons to select “Yes” and press OK. If you decide to keep the file, select “No” and press OK to cancel the delete function, or press EXIT. 77 File Management 3. Auto Delete 4. Rename To set automatic deletion function to automatically delete unwanted To rename a file or folder, select a file or folder in the File list (see recording files that are older than the specified time. Press the POPUP “Exploring Contents” section in Chapter 6). Press the POPUP button to button to display the “Pop-up Menu” window. Press the OK button to display the “Pop-up Menu” window. select “Auto Delete” and press the OK button. Use the LEFT/RIGHT “Rename” and press the OK button. Press the OK button to select buttons to select one of the following options; Never: Set not to delete. After X days: Delete after days you set. Use the “Keyboard Input” pop-up window to edit the file name (see “On-screen Keyboard” section in Chapter 4). NOTE NOTE same time, so the “Rename” menu item will be disabled if you use Auto Delete function applies only for the recording files. the BLUE button to select more than one file. 78 You cannot rename more than one file to have the same name at the You cannot rename the pre-set “recording” and “contents” folders. File Management 5. Copy / Move To copy or move files to or from the DP-Lite, select the desired file(s) in the File list (see “Exploring Contents” section in Chapter 6). Press the POPUP button to display the “Pop-up Menu” window. Press the OK button to select “Copy to” or “Move to” and press the OK button. The following options will be displayed alongside the window, as follows; HDD: Select the internal HDD. Network: Select a networked PC or storage device. USB: Select a USB storage device. Use the UP/DOWN buttons to select the type of storage device for your desired destination and press the OK button. A pop-up browser window will appear. 79 File Management Once you have set your destination folder with the RED button, a “Check File Size” pop-up dialog will be displayed to confirm the copy or move function. The file size and estimated time information is displayed, as follows; Use the UP/DOWN buttons to select a device and press the OK button (only for “Network” and “USB” device types). Now use the following functions to set your destination folder; UP/DOWN buttons: Select the previous or next folder in the list. Use the LEFT/RIGHT buttons to select “Yes” and press OK. OK button: Show the folders inside the selected folder. decide to cancel the copy or move function, select “No” and press OK, RED button: Set the selected folder as the destination folder. or press EXIT. GREEN button: Create a new folder alongside the currently shown folders. Use the “Keyboard Input” pop-up window to enter your desired name (see “On-screen Keyboard” section in Chapter 4). 80 If you File Management Once you have confirmed the copy or move function, a progress bar NOTE indicates the status, as shown below; When copying or moving a beyonwiz recorded file to the internal HDD, only the “recording” folder will appear in the browser window. When copying or moving any other media file to the internal HDD, only the “contents” folder will appear in the browser window. To copy or move a file to a networked PC, ensure that your PC user account has write permissions for the selected destination. USB storage devices should be formatted with the DP-Lite (see “Format USB Storage” section in Chapter 9). You can also backup beyonwiz recorded files from the DP-Lite to a networked PC by using a software application “WizFX” installed on your PC. Visit the beyonwiz website (www.beyonwiz.com.au) to download the “WizFX” software application and user instructions While the copy or move function is in progress, you can select the following functions; LIVE or RECALL buttons: Return to STB/PVR mode to watch live TV. EXIT button: Cancel the copy or move function. 81 File Management 6. Edit Recording File Select one of the following functions; You can edit a recorded file. Editing allows you to; (i) remove commercial advertisements from a TV recording. (i) remove soft padding from your recorded programs (see “Soft The rest of the file is retained. Padding” section in Chapter 9). (iii) retain only a particular section of a recorded program. Delete A->B: Cut out the selected section. Keep A->B only: Retain only the selected section. The rest of the file is deleted. Copy A->B to a new file: Copy only the selected section, and create a Locate the desired file and begin playback (see Chapter 6 “File new file for it. Playback”). your desired name (see “On-screen Keyboard” section in Chapter 4). Move the red position marker to the start of the section you wish to edit by using the trick-mode functions (see “Trick Mode” Use the “Keyboard Input” pop-up window to enter Cut out A->B: Cut out the selected section, and create a new file for section in Chapter 6). Now press the YELLOW button. The progress it. Use the “Keyboard Input” pop-up window to enter your desired bar will appear, and a yellow position marker “A” will be displayed to name (see “On-screen Keyboard” section in Chapter 4). indicate the start position. Move the red position marker to the end of the section you wish to edit and press the POP-UP button. The “Edit A progress bar indicates the status of the edit function. You can cancel menu” pop-up window will be displayed, as follows; the edit function by pressing the EXIT button at any stage. 82 Internet Service 8. Internet Service The DP-Lite is designed to support various Internet services. Press wizTV button to access the services. You can get the latest information by visiting our website, wiztv.com.au www.beyonwiz.com.au 83 This page intentionally left as blank. 84 Advanced Setup 9. Advanced Setup This chapter describes how to configure the Miscellaneous (“Misc.”) and System categories of the setup menu. These categories are configured in the same manner as described in the “How to Change Configuration” section in Chapter 4. 1. Miscellaneous 1-1. Favorite You must create favorite service groups in order to use the favorite Add group: To create a new group, press the RED button to display feature (see “Favorite Group” section in Chapter 5). The Favorite menu the “Keyboard Input” pop-up window and enter your desired name consists of three columns: “Group”, “Fav. Service” and “All Service”. (see “On-screen Keyboard” section in Chapter 4). Enter the Favorite menu by pressing the OK button. You can now use GREEN button to display the “Keyboard Input” pop-up window and the LEFT/RIGHT/UP DOWN buttons to move the cursor between the enter your desired name. three columns, and down to any item listed in the columns. 1) Group Delete group: Select the group you wish to delete, and then press the YELLOW button. A pop-up dialog will appear to confirm the deletion. The first column contains the list of your favorite groups. create up to 20 groups. Rename group: Select the group you wish to rename and press the You can Use the LEFT/RIGHT buttons to select “Yes” and press OK. If you A favorite group cannot contain both TV services and radio services, The type of the group is determined by the decide to keep the group, select “No” and press OK, or press EXIT. Move group: Select the group you wish to move, and then press the first service placed in it, and is indicated by the ‘TV’ and ‘RADIO’ icons BLUE button. Use the UP/DOWN buttons again to move the group alongside the group name. to your desired position in the list. Press the BLUE button again to Place the cursor on the “Group” column, and then you can perform the following functions; accept the change, or EXIT to cancel the change. 85 Advanced Setup 2) All Service 3) Favorite Service The third column shows all services that you can access. This list The second column displays the services belonging to the favorite group shows either all the TV services, or all the radio services. selected in the first column. Ensure the favorite group you wish to add services to is selected in the Place the cursor on the “Fav. Service” column, then you can perform the “Group” column. following functions; Place the cursor on the “All Service” column, and then you can perform the following functions; Add service to group: Select the service you wish to add, and then press the OK button. This service should now appear in the second Delete service from group: Select the service you wish to delete, and then press the OK button. The service should disappear from the list. Move service in list: Select the service you wish to move, and then column. press the BLUE button. Use the UP/DOWN buttons again to move Change service list: Press the TV/RADIO button to switch between the service to your desired position in the list. displaying the TV services list and the radio services list. button again to accept the change, or EXIT to cancel the change. Page down/up: Use the GREEN and YELLOW buttons to show the next or previous page of services. 86 Press the BLUE Page down/up: Use the GREEN and YELLOW buttons to show the next or previous page of services. Advanced Setup 1-2. OSD 1) Help Box Display 2) Transparency You can hide the help box that is displayed with the service list. This You can set the transparency of the on-screen display (OSD). This will will extend the service list window so that more services will be listed, change how much of the TV image you can see behind the pop-up without having to press the RED button each time (see “Change Service messages which appear on your screen from time to time. with Service List” section in Chapter 5). If you set this option to “Hide”, select a value from 0% (solid windows) to 50% (highly transparent the help box does not appear when you press the LIST button. windows). You can 87 Advanced Setup 3) Colour Theme 1-3. Access Control You can choose between 10 colour themes for on-screen menus and You can set a 4-digit PIN number to control access to certain set-up information boxes. menus. After setting a PIN number, users must enter the PIN number to access the menu. 1) Set PIN Number Press the OK button to open the “Change PIN Code” pop-up window, as shown below; Use the NUMERIC buttons to enter the current PIN number, then your desired new PIN number, and then repeat your desired new PIN number to confirm it was entered correctly NOTE 88 The default PIN number is 0000. Advanced Setup 2) Access Control Several functions can be configured to require PIN number entry, as follows; Censorship: To view a program with a selected classification rating or higher. Start-up: Every time the DP-Lite is turned on. Setup Menu: To access to Setup menu. Time Setting Menu: To change the time and date settings. Network Configuration Menu: To change the network configuration. Service Scan Menu: To scan for services. Factory Setting Menu: To restore to the factory default settings. 89 Advanced Setup 1-4. PVR 1) Time-shifting 2) Time-Shift Warning You can turn off the time-shift function to reduce the workload of the You can have a warning message displayed if you are currently time- internal hard disk drive (HDD). shifting and you attempt to perform an action which would delete the time-shift buffer, as follows; NOTE To enable the time-shift function temporarily, press the PAUSE button while you are watching a live TV program. You can then use all the time-shift functions as described in the “Time-shifting” section in Chapter 5), including all the trick-mode operations. 90 Changing to a different service. Entering File Play, Setup or WizTV modes. Advanced Setup 3) EPG Action 4) EPG Scroll You can control the action of the OK button when a future program You can change the scroll option for vertical navigation. (one not shaded light blue) is selected in the EPG (see “Service Change and Recording” section in Chapter 5). Select either of the following options; Change Svc: Pressing the OK button will change the service being viewed to the service corresponding to the selected program. Set Timer: Pressing the OK button will cycle between setting a 5) Soft Padding You can automatically add additional time to the duration of your timers to allow for differences between the scheduled broadcast times and the actual broadcast times. recording timer, setting a view timer and deleting the timer for the selected program. The following settings can be configured; Pre-padding: Adds the selected number of minutes of recording time prior to the scheduled starting time. 91 Advanced Setup Post-padding: Adds the selected number of minutes of recording time after the scheduled finishing time. Soft Padding Priority: Determines how to resolve timer conflicts caused by the addition of pre-padding or post-padding. Select one of the following options; None: The scheduled start and end times of a timer override the Pre-padding: The scheduled end time of a timer will be overridden pre-padding and post-padding of a previous or following timer. by the pre-padding of a following timer. Post-padding: The scheduled start time of a timer will be overridden by the post-padding of a previous timer NOTE If the soft-padding time is longer than the set period of a previous or following timer, the soft-padding will be ignored regardless of the “Soft Padding Priority” setting, as illustrated above. 92 Advanced Setup 6) Dynamic Channel Management 7) Skip for recordings You can automatically update new services. You can configure the skip function. NOTE Press the LEFT/RIGHT buttons to change the interval of skip. NOTE If DCM is enabled, newly added channels or deleted channels can be Negative numbers indicate backwards skips. applied without a scan. If you deleted some channels manually, then Press OK button to toggle the units between “sec”(seconds) and “%”. it will automatically restore them. The minimum interval of skip for contents is 5 secs or 2% But manually renamed channels will be kept. Normally you can not detect any clue that indicates the DCM is there. 93 Advanced Setup 1-5. File Player 1) Resume Play 2) Automatic Play Next You can control the behaviour of the starting position for playback of You can set automatic play function to automatically play next files in files that have already been partially played. the file list. Select one of the following options; Disable: Always play from the beginning of the file. Ask: A pop-up dialog will ask whether or not to resume playback from your previous position in the file. Selecting “No” will begin playback from the beginning of the file. 3) Filter Default You can set the default type of contents as Movies, Music, Photos or Media(all). Always: Resume playback from your previous position in the file. 4) Skip for contents You can configure the skip function. Press the LEFT/RIGHT buttons to change the interval of skip. Press OK button to toggle the units between “sec”(seconds) and “%”. NOTE NOTE Resume playback is only available for the last 32 files played. 94 Negative numbers indicate backwards skips. Press OK button to toggle the units between “sec”(seconds) and “%”. The minimum interval of skip for contents is 5 secs or 2% Advanced Setup 1-6. Preference 1) Keyboard Order You can control the behaviour of the remote control keypad when using the NUMERIC buttons to enter letters and characters. Select one of the following options; ABC2: Cycle through the assigned letters and characters, then the assigned number with each press of the NUMERIC button. 2ABC: Cycle through the assigned number, then the assigned letters and characters with each press of the NUMERIC button. 3) Auto Delete You can set to enable or disable the automatic deletion function to automatically delete unwanted files that are older than the specified time. Select one of the following options. You can configure the global options. This option is used in the timer or file list. Press the OK buttons to configure following options; Delete a recording after days configured. Use LEFT/RIGHT buttons to set the days. Empty the trashcan on HDD full. 2) Watch TV in Background of WizTV When using the WizTV internet service, you can set to watch TV in the background. 95 Advanced Setup 2. Management 2) Firmware Upgrade You can upgrade or initialize your DP-Lite in this menu. You can upgrade your DP-Lite with the latest firmware. Please visit the beyonwiz website (www.beyonwiz.com.au) for firmware information. 2-1. Firmware 1) Firmware Information To upgrade the firmware, download the latest version from the above website. The DP-Lite can upgrade to a firmware file stored on a networked PC, attached USB device, memory card. This displays a pop-up window with the current system information, as follows; System identity number. Firmware version number. Loader version number. Select the type of storage device where your firmware file is located and press the OK button. A pop-up browser window will appear. 96 Advanced Setup Use the UP/DOWN buttons to select a device and press the OK button It takes several minutes to complete the upgrade. (only for “Network” and “USB” device types). DP-Lite is NOT turned off until the upgrading process is completed. Now use the following functions to locate your firmware file; NOTE UP/DOWN buttons: Select the previous or next folder in the list. OK button: Show the folders inside the selected folder. Ensure that your If the firmware upgrade progress bar does not update when you upgrade using the Network option, check the network configuration of your PC and DP-Lite. Select the desired firmware file from the file list and press the OK button to start the upgrade process. If you cannot see your desired network device in the browser window, use the RED or GREEN button to scan for devices (see “Select Device” section in Chapter 6). 97 Advanced Setup 2-2. HDD 1) HDD Information This displays a pop-up window with the current internal hard disk drive (HDD) information, as follows; Model number. Serial number. Used space. 2) HDD Format You can re-initialise (or format) the internal HDD. This will delete all files on the internal HDD. If you select this menu item with the OK button, a confirmation pop-up dialog will be displayed, as shown below. Select “Yes” and press the OK button to proceed. To cancel the HDD format function, select “No” and press the OK button, or press the EXIT button. If you select “Yes”, the DP-Lite will restart and format the internal HDD automatically. NOTE It takes several minutes to complete the HDD format process. Ensure that your DP-Lite is NOT turned off until the formatting process is completed. 98 Advanced Setup 3) Check HDD If the DP-Lite is turned off incorrectly, it is strongly recommended that you check the internal HDD. If you select this menu item with the OK button, a confirmation pop-up dialog will be displayed, as shown below. Select “Yes” and press the OK button to proceed. To cancel the HDD check function, select “No” and press the OK button, or press the EXIT button. NOTE When you turn the DP-Lite on after it is turned off incorrectly, a warning message asks you to check the onboard HDD. The HDD check process takes several minutes. During this process, the PVR functions are disabled and you can only view a TV service or listen to a radio service. 99 Advanced Setup 4) Format USB Storage In order for the DP-Lite to be able to write files to a USB storage device, NOTE the USB device must be formatted first. Select the “Format USB HDD” It takes several minutes to format a USB HDD. menu with the OK button. Even if the USB storage device is formatted with a PC, it should be re- A list of USB storage devices will be formatted with the DP-Lite. displayed. If you only want to play media files from your USB storage device, and you do not intend to copy or move media files from the DP-Lite onto your USB device, you do not need to format it with the DP-Lite. Use the UP/DOWN buttons to select the device you wish to format and press the OK button. WARNING If you format the USB storage device, all the data stored in the USB storage device will be erased. 100 Advanced Setup 2-3. Initialize 1) Clear Service Information 2) Factory Setting You can clear all the scanned services information. If you select this You can restore the DP-Lite to its factory configuration. This will erase menu item with the OK button, a confirmation pop-up dialog will be all setup information. If you select this menu item with the OK button, displayed, as shown below; a confirmation pop-up dialog will be displayed, as shown below; Select “Yes” and press the OK button to proceed. To cancel the clear Select “Yes” and press the OK button to proceed. To cancel the factory services function, select “No” and press the OK button, or press the setting function, select “No” and press the OK button, or press the EXIT button. EXIT button. NOTE A factory reset will NOT delete any media files on the internal HDD. 101 Advanced Setup 4) Clear WizTV Disk Cache 3) Clear IceGuide Disk Cache The EPG information from IceTV is stored on the internal HDD (see “Ice You can clear the WizTV information stored on the internal HDD. If you Guide” section in Chapter 4). You can clear the EPG information and select this menu item with the OK button, a confirmation pop-up dialog reload the data from the IceTV server. will be displayed, as shown below. If you select this menu item with the OK button, a confirmation pop-up dialog will be displayed, as shown below. Select “Yes” and press the OK button to proceed. To cancel the clear Select “Yes” and press the OK button to proceed. To cancel the clear IceGuide disk cache function, select “No” and press the OK button, or press the EXIT button. 102 WizTV disk cache function, select “No” and press the OK button, or press the EXIT button. Troubleshooting Guide connected to the product. 10. Troubleshooting Guide Check the brightness level of TV. Check that the channel is currently on air. Check whether the TV is set to the correct Before contacting beyonwiz Technical Support, please check this input corresponding to the product’s video Troubleshooting Guide and try all the suggested solutions for your output connections (e.g. AV1, Component, HDMI etc). problem. If the product does not work correctly after completing the following troubleshooting suggestions, please contact your local product Has a Service Scan been performed? distributor or service centre. Check that the product’s video output settings are configured correctly to suit your display It is recommended that you check your product’s firmware version in the Setup menu (Setup\Management\Firmware) and upgrade to the resolution. (Press the TV-OUT button on the most recent firmware version, available from the beyonwiz website, Remote Control to advance through the various www.beyonwiz.com.au, before troubleshooting. video output resolution options, or configure this via the Setup menu. Problem Product has no power No picture (Setup\Configuration\A/V Output) Possible Solutions Check the main power cable and ensure that it Poor picture & is plugged into a suitable power outlet. sound quality Check that there is power available at the correct port on the rear of the product? Avoid positioning the unit near a mobile phone power outlet by plugging in another electrical or microwave oven as these devices may cause appliance (e.g. a lamp). interference. Make sure that the product is in Operating Make sure that the AV Cables are securely Use a good quality 75ohm coaxial cable to connect the antenna to the product. Mode. Has the antenna cable been connected to the Check the signal strength and signal quality connected to the TV. indicators on the product’s onscreen display Make sure that the antenna cable is correctly (by pressing the INFO button on the Remote Control) to ensure that the received signal 103 Troubleshooting Guide strength and/or quality is adequate. No sound, or poor sound If not, front panel of the DP-Lite has been removed. please contact an authorised antenna service Remote control agent or licensed contractor to seek advice does not operate Remote control's infrared sender should be concerning improving your TV reception. TV pointed directly towards the TV's Remote Check the Volume controls of the product, TV control receiver. and other audio device/s. Check the battery of the Remote control. Check the Mute status of the product, TV and Ensure that the correct mode is selected on the other audio device/s. remote control i.e. STB mode if operating the Check that the audio output connections on the DP-Lite or TV mode if operating the TV. product have been connected to the correct Remote control Has the Remote control been programmed to operate your TV? device/s. (See page 7 of this Guide) Check that the product’s audio output settings Timers configured in the Setup menu are correct. recording are not correctly Check to ensure that the timers have been set correctly. (Setup\Configuration\A/V Output) Check whether more than two timers overlap. To use the product with the supplied Remote Check whether the control, the Remote control's infrared sender the DP-Lite should 104 input connectors on the TV and/or other audio does not operate be pointed directly towards the power supply to the product has been disconnected. I can’t connect to product’s infrared receiver. my network via Check the remote control’s batteries. LAN Ensure that the correct mode is selected on the To use the equipment with Remote control, the Check to ensure that the Ethernet (LAN) cable is connected to the correct port on the rear of the product. Is the correct type of Ethernet cable being Remote control i.e. STB mode if operating DP- used for your network connection? Lite or TV mode if operating the TV. (i.e. a “straight-through” or “crossover” cable?) If the Remote control range seems to be Have the LAN settings been correctly limited, check to ensure that the protective configured in the product’s Setup Menu? plastic film (for shipping protection) on the (Setup\Network\Setting) Troubleshooting Guide EPG data is not present in the Guide, or the EPG Check to ensure that the other devices on your Unable to use “trick network are configured correctly to connect mode” functions with another network device. with live TV Check whether Time Shift is enabled. (Setup\Miscellaneous\Preferences) Ensure the Time Shift buffer contains enough data to execute the desired function. Do you have subscription with an EPG data provider? (e.g. Ice TV) Unable to play Check with your provider to ensure that your media files Check whether the media files are in a format that is supported by the product. Check whether the media files are playable on data in the Guide is subscription is current and that your account is incorrect for my correctly configured for your region. another device or if there may be some issue Have you correctly configured the product with or error with the actual media files. region your provider’s account details? (Setup\Network\Ice Guide) Is the product correctly configured and connected to a network device that can regularly access the internet to receive EPG data from your provider? The picture looks Check whether the product has been squashed or configured to display the correct TV Aspect too wide Ratio. (Setup\Configuration\A/V Output) Check whether the TV has been configured to display the correct TV Aspect Ratio. (see your TV user guide for information) Unable to access Check whether system settings on the product Setup Menu have been locked with a PIN. options (Setup\Miscellaneous\Access Control) 105 This page intentionally left as blank. 106 Specification Specification Video & Audio Decoding Main System Main Processor HDD 200MHz RISC CPU 500GB (SATA) Tuner & Channel Decoder Dual Tuner Tuner Input Conn. Tuner Loop-through Conn. Frequency Range Signal Level Aerial Supply DVB-T Compliant (Internal Loop-through) IEC 169-2 Female Type IEC 169-2 Male Type 174~230MHz, 470~860MHz -20 ~ -80dBm 5V, max. 100mA (Switchable in Setup) Video & Audio Output Analog Video Output Digital Video Output Analog Audio Output Digital Audio Output Composite, S-Video, Component HDMI w/ HDCP 2 Ch RCA Coaxial, Optical (S/PDIF, Pass-through) Extended Interface & Slots Ethernet USB Host 10/100 Ethernet Port 1 USB Host Ports (USB 2.0 Compliant) MPEG-2 Video MPEG-4.2 Video for DivX MPEG-4.10 (H.264) Video MPEG Audio Dolby Audio Pass-through MPEG-2 up to 1080i MPEG-4.2 720p MPEG-4.10 up to 1080i MPEG-1 Layer I, II, III (MP3) Dolby Digital Stereo Decoding Dolby & DTS Pass-through Power Supply Input Voltage Type Standby Power Consumption Power Consumption Protection 100~240VAC, 50/60Hz SMPS Max. 5W Max. 40W Separate Internal Fuse Lightning Protection Physical Specification Size Weight 390x60x295 mm 3.7Kg Specifications are subject to change without prior notice. a Warranty Conditions Warranty Conditions 1. Only the original invoice/receipt issued by the dealer will be accepted by beyonwiz as proof of purchase. 2. beyonwiz may reject warranty claims on equipment that it believes to be illegally acquired or when the “owner” is unable to provide proof of purchase or where security labels or serial numbers have been tampered with or removed. 3. The warranty covers only defects in the material and workmanship of the product for a period of 12 months from the date of original purchase. 4. This warranty is on a “Return to Base” basis. equipment. 5. The warranty is void if failures arise as a result of any of the following. i) Abuse, misuse, physical impact, normal wear and tear. ii) Alteration or repairs carried out without written authorization from beyonwiz. iii) Upgrades that are not approved by beyonwiz. iv) The unit being operated or maintained other than in accordance with the supplied manual. 6. This equipment will not be considered defective as a result of incompatibility with other equipment or accessories other than the ones supplied with the unit at the time of purchase. 7. This unit should be returned in its original carton and protective packaging or alternatively in a packing suitable to prevent damage. beyonwiz will not accept any responsibility for goods damaged whilst transit. 8. Repair or replacement under the terms of this warranty does not give the right to an extension or a renewal of the warranty period. Repairs or replacements may be carried out with functionally equivalent new, reconditioned or equivalent parts. Parts that have been replaced become the property of beyonwiz. 9. The customer acknowledges that no promise, representation or undertaking has been given by beyonwiz, or its dealers, in relation to equipment other than as contained in this warranty. The owner is responsible for the delivery to, and collection from, the point of purchase of the 10. A service charge will apply if the fault is not covered within the conditions of this warranty or if there is no fault found. The charge will be based on the current market rate. 11. beyonwiz is not liable for any loss other than that covered by this warranty. 12. Nothing contained in this warranty shall be read or applied so as to affect the right of the consumer in relation to the provisions of the trade practices act or other statutory rights provided by legislation of the state or territory. In the absence of applicable legislation this warranty will be the purchaser’s sole and exclusive remedy and neither beyonwiz nor its distributors or agents shall be liable for any incidental or consequential damages for the breach of any express or implied warranty of this equipment. b WEEE Information WEEE Information Correct Disposal of This Product (Waste Electrical & Electronic Equipment) This mark, shown on the product or its literature, indicates that it should not be disposed of with other household waste at the end of its working life. To prevent possible harm to the environment or human health from uncontrolled waste disposal, please separate this from other types of waste and recycle it responsibly to promote the sustainable reuse of resources. Household users should contact either the retailer where they purchased this product, or their local government office, for details of where and how they can take this item for environmentally safe recycling. Business users should contact their supplier and check the terms and conditions of their purchase contract. This product should not be mixed with other commercial waste for disposal. c Contact Beyonwiz Contact beyonwiz beyonwiz Australia [email protected] www.beyonwiz.com.au Some features and information in this manual may differ slightly from the product itself due to firmware version and changes made after printing. d Version 1.52_Eng