1
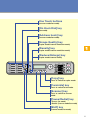
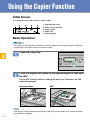
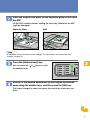
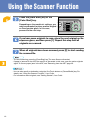
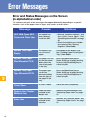
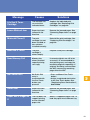
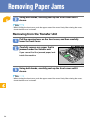
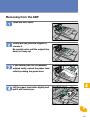
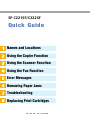
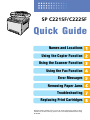
SP C221SF/C222SF
Quick Guide
Names and Locations
Using the Copier Function
Using the Scanner Function
Using the Fax Function
Error Messages
Removing Paper Jams
Troubleshooting
Replacing Print Cartridges
Read this manual carefully before you use the product and keep it handy for future
reference. For safe and correct use, please be sure to read "Safety Information" before using
the machine.
Names and Locations
Exterior
Exposure Glass Cover
Open this cover to place originals on the
exposure glass.
Exposure Glass
Place originals here sheet by sheet.
ADF (Auto document feeder)
Cover
Open this cover to remove originals jammed
in the ADF.
Input Tray for the ADF
Place stacks of originals here. They will feed
in automatically.
Output Tray for the
ADF
Originals scanned with the
ADF are output here.
Top Cover
Open this cover to replace the
print cartridges.
Tray 1
Tray 2 (option)
Front Cover
Open this cover to replace the waste toner
bottle or remove jammed paper.
Control Panel
Output Tray
Printed paper is output here.
2
Interior
Print Cartridges
Load from the machine rear, in the
order of cyan (C), magenta (M), yellow
(Y), and black (K).
BAA373S
Waste Toner Bottle
Collects excess toner during printing.
Transfer Unit
Remove this unit when replacing the
waste toner bottle.
BAA303S
BAA308S
3
Names and Locations
Control Panel
Screen
Displays current status and messages.
Menu keys
Press any of these four keys to enter the menu for configuring the machine.
• [ ] key
Press to exit to the previous level of the menu tree.
• [ ] [ ] keys
Press to scroll through the current level of the menu tree. When entering characters, press the [ ] or [ ] key to move the cursor left or right, respectively.
• [OK] key
Press to confirm settings or enter the next level of the menu tree.
Number keys
Use to enter numerical values when specifying settings such as fax numbers and
copy quantities, or enter letters when specifying names.
[Clear/Stop] key
• While the machine is processing a job: press to cancel the current job.
• While configuring the machine: press to cancel the current setting and return to
standby mode.
• While in standby mode: press to cancel temporary settings such as the image
density or resolution.
[B&W Start] key
Press to scan or copy in black and white, or start sending a fax.
[Color Start] key
Press to scan or copy in color.
4
One Touch buttons
(scanner mode/fax mode)
[On Hook Dial] key
(fax mode)
[Address book] key
(scanner mode/fax mode)
[Image Quality] key
(copier mode/scanner mode/fax mode)
[Density] key
(copier mode/scanner mode/fax mode)
[Reduce/Enlarge] key
(copier mode/scanner mode)
[Copy] key
Press to switch to copier mode.
[Facsimile] key
Press to switch to fax mode.
[Scanner] key
Press to switch to scanner
mode.
[Pause/Redial] key
• Pause: (fax mode)
• Redial: (scanner mode/fax mode)
[Shift] key
(scanner mode/fax mode)
5
Using the Copier Function
Initial Screen
The following is the initial screen in copier mode.
BAA350S
1. Reproduction ratio
2. Status of the machine
3. Copy quality
4. Paper size
5. Copy quantity
Basic Operation
• The original in the ADF takes precedence over the original on the exposure glass if you place
originals both in the ADF and on the exposure glass.
Press the [Copy] key.
BAA359S
Place the original face down on the exposure glass or face up in
the ADF.
Lift the ADF carefully without holding the input tray. Otherwise, the ADF
might be damaged.
Exposure Glass
ADF
BAA357S
BAA353S
• If necessary, configure advanced photocopy settings. For more details, see "Advanced Photocopy Settings" on page 8.
6
To make multiple copies, enter the number of copies using the
number keys.
• The maximum number of copies is 99.
Press the [B&W Start] or [Color Start]
key.
BAA354S
• To cancel photocopying, press the [Clear/Stop] key.
• If a paper jam occurs, printing stops after the current page has been printed out. After the
jammed paper is removed, printing restarts from the jammed page automatically.
• If a scanning jam occurs in the ADF, copying is canceled immediately. In this case, copy the
originals again starting from the jammed page.
• For information about originals, see "Getting Started", User Guide.
7
Using the Copier Function
Advanced Photocopy Settings
❖ Making Enlarged or Reduced Copies
You can specify the reduction or enlargement ratio for the current job. There are two ways
to set the scaling ratio: using a preset ratio or manually specifying a custom ratio.
1. Press the [Reduce/Enlarge] key.
2. Press the [Reduce/Enlarge] key or [ ][ ] keys to select the desired ratio, and then
press the [OK] key.
3. If [Custom 25-400%] has been selected, specify the desired ratio using the number keys,
and then press the [OK] key.
❖ Copying Multiple Pages onto One Sheet
• This function is only available when the original is set in the ADF, not when it is set on the
exposure glass.
• To use this function, the paper tray specified for photocopying must contain A4, Letter, or Legal
size paper.
You can combine two or four pages of the original on a single sheet of photocopied paper.
1. Press the [Reduce/Enlarge] key.
2. Press the [Reduce/Enlarge] key or [ ][ ] keys to select [2in1] or [4in1], and then press
the [OK] key.
3. Press the [ ][ ] keys to select the desired printout format, and then press the [OK]
key.
The following types of printout format can be selected depending on your preference.
Printout formats for 2-in-1 copying
[Portrait]
[Landscape]
BAA360S
BAA361S
Printout formats for 4-in-1 copying
[Portrait Row]
[Landscape Row]
BAA364S
BAA362S
[Portrait Column]
8
[Landscape Column]
BAA363S
BAA365S
❖ Adjusting Image Density
You can adjust the image density for the current job.
1. Press the [Density] key.
2. Press the [Density] key or [ ][ ] keys to select the desired density level, and then
press the [OK] key.
(Lightest)
(Darkest)
❖ Selecting the Document Type
You can select the best document type for the original that you are scanning.
1. Press the [Image Quality] key.
2. Press the [Image Quality] key or [ ][ ] keys to select the desired document type, and
then press the [OK] key.
Mixed
for originals with both
text and photographs
Text
for originals with
text only
Photo
for originals with
photographs only
• For more details about the copier function, see "Using the Copier Function", User Guide.
• If you would like to change the default settings of the machine, see "Configuring the Machine
Using the Control Panel", User Guide.
9
Using the Scanner Function
Initial Screen
The following is the initial screen in scanner mode.
BAA351S
Basic Operation
You can send scanned files via e-mail (Scan to E-mail), to an FTP server (Scan to FTP), or
to the shared folder of a computer on a network (Scan to Folder).
• Scan destinations must be registered using a Web browser in advance. For details, see "Using
the Scanner Function", User Guide.
• To send files via e-mail, SMTP and DNS settings must be configured properly in advance. For
details, see "Configuring the Machine Using a Web Browser", User Guide.
• It is recommended that you call the receiver and confirm with them when sending important
documents.
• The original in the ADF takes precedence over the original on the exposure glass if you place
originals both in the ADF and on the exposure glass.
Press the [Scanner] key.
BAA366S
10
Place the original face down on the exposure glass or face up in
the ADF.
Lift the ADF carefully without holding the input tray. Otherwise, the ADF
might be damaged.
Exposure Glass
ADF
BAA357S
BAA353S
• If necessary, configure advanced scan settings. For more details, see "Advanced Scan
Settings" on page 13.
Press the [Address book] key.
You can press the [
the address book.
][
] keys to scroll
BAA367S
Search for the desired destination by entering the destination
name using the number keys, and then press the [OK] key.
The screen changes to show the names that match the characters you
enter.
11
Using the Scanner Function
Press the [B&W Start] key or the
[Color Start] key.
Depending on the machine's settings, you
may be prompted to place another original
on the exposure glass. In this case,
proceed to the next step.
BAA354S
If you have more originals to scan, place the next original on the
exposure glass, and then press [1]. Repeat this step until all
originals are scanned.
When all originals have been scanned, press [2] to start sending
the scanned file.
• To cancel scanning, press the [Clear/Stop] key. The scan files are discarded.
• If paper is jammed in the ADF, the scan file is discarded. In this case, scan the entire originals
again. To remove paper jams in the ADF, see "Removing from the ADF" page 25.
• You can also specify a destination using the One Touch buttons or [Pause/Redial] key. For
details, see "Using the Scanner Function", User Guide.
• For information about originals, see "Getting Started", User Guide.
12
Advanced Scan Settings
❖ Specifying the Scanning Size
You can specify the scanning size according to the size of the original for the current job.
1. Press the [Reduce/Enlarge] key.
2. Press the [Reduce/Enlarge] or [ ][ ] keys to select the size of the original, and then
press the [OK] key.
If you would like to specify a custom scanning size, see "Specifying the scanning size
according to the size of the original", User Guide.
❖ Adjusting Image Density
You can adjust the image density for the current job.
1. Press the [Density] key.
2. Press the [Density] key or [ ][ ] keys to select the desired density level, and then
press the [OK] key.
(Lightest)
(Darkest)
❖ Specifying Resolution
You can specify the resolution for scanning the original for the current job.
1. Press the [Image Quality] key.
2. Press the [Image Quality] key or [ ][ ] keys to select the desired resolution, and then
press the [OK] key.
• For more details about the scanner function, including how to scan originals from a computer
(TWAIN scanning), see "Using the Scanner Function", User Guide.
• If you would like to change the default settings of the machine, see "Configuring the Machine
Using the Control Panel", User Guide.
13
Using the Fax Function
Initial Screen
The following is the initial screen in fax mode.
BAA352S
1. Resolution setting
2. Status of the machine
3. Current month and date
4. Current time
Basic Operation for Sending a Fax
• Make sure to establish a telephone line connection, and configure the settings for fax transmission in advance.
• The original in the ADF takes precedence over the original on the exposure glass if you place
originals both in the ADF and on the exposure glass.
• It is recommended that you call the receiver and confirm with them when sending important
documents.
Press the [Facsimile] key.
BAA369S
14
Place the original face down on the exposure glass or face up in
the ADF.
Lift the ADF carefully without holding the input tray. Otherwise, the ADF
might be damaged.
Exposure Glass
ADF
BAA357S
BAA353S
• If necessary, configure the advanced fax settings. For details, see "Advanced Scan Settings" on
page 17.
Enter the fax number (up to 40 characters) using the number
keys.
Press the [B&W Start] key.
Depending on the machine's settings, you
will be prompted to place another original
on the exposure glass. In this case,
proceed to the next step.
BAA368S
If you have more originals to scan, press [1] within 60 seconds,
place the next original on the exposure glass, and then press the
[OK] key. Repeat this step until all originals are scanned.
If you do not press [1] within 60 seconds, the machine will start to dial the
destination.
15
Using the Fax Function
When all originals have been scanned, press [2] to start sending
the fax.
• To cancel sending a fax, press the [Clear/Stop] key.
• A fax number can contain 0 to 9, pause, "∗", "#", and space.
• If necessary, insert a pause in a fax number. The machine pauses briefly before it dials the digits
following the pause.
• To use tone services on a pulse-dialing line, insert "∗" in a fax number. "∗" switches the dialing
mode from pulse to tone temporarily.
• If paper is jammed in the ADF, the jammed page has not been scanned properly. When the
machine is in Immediate Transmission mode, resend the fax starting from the jammed page.
When in Memory Transmission mode, scan the entire originals again.
• You can also specify a fax destination using the Quick Dial, Speed Dial, Broadcast, or Redial
functions. For details, see "Using the Fax Function", User Guide.
• By default, the machine is set to print a transmission report automatically after a fax transmission. To change this setting, see "Configuring the Machine Using the Control Panel",
User Guide.
• For information about originals, see "Getting Started", User Guide.
16
Advanced Scan Settings
❖ Adjusting Image Density
You can adjust the image density for the current job.
1. Press the [Density] key.
2. Press the [Density] or [ ][ ] keys to select the desired density level, and then press
the [OK] key.
Normal
Dark
Light
❖ Specifying Resolution
You can specify the resolution for scanning the original for the current job.
1. Press the [Image Quality] key.
2. Press the [Image Quality] or [ ][ ] keys to select the desired resolution setting, and
then press the [OK] key.
Standard
for originals with
normal-sized characters
Fine
for originals with
small print
Photo
for originals with
images
• For more details about the fax function, see "Using the Fax Function", User Guide.
• If you would like to change the default settings of the machine, see "Configuring the Machine
Using the Control Panel", User Guide.
17
Error Messages
Error and Status Messages on the Screen
(in alphabetical order)
"X" indicates the parts of the messages that appear differently depending on a specific
situation, such as the paper sizes or types, tray names, or toner colors.
Message
18
Causes
Solutions
ADF JAM Open ADF
Cover and Clear Jam
An original has
been jammed
inside the ADF.
• Remove jammed originals, and
then place them again. See
"Removing from the ADF" on page
25.
• Check the originals are suitable
for scanning. See "Placing
Originals", User Gudie.
Bypass Tray Paper
Empty
The bypass tray
has run out of
paper.
Load paper to the bypass tray.
See "Loading Paper in the Bypass
Tray", User Guide.
Bypass Tray Paper
Size Mismatch?Y/N
The paper size set
for the document
differs from the
size of the paper
in the tray.
Press the [B&W Start] key or
[Color Start] key to begin printing,
or press the [Clear/Stop] key to
cancel the job.
Bypass Tray Paper
Type Mismatch?Y/N
The paper type
set for the
document differs
from the type of
the paper in the
tray.
Press the [B&W Start] key or
[Color Start] key to begin printing,
or press the [Clear/Stop] key to
cancel the job.
Cover Open
A cover is open.
Close the cover completely.
Duplex Jam / Duplex
Misfeed Jam
Paper has been
jammed in the
duplex unit.
Remove the jammed paper. See
"Removing Paper Jams" on page
21.
Inner Jam
Paper has been
jammed in the
machine.
Remove the jammed paper. See
"Removing Paper Jams" on page
21.
Message
Causes
Solutions
Life End X Toner
Cartridge
The machine has
run out of the
indicated toner.
Replace the indicated print
cartridge. See "Replacing Print
Cartridges" on page 30.
Lower Misfeed Jam
Paper has been
jammed in the
machine.
Remove the jammed paper. See
"Removing Paper Jams" on page
21.
Misinstall Toner X
The print
cartridge has not
been installed or
has not been
installed correctly.
Reinstall the print cartridge. See
"Replacing Print Cartridges" on
page 30.
Near End X Toner
The print
cartridge is
almost empty.
Prepare a new print cartridge.
Near Memory Full
Memory has
almost reached
capacity during
sort copy.
If several originals are still to be
scanned, it is recommended to
start printing now, and copy the
remaining originals separately. If
originals are being scanned from
the ADF, remove any remaining
pages from the ADF.
No Profile Exist
No Quick Dial
entry is
associated with
the One Touch
button you
pressed.
• Press a different One Touch
button.
• Assign a registered destination
to the One Touch button. See
"Registering Scan Destinations",
User Guide.
Outer Jam
Paper has been
jammed in the
machine.
Remove the jammed paper. See
"Removing Paper Jams" on page
21.
Paper size X illegal on
X
The tray does not
support printing
on the selected
paper size.
Select a supported paper size, or
load the paper into a different tray.
19
Error Messages
Causes
Solutions
Paper size X mismatch on X
The paper size set
for the document
differs from the
size of the paper in
the tray.
Load paper of the selected size in
the tray, or change the paper
size setting. See "Specifying Paper
Type and Paper Size", User Guide.
Paper Tray Misfeed
Jam
Paper has been
jammed in the
paper tray.
Remove the jammed paper. See
"Removing Paper Jams" on page
21.
Paper type X mismatch on X
The paper type
set for the
document differs
from the type of
the paper in the
tray.
Load paper of the selected type in
the tray, or change the paper type
setting. See "Specifying Paper Type
and Paper Size", User Guide.
Paper type X illegal
on X
The tray does not
support printing
on the selected
paper type.
Select a supported paper type, or
load the paper into a different tray.
Tray X Paper Size
Mismatch?Y/N
The paper size set
for the document
differs from the
size of the paper
in the tray.
Press the [B&W Start] key or [Color
Start] key to begin printing, or the
[Clear/Stop] key to cancel the job.
Tray X Paper Type
Mismatch?Y/N
The paper type
set for the
document differs
from the type of
the paper in the
tray.
Press the [B&W Start] key or [Color
Start] key to begin printing, or the
[Clear/Stop] key to cancel the job.
Upper Misfeed Jam
Paper has been
jammed in the
machine.
Remove the jammed paper. See
"Removing Paper Jams" on page
21.
Message
20
Removing Paper Jams
Removing Jammed Paper
• Jammed paper may be covered in toner. Be careful not to get toner on your hands or clothes.
• Toner on prints made immediately after clearing a paper jam may be insufficiently fused and can
smudge. Make test prints until smudges no longer appear.
• Do not forcefully remove jammed paper, as it may tear. Torn pieces remaining inside the
machine will cause further jams and possibly damage the machine.
Paper Jam Positions
If a paper jam occurs, paper may be jammed inside the machine or in the ADF. If paper is
jammed inside the machine, check the following positions, in the indicated order, to locate
the jammed paper.
1. Fusing Unit
If paper is jammed in the fusing unit, see
"Removing from the Fusing Unit" on page 22.
ADF
If paper is jammed in the ADF, see "Removing
from the ADF" on page 25.
2. Tray
If paper is jammed in the tray, see
"Removing from the Tray" on page 23.
3. Transfer Unit
If paper is jammed in the transfer unit, see
"Removing from the Transfer Unit" on page 24.
21
Removing Paper Jams
Removing from the Fusing Unit
CAUTION
• The inside of this machine becomes very hot. Do not touch the parts labelled " " (indicating a hot surface).
• The fusing section of this machine might be very hot. Caution should be taken when
removing jammed paper.
• Since the temperature around the guide is high, wait for it to cool before checking for jammed
paper.
Pull the opening lever on the front cover, and then carefully
lower the front cover.
Lower the blue fusing unit lever, and
pull out the jammed paper carefully.
BAA304S
BAA305S
If you cannot find the jammed paper, check
for it by pulling down the guide.
BAA306S
22
Carefully lift the blue fusing unit
levers.
BAA307S
Using both hands, carefully push up the front cover until it
closes.
• When closing the front cover, push the upper area of the cover firmly. After closing the cover,
check that the error is cleared.
Removing from the Tray
Pull the opening lever on the front cover, and then carefully lower
the front cover.
Pull out the jammed paper carefully.
BAA309S
If paper has become jammed inside the
transfer unit, pull the paper forward.
• Do not pull out the paper tray (Tray 1).
• If paper is jammed in tray 2 but is difficult to locate, pull
out tray 2 to remove it. After removing the paper, carefully
push tray 2 all the way back inside the machine.
BAA310S
23
Removing Paper Jams
Using both hands, carefully push up the front cover until it
closes.
• When closing the front cover, push the upper area of the cover firmly. After closing the cover,
check that the error is cleared.
Removing from the Transfer Unit
Pull the opening lever on the front cover, and then carefully
lower the front cover.
Carefully remove any paper that is
jammed under the transfer unit.
If you cannot find the jammed paper, look
inside the machine
BAA311S
Using both hands, carefully push up the front cover until it
closes.
• When closing the front cover, push the upper area of the cover firmly. After closing the cover,
check that the error is cleared.
24
Removing from the ADF
Open the ADF cover.
BAA312S
Gently pull the jammed original to
remove it.
Be careful not to pull the original too
hard, as it may rip.
BAA313S
If you cannot pull out the jammed
original easily, unlock the paper feed
roller by raising the green lever.
BAA379S
Lift the paper feed roller slightly and
pull it out toward you.
BAA380S
25
Removing Paper Jams
Gently pull the jammed original to
remove it.
BAA381S
If you cannot pull out the jammed
original easily, raise the input tray to
see if the original is jammed in the
output area.
BAA385S
Gently pull the jammed original to
remove it.
BAA386S
Put the paper feed roller back in with
the roller part facing downwards.
BAA382S
26
Lower the green lever to lock the
paper feed roller.
BAA383S
Close the ADF cover.
BAA314S
Lift the ADF, and if there is original
remaining in the ADF, gently pull the
jammed original to remove it.
Be careful not to hold the input tray when
lifting the ADF, for the tray might be
damaged.
BAA387S
Close the ADF.
27
Troubleshooting
Printing or Scanning Problems
❖ Images are too dark or too light on the copied pages or
scanned files.
Image density is too dark or too light. Adjust the image density.
❖ Toner smears on the printed surface.
Toner on the printed surface is not dry. Do not touch printed surfaces immediately after
paper is output. Remove freshly output paper one by one, taking care not to touch printed
areas.
❖ Copied pages or scanned files are dirty.
Toner or correction fluid on the original is not dry. Before placing originals on the exposure
glass, make sure that toner or correction fluid is dry.
❖ The same area is dirty whenever making copies or scanning files.
The exposure glass or ADF is dirty. Clean the exposure glass or ADF. Clean the parts
indicated with arrows with a soft damp cloth and then wipe the same parts with a dry cloth
to remove any remaining moisture. For more details, see "Cleaning", User Guide.
Exposure Glass
ADF
BAA083S
28
BAA084S
Fax Transmission Problems
❖ Cannot send or receive faxes.
The modular cable may be disconnected. Make sure that the modular cable is correctly
connected. For more details, see "Connecting to a Telephone Line", User Guide.
❖ Cannot receive faxes even when sending them is
possible.
• A print cartridge is empty. Replace the print cartridge. For more details, see "Replacing
Print Cartridges" on page 30.
• A tray is empty. Load paper into the tray. For more details, see "Loading Paper", User
Guide.
❖ A fax you sent appears blank when received.
The original was placed upside down. Place the original in the correct orientation. For more
details, see "Placing Originals", User Guide.
❖ Cannot print the received faxes.
• The paper tray is empty. Load paper in the paper tray. For more details, see "Loading
Paper", User Guide.
• The tray for printing faxes does not contain A4, Letter, Legal, size paper. Change the tray
setting, and load paper of the approriate size. For more details, see "Fax Settings", User
Guide.
• If you cannot solve the problem, contact your local sales or service representative.
29
Replacing Print Cartridges
WARNING
• Do not incinerate used toner or toner containers. Toner dust might ignite when exposed to
an open flame. Dispose used toner containers in accordance with local regulations.
• Do not store toner, used toner, or toner containers in a place with an open flame. The
toner might ignite and cause burns of a fire.
CAUTION
• Keep toner (used or unused) and toner containers out of reach of children.
• If toner or used toner is inhaled, gargle with plenty of water and move into a fresh air
environment. Consult a doctor if necessary.
• Avoid getting toner on your clothes or skin when removing a paper jam or replacing toner.
If your skin comes into contact with toner, wash the affected area thoroughly with soap
and water.
• If toner gets on your clothing, wash with cold water. Hot water will set the toner into the
fabric and may make removing the stain impossible.
• If toner or used toner gets into your eyes, flush immediately with large amounts of water.
Consult a doctor if necessary.
• If toner or used toner is swallowed, dilute by drinking a large amount of water. Consult a
doctor if necessary.
• Store print cartridges in a cool dark place.
• The actual number of printed pages varies depending on image volume and density, number of
pages printed at a time, paper type and size, and environmental conditions such as temperature
and humidity. Toner quality degrades over time. Early replacement of print cartridges might be
necessary. Therefore, we recommend you always keep new print cartridges ready.
• For good print quality, we strongly advise you use genuine print cartridges only.
• The supplier shall not be responsible for any damage or expense that might result from the use
of parts other than genuine parts from the supplier with your office products.
30
Messages for Preparing Print Cartridges
Prepare the indicated print cartridge when any of the following messages appear on the
screen:
• "Near End K Toner"
• "Near End M Toner"
• "Near End C Toner"
• "Near End Y Toner"
• To purchase print cartridges, contact your service representative.
Messages for Replacing Print Cartridges
Replace the indicated print cartridge when any of the following messages appear on the
screen:
• "Life End K Toner Cartridge"
• "Life End M Toner Cartridge"
• "Life End C Toner Cartridge"
• "Life End Y Toner Cartridge"
• Do not allow paper clips, staples, or other small metallic objects to fall inside the machine.
• Do not expose the print cartridge without its cover to direct sunlight for a long time.
• Do not touch the print cartridge's photo conductor unit.
BAA372S
31
Replacing Print Cartridges
• When removing print cartridges, be careful not to touch the Laser Scanning Unit on the
underside of the upper cover (the white area in the illustration).
BAA358S
• If cyan, magenta, or yellow toner runs out, you can print in black and white using just the black
toner. Change the color mode setting to Black and White using the machine's driver.
• If black toner runs out, you cannot print in black and white or color until the black print cartridge
is replaced.
Pull up the lever on the top cover,
and then carefully raise the top
cover.
Make sure that the exposure glass cover or
ADF is closed.
BAA315S
Tilt the print cartridge forward and
pull it out.
• Do not shake the removed print cartridge.
Doing so can cause remaining toner to
leak.
• Place the old print cartridge on paper or
similar material to avoid dirtying your
workspace.
• The toner color is indicated by the label
on each print cartridge.
32
BAA316S
Take the new print cartridge out of
the box, and then take it out of the
plastic bag.
BAA317S
Hold the print cartridge and shake it
from side to side five or six times.
Even distribution of toner within the bottle
improves print quality.
BAA318S
Remove the cover from the print
cartridge.
BAA319S
Check that the toner color and
location correspond, and carefully
insert the print cartridge vertically.
BAA320S
33
Replacing Print Cartridges
Close the top cover carefully. Be
careful not to trap your fingers.
To prevent malfunction, do not turn off the
power while "Calibrating" is displayed on
the screen.
BAA384S
Put the cover that you removed in
step 5 on the old print cartridge.
Then, put the old print cartridge into
the bag, and then put it into the box.
BAA322S
• Make sure to cover the old print cartridge with the protective cover for recycling and environmental purposes.
• Comply with the print cartridge recycling program, whereby used print cartridges are collected
for processing. For details, ask your sales or service representative.
34
Where to Inquire
Contact your sales or service representative for further information about topics covered
in this manual or to enquire about topics not covered in this manual.
Saving Energy
This machine is equipped with an energy saving function.
By default, this machine is set to enter Sleep mode if it has been idle for 15 minutes. In
Sleep mode, the machine's power consumption becomes lower than in normal state. The
machine takes about 1 minute to recover from Sleep mode.
According to your convenience, you can chage how long the machine waits before
entering Sleep Mode by configuring the [Power Saver] setting under [Admin Settings].
For details about [Power Saver], see "Administrator Settings", User Guide.
❖ Opening Manuals
The "Manuals" CD-ROM provided with the machine contains manuals in
HTML format and PDF. Install the manuals before using the machine.
There are two ways to view the manuals.
• Double-click the manual icon on your desktop.
• On the [Start] menu, point to [All Programs], point to [Product Name],
and then click [Manual Name].
• The menu options may appear differently, depending on the options
chosen during installation.
• For details about installing the manuals, see "Guide to the Machine",
User Guide.
Copyright © 2007
35
SP C221SF/C222SF
Quick Guide
Names and Locations
Using the Copier Function
Using the Scanner Function
Using the Fax Function
Error Messages
Removing Paper Jams
Troubleshooting
Replacing Print Cartridges
GB GB EN USA G184-8508