1
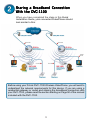
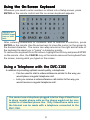
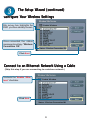
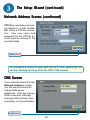
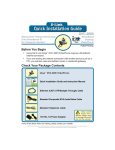
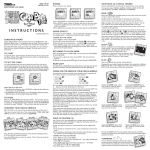
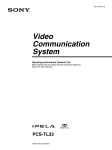
Standalone Wireless
Videoconferencing
Over Broadband IP
DVC-1100
Wireless
VideoPhone
Patent Pending
Before You Begin
1. Using the D-Link i2eyeTM DVC-1100 Wireless VideoPhone requires a connection to
the Internet over a Broadband connection (e.g., a Cable modem or a DSL modem
with a router).
2. Attaching a telephone to the DVC-1100 is optional, but highly recommended for
optimal sound quality.
3. If you are sharing the Internet connection with another device (such as a PC) you
will also need a wireless broadband router or wireless residential gateway.
Check Your Package Contents
i2eye DVC-1100 Wireless VideoPhone
Includes Detachable Antenna
Quick Installation Guide and Instruction Manual
Ethernet (CAT5 UTP/Straight Through) Cable
Standard Composite RCA Audio/Video Cable
Remote Control
5V DC, 2A Power Adapter
1
Using a power
supply with a
different voltage rating
will damage this product
and void the warranty.
Connecting the DVC-1100 Wireless
VideoPhone
A. Place the DVC-1100 Wireless VideoPhone directly on top of a television.
To obtain the best viewing experience, the VideoPhone should be 5 to 10
feet away from the intended subject.
B. Attach the supplied audio/video cable to the DVC-1100 and to the
matching audio/video jacks on the television or VCR.
C. To connect to a network using an Ethernet cable, attach the supplied
Ethernet cable to the DVC-1100 and to the Cable or DSL modem or
Ethernet network device (hub, switch or router).
D. To connect using a wireless network, attach the supplied antenna to the
DVC-1100.
E. Attaching a telephone is optional, but recommended for optimal sound
quality. Attach a standard telephone cable to the telephone and directly
to the DVC-1100. Do NOT attach the telephone to a wall telephone
outlet.
F. Plug the supplied AC power cable into an AC outlet and then into the
DVC-1100.
G. Attaching an external microphone is optional, but recommended for
optimal sound for a group videoconference.
F
C
G
i2eye
2
E
B
D
Sharing a Broadband Connection
With the DVC-1100
When you have completed the steps in this Quick
Installation Guide, your connected VideoPhone should
look similar to this:
Before using your D-Link DVC-1100 Wireless VideoPhone, you will want to
understand the network requirements for this device. If you are using a
residential gateway or router and sharing the broadband connection with
your DVC-1100, please read the section starting on Page 50 of the manual
included with the DVC-1100.
3
Using the Remote Control
The DVC-1100 Wireless VideoPhone needs to be configured before use.
There is an easy to use Setup Wizard built into the DVC-1100 to accomplish
the configuration.
You will use the Setup Wizard along with the remote control included with the
DVC-1100. The remote control is used to enter numbers, characters and to
make selections from a keyboard that is displayed on the TV screen.
When a numeric input
is required, (e.g., a
telephone number or
IP address) enter it
directly by pressing
the number keys.
The * (asterisk--sometimes
called a “star” key) is used
to enter a “.” (period also
called a “dot”.)
Number sign
When entering alphanumeric
information the left arrow
key performs a backspace,
deleting the character to the
left of the on-screen cursor.
Cancel
Use the arrow keys
to move the position
of the on-screen
cursor.
ENTER key
Full-Screen /
Picture-in-Picture
Speakerphone
Mode
Self-View /
Remote View
Adjust Contrast
Mute Video
Mute Audio
4
Using the On-Screen Keyboard
Whenever you need to enter numbers or letters into a Setup screen, press
ENTER on the remote control and the on-screen keyboard appears:
Shift Key for
UPPER, lower
case or shift
lock
After entering characters or numbers, and to execute a selection, press
ENTER on the remote. Use the arrow keys to move the cursor on the screen to
the desired character. The cursor can wrap around on the right and left side of
the keyboard to assist you in “typing” a character quickly.
To remove the keyboard from the screen, highlight the OK key and press ENTER
on the remote. Also, the CANCEL key on the remote removes the keyboard from
the screen, leaving what you typed on the screen.
Usin
g a TTeleph
eleph
on
sing
elephon
onee with th
thee DVC-1100
In addition to providing optimal sound quality, a telephone:
• Can be used to start a videoconference similar to the way you
would place a regular telephone call.
• Lets you receive a videconference call similar to the way you
would receive a regular telephone call.
You cannot use a telephone plugged into the i2eye VideoPhone
to place regular phone calls as the phone would not be connected to a standard phone line. Only VideoPhone calls over
the Internet can be made with a telephone connected to the
DVC-1100.
5
The Setup Wizard
Press the power switch on the
back of the DVC-1100 and the
Welcome Screen appears.
Click Next
Personal Information Screen
Enter your name and phone
number (consisting of a Country
code, Area code and Phone
number.)
The phone number you enter
is one you create for family,
friends and others to call you.
You can use your regular phone
number or make up a new one.
The Caller ID function displays
this name at the other end of the
connection. Your number willl
not be visible to anyone else.
Click Next
Note: The Country code for the United States and Canada is “1”. See
Page 74 of the DVC-1100 manual for Country codes of other countries.
6
The Setup Wizard (continued)
Connect to a Wireless Network
(Only if using DVC-1100 in wireless mode. Wireless mode is enabled by default.)
Highlight the SSID of the device you wish to connect to
and press Enter on the remote control.
Note: The number next to
the SSID indicates the signal strength of the available
access point on the wireless
network.
Confi
gur
our Wir
eless Settin
gs
Configur
guree YYour
Wireless
Settings
Note: The wireless settings must match your existing wireless network
settings.
Press Enter to choose the
Authentication Type between Open System and
Shared Key.
Press Enter to choose the
appropriate WEP Type between 64, 128 or 256 bits.
Press Enter to select the
Key ID you wish to use.
Click OK
Enter the your encryption
keys here.
Note: If you have any questions regarding using wireless encryption
on the DVC-1100, please refer to DVC-1100 manual on page 13.
7
The Setup Wizard (continued)
Confi
gur
our Wir
eless Settin
gs
Configur
guree YYour
Wireless
Settings
Site survey box highlights the
SSID you have already chosen.
Once connected, the status
message should say “Wireless
Connection OK”
Click Next
Connect to an Ethernet Network Using a Cable
(Skip this step if you are connecting to a wireless network.)
Uncheck the “Enable Wireless” checkbox.
Click Next
8
The Setup Wizard (continued)
Network Address Screen
Choose one of the three available options that best suits your environment. If
you are not sure which option will work with your Internet connection, please
contact your ISP or network administrator for support.
DHCP is used when connecting directly to a broadband modem that offers dynamic IP addressing or when behind a
router/DHCP server that offers
static DHCP.
Click Next
Fixed IP is used when connecting to a broadband connection
that offers static IP addressing
or when behind a router that is
not configured for static DHCP.
This choice requires the input
of specific IP address information.
Click Next
9
The Setup Wizard (continued)
Network Address Screen (continued)
PPPoE is used when connecting directly to a DSL modem
that offers a PPPoE connection. Your user name and
password for the PPPoE account must be entered in the
provided fields.
Click Next
To configure a router to work with the DVC-1100, please see the
section starting on Page 50 of the DVC-1100 manual.
DNS Screen
If you selected Fixed IP in the
Network Address screen,
you will see the screen for
setting DNS server
addresses. Only the primary
DNS is required, although
entering both a primary and
secondary is recommended.
Click Next
10
The Setup Wizard (continued)
Network Speed Screen
Select the type of broadband
Internet connection you use.
Click Next
System Restart
Click Yes
Your Setup is Complete!
11
NOTES
12
Technical Support
You can find software updates and user documentation on the D-Link website.
D-Link provides free technical support for customers within the United States and
within Canada for the duration of the warranty period on this product.
U.S. and Canadian customers can contact D-Link Technical Support through our
website, or by phone.
Tech Support for customers within the United States:
D-Link Technical Support over the Telephone:
(877) 453-5465
24 hours a day, seven days a week.
D-Link Technical Support over the Internet:
http://support.dlink.com
email:[email protected]
Tech Support for customers within Canada:
D-Link Technical Support over the Telephone:
(800) 361-5265
Monday to Friday 8:30am to 9:00pm EST
D-Link Technical Support over the Internet:
http://support.dlink.ca
email:[email protected]
13