1
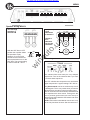
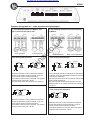
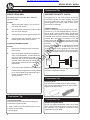
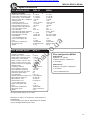
Car audio and car goods internet store Winauto
MRA22, MRA31, MRA41
Wiring
Tools and material needed
Connect power and remote
Connect the fuse holder as close to the vessel
battery + as possible, using AWG 8 = 10 mm2 or
heavier cable. Use a ring crimp terminal cable to
connect to battery +. Apply silicon grease to the fuse
to prevent corrosion. Use a 50 Amp fuse for both
amplifiers.
Tools:
Flat and Phillips screwdrivers
Wire cutter, Wire stripper
Electric drill with drills
Crimping tool
Digital multimeter or test lamp
Material:
Speaker wire: minimum
12 AWG = 4 mm2 for subwoofers
13 – 16 AWG = 1,5-2,5 mm2 for other
speakers
Stainless metal screws for mounting the
amplifier to the amplifier board and the
amplifier board to the vessel, and some
extra for fuse holder.
Electrical insulation tape
DLS FH1
fuse holder
Connect the battery cable by a crimp fork terminal
(spade ) to the +12 Volt on the amplifier. Do likewise
with the negative cable. If you use a AWG 8 = 10
mm2 or thinner cable, you can do without the crimp
terminal and put the cable right into the connector.
Be sure to use a rubber grommet or a plastic
insulating tube where the cable passes places when
it can easily be jammed. Use wire ties to secure to
existing cables.
w
in
au
to
.u
Amplifier installation kit:
If available, buy an amplifier installation kit. It
contains normally all you need. This is what you
have to buy if you buy the items separately.
Power cable,minimum 8 AWG = 10 mm2
for MRA22, 4 AWG = 21 mm2 for MRA 31/41.
1 pc of fuseholder to install close to the
battery + fuse 50 Ampere.
15 AWG = 1,5 mm2 wire for remote turn on /
off cable from radio / CD.
RCA-cable for input from radio.
Different lengths are available.
Two ring crimp terminals –one
for connection to the battery plus and one
for the battery minus connection.
Two heavy fork crimp terminals to connect
+ and – to amplifer – but you do only need
them if you use heavy cable or to make the
installation look nicer.
Four to ten fork crimp terminals to
connect the speaker cables – but you do
only need them if you use heavy cables or
want the installation to look nicer.
One fork crimp terminal to connect the
remote wire to the amplifier, but you need it
only to make it look nicer.
Four to eight splicers to connect speaker
cables to high level input cable, if high level
input is used.
Wire ties
a
To head unit
remote
If amplifier installation kits are available with different size of power cable, chose the most heavy
power cable to improve sound quality and to allow
more amplifiers to be installed now or later.
These are the minimum sizes we recommend for
the amplifiers:
MRA22
10 mm2 (7 AWG)
MRA31/41 21 mm2 (4 AWG)
This is for cable lengths up to 5 meters.
The ground cable must have the same size.
Remote terminal ( REM )
For RCA cable signal input:
Connect the radio power antenna lead = remote
turn on/off from the car stereo to the amplifier remote
connection. This turns on the amplifier when the
car stereo is turned on.
You can either use the built in remote cable in the
RCA cable itself or use a separate cable.
We recommend to use a separate remote wire and
run the RCA lead separate from remote wire, power
cables and speaker cables.
You can either use a crimp fork terminal or insert
the cable directly into the amplifier terminal. If there
is no remote voltage available from the stereo, you
must connect to the ignition key through the radio
or any accessories fuse.
For High Level input:
We recommend you to connect the remote wire as
described above. The amplifier will produce soft on
/ soft off operation this way. You must set the Hi
level/Low level switch to High level position in this
case.
In the case that there is no remote voltage available
from the car stereo or you want to simplify the installation, the amplifier can be turned on/ turned off
by the high level input voltage. This is done when
the Hi level/Low level switch is set to Hi level position. There is a small disadvantage that this function
gives soft turn on operation but some pop sound
when switching off.
3