1
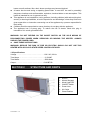
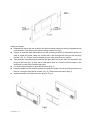
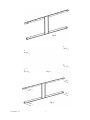
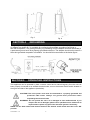
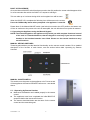
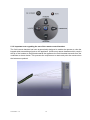
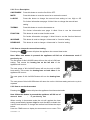
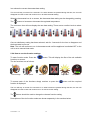
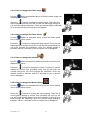
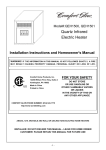
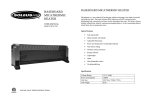
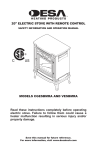
Homeowner’s
IMPORTANT INSTRUCTIONS &
OPERATING MANUAL
ELECTRIC HEATER Model No.: GL2029US
Article No. :
1-GL2029USC (Curved) 1-GL2029USP (Panoramic)
READ AND SAVE THESE INSTRUCTIONS
READ CAREFULLY BEFORE ATTEMPTING TO ASSEMBLE, INSTALL, OPERATE OR
MAINTAIN THE PRODUCT DESCRIBED.
PROTECT YOURSELF AND OTHERS BY OBSERVING ALL SAFETY INFORMATION.
FAILURE TO COMPLY WITH INSTRUCTIONS COULD RESULT IN PERSONAL
INJURY AND/OR PROPERTY DAMAGE.
WARNING! To reduce the risk of fire, electric shock, or personal
injury, read all the instructions before using this heater.
TABLE OF CONTENTS
SECTION 1: WARNINGS & ELECTRIC SPECIFICATIONS
1.1 Important Instructions ............................................................................................3,4
1.2 Specifications ...........................................................................................................4
SECTION 2:STRUCTURE AND PARTS.........................................................................4
SECTION 3: INSTALLATION
3.1 Tools required ...........................................................................................................5
3.2 Unpacking the heater ................................................................................................5
3.3 Locating your electric heater ............................................................................ 5, 6, 7
SECTION 4: Grounding...................................................................................................8
SECTION 5: OPERATING INSTRUCTIONS
5.1 Operating the appliance using the manual keypad...................................................9
5.1.1 Operating by remote handset...............................................................................9
5.1.2 Important note regarding the use of the remote control handset……………..…….10
5.2.1 Button description .................................................................................................11
5.2.2 How to change the manual heat setting.............................................................11
5.2.3 How to use the thermostat...............................................................................11, 12
5.2.4 How to use the function settings......................................................................12
5.2.4.1 How to change the flame image.......................................................................13
5.2.4.2 How to change the flame speed.......................................................................13
5.2.4.3 How to change the volume...........................................................................13
5.2.4.4 How to change the mood lighting.....................................................................13
5.2.4.5 How to change the brightness...........................................................................14
5.2.4.6 How to change the sleep timer....................................................................14
5.3 To reset the heater.................................................................................................15
SECTION 6: MAINTENANCE....................................................................................15
SECTION 7: SERVICING..............................................................................................15
3.EF.40.Rev. 1.0
2
SECTION 1
WARNINGS & ELECTRIC SPECIFICATIONS
1.1 IMPORTANT INSTRUCTIONS
When using electrical appliances, basic precautions should always be followed to reduce
the risk of fire, electric shock and injury to person, including the following:
CAUTION- High temperature, keep electrical cords, drapery, and other furnishings at least 3 feet
(0.9m) from the front of the heater and away from the side and rear.
z Read all instructions before using heater.
z This heater is hot when in use. To avoid burns, do not let bare skin touch hot surfaces. Keep
combustible materials, such as furniture, pillows, bedding, papers, clothes and curtains at
least 3 feet (0.9m) from the front of the heater and keep them away from the sides and rear.
z Extreme caution is necessary when any heater is used by or near children or invalids and
whenever the heater is left operating unattended.
z Unplug power cord before servicing or moving the heater. Always unplug heater when not in
use.
z Do not operate any heater with a damaged cord or after the heater malfunctions, has been
dropped or damaged in any manner. Return heater to authorized service facility for
examination, electrical or mechanical adjustment, or repair.
z Do not use outdoors.
z This heater is not intended for use in bathrooms, laundry areas and similar indoor locations.
Never locate heater where it may fall into a bathtub or other water container.
z Do not run cord under carpeting. Do not cover cord with throw rugs, runners, or the like.
Arrange cord away from traffic area and where it will not be tripped over.
z To disconnect heater, turn controls to off, then remove plug from outlet.
z Connect to properly grounded outlets only.
z Do not insert or allow fingers or foreign objects to enter any ventilation or exhaust opening
as it may cause an electric shock or fire or damage the heater. Do not block or tamper with
the heater in any manner while it is in operation.
z To prevent a possible fire, do not block air intakes or exhaust in any manner. Do not use on
soft surfaces, like a bed, where openings may become blocked.
z A heater has hot and arcing or sparking parts inside. Do not use it in areas where gasoline,
paint, or flammable liquids are used or stored.
z Use this heater only as described in this manual. Any other use not recommended by the
manufacturer may cause fire, electrical shock, or injury to persons.
z Where possible, avoid the use of extension cords because the extension cord may overheat
and cause a risk of fire. If they must be used, minimize the risk of overheating by ensuring
that they are UL listed, a minimum No.14 AWG, rated not less than 1875 watts. Never use a
single extension cord to operate more than one heater.
z This heater includes an overheat protection system that shuts off the heater when parts of the
heater are getting excessively hot. If the heater shuts off, immediately turn the heater OFF and
inspect for any objects, on or adjacent to the heater, which may cause high temperatures. DO
NOT OPERATE THE HEATER UNTIL IT IS RESET. To reset the heater, turn it OFF, unplug it
from the electrical outlet, and wait five to ten minutes for the unit to cool down before plugging
it back in and turning the heater on.
z Make certain that the power source conforms to the electrical requirements of the heater.
z To prevent a possible fire, do not block air intakes or exhaust in any manner. Do not place
3.EF.40.Rev. 1.0
3
z
z
z
z
heater on soft surfaces, like a bed, where openings may become blocked.
A heater has hot and arcing or sparking parts inside. It must NOT be used in potentially
dangerous locations such as flammable, explosive, chemical-laden or wet atmosphere. This
heater is intended for use in general use only.
This appliance is not intended for use by persons (including children) with reduced physical,
sensory or learning disabilities, or lack of experience and knowledge, unless they have been
given supervision or instruction concerning use of the appliance by a person responsible for
their safety.
Children should be supervised to ensure that they do not play with the appliance.
The appliance has a 3-prong plug. To reduce the risk of electric shock this plug is
intended to fit in a well-grounded outlet.
WARNING: DO NOT DEPEND ON THE ON/OFF SWITCH AS THE SOLE MEANS OF
DISCONNECTING POWER WHEN SERVICING OR MOVING THE HEATER. ALWAYS
UNPLUG THE POWER CORD.
z
SAVE THESE INSTRUCTIONS.
WARNING: REDUCE THE RISK OF FIRE OR ELECTRIC SHOCK---DO NOT USE THIS
HEATER WITH ANY SOLID STATE SPEED CONTROL DEVICES.
1.2 Specifications
Voltage …………………………………………. 120 V AC, 60 Hz
Total Amps ……………………………………... 12.5 AMP
Total Watts……………………………………….1500 Watts
Output……………………………………………5120 BTUS
SECTION 2
STRUCTURE AND PARTS
1. Screen
2. Manual Keypad
3. Mood Light LED
4. ON/OFF Switch
5. Power Inlet
6. Air Outlet
7. Glass Retainer
3.EF.40.Rev. 1.0
4
SECTION 3
INSTALLATION
3.1 Tools required
Magnetic Phillips Screw Driver
Rotary Hammer
3.2 Unpacking the Heater
WARNING! Do NOT use this appliance if any part has been under water.
Immediately call a qualified service technician to inspect and to replace any part of
the electrical system if necessary.
Keep plastic wrapping away from children.
z
Open the packaging carefully and remove the foam.
z
Remove and discard the plastic bag.
z
Be responsible when handling the packing materials.
z
Keep the original packaging for future transport and/or storage.
z
Check all accessories are got before you keep the packing.
3.3 Locating Your Electric heater
Your new electric heater may be installed virtually anywhere in your home. However, when
choosing a location ensures that the general instructions are followed. For best results, install out
of direct sunlight.
If the power cord is damaged, it must be repaired by the manufacturer, its authorized service
centre or professional person.
Make sure that the plug or switched fused spur is accessible after the electric fire is fitted.
The appliance should be located close to a suitable mains socket to enable connection. The
electrical socket must be easily accessible to allow disconnection.
WARNING! Keep drapery and other furnishings at least 3’/0.9m from the front
and sides of the electric heater.
Clearance to Combustibles
Sides …………………………….……. 4 in. ( 100 mm )
Floor ……………………………... 15 3/4 in. ( 400 mm )
Top …………………………….……… 0 in. (
0 mm )
Back ……………………………….…...0 in. (
0 mm )
3.EF.40.Rev. 1.0
5
Install your heater:
z Respectively loosen the two screws of the wall mounting bracket on the top of appliance with
a screwdriver, Then take out the wall mounting bracket (see fig.1)
z Choose a solid and plain wall and then put the mounting bracket on the position where you
want to install the heater. Mark the 4 holes with a pen through the holes on the mounting
bracket. (Fig. 2) – Ensure that the bracket is level using a spirit level or similar.
z Take away the mounting bracket and then drill 4pcs Φ8 holes on the wall. Put the plastic wall
plug into the hole. (Fig. 3) If the wall is solid wood, there is no need to drill the holes on the
wood and no need for the plastic wall plugs.
z Fix the mounting bracket by 4pcs M5×8 screws (Fig. 4)
z Hang the heater on the hooks at bottom and push the heater into the mounting bracket and
then fix it using the 2pcs M5×8 screws. (Fig. 5) (These were removed in step 1)
z Install the heater front fascia as in the picture. (Fig. 6)
3.EF.40.Rev. 1.0
6
Fig. 2
Fig. 3
Fig. 4
3.EF.40.Rev. 1.0
7
Fig. 5
SECTION 4
Fig. 6
GROUNDING
Plug the power supply cord into a wall outlet (120Vac, 60Hz).The cord has a plug as shown at A.
An adapter as shown at C is available for connecting three-blade grounding-type plugs to
two-slot receptacles. The green grounding lug extending from the adapter must be connected to
a permanent ground such as a properly grounded outlet box. The adapter should not be used if a
three-slot grounded receptacle is available. You should follow as shown at the below figure:
SECTION 5
OPERATING INSTRUCTIONS
This appliance can be operated by both a remote control and a manual keypad. Once the unit has
been properly connected to an earthed electrical outlet, turn on the manual On/Off switch located on
the right hand side of the appliance (see below).
CAUTION! The unit’s power cord must be connected to a properly grounded and
protected 120V outlet. Always use ground fault protection where
required by the electrical code.
WARNING! Do not operate the unit if it is damaged or has malfunctioned. If you
suspect the unit is damaged, please call a qualified service technician to
inspect and to replace any part of the electrical system if necessary.
NOTE! To use both remote and manual functions the manual on/off switch must be in the ‘ON’
position.
3.EF.40.Rev. 1.0
8
BOOT UP PROCEDURE.
Once the Manual ON/OFF switch has been turned to the ON position the screen should appear white
for a few seconds after which the ‘BOOT-UP’ sequence will begin.
This can take up to 2 minutes during which an hourglass icon will be seen.
When the BOOT-UP is complete the following icon will be seen on the screen.
Press the ON/Standby button when prompted – the appliance is now ON.
Please Note: If the Manual ON/OFF switch (see below) is turned to the OFF position, the heater cuts
off due to overheat or the power to the unit is interrupted, the unit will reboot once power is restored.
5.1 Operating the Appliance using the Manual Keypad
NOTE! The manual keypad on the appliance will provide you with complete functional control
of the unit. It is intended however, that this keypad is used only if you lose the remote
handset or the handset batteries have failed. Please use the remote handset to carry
out all functions.
MANUAL KEYPAD SWITCHES
These keypad switches provide identical functionality as the remote control handset. For a detailed
description of the function of each button, see the section below titled ‘Operating by Remote
Handset’.
MANUAL ON/OFF SWITCH
This switch turns the power to the appliance on/off. Once turned
off the appliance will need to RE-BOOT before use – see details
above.
5.1 .1 Operating by Remote Handset
z Make sure the batteries are installed properly in the remote
control.
z The appliance must have completed the initial BOOT-UP
sequence before the remote will function.
z The buttons described below are the same for the remote
control and the manual keypad.
3.EF.40.Rev. 1.0
9
5.1.2 Important note regarding the use of the remote control handset.
The Celsi remote handset has been ergonomically designed to enable the operator to view the
keypad whilst transmitting signals to the appliance. Unlike most remote handsets which require
the tip of the handset to be pointed towards the appliance the Celsi handset transmits from the
underside as shown below. This prevents the requirement to rotate and point the remote when
the buttons are pushed.
3.EF.40.Rev. 1.0
10
5.2.1 Button Description.
ON/STANDBY: Press this button to turn the fire ON or OFF.
MUTE:
Press this button to mute the sound or to restore the sound.
Lo/Hi/Off:
Press this button to change the manual heat setting to Low, High or Off.
For further information see page 10 titled ‘How to change the manual heat
setting’
THERMO:
Press this button to turn the thermostat on.
For further information see page 11 titled ‘How to use the thermostat’.
FUNCTION:
This button is used to enter function mode.
For further information see page 11 titled ‘How to use the function features’.
INCREASE:
This button is used to change a ‘thermostat’ or ‘function’ setting.
DECREASE:
This button is used to change a ‘thermostat’ or ‘function’ setting.
5.2.2 How to change the manual heat setting.
Pressing the
button will place the appliance into manual heat mode.
Note: When this button is pressed the appliance will fall out of thermostat mode if
previously set.
The first press of this Lo/Hi/Off button will turn the unit to LOW heat
setting. This means the heating fan on the left side of the
appliance will turn on.
The next press of this Lo/Hi/Off button will turn the unit to HIGH
heat setting. This means the heating fans on both sides of the
appliance will turn on.
The next press of this Lo/Hi/Off button will turn the heating fans
off.
The next press of this Lo/Hi/Off button will return the unit to LOW heat setting and so the cycle is
repeated.
5.2.3 How to use the thermostat.
Pressing the
button will place the appliance into thermostat mode.
Note: When this button is pressed the appliance will fall out of
manual heat
if previously set.
.
When running in thermostat mode the unit will regulate the heat
setting automatically between high fan and fan off to maintain the
comfort level selected. To change the comfort level follows the steps
below:
Press the TEMP button to display the thermostat icon on screen. This
3.EF.40.Rev. 1.0
11
icon shows the current thermostat heat setting.
This icon will stay on screen for 3 seconds. If no other buttons are pressed during this time, the icon will
disappear from the screen and continue to run at this thermostat setting.
When the thermostat icon is on screen, the thermostat heat setting can be changed by pressing
The
buttons to increase or decrease the regulated temperature.
The on screen icon will now display the new heat setting. There are ten comfort levels to select
from.
Once a satisfactory setting has been selected, wait for 3 seconds for the icon to disappear and
the thermostat is now set.
Note: The unit will continue to run in thermostat mode until the appliance is switched OFF or the
unit is set to manual heat mode.
5.2.4 How to use the function settings.
To enter function mode. Press the
functions on screen.
The six functions are as follows:
Flame Image
Flame Speed
button. This will display the first of the six available
Volume
Mood Lighting
Brightness
To access each of the functions simply continue to press the
function is displayed.
Sleep Timer
button until the required
The icon will stay on screen for 3 seconds. If no other buttons are pressed during this time, the icon will
disappear from the screen and continue to run in with its current setting.
The
buttons should be used to change the relevant function setting.
Descriptions of the six function modes are shown separately in the sections below.
3.EF.40.Rev. 1.0
12
5.2.4.1 How to change the Flame Image.
button as described above so that the flame image icon
Use the
is displayed on screen.
Press the
buttons to change the flame image. There are four
flame images to choose from and you will see the image change as
you scroll through the selections. Once the desired image is selected, wait
for 3 seconds for the on screen icon to disappear.
5.2.4.2 How to change the Flame Speed.
Use the
button as described above so that the flame speed
icon is displayed on screen.
Press the
buttons to change the flame speed. There are five
flame speeds to choose from and you will see the speed change as
you scroll through the selections. Once the desired speed is
selected, wait for 3 seconds for the on screen icon to disappear.
5.2.4.3 How to change the Volume.
Use the
button as described above so that the volume icon is
displayed on screen.
Press the
buttons to change the volume. There are 6 volume
settings to choose from (including mute) and you will hear the
volume change as you scroll through the selections. Once the
desired volume is selected, wait for 3 seconds for the on screen
icon to disappear.
5.2.4.4 How to change the Mood Lighting.
button as described above so that the mood lighting
Use the
icon is displayed on screen.
Press the
buttons to change the mood lighting. There are 4
mood lighting settings to choose from (including off) and you will
see the mood lighting change from blue to amber to white as you
scroll through the selections. Once the desired mood lighting is
selected, wait for 3 seconds for the on screen icon to disappear.
3.EF.40.Rev. 1.0
13
5.2.4.5 How to change the Brightness.
button as described above so that the brightness icon
Use the
is displayed on screen.
Press the
buttons to change the screen brightness. There are
3 brightness settings to choose from and you will see brightness
change as you scroll through the selections. Once the desired
brightness is selected, wait for 3 seconds for the on screen icon to
disappear.
Please note that in daylight conditions this brightness change may appear
quite subtle
5.2.4.6 How to change the Sleep Timer.
Use the
button as described above so that the sleep timer
icon is displayed on screen.
Press the
buttons to change the sleep timer.
There are 9 sleep timer settings to choose from (including off).
OFF
30 mins
1 hour
1 hour 30
mins
2 hours
2 hours 30
mins
3 hours
3 hours 30
mins
4 hours
Important notes regarding the use of the sleep timer:
Once the sleep timer has been changed from
to any of the 8 available sleep timer setting,
the appliance will now continue to run for the selected time. Once this time has elapsed the
appliance will automatically turn to STANDBY.
If the sleep timer has been selected and it is no longer required, it can be cancelled by entering
the function mode and select the sleep timer – change the setting to
.
Whilst the appliance is running in sleep timer mode it is still possible to change any functionality
without affecting the timer. (for example heat setting or mood lighting).
If the sleep timer setting is changed whilst the sleep timer is in operation, the new setting will now
be used for the sleep timer process.
The sleep timer is always reset to
3.EF.40.Rev. 1.0
after entering standby mode
14
.
5.3 To Reset the Heater:
Your heater includes a protection system that shuts off the heater if it overheats for any reason:
1) Turn unit to off.
2) Unplug unit wait 10 minutes.
3) Plug in and turn on.
SECTION 6
MAINTENANCE
WARNING: ALWAYS UNPLUG THE CORD BEFORE MOVING OR SERVICING.
DO NOT IMMERSE HEATER IN WATER!
z
z
z
Always turn OFF the heater and disconnect the cord from the electrical outlet before
cleaning your heater.
Light accumulated dust may be removed from the heater with a soft cloth or vacuum cleaner.
Wipe the exterior surfaces of the heater occasionally with a slightly damp cloth (not dripping
wet) using a solution of mild detergent and water. Dry the case thoroughly before operating
the heater.
Caution: Do not allow water to run into the interior of the heater as this could create a fire or
electric shock hazard.
z The fan motor is factory lubricated for life and will not require further lubrication.
z Store heater in a clean dry place when not in use.
Warning: Any other servicing needed must be performed by an authorized service
representative. Do not attempt to service the unit yourself.
SECTION 7
SERVICING
AMERICAN ELECTRIC FIREPLACES LLC
1005 N.COMMONS DRIVE AURORA ILLINOIS 60504 U.S.A
Tel: (+1) 630 723 0071
Email: [email protected]
Model No.: GL2029US
Article No. :
3.EF.40.Rev. 1.0
1-GL2029USC (Curved) 1-GL2029USP (Panoramic)
15