1
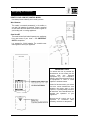
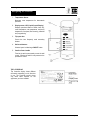
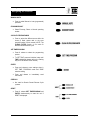
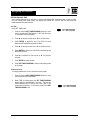
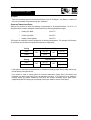
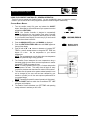
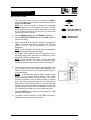
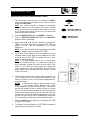
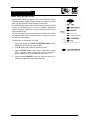
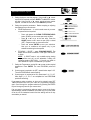
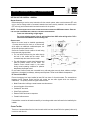
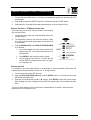
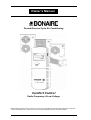
Owner’s Manual Ducted Reverse Cycle Air Conditioning Comfort Control Radio Frequency & Low Voltage Please keep this important manual in a safe place. It is the owner’s responsibility to ensure that regular maintenance is carried out on this Air Conditioning product. Failure to do so will void all guarantees beyond statutory and legal requirements. Multi-Appliance Comfort Control Contents INTRODUCTION.............................................................................................................................. 4 YOUR MULTI-APPLIANCE COMFORT CONTROLLER .............................................................................................. 4 NAVIGATING THE CONTROLS ..................................................................................................... 5 IDENTIFY YOUR COMFORT CONTROL MODEL ....................................................................................................... 5 The Comfort Controller.................................................................................................................................................. 5 THE LCD DISPLAY....................................................................................................................................................... 6 USING THE 9 BUTTONS.............................................................................................................................................. 7 SETTING DAY AND TIME ............................................................................................................................................ 9 DUCTED REVERSE CYCLE......................................................................................................... 11 GENERAL INFORMATION. ........................................................................................................................................ 12 Important Notices! .................................................................................................................................. 12 Warranty ................................................................................................................................................ 12 Data Location ......................................................................................................................................... 12 Assembly ............................................................................................................................................... 13 Operating Temperature Range .............................................................................................................. 13 SAFETY ...................................................................................................................................................................... 14 Safety & Owner Responsibility ............................................................................................................... 14 Precautions ............................................................................................................................................ 14 Power interruption .................................................................................................................................. 15 QUICK START ............................................................................................................................................................ 16 USING YOUR COMFORT CONTROLLER – GENERAL OPERATION...................................................................... 17 Cooling Mode - Manual .......................................................................................................................... 17 Heating Mode - Manual.......................................................................................................................... 18 Heating & Cooling Auto-Changeover Mode - Manual ............................................................................ 19 Economy Mode ...................................................................................................................................... 20 Boost Mode ............................................................................................................................................ 20 ZONES - Selecting ABCD options ......................................................................................................... 21 Auto – Program Mode ............................................................................................................................ 22 Programming Your Comfort Control....................................................................................................... 22 Program Planning Sheets ...................................................................................................................... 24 ADVANCED FEATURES ............................................................................................................................................ 25 Automatic Defrost Function .................................................................................................................... 25 Soft Heat Function ................................................................................................................................. 25 Economy Fan Speed Selection – Indoor Fan......................................................................................... 25 Economy Fan Speed Selection – Outdoor Fan ...................................................................................... 26 Variable Outdoor Fan Speed Control ..................................................................................................... 26 Anti-Freeze – Indoor Unit ....................................................................................................................... 26 System Zoning Control........................................................................................................................... 26 Boost Heating......................................................................................................................................... 26 AIR CONDITIONING MAINTENANCE........................................................................................................................ 27 SCHEDULED MAINTENANCE ................................................................................................................................... 28 PROBLEM SOLVING.................................................................................................................................................. 28 RESET Procedure.................................................................................................................................. 28 CONTROL SETUP ........................................................................................................................ 31 SETTING UP THE CONTROL - GENERAL................................................................................................................ 31 Installation .............................................................................................................................................. 31 Page 2 Multi-Appliance Comfort Control Contents Coding The Unit ..................................................................................................................................... 31 Checking The Signal – RF Remote Control Only ................................................................................... 32 Changing the Code ................................................................................................................................ 32 SETTING UP THE CONTROLS – BONAIRE DUCTED REVERSE CYCLE SYSTEM............................................... 33 Setting The Zone Availability.................................................................................................................. 33 Setting The System Fan Speed ............................................................................................................. 33 Setting The Defrost Cycle Type ............................................................................................................. 33 Setting BOOST Heating function............................................................................................................ 33 Setting The Outdoor Unit Economy Fan Function.................................................................................. 33 COMMISSIONING CHECK LIST ................................................................................................................................ 34 WARRANTY .................................................................................................................................. 36 PRODUCT WARRANTY STATEMENT. ..................................................................................................................... 36 WARRANTY ON REPLACEMENTS PARTS .............................................................................................................. 37 PERIODS OF WARRANTY – YEARS......................................................................................................................... 37 SERVICE........................................................................................................................................ 38 PROOF OF PURCHASE............................................................................................................................................. 38 DEALER / PRODUCT INFORMATION ....................................................................................................................... 38 SERVICE CENTRES .................................................................................................................................................. 39 Page 3 Multi-Appliance Comfort Control Introduction INTRODUCTION YOUR MULTI-APPLIANCE COMFORT CONTROLLER You have chosen one of the world's most advanced comfort control systems incorporating the latest technology. Your Comfort Control has been designed to operate various Climate Technologies products: Heating & Cooling - Ducted Reverse Cycle Air Conditioners Heating Only - Ducted Gas Central Heaters. Fresh Air Conditioners - Ducted Evaporative Air Conditioners. Dual Cycle Add-on Cooling - Refrigerated Air Conditioning (cooling only) designed to add-on to Ducted Gas Central Heaters. Your Comfort Controller is designed to automatically detect the appliances during the commissioning of the unit by the installer. Controller options not required for your appliances will usually not be visible on your Comfort Control display. Whether hand held or wall mounted take advantage of the versatility your Comfort Controller offers. Use your Comfort Controller to reduce your energy bills by selectively conditioning either part or all of your home at an economical rate or by setting programs to suit your needs. Your Comfort Control is designed in Australia to suit Australian conditions and will ensure that your home is comfortable all year round. This manual has been specifically written to provide you with detailed explanation of the setting, operation and function of your Bonaire Ducted Reverse Cycle Air Conditioning system. Page 4 Multi-Appliance Comfort Control Navigating the Controls NAVIGATING THE CONTROLS IDENTIFY YOUR COMFORT CONTROL MODEL Use these pictures to identify which model you have. WALL MOUNTED This model is mounted permanently in the cradle on your wall. No batteries are required. Power is supplied via the same cable that takes the controller's signals to your heating and / or cooling appliances. HAND HELD RF This model is hand held and will operate your appliances from most areas of your home – See IMPORTANT NOTE for exceptions. It is powered by 3 AAA batteries. The controller uses radio signals to control your appliance. IMPORTANT NOTE To reduce the risk of possible RF interference, do not locate your RF control near any electrical equipment e.g. TV’s computers, fridges, telecommunications and HI FI equipment or close to metal objects or window frames. Other RF devices within your home can also cause interference such wireless door bells, gate or door openers, or perhaps baby monitors & intercoms. Such interference can impede the operation of your appliance. Ensure the RF control unit is not exposed to excessive heat, humidity, moisture or dampness. The Comfort Controller Features of the Controller Page 5 Multi-Appliance Comfort Control Navigating the Controls 1. Temperature Sensor Measures room temperature for thermostatic operation. 2. Display screen LCD (Liquid Crystal Display) Displays operational status of mode, time, day, room temperature, set temperature, temporary temperature, fan speed, filter cleaning, batteries and programming. 3. Flip open door Covers the less frequently used secondary buttons. 4. Soft touch buttons 9 button layout includes large ON/OFF button 5. Comfort Control cradle Fixed to the wall to permanently mount the wall control. Fixed to the wall for easy access to the portable RF control. THE LCD DISPLAY The Controller display shows different information depending on the functions in use. The Controller usually shows only those items required for the appliances you have installed. Page 6 Multi-Appliance Comfort Control Navigating the Controls USING THE 9 BUTTONS The following explains the function of each of the buttons: ON/OFF • Turns your Bonaire Ducted Reverse Cycle system ON and OFF. The Comfort Control remembers your SET TEMP and operating setting and uses them next time you turn it ON. • During programming the ON/OFF button selects ON or OFF for the program period. • Use to turn ZONES ON and OFF (if fitted, please refer to the zone operation section of this manual) ▼ ▲ BUTTONS • Press & release ▼ ▲ buttons to increase or decrease one setting at a time. Settings include day, time, temperature, fan speed and timer. • Or, press & hold ▼ ▲ (DOWN/UP) button to continuously increase or decrease the selected settings. • The ▼ ▲ buttons are also used to select the different zones or programs available. HEAT/COOL/FRESH AIR • Press to select from the heating and or cooling choices (in most cases you will only be able to see the titles for the appliances that you have installed). • HEAT Heating Only Mode • COOL Cooling Only Mode • HEAT COOL When the air conditioner is operated in this mode, it will automatically switch between the Heating and Cooling modes, depending on the room temperature and set temperature • COOL FRESH AIR Not used for Bonaire Ducted Reverse Cycle systems. • FRESH AIR Cycle systems. Not used for Bonaire Ducted Reverse Page 7 Multi-Appliance Comfort Control Navigating the Controls MANUAL/AUTO • Press to select Manual or Auto (programmed) operation. ECONOMY/BOOST • Select Economy, Boost or Normal operating modes. CLEAN FILTER/ZONE ABCD • Press to select the different zones within the house (if fitted, please refer to the zone operation section of this manual). NOTE: The CLEAN FILTER function is not used for Bonaire Ducted Reverse Cycle. SET TIME/PROGRAM • Press & release to select the programming options. • To SET TIME, press and hold the button until TIME is displayed (please refer to the ‘Setting Day and Time section of this manual) ENTER • Press and release to save settings when in SET TIME, PROGRAM mode and ZONE selection setting. • Press and release to immediately send instructions. PRECOOL • Not used for Bonaire Ducted Reverse Cycle systems. RESET • Press & release SET TIME/PROGRAM and ENTER simultaneously to reset the unit if RESET is displayed. Page 8 Multi-Appliance Comfort Control Navigating the Controls SETTING DAY AND TIME After installing batteries for the first time or replacing old batteries (RF hand held model), or after a power cut (Low voltage hard wired model), the display will indicate OFF and the day and time when the batteries/power were last removed. SET TIME Using SET TIME mode: 1. Press & hold the SET TIME/PROGRAM button for more than 2 seconds until TIME flashes. A DAY will also flash on the bottom row of the display. 2. Press ▲ to advance to next day or ▼ for previous days. 3. Press ENTER to select the day. The DAYS will stop flashing and the HOURS segments will flash. 4. Press ▲ to advance to next hour or ▼ for previous hours. 5. Press ENTER to select hour. HOUR will stop flashing and MINUTES will flash. 6. Press ▲ to advance to next minute or ▼ for previous minutes. 7. Press ENTER to select minutes. 8. Press SET TIME/PROGRAM to exit the time setting mode at any stage. 12/24 HOUR CLOCK To change between the 12 hour and 24 hour clock modes 1. Press & hold the SET TIME/PROGRAM button for more than 2 seconds until TIME flashes. 2. When TIME is flashing press the SET TIME/PROGRAM button again for approximately 3 seconds. The time will switch between the 12 and 24 hour clock. (AM or PM shows next to the clock in 12 hour clock mode.) Press SET TIME/PROGRAM to exit. Page 9 Page 10 Multi-Appliance Comfort Control Ducted Reverse Cycle DUCTED REVERSE CYCLE Owner’s Operation and Maintenance Manual Please keep this important manual in a safe place. It is the owner’s responsibility to ensure that regular maintenance is carried out on this Ducted Reverse Cycle product. Failure to do so will void all guarantees beyond statutory and legal requirements. Page 11 Multi-Appliance Comfort Control Ducted Reverse Cycle Congratulations on purchasing this Bonaire Ducted Reverse Cycle Air Conditioning system, an exciting new product offered by Climate Technologies. Bonaire Ducted Reverse Cycle Air Conditioners are designed and constructed for the harsh Australian climate offering unsurpassed efficiency and durability. Your air conditioning unit is supported by Climate Technologies, Australia’s most advanced manufacturer of a complete range of climate control products. To ensure you fully enjoy the benefits of this Ducted Reverse Cycle Air Conditioning system, please read these instructions carefully and keep them handy for future reference. If operated and maintained in accordance with this manual, this unit will provide you with years of comfort and reliability. Please take the time to read this manual. NOTE: As a responsible corporate citizen the manufacturer, being Climate Technologies, respects the OHS&W laws of this country and abides by them. In doing so, our service providers reserve the right to refuse service unless safety and accessibility to the unit can be guaranteed in accordance with the installation instructions and Australian Standards. The cost of any extra equipment required to provide access to the unit for servicing is the responsibility of the owner. GENERAL INFORMATION. IMPORTANT NOTICES! • If an appropriately qualified and licensed person is not used to install the equipment or if it's not installed according to the guidelines, then Climate Technologies will not accept responsibility for any problems, which occur as a result. • This manual should be considered as a permanent part of the air conditioning equipment and should remain with this equipment. It should be read and understood by any persons that will be operating the system. NOTE: This operation manual must be carefully read before operating the air conditioner. If further information or details and data are required, please contact your Bonaire dealer. • Climate Technologies pursues a policy of continual improvement in design and performance of its products. The right is therefore reserved to vary specification without notice. • Climate Technologies cannot anticipate every possible circumstance that might involve a potential hazard. • This air conditioner is designed for standard air conditioning use only. Do not use this air conditioner for other purposes such as drying clothes, refrigerating foods or for any other similar heating or cooling processes. WARRANTY Warranty service work must only be carried out by Climate Technologies service division or its authorised service providers. See warranty section. DATA LOCATION Your appliance model number, serial number and model description are located on the appliance data plate on the side of both the indoor and outdoor units. These details should also be in the warranty section of this booklet. You will need this information, should your appliance require servicing, spare parts or just if you require additional information about this product. Page 12 Multi-Appliance Comfort Control Ducted Reverse Cycle ASSEMBLY There is no assembly required of this Ducted Reverse Cycle Air Conditioner. Your Dealer or installer will carry out all assembly and commissioning upon installation. OPERATING TEMPERATURE RANGE Although the controller will allow the operating set temperature to be adjusted between 5 to 36°C, it is important that the controller settings be maintained within the following temperature ranges: o Heating Only Mode 16 to 27°C o Cooling Only Mode 18 to 32°C o Heating & Cooling Mode 18 to 27°C The Bonaire air conditioner has been designed for the following temperatures. The operation of the Bonaire air conditioner must be within this operational temperature ranges below. Temperature (°C) Cooling Indoor DB Outdoor Outdoor WB 5 to 43 15 to 23 - Temperature (°C) Heating Indoor 18 to 32 DB 16 to 27 -5 to 25 WB -6 to 18 If the system is used when the temperatures are outside the operating ranges above, safety devices may activate causing the system to stop. If the system is used on heating below the minimum temperature ranges above, the outdoor heat exchanger may freeze and cause the unit to malfunction and stop. If the system is to be installed in locations where the ambient temperature falls below the minimum operating ranges stated above, supplementary BOOST heating may be required (contact your dealer for advice on this option). Page 13 Multi-Appliance Comfort Control Ducted Reverse Cycle SAFETY SAFETY & OWNER RESPONSIBILITY The manufacturer and its service providers reserve the right to refuse service unless safety and accessibility to the unit can be guaranteed in accordance with the installation instructions and Australian Standards. The cost of any extra equipment required to provide access to the unit for servicing is the responsibility of the owner. PRECAUTIONS The precautions described below are WARNING and CAUTION. These are very important precautions concerning safety. Be sure to observe all of them without fail. WARNING – THESE ARE ITEMS WHICH, IF IMPROPERLY PERFORMED OR IGNORED, COULD RESULT IN SEVERE PERSONAL INJURY OR DEATH. • Do not attempt to install this air conditioner yourself. This air conditioning system must be installed by suitably qualified, certified persons in accordance with national and local codes. • This unit contains no user-serviceable parts. personnel for repairs. • These products are equipped with electrical parts. Do not pour water into the indoor or outdoor unit. If water comes in contact with electrical components it will cause a serious electrical shock. • Do not remove any fixed covers on the indoor or outdoor unit. • In the event of a malfunction (burning smell, etc…), switch the air conditioner OFF at the main switch, and contact either your dealer or Climate Technologies Service Department. • Refrigerant leakage can cause difficulty with breathing due to oxygen deficiency. Do not cut, puncture, close off, damage or break tubing in unit/s or the interconnecting refrigeration piping. • Do not use any sprays such as insecticide, paint lacquer, hair spray, flammable or other gases near the air inlets, return air (grilles or openings) or in the air conditioned space. • The air conditioning unit/s must not be installed near LPG or flammable gas or liquids in accordance with national and local codes. • Do not insert fingers or objects into any part or section of the air conditioning unit/s • Do not tamper with or adjust any safety devices, electrical wiring or other components inside the indoor or outdoor units. Always consult authorised and qualified service CAUTION – THESE ARE ITEMS WHICH, IF IMPROPERLY PERFORMED OR IGNORED, COULD RESULT IN MINOR PERSONAL INJURY OR PRODUCT OR PROPERTY DAMAGE. • If the circuit breaker trips repeatedly (often activated), stop the system and contact either your dealer or Climate Technologies Service Department. • A qualified service agent must perform services and inspections. • Do not drink or let animals drink the air conditioning unit drain water (condensate). Drainage should be in accordance with national and local codes. • This electrical appliance was not intended for use by young children or infirm persons without supervision. Take care to install units where children or others cannot climb on them and fall. Page 14 Multi-Appliance Comfort Control Ducted Reverse Cycle • Do not place articles on or against this appliance. • Do not place articles in front of or over the return air grille. • Do not operate the air conditioner without the return air filter/s in place. • Always turn the air conditioner off from the controller and the main switch before cleaning any part of the unit including cleaning or changing the return air filter • Turn OFF the main switch when the air conditioner is not in use for extended periods of time i.e. if you are going away on holidays to prevent accidental use of the air conditioner. • The main switch must be turned ON at least 6 hours before the air conditioner is operated after long periods of being turned OFF. • It is recommended that the ventilation be provided during use. • Ensure that the unit is stable, vertical, level (not leaning) & installed so it cannot topple over or be pushed over by children or others. POWER INTERRUPTION Should there be an interruption to the power supply during the operation of the air conditioning system the unit will automatically* resume operation once the power has been restored. *NOTE: This function is only available on systems operating with the RF Controller. Please refer to your problem-solving chart to assist resolving other problems. Page 15 Multi-Appliance Comfort Control Ducted Reverse Cycle QUICK START First - the 15 second delay To give you time to choose your settings the Comfort Control pauses 15 seconds then sends its signal to your Heater/Cooler. So don't worry if something doesn't happen immediately. Watch for the transmit symbol at the top of the screen. This means that the signal has been sent. If you don't want to wait, pressing and releasing the ENTER button sends your settings immediately. (You don't need to do this when using ON/OFF.) Control Functions 1 ON/OFF Turns the unit On or Off 2 Arrows Make adjustments to temperature settings 3 Operating Mode Operation mode Selection for HEAT, COOL or HEAT COOL 4 MANUAL / AUTO Manually selecting the product function and settings or using the program mode. 5 ECONOMY/BOOST Press this button to cycle through Economy, Boost and back to normal operation 6 ZONE ABCD Press this button to turn zone motors (where fitted) on and off. Refer to Page 21 for more details. 7 SET TIME/PROGRAM Press the button for 2 seconds before releasing to set the time. See Page 9 for more details. Press and release the button with a touch to set up timed program. See page 22 for details on setting a program sequence. 8 ENTER Press the enter button to save settings or override the 15 second delay. Control Display 9 Time and day information Displays the current time and day. 10 Set and room temperatures Displays the room temperature and the set temperature for the system to achieve. 11 Battery Low status symbol (RF controls only) 12 Transmission Symbol Indicates the unit and control are communicating. See page 32 for more information. 13 Operating Mode - Manual or Auto Indicates is the unit is in standard thermostat mode (MANUAL) or if the program is controlling the unit to programmed settings. 14 Unit Setting Indicates if the control is in HEAT or COOL mode or if it is using HEAT & COOL 15 Program mode status. Indicates the program period being, 2, 3 or 4. Page 16 Multi-Appliance Comfort Control Ducted Reverse Cycle USING YOUR COMFORT CONTROLLER – GENERAL OPERATION There is 2 ways to operate your Comfort Control. You can use MANUAL where you select the operating modes or you can use the AUTO and program the operation modes to happen automatically. COOLING MODE - MANUAL 1. Turn the comfort control ON, press and release the ON/OFF button. When fitted to a Ducted Reverse Cycle system the control will default to HEATCOOL. NOTE: Your Comfort Controller is designed to automatically detect the appliances you have installed, once coded. Controller options not required for your appliances will usually not be visible on your Comfort Control display. So don't worry if you don't see all the menu items listed in this book. 2. Press the MANUAL/AUTO button until MANUAL is displayed. 3. Press the HEAT/COOL/FRESH AIR button until COOL appears at the top of the display. 4. Press & hold the ▼ or ▲ buttons to decrease or increase SET TEMP or, press & release buttons to change the SET TEMP one degree at a time. Set the temperature to your desired temperature. NOTE: The set temperature must be below the room temperature before the system will begin cooling operation. 5. The Comfort Control measures the room temperature using a thermostat inside its case. When the room temperature is warmer than the SET TEMP the system will start. NOTE: For safety operation there is up to a 3 minute delay before the compressor will start. This safety timer will begin at every compressor shutdown and when the main switch is first turned on. 6. The indoor fan will operate at the system selected speed; this can not be changed by the user and has been selected by your installer to provide you will the most optimum performance for your system design. NOTE: The default fan speed for manual operation is High speed. 7. Press the ON/OFF button to switch the air conditioner OFF. OFF will appear on the display. 8. The Comfort Control remembers your SET TEMP and operating setting and uses it next time you turn it ON. Page 17 Multi-Appliance Comfort Control Ducted Reverse Cycle HEATING MODE - MANUAL 1. Turn the comfort control ON, press and release the ON/OFF button. When fitted to a Ducted Reverse Cycle system the control will default to HEATCOOL. NOTE: Your Comfort Controller is designed to automatically detect the appliances you have installed, once coded. Controller options not required for your appliances will usually not be visible on your Comfort Control display. So don't worry if you don't see all the menu items listed in this book. 2. Press the MANUAL/AUTO button until MANUAL is displayed. 3. Press the HEAT/COOL/FRESH AIR button until HEAT appears at the top of the display. 4. Press & hold the ▼ or ▲ buttons to decrease or increase SET TEMP or, press & release buttons to change the SET TEMP one degree at a time. Set the temperature to your desired temperature. NOTE: The set temperature must be above the room temperature before the system will begin heating operation. 5. The Comfort Control measures the room temperature using a thermostat inside its case. When the room temperature is cooler than the SET TEMP the system will start. NOTE: For safety operation there is up to a 3 minute delay before the compressor will start. This safety time re-starts at every compressor shutdown or when the main switch is first turned on. 6. The indoor fan will operate at the system selected speed; this can not be changed by the user and has been selected by your installer to provide you will the most optimum performance for your system design. NOTES: 1) The default fan speed for manual operation is High speed. 2) Your Bonaire Ducted Reverse Cycle system incorporates Bonaire’s unique SOFT HEAT function. This function prevents the circulation of cold air while the system is in heating mode. The indoor fan will automatically cycle on & off at startup to allow the indoor heat exchange to heat up. Once the indoor heat exchanger has reached the optimum temperature the indoor fan will start and cycle off if the indoor coil temperature drops below 25°C (speak with your dealer if you wish to disable this option). 7. Press the ON/OFF button to switch the air conditioner OFF. OFF will appear on the display. 8. The Comfort Control remembers your SET TEMP and operating setting and uses them next time you turn it ON. Page 18 Multi-Appliance Comfort Control Ducted Reverse Cycle HEATING & COOLING AUTO-CHANGEOVER MODE - MANUAL 1. Turn the comfort control ON, press and release the ON/OFF button. When fitted to a Ducted Reverse Cycle system the control will default to HEATCOOL. NOTE: Your Comfort Controller is designed to automatically detect the appliances you have installed, once coded. Controller options not required for your appliances will usually not be visible on your Comfort Control display. So don't worry if you don't see all the menu items listed in this book. 2. Press the MANUAL/AUTO button until MANUAL is displayed. 3. Press the HEAT/COOL/FRESH AIR button until HEATCOOL appears at the top of the display. 4. Press & hold the ▼ or ▲ buttons to decrease or increase SET TEMP or, press & release buttons to change the SET TEMP one degree at a time. Set the temperature to your desired temperature. NOTE: Your system will select the best operating mode of either heating or cooling to achieve the selected SET TEMP. 5. The Comfort Control measures the room temperature using a thermostat inside its case. When the room temperature is cooler or warmer than the SET TEMP the system will start in either heating or cooling respectively. NOTE: 1) For safety operation there is up to a 3 minute delay before the compressor will start. This safety timer will begin at every compressor shutdown and when the main switch is first turned on. 2) To avoid short cycling between each heating and cooling operation the system will determine the minimum time delay required before auto-changing from heating to cooling modes or vise-versa. 6. The indoor fan will operate at the system selected speed; this can not be changed by the user and has been selected by your installer to provide you will the most optimum performance for your system design. NOTES: 1) The default fan speed for manual operation is High speed. 2) Your Bonaire Ducted Reverse Cycle system incorporates Bonaire’s unique SOFT HEAT function. This function prevents the circulation of cold air while the system is in heating mode. The indoor fan will automatically cycle on & off at startup to allow the indoor heat exchange to heat up. Once the indoor heat exchanger has reached the optimum temperature the indoor fan will start and cycle off if the indoor coil temperature drops below 25°C (speak with your dealer if you wish to disable this option). 7. Press the ON/OFF button to switch the air conditioner OFF. OFF will appear on the display. 8. The Comfort Control remembers your SET TEMP and operating setting and uses it next time you turn it ON. Page 19 Multi-Appliance Comfort Control Ducted Reverse Cycle ECONOMY MODE The ECONOMY mode operates in two ways (ECONOMY mode is available in both heating and cooling operation); a. Your system will economise the indoor fan speed dependant on the differential between the room temp and your SET TEMP. b. Your system will economise the outdoor fan speed to reduce operating noise and fan power in low load conditions. 1. To select ECONOMY mode switch the Controller ON and select HEAT, COOL or HEATCOOL and MANUAL operation. 2. Press ECONOMY/BOOST. The display will first show ECONOMY. Press again and BOOST is shown (heating only). Press again and BOOST is cleared, i.e. normal operation. Repeat as necessary to display ECONOMY. Save your selection by pressing ENTER 3. Adjust your SET TEMP as desired. NOTE: 1) The economy mode is not intended for use during peak load conditions. Continual use of the economy mode during peak load conditions may result in a loss in maximum performance. 2) If you wish to disable the outdoor unit economy operation please discuss this option with your dealer. BOOST MODE The BOOST mode is an installer settable option which is only available in heating operation. This mode will only operate in systems with supplementary heating (field supplied – consult your dealer for this option). When BOOST heating is selected the system will automatically switch on the BOOST heating relay if the room temperature exceeds 2°C below the SET TEMP and the system is calling for heating. At this point the indoor fan will operate on high speed regardless of any previous speed settings and continue until the room temp equals the SET TEMP; at which point the BOOST heating relay will de-energise and the fan will resume normal operation. 1. To select BOOST mode switch the Controller ON and select HEAT or HEATCOOL and MANUAL operation. 2. Press ECONOMY/BOOST. The display will first show ECONOMY. Press again and BOOST is shown (heating only). Press again and BOOST is cleared, i.e. normal operation. Repeat as necessary to display BOOST. Save your selection by pressing ENTER 3. Adjust your SET TEMP as desired. Page 20 Multi-Appliance Comfort Control Ducted Reverse Cycle ZONES - SELECTING ABCD OPTIONS Selecting ZONE ABCD only applies if your home is fitted with optional motorised ductwork dampers (please consult your dealer) that allow opening or closing of each section of ducting or zoned area. For correct operation the controller must have at least one zone open at all times. The default zone is A if no other is selected. Where zone motors are fitted the installer can set your controller to show only the zones available for use. The Controller will not allow you to turn all of the zones off. If you press and release ENTER with all zones set to off the Controller will recall your last correct zone setting. To set the open or closed status of a ZONE: 1. Press and release the CLEAN FILTER/ZONE ABCD button. ZONE A (or the current open zone) will flash. 2. Press ▼ or ▲ to select the zone you wish to control. 3. Press the ON/OFF button to set a zone as open (ON) or closed (OFF). Repeat to open or close more zones. If the letter is already displayed on the LCD screen the zone is open / on. 4. Press and release ENTER to save your selections. Now the air conditioner operates only in your selected zone/s. Page 21 Multi-Appliance Comfort Control Ducted Reverse Cycle AUTO – PROGRAM MODE Auto mode is where the Comfort control automatically operates your unit according to your program settings. The default sequence is as per the chart. To set your program, see next section Programming Your Comfort Control. To operate your unit in AUTO mode, press the MANUAL/AUTO button, the display will show AUTO (if operating in MANUAL). The unit will now turn on and off at specific times and will change operational functions as programmed. PROGRAMMING YOUR COMFORT CONTROL Programming your Comfort Control will provide you with energy and time savings not to mention the comfort of set and forget air conditioning. Your air conditioning system will only operate when you need it, and at your chosen comfort levels. Determine your most comfortable settings, program them and let your Comfort Control do the rest automatically. Programming Sequence If you've never programmed your Comfort Controller before (or it’s been a while) remember it's easiest to program the whole week to the same settings (by selecting the whole week MON TUE WED THU FRI SAT SUN day choice) and then program variations for particular days or the weekend as you become more familiar with programming. If the Controller exits program mode it may be because you've paused longer than about 15 seconds to make your next choice. All the settings you've made up to then will be saved. Just switch back to program mode, scroll through your settings using the ENTER key and carry on from where you left off. The following is the programming sequence once the control is turned on:1. To Start Program: Press the SET TIME/PROGRAM button. PROGRAM 1 and the current day will flash. 2. Selecting the Days / Day Group: Press the ▼ or ▲ arrows to select the day or day group to be modified. Options are: ‘Single Day’, ‘MON TUE WED THU FRI’ or ‘SAT SUN’ or ‘MON TUE WED THU FRI SAT SUN’. Press ENTER to complete the selection 3. Turning the unit On or Off: Press the ON/OFF button to turn the unit ON or OFF. At this point the control display will be ON or OFF and the timer hour number will be flashing. 4. Selecting the Operating Mode: if programmed ON: You can now select whether you would like your air conditioning system to operate in heating only or cooling only or heating & cooling (changeover) modes. Press the HEAT/COOL/FRESH AIR button to select the operating mode you require, if the mode is already selected proceed to the next step. Page 22 Multi-Appliance Comfort Control Ducted Reverse Cycle 5. Setting the time to start the program: Using the ▼ or ▲ arrows set the HOUR required and press ENTER. The MINUTES number will flash. Using the ▼ or ▲ arrows set the minutes number required. The time will now be set. Press ENTER to proceed. 6. Setting the operation parameters: Before accepting or adjusting the temperature you can also set:• • ZONE Requirements – i.e. which zoned areas do you want to operate at this time period. − Press and release the CLEAN FILTER/ZONE ABCD button. ZONE A (or the current open zone) will flash − Press ▼ or ▲ to go to the next zone. Press the ON/OFF button to set a zone as open (ON) or closed (OFF). Repeat to open or close more zones. − Press and release ENTER to save your selections. Now your air conditioner will operate only in your selected zone during that time period. ECONOMY / BOOST - press ECONOMY/BOOST. The display will first show ECONOMY. Press again and BOOST is shown. NOTE: 1) BOOST mode is only available during heating only operation and will not be selectable if setting the operating mode to HEATCOOL. 2) Consult your dealer to see if the BOOST option is installed with your system. 7. Setting the Temperature: use the ▼ or ▲ arrows set the required temperature. Press ENTER. The next PROGRAM period will flash. 8. If next program is required to be OFF; repeat function steps 3 & 5. The next PROGRAM will now be flashing. 9. If next program is required to be ON; repeat steps 3, 4, 5, 6 & 7. After steps 3, 4, 5, 6 & 7 are completed the next PROGRAM period will be flashing. If you want to make corrections to what you've entered, press SET TIME/PROGRAM twice and you'll start the programming sequence again. Scroll through the program selections by pressing the ENTER key and change any items as you come to them. If at any stage in programming mode you want to revert to the factory default settings, remove the batteries (RF model only) or turn the power off to the unit for hardwired controls and the settings will be as they were before you started. Page 23 Multi-Appliance Comfort Control Ducted Reverse Cycle PROGRAM PLANNING SHEETS Record your preferred settings for each season. Photocopy this page for more copies if you need to record more variations. Page 24 Multi-Appliance Comfort Control Ducted Reverse Cycle ADVANCED FEATURES Your new BONAIRE Ducted Reverse Cycle air conditioning system incorporates one of the most advanced and up to date control systems and functions available to keep your home comfortable under many different conditions. Some of the advanced features that help achieve your comfort conditions are: AUTOMATIC DEFROST FUNCTION During heating at low ambient (outside) temperatures it is possible for frost to build up on the outdoor heat exchanger. This build up of frost will restrict the airflow and efficiency across the heat exchanger and subsequently reduce the heating performance of the air conditioning system. To provide the most effective heating, the control uses a multi-stage defrost cycle; which means the system will only defrost when it needs, saving you energy. When the system determines a defrost must be performed it will initiate one of two defrost cycles depending on the settings made by your installer, they are:Hush Defrost – Factory Setting The Hush Defrost cycle is designed to provide you with the quietest defrost operation. During this cycle the outdoor unit will shutdown, then restart in defrost mode. Once the system has determined that all frost has been removed it will shutdown again then restart in heating operation and resume normal heating functions. This defrost cycle will take on average between 6 to 12 minutes (16 minutes max.) Quick Defrost The quick Defrost cycle is designed to provide you with the fastest and most efficient defrost operation. During this cycle the outdoor unit will immediately changeover to the defrost cycle when required. Once the system has determined that all frost has been removed it will immediately return to normal heating operation. This defrost cycle will take on average between 4 to 8 minutes (10 minutes max.). Quick defrost is the most efficient defrost cycle and should be selected in colder climates where repeated defrosting is more probable. NOTES: 1) During defrost the indoor fan and outdoor fans are switched OFF (to disable this function please refer to your dealer). 2) During defrost you may see mist or steam emitted from the outdoor unit, this is not abnormal. 3) If BOOST heating, if installed and activated, will operate during the defrost cycle to assist in maintaining heating operation. SOFT HEAT FUNCTION The Soft Heat function is designed to reduce the possibility of cold drafts often experienced when an air conditioning system starts heating operation. Soft heat will hold off the indoor fan until the indoor heat exchanger is warm enough to supply warm air directly to the outlets. The control system will continually monitor the indoor coil temperature and if it drops below 25°C will shut down the fan and allow for the coil to re-heat before re-starting the indoor fan on low speed. It is normal for the fan to start and stop during low temperature start-ups. NOTE: The Soft Heat function is set as a factory default (to disable this function please refer to your dealer). ECONOMY FAN SPEED SELECTION – INDOOR FAN When operating in the economy mode the indoor fan speed is determined by the indoor comfort controller. By monitoring the room temperature and the SET TEMP chosen by the operator the system will calculate the best operating fan speed. As a general rule the indoor fan speed will gradually reduce as the room temperature approaches the SET TEMP level. NOTE: The system will maintain low speed during system cycling if the ‘fan always on’ functions have been set by the installer (to operate this function please refer to your dealer) Page 25 Multi-Appliance Comfort Control Ducted Reverse Cycle ECONOMY FAN SPEED SELECTION – OUTDOOR FAN When operating in the economy mode the outdoor fan speed is reduced back to approximately 70% of the full operating speed. This function is designed to provide reduced power usage from the outdoor fan/s and provide reduced noise operation during low load conditions. If the system monitors safety functions being activated that requires maximum fan speed the control will raise the outdoor fan speed to 100% until the safety issue has passed then it will resume economy operation. NOTE: Outdoor fan economy operation is available as a factory default setting it can be disabled from system the system set-up (please refer to your dealer to disable this function). VARIABLE OUTDOOR FAN SPEED CONTROL The outdoor fan motor/s is controlled via a state of the art speed control system. During operation the indoor coil, outdoor coil, air and ambient temperatures are monitored to determine the best fan speed operation. From these monitored temperatures the controller will change the outdoor fan speed to the lowest setting while continuing to maintain optimum performance. The advantage of this is reduced power consumption and lower outdoor noise levels. If required the control system will shut down the outdoor fan/s from time to time, even while the outdoor unit (compressor) is operating this is part of the optimum performance control and is not abnormal. ANTI-FREEZE – INDOOR UNIT During cooling operation if the control system senses if the indoor coil is below 0°C and the system has been operating for a specific time period the compressor will stop and not resume until the indoor coil temperature has risen above 7°C. During this period the indoor fan will operate at low speed and the controller will display RESET to acknowledge the freeze protection has been activated. This RESET will need to be cleared after the system has resumed normal operation. SYSTEM ZONING CONTROL Zoning operation is a common function required by most ducted reverse cycle system as it provides a means of flexible whole of home conditioning while reducing unit size and running costs. Your BONAIRE Ducted Reverse Cycle system incorporates zoning control, up to four individual zones, built into the indoor control unit. Not only does this provide flexible system operation but it allows simple and convenient zone control directly from your Ultimate RF Handset or wall mounted Premium control. NOTE: Zone motors and zoning fitment is a field supplied option (please refer to your dealer regarding the setup and availability of zoning for your system). BOOST HEATING In climates where the outdoor minimum temperatures falls outside the designed operating range of the reverse cycle system you may require BOOST or supplementary heating (field supplied). If installed, your unit can control the BOOST heating operation to assist in maintaining maximum heating performance. When the system monitors the indoor temperature is 2 or more degrees below the SET TEMP, and heating operation is called for, it will initiate the BOOST heating relay and start the indoor fan on high speed, if not already on high. The unit will maintain the BOOST heating until the room temperature is equal to the SET TEMP at which point BOOST will be switched off and the system will return to normal heating operation. If the system initiates a defrost cycle, BOOST heating will be activated the indoor fan will remain on and with the BOOST heaters while defrosting is being carried out. NOTES: 1) If the system is turned OFF from the controller while BOOST heating is operating the indoor fan will remain on for an additional 2 minutes to dissipate the residual heat in the heaters, to avoid any safety trips. 2) BOOST heating is an installer settable function and is disabled as a factory default. Page 26 Multi-Appliance Comfort Control Ducted Reverse Cycle AIR CONDITIONING MAINTENANCE IMPORTANT! Warning: Before commencing any maintenance work on your unit, isolate the power by turning the unit OFF at the main switch. Warning: There are no user serviceable parts inside the air conditioner. DO NOT remove any access panels or fixed covers. Note: It is essential that your BONAIRE Ducted Reverse Cycle system be maintained in accordance with this manual. Failure to do so will affect the life of the product and reduce the level of efficiency. ELECTRICAL No general maintenance is required to the electrical system. ONLY a Qualified Electrician should only carry out electrical connections and maintenance. CLEANING YOUR RETURN AIR FILTER Regular and thorough cleaning of the return air filter is required to avoid lack of airflow, blocking of coil, service faults, damage to equipment, poor performance and excess power consumption. Your filter should be cleaned at the beginning of summer and winter, if the system is used regularly or in a location where dirt may easily accumulate, clean the filter/s more frequently. Once every 2 to 4 weeks is recommended. NOTE: There are many types of air filters and grilles available, some are long life and require less cleaning, please consult your dealer on what type of filter and grille is installed, how and when to clean them. OUTDOOR UNIT Regularly inspect the outdoor unit to ensure there are no obstructions blocking the heat exchanger (e.g. dirt, vegetation, paper, rubbish, plastic, etc…) that may restrict the airflow. Check that there are no plants or foreign objects blocking the fan outlet from the unit. Inspect and listen for excessive and unusual fan motor noises. Check the paintwork for scratches and signs of corrosion, apply touch up or anti-corrosion paint as necessary. INDOOR UNIT Only authorised persons should conduct maintenance on the indoor unit. The main and safety drains should be checked and cleaned routinely (bi-annually recommended). For systems with heavy usage this should be checked more frequently. Fans and coils should also be checked for build up of dirt and cleaned as necessary. Page 27 Multi-Appliance Comfort Control Ducted Reverse Cycle SCHEDULED MAINTENANCE CONTROLS – RF HANDSET ONLY Replace the batteries in the Radio Frequency Comfort Controller (where fitted) at the start of each new season cycle (i.e. every cooling season) with new AAA alkaline batteries. SYSTEM Your BONAIRE Ducted Reverse Cycle system should be serviced annually by qualified service personnel to ensure trouble free operation. A comprehensive maintenance and check of the system should be carried out. Including but not limited to the following: • Refrigerant charge check • Refrigerant leak check • Compressor and fan/s operation check • Electrical wiring, connections components check including earth test • Check and test controls • Check heat exchangers for dirt buildup and clean as required • Check piping and insulation • Check unit fixings, brackets and bolts • Check fitment and fixings of all suspension, supports and access panels (especially electrical panels) PROBLEM SOLVING RESET FUNCTION In the unlikely event that a fault develops with the air conditioner the controller system will diagnose the fault (where possible) and display the words RESET on the controller screen. Not all RESET displays will adversely effect the operation of your air conditioning system. If the controller displays RESET and the system is operating correctly it may have been an indicator that there was abnormal operation and now all is okay. If this is the case just carry out the reset procedure stated below. If the controller displays RESET and the system is neither heating or cooling as required; the system has performed a lock out procedure and must be reset before it will resume normal operation. If this is the case perform the reset procedure stated below. IMPORTANT NOTE: If the system displays RESET on the controller screen repeatedly even after being reset, contact your authorised Climate Technologies service department for instructions and possible service needs. RESET PROCEDURE 1. Press & release SET TIME/PROGRAM and ENTER simultaneously to reset the unit if RESET is displayed. Page 28 Multi-Appliance Comfort Control Ducted Reverse Cycle NOT ABNORMAL OPERATION OR MALFUNCTION OF THE AIR CONDITIONER The following items are not classed as abnormal operation or malfunction of the air conditioner and do not require you contacting your authorised Climate Technologies service department or a service visit: The System Does Not Start Immediately After the ON / OFF Button is Pressed If the controller display is showing ON the system is in the normal operating condition. The system may not start or restart immediately because one of its safety devices or timers has activated to prevent the system from being overloaded. The system can start after at least 3 minutes has passed, in some cases the safety delay may extend to 10 minutes depending on the previous operating function. The System Does Not Start Immediately After Adjusting the SET TEMP If the controller display is showing ON the system is in the normal operating condition. The system may not start or restart immediately because one of its safety devices or timers has activated to prevent the system from being overloaded. The system can start after at least 3 minutes has passed, in some cases the safety delay may extend to 10 minutes depending on the previous operating function. Starting and Stopping of the Indoor Fan Automatically During Heating Operation The indoor fan may start and stop depending on the temperature of the indoor coil to prevent cold drafts. Starting and Stopping of the Outdoor Unit Compressor and Fan During normal operation the outdoor unit fan may start and stop depending on the system requirements, this may happen while the compressor is operating. The outdoor noise levels may change during the ON / OFF operation of the outdoor fan. The compressor will start and stop as required for the heating and cooling needs of the system. Water Flow from the Outdoor Unit This will most likely occur during heating operation depending on the outdoor humidity and temperature levels. Some water may also drip from the service valves and pipe work during cooling and heating operation. Refrigerant Flow Sound During starting and stopping a “shuh” sound may be heard, this is a result of the refrigerant flow. Smells from the Indoor Unit The unit will draw smells into the return air from furniture, rooms, cooking, etc... Ensure good ventilation and clean the return air filter regularly to minimise smells that may result after long periods of use. Steam or Mist from the Outdoor Heat Exchanger During defrost operation it is likely that steam or mist may be produced off the outdoor heat exchanger while the frost is being melted. Page 29 Multi-Appliance Comfort Control Ducted Reverse Cycle YOUR AIR CONDITIONER WILL NOT OPERATE! 1. 2. 3. 4. 5. 6. Question Y/N Solution Has the unit been run since installation? Yes Refer to question 4 No Check that the main switch is turned ON, Check and replace the batteries in the controller (RF Handset Only). Yes Refer to question 3 No Refer to question 4 Yes Refer to question 4 No Check that the unit is turned ON at the main switch. Contact your dealer to commission the unit. Yes Press the reset buttons or turn the unit off then on to reset unit. If the unit still does not start call for service. (refer to solution 6 for reset instructions) NOTE: Remember your system is fitted with a start-up and changeover delay timer to prevent compressor damage. No Follow the instructions in ‘USING YOUR COMFORT CONTROLLER – GENERAL OPERATION’ located at the beginning of this manual and set the controller correctly. Yes The air conditioner may be programmed to be OFF. To operate the air conditioner manually press the Manual / Auto button until the MANUAL is displayed. Adjust the room SET TEMP as desired. No Refer to question 4 Yes Reset the unit. This can be done by: Is the unit installed in a new home? Has the installer run the unit? Is the controller set to operate in the correct mode and is the SET TEMP higher or lower than the room temperature? Is the controller in program mode? Is RESET showing on the controller display? 1. Following the RESET procedure on ‘Page 28’, or, 2. Turn the appliance Off, then ON at the unit power isolator No Unit should operate normally. If not contact your authorised Climate Technologies service provider. THIS TROUBLE SHOOTING GUIDE IS A REFERENCE ONLY. FOR SERVICE OR WARRANTY REQUIREMENTS PLEASE REFER TO THE WARRANTY SECTION OF THIS BOOK Page 30 Multi-Appliance Comfort Control Controls- Installation / Setup / Commissioning CONTROL SETUP SETTING UP THE CONTROL - GENERAL BEFORE STARTING Before attempting to use the setup instructions for the controls system, make sure the antenna (RF units only) or the low voltage cable is connected, batteries have been correctly installed in the remote control (RF units only) and the main switch has been turned on for the product. NOTE: DO NOT RUN THE LOW VOLTAGE LOOM IN LONG PARALLEL RUNS WITH 240V MAINS CABLES. KEEP THE LOW VOLTAGE LOOM 200MM AWAY FROM ANY LONG RUNS OF MAINS WIRING. Cross over mains wiring at right angles. Do not use existing access holes in wall cavities where 240V mains wiring exists. Drill a new access hole 200mm from the existing hole. INSTALLATION Where the control must be installed approximately 1.5 metres above the floor level on an internal wall which adjoins an additional conditioned space, this will provide the best comfort control. Secure the Comfort Control cradle to the wall using the screws and plugs provided. • For hard wired versions bring the cable through the hole in the cradle into the control. Once connected snap the control into the cradle. • For radio frequency controls install batteries and slide the Comfort Control into the cradle. The Comfort Control should remain in the cradle during normal operating conditions for optimum temperature thermostat control. Do not locate Comfort Control near concealed hot or cold water pipes, warm air ducts, radiators, sunlight, televisions or draughts from hallways, stairways and fireplaces. These can all affect the temperature. RF Control Units ONLY Ensure the antenna has been installed at least 500 mm clear of all metal masses. The transmissions between the RF Remote Control and the unit control box are radio signals which are subject to interference. The primary causes for signal interference are: • Metal Construction buildings or metal masses near the antenna. • Incorrect location of the antenna • Cordless RF door bells • Other Faulty appliances • Remote Control too close to computers • Powerful radio scanners If transmission cannot be achieved successfully a Low voltage cable control will need to be installed by the installer. CODING THE UNIT There is a 4 minute window from the time the main switch has been turned ON to the system (indoor unit) in which to code the unit. Page 31 Multi-Appliance Comfort Control Controls- Installation / Setup / Commissioning 1. Turn the main switch ON to the unit. If the power has already been applied, turn the main switch OFF, then ON again. 2. Press the ▲ arrow and the ON/OFF button for 5 seconds until the word “CODE” flashes. 3. Code flashes for 15 seconds. When code stops flashing the unit is now ready to turn on. CHECKING THE SIGNAL – RF REMOTE CONTROL ONLY There are 3 ways you can check if the wall control is communicating with unit control board. 1. The red light on the indoor unit control board will flicker when receiving a signal. 2. The transmission symbol on the control will show for a flash only. If the symbol hangs for approximately 2 seconds there is no transmission. 3. Press the MANUAL/AUTO and CLEAN FILTER/ZONE ABCD for 15 seconds. • If the 2 dots between the hours and the minutes flash together signal OK. If the 2 dots alternate there is no communication. • Press ENTER in each location to check the signal. • The test function stays active for 5 minutes after the last time ENTER is pressed. Where there is no signal, try re-coding the unit. CHANGING THE CODE It is possible for the Code (digital address) to be duplicated in another installation nearby which will interfere with the successful operation of your unit. To change the code: 1. Turn the system main switch OFF, then ON. 2. Press the HEAT/COOL/FRESH AIR button and the ON/OFF button for 5 seconds until the words SET CODE and 4 digits show. 3. Each digit can be altered using the ▼ or ▲ buttons. Press ENTER for each digit or digit change. When all digits have been changed the word CODE will appear briefly until the update has taken place. There is a 4 minute window in which to code the unit. Code flashes for 15 seconds. When code stops flashing the unit is now ready to turn on. Page 32 Multi-Appliance Comfort Control Controls- Installation / Setup / Commissioning SETTING UP THE CONTROLS – BONAIRE DUCTED REVERSE CYCLE SYSTEM SETTING THE ZONE AVAILABILITY The unit default is for all zones to be available. To filter out the zones not being used: 1. Press the ENTER and CLEAN FILTER/ZONE ABCD buttons for 10 seconds pressing the ENTER button first. 2. Using the ▼ or ▲ buttons select the zone combination required AB, ABC or ABCD. 3. Press ENTER to keep the combination. Now only the zone combination selected will be available for use when operating the zone requirements. SETTING THE SYSTEM FAN SPEED This is not user adjustable and must be set by your dealer during installation SETTING THE DEFROST CYCLE TYPE This is not user adjustable and must be set by your dealer during installation SETTING BOOST HEATING FUNCTION This is not user adjustable and must be set by your dealer during installation SETTING THE OUTDOOR UNIT ECONOMY FAN FUNCTION This is not user adjustable and must be set by your dealer during installation Page 33 Multi-Appliance Comfort Control Controls- Installation / Setup / Commissioning COMMISSIONING CHECK LIST GENERAL All equipment ordered by the customer is installed. The mains and control wiring are complete and the main switch and circuit breaker turned ON. All Controller functions for the appliance operate. All electrical, pipe and drain connections are to manufacturer’s specifications and the relevant local and national codes. Operate the air conditioner for heating and cooling. DUCTED REVERSE CYCLE SYSTEM Outdoor unit is installed away from flammable and corrosive materials and fumes (i.e. pool chlorine/petrol etc). The system has been leak checked and evacuated as per the installation instructions. All installer settable functions have been adjusted and set correctly. Indoor unit platform or suspension mounting is suitable as per the installation instructions. Indoor unit is level. Indoor unit drain/s have been checked and tested for flow and leaks. Outdoor unit foundation / platform are suitable as per the installation instructions. Outdoor unit is level. All clearances around the outdoor unit are to the manufacturer’s specifications. Check for abnormal noise or vibration during operation of both heating and cooling. Check that the noise, condensate drainage or air flow does not disturb the neighbors. DUCTWORK All ductwork is completed to plan, correctly supported and airtight. Air distribution checked, dampers are adjusted and all outlets correctly adjusted and wiped clean. Page 34 Multi-Appliance Comfort Control Controls- Installation / Setup / Commissioning Any roof penetrations are fully sealed and watertight. Roof access panel cover has been refitted. SITE All rubbish has been removed from inside and on the roof. CUSTOMER HAND OVER The operation of the Controller. How and when to remove and clean the return air filter Maintenance requirements Page 35 Multi-Appliance Comfort Control Warranty – Australia ONLY WARRANTY PRODUCT WARRANTY STATEMENT. Subject to the following conditions Climate Technologies provide, from the dated proof of purchase, the following warranty: • Functional components found within the unit to be to be defective in workmanship or material will be replace free of charge subject to the periods of warranty specified. • Structural components within the product that fail to perform the intended function due to faulty manufacture or deterioration will be replaced free of charge subject to the periods of warranty specified. This warranty only covers products and associated controls covering refrigerated reverse cycle air conditioning manufactured and supplied by Climate Technologies. Conditions and Exclusions • Appliance warranty does not cover installation components that may be attached to the product manufactured by Climate Technologies. These may include and is not limited to items such as ducting grills, piping etc. These items remain solely the responsibility of the dealer / installer. • Product fitness for purpose and overall system design / sizing is solely the responsibility of the dealer / installer. This includes but is not limited to heat load calculations, air flow, system balancing, humidity, water quality etc. • Traveling time and mileage are included within 30km of either your authorised Climate Technologies dealer or service provider’s premises. Customers in areas other than the above are responsible for any traveling time and mileage required to carry out warranty repairs. • The product must be installed by a qualified person in the manner prescribed by local & statutory regulations and to the manufacturer’s specifications. • Service within the terms of this warranty will be recognised where we are satisfied that the appliance or part was supplied within the relevant time limits. Documents of purchase and Dealer/Installer information will assist in this process. • A charge will be made for work done or a service call where: - There is nothing wrong with the appliance. - The defective operation of the appliance is due to failure of electricity or refrigerant gas supplied. - Defects are caused by neglect, incorrect application, abuse or by accidental damage of the appliance. - An unauthorised person has attempting to repair the appliance. - A situation arises referenced in the trouble-shooting guide. • Damage caused by elements such as wind, rain, lighting, floods etc along with power spiking and brownouts are not considered defective material or workmanship and as such are not considered warranty. • If there is no required certificate of compliance for plumbing or electrical, Climate Technologies reserves the right to refuse service on non-compliant installations. • No responsibility will be accepted for outside elements such as pests, animals, pets and vermin that may cause damage to the unit. • Harsh environmental situations such as salt air that may cause cabinet damage / rusting can not be considered warranty. • Claims for damage to contents, carpet, walls, ceilings, foundations or any other consequential loss either direct or indirect resulting from, power spikes, incorrect operation, incorrect installation, poor maintenance or faulty product are excluded. • All warranties are NOT transferable. NOTE: In addition to this warranty, the Trade Practices Act and similar laws in each state provide the owner, under certain circumstances, with minimum statutory rights in relation to the product. This warranty must be read subject to that legislation and nothing in this warranty has the effect of excluding, restricting or modifying those rights. Page 36 Multi-Appliance Comfort Control Warranty – Australia ONLY WARRANTY ON REPLACEMENTS PARTS Parts replaced under warranty are warranted for the balance of the original warranty period. PERIODS OF WARRANTY – YEARS DUCTED REVERSE CYCLE AIR CONDITIONING Unit Components RESIDENTIAL Parts Labour COMMERCIAL Parts Labour Compressor 5 5 2 2 **All other components 5 5 2 2 ** Return air filter/s and zone motors are field supplied and therefore are not covered by the above warranty periods. Page 37 Multi-Appliance Comfort Control Service SERVICE PROOF OF PURCHASE It is important that the name of the Dealer or Retailer from whom you purchased your product and the name of the installer are recorded on this page. The installer is responsible for the correct installation, start up and demonstrating the operation of this product. The Dealer or retailer is also responsible for issuing the relevant certificates of compliance for the electrical connections. (These may differ from state to state) Please attach your proof of purchase here. Your receipt is your warranty and will be required to validate any warranty. DEALER / PRODUCT INFORMATION Dealer/Retailer: Dealer Address: Dealer Phone Number: Unit Model Number: Serial No: Date Installed: Installed by: Date Commissioned: Commissioned by: Signature: ………………………………….. Page 38 Multi-Appliance Comfort Control Service SERVICE CENTRES Only qualified service personnel should conduct any service work carried out on your ducted reverse cycle air conditioning system. It is important that periodical service is carried out on your product to ensure your will receive the efficiency benefits the product provides. An authorised Climate Technologies service provider must carry out warranty service. For Metro Service only ring the numbers below. South Australia/ Northern Territory (08) 8307 5230 New South Wales / Australian Capital Territory (03) 8795 2457 Western Australia (08) 9454 1000 Victoria/Tasmania (03) 8795 2456 Queensland (07) 4634 1803 Outside Metro areas please contact your nearest Climate Technologies Service Provider. Page 39 Manufactured by Climate Technologies ABN 13 001 418 042 26 Nylex Avenue Salisbury, SA 5108 Australia www.climatetechnologies.com.au Part No 6602201/A