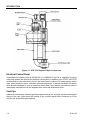
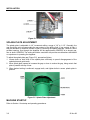
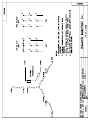
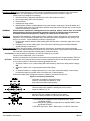
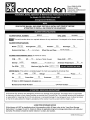
1
ACD-1500 ATMOSPHERIC DEGASSER Issued 15 Nov 09 Maintenance & Operation Manual Mineral Processing, Industrial, & Environmental Applications Derrick Corporation 590 Duke Road Buffalo, New York 14225 Phone: 716.683.9010 Fax: 716.683.4991 www.derrickcorp.com Oil & Gas Applications Derrick Equipment Company 15630 Export Plaza Drive Houston, Texas 77032 Phone: 281.590.3003 Toll Free: 1.866.DERRICK Fax: 281.442.6948 www.derrickequipment.com UNIT NUMBER IS KEY TO DERRICK SERVICE All inquiries to Derrick must include the equipment unit number. The stainless steel unit number tag attached to each piece of Derrick equipment is your key to efficient service and support. Typical Derrick Unit Number This unique number gives vital information to Service personnel who use it to identify the correct parts when filling orders, provide accurate responses to service questions, track documentation, and trace the equipment’s history or configuration. In short, the unit number provides the critical information needed to ensure that Derrick customers receive the best possible service. The unit number consists of a two-character alphabetic prefix that identifies the equipment type and a series of numeric characters that signify the sequence of the machine’s manufacture. For example, unit number MA000001 would be the first screening machine manufactured by Derrick. Alphabetic prefixes currently in use are: MA - Screening Machine AD - Desilter and Desander DG - Degasser AG - Mud Agitator CF - Centrifuge SF - Screen Frame To ensure that it will remain intact over many years of rigorous service, the heavy-gage tag is riveted to a structural member such as the shaker support structure. It is not to be confused with any other identifier on the machine such as a vibrator motor serial number. For convenient availability, the unit number is also recorded in the Operation and Maintenance manual shipped with the equipment. When contacting Derrick for any equipment question or need, always have the unit number in your possession. It’s the best way to get the most efficient service from our dedicated Service and Engineering personnel. ABOUT THIS MANUAL This document is published in both printed and electronic form. In the electronic manual, all sections and paragraphs listed in the CONTENTS are linked to the corresponding text. Navigate the electronic manual as follows: 1. To view any desired information, display the CONTENTS page and move the cursor to the desired paragraph or section title. 2. To display the desired information, click on the listing when the pointing finger appears over the text. 3. When finished viewing the text, press Alt + left arrow key to return to the CONTENTS page. 4. If desired to return to the same information, press Alt + right arrow. To locate a different item, repeat steps 1 and 2. The content of this document is subject to change at any time. Information provided does not cover all details or variations possible with DERRICK equipment, nor does it cover every contingency that may be met in conjunction with installation, operation, maintenance, or troubleshooting of the equipment. Should additional information be required, or should situations arise that are not covered by this manual, bring the matter to the attention of your local DERRICK representative or the Service Department at DERRICK Corporation in Buffalo, New York. Copyright 2009 by DERRICK CORPORATION CONTENTS Section Page 1 - Introduction ................................................................................................................ 1-1 Overview .................................................................................................................... 1-1 Safety ......................................................................................................................... 1-2 Equipment Use........................................................................................................... 1-2 Description and Operation.......................................................................................... 1-2 Major Components ..................................................................................................... 1-2 Product Support ......................................................................................................... 1-5 2 - Safety .......................................................................................................................... 2-1 Introduction ................................................................................................................ 2-1 Warnings .................................................................................................................... 2-1 Material Safety Data Sheets (MSDSs) ....................................................................... 2-3 3 - Installation .................................................................................................................. 3-1 General ...................................................................................................................... 3-1 Safety ......................................................................................................................... 3-1 Installation Sequence ................................................................................................. 3-1 Storage....................................................................................................................... 3-2 Site Preparation and Clearance Requirements.......................................................... 3-2 Moving/Positioning the Equipment ............................................................................. 3-2 Electric Power Connections ....................................................................................... 3-5 Splash Plate Adjustment ............................................................................................ 3-6 Machine Startup ......................................................................................................... 3-6 4 - Operating Instructions .............................................................................................. 4-1 General ...................................................................................................................... 4-1 Operating Safety ........................................................................................................ 4-1 Initial Startup .............................................................................................................. 4-1 Normal Startup and Operation ................................................................................... 4-1 Normal Shutdown....................................................................................................... 4-2 Emergency Shutdown ................................................................................................ 4-2 15 Nov 09 TOC-1 ACD-1500Degasser CONTENTS Section Page 5 - Maintenance............................................................................................................... 5-1 General ...................................................................................................................... 5-1 Bearing Lubrication.................................................................................................... 5-1 Troubleshooting ......................................................................................................... 5-2 Parts Replacement .................................................................................................... 5-2 Spare Parts ................................................................................................................ 5-2 6-7 - Not Used 8 - Reference Drawings ................................................................................................. 8-1 9 - Installation and Maintenance Log........................................................................... 9-1 10 - Supplier Data ............................................................................................................ 10-1 TOC-2 15 Nov 09 SECTION 1 - INTRODUCTION OVERVIEW This manual provides installation, operation, and maintenance instructions for the Derrick Atmospheric Centrifugal Degasser (ACD) 1500 (Figure 1-1). The manual is divided into several sections to assist the user in readily accessing the information. Personnel responsible for transporting, installing, operating, adjusting, or maintaining this equipment should be required to read and understand the information and instructions in this manual. One copy of this manual should be available and accessible at the equipment location. For maximum safety and performance, no additions and/or changes may be made to the equipment without the explicit written permission of Derrick Corporation. Genuine Derrick repair/replacement parts are required. Figure 1-1 Atmospheric Centrifugal Degasser (ACD) 1500 15 Nov 09 1-1 ACD-1500Degasser INTRODUCTION SAFETY Section 2 of this manual contains relevant safety information relating to both operation and maintenance of this equipment. Be sure this information is read and understood by all personnel. DO NOT operate the equipment if defective or faulty mechanical or electrical components are detected. EQUIPMENT USE The degasser and associated components are designed exclusively for releasing entrained gases from slurries. Derrick Corporation does not authorize any other use of this equipment. Intended usage of equipment includes compliance with the operating, maintenance, and safety procedures included in this manual. DESCRIPTION AND OPERATION The ACD-1500 degasser (Figure 1-2) is designed to be immersed in a drilling fluid tank. For proper functioning, the fluid level in the mud tank should be higher than the pump bolting flange. The degasser uses impact/turbulence combined with a large surface area of exposure to liberate gas from the mud. Entrained gases are removed from drilling fluid by exposing a thin film of the mud to the atmosphere. Drilling fluid is pumped by the centrifugal pump at the bottom of the degasser up through the pump riser and delivered to the impact plate, which disperses the liquid horizontally against the interior surface of the spray tank. The mud spreads evenly across the horizontal surface of the spray tank, allowing the bubbles to break free from the mud. Degassed mud flows out the discharge outlet and returns to the tank. Mud is continuously circulated from the tank through the degasser and back to the tank. This recirculation process maximizes gas removal. The removed gas exits the vent at the top of the spray tank. An optional exhaust fan at the top of the spray tank assists in drawing gas away from the vent. The fan’s discharge flange may be connected to a pipe to transport the gas farther from the degasser. The gap between the impact plate and riser opening is adjustable to control the thickness of the dispersed film. The ACD-1500 degasser processes up to 1500 gallons per minute (gpm), depending on the impact plate gap, which is adjustable within a 1” range (1/4” to 1-1/4”) in 1/4” increments. Forcing the mud through the small gap between impact plate and pump riser causes it to strike the walls of the spray tank with considerable force, producing turbulence that assists in liberating gas from the mud. Maximum process throughput is achieved with the largest impact plate gap, while flow is diminished with a smaller gap. Generally, the higher the flow the lower the release of entrained gas. The impact plate gap is adjusted to meet the mud conditions. High gas content may warrant a small gap to maximize removal of entrained gas, while a larger gap may be suitable when gas content is lower and higher flow is desired. MAJOR COMPONENTS The degasser (Figure 1-3) consists of a skid-mounted spray tank, electric motor-driven centrifugal pump, impact plate, electrical control panel, vent, and exhaust fan (optional). These components are described in the following paragraphs. 1-2 15 Nov 09 INTRODUCTION Centrifugal Pump Drilling fluid is drawn into the degasser from the bottom of the mud tank by the centrifugal pump. The pump is driven by a shaft rotated by the electric motor at the top of the degasser. The shaft is supported by two bearings that control the shaft movement in both thrust and radial directions. Clamping collars installed on the shaft ensure that minimal thrust is applied to the vertical shaft. Impact Plate Fluid pumped upward through the riser by the centrifugal pump strikes the circular impact plate, which disperses the fluid horizontally into the spray tank. Its slotted mounting holes permit vertical positioning of the impact plate to vary the gap between the top of the riser and the plate. Serrated tabs ensure positive setting of the gap at six locations. After properly positioning the impact plate, tightening the attaching hardware secures the plate to a fitting at the top of the spray tank. Spray Tank Fluid dispersed at high velocity by the impact plate spreads across the interior surfaces of the spray tank. The tank’s shape encourages release of entrained gas from the mud. Figure 1-2 ACD-1500 Degasser Functional Diagram 15 Nov 09 1-3 ACD-1500Degasser INTRODUCTION Figure 1-3 ACD-1500 Degasser Major Components Electrical Control Panel Three-phase AC electric power at 460/480 60 Hz or 380/400 50 Hz 50A is supplied to the drive motor and exhaust fan motor by the electrical control panel. In addition to the START and STOP switches that turn the machine on and off, the control panel contains a DC power supply, control relay, power contactor, starter, and other electrical components. A thermal overload in the starter shuts down the degasser in case of excessive current draw. Upon sensing an overload, power is immediately interrupted to both the degasser drive motor and exhaust fan motor. Vent Pipe Aided by the exhaust fan, liberated gas flows upward through the vent pipe and exits the flange at the top of the vent. Slots around the outside of the vent pipe permit entry of ambient air to mix with the gas and facilitate gas extraction. 1-4 15 Nov 09 INTRODUCTION PRODUCT SUPPORT Derrick offers 24-hour-per-day, 7-day-per-week product support. Product support includes screen replacement / ordering information and repair / replacement parts and service for the entire product line. Refer to the following table for the parts / service center nearest you. PARTS SALES & SERVICE LOCATIONS Colorado - 970.241.2417 Louisiana Broussard - 877.635.3354 Mississippi Laurie - 877.635.3354 New York - Corporate Headquarters Buffalo - 716.683.9010 Oklahoma Oklahoma City - 405.208.4070 Texas Houston (Oilfield Headquarters) - 866.DERRICK (337.7425) Bridgeport - 940.210.9975 Corpus Christi - 361.664.2410 Texas (Cont’d) Longview - 337.298.9411 Midland - 432.230.3720 Wyoming - 307.265.0445 Germany - 011.49.5162.98580 CONTACT INFORMATION Location Telephone Facsimile (FAX) Derrick Corporation 590 Duke Road Buffalo, New York 14225 USA 716.683.9010 716.683.4991 General Service Manager [email protected] Derrick Equipment Company 15630 Export Plaza Drive Houston, Texas 77032 USA 281.590.3003 281.442.6948 General Manager [email protected] 15 Nov 09 E-Mail / Website 1-5 ACD-1500Degasser SECTION 2 - SAFETY INTRODUCTION This section contains a summary of WARNINGS used in this manual and a list of material safety data sheets (MSDSs) applicable to the equipment. The ACD-1500 Degasser has been designed to perform the stated functions safely. WARNINGS All persons responsible for operation and maintenance of this equipment must read and understand all safety information in this manual prior to operating and/or maintaining the equipment. The safety warnings listed below are included in applicable procedures throughout this manual. Sound WARNING! TO PROTECT AGAINST HEARING LOSS, HEARING PROTECTION SHOULD BE WORN AT ALL TIMES WHEN WORKING ON OR NEAR DERRICK MACHINES. Electrical Hazards WARNING! TO AVOID SERIOUS PERSONAL INJURY BE SURE EQUIPMENT IS LOCKED OUT, TAGGED OUT, AND DE-ENERGIZED PRIOR TO PERFORMING MAINTENANCE AND/OR ADJUSTMENTS. WARNING! MOTOR MUST BE OPERATED AT THE DESIGNATED SUPPLY VOLTAGE. WARNING! HIGH VOLTAGE MAY BE PRESENT. BE SURE FUSED DISCONNECT SUPPLYING ELECTRICAL POWER TO THIS EQUIPMENT IS OPEN. LOCK-OUT AND TAG-OUT POWER SUPPLY TO PREVENT ACCIDENTAL APPLICATION OF POWER WHILE MAINTENANCE AND/OR ADJUSTMENTS ARE IN PROGRESS. WARNING! ELECTRICAL CONNECTIONS MUST BE MADE IN ACCORDANCE WITH THE NATIONAL ELECTRICAL CODE (NEC) AND ALL APPLICABLE LOCAL CODES. FAILURE TO COMPLY MAY RESULT IN AN UNSAFE CONDITION THAT COULD INJURE PERSONNEL OR DAMAGE EQUIPMENT. ENSURE THAT ALL ELECTRICAL AND CONDUIT CONNECTIONS ARE SECURE. 15 Nov 09 2-1 ACD-1500Degasser SAFETY Equipment Handling WARNING! TO ENSURE PROPER BALANCE AND ORIENTATION WHEN UNIT IS RAISED AND PREVENT DAMAGE TO COMPONENTS, ATTACH LIFTING SLINGS ONLY TO LABELLED LIFTING POINT. DO NOT ATTEMPT LIFTING BY ATTACHMENT TO ANY OTHER LOCATION. WARNING! BE SURE THAT HANDLING DEVICES HAVE SUFFICIENT LIFTING CAPACITY TO SAFELY HANDLE THE WEIGHT OF THE EQUIPMENT. Operation WARNING! ALL OPERATING AND MAINTENANCE PERSONNEL MUST READ AND UNDERSTAND ALL SAFETY INFORMATION IN THIS MANUAL BEFORE WORKING WITH THE EQUIPMENT. Maintenance WARNING! HIGH VOLTAGE MAY BE PRESENT. ALWAYS OPEN FUSED DISCONNECT SUPPLYING ELECTRIC POWER TO THE EQUIPMENT, AND LOCK OUT AND TAG OUT POWER SUPPLY BEFORE PERFORMING ANY MAINTENANCE OF EQUIPMENT. 2-2 15 Nov 09 SAFETY MATERIAL SAFETY DATA SHEETS (MSDSs) Material Safety Data Sheets (MSDSs) for exterior finish products are included on the following pages to advise personnel of the properties and any possible hazards associated with these materials. Emergency first-aid procedures, special precautions, emergency telephone number, and other relevant data are contained in the MSDSs. These documents were prepared by the product manufacturers, which have sole responsibility for accuracy of the information. The MSDSs in this section are current as of the publication date of this manual and are supplied only for reference. Checking with the product manufacturer for updates is recommended and is the responsibility of the customer. In addition to the MSDSs, manufacturer’s specifications are listed for the approved bearing greases and anti-seize lubricant for the ACD-1500 Degasser. To ensure that current information is available, the MSDS for each product should be obtained at the time of purchase. Please note that all lubricants listed are equivalent and approved for bearing and other lubrication requirements. MATERIAL DESCRIPTION – WHERE USED MSDS No. / Date Paints Devoe Devthane 359 - Top Coat 359 / 05-06-08 Devoe Epoxy Primer - Undercoat 313K / 08-02-04 Lubricants and Sealants* Grease, NLGI Grade 2, Lithium Base - Shaft Bearings Contact Manufacturer Loctite 76764 Anti-Seize Lubricant - Fasteners Contact Manufacturer * Equivalent product may be substituted for listed items. 15 Nov 09 2-3 ACD-1500Degasser (ANSI Section 4) FIRE-FIGHTING MEASURES (ANSI Section 5) Fire extinguishing media : Dry chemical or foam water fog. Carbon dioxide. Closed containers may explode when exposed to extreme heat or fire. Vapors may ignite explosively at ambient temperatures. Vapors are heavier than air and may travel long distances to a source of ignition and flash back. Vapors can form explosive mixtures in air at elevated temperatures. Closed containers may burst if exposed to extreme heat or fire. Dust explosion hazard. May decompose under fire conditions emitting irritant and/or toxic gases. Fire fighting procedures : Water may be used to cool and protect exposed containers. Firefighters should use full protective clothing, eye protection, and self-contained breathing apparatus. Selfcontained breathing apparatus recommended. (ANSI Section 6) Steps to be taken in case material is released or spilled : Comply with all applicable health and environmental regulations. Eliminate all sources of ignition. Ventilate area. Ventilate area with explosion-proof equipment. Spills may be collected with absorbent materials. Use non-sparking tools. Evacuate all unnecessary personnel. Place collected material in proper container. Complete personal protective equipment must be used during cleanup. Large spills - shut off leak if safe to do so. Dike and contain spill. Pump to storage or salvage vessels. Use absorbent to pick up excess residue. Keep salvageable material and rinse water out of sewers and water courses. Small spills use absorbent to pick up residue and dispose of properly. HANDLING AND STORAGE (ANSI Section 7) Handling and storage : Store below 80f. Store below 100f (38c). Keep away from heat, sparks and open flame. Store in original container. Keep away from direct sunlight, heat and all sources of ignition. Keep container tightly closed in a well-ventilated area. Other precautions : Use only with adequate ventilation. Do not take internally. Keep out of reach of children. Avoid contact with skin and eyes, and breathing of vapors. Wash hands thoroughly after handling, especially before eating or smoking. Keep containers tightly closed and upright when not in use. Empty containers may contain hazardous residues. Ground equipment when transferring to prevent accumulation of static charge. EXPOSURE CONTROLS/PERSONAL PROTECTION (ANSI Section 8) Respiratory protection : Respiratory protection is required for use in isocyanate containing environments. Consider type of application and environmental concentrations when selecting respiratory protection. Observe governmental regulations for respirator use. (29 CFR 1910.134(OSHA))(Canadian z94.4) The use of positive pressure supplied air respirator is mandatory when the airborne isocyanate concentrations are not known. Note: isocyanate based materials have been determined to cause allergic sensitization in humans. Avoid inhalation and dermal (skin) contact with the uncured material. Ventilation : Provide dilution ventilation or local exhaust to prevent build-up of vapors. Use explosionproof equipment. Use non-sparking equipment. Personal protective equipment : Eye wash, safety shower, safety glasses or goggles. Impervious gloves, impervious clothing, face shield, apron, boots. STABILITY AND REACTIVITY (ANSI Section 10) Under normal conditions : Stable see section 5 fire fighting measures Materials to avoid : Oxidizers, acids, reducing agents, bases, aldehydes, halogens, amines, alkalis, water, peroxides, nitric acid, alcohols, combustible materials, caustics, mineral acids. Nitrates. Conditions to avoid : Sunlight, elevated temperatures, moisture, contact with oxidizing agent, storage near acids, sparks, open flame, ignition sources. Hazardous polymerization : Will not occur 359D The information contained herein is based on data available at the time of preparation of this data sheet which ICI Paints believes to be reliable. However, no warranty is expressed or implied regarding the accuracy of this data. ICI Paints shall not be responsible for the use of this information, or of any product, method or apparatus mentioned and you must make your own determination of its suitability and completeness for your own use, for the protection of the environment, and the health and safety of your employees and the users of this material. Complies with OSHA hazard communication standard 29CFR1910.1200. EMERGENCY TELEPHONE NO. (800) 545-2643 Inhalation : Remove to fresh air. Restore and support continued breathing. Get emergency medical attention. Have trained person give oxygen if necessary. Get medical help for any breathing difficulty. Remove to fresh air if inhalation causes eye watering, headaches, dizziness, or other discomfort. Skin contact : Wash thoroughly with soap and water. If any product remains, gently rub petroleum jelly, vegetable or mineral/baby oil onto skin. Repeated applications may be needed. Remove contaminated clothing. Wash contaminated clothing before re-use. Dispose of contaminated leather items, such as shoes and belts. If irritation occurs, consult a physician. Eye contact : Flush immediately with large amounts of water, especially under lids for at least 15 minutes. If irritation or other effects persist, obtain medical treatment. Ingestion : If swallowed, obtain medical treatment immediately. ACCIDENTAL RELEASE MEASURES 15885 Sprague Road Strongsville, Ohio 44136 FIRST-AID MEASURES Hazardous decomposition or combustion products : Carbon monoxide, carbon dioxide, oxides of nitrogen, oxides of sulfur, ammonia, hydrogen chloride, toxic gases, barium compounds. Cyanides. DEVTHANE 359 DERRICK GREEN HAZARDS IDENTIFICATION (ANSI Section 3) Primary route(s) of exposure : Inhalation, skin contact, eye contact, ingestion. Effects of overexposure : Inhalation : Irritation of respiratory tract. Prolonged inhalation may lead to. Inhalation of spray mist may cause irritation of respiratory tract. Mucous membrane irritation, fatigue, drowsiness, dizziness and/or lightheadedness, headache, uncoordination, nausea, vomiting, abdominal pain, chest pain, coughing, apathy, central nervous system depression, intoxication, anesthetic effect or narcosis, difficulty of breathing, allergic response, tremors, severe lung irritation or damage, pulmonary edema, pneumoconiosis, loss of consciousness, respiratory failure, death. Possible sensitization to respiratory tract. Skin contact : Irritation of skin. Prolonged or repeated contact can cause dermatitis, defatting, severe skin irritation. Possible sensitization to skin. Eye contact : Irritation of eyes. Prolonged or repeated contact can cause conjunctivitis, blurred vision, tearing of eyes, redness of eyes, severe eye irritation, corneal injury. Ingestion : Ingestion may cause lung inflammation and damage due to aspiration of material into lungs, mouth and throat irritation, drowsiness, dizziness and/or lightheadedness, headache, uncoordination, nausea, vomiting, diarrhea, gastro-intestinal disturbances, abdominal pain, visual disturbances, apathy, central nervous system depression, intoxication, anesthetic effect or narcosis, burns of the mouth, throat, stomach, pulmonary edema, loss of consciousness, respiratory failure, death. Medical conditions aggravated by exposure : Eye, skin, respiratory disorders, kidney disorders, liver disorders, nervous system disorders, respiratory disorders. prepared 05/06/08 ICI Paints North America MATERIAL SAFETY DATA SHEET TOXICOLOGICAL INFORMATION (ANSI Section 11) Supplemental health information : Contains a chemical that is moderately toxic by ingestion. Contains a chemical that is toxic by inhalation. Contains a chemical that may be absorbed through skin. Free diisocyanate may cause allergic reaction in susceptible persons. Notice - reports have associated repeated and prolonged occupational overexposure to solvents with permanent brain and nervous system damage. Intentional misuse by deliberately concentrating and inhaling the contents may be harmful or fatal. Contains iron oxide, repeated or prolonged exposure to iron oxide dust may cause siderosis, a benign pneumoconiosis. Other effects of overexposure may include toxicity to liver, kidney, central nervous system, blood. Carcinogenicity : Contains formaldehyde, a potential cancer hazard. Rats exposed to formaldehyde via inhalation developed cancer of the nasal cavity. Evidence in humans is limited (nasal and nasopharyngeal cancer). Formaldehyde is listed as a carcinogen by OSHA, probable human carcinogen (group 2a) by IARC, and anticipated human carcinogen by NTP. Overexposure can cause eye, skin, and respiratory tract irritation, and skin and respiratory sensitization. In a lifetime inhalation study, exposure to 250 mg/m3 titanium dioxide resulted in the development of lung tumors in rats. These tumors occurred only at dust levels that overwhelmed the animals' lung clearance mechanisms and were different from common human lung tumors in both type and location. The relevance of these findings to humans is unknown but questionable. The international agency for research on cancer (IARC) has classified titanium dioxide as possibly carcinogenic to humans (group 2b) based on inadequate evidence of carcinogenicity in humans and sufficient evidence of carcinogenicity in experimental animals. Physical Data Product Code 359F65DGF 379C0910 ECOLOGICAL INFORMATION (ANSI Section 12) No ecological testing has been done by ICI paints on this product as a whole. DISPOSAL CONSIDERATIONS (ANSI Section 13) Waste disposal : Dispose in accordance with all applicable regulations. Avoid discharge to natural waters. REGULATORY INFORMATION (ANSI Section 15) As of the date of this MSDS, all of the components in this product are listed (or are otherwise exempt from listing) on the TSCA inventory. This product has been classified in accordance with the hazard criteria of the CPR (controlled products regulations) and the MSDS contains all the information required by the CPR. (ANSI Sections 1, 9, and 14) Description Wt. / Gal. devthane 359h (no organic haps) derrick green devthane 379 hs converter Ingredients Reproductive effects : High exposures to xylene in some animal studies, often at maternally toxic levels, have affected embryo/fetal development. The significance of this finding to humans is not known. Mutagenicity : No mutagenic effects are anticipated Teratogenicity : No teratogenic effects are anticipated 9.02 9.40 VOC gr. / ltr. 291.43 112.85 % Volatile by Volume 34.96 13.00 Flash Point 80 f 135 f Boiling Range 208-595 293-293 HMIS *330 *321 DOT, proper shipping name UN1263, paint, 3, PGIII UN1866, resin solution, combustible liquid, PGIII Product Codes with % by Weight (ANSI Section 2) Chemical Name 4-heptanone, 2,6-dimethylethane, 1,1',1''-methylidenetris(oxy)-trisacetic acid, butyl ester c.i. pigment green 7 benzene, dimethyltitanium oxide 2-propenoic acid, 2-methyl-, 2-hydroxyethyl ester, polymer with ethenylbenzene, 2-ethylhexyl 2-propeno and methyl 2-methyl-2propenoate hexane, 1,6-diisocyanato-, homopolymer formaldehyde c.i. pigment yellow 42 acetic acid, 1,1-dimethylethyl ester butanamide, 2-((2-methoxy-4-nitrophenyl)azo) -n-(2-methoxyphenyl)-3-oxosolvent naphtha (petroleum), light aromatic 1-butanol propanoic acid, 3-ethoxy-, ethyl ester sulfuric acid, barium salt castor oil hexane, 1,6-diisocyanatoacetic acid, c6-8-branched alkyl esters benzene,1,2,4-trimethylanti-settling agent polyamide Common Name diisobutyl ketone ethyl orthoformate butyl acetate phthalo green pigment xylene titanium dioxide acrylic polymer CAS. No. 108-83-8 122-51-0 123-86-4 1328-53-6 1330-20-7 13463-67-7 26916-05-2 aliphatic polyisocyanate formaldehyde yellow iron oxide tert-butyl acetate pigment yellow 74 light aromatic solvent naphtha n-butanol ethyl 3-ethoxypropionate barium sulfate castor oil, raw hexamethylene diisocyanate oxo-heptyl acetate pseudocumene anti-settling agent rheological additive 28182-81-2 50-00-0 51274-00-1 540-88-5 6358-31-2 64742-95-6 71-36-3 763-69-9 7727-43-7 8001-79-4 822-06-0 90438-79-2 95-63-6 Sup. Conf. Sup. Conf. Form: 359D, Page 2 of 3, prepared 05/06/08 359F65DGF 1-5 1-5 5-10 1-5 .1-1.0 1-5 40-50 379C0910 5-10 .1-1.0 90-95 LT .01 1-5 1-5 1-5 1-5 1-5 5-10 1-5 10-20 .1-1.0 1-5 .1-1.0 1-5 1-5 1-5 Chemical Hazard Data Common Name diisobutyl ketone ethyl orthoformate butyl acetate phthalo green pigment xylene titanium dioxide acrylic polymer aliphatic polyisocyanate formaldehyde yellow iron oxide tert-butyl acetate pigment yellow 74 light aromatic solvent naphtha n-butanol ethyl 3-ethoxypropionate barium sulfate castor oil, raw hexamethylene diisocyanate oxo-heptyl acetate pseudocumene anti-settling agent rheological additive Footnotes: C=Ceiling - Concentration that should not be exceeded, even instantaneously. (ANSI Sections 2, 8, 11, and 15) CAS. No. 108-83-8 122-51-0 123-86-4 1328-53-6 1330-20-7 13463-67-7 26916-05-2 28182-81-2 50-00-0 51274-00-1 540-88-5 6358-31-2 64742-95-6 71-36-3 763-69-9 7727-43-7 8001-79-4 822-06-0 90438-79-2 95-63-6 Sup. Conf. Sup. Conf. S=Skin - Additional exposure, over and above airborn exposure, may result from skin absorption. 8-Hour TWA 25 ppm not est. 150 ppm not est. 100 ppm 10 mg/m3 not est. not est. not est. 5 mg/m3 200 ppm not est. not est. 20 ppm not est. 10 mg/m3 not est. 0.005 ppm not est. 25 ppm not est. 10 mg/m3 ACGIH-TLV STEL C not est. not est. not est. not est. 200 ppm not est. not est. not est. 150 ppm not est. not est. not est. not est. not est. not est. not est. not est. 0.3 ppm not est. not est. not est. not est. not est. not est. not est. not est. not est. not est. not est. not est. not est. not est. not est. not est. not est. not est. not est. not est. not est. not est. not est. not est. not est. not est. n/a=not applicable not est=not established CC=CERCLA Chemical S not est. not est. not est. not est. not est. not est. not est. not est. not est. not est. not est. not est. not est. not est. not est. not est. not est. not est. not est. not est. not est. not est. 8-Hour TWA 50 ppm not est. 150 ppm not est. 100 ppm 10 mg/m3 not est. not est. 0.75 ppm 10 mg/m3 200 ppm not est. 500x ppm 100 ppm not est. 5 mg/m3 not est. not est. not est. not est. not est. 5 mg/m3 ppm=parts per million mg/m3=milligrams per cubic meter Sup Conf=Supplier Confidential Form: 359D, Page 3 of 3, prepared 05/06/08 OSHA-PEL STEL C not est. not est. not est. not est. not est. not est. not est. not est. not est. not est. not est. not est. not est. not est. not est. not est. 2 ppm not est. not est. not est. not est. not est. not est. not est. not est. not est. not est. not est. not est. not est. not est. not est. not est. not est. not est. not est. not est. not est. not est. not est. not est. not est. not est. not est. S not est. not est. not est. not est. not est. not est. not est. not est. not est. not est. not est. not est. not est. not est. not est. not est. not est. not est. not est. not est. not est. not est. S2=Sara Section 302 EHS S3=Sara Section 313 Chemical S.R.Std.=Supplier Recommended Standard S.R. Std. not est. not est. not est. not est. not est. not est. not est. not est. not est. not est. not est. not est. not est. not est. not est. not est. not est. not est. not est. not est. not est. not est. S2 S3 CC n n n n n n n n y n n n n n n n n n n n n n n n n n y n n n y n n n n y n n n y n y n n n n y n y n n n y n y n n y n n n y n n n n H n n n n y n n n y n n n n n n n n y n n n n M n n n n n n n n n n n n n n n n n n n n n n N n n n n n y n n y n n n n n n n n n n n n n I n n n n n y n n y n n n n n n n n n n n n n O n n n n n n n n y n n n n n n n n n n n n n H=Hazardous Air Pollutant, M=Marine Pollutant P=Pollutant, S=Severe Pollutant Carcinogenicity Listed By: N=NTP, I=IARC, O=OSHA, y=yes, n=no (ANSI Section 3) (ANSI Section 4) Inhalation : Remove to fresh air. Restore and support continued breathing. Get emergency medical attention. Have trained person give oxygen if necessary. Get medical help for any breathing difficulty. Skin contact : Wash thoroughly with soap and water. If any product remains, gently rub petroleum jelly, vegetable or mineral/baby oil onto skin. Repeated applications may be needed. Remove contaminated clothing. Wash contaminated clothing before re-use. Dispose of contaminated leather items, such as shoes and belts. If irritation occurs, consult a physician. Eye contact : Flush immediately with large amounts of water, especially under lids for at least 15 minutes. If irritation or other effects persist, obtain medical treatment. Ingestion : If swallowed, obtain medical treatment immediately. FIRE-FIGHTING MEASURES (ANSI Section 5) Fire extinguishing media : Dry chemical or foam water fog. Carbon dioxide. Closed containers may explode when exposed to extreme heat or fire. Vapors may ignite explosively at ambient temperatures. Vapors are heavier than air and may travel long distances to a source of ignition and flash back. Vapors can form explosive mixtures in air at elevated temperatures. Closed containers may burst if exposed to extreme heat or fire. May decompose under fire conditions emitting irritant and/or toxic gases. Fire fighting procedures : Water may be used to cool and protect exposed containers. Firefighters should use full protective clothing, eye protection, and self-contained breathing apparatus. Selfcontained breathing apparatus recommended. Hazardous decomposition or combustion products : Carbon monoxide, carbon dioxide, oxides of nitrogen, oxides of sulfur, ammonia, aldehydes, toxic gases, barium compounds. Cyanides. (ANSI Section 6) HANDLING AND STORAGE (ANSI Section 7) Handling and storage : Store below 80f. Store below 100f (38c). Keep away from heat, sparks and open flame. Keep away from direct sunlight, heat and all sources of ignition. Other precautions : Use only with adequate ventilation. Do not take internally. Keep out of reach of children. Avoid contact with skin and eyes, and breathing of vapors. Wash hands thoroughly after handling, especially before eating or smoking. Keep containers tightly closed and upright when not in use. Empty containers may contain hazardous residues. Ground equipment when transferring to prevent accumulation of static charge. EXPOSURE CONTROLS/PERSONAL PROTECTION (ANSI Section 8) Respiratory protection : Control environmental concentrations below applicable exposure standards when using this material. When respiratory protection is determined to be necessary, use a NIOSH/MSHA (Canadian z94.4) Approved elastomeric sealing- surface facepiece respirator outfitted with organic vapor cartridges and paint spray (dust/mist) prefilters. Determine the proper level of protection by conducting appropriate air monitoring. Consult 29CFR1910.134 For selection of respirators (Canadian z94.4). Ventilation : Provide dilution ventilation or local exhaust to prevent build-up of vapors. Use explosionproof equipment. Use non-sparking equipment. Personal protective equipment : Eye wash, safety shower, safety glasses or goggles. Impervious gloves, impervious clothing, face shield, apron. STABILITY AND REACTIVITY (ANSI Section 10) Under normal conditions : Stable see section 5 fire fighting measures Materials to avoid : Oxidizers, acids, reducing agents, bases, aldehydes, ketones, halogens, amines, carbon tetrachloride (at elevated temperatures), aluminum, nitric acid, metal compounds, lewis acids, mineral acids. Conditions to avoid : Elevated temperatures, moisture, contact with oxidizing agent, storage near acids, sparks, open flame, ignition sources. Hazardous polymerization : Will not occur may polymerize in presence of aliphatic amines. TOXICOLOGICAL INFORMATION (ANSI Section 11) Supplemental health information : Contains a chemical that is moderately toxic by ingestion. Contains a chemical that may be absorbed through skin. Excessive inhalation of fumes may lead to metal fume fever characterized by a metallic taste in mouth, excessive thirst, coughing, weakness, fatigue, muscular pain, nausea, chills and fever. Notice - reports have associated repeated and prolonged occupational overexposure to solvents with permanent brain and nervous system damage. Intentional misuse by deliberately concentrating and inhaling the contents may be harmful or fatal. Other effects of overexposure may include toxicity to liver, kidney, central nervous system, blood. 313K The information contained herein is based on data available at the time of preparation of this data sheet which ICI Paints believes to be reliable. However, no warranty is expressed or implied regarding the accuracy of this data. ICI Paints shall not be responsible for the use of this information, or of any product, method or apparatus mentioned and you must make your own determination of its suitability and completeness for your own use, for the protection of the environment, and the health and safety of your employees and the users of this material. Complies with OSHA hazard communication standard 29CFR1910.1200. EMERGENCY TELEPHONE NO. (800) 545-2643 FIRST-AID MEASURES ACCIDENTAL RELEASE MEASURES Steps to be taken in case material is released or spilled : Comply with all applicable health and environmental regulations. Eliminate all sources of ignition. Ventilate area. Ventilate area with explosion-proof equipment. Spills may be collected with absorbent materials. Use non-sparking tools. Evacuate all unnecessary personnel. Place collected material in proper container. Complete personal protective equipment must be used during cleanup. Large spills - shut off leak if safe to do so. Dike and contain spill. Pump to storage or salvage vessels. Use absorbent to pick up excess residue. Keep salvageable material and rinse water out of sewers and water courses. Small spills use absorbent to pick up residue and dispose of properly. 925 Euclid Avenue Cleveland, Ohio 44115 Primary route(s) of exposure : Inhalation, skin contact, eye contact, ingestion. Effects of overexposure : Inhalation : Irritation of respiratory tract. Prolonged inhalation may lead to mucous membrane irritation, fatigue, drowsiness, dizziness and/or lightheadedness, headache, uncoordination, nausea, vomiting, diarrhea, abdominal pain, chest pain, blurred vision, flu-like symptoms, coughing, sneezing, difficulty with speech, apathy, central nervous system depression, anesthetic effect or narcosis, difficulty of breathing, allergic response, fever and chills, tremors, abnormal blood pressure, severe lung irritation or damage, liver damage, kidney damage, pulmonary edema, pneumoconiosis, loss of consciousness, respiratory failure, asphyxiation, death. Possible sensitization to respiratory tract. Skin contact : Irritation of skin. Prolonged or repeated contact can cause dermatitis, defatting, blistering, allergic response, severe skin irritation, severe skin irritation or burns. Possible sensitization to skin. Eye contact : Irritation of eyes. Prolonged or repeated contact can cause conjunctivitis, blurred vision, tearing of eyes, redness of eyes, severe eye irritation, severe eye irritation or burns, corneal injury. Ingestion : Ingestion may cause lung inflammation and damage due to aspiration of material into lungs, mouth and throat irritation, drowsiness, dizziness and/or lightheadedness, headache, uncoordination, nausea, vomiting, diarrhea, gastro-intestinal disturbances, abdominal pain, visual disturbances, apathy, central nervous system depression, anesthetic effect or narcosis, burns of the mouth, throat, stomach, liver damage, kidney damage, pulmonary edema, loss of consciousness, respiratory failure, death. Medical conditions aggravated by exposure : Eye, skin, respiratory disorders, lung disorders, asthma-like conditions, respiratory disorders. ORGANIC ZINC-RICH EPOXY PRIMER HAZARDS IDENTIFICATION prepared 08/02/04 ICI Paints North America MATERIAL SAFETY DATA SHEET Carcinogenicity : The international agency for research on cancer (IARC) has evaluated ethylbenzene and classified it as a possible human carcinogen (group 2b) based on sufficient evidence for carcinogenicity in experimental animals, but inadequate evidence for cancer in exposed humans. In a 2 year inhalation study conducted by the national toxicology program (NTP), ethylbenzene vapor at 750 ppm produced kidney and testicular tumors in rats and lung and liver tumors in mice. Genetic toxicity studies showed no genotoxic effects. The relevance of these results to humans is not known. Reproductive effects : High exposures to xylene in some animal studies, often at maternally toxic levels, have affected embryo/fetal development. The significance of this finding to humans is not known. Mutagenicity : Triethylenetetramine has demonstrated weak mutagenic activity in standard in vitro tests, and has caused embryo- fetal toxicity and fetal malformations when fed to rats. Triethylenetetramine did not exhibit carcinogenic potential in life-time mouse skin painting studies. Teratogenicity : No teratogenic effects are anticipated Physical Data Product Code 313B0250 313C0910 ECOLOGICAL INFORMATION (ANSI Section 12) No ecological testing has been done by ICI paints on this product as a whole. DISPOSAL CONSIDERATIONS (ANSI Section 13) Waste disposal : Dispose in accordance with all applicable regulations. Avoid discharge to natural waters. REGULATORY INFORMATION (ANSI Section 15) As of the date of this MSDS, all of the components in this product are listed (or are otherwise exempt from listing) on the TSCA inventory. This product has been classified in accordance with the hazard criteria of the CPR (controlled products regulations) and the MSDS contains all the information required by the CPR. (ANSI Sections 1, 9, and 14) Description Wt. / Gal. do not use, use dc313b0250d instead catha coat 313 organic zinc-rich epoxy primer clear converter Ingredients 24.77 7.54 VOC gr. / ltr. 334.95 338.66 % Volatile by Volume 41.44 41.11 Flash Point 90 f 110 f Boiling Range 244-304 243-304 HMIS *231 *320 DOT, proper shipping name paint, 3, UN1263, PGIII paint, combustible liquid, UN 1263, PGIII Product Codes with % by Weight (ANSI Section 2) Chemical Name benzene, ethyl2-heptanone 1,2,-ethanediamine, n,n'-bis(2-aminoethyl)zinc oxide benzene, dimethyloxirane,2,2'-(( (1-methylethylidene) bis (4,1-phenyleneoxymethylene) )) bisphenol, 4,4'-(1-methylethylidene)bis-, polymer with 2,2'-((1-methylethylidene)bis (4,1-phenyleneoxymethylene))bis(oxirane) fatty acids, c18-unsatd., dimers, reaction products with polyethylenepolyamines 1-butanol zinc sulfuric acid, barium salt amine adduct Chemical Hazard Data Common Name ethylbenzene methyl amyl ketone triethylenetetramine zinc oxide xylene diglycidyl ether of bisphenol a epoxy resin polyamide resin n-butanol zinc barium sulfate amine adduct Footnotes: C=Ceiling - Concentration that should not be exceeded, even instantaneously. Common Name ethylbenzene methyl amyl ketone triethylenetetramine zinc oxide xylene diglycidyl ether of bisphenol a epoxy resin polyamide resin n-butanol zinc barium sulfate amine adduct CAS. No. 100-41-4 110-43-0 112-24-3 1314-13-2 1330-20-7 1675-54-3 25036-25-3 68410-23-1 71-36-3 7440-66-6 7727-43-7 Sup. Conf. 313B0250 .1-1.0 5-10 313C0910 20-30 1-5 1-5 1-5 1-5 1-5 40-50 10-20 70-80 1-5 10-20 (ANSI Sections 2, 8, 11, and 15) CAS. No. 100-41-4 110-43-0 112-24-3 1314-13-2 1330-20-7 1675-54-3 25036-25-3 68410-23-1 71-36-3 7440-66-6 7727-43-7 Sup. Conf. S=Skin - Additional exposure, over and above airborn exposure, may result from skin absorption. ACGIH-TLV 8-Hour TWA STEL C 100 ppm 125 ppm not est. 50 ppm not est. not est. not est. not est. not est. 2 mg/m3 10 mg/m3 not est. 100 ppm 150 ppm not est. not est. not est. not est. not est. not est. not est. not est. not est. not est. 20 ppm not est. not est. not est. not est. not est. 10 mg/m3 not est. not est. not est. not est. not est. n/a=not applicable not est=not established CC=CERCLA Chemical S not est. not est. not est. not est. not est. not est. not est. not est. not est. not est. not est. not est. 8-Hour TWA 100 ppm 100 ppm not est. 5 mg/m3 100 ppm not est. not est. not est. 100 ppm not est. 5 mg/m3 not est. ppm=parts per million mg/m3=milligrams per cubic meter Sup Conf=Supplier Confidential Form: 313K, Page 2 of 2, prepared 08/02/04 OSHA-PEL STEL C not est. not est. not est. not est. not est. not est. not est. not est. not est. not est. not est. not est. not est. not est. not est. not est. not est. not est. not est. not est. not est. not est. not est. not est. S not est. not est. not est. not est. not est. not est. not est. not est. not est. not est. not est. not est. S2=Sara Section 302 EHS S3=Sara Section 313 Chemical S.R.Std.=Supplier Recommended Standard S.R. Std. not est. not est. not est. not est. not est. not est. not est. not est. not est. not est. not est. not est. S2 S3 CC n n n n n n n n n n n n y n n y y n n n y y n n y n n n y n n n y y n n H y n n n y n n n n n n n M n n n n n n n n n n n n N n n n n n n n n n n n n I y n n n n n n n n n n n O n n n n n n n n n n n n H=Hazardous Air Pollutant, M=Marine Pollutant P=Pollutant, S=Severe Pollutant Carcinogenicity Listed By: N=NTP, I=IARC, O=OSHA, y=yes, n=no SECTION 3 - INSTALLATION GENERAL This section describes the recommended installation procedure for the ACD-1500 Degasser. Instructions include equipment handling, equipment leveling, and electrical connections. SAFETY Read and understand ALL safety information presented in this manual before installing and operating this equipment. Refer to Section 2 for a summary of Warnings affecting installation, operation, and maintenance of this equipment. Before beginning the installation, review the information presented in Equipment Hoisting later in this section. Pay particular attention to the information concerning lift points. Failure to observe proper equipment handling procedures may result in serious personal injury or death and/or damage to the equipment. WARNING! BE SURE THAT HANDLING DEVICES HAVE SUFFICIENT LIFTING CAPACITY TO SAFELY HANDLE THE WEIGHT OF THE EQUIPMENT. WARNING! TO ENSURE PROPER BALANCE AND ORIENTATION WHEN UNIT IS RAISED AND PREVENT DAMAGE TO COMPONENTS, ATTACH LIFTING SLINGS ONLY TO LABELLED LIFTING POINTS. DO NOT ATTEMPT LIFTING BY ATTACHMENT TO ANY OTHER LOCATION. INSTALLATION SEQUENCE Following is the sequence of steps for installing the ACD-1500 Degasser. The sequence may vary depending on the user’s facilities and previous experience with this type of equipment. 1. Read and understand all safety information in Section 2 before installing and operating this equipment. 2. Install the degasser in the drilling fluid tank downstream of the shale shaker. 3. Be sure the unit is secure and level on the tank. 4. Connect a 6” vent line to the exhaust fan flange to carry gas to a safe area. 5. Connect electrical power supply to the equipment. 6. Refer to Section 4 for startup and operating instructions. 15 Nov 09 3-1 ACD-1500Degasser INSTALLATION STORAGE Storage Before Use If equipment is not being installed immediately, it should be stored in a dry environment (50 percent relative humidity or less). A dry environment will ensure that the machine remains in the same condition as when it was received. If unit is stored outdoors, use a UV-resistant tarp, or UV-resistant shrink wrap. Install vents when using shrink wrap. Seal the Operation and Maintenance manual in plastic and attach to unit. Storage After Use WARNING! BEFORE PREPARING THE DEGASSER FOR STORAGE, SHUT DOWN, DISCONNECT, AND LOCK OUT AND TAG OUT ELECTRIC POWER. Prior to an idle period of any duration the unit must be thoroughly cleaned inside and out to prevent damage from hardening of built-up mud. After cleaning the unit, cover outlet flange. Preventive Maintenance During Storage To prevent motor damage during the storage period, perform the following precautionary activities: 1. Check insulation resistance of the motor windings using a megohmmeter (Megger). Periodically measure and record the readings in a log. Investigate any significant drop in resistance immediately. 2. Rotate the motor shaft 10 full turns at least once every two months to decrease the likelihood of bearing deterioration during storage. Note! Do not lubricate bearings during storage. Motor bearings are packed with grease at the factory and can be damaged by excessive grease. SITE PREPARATION AND CLEARANCE REQUIREMENTS Prior to installation of equipment, verify that electricity is available at the installation site. Also ensure that clearances around the equipment are adequate. Prepare the installation site as follows: 1. Check that discharge chute, if used, is properly sized for the equipment (refer to general assembly drawing in Section 8 for discharge size. 2. Verify that available electric power supply at the site agrees with electric power requirements of the equipment. MOVING/POSITIONING THE EQUIPMENT The degasser is shipped fully assembled. A label indicating the weight of the unit is affixed to the equipment. While the machine is still mounted on the wooden shipping skid, the unit should be transported on the ground using a forklift. After the machine is removed from the shipping skid, either a forklift or overhead-lifting device may be used. 3-2 15 Nov 09 INSTALLATION WARNING! BE SURE THAT HANDLING DEVICES HAVE SUFFICIENT LIFTING CAPACITY TO SAFELY HANDLE THE WEIGHT OF THE EQUIPMENT. WARNING! DO NOT REMOVE ORANGE SHIPPING BRACKETS UNTIL EQUIPMENT HAS BEEN POSITIONED AT FINAL INSTALLATION SITE. WARNING! WHEN USING AN OVERHEAD LIFTING DEVICE, USE ONLY THE SINGLE LIFT POINT PROVIDED. DO NOT ATTEMPT TO LIFT MACHINE USING ANY OTHER LIFTING LOCATION. Equipment Hoisting A single lifting lug is attached to the top of the degasser to allow attachment of an overhead lifting device (Figure 3-1). The lug is labeled “LIFT HERE ONLY”. DO NOT attempt to lift the degasser by any other non-designated portion of the unit. Install a clevis that is capable of supporting the equipment weight through the lifting lug, and attach the hoisting sling to the clevis. Figure 3-1 Hoisting Degasser 15 Nov 09 3-3 ACD-1500Degasser INSTALLATION Positioning and Mounting Position the degasser with sufficient space around unit to allow access to various components by operators and maintenance personnel. Approximately 2’ to 3’ space is required on all four sides of the equipment. The recommended installation is to weld rails close to the degasser to “trap” the machine in place. The degasser should not be welded to the tank as this installation will prevent access to the pump. Typical operation and maintenance functions include the following activities: Removing the access panels Greasing drive shaft bearings Connection of exhaust line Access to electrical control panel Leveling For proper operation, the degasser must be properly leveled along its length and width (Figure 32). A 4-foot level is recommended. Shim the equipment as required to level the unit. Figure 3-2 Degasser Leveling 3-4 15 Nov 09 INSTALLATION ELECTRIC POWER CONNECTIONS WARNING! TO AVOID SERIOUS PERSONAL INJURY BE SURE POWER TO EQUIPMENT IS LOCKED OUT, TAGGED OUT, AND DE-ENERGIZED BEFORE BEGINNING ELECTRICAL INSTALLATION. WARNING! MOTOR MUST BE OPERATED AT THE DESIGNATED SUPPLY VOLTAGE AND FREQUENCY. WARNING! A FUSED-DISCONNECT PRIMARY POWER SUPPLY WITH SUFFICIENT INTERRUPTING CAPACITY TO CLEAR THE MAXIMUM FAULT CURRENT CAPABILITY OF THE SYSTEM IS REQUIRED. WARNING! ELECTRICAL CONNECTIONS MUST BE MADE IN ACCORDANCE WITH THE NATIONAL ELECTRICAL CODE (NEC) AND ALL APPLICABLE LOCAL CODES. FAILURE TO COMPLY MAY RESULT IN AN UNSAFE CONDITION THAT COULD INJURE PERSONNEL OR DAMAGE EQUIPMENT. ENSURE THAT ALL ELECTRICAL AND CONDUIT CONNECTIONS ARE SECURE. The electrical connections should be performed only by trained, qualified personnel familiar with high-voltage applications and knowledgeable of National Electrical Code (NEC) standards and other applicable state or local codes for installation of industrial equipment. A fused disconnect is required for primary power supply. The degasser is factory-wired to operate at either of the following two power configurations: 460/480Vac 60Hz Three-phase 380/400Vac 50Hz Three-phase Refer to Section 8 for the wiring schematic for the machine’s power requirements. The fused disconnect and wiring to the equipment shall be suitably sized and in accordance with NEC standards and all applicable state and local codes. Make the following electric power connections: 1. Install a fused disconnect device having sufficient interrupting capacity to clear the maximum fault current capability of the power supply system. 2. Remove the plug from hole at bottom of the electrical control panel, install appropriate feedthrough into the hole, and attach rigid conduit. Pass three-phase cable through the conduit and into the control panel. 3. Connect three-phase power leads to the terminal block at the lower left corner of the electrical control panel as shown in Figure 3-4. 4. Turn on electric power, press START button, and confirm that pump motor rotates in correct direction. Reverse two leads in electrical control panel, if motor rotation is opposite. Note! If rotation is opposite, connections are reversed. Refer to Section 3 for proper connection procedure. 15 Nov 09 3-5 ACD-1500Degasser INSTALLATION Figure 3-4 Electrical Connections SPLASH PLATE ADJUSTMENT The splash plate is adjustable in 1/4” increments within a range of 1/4” to 1-1/2”. Generally, the gap should be set to accommodate the gas content of the drilling fluid. If gas content is high, it may be desirable to maximize release of gas by narrowing the splash plate gap. However, at the smallest opening, flow through the degasser will be approximately 500GPM; at its largest gap, flow is about 1500GPM. The setting should be consistent with process considerations and based on experience in operating the degasser. To adjust the splash plate gap (Figure 3-5), proceed as follows: 1. Loosen bolts on both ends of the splash plate sufficiently to permit disengagement of the splash plate and guide teeth. 2. Move splash plate upward to increase the gap or down to reduce the gap, being certain that plate is parallel with top of riser. 3. When desired setting is achieved, engage teeth, and tighten bolts to secure splash plate in position. Figure 3-5 Splash Plate Adjustment MACHINE STARTUP Refer to Section 4 for startup and operating procedures. 3-6 15 Nov 09 SECTION 4 - OPERATING INSTRUCTIONS GENERAL This section includes initial and normal startup shutdown procedures for the ACD-1500 Degasser, as well as emergency shutdown. OPERATING SAFETY WARNING! ALL OPERATING AND MAINTENANCE PERSONNEL MUST READ AND UNDERSTAND ALL SAFETY INFORMATION IN THIS MANUAL BEFORE WORKING WITH THE EQUIPMENT. INITIAL STARTUP The initial startup procedure should be used when the equipment is being started for the first time, or when equipment has been returned to use after an extended period out of service. 1. Verify that all operators and maintenance personnel have read and understand all operating and safety information in Section 2. 2. Confirm that equipment has been installed in accordance with Section 3. 3. Check that correct electric power configuration is available in accordance with Section 3. 4. Be sure that all operators and maintenance personnel are clear of equipment before applying electric power to vacuum pump and centrifugal pump. 10. Open fused disconnect that supplies electric power to the machine. Press START button on the electrical control panel to turn on the centrifugal pump motor and exhaust fan motor. Liquid will then be drawn into the pump and circulated up to the spray tank. Check that centrifugal pump turns in proper direction to draw in liquid; if direction is opposite, reverse two electrical leads. Note! If rotation is opposite, connections are reversed. Refer to Section 3 for proper connection procedure. NORMAL STARTUP AND OPERATION The following procedure shall be performed at each machine startup: 1. Be sure that all operators and maintenance personnel are clear of the equipment before applying electric power to vacuum pump and centrifugal pump. 2. Turn on electric power to degasser. 3. Press START button on the electrical control panel to turn on the centrifugal pump motor and exhaust fan motor to begin circulating mud through the degasser. 15 Nov 09 4-1 ACD-1500Degasser OPERATING INSTRUCTIONS NORMAL SHUTDOWN The normal shutdown procedure is to be used for controlled stopping of operation. Normal shutdown is performed for routine activities such as cleaning, lubrication, inspection, or other routine procedure. 1. Press STOP button on the electrical control panel to stop the centrifugal pump and exhaust fan. 2. Open fused disconnect that supplies electric power to the machine. EMERGENCY SHUTDOWN To immediately stop the machine in case of emergency, open the fused disconnect supplying electric power to the machine. 4-2 15 Nov 09 SECTION 5 - MAINTENANCE GENERAL Proper maintenance will ensure maximum life and trouble-free operation. While the maintenance schedule presented in this section is not rigid, modifications should be based on experience with operating the equipment at your facilities. A maintenance log should be kept to help establish a routine maintenance schedule, as well as to monitor and adjust the schedule as necessary throughout the equipment’s life. Consider the following factors when establishing a maintenance schedule: Duty cycle Ambient temperature Operating environment BEARING LUBRICATION WARNING! TO AVOID SERIOUS PERSONAL INJURY BE SURE EQUIPMENT IS LOCKED OUT, TAGGED OUT, AND DE-ENERGIZED PRIOR TO PERFORMING MAINTENANCE. The upper and lower shaft bearings (Figure 5-1) must be re-lubricated periodically based on hours of operation. For safety, lubrication is to be performed with the degasser shut down, locked out, and tagged out. Figure 5-1 Upper and Lower Shaft Bearing Lubrication 15 Nov 09 5-1 ACD-1500Degasser MAINTENANCE BEARING LUBRICATION (CONT’D) The recommended lubricant for the shaft bearings is NLGI grade 2 mineral oil lithium or lithium complex base grease. Grease should be injected into grease fitting until purged through the fitting regardless of the quantity added. Bearings should be re-lubricated in accordance with the following schedule: Daily Operating Hours Interval (Weeks) 8 10 16 5 24 3 TROUBLESHOOTING As long as the mud level in the tank remains at or above 12” (305mm), the degasser will circulate fluid up to the spray tank. Malfunctions are generally caused by incoming power disruptions or tripping of overloads or blown fuse(s) in the electrical control panel. Always check these items and for correct incoming power first before proceeding with further checking and tests. Refer to the electrical schematic diagram in Section 8 for assistance in tracing electrical malfunctions. Before performing electrical continuity checks, always shut down, lock out, and tag out electric power to degasser. WARNING! TO AVOID SERIOUS PERSONAL INJURY BE SURE EQUIPMENT IS LOCKED OUT, TAGGED OUT, AND DE-ENERGIZED PRIOR TO PERFORMING MAINTENANCE. PARTS REPLACEMENT Defective parts should be replaced as soon as possible to prevent further damage to the equipment. Refer to the applicable drawings in Section 8 for Derrick component locations and part numbers. Refer to Section 10 for supplier component data. SPARE PARTS Since all potential part replacements cannot be predicted, the spare parts inventory should be based on the user’s experience with similar equipment. Consider the following factors when establishing a spare parts inventory: Duty cycle Ambient temperature Operating environment 5-2 15 Nov 09 SECTION 8 - REFERENCE DRAWINGS This section contains Derrick engineering drawings for your equipment. These drawings are included to provide assistance in troubleshooting, repair, and parts ordering. Number Title 17171-00 ACD-1500 Degasser General Arrangement 17173-00 ACD-1500 Degasser Parts List 17199-00 ACD-1500 Degasser 380/460V Electrical Component Parts List 17197-00 ACD-1500 Degasser 380/460V Electrical Control Panel Parts List 17198-00 ACD-1500 Degasser Wiring Schematic PE-S-014-09 Thermal Unit Selection Table 15 Nov 09 8-1 ACD-1500Degasser PE-S-014-09 rev. 01/15/08 RECOMMENDED THERMAL UNIT SELECTION TABLE FOR DERRICK® SUPPLIED MANUAL STARTERS DERRICK VIBRATING MACHINES F, FX, K, KX, L, LX, T, TX MOTORS E, EX, M, MX, SG, SGX MOTORS R, RX MOTORS A, C, N MOTORS 575V.A.C. 460V.A.C. 230V.A.C. 215V.A.C. 440V.A.C. 380V.A.C. 220V.A.C. 60Hz 60Hz 60Hz 60Hz 50Hz 50Hz 50Hz 1.5HP 1.5HP 1.5HP 1.5HP 1.5HP 1.5HP 1.5HP = = = = = = = 575V.A.C. 460V.A.C. 230V.A.C. 215V.A.C. 440V.A.C. 380V.A.C. 220V.A.C. 60Hz 60Hz 60Hz 60Hz 50Hz 50Hz 50Hz 2.5HP 2.5HP 2.5HP 2.5HP 2.5HP 2.5HP 2.5HP = = = = = = = 575V.A.C. 460V.A.C. 230V.A.C. 215V.A.C. 440V.A.C. 380V.A.C. 220V.A.C. 60Hz 60Hz 60Hz 60Hz 50Hz 50Hz 50Hz 3.0HP 3.0HP 3.0HP 3.0HP 3.0HP 3.0HP 3.0HP 575V.A.C. 460V.A.C. 230V.A.C. 215V.A.C. 440V.A.C. 380V.A.C. 220V.A.C. 60Hz 60Hz 60Hz 60Hz 50Hz 50Hz 50Hz 5.0HP 5.0HP 5.0HP 5.0HP 5.0HP 5.0HP 5.0HP SQD-B3.30 SQD-B4.15 SQD-B10.2 SQD-B10.2 SQD-B3.70 SQD-B4.15 SQD-B8.20 or or or or or or or FUR-H19 FUR-H21 FUR-H26 FUR-H27 FUR-H19 FUR-H21 FUR-H26 SQD-B6.25 SQD-B7.70 SQD-B17.5 SQD-B17.5 SQD-B6.90 SQD-B7.70 SQD-B14.0 or or or or or or or FUR-H24 FUR-H26 FUR-H32 FUR-H32 FUR-H24 FUR-H26 FUR-H31 = = = = = = = SQD-B6.90 SQD-B9.10 SQD-B19.5 SQD-B19.5 SQD-B7.70 SQD-B9.10 SQD-B17.5 or or or or or or or FUR-H25 FUR-H27 FUR-H33 FUR-H34 FUR-H26 FUR-H27 FUR-H32 = = = = = = = SQD-B11.5 SQD-B15.5 SQD-B36.0 SQD-B36.0 SQD-B12.8 SQD-B15.5 SQD-B32.0 or or or or or or or FUR-H29 FUR-H32 FUR-H40 FUR-H40 FUR-H30 FUR-H32 FUR-H37 DERRICK DEGASSER 575V.A.C. 460V.A.C. 230V.A.C. 415V.A.C. 380V.A.C. 60Hz 60Hz 60Hz 50Hz 50Hz 5.0HP 5.0HP 5.0HP 5.0HP 5.0HP = = = = = SQD-B8.20 SQD-B10.2 SQD-B19.5 SQD-B11.5 SQD-B19.5 1.5HP 1.5HP 1.5HP 1.5HP = = = = SQD-B3.30 SQD-B3.70 SQD-B8.20 SQD-B3.70 or FUR-H28 or FUR-H30 or FUR-H38 or FUR-H31 or FUR-H32 DERRICK PRIMER 575V.A.C. 460V.A.C. 230V.A.C. 380V.A.C. NOTE: 60Hz 60Hz 60Hz 50Hz IF MOTOR VOLTAGE OR HORSE POWER IS NOT LISTED, CONTACT ENGINEERING DEPARTMENT. **** FOR MAGNETIC STARTER OVERLOAD INFO REFER TO THE ELECTRICAL PARTS LIST THAT IS FOUND ON THE EQUIPMENTS GENERAL ARRANGEMENT DRAWING. Derrick®, Flo-Line®, FLC 2000™, Flo-Line Scalper™, Pyramid®, Sandwich Screens®, DE-1000™, Hi-G™, Vacu-Flo™, GBG™, PMD™, PWP™, SWG™, DC™, DF™, DX™, and GS™, are trademarks of Derrick Corporation. (F:\ENG\DOCS\PES014.DOC) SECTION 9 - INSTALLATION AND MAINTENANCE LOG PURPOSE This section should be used by operating and maintenance personnel to record historical information gathered during the installation and operation of the Derrick equipment. If properly kept, the log will be useful for altering maintenance intervals and intercepting trends that may indicate the need for changing operating procedures. Each entry in the log should be dated for future reference and tracking. If required, additional pages may be added to the log by copying a blank page or simply inserting ruled paper at the rear of the section. Installation and Maintenance Notes: 15 Nov 09 9-1 ACD-1500Degasser INSTALLATION & MAINTENANCE LOG 9-2 15 Nov 09 INSTALLATION AND MAINTENANCE LOG 15 Nov 09 9-3 ACD-1500Degasser INSTALLATION & MAINTENANCE LOG 9-4 15 Nov 09 INSTALLATION AND MAINTENANCE LOG 15 Nov 09 9-5 ACD-1500Degasser INSTALLATION & MAINTENANCE LOG 9-6 15 Nov 09 SECTION 10 - SUPPLIER DATA GENERAL Documentation for ACD-1500 Degasser components manufactured by outside suppliers is included in this section. For Derrick engineering drawings, refer to Section 8. COMPONENT Baldor 25HP Centrifugal Pump Motor Baldor 0.50HP Exhaust Fan Motor Cincinnati Fan Exhaust Blower 05 Jan 10 DESCRIPTION DOCUMENT Wiring Diagram Drawing CD0005 Installation and Operation MN400-209 Specifications CM7058-I Installation and Operation MN400-209 Specifications CM7006-I Operation and Maintenance Manual OMM-09-0509 10-1 ACD-1500Degasser Integral Horsepower AC Induction Motors Installation & Operating Manual 2/09 MN400 Any trademarks used in this manual are the property of their respective owners. Table of Contents Section 1 General Information . . . . . . . . . . . . . . . . . . . . . . . . . . . . . . . . . . . . . . . . . . . . . . . . . . . . . . . . . . . . . . . . . . . . . . . . . . . . . . . Overview . . . . . . . . . . . . . . . . . . . . . . . . . . . . . . . . . . . . . . . . . . . . . . . . . . . . . . . . . . . . . . . . . . . . . . . . . . . . . . . . . . . . . Limited Warranty . . . . . . . . . . . . . . . . . . . . . . . . . . . . . . . . . . . . . . . . . . . . . . . . . . . . . . . . . . . . . . . . . . . . . . . . . . . . . . . Safety Notice . . . . . . . . . . . . . . . . . . . . . . . . . . . . . . . . . . . . . . . . . . . . . . . . . . . . . . . . . . . . . . . . . . . . . . . . . . . . . . . . . . Receiving . . . . . . . . . . . . . . . . . . . . . . . . . . . . . . . . . . . . . . . . . . . . . . . . . . . . . . . . . . . . . . . . . . . . . . . . . . . . . . . . . . . . . Handling . . . . . . . . . . . . . . . . . . . . . . . . . . . . . . . . . . . . . . . . . . . . . . . . . . . . . . . . . . . . . . . . . . . . . . . . . . . . . . . . . . . . . . Storage . . . . . . . . . . . . . . . . . . . . . . . . . . . . . . . . . . . . . . . . . . . . . . . . . . . . . . . . . . . . . . . . . . . . . . . . . . . . . . . . . . . . . . . Removal From Storage . . . . . . . . . . . . . . . . . . . . . . . . . . . . . . . . . . . . . . . . . . . . . . . . . . . . . . . . . . . . . . . . . . . . . Section 2 Installation & Operation . . . . . . . . . . . . . . . . . . . . . . . . . . . . . . . . . . . . . . . . . . . . . . . . . . . . . . . . . . . . . . . . . . . . . . . . . . . Overview . . . . . . . . . . . . . . . . . . . . . . . . . . . . . . . . . . . . . . . . . . . . . . . . . . . . . . . . . . . . . . . . . . . . . . . . . . . . . . . . . . . . . Location . . . . . . . . . . . . . . . . . . . . . . . . . . . . . . . . . . . . . . . . . . . . . . . . . . . . . . . . . . . . . . . . . . . . . . . . . . . . . . . . . . . . . . Mounting . . . . . . . . . . . . . . . . . . . . . . . . . . . . . . . . . . . . . . . . . . . . . . . . . . . . . . . . . . . . . . . . . . . . . . . . . . . . . . . . . . . . . Alignment . . . . . . . . . . . . . . . . . . . . . . . . . . . . . . . . . . . . . . . . . . . . . . . . . . . . . . . . . . . . . . . . . . . . . . . . . . . . . . . . . . . . . Doweling & Bolting . . . . . . . . . . . . . . . . . . . . . . . . . . . . . . . . . . . . . . . . . . . . . . . . . . . . . . . . . . . . . . . . . . . . . . . . . . . . . Guarding . . . . . . . . . . . . . . . . . . . . . . . . . . . . . . . . . . . . . . . . . . . . . . . . . . . . . . . . . . . . . . . . . . . . . . . . . . . . . . . . . . . . . Power Connection . . . . . . . . . . . . . . . . . . . . . . . . . . . . . . . . . . . . . . . . . . . . . . . . . . . . . . . . . . . . . . . . . . . . . . . . . . . . . Conduit Box . . . . . . . . . . . . . . . . . . . . . . . . . . . . . . . . . . . . . . . . . . . . . . . . . . . . . . . . . . . . . . . . . . . . . . . . . . . . . . AC Power . . . . . . . . . . . . . . . . . . . . . . . . . . . . . . . . . . . . . . . . . . . . . . . . . . . . . . . . . . . . . . . . . . . . . . . . . . . . . . . . Rotation . . . . . . . . . . . . . . . . . . . . . . . . . . . . . . . . . . . . . . . . . . . . . . . . . . . . . . . . . . . . . . . . . . . . . . . . . . . . . . . . . . First Time Start Up . . . . . . . . . . . . . . . . . . . . . . . . . . . . . . . . . . . . . . . . . . . . . . . . . . . . . . . . . . . . . . . . . . . . . . . . . . . . . Coupled Start Up . . . . . . . . . . . . . . . . . . . . . . . . . . . . . . . . . . . . . . . . . . . . . . . . . . . . . . . . . . . . . . . . . . . . . . . . . . . . . . Jogging and Repeated Starts . . . . . . . . . . . . . . . . . . . . . . . . . . . . . . . . . . . . . . . . . . . . . . . . . . . . . . . . . . . . . . . . . . . . Section 3 Maintenance & Troubleshooting . . . . . . . . . . . . . . . . . . . . . . . . . . . . . . . . . . . . . . . . . . . . . . . . . . . . . . . . . . . . . . . . . . . . General Inspection . . . . . . . . . . . . . . . . . . . . . . . . . . . . . . . . . . . . . . . . . . . . . . . . . . . . . . . . . . . . . . . . . . . . . . . . . . . . . Relubrication & Bearings . . . . . . . . . . . . . . . . . . . . . . . . . . . . . . . . . . . . . . . . . . . . . . . . . . . . . . . . . . . . . . . . . . . . . . . . Type of Grease . . . . . . . . . . . . . . . . . . . . . . . . . . . . . . . . . . . . . . . . . . . . . . . . . . . . . . . . . . . . . . . . . . . . . . . . . . . . Relubrication Intervals . . . . . . . . . . . . . . . . . . . . . . . . . . . . . . . . . . . . . . . . . . . . . . . . . . . . . . . . . . . . . . . . . . . . . . Relubrication Procedure . . . . . . . . . . . . . . . . . . . . . . . . . . . . . . . . . . . . . . . . . . . . . . . . . . . . . . . . . . . . . . . . . . . . Troubleshooting Chart . . . . . . . . . . . . . . . . . . . . . . . . . . . . . . . . . . . . . . . . . . . . . . . . . . . . . . . . . . . . . . . . . . . . . . . . . . Suggested bearing and winding RTD setting guidelines . . . . . . . . . . . . . . . . . . . . . . . . . . . . . . . . . . . . . . . . . . . . . MN400 1-1 1-1 1-1 1-1 1-2 1-2 1-3 1-4 2-1 2-1 2-1 2-1 2-1 2-2 2-2 2-2 2-2 2-2 2-3 2-4 2-4 2-4 3-1 3-1 3-1 3-1 3-1 3-3 3-4 3-5 Table of Contents i Section 1 General Information ii Table of Contents MN400 Section 1 General Information Overview Important: This manual contains general procedures that apply to Baldor Motor products. Be sure to read and understand the Safety Notice statements in this manual. For your protection, do not install, operate or attempt to perform maintenance procedures until you understand the Warning and Caution statements. A Warning statement indicates a possible unsafe condition that can cause harm to personnel. A Caution statement indicates a condition that can cause damage to equipment. This instruction manual is not intended to include a comprehensive listing of all details for all procedures required for installation, operation and maintenance. This manual describes general guidelines that apply to most of the motor products shipped by Baldor. If you have a question about a procedure or are uncertain about any detail, Do Not Proceed. Please contact your Baldor distributor for more information or clarification. Before you install, operate or perform maintenance, become familiar with the following: S NEMA Publication MG-2, Safety Standard for Construction and guide for Selection, Installation and Use of Electric Motors and Generators. S The National Electrical Code S Local codes and Practices Limited Warranty www.baldor.com/support/warranty_standard.asp Safety Notice: This equipment contains high voltage! Electrical shock can cause serious or fatal injury. Only qualified WARNING: WARNING: WARNING: WARNING: WARNING: WARNING: WARNING: WARNING: WARNING: WARNING: WARNING: MN400 personnel should attempt installation, operation and maintenance of electrical equipment. Be sure that you are completely familiar with NEMA publication MG-2, safety standards for construction and guide for selection, installation and use of electric motors and generators, the National Electrical Code and local codes and practices. Unsafe installation or use can cause conditions that lead to serious or fatal injury. Only qualified personnel should attempt the installation, operation and maintenance of this equipment. Do not touch electrical connections before you first ensure that power has been disconnected. Electrical shock can cause serious or fatal injury. Only qualified personnel should attempt the installation, operation and maintenance of this equipment. Disconnect all electrical power from the motor windings and accessory devices before disassembly of the motor. Electrical shock can cause serious or fatal injury. Be sure the system is properly grounded before applying power. Do not apply AC power before you ensure that all grounding instructions have been followed. Electrical shock can cause serious or fatal injury. National Electrical Code and Local codes must be carefully followed. Avoid extended exposure to machinery with high noise levels. Be sure to wear ear protective devices to reduce harmful effects to your hearing. Surface temperatures of motor enclosures may reach temperatures which can cause discomfort or injury to personnel accidentally coming into contact with hot surfaces. When installing, protection should be provided by the user to protect against accidental contact with hot surfaces. Failure to observe this precaution could result in bodily injury. This equipment may be connected to other machinery that has rotating parts or parts that are driven by this equipment. Improper use can cause serious or fatal injury. Only qualified personnel should attempt to install operate or maintain this equipment. Do not by-pass or disable protective devices or safety guards. Safety features are designed to prevent damage to personnel or equipment. These devices can only provide protection if they remain operative. Avoid the use of automatic reset devices if the automatic restarting of equipment can be hazardous to personnel or equipment. Be sure the load is properly coupled to the motor shaft before applying power. The shaft key must be fully captive by the load device. Improper coupling can cause harm to personnel or equipment if the load decouples from the shaft during operation. Use proper care and procedures that are safe during handling, lifting, installing, operating and maintaining operations. Improper methods may cause muscle strain or other harm. Thermostat contacts automatically reset when the motor has slightly cooled down. To prevent injury or damage, the control circuit should be designed so that automatic starting of the motor is not possible when the thermostat resets. General Information 1-1 Section 1 General Information Safety Notice Continued WARNING: UL Listed motors must only be serviced by UL Approved Authorized Baldor Service Centers if these motors are to be returned to a hazardous and/or explosive atmosphere. WARNING: Pacemaker danger − Magnetic and electromagnetic fields in the vicinity of current carrying carrying conductors and permanent magnet motors can result result in a serious health hazard to persons with cardiac pacemakers, metal implants, and hearing aids. To avoid risk, stay way from the area surrounding a permanent magnet motor. WARNING: Before performing any motor maintenance procedure, be sure that the equipment connected to the motor shaft cannot cause shaft rotation. If the load can cause shaft rotation, disconnect the load from the motor shaft before maintenance is performed. Unexpected mechanical rotation of the motor parts can cause injury or motor damage. WARNING: Use only UL/CSA listed explosion proof motors in the presence of flammable or combustible vapors or dust. WARNING: Motors that are to be used in flammable and/or explosive atmospheres must display the UL label on the nameplate along with CSA listed logo. Specific service conditions for these motors are defined in NFPA 70 (NEC) Article 500. WARNING: Guards must be installed for rotating parts such as couplings, pulleys, external fans, and unused shaft extensions, should be permanently guarded to prevent accidental contact by personnel. Accidental contact with body parts or clothing can cause serious or fatal injury. Caution: To prevent premature equipment failure or damage, only qualified maintenance personnel should perform maintenance. Caution: Do not over−lubricate motor as this may cause premature bearing failure. Caution: Do not over tension belts. Excess tension may damage the motor or driven equipment. Caution: Do not lift the motor and its driven load by the motor lifting hardware. The motor lifting hardware is adequate for lifting only the motor. Disconnect the load (gears, pumps, compressors, or other driven equipment) from the motor shaft before lifting the motor. Caution: If eye bolts are used for lifting a motor, be sure they are securely tightened. The lifting direction should not exceed a 20° angle from the shank of the eye bolt or lifting lug. Excessive lifting angles can cause damage. Caution: To prevent equipment damage, be sure that the electrical service is not capable of delivering more than the maximum motor rated amps listed on the rating plate. Caution: If a HI POT test (High Potential Insulation test) must be performed, follow the precautions and procedure in NEMA MG1 and MG2 standards to avoid equipment damage. If you have any questions or are uncertain about any statement or procedure, or if you require additional information please contact your Baldor distributor or an Authorized Baldor Service Center. Each Baldor Electric Motor is thoroughly tested at the factory and carefully packaged for shipment. When Receiving you receive your motor, there are several things you should do immediately. 1. Observe the condition of the shipping container and report any damage immediately to the commercial carrier that delivered your motor. 2. Verify that the part number of the motor you received is the same as the part number listed on your purchase order. Handling The motor should be lifted using the lifting lugs or eye bolts provided. Caution: Do not lift the motor and its driven load by the motor lifting hardware. The motor lifting hardware is adequate for lifting only the motor. Disconnect the load (gears, pumps, compressors, or other driven equipment) from the motor shaft before lifting the motor. 1. Use the lugs or eye bolts provided to lift the motor. Never attempt to lift the motor and additional equipment connected to the motor by this method. The lugs or eye bolts provided are designed to lift only the motor. Never lift the motor by the motor shaft or the hood of a WPII motor. 2. To avoid condensation inside the motor, do not unpack until the motor has reached room temperature. (Room temperature is the temperature of the room in which it will be installed). The packing provides insulation from temperature changes during transportation. 3. When lifting a WPII (Weather Proof Type 2) motor, do not lift the motor by inserting lifting lugs into holes on top of the cooling hood. These lugs are to be used for hood removal only. A spreader bar should be used to lift the motor by the cast lifting lugs located on the motor frame. 1-2 General Information MN400 4. If the motor must be mounted to a plate with the driven equipment such as pump, compressor etc., it may not be possible to lift the motor alone. For this case, the assembly should be lifted by a sling around the mounting base. The entire assembly can be lifted as an assembly for installation. Do not lift the assembly using the motor lugs or eye bolts provided. Lugs or eye bolts are designed to lift motor only. If the load is unbalanced (as with couplings or additional attachments) additional slings or other means must be used to prevent tipping. In any event, the load must be secure before lifting. If the load is unbalanced (as with couplings or additional attachments) additional slings or other means must be used to prevent tipping. In any event, the load must be secure before lifting. Storage requirements for motors and generators that will not be placed in service for at least six months Storage from date of shipment. Improper motor storage will result in seriously reduced reliability and failure. An electric motor that does not experience regular usage while being exposed to normally humid atmospheric conditions is likely to develop rust in the bearings or rust particles from surrounding surfaces may contaminate the bearings. The electrical insulation may absorb an excessive amount of moisture leading to the motor winding failure. A wooden crate “shell” should be constructed to secure the motor during storage. This is similar to an export box but the sides & top must be secured to the wooden base with lag bolts (not nailed as export boxes are) to allow opening and reclosing many times without damage to the “shell”. Minimum resistance of motor winding insulation is 5 Meg ohms or the calculated minimum, which ever is greater. Minimum resistance is calculated as follows: Rm = kV + 1 where: (Rm is minimum resistance to ground in Meg−Ohms and kV is rated nameplate voltage defined as Kilo−Volts.) Example: For a 480VAC rated motor Rm =1.48 meg−ohms (use 5 MΩ). For a 4160VAC rated motor Rm = 5.16 meg−ohms. Preparation for Storage 1. Some motors have a shipping brace attached to the shaft to prevent damage during transportation. The shipping brace, if provided, must be removed and stored for future use. The brace must be reinstalled to hold the shaft firmly in place against the bearing before the motor is moved. 2. Store in a clean, dry, protected warehouse where control is maintained as follows: a. Shock or vibration must not exceed 2 mils maximum at 60 hertz, to prevent the bearings from brinelling. If shock or vibration exceeds this limit vibration isolation pads must be used. b. Storage temperatures of 10°C (50°F) to 49°C (120°F) must be maintained. c. Relative humidity must not exceed 60%. d. Motor space heaters (when present) are to be connected and energized whenever there is a possibility that the storage ambient conditions will reach the dew point. Space heaters are optional. Note: Remove motor from containers when heaters are energized, reprotect if necessary. 3. Measure and record the resistance of the winding insulation (dielectric withstand) every 30 days of storage. a. If motor insulation resistance decreases below the minimum resistance, contact your Baldor District office. b. Place new desiccant inside the vapor bag and re−seal by taping it closed. c. If a zipper−closing type bag is used instead of the heat−sealed type bag, zip the bag closed instead of taping it. Be sure to place new desiccant inside bag after each monthly inspection. d. Place the shell over the motor and secure with lag bolts. 4. Where motors are mounted to machinery, the mounting must be such that the drains and breathers are fully operable and are at the lowest point of the motor. Vertical motors must be stored in the vertical position. Storage environment must be maintained as stated in step 2. MN400 General Information 1-3 5. Motors with anti−friction bearings are to be greased at the time of going into extended storage with periodic service as follows: a. Motors marked “Do Not Lubricate” on the nameplate do not need to be greased before or during storage. b. Ball and roller bearing (anti−friction) motor shafts are to be rotated manually every 3 months and greased every 6 months in accordance with the Maintenance section of this manual. c. Sleeve bearing (oil lube) motors are drained of oil prior to shipment. The oil reservoirs must be refilled to the indicated level with the specified lubricant, (see Maintenance). The shaft should be rotated monthly by hand at least 10 to 15 revolutions to distribute oil to bearing surfaces. d. “Provisions for oil mist lubrication” – These motors are packed with grease. Storage procedures are the same as paragraph 5b. e. “Oil Mist Lubricated” – These bearings are protected for temporary storage by a corrosion inhibitor. If stored for greater than 3 months or outdoor storage is anticipated, connected to the oil mist system while in storage. If this is not possible, add the amount of grease indicated under “Standard Condition” in Section 3, then rotate the shaft 15 times by hand. 6. All breather drains are to be fully operable while in storage (drain plugs removed). The motors must be stored so that the drain is at the lowest point. All breathers and automatic “T” drains must be operable to allow breathing and draining at points other than through the bearings around the shaft. Vertical motors should be stored in a safe stable vertical position. 7. Coat all external machined surfaces with a rust preventing material. An acceptable product for this purpose is Exxon Rust Ban # 392. Non−Regreaseable Motors Non−regreasable motors with “Do Not Lubricate” on the nameplate should have the motor shaft rotated 15 times to redistribute the grease within the bearing every 3 months or more often. All Other Motor Types Before storage, the following procedure must be performed. 1. Remove the grease drain plug, if supplied, (opposite the grease fitting) on the bottom of each bracket prior to lubricating the motor. 2. The motor with regreasable bearing must be greased as instructed in Section 3 of this manual. 3. Replace the grease drain plug after greasing. 4. The motor shaft must be rotated a minimum of 15 times after greasing. 5. Motor Shafts are to be rotated at least 15 revolutions manually every 3 months and additional grease added every nine months (see Section 3) to each bearing. 6. Bearings are to be greased at the time of removal from storage. Removal From Storage 1. Remove all packing material. 2. Measure and record the electrical resistance of the winding insulation resistance meter at the time of removal from storage. The insulation resistance must not be less than 50% from the initial reading recorded when the motor was placed into storage. A decrease in resistance indicates moisture in the windings and necessitates electrical or mechanical drying before the motor can be placed into service. If resistance is low, contact your Baldor District office. 3. Regrease the bearings as instructed in Section 3 of this manual. 4. Reinstall the original shipping brace if motor is to be moved. This will hold the shaft firmly against the bearing and prevent damage during movement. 1-4 General Information MN400 Section 2 Installation & Operation Overview Location Caution: Mounting Alignment Caution: MN400 Installation should conform to the National Electrical Code as well as local codes and practices. When other devices are coupled to the motor shaft, be sure to install protective devices to prevent future accidents. Some protective devices include, coupling, belt guard, chain guard, shaft covers etc. These protect against accidental contact with moving parts. Machinery that is accessible to personnel should provide further protection in the form of guard rails, screening, warning signs etc. It is important that motors be installed in locations that are compatible with motor enclosure and ambient conditions. Improper selection of the motor enclosure and ambient conditions can lead to reduced operating life of the motor. Proper ventilation for the motor must be provided. Obstructed airflow can lead to reduction of motor life. 1. Open Drip−Proof/WPI motors are intended for use indoors where atmosphere is relatively clean, dry, well ventilated and non−corrosive. 2. Totally Enclosed and WPII motors may be installed where dirt, moisture or dust are present and in outdoor locations. Severe Duty, IEEE 841 and Washdown Duty enclosed motors are designed for installations with high corrosion or excessive moisture conditions. These motors should not be placed into an environment where there is the presence of flammable or combustible vapors, dust or any combustible material, unless specifically designed for this type of service. Hazardous Locations are those where there is a risk of ignition or explosion due to the presence of combustible gases, vapors, dust, fibers, or flyings. Facilities requiring special equipment for hazardous locations are typically classified in accordance with local requirements. In the US market, guidance is provided by the National Electric Code. Do not lift the motor and its driven load by the motor lifting hardware. The motor lifting hardware is adequate for lifting only the motor. Disconnect the load (gears, pumps, compressors, or other driven equipment) from the motor shaft before lifting the motor. The motor must be securely installed to a rigid foundation or mounting surface to minimize vibration and maintain alignment between the motor and shaft load. Failure to provide a proper mounting surface may cause vibration, misalignment and bearing damage. Foundation caps and sole plates are designed to act as spacers for the equipment they support. If these devices are used, be sure that they are evenly supported by the foundation or mounting surface. After installation is complete and accurate alignment of the motor and load is accomplished, the base should be grouted to the foundation to maintain this alignment. The standard motor base is designed for horizontal or vertical mounting. Adjustable or sliding rails are designed for horizontal mounting only. Consult your Baldor distributor or authorized Baldor Service Center for further information. Accurate alignment of the motor with the driven equipment is extremely important. The pulley, sprocket, or gear used in the drive should be located on the shaft as close to the shaft shoulder as possible. It is recommended to heat the pulley, sprocket, or gear before installing on the motor shaft. Forcibly driving a unit on the motor shaft will damage the bearings. 1. Direct Coupling For direct drive, use flexible couplings if possible. Consult the drive or equipment manufacturer for more information. Mechanical vibration and roughness during operation may indicate poor alignment. Use dial indicators to check alignment. The space between coupling hubs should be maintained as recommended by the coupling manufacturer. 2. End-Play Adjustment The axial position of the motor frame with respect to its load is also extremely important. The motor bearings are not designed for excessive external axial thrust loads. Improper adjustment will cause failure. 3. Pulley Ratio The pulley ratio should not exceed 8:1. Do not over tension belts. Excess tension may damage the motor or driven equipment. 4. Belt Drive Align sheaves carefully to minimize belt wear and axial bearing loads (see End-Play Adjustment). Belt tension should be sufficient to prevent belt slippage at rated speed and load. However, belt slippage may occur during starting. 5. Sleeve bearing motors are only suitable for coupled loads. Installation & Operation 2-1 Section 1 General Information Doweling & Bolting After proper alignment is verified, dowel pins should be inserted through the motor feet into the foundation. This will maintain the correct motor position should motor removal be required. (Baldor motors are designed for doweling.) 1. Drill dowel holes in diagonally opposite motor feet in the locations provided. 2. Drill corresponding holes in the foundation. 3. Ream all holes. 4. Install proper fitting dowels. 5. Mounting bolts must be carefully tightened to prevent changes in alignment. Use a flat washer and lock washer under each nut or bolt head to hold the motor feet secure. Flanged nuts or bolts may be used as an alternative to washers. WARNING: Guards must be installed for rotating parts such as couplings, pulleys, external fans, and unused shaft extensions, should be permanently guarded to prevent accidental contact by personnel. Accidental contact with body parts or clothing can cause serious or fatal injury. Guarding Guards must be installed for rotating parts such as couplings, pulleys, external fans, and unused shaft extensions. This is particularly important where the parts have surface irregularities such as keys, key ways or set screws. Some satisfactory methods of guarding are: 1. Covering the machine and associated rotating parts with structural or decorative parts of the driven equipment. 2. Providing covers for the rotating parts. Covers should be sufficiently rigid to maintain adequate guarding during normal service. Power Connection Motor and control wiring, overload protection, disconnects, accessories and grounding should conform to the National Electrical Code and local codes and practices. Flying leads must be insulated with two full wraps of electrical grade insulating tape or heat shrink tubing. Conduit Box For ease of making connections, an oversize conduit box is provided. The box can be rotated 360° in 90° increments. Auxiliary conduit boxes are provided on some motors for accessories such as space heaters, RTD’s etc. AC Power Connect the motor leads as shown on the connection diagram located on the name plate or inside the cover on the conduit box. Be sure the following guidelines are met: 1. AC power is within ±10% of rated voltage with rated frequency. (See motor name plate for ratings). OR 2. AC power is within ±5% of rated frequency with rated voltage. OR 3. A combined variation in voltage and frequency of ±10% (sum of absolute values) of rated values, provided the frequency variation does not exceed ±5% of rated frequency. Performance within these voltage and frequency variations are shown in Figure 2-2. Figure 2-1 Accessory Connections One heater is installed in each end of motor. Leads for each heater are labeled H1 & H2. (Like numbers should be tied together). Three thermistors are installed in windings and tied in series. Leads are labeled T1 & T2. Winding RTDs are installed in windings (2) per phase. Each set of leads is labeled W1, W2, W3, W4, W5, & W6. * One bearing RTD is installed in Drive endplate (PUEP), leads are labeled RTDDE. * One bearing RTD is installed in Opposite Drive endplate (FREP), leads are labeled RTDODE. * Note RTD may have 2−Red/1−White leads; or 2−White/1−Red Lead. 2-2 Installation & Operation MN400 Section 1 General Information +20 Changes in Motor Performance (%) +15 Figure 2-2 Typical Motor Performance VS Voltage Variations Maximum Torque Full -Load Current +10 +5 Full -Load Current Power Factor 0 −5 Efficiency Efficiency −10 −15 −20 Power Factor Maximum Torque −15 −10 −5 0 +5 +10 +15 Voltage Variations (%) Rotation MN400 All three phase motors are reversible. To reverse the direction of rotation, disconnect and lock out power and interchange any two of the three line leads for three phase motors. For single phase motors, check the connection diagram to determine if the motor is reversible and follow the connection instructions for lead numbers to be interchanged. Not all single phase motors are reversible. Adjustable Frequency Power Inverters used to supply adjustable frequency power to induction motors produce wave forms with lower order harmonics with voltage spikes superimposed. Turn−to−turn, phase−to−phase, and ground insulation of stator windings are subject to the resulting dielectric stresses. Suitable precautions should be taken in the design of these drive systems to minimize the magnitude of these voltage spikes. Consult the drive instructions for maximum acceptable motor lead lengths, and proper grounding. Installation & Operation 2-3 Section 1 General Information First Time Start Up Be sure that all power to motor and accessories is off. Be sure the motor shaft is disconnected from the load and will not cause mechanical rotation of the motor shaft. 1. Make sure that the mechanical installation is secure. All bolts and nuts are tightened etc. 2. If motor has been in storage or idle for some time, check winding insulation integrity. 3. Inspect all electrical connections for proper termination, clearance, mechanical strength and electrical continuity. 4. Be sure all shipping materials and braces (if used) are removed from motor shaft. 5. Manually rotate the motor shaft to ensure that it rotates freely. 6. Replace all panels and covers that were removed during installation. 7. Momentarily apply power and check the direction of rotation of the motor shaft. 8. If motor rotation is wrong, be sure power is off and change the motor lead connections. Verify rotation direction before you continue. 9. Start the motor and ensure operation is smooth without excessive vibration or noise. If so, run the motor for 1 hour with no load connected. 10. After 1 hour of operation, disconnect power and connect the load to the motor shaft. Verify all coupling guards and protective devices are installed. Ensure motor is properly ventilated. Coupled Start Up This procedure assumes a coupled start up. Also, that the first time start up procedure was successful. 1. Check the coupling and ensure that all guards and protective devices are installed. 2. Check that the coupling is properly aligned and not binding. 3. The first coupled start up should be with no load. Apply power and verify that the load is not transmitting excessive vibration back to the motor though the coupling or the foundation. Vibration should be at an acceptable level. 4. Run for approximately 1 hour with the driven equipment in an unloaded condition. The equipment can now be loaded and operated within specified limits. Do not exceed the name plate ratings for amperes for steady continuous loads. Jogging and Repeated Starts Repeated starts and/or jogs of induction motors generally reduce the life of the motor winding insulation. A much greater amount of heat is produced by each acceleration or jog than by the same motor under full load. If it is necessary to repeatedly start or jog the motor, it is advisable to check the application with your local Baldor distributor or Baldor Service Center. Heating - Duty rating and maximum ambient temperature are stated on the motor name plate. Do not exceed these values. If there is any question regarding safe operation, contact your local Baldor District Office or Baldor Service Center. 2-4 Installation & Operation MN400 Section 3 Maintenance & Troubleshooting WARNING: UL Listed motors must only be serviced by UL Approved Authorized Baldor Service Centers if these motors are to be returned to a hazardous and/or explosive atmosphere. General Inspection Inspect the motor at regular intervals, approximately every 500 hours of operation or every 3 months, whichever occurs first. Keep the motor clean and the ventilation openings clear. The following steps should be performed at each inspection: WARNING: Do not touch electrical connections before you first ensure that power has been disconnected. Electrical shock can cause serious or fatal injury. Only qualified personnel should attempt the installation, operation and maintenance of this equipment. 1. Check that the motor is clean. Check that the interior and exterior of the motor is free of dirt, oil, grease, water, etc. Oily vapor, paper pulp, textile lint, etc. can accumulate and block motor ventilation. If the motor is not properly ventilated, overheating can occur and cause early motor failure. 2. Use a “Megger” periodically to ensure that the integrity of the winding insulation has been maintained. Record the Megger readings. Immediately investigate any significant drop in insulation resistance. 3. Check all electrical connectors to be sure that they are tight. Bearing grease will lose its lubricating ability over time, not suddenly. The lubricating Relubrication & Bearings ability of a grease (over time) depends primarily on the type of grease, the size of the bearing, the speed at which the bearing operates and the severity of the operating conditions. Good results can be obtained if the following recommendations are used in your maintenance program. Type of Grease A high grade ball or roller bearing grease should be used. Recommended grease for standard service conditions is Polyrex EM (Exxon Mobil). Do not mix greases unless compatibility has been checked and verified. Equivalent and compatible greases include: Texaco Polystar, Rykon Premium #2, Pennzoil Pen 2 Lube and Chevron SRI. Relubrication Intervals Recommended relubrication intervals are shown in Table 3-1. It is important to realize that the recommended intervals of Table 3-1 are based on average use. Refer to additional information contained in Tables 3-2, 3-3 and 3-4. Table 3-1 Relubrication Intervals * NEMA / (IEC) Frame Size Up to 210 incl. (132) Over 210 to 280 incl. (180) Over 280 to 360 incl. (225) Over 360 to 5800 incl. (300) 10000 ** 6000 2700 Hrs. ** ** ** Rated Speed - RPM 3600 1800 5500 Hrs. 12000 Hrs. 3600 Hrs. 9500 Hrs. * 2200 Hrs. 7400 Hrs. *2200 Hrs. 3500 Hrs. 1200 18000 Hrs. 15000 Hrs. 12000 Hrs. 7400 Hrs. 900 22000 Hrs. 18000 Hrs. 15000 Hrs. 10500 Hrs. * Relubrication intervals are for ball bearings. For vertically mounted motors and roller bearings, divide the relubrication interval by 2. ** For motors operating at speeds greater than 3600 RPM, contact Baldor for relubrication recommendations. MN400 Maintenance & Troubleshooting 3-1 Table 3-2 Service Conditions Severity of Service Standard Severe Extreme Hours per day of Operation 8 16 Plus 16 Plus Low Temperature Ambient Temperature Maximum 40° C 50° C >50° C* or Class H Insulation <−29° C ** Atmospheric Contamination Clean, Little Corrosion Moderate dirt, Corrosion Severe dirt, Abrasive dust, Corrosion, Heavy Shock or Vibration * Special high temperature grease is recommended (Dow Corning DC44). Note that Dow Corning DC44 grease does not mix with other grease types. Thoroughly clean bearing & cavity before adding grease. ** Special low temperature grease is recommended (Aeroshell 7). Table 3-3 Relubrication Interval Multiplier Multiplier 1.0 0.5 0.1 1.0 Severity of Service Standard Severe Extreme Low Temperature Some motor designs use different bearings on each motor end. This is normally indicated on the motor nameplate. In this case, the larger bearing is installed on the motor Drive endplate. For best relubrication results, only use the appropriate amount of grease for each bearing size (not the same for both). Table 3-4 Bearings Sizes and Types Frame Size NEMA (IEC) 56 to 140 (90) 140 (90) 180 (100−112) 210 (132) 250 (160) 280 (180) 320 (200) 360 (225) 400 (250) 440 (280) 5000 to 5800 (315−450) 5000 to 5800 (315−450) 360 to 449 (225−280) AC Induction Servo 76 Frame 180 (112) 77 Frame 210 (132) 80 Frame 250(160) * Bearing Description (These are the “Large” bearings (Shaft End) in each frame size) Volume of grease Weight of Grease to to be added Bearing add * 3 in teaspoon oz (Grams) 6203 0.08 (2.4) 0.15 0.5 6205 0.15 (3.9) 0.2 0.8 6206 0.19 (5.0) 0.3 1.0 6307 0.30 (8.4) 0.6 2.0 6309 0.47 (12.5) 0.7 2.5 6311 0.61 (17) 1.2 3.9 6312 0.76 (20.1) 1.2 4.0 6313 0.81 (23) 1.5 5.2 6316 1.25 (33) 2.0 6.6 6319 2.12 (60) 4.1 13.4 6328 4.70 (130) 9.2 30.0 NU328 4.70 (130) 9.2 30.0 NU319 2.12 (60) 4.1 13.4 6207 6210 6213 0.22 (6.1) 0.32 (9.0) 0.49 (14.0) 0.44 0.64 0.99 1.4 2.1 3.3 Weight in grams = .005 DB of grease to be added Note: Not all bearing sizes are listed. For intermediate bearing sizes, use the grease volume for the next larger size bearing. 3-2 Maintenance & Troubleshooting MN400 Caution: To avoid damage to motor bearings, grease must be kept free of dirt. For an extremely dirty environment, contact your Baldor distributor or an authorized Baldor Service Center for additional information. Relubrication Procedure Be sure that the grease you are adding to the motor is compatible with the grease already in the motor. Consult your Baldor distributor or an authorized service center if a grease other than the recommended type is to be used. Caution: Do not over−lubricate motor as this may cause premature bearing failure. With Grease Outlet Plug 1. With the motor stopped, clean all grease fittings with a clean cloth. 2. Remove grease outlet plug. Caution: Over−lubricating can cause excessive bearing temperatures, premature lubrication breakdown and bearing failure. 3. Add the recommended amount of grease. 4. Operate the motor for 15 minutes with grease plug removed. This allows excess grease to purge. 5. Re-install grease outlet plug. Without Grease Provisions Note: Only a Baldor authorized and UL or CSA certified service center can disassemble a UL/CSA listed explosion proof motor to maintain it’s UL/CSA listing. 1. Disassemble the motor. 2. Add recommended amount of grease to bearing and bearing cavity. (Bearing should be about 1/3 full of grease and outboard bearing cavity should be about 1/2 full of grease.) 3. Assemble the motor. Sample Relubrication Determination Assume - NEMA 286T (IEC 180), 1750 RPM motor driving an exhaust fan in an ambient temperature of 43° C and the atmosphere is moderately corrosive. 1. Table 3-1 list 9500 hours for standard conditions. 2. Table 3-2 classifies severity of service as “Severe”. 3. Table 3-4 shows that 1.2 in3 or 3.9 teaspoon of grease is to be added. Note: Smaller bearings in size category may require reduced amounts of grease. MN400 Maintenance & Troubleshooting 3-3 Section 1 General Information Table 3-5 Troubleshooting Chart Symptom Motor will not start Excessive humming Motor Over Heating Possible Causes Usually caused by line trouble, such as, single phasing at the starter. High Voltage. Eccentric air gap. Overload. Compare actual amps (measured) with nameplate rating. Single Phasing. Improper ventilation. Unbalanced voltage. Rotor rubbing on stator. Over voltage or under voltage. Open stator winding. Grounded winding. Improper connections. Bearing Over Heating Misalignment. Excessive belt tension. Excessive end thrust. Excessive grease in bearing. Insufficient grease in bearing. Dirt in bearing. Vibration Misalignment. Rubbing between rotating parts and stationary parts. Rotor out of balance. Resonance. Noise Growling or whining Foreign material in air gap or ventilation openings. Bad bearing. 3-4 Maintenance & Troubleshooting Possible Solutions Check source of power. Check overloads, fuses, controls, etc. Check input line connections. Have motor serviced at local Baldor service center. Locate and remove source of excessive friction in motor or load. Reduce load or replace with motor of greater capacity. Check current at all phases (should be approximately equal) to isolate and correct the problem. Check external cooling fan to be sure air is moving properly across cooling fins. Excessive dirt build-up on motor. Clean motor. Check voltage at all phases (should be approximately equal) to isolate and correct the problem. Check air gap clearance and bearings. Tighten “Thru Bolts”. Check input voltage at each phase to motor. Check stator resistance at all three phases for balance. Perform dielectric test and repair as required. Inspect all electrical connections for proper termination, clearance, mechanical strength and electrical continuity. Refer to motor lead connection diagram. Check and align motor and driven equipment. Reduce belt tension to proper point for load. Reduce the end thrust from driven machine. Remove grease until cavity is approximately 3/4 filled. Add grease until cavity is approximately 3/4 filled. Clean bearing cavity and bearing. Repack with correct grease until cavity is approximately 3/4 filled. Check and align motor and driven equipment. Isolate and eliminate cause of rubbing. Have rotor balance checked are repaired at your Baldor Service Center. Tune system or contact your Baldor Service Center for assistance. Remove rotor and foreign material. Reinstall rotor. Check insulation integrity. Clean ventilation openings. Replace bearing. Clean all grease from cavity and new bearing. Repack with correct grease until cavity is approximately 3/4 filled. MN400 Suggested bearing and winding RTD setting guidelines Most large frame AC Baldor motors with a 1.15 service factor are designed to operate below a Class B (80°C) temperature rise at rated load and are built with a Class H winding insulation system. Based on this low temperature rise, RTD (Resistance Temperature Detectors) settings for Class B rise should be used as a starting point. Some motors with 1.0 service factor have Class F temperature rise. The following tables show the suggested alarm and trip settings for RTDs. Proper bearing and winding RTD alarm and trip settings should be selected based on these tables unless otherwise specified for specific applications. If the driven load is found to operate well below the initial temperature settings under normal conditions, the alarm and trip settings may be reduced so that an abnormal machine load will be identified. The temperature limits are based on the installation of the winding RTDs imbedded in the winding as specified by NEMA. Bearing RTDs should be installed so they are in contact with the outer race on ball or roller bearings or in direct contact with the sleeve bearing shell. Winding RTDs − Temperature Limit In 5C (405C Maximum Ambient) Class B Temp Rise 3 80°C (Typical Design) Alarm Trip 130 140 140 150 Motor Load 3 Rated Load Rated Load to 1.15 S.F. Class F Temp Rise 3 105°C Alarm 155 160 Class H Temp Rise 3 125°C Trip 165 165 Alarm 175 180 Trip 185 185 Note: S Winding RTDs are factory production installed, not from Mod−Express. S When Class H temperatures are used, consider bearing temperatures and relubrication requirements. Bearing RTDs − Temperature Limit In 5C (405C Maximum Ambient) Anti−Friction Sleeve Alarm Trip Alarm Trip 95 100 85 95 110 115 105 110 Note: * Bearing temperature limits are for standard design motors operating at Class B temperature rise. ** High temperature lubricants include some special synthetic oils and greases. Greases that may be substituted that are compatible with Polyrex EM (but considered as “standard” lubricants) include the following: − Texaco Polystar − Rykon Premium #2 − Chevron SRI #2 − Mobilith SHC−100 − Pennzoil Pennzlube EM−2 − Chevron Black Pearl − Darmex 707 − Darmex 711 − Petro−Canada Peerless LLG Bearing Type Oil or Grease Standard* High Temperature** See the motor nameplate for replacement grease or oil recommendation. Contact Baldor application engineering for special lubricants or further clarifications. MN400 Maintenance & Troubleshooting 3-5 3-6 Maintenance & Troubleshooting MN400 Baldor District Offices BALDOR ELECTRIC COMPANY World Headquarters P.O. Box 2400 Fort Smith, AR 72901−2400 (479) 646−4711 Fax (479) 648−5792 www.baldor.com © 2009 Baldor Electric Company MN400 All rights reserved. Printed in USA 2/09 Specifications: CM7058T-I 208V AMPS: BLANK-22: DESIGN CODE: FL EFFICIENCY: FRAME: FRONT-BEARING: GREASE: HERTZ: INSULATION-CLASS: KVA-CODE: CATALOG NUMBER: SPEC. NUMBER: SPEED [rpm]: MOTOR-WEIGHT: NAMEPLATE-SERIAL-NUMBER: OUTPUT [hp]: PHASE: POWER-FACTOR: PULLEY-BEARING: RATING: SERIAL-NUMBER: SERVICE FACTOR: TEMPERATURE-CODE: VOLTAGE: FL AMPS: 65 -B 92.4 284TC 6309 POLYREX EM 60//50 F G CM7058T-I 10E949X350H1 1775//1470 --25//20 3 84 6311 40C AMB-CONT -1.15 T3C 230/460//190/380 61.6/30.8//60/30 Specifications: CM7006-I 208V AMPS: BLANK-22: DESIGN CODE: FL EFFICIENCY: FRAME: FRONT-BEARING: GREASE: HERTZ: INSULATION-CLASS: KVA-CODE: CATALOG NUMBER: SPEC. NUMBER: SPEED [rpm]: MOTOR-WEIGHT: NAMEPLATE-SERIAL-NUMBER: OUTPUT [hp]: PHASE: POWER-FACTOR: PULLEY-BEARING: RATING: SERIAL-NUMBER: SERVICE FACTOR: TEMPERATURE-CODE: VOLTAGE: FL AMPS: 1.8 -B 75.5 56C 6203 POLYREX EM 60//50 F H CM7006-I 35X724-1802G1 1725//1425 45 LBS -.5//.33 3 83 6205 40C AMB-CONT -1.15 T3C 230/460//190/380 1.6/.8//1.4/.7 DANGER Hazardous voltage can cause electrical shock and death. High speed rotating equipment can cause severe personal injury. Lock out/Tag out to prevent personal injury BEFORE starting ANY service or inspection. Avoid injury. NEVER operate without ALL required safety guards in place. Avoid injury. You MUST read and understand all instructions in this manual BEFORE installing. TABLE OF CONTENTS I. GENERAL A. Unpacking and Handling .............................2 B. Safety Accessories & Instructions............2-3 II. INSTALLATION A. Vibration.......................................................3 B. Mounting Methods....................................3-4 C. Duct Work Connections...............................4 D. Safety Guards..............................................4 E. Dampers and Valves....................................4 F. Set Screw & Taper-lock Bushing Torque Values ..............................................5 III. ELECTRICAL A. Disconnect Switches ...................................5 B. Motors.......................................................5-6 C. Maximum Blower Speed..............................6 IV. INITIAL UNIT STARTUP A. Pre-Startup & Post-Startup Checks.............7 B. Vibration....................................................8-9 V. ROUTINE INSPECTION & MAINTENANCE .....9 A. Hardware ...................................................10 B. Motor Bearing Lubrication .........................10 C. Wheel Balance ..........................................10 D. Vibration.....................................................10 E. Dampers and Valves..................................10 F. Safety Equipment or Accessories .........10-11 VI. ORDERING PARTS .........................................11 VII. TROUBLESHOOTING ................................11-12 VIII. LONG TERM STORAGE ............................12-13 IX. WARRANTY, LIABILITY & RETURNS............14 X. PARTS DRAWING ...........................................15 I. GENERAL A. Unpacking: Be careful not to damage or deform any parts of the blower when removing it from the packaging container. All the packaging material should be kept in the event the blower needs to be returned. Handling: Handling of the blower should be performed by trained personnel and be consistent with all safe handling practices. Verify that all lifting equipment is in good operating condition and has the proper lifting capacity. The blower should be lifted using well-padded chains, cables or lifting straps with spreader bars. NEVER lift the blower by an inlet or discharge flange, motor shaft, motor eye bolt, or any other part of the blower assembly that could cause distortion of the blower assembly. B. Safety Instructions & Accessories: 1. Safety Instructions: All installers, operators and maintenance personnel should read AMCA Publication 410-96, “Recommended Safety Practices for Users and Installers of Industrial and Commercial Fans”. This manual is included with the blower. Additional copies can be requested by writing us at Cincinnati Fan, 7697 Snider Rd., Mason, OH 45040-9135 2. Sound: Some blowers can generate sound that could be hazardous to personnel. It is the responsibility of the user to measure the sound levels of the blower and/or system, determine the degree of personnel exposure, and comply with all applicable safety laws and requirements to protect personnel from excessive noise. OMM-09-0509-page 2 3. Air Pressure and Suction: In addition to the normal dangers of rotating machinery, the blower can present additional hazards from the suction or pressure created at the blower inlet or discharge. Suction at the blower inlet can draw materials into the blower where they become high velocity projectiles at the discharge and cause severe personal injury or death. It can also be extremely dangerous to persons in close proximity to the inlet or discharge as the forces involved can overcome the strength of most individuals. WARNING NEVER OPERATE A BLOWER WITH A NON-DUCTED INLET AND/OR DISCHARGE. IF THE BLOWER INLET AND/OR DISCHARGE IS NON-DUCTED, IT IS THE USERS RESPONSIBILITY TO INSTALL AN INLET AND/OR DISCHARGE GUARD. 4. Temperature: Many blowers, blower components and all motors operate at temperatures that could burn someone if they come in contact with them. If this potential hazard could exist in your installation, steps must be taken by the user to protect anyone from coming in contact with this equipment. 5. Spark Resistance; (Per AMCA Standard 99-0401-86 and ISO 13499) DANGER NO GUARANTEE OF ANY LEVEL OF SPARK RESISTANCE IS IMPLIED BY SPARK RESISTANT CONSTRUCTION. IT HAS BEEN DEMONSTRATED THAT ALUMINUM IMPELLERS RUBBING ON RUSTY STEEL CAN CAUSE HIGH INTENSITY SPARKS. AIR STREAM MATERIAL AND DEBRIS OR OTHER SYSTEM FACTORS CAN ALSO CAUSE SPARKS. 6. Safety Accessories; Guards: All moving parts must be guarded to protect personnel. Safety requirements can vary, so the number and types of guards required to meet company, local, state and OSHA regulations must be determined and specified by the actual user or operator of the equipment. NEVER start any blower without having all required safety guards properly installed. All blowers should be checked on a regular schedule, for missing or damaged guards. If any required guards are found to be missing or defective, the power to the blower should be immediately turned off and locked out in accordance with OSHA regulations. Power to the blower should NOT be tuned back on until the required guards have been repaired or replaced. This blower can become dangerous due to a potential “windmill” effect, even though all electrical power has been turned off or disconnected. The blower wheel should be carefully secured to prevent any rotational turning BEFORE working on any parts of the blower/motor assembly that could move. 7. Access or Inspection Doors: DANGER NEVER OPEN ANY ACCESS OR INSPECTION DOORS WHILE THE BLOWER IS OPERATING. SERIOUS INJURY OR DEATH COULD RESULT FROM THE AFFECTS OF AIR PRESSURE, AIR SUCTION OR MATERIAL THAT IS BEING CONVEYED. DISCONNECT OR LOCK OUT POWER TO THE BLOWER AND LET THE BLOWER WHEEL COME TO A COMPLETE STOP BEFORE OPENING ANY TYPE OF ACCESS OR INSPECTION DOOR. II. INSTALLATION A. Vibration: Before any mounting method is selected, the user should be aware of the effects vibration will have on the blower, motor and other parts. Improper blower installation can cause excessive vibration causing premature wheel and/or motor bearing failure, that is not covered under warranty. I WARNING SHUT THE BLOWER DOWN IMMEDIATELY IF THERE IS ANY SUDDEN INCREASE IN VIBRATION. OMM-09-0509-page 3 B. Mounting Methods: An Arrangement 4HM blower is an Arrangement 4, direct driven blower without the bottom base under the motor. If the motor being supplied is a foot mounted motor, an angle base must be used to connect the blower to the motor. A C-Face motor can be bolted directly to the housing without using an angle bracket. Most Arrangement 4HM blowers are supplied with an inlet or discharge flange for mounting the blower to some type of equipment. Some are supplied with both inlet and discharge flanges. CAUTION In all cases where the blower flange will be the only connection with another structure, the structure MUST be braced enough and/or rigid enough so as not to allow a resonance vibration to occur. Some form of additional bracing under the motor, supplied and installed by the customer, might be required to maintain vibration levels below the maximum limits as indicated in Fig. 3 on page 9. If the blower has an inlet and a discharge flange, be careful not to cause “binding” when bolting them down. That will most definitely cause a vibration problem. 1. Mounting Blower By Inlet Flange only; a. With motor shaft horizontal (parallel with floor): If mounting the blower by the inlet flange only and with the motor shaft horizontal (parallel with floor), it is very likely additional support under the motor will be required. b. With motor shaft vertical (perpendicular to floor): This is the best way to mount an Arrangement 4HM blower as long as the mounting plate the flange will be bolted to is rigid enough to support the weight of the blower/motor assembly. 2. Mounting Blower By Discharge Flange only; a. With motor shaft horizontal or vertical: Because of the forces involved, it will most likely be necessary to add additional support under the motor. Mount the blower and take the vibration readings as shown in Fig. 2 on page 8. If they exceed the maximums shown in Fig. 3 on page 9, you will need to add additional support. C. Duct Work Connections: All ducting or accessories, added by the user, should be independently supported. DO NOT use the blower/motor assembly to support any additional weight. Inlet and/or discharge duct elbows should be located a minimum of 2 blower wheel diameters from the blower. Any duct elbows located closer than 2 wheel diameters to the blower inlet or discharge WILL reduce the air performance and blower efficiency. Any duct elbows near the blower discharge should be in the same rotational direction as the blower rotation. Non-Ducted Blower Inlet: Any blower with no ducting on the inlet must have an inlet guard. The blower should be located so the blower inlet is, at least, 1 wheel diameter away from any wall or bulkhead to eliminate a reduction in air flow. Non-Ducted Blower Discharge: Any blower with no ducting on the discharge must have a discharge guard. D. Safety Guards: Cincinnati Fan offers guards, as optional, to keep your blower in compliance with OSHA safety regulations. These include inlet or discharge guards. Any blowers built with high temperature construction, a “heat slinger guard” is standard. It is the responsibility of the user to make sure this blower meets all local, state and OSHA safety regulations. If you have a specific guard requirement not covered by OSHA, please contact the local Cincinnati Fan sales office for assistance. E. Dampers and Valves: (Airflow control devices) If the blower is supplied with any type of air flow control device, it should be closed before initial start-up of the blower to minimize overloading of the motor. Any airflow control device, with bearings, should be maintained in accordance with the manufacturers instructions. Any air flow control device, with an automatic control mechanism, should be adjusted per the manufacturers recommendations. OMM-09-0509-page 4 F. Set Screw and Taper-lock Bushing Torque Values: All blower wheel set screws are tightened to the proper torque prior to shipment. Some wheels may have taper-lock hubs and split, taper-lock bushings to secure the wheel to the motor shaft. NOTE: Check all set screw or taper-lock bushing torques. Forces encountered during shipment, handling, rigging and temperature can affect factory settings. For correct torque values, see Tables 1 and 2 below. Table 1 Table 2 SET SCREW TORQUE VALUES TORQUE VALUES FOR TAPER-LOCK BUSHINGS Diameter & Number of Treads/Inch Hex Wrence Size (Across Flats) Required Torque (Inch Pounds) 1/4-20 5/16-18 3/8-16 7/16-14 1/2-13 5/8-11 1/8” 5/32” 3/16” 7/32” 1/4” 5/16” 65 165 228 348 504 1104 Taper-lock Bushing Size H Required Torque (Inch Pounds) 95 B P Q R 192 192 350 350 CAUTION Set screws should NEVER be used more than once. If the set screws are loosened, they MUST be replaced. Use only knurled, cup-point, set screws with a nylon locking patch. III. ELECTRICAL A. Disconnect Switches: All blower motors should have an independent disconnect switch located in close visual proximity to turn off the electrical service to the blower motor. Disconnects must be locked out in accordance with OSHA “lock out-tag out” procedures any time inspection or maintenance is being performed on the blower and/or motor assembly. The “lock out-tag out” procedure should be performed by a licensed electrician or authorized personnel. All disconnects should be sized in accordance with the latest NEC codes (National Electric Codes) and any local codes and should be installed only by a licensed electrician. “Slow blow” or “time delay” fuses or breakers should be used since the initial start-up time for the blower motor, although rare, can be up to 10 seconds. B. Motors: DANGER ALL WIRING CONNECTIONS, INSPECTION AND MAINTENANCE OF ANY MOTOR MUST BE PERFORMED BY A LICENSED ELECTRICIAN IN ACCORDANCE WITH THE MOTOR MANUFACTURERS RECOMMENDATIONS, ALL ELECTRICAL CODES AND OSHA REGULATIONS. FAILURE TO PROPERLY INSTALL, MAKE WIRING CONNECTIONS, INSPECT OR PERFORM ANY MAINTENANCE TO A MOTOR CAN RESULT IN MOTOR FAILURE, PROPERTY DAMAGE, EXPLOSION, ELECTRICAL SHOCK AND DEATH. 1. DO NOT connect or operate a motor without reading the motor manufacturers instructions supplied with the blower. The basic principle of motor maintenance is: KEEP THE MOTOR CLEAN AND DRY. This requires periodic inspections of the motor. The frequency of the inspections depends on the type of motor, the service and environment it will be subjected to and the motor manufacturers instructions. 2. Cleaning: Cleaning should be limited to exterior surfaces only. Follow motor manufacturers cleaning instructions. 3. Lubrication: Most small motors have sealed bearings that are permanently lubricated for the life of the motor. Some larger motors have grease plugs that should be replaced with grease fittings to perform re-lubrication. These motors, or any motor with grease fittings, should be lubricated in accordance with the motor manufacturers recommendations. Lubrication frequency depends on the motor horsepower, speed and service. BE SURE you use compatible grease and DO NOT over grease. 4. Location: If the motor will be outside and subjected to the weather, it is recommended that a weather cover be installed to keep rain and snow off of the motor. No motors are guaranteed to be “watertight”. Be careful to allow enough openings between the motor and the motor cover to let the motor ”breath”. If the back end of the motor is covered, the cover should be no closer than 3” to the back of the motor for proper ventilation. OMM-09-0509-page 5 5. Wiring Connections: All wiring connections should be made for the proper voltage and phase as shown on the motor nameplate. Connections should follow the motor manufacturers recommendations as shown on the wiring schematic. This wiring diagram will be located on the outside of the motor, inside of the motor conduit box or on the motor nameplate. Reversing some wires might be necessary to get the correct blower rotation. 6. Motors with Thermal Overload Protection: If a motor is equipped with thermal overloads, the thermal overload must be wired per the wiring schematic to be operable. There are 3 types of thermal overloads: a. Automatic: These will automatically shut the motor down if the internal temperature exceeds the design limits. DANGER MAKE SURE YOU LOCK OUT THE POWER TO THE MOTOR BEFORE INSPECTING ANY MOTOR WITH AUTOMATIC THERMALS. WHEN THE THERMALS COOL DOWN, THEY WILL ALLOW THE MOTOR TO AUTOMATICALLY START UP AGAIN, UNLESS YOU HAVE LOCKED OUT THE POWER TO THE MOTOR. b. Manual: These motors will have a button on them. If the motor overheats, it will shut down. After you have inspected the motor and eliminated the over heating problem, you will need to “reset” it by pushing the button. You should still lock out the power BEFORE inspecting the motor. c. Thermostats: This type of thermal is a temperature sensing device ONLY. If the motor overheats, the thermostats will open or close (depending on the type) and send a “signal” to the electrical box. THEY WILL NOT TURN THE MOTOR OFF. These are pilot circuit devices that must be connected to the magnetic starter circuit. 7. EXPLOSION PROOF Motors: No motor is explosion proof. Explosion proof (EXP) motors are designed so if there is an explosion WITHIN the motor, the explosion will be CONTAINED INSIDE the motor and not allowed to get out to the atmosphere. All explosion proof motors must be selected based on the atmosphere and/or the environment the motor will be operating in. Explosion proof motors are designed, rated, and labeled for their operating conditions based on Classes, Groups and “T” Codes. The Class, Group and “T” Code of an EXP motor MUST be selected based on the atmosphere and/or environmental conditions the motor will be operating in. Consult the NEC (National Electric Code) and the NFPA (National Fire Protection Association) for the proper EXP motor Class, Group and “T” Code required for your specific application and location. DANGER IF AN EXPLOSION PROOF MOTOR IS USED IN AN AREA CONTAINING VOLITILE LIQUIDS, GASES, FUMES OR DUST FOR WHICH THE MOTOR WAS NOT DESIGNED TO OPERATE IN, AN EXPLOSION AND/OR FIRE CAN OCCUR. NOTICE: a. All EXP motors have some type of thermal overload as required by UL (Underwriters Laboratories). Refer to all of Section 6 above. b. All EXP motors are required to have the UL (Underwriters Laboratories) and CSA (Canadian Standards Association) listing numbers on the motor name plate or on a separate plate attached to the motor. The Class, Group and “T” Code the motor is designed for must also be listed. 8. Normal Motor Operating Temperatures: Using your hand to test the normal running temperature of a motor can be a very painful experience; The normal operating temperature of a fully loaded, open type, electric motor operating in a 70°F. (21° C.) ambient temperature is 174°F. (79° C.) C. Maximum Blower Speed and Motor Speed Controllers: If you will be using any type of motor speed controller with this blower, DO NOT exceed the maximum safe blower speed. Installing and using a speed control devise requires special training and certification as required by the speed control manufacturer. See the manufacturers instructions for proper use, installation and wiring connections for the maximum speed settings. It may also be necessary to “block out” some speeds to eliminate a resonant vibration problem. The maximum safe blower speed is shown on the data sheet shipped with the blower. If you have lost the data sheet, contact Cincinnati Fan or our sales office for your area. You must have the serial number from the blower name plate for us to determine the maximum safe blower speed. Cincinnati Fan will only extend the motor manufacturers warranty, when used with a speed controlling devise, if the motor has the words “Inverter Duty” marked on the motor name plate. If the motor does not have “Inverter Duty” marked on the motor name plate, and you have a motor failure, you will be required to contact the motor manufacturer for any service or warranty claims. OMM-09-0509-page 6 IV. INITIAL UNIT STARTUP NOTICE: Failure to complete and document all the following pre-startup and both post-startup checks, listed in sections A (below) and B on page 8, could void all warranties. A. Pre-Startup & Post-Startup Checks: (Check blocks as each step is completed. Retain this for your records.) DATE: ___________________ A1. Pre-Startup Checks Completed By: ___________________________________ A2. 8 Hour, Post-Startup Checks Completed By: _______________________ DATE: ___________________ A3. 3 Day, Post-Startup Checks Completed By: _____________________ DATE: ___________________ MAKE SURE POWER TO THE MOTOR IS LOCKED OUT BEFORE STARTING PRE-STARTUP OR POST-STARTUP CHECKS. 1. ■ ■ ■ If possible, CAREFULLY spin the blower wheel by hand to ensure it rotates freely and no rubbing or clicking noise is heard. 2. ■ ■ ■ Check all blower mounting flange and duct work hardware to make sure it is tight. 3. ■ ■ ■ Check all blower wheel set screws to make sure they are tight per Table 1 on page 5. 4. ■ ■ ■ If the wheel has a taper-lock bushing, make sure the bolts are tightened per Table 2 on page 5. 5. ■ ■ ■ Make certain there is no foreign material in the blower or duct work that can become a projectile. 6. ■ ■ ■ Make sure any inspection doors in the duct work are securely bolted or locked. 7. ■ ■ ■ Ensure all electrical power components are properly sized and matched for your electrical system. 8. ■ ■ ■ Check that all required guards are properly secured. 9. ■ ■ ■ Any dampers should be fully opened and closed to make sure there is no binding or interference. 10. ■ ■ ■ If your blower is mounted on an elevated support structure, make sure the structure is welded at all the joint connections and the structure is properly braced to prevent “side sway”. 11. ■ ■ ■ Close any dampers to minimize load on motor. Especially on blowers with high temperature construction. Never subject a “cold” blower to a “hot” gas stream. If the blower will be handling “hot gases” greater than 150°F (65°C) it is imperative that the blower be subjected to a gradual rate of temperature increase, not to exceed 15°F/minute (8°C/minute). The same temperature limits are also important when the blower is experiencing a drop in temperature until the temperature drops down to 150°F (65°C). Only, when the entire blower has reached an equilibrium temperature of 150°F (65°C), or less, should the power be turned off. 12. ■ ■ ■ Make sure the power source connections to the blower motor are per the motor manufacturers instructions. 13. ■ ■ ■ Make sure the blower wheel is stationary prior to startup. Starting a blower with a wheel that is rotating backwards can cause wheel damage. 14. ■ ■ ■ Apply power to the blower motor momentarily (i.e. “bump start”) to check for proper blower wheel rotation. If the blower is rotating in the wrong direction, reconnect the motor leads per the motor manufacturers wiring schematic. Blower rotation is determined by viewing the blower from the motor side of the blower, NOT from the inlet side. After reconnecting the leads, repeat this step. See Fig. 1 below. Fig. 1 Clockwise (CW) Rotation Counter-Clockwise (CCW) Rotation 15. ■ ■ ■ Apply power to the blower motor and let it come up to full speed. Turn off the power. Look and listen for any unusual noise or mechanical abnormality while the blower wheel is still spinning. If any are noticed, lock out the power, wait for the blower wheel to come to a complete stop, locate the cause and correct it. 16. ■ ■ ■ Unlock power and start the blower. 17. ■ ■ ■ Measure, record and keep the following motor data for future reference and comparison: (Single phase motors will only have L1 and L2 leads) Amperage draw on each motor lead: L1 _______ L2 _______ L3 _______ (Running amps SHOULD NOT exceed the motor nameplate amps for the voltage being operated on) Voltage coming to motor leads: L1_______ L2_______ L3_______ (Should be about the same input voltage on all leads) OMM-09-0509-page 7 B. Vibration: The blower was balanced at the factory to comply with ANSI/AMCA Standard 204-05, Category BV-2. However, rough handling in shipment and/or erection, weak and/or non-rigid foundations, and misalignment may cause a vibration problem after installation. After installation, the vibration levels should be checked by personnel experienced with vibration analysis and vibration analysis equipment. NOTE: The blower SHOULD NOT be operated if the vibration velocity of the fan exceeds 0.50 inches per second, filter out, with the blower rigidly mounted. Vibration readings for direct driven blowers should be taken on the motor at the top, sides and end as per Fig. 2 below. After you have taken your vibration readings, write them down in the spaces below and keep for future comparison. DANGER If the blower is going to be conveying material, it is the users responsibility to periodically turn the blower off and lock out the power. The blower wheel should then be checked for material build-up and/or erosion. If material has built up on any parts of the wheel, it MUST be removed and cleaned before it is put back into service. If any parts of the wheel have been eroded, the wheel MUST be replaced. Failure to perform this inspection can cause excessive vibration that will damage the blower and/or motor bearings. When vibration becomes excessive, it will lead to complete blower failure that could cause property damage, severe personal injury and death. The user must determine the frequency of this inspection based on the actual circumstances of their operation, BUT checking the vibration readings should NEVER exceed a 12 month period. For the AMCA/ANSI standard for vibration limits, see Fig. 3 on page 9. Fig. 2 VIBRATION METER PROBE POSITIONS For Arrangement 4HM Blowers OMM-09-0509-page 8 Fig. 3 Vibration Severity Chart V. ROUTINE INSPECTION & MAINTENANCE Periodic inspection of all the blower parts is the key to good maintenance and trouble-free operation. The frequency of inspections must be determined by the user and is dependent upon the severity of the application. BUT, it should NEVER exceed a 12 month period. The user should prepare an inspection and maintenance schedule and make sure it is adhered to. WARNING BEFORE STARTING ANY INSPECTION OR MAINTENANCE, BE SURE BLOWER IS TURNED OFF, POWER IS LOCKED OUT AND THE BLOWER WHEEL HAS BEEN CAREFULLY SECURED TO PREVENT WIND MILLING. IF THE OPERATING CONDITIONS OF THE BLOWER ARE TO BE CHANGED (SPEED, PRESSURE, TEMPERATURE, ETC.) CONSULT CINCINNATI FAN, OR OUR SALES OFFICE FOR YOUR TERRITORY, TO DETERMINE IF THE UNIT WILL OPERATE SAFELY AT THE NEW CONDITIONS. OMM-09-0509-page 9 A. Hardware: All blower and foundation hardware should be checked to make sure it is tight. Wheel set screws or taper-lock bushings should be tightened to the torque values shown in Tables 1 and 2 on page 5. NOTE: If any set screws have come loose, they must be thrown away and replaced. NEVER use set screws more than once. Replace with knurled, cup-point set screws with a nylon locking patch. B. Motor Bearing Lubrication: 1. Motor Bearings: Most smaller motors have sealed bearings that never require re-lubrication for the life of the motor. For any motors with grease fittings, consult the motor manufacturers recommendations with reference to the lubrication frequency and the type of grease that should be used. DO NOT over grease the motor bearings. Generally, 1-2 shots should be enough. Use a hand operated grease gun at no more than 40 PSI. IF POSSIBLE, CAREFULLY lubricate the motor bearings while the motor is running. C. Wheel Balance: All blower wheels are balanced at the factory. It is not uncommon that additional “trim balancing” is required after the blower is assembled. Trim balancing of the blower assembly, in the field, is typically always necessary for all replacement wheels. After any wheel is installed, the final balance of the entire blower assembly should be checked. Refer to Section B on page 8 and Fig. 3 on page 9. Air stream material or chemicals can cause abrasion or corrosion of the blower parts. This wear is generally uneven and, over time, will lead to the wheel becoming unbalanced, causing excessive vibration. When that happens, the wheel must be rebalanced or replaced. The other air stream components should also be inspected for wear or structural damage and cleaned or replaced if necessary. After cleaning any blower wheel, it should be balanced and then “trim balanced” on the motor shaft. There are three ways to balance a blower wheel: 1. Add balancing weights for fabricated aluminum, steel or stainless steel wheels: Balance weights should be rigidly attached to the wheel at a location that will not interfere with the blower housing nor disrupt air flow. They should (if at all possible) be welded to the wheel. When trim balancing the wheel, on the blower, be sure to ground the welder directly to the blower wheel. Otherwise, the welding current will likely pass through the motor and damage the motor bearings. 2. Grinding off material for cast aluminum wheels: If you are grinding on the wheel to remove material, be very careful not to grind too much in one area. That could affect the structural integrity of the wheel. 3. Forward curved wheels, Models LM and LMF only (also known as squirrel cage or multivane wheels). These wheels have balancing clips attached to individual blades around the wheel. That is the only proper way to balance this type of wheel. NOTE: Removing any forward curve wheel from the blower to clean it, requires special attention when reinstalling the wheel back into the blower housing. Make sure you reinstall the wheel so the proper wheel-to-inlet clearance is maintained. Failure to do this will affect the blowers airflow (CFM), static pressure (SP) capabilities and efficiency. Consult Cincinnati Fan or our local sales office for your area for assistance if necessary. D. Vibration: As mentioned previously in this manual, excessive vibration can cause premature motor bearing failure that could lead to catastrophic failure of the blower. After performing any routine maintenance, the vibration readings should be taken again. New readings should be taken (maximum every 12 months) and compared to the readings you recorded in Fig. 2 on page 8, during the initial startup. If any major differences are present, the cause should be determined and corrected before the blower is put back into operation. The most common causes of vibration problems are: 1. Wheel unbalance. 2. Mechanical looseness. 3. Poor blower inlet and/or discharge conditions. 4. Foundation stiffness. E. Dampers and Valves: (Airflow control devices) Turn off and lock out power to the blower motor. Any dampers or valves should be periodically inspected to make sure all parts are still operable within their full range and there is no interference with any other damper or blower components. Any bearings or seals should be checked for their proper function. The manufacturers maintenance instructions should be followed. F. Safety Equipment & Accessories: It is the users responsibility to make sure that all safety guards required by the company, local, state and OSHA regulations are properly attached and fully functional at all times. If any guards become defective or non-functional at any time, the power to the blower MUST be turned off and locked out until complete repairs and/or replacements have been made, installed and inspected by authorized personnel. OMM-09-0509-page 10 Any accessories used in conjunction with the blower should also be inspected to make sure they are functioning within their intended limits and design specifications. The manufacturers maintenance manuals should be referred to for correct maintenance procedures. These accessories include, but are not limited to, the following: Shaft seals, inspection doors, vibration isolators or vibration bases, air flow or pressure measuring equipment, hoods, controls, special coatings, silencers, expansion joints, valves, flexible connectors and filters. VI. ORDERING REPLACEMENT PARTS: Under normal conditions, you should not need any spare or replacement parts for at least 24 months after shipment from Cincinnati Fan. That does not include any wear due to abrasion, corrosion, excessive temperatures, abuse, misuse, accident or any severe conditions the fan was not designed for. NOTICE: 1. If this blower is vital to any process that could cost you lost revenue, we strongly recommend that you keep a replacement blower wheel and motor at your location. 2. If this blower is vital for the safety of any people and/or animals, we strongly recommend that you keep a complete blower/motor assembly, as originally ordered, at your location. To order any parts or complete units, contact us for the name of our sales office for your area. Or you can find them on our website at: www.cincinnatifan.com WE MUST HAVE THE BLOWER SERIAL NUMBER FROM THE BLOWER NAME PLATE TO IDENTIFY PARTS CORRECTLY. VII. TROUBLESHOOTING DANGER Troubleshooting should only be performed by trained personnel. Any potential electrical problems should only be checked by a licensed electrician. All safety rules, regulations and procedures MUST be followed. Failure to follow proper procedures can cause property damage, severe bodily injury and death. Potential problems and causes listed below are in no order of importance or priority. The causes are only a list of the most common items to check to correct a problem. If you find the cause of a problem, DO NOT assume it is the ONLY cause of that problem. Different problems can have the same causes. PROBLEM Excessive Vibration 1. 2. 3. 4. 5. 6. 7. 8. 9. 10. Airflow (CFM) Too Low 1. 2. 3. 4. 5. 6. 7. 8. 9. 10. Airflow (CFM) Too High 1. 2. 3. 4. CAUSE Loose mounting bolts, wheel set screws, taper-lock hubs. Worn or corroded blower wheel. Accumulation of foreign material on blower wheel. Bent motor shaft. Worn motor bearings. Motor out of balance. Inadequate structural support. Support structure not sufficiently cross braced. Weak or resonant foundation. Foundation not flat and level. Blower wheel turning in wrong direction (rotation). Actual system static pressure (SP) is higher than expected. Motor speed (RPM) too low. Dampers or valves not adjusted properly. Leaks or obstructions in duct work. Filters dirty. Inlet and/or discharge guards are clogged. Duct elbow too close to blower inlet and/or discharge. Improperly designed duct work Blower wheel not properly located relative to the inlet bell (Models LM and LMF only). Actual system static pressure (SP) is lower than expected. Motor speed (RPM) too high. Filter not in place. Dampers or valves not adjusted properly. OMM-09-0509-page 11 VIII. LONG TERM STORAGE INSTRUCTIONS: (Storage exceeding 30 days after receipt of equipment) NOTE: Failure to adhere to these instructions voids all warranties in their entirety. 1. Storage site selection: a. Level, well-drained, firm surface, in clean, dry and warm location. Minimum temperature of 50°F (10°C). b. Isolated from possibility of physical damage from construction vehicles, erection equipment, etc. c. Accessible for periodical inspection and maintenance. 2. The blower should be supported under each corner of its base to allow it to “breath”. Supports (2 x 4’s, timbers, or railroad ties) should be placed diagonally under each corner. 3. If the equipment is to be stored for more than three (3) months, the entire blower assembly must be loosely covered with plastic, but not tightly wrapped. 4. Storage Maintenance: A periodic inspection and maintenance log, by date and action taken, must be developed and maintained for each blower. See example below. Each item must be checked monthly. EXAMPLE: Storage / Maintenance Schedule Log Long Term Storage instructions continued on page 13. OMM-09-0509-page 12 5. General Motor Procedure: If the motor is not put into service immediately, the motor must be stored in a clean, dry, warm location. Minimum temperature of 50°F. (10°C,). Several precautionary steps must be performed to avoid motor damage during storage. a. Use a “Megger” each month to ensure that integrity of the winding insulation has been maintained. Record the Megger readings. Immediately investigate any significant drop in insulation resistance. b. DO NOT lubricate the motor bearings during storage. Motor bearings are packed with grease at the factory. c. If the storage location is damp or humid, the motor windings must be protected from moisture. This can be done by applying power to the motor’s space heaters, (IF AVAILABLE) while the motor is in storage. If the motor does not have space heaters, storing it in a damp or humid location will, very quickly, cause internal corrosion and motor failure which is not warranted. NOTE: For specific storage instructions, for the actual motor and any accessory parts that were supplied, refer to the manufacturer’s instructions. OMM-09-0509-page 13 IX. LIMITED WARRANTY: Cincinnati Fan & Ventilator Company (Seller) warrants products of its own manufacture, against defects of material and workmanship under normal use and service for a period of eighteen (18) months from date of shipment or twelve (12) months from date of installation, whichever occurs first. This warranty does not apply to any of Seller’s products or any part thereof which has been subject to extraordinary wear and tear, improper installation, accident, abuse, misuse, overloading, negligence or alteration. This warranty does not cover systems or materials not of Seller’s manufacture. On products furnished by Seller, but manufactured by others, such as motors, Seller extends the same warranty as Seller received from the manufacturer thereof. Expenses incurred by Purchaser’s in repairing or replacing any defective product will not be allowed except where authorized in writing and signed by an officer of the Seller. The obligation of the Seller under this warranty shall be limited to repairing or replacing F.O.B. the Seller’s plant, or allowing credit at Seller’s option. THIS WARRANTY IS EXPRESSLY IN LIEU OF ALL OTHER WARRANTIES EITHER EXPRESSED OR IMPLIED INCLUDING THE WARRANTIES OF MERCHANTABILITY AND FITNESS FOR A PARTICULAR PURPOSE AND OF ALL OTHER OBLIGATIONS AND LIABILITIES OF THE SELLER. THE PURCHASER ACKNOWLEDGES THAT NO OTHER REPRESENTATIONS WERE MADE TO PURCHASER OR RELIED UPON BY PURCHASER WITH RESPECT TO THE QUALITY OR FUNCTION OF THE PRODUCTS HEREIN SOLD. Removal of the Sellers nameplate or any generic fan nameplate containing the fan serial number voids all warranties, either written or implied. Failure to complete and document all the pre-startup and post startup checks and perform the suggested routine maintenance checks voids all warranties, either written or implied. LIMITATION OF LIABILITY: Notice of any claim, including a claim for defect in material or workmanship, must be given to Seller in writing within 30 days after receipt of the equipment or other products. Seller reserves the right to inspect any alleged defect at Purchaser’s facility before any claim can be allowed and before adjustment, credit, allowance replacement or return will be authorized. See RETURNS below. Seller’s liability with respect to such defects will be limited to the replacement, free of charge, of parts returned at Purchaser’s expense F.O.B. Seller’s plant and found to be defective by the Seller. IN NO EVENT WILL SELLER BE LIABLE FOR SPECIAL, INDIRECT, INCIDENTAL OR CONSEQUENTIAL DAMAGES, WHETHER IN CONTACT, TORT, NEGLIGENCE, STRICT LIABILITY OR OTHERWISE, INCLUDING WITHOUT LIMITATION DAMAGES FOR INJURY TO PERSONS OR PROPERTY, LOST PROFITS OR REVENUE, LOST SALES OR LOSS OF USE OF ANY PRODUCT SOLD HEREUNDER. PURCHASER’S SOLE AND EXCLUSIVE REMEDY AGAINST SELLER WILL BE THE REPLACEMENT OF DEFECTIVE PARTS AS PROVIDED HEREIN OR REFUND OF THE PURCHASE PRICE FOR DEFECTIVE PRODUCTS, AT SELLER’S SOLE OPTION. SELLER’S LIABILITY ON ANY CLAIM, WHETHER IN CONTRACT, TORT, NEGLIGENCE, STRICT LIABILITY OR OTHERWISE, FOR ANY LOSS OR DAMAGE ARISING OUT OF OR IN CONNECTION WITH PURCHASER’S ORDER OR THE PRODUCTS OR EQUIPMENT PURCHASED HEREUNDER, SHALL IN NO CASE EXCEED THE PURCHASE PRICE OF THE EQUIPMENT GIVING RISE TO THE CLAIM. RESPONSIBILITY: It is the understanding of the Seller that Purchaser and/or User will use this equipment in conjunction with additional equipment or accessories to comply with all Federal, State and local regulations. The Seller assumes no responsibility for the Purchaser’s or Users compliance with any Federal, State and local regulations. RETURNS: Cincinnati Fan & Ventilator Company assumes no responsibility for any material returned to our plant without our permission. An RMA (Return Material Authorization) number must be obtained and clearly shown on the outside of the carton or crate and on a packing slip. Any items returned must be shipped freight prepaid. Failure to comply will result in refusal of the shipment at our receiving department. DISCLAIMER This manual, and all its content herein, is based on all applicable known material at the time this manual was created. Any parts of this manual are subject to change at any time and without notice. If any statements, diagrams and/or instructions contained herein, for components not manufactured by the Seller, conflict with instructions in the manufacturer’s manual (i.e.: motors, dampers, etc.), the instructions in the manufacturer’s manual, for that component take precedent. Should you want the latest version of this manual, please contact us or our sales office for your area. Or, you can print a current version by going to our website at: www.cincinnatifan.com 7697 Snider Road, Mason, OH 45040-9135 Phone: (513) 573-0600 Fax: (513) 573-0640 E-Mail: [email protected] OMM-09-0509-page 14 X. PARTS DRAWING: PLEASE NOTE Cincinnati Fan manufactures many models and arrangements with special variations. For that reason, the maintenance manuals contained on our website do not include a parts drawing nor the completed blower or fan specifications on page 1. For the parts drawing of all the standard components and specifications for the specific blower or fan that you have, please contact our local Cincinnati Fan sales office for your area. You will need to give them the serial number shown on the blower or fan nameplate so they can supply you the correct information. Click on “Contact a Sales Rep” on our website for the name and contact information for our local sales office for your area. www.cincinnatifan.com OMM-09-0509-page 15