1
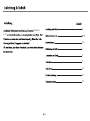
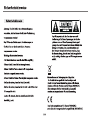
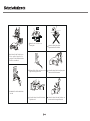
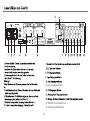
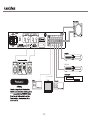
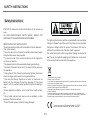
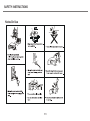
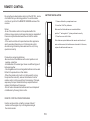
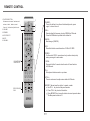
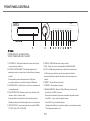
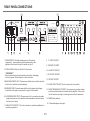
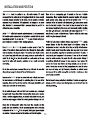
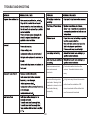
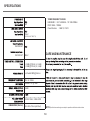
1--12
Hi-Fi Stereo Receiver VR 100+
Instruction Manual 13--23
Hi-Fi Stereo Receiver VR 100+
VR 100+
Hi-Fi Stereo DAB+ Receiver
FUNCTION
(STANDBY)
INPUT
DAB/FM
INFO
AUTO
PRESET-
PRESET+
MANU/MEM
Receiver
VR 100+
5-6
7
8
9
10
11
12
Halten Sie das Gerät fern von
Feuchtigkeit
Achten Sie darauf, dass keine
Gegenstände ins Gerät fallen
Bitte halten Sie das Gerät fern von
Hitze- quellen. Sorgen Sie für
genügend Luftzirkulation bei dem
Einbau in einem Rack
Nehmen Sie das Gerät vom Netz, wenn es
lange Zeit nicht genutzt wird
Achten Sie darauf, dass keine Sprays oder
Chemie an Ihr Gerät kommen
Achten Sie darauf, dass Ihr Gerät nicht
abgedeckt wird
Achten Sie darauf, dass das Gerät nur von
autorisierten Personen geöffnet wird
Behandeln Sie das Stromkabel mit
Vorsicht
Sie können Ihren VR 100+ über die Systemfernbedienung
(optional) fern bedienen. Richten Sie von Ihrer Sitzposition
aus die Fernbedienung in Richtung Ihres Gerätes.
Achtung:
- Wenn sich ein Hindernis zwischen der Fernbedienung und
Ihrem Gerät befindet, kann das die Bedienung
beeinträchtigen.
- Wenn Sie andere Fernbedienungen oder Sender in der
Nähe benutzen, kann das ebenfalls zu Störungen führen.
- Achten Sie darauf, dass Sie die Batterien richtig einlegen
Polarisierung plus zu + minus zu - Benutzen Sie zwei gleiche Alkali Batterien
- Aufladbare Batterien können benutzt werden, wir raten
jedoch davon ab.
- Entfernen Sie die Batterien, wenn die Fernbedienung
längere Zeit nicht benutzt wird (6 Monate oder länger)
- Entsorgen Sie Ihre Altbatterien nur in der dafür
vorgesehenen Wertstoffentsorgung (bei Ihrem Händler)
Wirkungsbereich der Fernbedienung
- Die Reichweite der Fernbedienung beträgt ca. 7 Meter.
Sie sollte auf das Infrarotfenster des Gerätes gerichtet
werden.
Dabei ist eine seitliche Abweichung von 30 Grad möglich.
1. Nehmen Sie die Batterien aus
ihrer Verpackung
2. Legen Sie die 2 „AAA“ Batterien
unter Beachtung der Polarität
seitenrichtig ein.
3. Wenn die Distanz zwischen der
Fernbedienung und dem Gerät
abnimmt, liegt das an der Ladung
der Batterien. In diesem Fall
entnehmen Sie die Batterien und
legen Sie neue ein.
1. Funktionstaste
3
Mit dieser Taste können Sie
Einstellungen wie Bass,
AMP STANDBY
SPK A/B
SPK A+B
1
Hochton, Balance und Reset
(FUNCTION)
(INPUT)
2
vornehmen.
2. Lautstärke –
4
5
6
Standby:
- Um das Gerät an und aus zu schalten, drücken Sie diese Taste.
Tune +/-:
- Manuelle Frequenzeinstellung in 0.05 MHz Schritten im UKW Betrieb.
Wählen Sie im DAB Betrieb Sender auf/ab.
3. Standby
4. Eingangswahl-Schalter
P-MODE
5. Mute
6. Lautstärke +
DAB/FM:
- Wählen Sie zwischen DAB und UKW.
INFO:
- Drücken Sie die Taste für ein RDS Signal oder DAB Informationen.
Stereo:
- Stereo/Mono Umschaltung.
F-Scan:
- Drücken Sie diese Taste für 2 Sek., um alle Sender im DAB Betrieb
automatisch zu speichern.
INFO
Bedienung IR 100
IR100
R100
PR+/-:
- um gespeicherte Sender auszuwählen auf/ab.
RADIO STANDBY
AUTO-
STEREO
AM
PR-
PR+
MONO
INFO
FM
AUTO+
F-SCAN
Auto +/-:
- um im UKW Betrieb den nächsten Sender zu suchen.
MEMORY
DAB
Bedienung C 100
CD STANDBY
Memory: Manuelle Möglichkeit Sender zu speichern
a. Wählen Sie mit+/- den Speicherplatz.
b. Drücken Sie TUN+/-, um den Sender zu wählen.
c. Drücken Sie MEMORY, um den Sender auf dem gewünschten
Platz zu speichern.
** die maximale Speicherkapazität liegt bei 10 Sendern.
Bedienung am Gerät
VR 100+
Hi-Fi Stereo DAB+ Receiver
FUNCTION
INPUT
DAB/FM
INFO
AUTO
PRESET-
PRESET+
MANU/MEM
(STANDBY)
Power
Um das Gerät in den Betrieb zu nehmen,
muss auf der Rückseite des Gerätes der
Power Schalter auf „on“ stehen.
1. VFD Display: In der Anzeige sehen Sie Informationen wie
Lautstärke, gewählter Eingang und Radiofrequenz.
2. Drehknopf: Mit diesem Knopf können Sie die Lautstärke,
6. DAB/FM: Mit dieser Taste wählen Sie zwischen DAB und UKW.
7. INFO: Drücken Sie die Taste für ein RDS Signal oder DAB Informationen.
8. Auto: Im DAB Betrieb können Sie diese Taste für 2 Sek. drücken, um alle Sender
Bass, Höhen, Balance sowie den Radiosender verändern.
automatisch zu speichern.
3. LED Anzeige: Die Anzeige leuchtet rot, wenn das Gerät
ausgeschaltet ist.
4. FUNCTION Taste: Drücken Sie diese Taste, um Funktionen
wie Bass, Höhen, Balance verstellen zu können
Drücken Sie die Taste für 2 Sek., um das Gerät an und aus
zu schalten.
5. INPUT Taste: Mit dieser Taste wählen Sie zwischen den
Eingängen: Tuner, TV, Tape, AUX, DVD, CD und Phono.
Im UKW Betrieb drücken Sie diese Taste, um den nächsten Sender zu suchen.
9. PRESET-: Drücken Sie diese Taste, um den nächsten Sender abwärts zu wählen.
10. PRESET+: Drücken Sie diese Taste, um den nächsten Sender aufwärts zu wählen.
11. MANUAL/MEMORY: Im DAB und UKW Betrieb können Sie durch Drücken dieser
Taste mit dem Drehknopf Sender wählen.
Halten Sie diese Taste für 2 Sek. gedrückt, um Sender abzuspeichern.
a. Drücken Sie PR+/-, um einen Senderspeicher zu wählen.
b. Drücken Sie TUN +/-, um einen Sender zu wählen.
c. Drücken Sie diese Taste und halten Sie diese gedrückt, um den Sender zu speichern.
** die maximale Speicherkapazität liegt bei 10 Sendern.
S-7-
15
+
-
-
16
+
Model: VR 100
Hi-Fi Stereo Receiver
Power Rating:AC 230V
50Hz
Max Power Consumption: 150W
11. DVD Eingangswahltaste
15.
15. DAB/FM: Antennenanschluss.
16.
16. 6,35 mm Kopfhörerbuchse.
S-8-
.
-
-
+
DAB/FM Antenna
DVD
Headphone
Headphone
+
Model: VR 100+
Hi-Fi Stereo DAB+ Receiver
Power Rating: AC 230V
50Hz
DVD
Max Power Consumption: 250W
DVD Spieler
VR100+
S-9-
Receiver
Receiver
Receiver
Receiver
Receiver
Receiver
S-10-
S-11-
Radio Frequenzband
DAB Band 3: 5A 174.928 MHz – 13F 239.200 MHZ
FM: 87,5 – 108 MHz
Senderspeicher: DAB 10, FM 10
DVD
4
K
250
S-12-
INTRODUCTION & CONTENTS
Introduction
Contents
Congratulations on purchasing this VR 100+ Receiver. It has been
developed following an extensive research and development program
that has culminated in what we regard as an exceptional mid-range
hi-fi product.
Introduction & Contents
13
Safety instructions
14,15
Remote control
16-17
Front panel controls
18
Rear panel connections
19
Making the connections
20
Installation and position
21
Trouble shooting
22
Specifications
23
We trust that this amplifier will give you hours of listening pleasure,
and provide years of unparalleled performance.
Please do not operate this product at high volume levels immediately
after switching on.
P13
SAFETY INSTRUCTIONS
Safety Instructions
CAUTION: To reduce the risk of electric shock, do not remove any
cover.
N O U S E R - S E R V I C E A B L E PA R T S I N S I D E , R E F E R A N Y
SERVICING TO QUALIFIED SERVICE PERSONNEL.
The lightning flash symbol with the arrowhead within an equilateral
triangle is intended to alert the user to the presence of uninsulated
'dangerous voltage' within the product's enclosure that may be
sufficient to constitute a risk of electric shock to persons.
The exclamation point within an equilateral triangle is intended to
alert the user to important operating and maintenance instructions
in the service literature relevant to this appliance.
IMPORTANT SAFETY INSTRUCTIONS
* Read and keep these instructions available for future reference.
* For indoor use only.
* The unit must only be connected to a suitable mains power supply
using the mains power lead provided.
* To reduce the risk of fire or electrical shock, do not expose this
unit to rain or moisture.
* The apparatus shall not be exposed to dripping or splashing.
* No objects filled with liquids, such as vases, shall be placed on
the apparatus.
* Unplug the unit from the wall socket during lightning storms and
when it is not going to be used for a long period of time.
* Take care that foreign objects do not enter, or liquids are not
spilled, into the enclosure through any openings. If this should
happen, refer to qualified service personnel before attempting to
use.
* Ensure adequate ventilation - do not cover this unit with curtains,
etc.
* Do not install near any heat source, such as radiators, or other
equipment that produces heat.
* Protect the mains power cable from being damaged.
"Information for the consumer"
Disposal of your old product
Your product is designed and manufactured with high quality materials and components,
which can be recycled and reused.
When this crossed out wheeled bin symbol is attached to a product it means the product is
covered by the European Directive 2002/96/EC.
Please make yourself aware of the local collection system for electrical and
electronic products.
Please act according to your loca rules and do not dispose of your old products with
your normal household waste. The correct disposal of your old product will help prevent
potential negative consequences for the environment and human health.
This product complies with European low votage (73/23/EEC)
and electromagnetic compatibility (89/336/EEC) directives.
P14
SAFETY INSTRUCTIONS
Notes On Use
P15
REMOTE CONTROL
By using the provided remote control unit the VR 100+ can be
controlled from your listening position. To use the remote
control unit, point it at the REMOTE SENSOR window of the
receiver.
BATTERY INSTALLATION
1. Remove the battery compartment cover.
2. Insert two "AAA" dry batteries.
Notes:
-Even if the remote control unit is operated within the
effective range, remote control operation may be impossible if
there are any obstacles between the unit and the remote
control.
-If the remote control unit is operated near other appliance
which generate infrared rays, or if other remote control
devices using infrared rays are used near the unit, it may
operate incorrectly.
Make sure that the batteries are inserted with their
positive "+" and negative "-" poles positioned correctly.
3. Close the cover until it clicks.
If the distance required between the remote control unit and
main unit decreases, the batteries are exhausted. In this case,
replace the batteries with new one.
Precautions concerning batteries
-Be sure to insert the batteries with correct positive+ and
negative - polarities.
-Use batteries of the same type. Never use different types of
batteries together.
- Rechargeable and non-rechargeable batteries can be used.
Refer to the precautions on their labels.
-When the remote control unit is not to be used for a long
time(more than a month), remove the batteries from the
remote control unit to prevent them from leaking. If the leak,
wipe away the liquid inside the battery compartment and
replace the batteries with new ones.
-Do not heat or disassemble batteries and never dispose of
old batteries by throwing them in a fire.
REMOTE CONTROL OPERATION RANGE
Use the remote control unit within a range of about 7
meters and the angles of up to 30 degrees aiming at
the remote sensor.
P16
REMOTE CONTROL
1.FUNCTION BUTTON.
3
Allows access to menu features such
as bass, treble, balance, reset.
SPK A+B
1
Use vol+/- button to adjust the level.
2. VOLUME-.
AMP STANDBY
SPK A/B
(FUNCTION)
(INPUT)
2
3. STANDBY.
4. INPUT SELECT.
5. MUTE.
4
5
6
STANDBY:
Press this button to turn the unit into standby mode, press
again to turn on the unit.
TUN+/-:
Manual adjust the frequency by step 0.05MHz for FM mode.
Select the DAB station up/down in the station list.
P-MODE
DAB/FM:
Band change. (DAB/FM)
6. VOLUME+.
INFO:
Press this button to see information of DAB or FM RDS.
STEREO:
For the model VR100+, press stereo key to active stereo (auto)
mode, press again to mono mode.
INFO
FOR INTERNET
RADIO IR 100
IR100
R100
RADIO STANDBY
AUTO-
STEREO
AM
PR-
PR+
MONO
INFO
FM
DAB
FOR CD PLAYER
C 100
CD STANDBY
AUTO+
F-SCAN
MEMORY
F-SCAN:
Press and hold for 2 seconds to active auto full scan function
for DAB mode.
PR+/-:
Select preset station number up or down.
AUTO+/-:
Press to auto search next/previous station for FM mode.
MEMORY: Manual save the station to preset number.
a. Use PR+/- key to select the preset number.
b. Press TUN+/- key to select the station.
c. Press MEMORY key to save the station to current preset number.
** The Max preset number is 10.
P17
FRONT PANEL CONTROLS
VR 100+
Hi-Fi Stereo DAB+ Receiver
FUNCTION
INPUT
DAB/FM
INFO
AUTO
PRESET-
PRESET+
MANU/MEM
(STANDBY)
POWER SWITCH ON REAR PANEL,
TURN IT ON BEFORE USE THE UNIT.
1. VFD DISPLAY. Will give the indication of level control, input
source selected, radio info.
2. ROTARY CONTROL KNOB. This allows adjustment of
6. DAB/FM. DAB/FM band mode change switch.
7. INFO. Press this key to see information of DAB orFM RDS.
8. AUTO. In DAB mode press this key to active auto scan function.
parameters such as volume, bass, treble, balance, frequency
In FM mode press this key once to auto search next station,
of radio.
press and hold this for about 2 seconds to auto search previous
Press to select audio mode stereo/mono in FM mode.
or to select station, as a confirm enter key in DAB mode.
3. LED INDICATOR, it will be turn on in red colour when the unit
is in standby mode.
4. FUNCTION BUTTON. Allows access to menu features such
as bass, treble, balance, reset.
station.
9. PRESET-. Preset station down select.
10. PRESET+. Preset station up select.
11. MANUAL/MEMORY: When in DAB or FM mode, press once the
control knob is TUNE+/- function.
Press and hold for about 2 seconds, save station to preset number.
Press and hold function button for 2 second, the unit go to
a. Use PR+/- key to select the preset number.
Standby mode, press this button again return to normal mode.
b. Use TUN+/- key to select the station.
5. INPUT BUTTON. Press to select input source within TUNER,
TV, TAPE, AUX, DVD, CD, PHONE.
c. Press and hold this key to save the station to current preset number.
** The Max preset number is 10.
P18
REAR PANEL CONNECTIONS
16
15
-
+
-
Headphone
Headphone
DAB/FM Antenna
DVD
+
Model: VR 100+
Hi-Fi Stereo DAB+ Receiver
Power Rating: AC 230V
50Hz
DVD
Max Power Consumption: 250W
1. POWER SWITCH: Switches mains power on/off to internal
components, however please note that mains power is still
applied to this unit even though this switch may be off.
8. TV INPUT SOCKET.
9. TAPE INPUT SOCKET.
2. FUSE HOLDER: fitted with 20mm T 2A fuse inside.
10. AUX INPUT SOCKET.
" IMPORTANT:"
Remove the mains plug from the mains socket before attempting
to check/ replace the fuse located on this fuse holder.
11. DVD INPUT SOCKET.
12. CD INPUT SOCKET.
3. MAINS CABLE INLET JACK: Please ensure that the input cable strain relief
bush is intact and has not been damaged.
4. WARNING ICONS: Please be aware that this unit contains high voltages,
and should not be opened, please refer to page 2 of this manual.
13. PHONO INPUT SOCKET. (For the connection of a turntable)
14. PHONO TERMINAL EARTH POST. It is necessary to provide a chassis
earth connection between the turntable and the amplifier. Failure to do
this will result in a buzzing or humming noise from the loudspeakers.
5/6. LOUDSPEAKER OUTPUTS. Please ensure that +/- connections are made
properly between rear of the amplifier and loudspeakers. Ensure wires are
not frayed or touching.
7. LINE OUTPUT SOCKETS: This is for connection to external amplification or
recording equipement.
P19
15. DAB/FM radio antenna.
16. 6.35mm Headphone output jack.
MAKING THE CONNECTIONS
TURNTABLE
-
-
+
Headphone
Headphone
DAB/FM Antenna
DVD
+
Model: VR 100+
Hi-Fi Stereo DAB+ Receiver
Power Rating: AC 230V
50Hz
DVD
Max Power Consumption: 250W
CD PLAYER
SPEAKER CONNECTIONS
DVD PLAYER
OTHER AUDIO SOURCE
Protect !
AUDIO RECORDER
TV
If the speaker cable is shorted during working, V 100+
will automatically come to protection mode, and VFD
will display " Protect ! ". Now you need to turn off
V 100+, check the speaker cable, and make sure all
speaker cable is connected correctly, then turn on
V 100+ again. V 100+ will return to normal working mode.
P20
CASSETTE DECK
INSTALLATION AND POSITION
receiver
receiver
receiver
receiver
V 100+
receiver
receiver
VR 100+
receiver
receiver
P21
TROUBLE AND SHOOTING
Noise is excessive in both
stereo and monaural
broadcasts.
An unusual hissing noise is
heard when listening to the
broadcast in stereo, but not
heard when listening
monaurally.
P22
Poor location and/or direction of the
antenna. Transmitted station is too far
away.
A slight noise may be heard because the
method used for modulation of FM
stereo broadcasts in different than that
used for monaural broadcasts.
SPECIFICATIONS
TUNER FREQUENCY RANGE
DAB BAND 3: 5A 174.928MHz - 13F 239.200MHz
FM 87.5MHz - 108MHz
Preset Stations : DAB 10, FM 10.
5mV
300mV
(CD, DVD, AUX, TAPE, TV)
RECOR OUT
RECOR OUT 480mV
CARE AND MAINTENANCE
+/- 14dB @ 10K Hz (+0, -3dB)
+/- 14dB @ 100 Hz (+0, -3dB)
2 x 40 watts RMS @ 8 ohms
10Hz to 50KHz
Less than 0.1% @ 1 watt
> 88dB
AC 230V 50Hz / MAX 250W
DIMENSIONS (WxDxH)
440 x 283 x 79mm (with feet)
NOTE: Specifications and design are subject to possible modifications without notice
P23