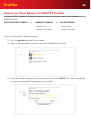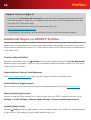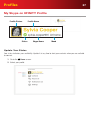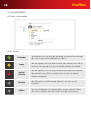
1
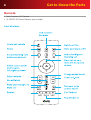
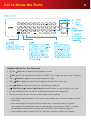
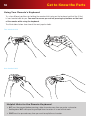
Skype™ on XFINITY
User Guide
Contents
2
Get to Know the Parts
4
Camera
Adaptor Box
Remote
5
6
8
Setup11
What You Will Need to Get Started
Comcast and Skype Accounts Wireless Network
Camera Setup
Connect
Power Up 12
12
12
13
15
18
Activate19
Pair Your Remote
Connect to Your Home Network
Ethernet Connection
Available Wireless Networks
Hidden Wireless Networks
System Check
Set Time Zone
Screen Resolution
Checking Your HD Video Signal
Checking Your Camera
Microphone Check
Checking Your Audio
Comcast Sign-In
Skype Account
Sync Contacts
Activation Complete
20
21
21
22
23
25
25
26
26
27
27
28
29
29
32
33
Profiles34
Sign In to Your Skype on XFINITY Profile 35
Additional Skype on XFINITY Profiles
36
Create a New Profile
36
My Skype on XFINITY Profile
37
Update Your Status
37
Update Your Mood
39
Video and Audio Calls
40
Make a Video Call
41
Make an Audio Call
Incoming Calls
Video and Audio Call Features 43
44
45
Messages48
Sending and Receiving Messages
Incoming Messages
Message Features Change Views
Group Messaging
49
50
51
51
52
Contacts53
Contacts
Available Contacts Pending Contact Requests All Contacts
Add Contacts
Filter Contacts
54
57
58
59
59
60
Settings61
Profile Settings
Edit Profile Name
Sign In Options
Change Linked Skype Account
Change Skype Password Privacy Settings
Manage Conversations
Sync Contacts
Delete Profiles
Blocked Contacts
System Settings
Video Settings Audio Settings Network Settings General Settings 62
62
63
64
65
65
66
66
67
68
69
70
71
72
73
Other Features
75
Recents
76
Notifications78
Glossary79
Introduction
3
Welcome
This user guide is where you will find answers to questions along with easy to follow, step-by-step
guidance on how to set up and use Skype on XFINITY® in your home. Learn how to maximize the full
potential of every feature, make a call or message a friend—everything you need to know is right here.
If you have questions that are not answered in this user guide, visit http://comcast.com/skype. For
additional support, call 877-704-7713.
About Skype on XFINITY
Skype on XFINITY delivers high-quality, face-to-face video calling right to your TV. Enjoy video and audio
calls—even messages—without a computer, without opening a browser. It’s the next best
thing to being there.
• C onnect with XFINITY and Skype contacts, with HD video/audio calls and messages. Now you will
never have to miss an important moment.
• Once signed in, you can make or receive calls and messages while watching TV. For incoming calls,
you will see who is calling you and be able to choose how you want to connect—by video or audio.
Important Notes
• T he Emergency Alert System (EAS) for national public warnings only broadcasts in TV mode (not
during calls or messaging). Learn more about EAS at www.fcc.gov/pshs/services/eas.
• N o emergency calls with Skype. Skype is not a replacement for your telephone and can’t be used for
emergency calling.
• Data used while enjoying Skype on XFINITY counts toward your Comcast monthly
Internet bandwidth usage. For more information go to www.comcast.com/corporate/customers/
policies/highspeedinternetaup.html.
Get to Know the Parts
Take a look at the components that make up Skype on XFINITY. Here you
will find visual diagrams, technical specifications and helpful tips to get
you familiar with all the essentials.
This section will cover:
•Camera
•Adaptor Box
•Remote
Get to Know the Parts
Camera
• High-Definition camera supports up to 720p @30 frames per second (requires both users to have consistent 1.5Mbps+ upload/download speeds)
• On/Off Indicator
• Digital/Optical Zoom Lens With Shutter
• Built-In Directional Microphones
• Adjustable Clip for Secure Placement
For camera placement, see Camera Setup on page 13.
5
Get to Know the Parts
6
Adaptor Box
• HDMI Connections Between Set-Top Box and TV • Dual-band (2.4GHz/5GHz) Wireless Network (802.11n)
• Ethernet-Ready for Wired Connection
• Digital Audio Output
• Audible Notifications
• Integration with Skype
• WPS-Capable for Wireless Setup (currently not available)
• New Message Indicator (currently not available)
• SD Slot for Viewing Media (currently not available)
Helpful Hints for the Adaptor Box
• There is no On/Off indicator light. The Power LED remains lit when plugged in.
• P lease be aware that digital audio can run through your digital audio receiver, but digital video
must be connected directly from your adaptor box to your TV.
• T he Reset button is recessed to prevent accidental pressing and has two functions, depending
on the length of time held:
- N
ormal Reset: Insert a thin object and hold the Reset button for 2-5 seconds to reboot the
adaptor box and keep your personal settings.
F actory Reset: Insert a thin object and hold the Reset button for 15 or more seconds to delete ALL personal settings and restore the adaptor box to the default factory settings. Factory
Reset should be used with caution, as it removes all Skype on XFINITY profiles.
Get to Know the Parts
7
8
Remote
• Radio Frequency (RF) Remote
• (2) CR2032 3V Lithium Batteries (pre-installed)
Get to Know the Parts
Get to Know the Parts
Helpful Hints for the Remote
• Use the Left arrow to go back to the previous screen.
• VOL adjusts the sound level for Skype on XFINITY only. It does not adjust your TV volume.
• Press
Sound to toggle on and off sound from the caller.
• Press Mic to toggle on and off the microphone for the caller to hear you.
• Press Video to turn off (and on) your video during a video call.
• Play/Pause / Forward / Rewind voicemail buttons are not available at this time.
• For your remote to work, you do not need to point it towards the adaptor box.
• T here are several reasons why your remote might not be working.
• Your remote might be locked. On the back of your remote, press the Lock button on and off to test this. • Your remote might not be paired to the adaptor box. The pairing process connects your remote to the adaptor box so that the adaptor box—and Skype on XFINITY—can only be controlled by one remote. To learn more, go to Pair Your Remote on page 20.
• Your batteries might be dead. If the LED light does not work, replace the batteries.
9
10
Get to Know the Parts
Using Your Remote’s Keyboard
Try a few different positions for holding the remote while typing on the keyboard and find the fit that
is most comfortable for you. You want to ensure you are not pressing any buttons on the front
of the remote while using the keyboard.
The illustrations below show two of the most popular holds.
Two-Handed Hold
One-Handed Hold
Helpful Hints for the Remote Keyboard
• A
LT must be pressed before pressing a blue character every time you enter a character. Holding down ALT while pressing multiple blue characters in a row will not work.
• C APS must be pressed every time you want to capitalize a character. Setup
This section provides guidance for setting up your system, from gathering
the necessary account information right up to activation.
This section will help you:
•Determine what you will need to get started and have everything ready
for fast and easy setup.
•Learn how to place your camera on top of your TV or on a flat surface.
•Identify and connect the cables to their designated ports.
Setup
12
What You Will Need to Get Started
• HDMI-capable Comcast set-top box and HDTV.
• Internet connection with at least 1.5 Mbps simultaneous upload and download speeds (check your speeds at http://speedtest.comcast.net).
Comcast and Skype Accounts
• A ll users of Skype on XFINITY will need their own Comcast ID.
• You will link your Comcast ID to a Skype account during the activation process. Each unique combination of a Comcast ID and Skype account is called a Skype on XFINITY profile.
• If you need to create a Skype account, you can do so during activation on your TV.
SKYPE ON XFINITY PROFILE
=
COMCAST ACCOUNT
+
SKYPE ACCOUNT
- Comcast ID - Skype Name
- Comcast Password - Skype Password If you have printed this User Guide, consider noting your setup details below. Comcast Account
• Comcast ID ________________________________________________
• Comcast Password ___________________________________________
Skype Account
• Skype Name _______________________________________________
• Skype Password _____________________________________________
Wireless Network
• If you choose to connect to your wireless network (rather than Ethernet), you will need the network
name and password (key).
• Network Name (SSID) _________________________________________
• Network Password (Key) ________________________________________
• Security Encryption Method (for hidden wireless networks only) _______________
Setup
13
Camera Setup
The XFINITY camera can be placed on top of your TV screen or on a flat surface (like a TV console). The
recommended viewing distance is 5’ - 12’. The camera should not be used near strong magnetic fields
(see illustration on next page).
TV Top
1.Place the front of the camera on top of your TV, with the bottom lip resting just below the top of the screen.
2.Push the clip down until it touches the back of the TV and the camera is secure.
3.Adjust the angle of the camera to capture your preferred viewing area and to ensure that the microphones are directly in front of the person speaking.
Flat Surface
1.Hold the camera with the lens facing towards you and adjust the clip’s rubber bottom, as shown.
2.Place the camera on a flat surface with the lens facing the viewing area. Hold the rubber bottom in
place while adjusting the angle of the camera to capture your preferred viewing area and to ensure that
the microphones are directly in front of the person speaking.
Helpful Hints for Setup
• T he camera’s broad angle will give you the ability to relax across the room while enjoying a
conversation. Run the Camera Test (during the TV activation or go to Settings > System Settings >
Video Settings at any time) to see what area will be captured during a video call.
• Position table/standing lamps in front of you to avoid appearing silhouetted.
• T urn down overhead lights and position a secondary table or standing lamp in front of you to
avoid having to turn overhead lights all the way up.
• If the camera cable is not long enough to reach the Camera port, connect the USB extension cable to the camera cable.
Important Note for Wall-Mounted TVs
Make sure the combined weight of the camera (8.81 oz.) and TV does not exceed the maximum
rating for your wall mount. Check the wall mount manufacturer’s manual for the maximum rating. The
camera clip is not compatible with all TV wall mounts. For wall-mounted TVs that have been installed
flush with the wall, camera placement on your TV is not recommended due to space constraints,
which may result in damage to your TV or the camera.
Important Note for Fireplace-Mounted TVs
The camera is not intended for use in high-temperature locations, such as above fireplaces.
14
Setup
Setup
15
Connect
The following illustration shows two potential set-ups. The setup on the left is without a receiver, DVD player or
game console. The setup on the right includes a receiver, DVD player and game console.
Setup
16
The steps below may differ slightly depending on your media setup, but the equipment order should
remain the same (see the illustration on following page).
A.Plug in the provided HDMI cable to your set-top box and the other end to the HDMI Cable In port on
your adaptor box.
B.Plug a second HDMI cable to the HDMI TV Out port on your adaptor box and the other end to one of
the available HDMI ports on your TV.
• Note: If you have an audio receiver, use one HDMI cable to connect your set-top box to your receiver then use another HDMI cable to connect the receiver to your adapter box (see the illustration on following page).
C.Plug the camera cable into the Camera port. If the camera cable is not long enough to reach the
Camera port, connect the USB extension cable to the camera cable.
D.Decide if you want to connect to your home network using a wired Ethernet cable or
wireless connection.
• Ethernet connection: Plug a CAT-6 Ethernet cable (not provided) to the Ethernet port on your
adaptor box and the other end to an available port on your modem or router.
• Wireless connection: Skip this step and follow the instructions when you activate on your TV.
E.If you are using an audio receiver with an SPDIF (Optical Digital Audio) cable, disconnect this cable from your set-top box and plug it into the Audio port on the adaptor box. Since SPDIF only transmits audio, you will also have to connect via HDMI in order to see any video. We strongly recommend using both HDMI and SPDIF cables (as depicted in the illustration) to connect your adaptor box.
F. C onnect the power adaptor to the power adaptor cable (see the illustration on following page).
G.Using your TV remote, select the same HDMI input to which you connected the adaptor box.
Setup
17
A
B
D
B
C
E
F
Setup
18
Power Up
If you need help with setup, visit http://comcast.com/skype or call at 877-704-7713.
1. P lug the power cable into the Power port on the adaptor cable. Then plug the power cable into
an electrical outlet. There is no power button on your adaptor box, so this power cable is the only
way to turn the system on and off.
2. Turn on your TV, set-top box and audio receiver (if you have one).
3. Make sure that your TV is set to the HDMI port that you connected the HDMI cable to. For
example, if you plugged the cable into HDMI 1, then make sure that your TV is set to HDMI 1 (not
HDMI 2, HDMI 3, etc.).
4. Next you will see a black screen.
5. In a few minutes (up to 20), you will be greeted with a Welcome screen.
Important Note for Power Up
Please do not unplug or reset the adaptor box before you see this screen. If you unplug or reset the
adaptor box before activation is complete, the system will restart from the beginning of the
setup process.
Helpful Hints for Powering Up
• T he power adaptor is made up of two pieces that join together.
• If needed, use the USB extension cable to add length to your camera cable.
Activate
Once you have completed setup, it is time to activate your Skype on
XFINITY. During activation, you will follow a series of steps on your TV
screen. Use your remote to complete the information and refer to the tips
in this section to complete the process.
This section will help you:
•Pair your remote with the system.
•C onnect to your home network via an Ethernet cable or a
wireless connection.
•Run short video and audio diagnostic tests to ensure everything is
working properly.
•Sign in to Comcast and Skype.
•Sync your contacts.
Activate
20
Pair Your Remote
The pairing process connects your remote to the adaptor box so that the adaptor box—and Skype on
XFINITY—can only be controlled by one remote.
1.Pull out the tab from the remote’s battery compartment.
2.Press and hold the Setup button on your remote until the red light on your remote turns green.
3. Press the Call button on your remote.
4.Flip the remote to the keyboard side.
5.U se the keyboard to enter the 3 letters displayed on your TV screen. Note: The letters on your
screen may differ from the example shown here.
Helpful Hints for Remote Pairing
• Y ou only have 60 seconds to press the letters on your remote that correspond to letters on your
screen. If you do not finish this within 60 seconds, simply restart the process.
• If your remote is not working, refer to the Helpful Hints for the Remote section on page 9.
• If you enter an incorrect letter during the pairing process, the screen will refresh and you will be
asked to retry.
Activate
Connect to Your Home Network
An Internet connection is required, but the screen(s) you will see depends on your choice of
network connection.
You have two options for network connectivity:
1. Wired connection using an Ethernet cable
2. Wireless connection to an available or hidden network
For additional help, visit http://comcast.com/skype or call 877-704-7713.
Ethernet Connection
To connect to your home network using an Ethernet cable, connect the Ethernet cable to your adaptor
box. The adaptor box will automatically detect your Ethernet connection and the following screen will
appear. Click CONTINUE.
Helpful Hints for Ethernet Connection
• If there is a problem finding your Ethernet connection, ensure that the Ethernet cable is properly
connected or use a wireless connection instead.
• If your Ethernet cable is detected but the connection fails, there may be a problem with your
Internet service. Check that your service is working properly and try again.
21
Activate
22
Available Wireless Networks
Follow these steps if you are using an available wireless network.
1. Ensure that the Ethernet cable is not connected.
2. From the options, click Select Your Wireless Network.
3.Select your wireless network from the list of networks within range.
4. Enter your network password.
Helpful Hints for Available Wireless Networks
• If your wireless network cannot be found, make sure that your wireless router or modem is
working properly and reconnect. If it still cannot be found, check that the Ethernet cable is not
connected, then click SCAN AGAIN.
• If your wireless network is found but the connection fails, there may be a problem with your
Internet service. Check your service and try again.
Activate
23
Hidden Wireless Networks
Follow these steps if you are using a hidden wireless network.
1. From the options on the choose your network screen
click Manually Enter Your Wireless Network.
2.Enter the network name of the hidden wireless network. Note that the network name might be
called the Service Set Identifier (SSID).
24
3.Select the security type of the hidden wireless network.
4. Enter your network password.
5. T his screen will appear once you have connected to the hidden network.
Activate
Activate
Helpful Hints for Hidden Wireless Networks
• If you have tried to join a network that cannot be found or is no longer in service, verify the
information you entered is correct and try again.
• You can also join an available wireless network or connect using an Ethernet cable instead.
• If you have a hidden network, you will need to know the network name (SSID), security type
and network password to connect.
System Check
After connecting to the Internet, some short tests will be run to ensure that everything is working
properly. These are quick diagnostic tests that check your hardware.
Set Time Zone
Select your Time Zone by choosing from the options shown. Your selection ensures that your call
times are accurate.
25
26
Activate
Screen Resolution
Select your TV’s resolution. Select 1080i, 720p, or 480p.
Checking Your HD Video Signal
This test ensures that your set-top box is connected properly and that you will be able to watch TV while
using Skype on XFINITY. If you see TV programming on the screen, click I SEE MY TV.
Helpful Hints for HD Video Signal
• If you see a gray box with an X, click I DON’T SEE ANYTHING. Check that your HDMI cable is
securely connected and try again. Also check that that the set-top box and inputted video source
are turned on.
• Y ou can use Skype on XFINITY without the TV connection, but you will not be able to watch TV
while using Skype on XFINITY.
Activate
27
Checking Your Camera
This test ensures that your camera is working and positioned to capture your preferred viewing area. Test
your camera, make any adjustments (if needed), then select I SEE MYSELF to continue.
Helpful Hints for Camera Check
• If your camera is properly adjusted and you still do not see yourself, select I DON’T SEE
ANYTHING. Check to see if the camera’s USB cable is securely plugged into the Camera Input
of the adaptor and try again.
• If you are still having trouble, visit http://comcast.com/skype or call 877-704-7713.
Microphone Check
This test ensures that the microphones in the camera are working properly. Speak and the sound check
will run automatically.
28
Activate
Helpful Hints for Microphone Check
• If your microphone test is not successful, make sure your camera is securely connected and check that there are no obstructions between you and the microphone. Try again by saying something out loud and speaking as clearly as possible.
• Ensure that the microphones are directly in front of the person speaking.
• Whatever is spoken will not be played back to you. Instead, when the microphone detects your voice, the gray bars will change to blue.
Checking Your Audio
While the microphone test confirms that you will be heard, the volume check verifies that you will be able
to hear your contact speaking.
Helpful Hints to Checking Your Audio
• If you cannot hear anything, make sure your TV sound is not muted.
• If you are using an audio receiver, disconnect the SPDIF (Optical Digital Audio) cable from
your set-top box, plug it into the audio port and try again.
Activate
29
Comcast Sign-In
If you have signed into Comcast before, this screen will look familiar to you. Simply enter your Comcast ID
and password then press CONTINUE.
Helpful Hints for Comcast Sign-In
• If you check the box next to Remember My Password you will not be prompted to enter your
password each time you sign in. As an added security measure, you will be prompted to re-enter
your Comcast password after 7 days of inactivity.
• If you have forgotten this information, visit https://login.comcast.net/myaccount
Skype Account
If you have a Skype account, click ALREADY HAVE SKYPE.
If you do not have a Skype account, click CREATE SKYPE ACCOUNT.
30
Activate
Already Have a Skype Account
If you already have a Skype account you want to use, enter the information to continue.
Create a Skype Account
Enter the email address you would like associated with your Skype account.
Activate
31
Enter your Skype Name and password.
Helpful Hints for Skype Sign-In
• Each Comcast ID must be linked with a unique Skype Name.
• If you cannot remember your Skype account information, visit www.skype.com.
• If you do not have a Skype account, select Create a Skype Account.
• Y ou can unlink a Skype account from your Skype on XFINITY profile at any time. Go to
Settings > Profile Settings > Change Linked Skype Account.
• Skype Voicemail and using Skype to call landlines and mobile devices is not supported on Skype on XFINITY.
Activate
32
Sync Contacts
By syncing your contacts, you will be able to access your XFINITY and Skype contacts from one place,
making it even faster and easier to find a family member or friend.
Important Notes About Syncing Contacts
• S yncing will store your XFINITY and Skype contacts in your Skype on XFINITY profile. If you or
another person have synced contacts previously with your Skype on XFINITY profile, the contacts
you are about to sync will be added to those contacts that were previously synced.
• S yncing cannot be undone.
• Before syncing, ensure that you are signed in to your profile so that you sync the right contacts
Helpful Hints for Syncing Contacts
• Once you sync your contacts, you may have some duplicate entries. To delete duplicates, visit
www.XFINITY.com, sign in to your account and then check for duplicate contacts. • S yncing may take several minutes.
Activate
33
Activation Complete
Once you have completed the activation process, you will see the following screen. You can now begin
connecting with family and friends.
Profiles
When you activate Skype on XFINITY, you will create your first Skype on
XFINITY profile by linking your Comcast ID to a Skype account. Later,
additional profiles can be added. These will be linked to other Comcast
IDs and Skype accounts.
This section will help you:
•Sign in to your Skype on XFINITY profile.
•Create additional Skype on XFINITY profiles.
•Update your profiles.
Profiles
35
Sign In to Your Skype on XFINITY Profile
A Skype on XFINITY profile is a combination of your Comcast and Skype accounts. Your Skype on
XFINITY Profile is:
SKYPE ON XFINITY PROFILE
=
COMCAST ACCOUNT
+
SKYPE ACCOUNT
- Comcast ID
- Skype Name
- Comcast Password
- Skype Password
To sign in to your profile, follow these steps.
1.Press the
Profiles button on your remote.
2.Select an existing profile (if more than one) and click OK on your remote.
3.Using your remote’s keyboard, enter your password, then click SIGN IN. This step is not required
if you have set your profile to remember your password.
36
Profiles
Helpful Hints for Sign-In
• If you check the Remember My Password box, you will not be prompted to enter your password
each time you sign in. However, as an added security measure, you will be prompted to enter your
password after 7 days of inactivity.
• If you do not remember your Comcast account information, visit
https://login.comcast.net/myaccount.
•If your remote is not working, refer to the Helpful Hints for the Remote section on page 9.
Additional Skype on XFINITY Profiles
You can add additional profiles (in addition to the profile created during activation). Each profile is a
combination of a unique Comcast ID and a unique Skype Name. For example, you cannot link the same
Skype Name to two different Comcast IDs. Please note that one XFINITY billing account is limited to only
seven Comcast IDs.
Create a New Profile
To create a new profile, press the Profiles button on your remote and then click Create New Profile.
Before creating a new profile, make sure you have already created the secondary Comcast ID and Skype
account for this new profile.
Create Additional Comcast Email Addresses
Visit http://customer.comcast.com, sign in to your account and create a secondary user. Create Additional Skype Accounts
You can create a new Skype account during the new profile process or by visiting www.skype.com.
Change Linked Skype Account
You can change the Skype account that is linked to your Skype on XFINITY profile at any time. Go to
Settings > Profile Settings > Manage Skype Settings > Change Linked Skype Account.
Switch Between Profiles
Click the Profiles button on your remote. If you are already signed in to a profile, you will be prompted
to sign out of it. After doing so, select another profile to sign in to.
Profiles
37
My Skype on XFINITY Profile
Profile Picture
Profile Name
Status
Skype Name
Mood
Update Your Status
Your status indicates your availability. Update it at any time to alert your contacts when you are available
to connect.
1. Go to the Home screen.
2. Select your profile.
Profiles
38
3.Click SET STATUS.
4.Select a status option.
Status Options:
Available
Your contacts can see that you are online and can call or message
you. This is your status when you first sign in.
Away
You are signed in but may not be active. Your contacts may still try
to call or message you, but you can decide whether to respond.
Do Not
Disturb
You are signed in, but not ready to talk or message at the moment.
Your contacts may still try to contact you, but you can decide
whether to respond.
Invisible
You will appear as offline to your contacts, but you can still
be active.
Offline
You are still signed in, but appear offline to your contacts. When
your status is offline, you cant call or message your contacts.
Profiles
Update Your Mood
Mood is a short update of what you are doing, how you are feeling or what is on your mind.
1. Go to the Home screen.
2.Select your profile.
3.Click SET MOOD.
4.Using the keyboard on your remote, type in your mood message
(maximum number of characters is 200).
39
Video and Audio Calls
Connect with family and friends by selecting someone from your
Contacts or Recent lists, then choose how you would like to call them—
by video or audio.
This section will help you:
•Make a video or audio call.
•Accept an incoming video or audio call.
Video and Audio Calls
41
Make a Video Call
A video call is a face-to-face conversation that happens on your TV. During a video call, you can turn off
the video and switch to an audio call. You can turn the video back on at any time during the call.
1.Select someone from your Contacts or Recent lists.
2.Click VIDEO CALL.
42
Video and Audio Calls
3. The
person you are calling is shown an incoming call notification. If they accept your call, you will
see a real-time video of your contact.
4.To end your call, click END on your screen. Or press
End on your remote.
Helpful Hints for Video and Audio Calls
• If your video or audio call lasts for four hours, you will be shown an option to continue the call. If
you do not click CONTINUE, the call will end.
• Y ou can make and accept video and audio calls while watching TV, including On Demand or DVR
programming. Simply make or accept a call as you normally would, click VIEWS on the screen,
then choose your preferred layout.
Video and Audio Calls
43
Make an Audio Call
An audio call works much like a video call except there is no actual video. Instead, you will see your
contact’s Skype profile picture during the call. Even if you make an audio call, you have the option of
turning on video any time during the call.
1.Select someone from your CONTACTS or RECENT lists.
2.Choose AUDIO CALL.
3.The person you are calling is shown an incoming call notification. If they accept your call, you will
see their profile picture (if they have one).
4.To end your call, click END on your screen, or press
End on your remote.
44
Video and Audio Calls
Incoming Calls
If you are signed in to Skype on XFINITY and a call comes in while you are watching TV, a call notification
appears on your screen. You have the choice to ACCEPT WITH VIDEO, ACCEPT WITH AUDIO or
DECLINE. The call notification will identify who is calling. If you do not make a selection after two
minutes, the call alert will disappear.
Whether you are watching live TV, On Demand or DVR programming, you can accept or initiate a call and
the program will continue to play while you are on the call.
1.When you have an incoming call, a request to answer the call appears on the screen. Continue by
selecting the contact.
2. Click ACCEPT WITH AUDIO to answer with just audio, click ACCEPT WITH VIDEO to enjoy a
face-to-face video call, or click DECLINE to ignore the call.
Video and Audio Calls
45
Helpful Hints for Incoming Calls
• W
hen you accept a call, keep in mind that you are choosing what you will share (either audio or
video), not what you will see. For instance, when you accept an incoming video call with audio,
you will see your contact’s video, but you will only share your audio with the other caller. • R emember that even if you accept as an audio call, you can still turn the video on at any time
during the call.
• P lease note that there is a difference between your XFINITY Voice (telephone) calls and your calls
coming through Skype on XFINITY. The Caller ID notification from XFINITY Voice will appear in the
center of your screen, while callers using Skype on XFINITY will appear in the upper right corner
of your screen. At this time, you can not receive XFINITY Voice calls using Skype on XFINITY.
• T o learn how to disable your XFINITY Voice (telephone) Caller ID while using Skype on XFINITY,
visit www.XFINITY.comcast.net/learn/voice.
• If you are not signed in, you will not receive any incoming call notifications from your
Skype on XFINITY.
Video and Audio Call Features
Mute Your Audio
Press the Mic button on your remote to mute yourself so your contact cannot hear you. Press again to
turn back on.
Mute Your Contact’s Sound
Press the
Sound button on your remote to mute the other person. Even though your contact’s sound
is muted, they may still be able to hear you. Press again to turn back on.
46
Video and Audio Calls
Put a Call On Hold
To pause the transmission of video and audio from your microphone, click Hold on your screen or press Hold on your remote. This will also mute incoming sound.
To take a call off hold, click Resume on your screen or press
Hold on your remote.
Video and Audio Calls
47
Change Views
You can change the layout of your screen depending on your viewing preference. For instance, you can
expand the screen that your TV program is on while minimizing the video call screen and vice versa. You
can also have your video screen and the caller’s video screen appear next to each other as the same
size. To change the layout of your screen, click Views on your screen or press Views on your remote.
Helpful Hints for Video and Audio Calls
• If your video or audio call lasts for four hours, you will be shown an option to continue the call. If
you do not click CONTINUE, the call will end.
• Y ou can make and accept video and audio calls while watching TV, including On Demand or DVR
programming. Simply make or accept a call as you normally would, click VIEWS on the screen,
then choose your preferred layout.
Messages
Connect with family and friends by selecting someone from your
Contacts or Recent list, then start sending and receiving messages.
This section will help you:
•Send and receive messages.
•Accept an incoming message while watching TV.
Messages
49
Sending and Receiving Messages
Use your remote’s keyboard to type a message to one of your contacts. Your message, and your contact’s
response, will appear as messages on your screen.
1.On your screen, select someone from your CONTACTS or RECENT lists.
2.Choose MESSAGE.
Messages
50
3.Using your remote, type your message. Press OK on your remote or click SEND on your
screen. You will see your message, along with your contact’s response, on the screen as the
conversation continues.
Helpful Hints for Messages
• If your remote is not working, refer to the Helpful Hints for the Remote section on page 9.
• W
hether you are watching live TV, On Demand or DVR programming, you can send and receive
messages wile the TV program continues to play.
Incoming Messages
1.When a message notification appears on your screen, it will identify the person who wants to
message with you.
2.Select the contact.
Messages
51
3.Click IGNORE to dismiss the message. Or click REPLY to view the message.
Helpful Hints for Incoming Messages
• If you do nothing, the incoming message notification will disappear in two minutes.
• If you are not signed in to Skype on XFINITY, you will not receive any incoming
message notifications.
Message Features
Change Views
You can change the layout of your screen depending on your viewing preference. For instance, you can
expand the screen that your TV program is on while minimizing the messages screen or vice versa.
To change your screen layout, click VIEWS on your screen or press
Views on your remote.
52
Messages
Group Messaging
You can participate in group messaging if another person initiates the group messaging session via their
Skype account. In future releases of Skype on XFINITY, you will be able to initiate group messaging.
Contacts
To talk with friends and family, you will first need to connect with them by
sending and/or accepting contact requests. When you have added friends
and family to your contacts, you can make video and audio calls, plus
send and receive messages.
This section will cover:
•An overview of your contacts.
•Searching Skype to add friends and family to your Skype on XFINITY.
•Sending and accepting contact requests.
•Blocked contacts. 54
Contacts
Contacts
Use your list of contacts to connect with family and friends.
If you chose to sync your XFINITY and Skype contacts during activation (see page 32 for details), all of
these contacts can now be accessed from here. If you skipped syncing contacts during activation, learn
more about syncing contacts in the Sync Contacts section on page 32.
To access your contacts, select CONTACTS. From the Contacts screen, you can view and manage the
following:
• Available
• Pending Contact Requests
• All Contacts
• Add Contact
Contacts
55
Your Contacts’ Information
Select a contact to view their profile picture, name, status, mood and other information. Your contacts are
sorted by status and then alphabetically.
View your recent conversations and connect right from this screen by following these steps:
1.From Contacts or Recent, select a contact. Your contacts are sorted by status and
then alphabetically.
2. From here you can initiate a video or audio call, or send a message.
Contacts
56
3.Click
to block or remove this contact.
-Blocking prevents a contact from calling or messaging you.
-Removing a contact deletes the person from your contacts.
4.Click VIEW DETAILS to see additional information about this contact (if available).
Important Note for Contacts
If you choose to stay signed in to Skype on XFINITY, even if you are not actively using it, others in
your household may be able to access your contacts. Avoid this by signing out each time. Learn
more in the Sign In Options section on page 63. If you are not signed in to Skype on XFINITY, you
will not receive any incoming call or message notifications.
Contacts
57
Helpful Hints for Contacts
• Manage your XFINITY contacts by visiting www.XFINITY.com.
• Manage
your Skype contacts by visiting www.skype.com.
• If you manage your contacts at www.XFINITY.com or www.skype.com, any changes you make may
take time to sync with Skype on XFINITY.
•W
hen you remove a contact from Skype on XFINITY, the contact may still remain in your XFINITY
and/or Skype contacts online. To permanently delete contacts from Skype on XFINITY, sign on to
your XFINITY and Skype address books and delete contacts from both.
•W
hen you block a contact from calling or messaging you via Skype on XFINITY, the change is also
reflected on your XFINITY and Skype contacts online.
Available Contacts
View contacts who are currently online or have set their status as Available, Away or Do Not Disturb. If
a contact’s status is Offline, or if they have not signed in, they will not appear under Available.
1. S elect Available from the Contacts menu.
2. To call or message a contact, select the contact and choose how you would like to connect.
Helpful Hints for Available Contacts
• If contacts set their status to Do Not Disturb, this is just a way to let you know that they would
prefer not to be contacted at the moment. However, they will still appear in your Available contacts
list and you can still call or message them. Learn more about statuses in Update Your Status on
pages 37-38.
Contacts
58
Pending Contact Requests
1. S elect Pending Contact Requests from the Contacts menu.
2. Y ou will see a list of people you have sent contact requests to.
3. If you want, you can resend the request. You can also remove the contact from this list. Please
note that removing a contact from this list does not withdraw your contact request.
Helpful Hints for Pending Contact Requests
• If someone has sent you a contact request, they will not appear in your Pending Contact Requests
list. To view contact requests you have received, go to
Home, then select Notifications.
• The Pending Contact Requests menu item will only be visible if you have contact requests.
Contacts
All Contacts
All Contacts is a list of all of your contacts, regardless of what their status is.
Add Contacts
Expand your contacts by inviting family and friends who are Skype users.
1. Select ADD CONTACT from the Contacts menu.
2. E nter a person’s Skype Name, Skype Display Name or email address.
Helpful Hints for Adding Contacts
• You can send a contact request to any other person on Skype.
• After a person has accepted your contact request, they will appear in your contacts.
• To learn about syncing your contacts, see Profile Settings on page 62.
59
Contacts
60
3. Click SEARCH SKYPE.
4. S elect the contact to send a contact request to. You can also add an optional personal message.
5. Click SEND. Filter Contacts
1. W hen you are viewing one of your contacts lists (Available, Pending Contact Requests or All
Contacts), press any alphabet key on your remote to filter which contacts are shown in your list.
2. A s you type a contact’s name or Skype Name, matching entries are displayed.
Helpful Hints for Filtering Contacts
• If your remote’s keyboard is not working, refer to the Helpful Hints for the
Remote section on page 9.
• To expand choices, enter fewer characters. To reduce choices, enter more characters.
Settings
Adjust your profile and system settings to enhance your Skype on
XFINITY experience.
This section will cover:
•Profile settings.
•S yncing contacts.
•V ideo settings.
•Audio settings.
•Other general settings.
Settings
62
Profile Settings
Visit Profile Settings to modify your profile, privacy settings, profile name and more. Profile Settings are
optional settings that you can change at any time.
1. S elect Settings.
2. Select Profile Settings.
Edit Profile Name
This is the name your contacts see while you are using Skype on XFINITY.
Settings
63
Sign In Options
You can choose to enter your Comcast password each time you sign in to Skype on XFINITY or have
it automatically filled in for you.
• S elect Comcast Password Required for Sign-In for the most secure measure of privacy.
• Or select Comcast Password Not Required for Sign-In. This option might be suitable if you
and your family share one Skype on XFINITY profile. For added security, you will be prompted to
re-enter your password after 7 days of inactivity.
Helpful Hints for Sign In Options
• If you choose to remain signed in, anyone in your household may be able to access your account.
• To sign out, visit your profile from the Home screen and choose Sign Out.
• A lthough there are currently no parental controls for Skype on XFINITY, you can ensure safety
measures by not allowing your children to have their own profiles and by signing
out after each use.
Settings
64
Change Linked Skype Account
• S elect Manage Skype Settings.
• S elect Change Linked Skype Account.
• Enter your Comcast password.
• Enter the new Skype account that you want to link your Skype on XFINITY profile to.
Helpful Hints for Changing Linked Skype Account
• A Skype on XFINITY profile is a combination of your Comcast and Skype accounts. One primary
Comcast account and up to six secondary Comcast accounts can each be associated with a Skype
on XFINITY profile. If you change the linked Skype account for your Skype on XFINITY profile, this
will not change other profiles. Learn more in the Profiles section on page 34.
Settings
Change Skype Password
• To change your Skype password, sign in to your account at www.skype.com.
Privacy Settings
Select who can contact you while you are using Skype on XFINITY. Choose one of the following:
•A
llow only my personal contacts to call or message me.
•A
llow anyone to call or message me.
Helpful Hints for Privacy Settings
• T he Allow anyone to call or message me option makes it possible for any
Skype user to contact you.
65
Settings
66
Manage Conversations
Choose how long details about your calls and messages are saved. Learn more about viewing your
Recents on page 76.
Sync Contacts
By syncing your contacts, you will be able to access your XFINITY and Skype contacts from your
Skype on XFINITY account, making it even faster and easier to connect with family and friends.
Important Notes About Syncing Contacts
• S yncing will store your XFINITY and Skype contacts in your Skype on XFINITY profile. If you or
another person have synced contacts previously with your Skype on XFINITY profile, the contacts
you are about to sync will be added to those contacts that were previously synced.
• S yncing cannot be undone.
• B efore syncing, ensure that you are signed in to your profile so that you sync the right contacts.
Settings
Helpful Hints for Syncing Contacts
• Once you sync your contacts, you may have some duplicate entries. To check for duplicates, visit
www.XFINITY.com, sign in to your account, then check for duplicates.
• S yncing may take several minutes.
Delete Profiles
To delete a single profile, select it and confirm that you want to delete it.
If there is more than one profile, you have the option of clicking DELETE ALL PROFILES. If you
delete all profiles you will have to go through the setup process again to use Skype on XFINITY.
67
Settings
68
Blocked Contacts
You can block a contact for any reason, at any time, and prevent that person from calling or messaging
you via Skype on XFINITY.
To unblock a contact, select the contact and click UNBLOCK.
Settings
69
System Settings
Visit System Settings to modify hardware, software and equipment settings. These may have been set
when you set up and activated your Skype on XFINITY. These settings ensure optimal performance of
your video, audio and network .
1. S elect Settings.
2. Select System Settings.
3. Select one of the following.
• V ideo.
•A
udio.
•N
etwork.
•G
eneral.
Settings
70
Video Settings
Video Settings: Camera
This checks that your camera is working and positioned to capture your preferred viewing area. Test
your camera, make adjustments (if needed), then select I DON’T SEE ANYTHING or I SEE MYSELF.
Helpful Hints to Camera Check
• If you do not see yourself, check if the camera’s USB cable is plugged into the camera
input of the adaptor.
Video Settings: Screen Resolution
This test identifies your screen’s resolution. Skype on XFINITY works optimally with 1080i, 720p, or
480p resolution. We recommend selecting the highest quality resolution your TV supports.
Settings
71
Video Settings: HD Video Signal
This test ensures that your set-top box is connected properly and that you will be able to watch TV while using Skype on XFINITY. If you see TV programming on the screen, click I SEE MY TV.
Helpful Hints for HD Video Signal
• If you only see a gray or black box, click I DON’T SEE ANYTHING. Check if your HDMI cable is
connected properly and try again.
• You can use Skype on XFINITY without the connection, but you will not be able to watch TV while
using the service.
Audio Settings
Audio Settings: Checking Audio
This test ensures that you will be able to hear your contact.
Settings
72
Helpful Hints to Check Audio
• If you cannot hear the tone, make sure your TV and stereo receiver are not muted.
• If you are using an audio receiver, disconnect the SPDIF (optical digital audio) cable from your settop box, plug it into the audio port and try again.
Audio Settings: Checking Your Microphone
This test ensures that the microphones in the camera are working properly. Speak and the sound
check will run automatically.
Network Settings
Network settings relate to your wireless network connection or your Ethernet connection. To learn about connecting to your home network, see the Connect to Your Home Network section on page 21.
For additional help, visit http://comcast.com/skype or call 877-704-7713.
Settings
73
General Settings
General Settings: Set Time Zone
Select your time zone. Selecting your time zone ensures accurate call time records appear in your
Recent calls and messages.
General Settings: Set Timeout
When you are signed into Skype on XFINITY yet not actively using it, the system will return to TV
after a certain time. You can decide this length of time in the following screen.
Settings
74
General Settings: Software Update
Occasionally you will be alerted about Skype on XFINITY software updates. You can also come to the
Software Update screen to check whether you are running the most up-to-date version of
Skype on XFINITY.
If you upgrade your software, onscreen directions will guide you through the software
update process.
Other Features
Learn about additional Skype on XFINITY’s features to maximize your
experience.
This section will cover:
•A list of recent call and message activity.
•Helpful alerts and system notifications.
Other Features
76
Recents
See your recent activity including the type of connection (video, audio or message) and contact name.
The most recent are listed first. Both incoming and outgoing calls are listed here.
Connect with a recent contact
1. S elect Recent.
2. S elect a contact from the list.
3. Choose how you would like to connect: VIDEO CALL, AUDIO CALL or MESSAGE.
Other Features
Manage Conversations
Select how long details about your calls and messages are saved. These details are viewable in your Recent list.
1. S elect Settings.
2. S elect Profile Settings.
3. S elect Manage Conversations.
4. S elect one of the following:
Save until I delete
Save for 1 year
Save for 3 months
Save for 1 month
Don’t save
77
Other Features
78
Notifications
Notifications are helpful alerts that are displayed until an action is taken. For instance, a software update
will remain in your list until you download and install the software. Not all notification types are currently
available. Other examples include:
• C ontact requests sent by family and friends: Accept or decline a contact request,
or block a contact.
• S oftware updates: To optimize performance, download security and feature enhancements.
• Birthday reminders for your contacts.
• Not all Notification types are currently available
View and Respond to a Notification
1. S elect Notifications.
2. S elect the notification you want to respond to or view.
3. A window provides the details of the notification. Click the desired action. Following is an example
of a contact request notification.
Glossary
80
Glossary
Available Wireless Networks
Nearby wireless networks, such as your
home network.
Primary Comcast ID
Comcast account holder who can create, delete
and suspend secondary accounts.
Blocked Contact
A person who cannot call or message you via
Skype on XFINITY.
Profile
A Skype on XFINITY profile is a combination of a
unique Comcast ID and a unique Skype Name.
Ethernet Connection
An Ethernet cable that connects the adaptor
box with your router to establish a wired
network connection.
Profile Picture
Personal photo or image that contacts may see.
Your profile picture may be viewable to people you
are calling or messaging with.
Hidden Wireless Network
Networks that do not broadcast their Network
Name (SSID). If your home network is hidden,
you will have to enter additional security
information to connect.
Recent
List of your recent calls and messages, shown with
the most recent ones first.
Messages
A brief written message. You can send and receive
these by using your remote.
Mood
Optional personal message that lets your contacts
know what you are doing, how you are feeling or
what is on your mind.
Network Name
The Network Name, also known as the Service
Set Identifier (SSID), is the identification of your
home network.
Notifications
Alerts and updates awaiting your review
and response.
Pairing
Process of syncing two electronic
devices, such as your remote and
adaptor box, so they can work together.
SPDIF Cable
Optical digital audio cable (not included) required to
connect the adaptor box if you use a digital audio
receiver in your home entertainment system.
Status
Lets your contacts know your availability
to connect.
Views
Options for displaying the layout of calls and
messages on your TV.
81
Skype is a trade mark of Skype or its related companies. Copyright 2003-2012, Skype, patents pending.
For Skype to Skype calls, all call participants must have a Skype account and be logged into Skype. Highspeed internet connectivity required. Simulated calling images shown. Actual call quality may vary.
Skype on XFINITY User Guide Version 1.0