1
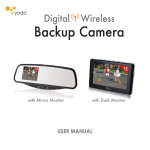
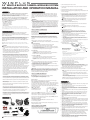
3.5” VEHICLE BACKUP CAMERA WIRELESS SYSTEM
INSTALLATION AND OPERATION MANUAL
Thank You
For questions or installation issues regarding the Vehicle Back-Up Camera
Wireless System, please visit www.winplus.com or contact WINPLUS at
866.294.9244 to speak to one of our installation specialist. You can also contact
us via email at [email protected].
Contact WINPLUS regarding:
• Damaged or missing parts
• Installation and operation
• Product issues or problems
• Warranty Service
IF YOU ARE EXPERIENCING ANY ISSUES WITH THE SYSTEM DURING
INSTALLATION OR OPERATION, DO NOT RETURN PRODUCT TO STORE.
CONTACT WINPLUS FOR INSTRUCTIONS ON HOW TO RETURN THE PRODUCT.
These installation instructions do not apply to all types of vehicles. They are
meant only as a general guide due to the large number of vehicle makes and
models. For vehicle specific questions, contact your vehicle’s manufacturer.
Consult your local motor vehicle laws on the use of this product to be sure it is
permitted.
! WARNING
• Through installation of the Vehicle Back-Up Camera you should be sure not to
degrade the safety of any system or device on your vehicle, including Federal
Motor Vehicle Safety Standards.
• Improper installation and wiring of the Vehicle Back-Up Camera system may
damage the vehicle’s electrical system, including vital vehicle computer and
operating systems. That could lead to an accident or fire, causing property
damage and/or serious personal injury. If you are unsure with the installation,
it is recommended to seek professional installation advice from qualified auto
electrician or, in the alternative, to have the installation performed by a
qualified auto electrician.
HOW TO INSTALL THE MONITOR
Prior To Installation
Monitor Mounting
Read all the installation instructions carefully before installing the product.
Improper installation will void manufacturer’s warranty. The installation
instructions do not apply to all types of vehicles, and are written as guidelines to
assist in installing the system.
Consult an experienced technician if you are not comfortable installing the
product. You can also contact WINPLUS at 866.294.9244 to speak to one of our
installation specialist if you have any specific questions regarding Vehicle
Back-Up Camera Wireless System. You can also visit www.winplus.com for
additional help.
BEFORE using the Vehicle Back Up Camera, please read the following
safety information. ALWAYS use the Vehicle Back Up Camera as outlined
here.
! WARNING
• A failure to read and follow these warnings and instructions may result in a
serious accident, including damaged property or a serious injury, including loss
of life.
• The Vehicle Back-Up Camera is designed as an aid to the driver in detecting
large stationary objects to help avoid damaging the vehicle. However, you, the
driver, must use it safely and properly. Use of the Vehicle Backup Camera is
not a substitute for safe, proper and legal driving.
• Never back up while looking only at the screen. You should always check
behind and around the vehicle when backing up just as you would if the
vehicle did not have the Vehicle Back-Up Camera. Always make sure your
intended path is clear. If you back up while looking only at the monitor, you
may hit a vehicle, pedestrian, bicyclist, child, pet or other object resulting in
injury or death. Always back up slowly.
• Never depend on the Vehicle Back-Up Camera entirely when backing up. The
image on the screen is different from actual conditions. Objects viewed in the
rear view monitor differ from actual distance because a wide-angle lens is
used. Objects in the rear view monitor will appear visually opposite than when
viewed in the rear view and outside mirrors. Use the inside mirror or glance
over your shoulder to properly judge distances to other objects.
• The Vehicle Back-Up Camera’s “night vision” feature is an aid to a driver but is
limited. Always use your own eyes to confirm the vehicle’s surroundings, as
the displayed image may be faint or dark, distorted, or not entirely visible.
Always check behind and all around the vehicle visually and with mirrors
before proceeding.
• The area displayed by the Vehicle Back-Up Camera is limited. Vehicle
Back-Up Camera does not display objects that are close to or below the
bumper, underneath the vehicle, or objects out of the camera’s field of view.
The area displayed on the screen may vary according to vehicle orientation or
road conditions.
• The Vehicle Back-Up Camera is not intended for use during longer backing
maneuvers or backing into potential crossing traffic or pedestrians. Crossing
traffic or pedestrians may be approaching outside of the camera’s field of view.
• Be sure to check the camera’s position and mounting angle before each use.
• Make sure the trunk, hatch, or backdoor is completely and securely closed
when backing up.
• If the back of the vehicle is hit, the position and mounting angle of the Vehicle
Back-Up Camera may change.
• When washing the vehicle with high pressure water, be sure not to spray it
around the camera. Otherwise, water may enter the camera unit causing water
condensation on the lens, a malfunction, fire or an electric shock.
• Do not strike the camera. It is a precision instrument. Otherwise, it may
malfunction or cause damage resulting in a fire or an electric shock.
• This product will only provide images of items that are within the field of view
of the camera. Thus, it is imperative that the camera should be kept clean and
unobstructed, and should mounted so that its field of view includes the entire
area behind your vehicle.
The Vehicle Backup Camera Wireless System Monitor can be mounted or placed
in various locations within the vehicle. The following provides mounting
instructions for the recommended locations.
NOTICE: Please ensure that monitor is secured and mounted where it would
NOT obstruct any OEM vehicle safety features. In an event of an accident,
manufacturer is not responsible for bodily injury caused by the monitor being a
projectile.
Select location for mounting the monitor in desired location.
! CAUTION: Ensure monitor location will not obstruct your vision while driving.
a. Dashboard Mounting
i. Screw and secure the mount stand to the back of the monitor.
ii. Clean dashboard surface where monitor will be mounted.
iii. Remove adhesive protector from underneath of monitor mounting stand.
iv. Place and secure monitor mounting stand onto dashboard using adhesive
from tape from bottom of stand.
v. Adjust and tilt mounting to have a better viewing angle.
Note:
• To maximize the effectiveness of the suction mount, it is recommended that
the application be performed under the following conditions:
• Surface temperature should be between 70ºF and 100ºF (21ºC and 38ºC).
• Application below 50 ºF (10 ºC) should be avoided.
• Application should not occur in direct sunlight.
• Mounting should be protected from exposure to direct sunlight for a period of
24 hours.
! CAUTION: These mounting options are illustrations only, and may not each
apply to every type of vehicle. For vehicle specific questions, contact your
vehicle’s manufacturer to be sure that the installation and mounting location you
choose will not degrade the safety of any system or device on your vehicle,
including Federal Motor Vehicle Safety Standards.
HOW TO POWER THE MONITOR
INSTALLATION: Power up monitor using 12V adapter provided
1. Plug 12V adapter to vehicle cigarette lighter socket.
2. Connect adapter to monitor power input.
Scotch-Loks
Grommet
3.5” LCD Monitor
Vent Mount Clips
Suction Cup Mount
Vent Mount
camera power wires
Cable Ties x 4
12V Adaptor
Dashboard Mount
! CAUTION: Keep away from reach of children may cause serious injury.
7) Plug the camera wire to the signal booster. Ensure wire is not obstructed or
tangled.
8) Remove light socket from its reverse light housing.
! CAUTION: It is highly recommended that you remove the bulbs as a
precaution.
9) Connect camera power wires
! CAUTION: Before connecting camera wires, use a Volt Meter or a
Multi-Meter to determine positive and the negative wires on the vehicle’s
reverse light wires. Vehicle wiring may vary. Refer to the vehicle Owner’s
Manual for more information.
a. Determine positive and negative wires. Most vehicles will have two color
wires, BLACK for negative and RED for positive.
b. Disconnect vehicle battery before proceeding to the next step as a
precaution
c. Using the Scotch-Lok Connectors, connect camera’s RED wire to reverse
light’s positive wire. If needed, use pliers to squeeze Scotch-Lok and
ensure a good connection.
d. Connect camera’s BLACK wire to reverse light’s negative wire. Secure and
link wires using the Scotch-Lok Connectors.
e. Secure wires with cable ties or electrical tape.
10) Plug camera power
wires to the signal booster
Camere Power Wires
Camera Wire
Signal Booster
Note: Place and secure the
signal booster where you
can get the best signal.
camera
power wires
Backup Camera
power source
CHECKPOINT:
At this point, you can check if you properly connected the wires by:
• Reconnecting the battery.
• Turn the ignition to the “Accessories” position.
• Engage the Emergency or Hand Brake.
• Put the vehicle in reverse.
If the camera and the monitor wirings are hooked up correctly, the monitor
should turn on and should display image of rear view of the vehicle.
**Disconnect vehicle battery before proceeding with installation**
11)
12)
13)
14)
Connect bulb back into light socket.
Reinstall light socket into reverse light housing.
Slide license plate between camera and mounting
Align camera mount to license plate.
Note: For maximum viewing, place camera on the center of the license plate.
15) Use double sided tape to secure the camera onto the license plate.
Note: Press license plate and camera mounting firmly to secure and get full
contact between the license plate and the double-sided tape.
16) Screw license plate with camera onto rear of the vehicle.
17) Once camera is secured, adjust camera angle to desired point of view.
Note:
- The preset camera angle may not be enough for all types of vehicle, adjust
accordingly.
- The camera angle should be chosen carefully to best suit your specific
vehicle because it will impact the size and location of the blind spot of the
rear view camera.
- If the camera hinges gets loose, tighten by adjusting the screws at the back
of the camera through the mounting.
Caution: Double check the camera angle from time to time to make sure that
it is always focused and adjusted to the desired point of view.
Operations
Power On/Off Button - BLUE LED Power Indicator
Press POWER ON/OFF button to turn the monitor on. When monitor is ON or in
use, the blue LED status indicator will be on. If there is power to the monitor but
the monitor is not communicating the reverse camera, the blue LED status
indicator will blink on and off. The blue LED status indicator light will be off when
the monitor power is OFF
MENU, + and - Buttons
Press MENU button to enter
the menu screen as shown:
MENU
MENU UP
POWER ON/OFF
MENU DOWN
PARKING ASSISTANT
Continue pressing MENU button to select
BRIGHTNESS, CONTRAST or COLOR controls.
Press + button or – button to adjust settings within the control selected.
HOW TO INSTALL THE CAMERA
Install Vehicle Backup Camera in the
top of the vehicle’s rear license plate
to achieve maximum viewing angle.
LICENSE PLATE
(optional use)
6) Insert camera wire into selected/drilled opening
Monitor Controls:
Note: The monitor will automatically turn on when the car is in reverse gear.
Note: Please always practice safe driving habits while backing up and use the
Parking Assistant only as aid.
Signal Booster
5) Check for openings or holes where license plate is mounted to insert camera
wire. If no opening is available, drill a small hole and insert wires. Select a
location close to the camera’s power cables.
Note: The Vehicle Backup Camera can be installed without drilling a hole by
using a pre-existing hole on the vehicle to route the wires to the reverse
taillights.
! CAUTION: Take extra precaution necessary to avoid vehicle damage.
Before drilling, inspect behind the drilling location to ensure there are no
vehicle wirings or components.
c. Suction Cup Mounting
i. Slide and lock suction cup mounting to back of monitor as shown.
ii. Secure monitor and mounting to window or windshield.
iii. Adjust to desired angle by twisting the suction cup arm to the desired
position.
Parking Assistant ON/OFF
Press Parking Assistant ON/OFF button to switch ON or OFF the
on-screen-display guideline.
Backup Camera
3) Inspect and determine route of camera wiring to reverse lights.
b. Vent Mounting
i. Slide and lock vent clip to back of monitor as shown.
ii. Adjust to desired view angle by rotating center ring; rotate clockwise to
unfasten.
iii. Mount monitor by sliding clip carefully into the air vent.
To exit the menu screen, select EXIT on the screen using the MENU button and
press either + or – to exit the menu screen.
Components
2) Locate reverse tail lights and select a wiring route the camera will use for its
power source
4) Insert camera wire through grommet (supplied). The grommet protects the wire
from the metal edge.
Installation Instructions
Thank you for purchasing the WINPLUS Vehicle Back-Up Camera Wireless
System. This back-up camera system was designed to give additional
convenience when driving or operating your vehicle. All parts needed to install
and operate the system are included in this package.
1) Remove license plate from rear of vehicle.
SAFE OPERATING TIPS
• If you replace the tires, the area displayed on the monitor may change and you
may need to adjust the camera.
• There is a plastic cover over the camera. Do not scratch the cover when
cleaning dirt or snow from the cover.
• The camera has a water resistant construction. Do not detach, disassemble or
modify it. This may cause incorrect operation. Camera is water resistant but
not waterproof.
• Do not submerged camera in water, which can cause internal damage to the
camera.
• If the temperature changes rapidly, such as when hot water is poured on the
vehicle in cold weather, the system may not operate normally. Camera can
withstand the effects of rain, snow, and inclement weather.
• When the temperature is extremely high or low, the screen may not clearly
display objects.
• When strong light directly enters a camera, objects may not be displayed
clearly.
• The screen may flicker under fluorescent light.
• The colors of objects on the rear view monitor may differ somewhat from those
of the actual object.
• If dirt, rain or snow attaches to the camera, the monitor may not clearly display
objects. If water droplets, snow or mud adhere to the camera lens, rinse with
water and wipe with a dry cloth.
• Do not use alcohol, benzene or thinner to clean the camera. This will cause
discoloration. To clean the camera, wipe with a clean a cloth dampened with
mild cleaner diluted with water and then wipe with a dry cloth.
• Will work up to 30 feet. Working distance varies depending on the interference
between the monitor and the camera.
• The system is only designed for backup/reserving purposes. WINPLUS is not
responsible for damages on the system or the vehicle if used for other
purposes.
• ALWAYS engage Parking/Emergency/Hand Brakes of the vehicle when testing
the system.
• Like most wireless device devices, the system may cause interference to other
wireless devices or vice versa. Wireless devices such as WIFI routers,
Bluetooth devices, and mobile handsets may cause interference with the
monitor. If this happens you will notice rolling lines, blurry images, or static
images on the monitor.
• The system is designed to ADD safety and protection. The device was NOT
designed to replace other safe driving habits. Double checking and looking
around before backing up is STILL the safest way.
SAFETY AROUND AND BEHIND OTHER VEHICLES
Using a rear-view camera is not enough to completely overcome a vehicle's blind
spot. Many preventable injuries and deaths occur in driveways or parking lots
when drivers do not see children, pets, or others near their vehicles. Here are a
few safety tips that will help you to avoid a backover accident.
• Walk completely around your vehicle before getting in. Check for kids, toys,
and pets before entering the vehicle and starting the engine.
• Know where children are. Have children stand in a place where they are in full
view.
• Be aware of young children. Young children are small and hard to see.
• Parents, caregivers and all adults need to be vigilant in supervising children,
especially when children are in the yard, driveway or parking lot playing near
parked cars.
• Roll down your window so you will be able to hear what is happening outside
your vehicle.
• Owners of SUVs, trucks, and vans need to take extra care to avoid hitting or
running over a child.
• Teach children to move away from a vehicle whenever it is started.
Testing and Troubleshooting
Testing:
1)
2)
3)
4)
Connect vehicle battery cables
Turn ignition to “ON” position without starting the engine
Engage parking brakes and put the car in reverse
Wait for monitor to show rear view image.
Troubleshooting:
1. Q: All I see is snow when I put my car in reverse?
A: This means that there is no communication between the camera and the
monitor.
a. Check the connection of the camera to the reverse light. Make sure all
the wirings are secure and tighten.
b. Refer to your vehicle manual for wiring information of the reverse
lighting. Make sure that the red wire from the camera is connected to
the positive wire of the reverse light and the black wire of the camera is
connected to the ground wiring of the reverse light
c. If you are using the Scotch-Lok make sure that you used a pliers to
crimp the wires together to ensure good connection.
2. Q: What is the maximum working distance of the system?
A: The system will work up to 30 feet depending on the amount of interference
between the camera and the monitor.
3. Q: Why am I seeing a lot of interference and rolling lines when I use the
system?
A: Since the system is a wireless, other wireless devices can interfere with the
signal between the monitor and the camera. Mobile phones and other
devices that use wireless technology can interfere with the system. Turn off
other wireless devices and you will notice the interference goes away. To
get a better signal try the following:
• Move the monitor around the dashboard.
• Move antenna wire around and place in a location that has little
interference.
4. Q: When it is bright outside, is it normal for the screen to take awhile to show
the actual image?
A: Yes, the camera takes awhile to normalize and stabilize when it is bright
outside. If the monitor takes more than 15 seconds to normalize and show
rear view image, please contact WINPLUS USA technical team.
IF YOU ARE EXPERIENCING ANY ISSUES WITH THE SYSTEM DURING
INSTALLATION OR OPERATION, DO NOT RETURN PRODUCT TO STORE.
CONTACT WINPLUS AT 1.866.294.9244 AND SPEAK TO OUR INSTALLATION
SPECIALISTS. FOR ADDED HELP, PLEASE VISIT www.winplus.com
Limited Warranty
Limited Warranty
WINPLUS North America warrants, to the original purchaser, that its products are
free from defects in material and workmanship for 90 days from the date of
original purchase. Where permitted by law, WINPLUS North America’s liability
shall be limited to that set forth in this limited express warranty. This limited
express warranty shall be the exclusive remedy of the purchaser and WINPLUS
North America makes no other warranty of any kind aside from the limited
express warranty stated above.
CONDITIONS OF WARRANTY
If during the 90 day warranty period your new product is found to be defective,
WINPLUS North America will repair such defect, or replace the product, without
charge for parts or labor subject to the following conditions:
1. All repairs must be performed by WINPLUS North America.
2. All warranty claims must be accompanied by a copy of the sales receipt or bill
of sale.
3. The equipment must not have been altered or damaged through negligence,
accident, improper operation, or failure to follow the product instructions for
installation, use, or care.
4. The replacement of parts is excluded from the warranty when replacement is
necessary due to normal wear and tear.
5. Repair or replacement parts supplied by WINPLUS North America under this
warranty are protected only for the unexpired portion of the original warranty.
6. This is a “repair or replace” warranty only, and does not cover the costs
incurred for the installation, removal or reinstallation of the product, or damage
to any vehicle or vehicle electrical system.
OWNER’S RESPONSIBILITIES:
WINPLUS North America will make every effort to provide warranty service within
a reasonable period of time. SHOULD YOU HAVE ANY QUESTIONS ABOUT
SERVICE RECEIVED OR IF YOU WOULD LIKE ASSISTANCE IN OBTAINING
SERVICE, PLEASE CALL TOLL FREE 1.866.294.9244 DURING REGULAR
BUSINESS HOURS MONDAY THROUGH FRIDAY 9:00 AM TO 5:00PM
In order to provide you with the proper warranty service, we request that you
adhere to the following procedure:
1. Include a copy of your sales receipt or bill of sale with your unit when it is
returned for warranty service.
2. If it is necessary to return your product for service, please return it securely
packed, preferably in the original shipping carton, and freight and insurance
prepaid to the following address:
ATTN: WINPLUS BACKUP CAMERA RETURNS
820 South Wanamaker Avenue,
Ontario, CA 91761
3. Please include a detailed explanation of the problem you are having.
4. If your product is found by WINPLUS North America to have a defect in
material or workmanship, within the warranty period, it will be repaired or
replaced at no charge and returned to you prepaid.
WINPLUS North America makes no other warranty of any kind aside from the
limited express warranty stated herein.
DISCLAIMER OF WARRANTIES, INCLUDING WARRANTY OF
MERCHANTABILITY AND WARRANTY OF FITNESS FOR PARTICULAR
PURPOSE: EXCEPT AS SPECIFICALLY SET FORTH HEREIN, NO WARRANTY
OR REPRESENTATION, EXPRESS OR IMPLIED, IS MADE AS TO THE VEHICLE
BACK-UP CAMERA. EXCEPT AS EXPRESSLY SET FORTH HEREIN, WINPLUS
NORTH AMERICA AND/OR ITS AFFILIATES EXPRESSLY DISCLAIMS, WITHOUT
LIMITATION, ANY STATUTORY WARRANTIES AND ALL IMPLIED WARRANTIES,
INCLUDING ANY IMPLIED WARRANTY OF MERCHANTABILITY OR FITNESS
FOR A PARTICULAR PURPOSE.
WINPLUS North America and/or its affiliates does not guarantee or promise that
the user of our Vehicle Back-Up Camera will not be in an accident or otherwise
not collide with an object and/or person. Our Vehicle Back-Up Cameras are not
intended in any way to be substitute for careful and cautious driving or for the
consistent adherence to all applicable traffic laws and motor vehicle safety
regulations. The Vehicle Back-Up Camera is not intended to be a substitute for
rearview mirrors or for any other motor vehicle equipment mandated by law.
Even when properly installed, our Vehicle Back-Up cameras have a limited field of
vision and do not provide a comprehensive view of the rear area of the vehicle.
You should always look around outside your vehicle and use your mirrors to
confirm rearward clearance and that your vehicle can back up safely.
FCC
! WARNING: Changes or modification to this equipment not expressly
approved by the party responsible for compliance could void the users authority
to operate the equipment.
NOTE: This equipment has been tested and found to comply with the limits for a
Class B digital device, pursuant to Part 15 of the FCC Rules. These limits are
designed to provide reasonable protection against harmful interference in a
residential installation. This equipment generates, uses and can radiate radio
frequency energy and, if not installed and used in accordance with the
instructions may cause harmful interference to radio or television reception,
which can be determined by turning the equipment off and on, the user is
encouraged to try to reconnect the interference by one or more of the following
measures:
o Reorient or relocate the receiving antenna.
o Increase the separation between the equipment and receiver.
o Connect the equipment into an outlet on a circuit different from that to which
the receiver is needed
o Consult the dealer or an experienced radio/TV technician for help.
WINPLUS North America and/or its affiliates are not responsible for a user’s
intended or actual use of the Vehicle Back-Up Camera. In no event shall
WINPLUS North America and/or its affiliates have any liability for any losses
(whether direct or indirect, in contract, tort or otherwise) incurred in connection
with the Vehicle Back-Up Camera, including but not limited to damaged property,
personal injury and/or loss of life. Neither shall WINPLUS North America and/or
its affiliates have any liability for any decision, action or inaction taken by any
person in reliance on the Vehicle Back-Up Camera, or for any delays,
inaccuracies and/or errors in connection with the Vehicle Back-Up Camera and
its functioning.
WINPLUS North America and/or its affiliates shall have no responsibility or
liability for damage and/or injury resulting from accidents occurring with vehicles
having the Vehicle Back-Up Camera installed, and WINPLUS North America
and/or its affiliates, the manufacturer, distributor and seller shall not be liable for
any injury, loss or damage, incidental or consequential, arising out of the use or
intended use of the product.
This device complies with Part 15 of the FCC Rules and applicable industry
Canada regulations. Operation is subjected to the following two conditions: (1)
this device may not cause harmful interference, and (2) this device must accept
any interference that may cause undesired operation of device.
The manufacture is not responsible for any radio or TV interference cause by
unauthorized modifications to this equipment. Such modifications could void the
user’s authority to operate this equipment.
(For Canada)
This Class A/B digital apparatus meets all requirements of the Canadian
Interference – Causing Equipment Regulations.
569;/(4,90*( :V\[O>HUHTHRLY(]LU\L
6U[HYPV*( ,<967,
<UP[;^V*V\U[PLZ,Z[H[L-HSJVULY9VHK
/H]LYOPSS:\MMVSR*) ?A<2
(<:;9(30(
<UP[ 4V\U[HPU/^`)VYVUPH
=PJ[VYPH(\Z[YHSPH
5,>A,(3(5+
6SP]L9VHK7LUYVZL
(\JRSHUK5L^ALHSHUK
(:0(
:\P[LZ[O-SVVY*VYWVYH[PVU7HYR
6U3HP:[YLL[:OH[PU5;/VUN2VUN
Have a comment or question? E-mail us at: [email protected]
or visit us online at: www.winplus.com
2009
ML-30681
;LS!
-H_! ;LS!
-H_!
;LS! -H_! ;LS! -H_! ;LS! -H_!