1
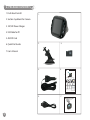
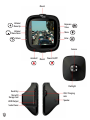
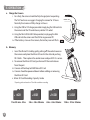
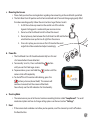
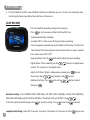
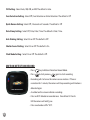
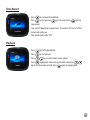
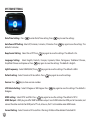
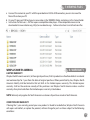
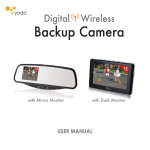
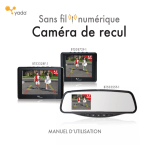
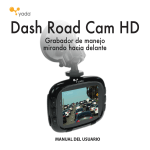
TABLE OF CONTENTS
1. Introduction ����������������������������������������������������������������������������������������������������������������������������������������������������������������������������������� 1
2. Package Contents ������������������������������������������������������������������������������������������������������������������������������������������������������������������������ 2
3. Product Specifications ��������������������������������������������������������������������������������������������������������������������������������������������������������������� 3
4. Safety Information ����������������������������������������������������������������������������������������������������������������������������������������������������������������������� 5
5. Operation ���������������������������������������������������������������������������������������������������������������������������������������������������������������������������������������� 6
6. Settings ������������������������������������������������������������������������������������������������������������������������������������������������������������������������������������������� 8
7. Viewing Files����������������������������������������������������������������������������������������������������������������������������������������������������������������������������������13
8. Warranty ����������������������������������������������������������������������������������������������������������������������������������������������������������������������������������������13
1. INTRODUCTION
The Yada Dash Road Cam HD is a video recording camera intended to capture incidents while driving. The
2.7” LCD is convenient for instant playback. Simply mount the camera as directed and use loop recording
or motion detection recording to capture events while driving.
Please read all of the installation instructions carefully before installing and using the product. Improper
installation or usage will void manufacturer’s warranty.
All certifications and technical specifications can be found at www.letsyada.com <http://www.letsyada.com> .
1
2. PACKAGE CONTENTS
1. Dash Road Cam HD
1.
2. Suction Cup Mount for Camera
3. 12V/24V Power Charger
4. USB Cable for PC
5. 4GB SD Card
6. Quick Start Guide
2.
5.
7. User’s Manual
3.
6.
Quick Start Guide
dash road cam HD
Mount
Exposure Value
Volume / Menu Up
Volume / Menu Down
Menu
Enter / OK
Enter / OK
Accident!
Power On / Off
Videos are available on www.letsyada.com to see step by step operating instructions.
Detailed instructions and warnings can be found in the user's manual provided.
CHARGE
MOUNT
MEMORY
POWER ON
Charge the
camera using the
12V adapter
provided
Mount the camera
underneath your
rearview mirror and
angled toward the
driver
Place a micro SD
card in the slot
Plug in the power
cable and it will
automatically start
recording under
“Cyclic Record” mode.
SCREEN OFF
MODES
POWER OFF
Click Power
once to shut
off the screen the camera will
still record
Press “-” (Volume /
Menu Down) to
scroll through
mode options.
Details found in
User Manual
To turn off, hold
the Power button
down until all lights
are off
WARNING:
VIEW FILES
Connect the camera to your PC
with the provided mini USB to
USB connector, you can also view
the micro-SD card on your PC
open up DCIM and you can view
Videos in the 100MEDIA folder,
The Yada dash road cam HD is for interior use only. Please
and Pictures in the Camera folder
check all local laws before operating. This camera is not
waterproof and is charged via 12V only.
Please read all warnings and operating instructions in the user's manual provided.
For more information, please visit: www.letsyada.com or email us at [email protected]
Winplus North America | 820 S. Wanamaker Ave., Ontario CA 91761 | 866.294.9244
4.
7.
Dash Road Cam HD
Forward Facing Driving Recorder
2
3. PRODUCT SPECIFICATIONS
Sensor
1.3M CMOS sensor, (1/4)inch
Camera Lens
Wide angle 90 degrees, the maximum aperture: F2.8
Lens of Low Illumination
3300mv / (Lux.sec) sensitivity
Zoom
16x digital zoom
LCD Screen
2.7 inch 4:3 Resolution: 960x240 TFT LCD
Video Output
HDMI interfaces: HDMI output up to 1280x720
Photograph
JPG 12million pixels 4000x3000
Camara Resolution
Full HD 1080P (1920 x 1080) 10 FPS
HD 720P (1280 x 720) 30 FPS
(720 x 480) 30 FPS
VGA (640 x 480) 30 FPS
QVGA (320 x 240) 30 FPS
Video FormatAVI
Video Compression Format H.264 Seamless connectivity
Automatic Boot Video
Plug in the power, it will automatically start. Off delay 30 seconds automatically shut down and save
Standby Auto-off Time
2 minutes, 5 minutes, 10 minutes, off
Audio
Built-in microphone,speaker AAC
Video Manner
Loop Video, Mandatory Video, Motion Detection Video, General Video
Loop Video Time
3 minutes, 5 minutes, 10 minutes, 15minutes, off
Storage
External media: micro SD (TF) maximum support : 32G
Flashlight
Electronic automatic video-light (LED)
USB InterfaceUSB2.0
HDMI interface
HDMI V1.3A
Language
10 languages (English, Deutsch, François, Espanola, Italian, Portuguese,
Traditional Chinese, Simplified Chinese, Japanese, and Russian)
Battery
High-capacity rechargeable polymer battery 3.7V 1100mAh
Power Supply
DC 5V
Dimensions & Weight
85 x 63 x 47mm Weight: 112.8g
Operating Humidity
10%-80%
Operating Temperature-20ºC~+60ºC
3
Mount
Volume/
Menu Up
Exposure
Value
Volume/
Menu Down
Menu
Return
Enter
Camera
Accident!
Mount
Power On/Off
Flashlight
Reset Key
Micro SD
Storage Card
HDMI Output
Socket Cover
4
USB / Charging
Jack
Speaker
4. SAFETY INFORMATION
a. Please read all safety warnings listed in this user’s manual.
b. Do not operate or adjust the camera while driving. The camera should be set prior to operating the vehicle.
c. Make sure the camera is not blocking the driver’s line of sight and check local laws and regulations for placement instructions.
d. Do not disassemble the camera. This will void the warranty and possibly cause failure, electric shock or fire. Please contact Winplus North America for repair or warranty claims.
e. Damage due to production malfunction, loss of data, or other damages occurring while using this product shall not be the responsibility of the manufacturer.
f. Always keep your eyes on the road and surrounding vehicles. At no time should the screen be used as
a monitor for driving assistance.
g. This product is a road safety accessory and the manufacturer is not liable for any losses brought on by malfunctions, loss of data or any other forms of losses from using this product.
h. This product is an accessory designed for the specific purpose of recording and saving captured video footage of the areas near the vehicle. Certain functions may not be supported depending on the driving
conditions and vehicle conditions. The firmware updates for improving performance may result in different performance by each product. The video may not be recorded depending on the conditions in which the device is used. Please use the device only for your reference. The recording may not take place depending on the status of the SD card.
i. This device is designed to capture and save accident footages of the vehicle in which the product is installed in. However, it does not guarantee that every accident footage will be recorded. Accidents with
very minor level of impact may not activate the impact sensor and the accident may not be recorded as event footage.
j. Do not put anything inside of the SD memory card slot except for the card itself.
k. Do not operate the product with sharp instruments such as a pen or pencil.
l. Do not attach a sticker or apply paint on the device or the SD Card.
m. Do not remove the SD card during operation.
n. Do not expose the camera to the direct heat of the vehicles heating system.
o. The camera is not weatherproof and is not intended for outside use. It should remain in the interior of the vehicle for proper operation. At no time should the camera be exposed to moisture or weather elements.
5
5. OPERATION
a. Charge the Camera
i. For safety, the camera should be fully charged prior to operating.
The first few times we suggest charging the camera for 12 hours.
Normally the camera will fully charge in 3 hours.
ii. Using the USB to 12V charger provided simply plug the USB end into
the camera and the 12V end into any vehicle 12V socket.
iii. Using the Mini USB to USB Cable provided, simply pug the Mini
USB end into the camera and the USB to any powered PC.
iv. If the battery is low on the camera, the battery icon will flash.
b.Memory
i. Insert the Micro SD card by gently pulling off the socket cover on
the camera and place the Micro SD card in the slot and pushing
till it clicks. Then replace the socket cover and push till it is secure.
ii. To remove the Micro SD Card, push once till the card releases
from the port.
iii. Camera will hold up to 32GB Micro SD Card
iv. Camera should be powered down before adding or removing
the Micro SD Card
v. Micro SD Card Recording Capacity Guide
*Capacity guide are based on 720 x 480 resolution recording
4GB
1 hrs 30 min - 2 hrs
6
8GB
3 hrs - 3 hrs 30 mins
16GB
32GB
6 hrs - 6 hrs 30mins
12 hrs - 12 hrs 30 mins
c. Mounting the Camera
i.
Please check your local laws and regulations regarding where mounting on the windshield is permitted.
ii. The Dash Road Cam HD position on the front windshield and its forward-facing angle greatly affect
the video recording quality. Follow these instructions to get the best results:
1. Install the suction cup mount on the central axis of the vehicle.
A good starting point is underneath your rearview mirror.
2. Do not use the Dash Road Cam HD without the mount.
3. Do not place any item between the Dash Road Cam HD and the front
windshield or cover up the line of sight from the camera.
4. Once set in place, you can view on the LCD monitor the exact
angle that will be recorded and adjust accordingly.
d. Power On
i. The Dash Road Cam HD should automatically turn On and
start record when Power detected.
ii. To manually turn On, Press and hold the
button
until you see the Yada Logo screen.
iii. To power down, press and hold the
button until the
camera shuts off completely.
iv. To shut off the LCD monitor while driving, press the
button just once (do not hold). The camera will
continue to record, but the screen will be black.
You will only see the LED indicators for functionality.
e. Shooting Mode
i. The camera comes pre-set to the most common recording function called “Loop Record”. To see all modes description and how to change settings please see the next section “Settings”.
f.Reset
i.
If the camera locks and does not allow you to operate, reset the camera by switch off and on
the Reset button.
7
6. SETTINGS
a. The Dash Road Cam HD has several different functions available for your use. To access the shooting modes,
scroll using the Menu Up or Menu Down buttons on the camera.
LOOP RECORD
• This is the default recording setting for the camera.
• Press
to start preview and the Dash Road HD Cam
should automatically recording.
• A red dot “REC” on the screen flashing indicates recording.
• Files are looped or recorded over by the default of 10 minutes. The Micro SD
Card will hold 10 minute segments and record over them as space is needed.
• Files saved under suffix “LOOP”
• Stop Loop Video: Press the
• Digital Zoom: When videoing use the
button while videoing to pause recording.
buttons as digital zoom
control. This camera has 16x digital zoom.
• Adjust the EV Value: When in video preview mode, press
the camera, then
• Additional Settings: Press
then press
key to adjust and
and use the
key on
to save.
button to select
.
Resolution Setting: FULL HD1080P (1920 x 1080) 10fps, HD 720P (1280 x 720) 30fps, WVGA (720 x 480) 30fps,
VGA (640 x 480) 30fps and QVGA 320 x 240 30fps. The default setting is HD720P. Using
to set the resolution and then press the
8
to save the setting. Press
to exit and
Loop Record Setting: Select Off, 3 minutes, 5 minutes, 10 minutes or 15 minutes. Use the
to record.
key to save
your selection, and press the
key to exit and
Auto Close Panel: Select On or Off, and press
to record. The default is 10 minutes.
to save the settings. The default is On.
After one minute of recording the screen will automatically shut off.
Audio Setting: Choose On or Off, and press the
key to save the settings. If you do not want the video with
sound, you can select Off. On the right middle of screen will appear
.
G-Sensor Setting: Select the sensitivity of the G-Sensor Low, Mid, or High. This is the sensitivity to turn on
the Accident record mode. The default setting is Low. In the event of an accident, you can also press the
Accident button on the camera. A red triangle will appear on the screen. The camera will automatically
save the current and previous files and they will not be recorded over. Files will have an icon of a key in the
top left corner to designate them as saved.
Standby Videos Setting: Use the
button to select On / Off then press
. Having the Standby
Videos On will means the Dash Road Cam HD will continue recording even the power disconnected or
engine off. In the Standby recording mode, the screen will shut off 30 seconds after the power disconnected,
but video recording will be continue. The default is Off.
9
CONTINUOUS RECORD
•
•
•
•
•
•
•
•
Press
key to Continuous Record Mode.
Press
to start preview,
again to start recording.
A red dot “REC” on the screen flashing indicates recording.
Files are NOT deleted or recorded over. Once Micro SD Card is full the camera will notify you.
Files saved under suffix “SOS”
Digital Zoom: When videoing use the
buttons as digital zoom
control. This camera has 16x digital zoom.
Adjust the EV Value: When in video preview mode, press
Key on
the camera, then
Key to adjust and
to save.
Additional Settings: Press
and use the
button to select
then press
.
Resolution Setting: FULL HD1080P (1920 x 1080) 10fps, HD720P (1280 x 720) 30fps, WVGA (720 x 480) 30fps,
VGA (640 x 480) 30fps, and QVGA 320 x 240 30fps. The default setting is HD720P. Using the
key to set
the resolution, and then press
key to save the setting. Press
to exit and
to record.
Anti-Shaking Setting: Choose On or Off, and press
to save the settings. The default is off.
Date Stamp Setting: This determines if the date/time is displayed. The default is ON. Choose On or Off,
and press
to save the settings.
Audio Setting: Choose On or Off, and press the
key to save the settings. If you do not want the video
with sound, you can select Off. On the right middle of screen will appear
.
10
TAKE PICTURE
•
•
•
•
•
•
•
•
Press
key to Take Picture Mode
Press
to start preview,
again to take picture.
Press
each time you want to take a picture
Files are NOT deleted or recorded over. Once Micro SD Card is full the
camera will notify you.
Files saved under suffix “SOS”
Digital Zoom: When videoing use the
buttons as digital zoom
control. This camera has 16x digital zoom.
Adjust the EV Value: When in video preview mode, press
key on
the camera, then
key to adjust and
to save.
Additional Settings: Press
and use the
button to select
then press
.
Capture Mode Setting: Select single shot, 2 seconds self-timer, 5 seconds self-timer, 10 seconds self-timer.
The default is single shot.
Resolution Setting: Select 12M, 8M, 5M or 3M. The default is 12M.
Quality Setting: Select The Best, Fine or Normal. The default is The Best.
Sharpness Setting: Select Strong, Normal, or Soft. The default is Normal.
White Balance Setting: Select Auto, Daylight or Cloudy. The default is Auto.
Color Setting: Select Normal, Black & White, or Sepia. The default is Normal.
11
ISO Setting: Select Auto, 100, 200, or 400. The default is Auto.
Face Detection Setting: Select Off, Face Detection or Smile Detection. The default is Off.
Quick Review Setting: Select Off, 2 Seconds or 5 Seconds. The default is Off.
Date Stamp Setting: Select Off, Date, Date / Time. The default is Date / Time.
Anti-Shaking Setting: Select On or Off. The default is Off.
Shutter Sound Setting: Select On or Off. The default is On.
Flash Mode Setting: Select On or Off. The default is Off.
MOTION DETECTION RECORD
• Press
key to Motion Detection Record Mode.
• Press
to start preview,
• Recording will start once the camera senses motion. If there is 12
again to start recording
no motion for 1 minute, the camera will stop recording until motion is detected again.
• A red dot on the screen indicates recording
• Files are NOT deleted or recorded over. Once Micro SD Card is full the camera will notify you.
• Files saved under suffix “SOS”.
Voice Record
• Press
key to Voice Record Mode
• Press
to start preview,
again to record voice,
again to stop record.
• Files are NOT deleted or recorded over. Once Micro SD Card is full the
camera will notify you.
• Files saved under suffix “SOS”
Playback
•
•
•
•
Press
key to Playback Mode
Press
to start preview
Press
key to select video / voice / photo
Press
to playback video, during playback video, press
key to fast forward or rewind, press
again to stop playback.
13
SYSTEM SETTINGS
Date/Time Setting: Press
to enter Date/Time setting. Press
key to save the settings.
Auto Power Off Setting: Select off, 2 minutes, 5 minutes, 10 minutes. Press
default is 5 minutes.
Beep Sound Setting: Select On or Off. Press
key again to save the settings. The
key again to save the settings. The default is On.
Language Setting: Select English, Deutsch, François, Espanola, Italian, Portuguese, Traditional Chinese,
Simplified Chinese and Japanese. Press
key again to save the settings. The default is English.
Light Frequency: Select 50HZ/60HZ; Press
key again to save the settings. The default is 60Hz.
Default setting: Select Cancel or Ok to confirm. Press
Version: Press
key again to save the settings.
key to show version number.
LCD Rotate Setting: Select 0 Degree or 180 Degree. Press
0 degree.
key again to save the settings. The default is
HDMI setting: Select NTSC and PAL. Press
key again to save the settings. The default is NTSC.
HDMI Out-put: HDMI plug can offer 1080P resolution out-put. Insert HDMI cable into HDMI port of camcorder, and
connect the other end into the HDMI port of TV set, of course, the TV set should be under HDMI mode.
Format Setting: Select Cancel or OK to confirm. Warning: All data will be deleted if selected OK.
14
7. VIEWING FILES
a.
b.
c.
Connect the camera to your PC with the provided mini USB to USB connector; you can also view the
Micro SD card on your PC
On your PC open up DCIM and you can view videos in the 100MEDIA folder, and pictures in the Camera folder
Instructions for Mac users: .AVI files require a compatible video player. A free compatible viewer can be downloaded at www.videolan.org <http://www.videolan.org> . Follow instructions to install and view files.
WINPLUS NORTH AMERICA
8. WARRANTY
LIMITED WARRANTY
Winplus North America warrants, to the original purchaser, that its products are free from defects in material
and workmanship for 1 year from the date of original purchase. Where permitted by law, Winplus North
America’s liability shall be limited to that set forth in this limited express warranty. This limited express
warranty shall be the exclusive remedy of the purchaser and Winplus North America makes no other
warranty of any kind aside from the limited express warranty stated above.
NOTE: Warranty only applies for North American customers of purchases made in North America.
CONDITIONS OF WARRANTY
If during the 1 year warranty period your new product is found to be defective, Winplus North America
will repair such defect, or replace the product, without charge for parts or labor subject to the following
conditions:
15
1.
2.
3.
4.
5.
6.
All repairs must be performed by Winplus North America.
All warranty claims must be accompanied by a copy of the sales receipt or bill of sale.
The equipment must not have been altered or damaged through negligence, accident, improper operation, or failure to follow the product instructions for installation, use, or care.
The replacement of parts is excluded from the warranty when replacement is necessary due to normal wear and tear.
Repair or replacement parts supplied by Winplus North America under this warranty are protected only
for the unexpired portion of the original warranty.
This is a “repair or replace” warranty only, and does not cover the costs incurred for the installation, removal or reinstallation of the product, or damage to any mobile phone device or vehicle.
OWNER’S RESPONSIBILITIES:
Winplus North America will make every effort to provide warranty service within a reasonable period of
time. SHOULD YOU HAVE ANY QUESTIONS ABOUT SERVICE RECEIVED OR IF YOU WOULD LIKE ASSISTANCE
IN OBTAINING SERVICE, PLEASE CALL TOLL FREE 1-866-294-9244 DURING REGULAR BUSINESS HOURS
MONDAY THROUGH FRIDAY 9:00 AM TO 5:00PM.
For customer service and technical support, please call us at 1-866-294-9244 or email us at customercare@
winplususa.com. If at that time it is determined that a replacement unit is needed, the support representative
will issue a Return Authorization and instruct on how to get a new unit.
Winplus North America makes no other warranty of any kind aside from the limited express warranty stated
herein.
DISCLAIMER OF WARRANTIES, INCLUDING WARRANTY OF MERCHANTABILITY AND WARRANTY OF
FITNESS FOR PARTICULAR PURPOSE: EXCEPT AS SPECIFICALLY SET FORTH HEREIN, NO WARRANTY OR
REPRESENTATION, EXPRESS OR IMPLIES, IS MADE AS TO THE DASH ROAD CAM HD. EXCEPT AS EXPRESSLY
SET FORTH HEREIN, WINPLUS NORTH AMERICA AND/OR ITS AFFILIATES EXPRESSLY DISCLAIMS, WITHOUT
LIMITATION, ANY STATUTORY WARRANTIES AND ALL IMPLIED WARRANTIES, INCLUDING ANY IMPLIED
WARRANTY OF MERCHANTABILITY OR FITNESS FOR A PARTICULAR PURPOSE.
Winplus North America and/or its affiliates do not guarantee or promise that the user of Dash Road Cam HD
will not be in an accident or otherwise not collide with an object and/or person. Our Dash Road Cam HD is
not intended in any way to be a substitute for careful and cautious driving or for the consistent adherence
16
to all applicable traffic laws and motor vehicle safety regulations.
The Dash Road Cam HD is not intended to be a substitute for rearview mirrors or for any other motor vehicle
equipment mandated by law. Even when properly installed, our Dash Road Cam HD has a limited field of
vision and does not provide a comprehensive view of the rear area of the vehicle. You should always look
around outside your vehicle and use your mirrors to confirm rearward clearance and that your vehicle can
back up safely.
Winplus North America and/or its affiliates are not responsible for a user’s intended or actual use of the Dash
Road Cam HD. In no event shall Winplus North America and/or its affiliates have any liability for any losses
(whether direct or indirect, in contract, tort or otherwise) incurred in connection with the Dash Road Cam
HD, including but not limited to damaged property, personal injury and/or loss of life. Neither shall Winplus
North American and/or its affiliates have any liability for any decision, action or inaction taken by any person
in reliance on the Dash Road Cam HD, or for any delays, inaccuracies and /or errors in connection with the
Dash Road Cam HD and its functioning.
Winplus North America and/or its affiliates shall have no responsibility or liability for damage and/or injury
resulting from accidents occurring with vehicles having the Dash Road Cam HD installed, and Winplus North
America and/or its affiliates, the manufacturer, distributor and seller shall not be liable for any injury, loss or
damage, incidental or consequential, arising out of the use or intended use of the product.
Customer Service/Contact
For questions or issues regarding the product, please visit www.letsyada.com or contact Winplus to speak
to our customer service representative:
Winplus North America Tel.: 866-294-9244
You can also contact us online by visiting www.letsyada.com for more information about the product.
IF YOU ARE EXPERIENCING ANY ISSUES WITH THE PRODUCT DURING OPERATION, DO NOT RETURN THE
PRODUCT TO THE STORE. CONTACT WINPLUS DIRECTLY FOR INSTRUCTIONS ON HOW TO RETURN/
EXCHANGE THE PRODUCT.
17
NORTH AMERICA
EUROPE
AUSTRALIA
NEW ZEALAND
ASIA
820 South Wanamaker Avenue,
Ontario, CA 91761
Unit 4, Two Counties Estate, Falconer Road,
Haverhill, Suffolk CB9 7XZ, U.K.
Unit 2, 991 Mountain Hwy Boronia,
Victoria, Australia, 3155
22-24 Olive Road, Penrose,
Auckland, New Zealand
Suites 6-11, 7th Floor, Corporation Park,
11 On Lai Street, Shatin, N.T., Hong Kong
www.winplus.com
Tel: 866-294-9244
Fax: 310-496-2740
Tel: 44-1440-713888
Fax: 44-1440-713889
Tel: 61-3-9720-4143
Fax: 61-3-9720-4165
Tel: 64-9-5254575
Fax: 64-9-5256817
Tel: 852-2798-8932
Fax: 852-2795-0241
www.letsyada.com
© 2013 Winplus North America Inc. All Rights Reserved. Winplus, the logo design, and Yada are trademarks or
registered trademarks of Winplus North America Inc. The Bluetooth® word mark and logos are owned by the
Bluetooth SIG, Inc. and any use of such marks by Winplus North America Inc. is under license.
ML-54329_V1