1
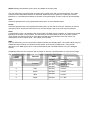
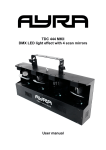
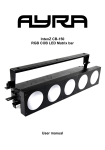
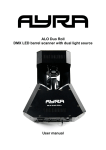
TDC LED Derby
DMX LED Derby light effect
User manual
Safety instructions
WARNING!
Always keep this device away from moisture and rain! Hazardous electrical shocks may occur!
WARNING!
Only connect this device to a matching power outlet. This device is intended to work on a
specified AC currency. Connecting this device to power outlets with other voltages may result in
permanent damage and possible hazardous situations, such as fire or electrical shocks!
WARNING!
Be careful with every operation of this device. Touching live wires inside and outside the unit
may cause hazardous electrical shocks!
This unit must be operated by, or under the supervision of an adult. This device is not suitable for children.
Every person involved with the installation, operation and maintenance of this device has to:
- Be qualified
- Follow the instructions of this manual
- Make sure there is no damage caused by transport. If the device seems damaged from the outside, do not
use it and contact your dealer for more information and consultation.
- To make sure the device maintains in perfect condition and for safe operation, it is necessary for the user to
follow the instructions and warning notes of this user manual.
- Damage caused by improper use or modifications to the device are not covered by warranty.
- This device does not have any user-serviceable parts inside. Servicing of this device needs to be done by
qualified technicians.
Important notes regarding safety and health:
- Never let the power cord come in contact with other cables. Handle the power cord and all connectors with
the mains with caution.
- Never remove any warning or informative labels from the unit
- The ground contact always needs to be connected. Do not cover or remove the ground contact.
- Never leave cables lying around
- Do not open the device and do not modify any hard- or software of this unit.
- Do not insert this object into air vents.
- Do not connect this device to a dimmerpack.
- Do not switch the system on and off frequently as this will reduce the lifespan of the device.
- Do not drive the inputs of the fixture with a signal larger than required to work at full performance.
- Only use this device indoor, avoid contact with water, moist or other liquids. Do not place items filled with
liquids on top of the unit.
- Avoid nearby flames or heat sources, do not place this device near flammable liquids, gas or flammable
items.
- Always disconnect the device when it is not in use for a longer period or time, when servicing is needed or
when the device needs cleaning.
- Only handle the power cord by its connectors. Never pull the cable to remove a connector from its socket,
as this could lead to damage and electrical shocks.
- Always operate this device with a stable AC current.
- Always operate this device with the AC ground wire connected to the electrical system's ground.
- Never use other types of cables than specified in the manual, do not use defective or bad functioning
cables. Contact your dealer when the included or required cables do not work properly with this device.
- When the device has been exposed to large temperature differences (for example, transport from outdoor
to indoor), do not connect the device immediately. Do not activate the unit until it has reached room
temperature, as moist might build up inside the unit, which may cause shortcuts and/or electrical shocks.
Guidelines and types of use:
- This device is intented to be used by professionals on stage, in theatres, clubs and other equal venues.
- This device is not suitable for children and always needs to be operated by an adult.
- Only use the device when the environment is suitable and will not cause any damage. Do not use the
product in moist or dusty environments, or where long-term damage may occur such as:
- indoor swimming pools where chlorine is used.
- Beaches, where sand and salt are present.
- Outdoor, without roof protection
- Indoor areas where intense heat sources are present or where the temperature exceeds levels
which are comfortable for humans.
- Only use the included power adapter and only connect the device to a suitable power outlet with the correct
output voltage. Connecting the device to a power outlet with the wrong type of voltage or using the prodcut
with a wrong type of power supply may cause permanent damage to the device.
- Avoid shocks and collission during use and transport. Do not transport the device while in use. Avoid brute
force during the installation and operation of this device.
- Familiarise yourself with the functions of the device before use. Do not allow operation of the device by
unskilled or unqualified people.
- Use of the device in other ways than described in this user manual may cause damage and injury. Ayra
does not take responsibility for any damage or injury caused by improper use.
Storage and transport:
- This device is intended for mobile use. When transported, use the original packaging of the product, or a
fitting flightcase, preferably filled with foam.
- This device is not intended for permanent use. Operation breaks will ensure that the lifespan of the device
remains unchanged.
- If the device is not used for a longer period of time, disconnect it from its power source and store it in its
original packaging, or in a fitting flightcase.
- Store the device indoor, dry and do not expose the device to extreme temperature differences.
Housing:
- Inspect the housing of the device frequently. Severe dents, cracks and missing screws should be avoided
at all costs. Do not use the device when the housing is not in optimal condition. Contact your dealer or a
skilled technician when in doubt about the state of the device
- Check the fixture and screws for corrosion. Corrosion should not be present on the fixture. Contact your
dealer or a skilled technician when corrosion is found on the fixture
- Every power or signal chassis/connector should be mounted tightly. Do not use the device when connectors
are loose.
- Do not use the power cord when the cores are visible. Contact your dealer for a replacement if needed.
- Avoid the buildup of dust and dirt. Clean the exterior of the fixture every month with a dry or damp cloth.
When using the device intensively, the cleaning frequency needs to be increased.
Fuses:
- The main fuse of this device is to be found on the rear of the device. In most cases, directly next to the
power inlet.
- Only replace a fuse for a new one with the same type and rating! Do not use a fuse with a higher or lower
rating.
- Do not bridge the fuse with electrical wires, aluminum foil, as the fuse is used for protection against
electrical shocks and short circuit.
- Always mount the fuse cover back to the fuse compartiment.
Box contents
Box contents
1x TDC LED Derby fixture
1x power cable
Unit and accessory inspection
- Always use the supplied power cable to connect the unit to a power supply. If the cable appears broken or
has visible damage, do not use it.
- If the unit is not going to be used for a longer period of time, disconnect it from the power supply and store it
in a dust-free environment.
- Always check the unit for possible damage before use. If you suspect that something is wrong with the unit,
do not connect it to a power source! When you suspect that your unit is broken or damaged, contact your
local dealer or a certified technician to inspect the unit.
Device overview
2
1
3
4
8
6
5
1. Beam output
2. Adjustable bracket
3. Safety eye
4. Menu display with buttons
5. IEC Power outlet (Power link)
6, IEC Power inlet with fuse
7. Built-in microphone
8. DMX input (3P XLR)
9. DMX output (3P XLR)
7
9
Setting up the unit
To activate the unit, connect the included power supply to the unit and a suitable 230V, 50 Hz power outlet.
The fixture will start up and show the last chosen setting on the display. Usually, with a new product, this is
the DMX mode with the value set on 001.
The display shows several settings, each with the possibility to set several values.
Use the display and the menu buttons to set preferences, change settings and scroll through the menu.
“Enter” is used to save a certain setting or preset, press “Menu” for at least 2 seconds to discard the change
and return to the main menu.
The table below shows an explanation for every feature and value.
display
ADDR
SLND
Mode
DMX address setting
Master/slave mode
SHND
SOUN
SENE
BLND
DISP
TEST
Hour
UERS
Auto mode
Sound controlled mode
Sound sensitivity
Black out mode
Display inversion
Test mode
Using time of light
Firmware version
Function
A001-A512
Master (default)
Slave 1 - Slave 2
Auto Speed 1-9
Sound controlled mode on/off
Sound sensitivity 0-100
LED mode, YES- NO
Display Inversion, Idsp-dspI
Self test
Fixture hours,0 ~ 9999
Firmware version xxx
ADDR: DMX address setting, used to determine the DMX starting channel. From this channel on, the fixture
will respond to values, corresponding with the amount of channels that the fixture is occupying. (For
example, when you turn the fixture in 3CH mode and set the starting address to value 003, the fixture will
respond to channels 3, 4 and 5.)
SLND: When using the master/slave function, you need to connect 2 or more fixtures with XLR-XLR cable.
The first fixture in line needs to be set as master, the others as Slave 1 or 2 (synchronized or mirrored
performance). This way, the slaves will mimic the behavior of the master fixture for wonderful synchronized
lighting shows.
SHND: Automatic mode, runs internal programs on a selectable speed.
SOUN: Activate or disable the built-in sound controlled mode. This way, the fixture will respond to the beat of
the music.
SENE: The sensitivity of the built-in microphone is adjustable, to optimize the built-in sound controlled mode.
For example, when your music source (speakers) are placed far away, you might want to increase the
sensitivity to make sure that the fixture responds to the sound accurately.
BLND: Black out mode (S.L.S.) The Signal Loss Setting provides the right action when the fixture suddenly
loses DMX signal. By activating the function, the fixture goes in blackout mode. By deactivation the mode,
the fixture goes in sound controlled mode.
DISP: Display invert version – When using the fixture in a hanging setup, it is possible to flip the display, so
the characters will be shown upside down. This makes reading the several statuses much easier.
TEST: Self test mode, to control all segments and LEDs
Hour: The fixture shows how much hours it has been active. This is very practical for rental companies
which need to perform service intervals on all fixtures after several hours of performing, to maintain optimal
shape.
UERS: Displays the software version which is installed on the main PCB.
The TDC LED Derby is equipped with several working modes, each with its own advantages. For simple
events there are stand-alone modes, for advanced situations there are options to create synchronized
lightshows, or controlled with a DMX-512 controller. A short description for each mode can be found below:
Auto:
Automatic lightshow with a pre-programmed internal show, on a pre-defined speed.
Sound:
Automatic lightshow with a pre-programmed internal show, on the beat of the music, thanks to an internal
microphone which senses the beat of the music and will change a step every time a beat is detected.
Slave:
In master/slave mode, it is possible to link several TDC LED Derby fixtures together, to create synchronized
lightshows in the Auto or Sound mode. The first fixture in the chain needs to be set in the Auto or Music
mode. All the next fixtures need to be set to Slave and will mimic the behavior of the first fixture. The
master/slave function requires XLR – XLR cables (not included).
DMX:
The TDC LED Derby can be connected to a DMX-controller with standard XLR – XLR cable. While doing so,
a DMX-terminator must be connected to the last fixture, at the end of the DMX-chain. This prevents
reflections in the DMX-signal, which could cause flickering and unwanted behavior from your intelligent
fixtures.
A DMX terminator is a XLR connector with a resistor of 120 Ohm, placed between pin 2 and 3 as a bridge.
With the following channel assignment, it is possible to control the TDC LED Derby:
5-ch
Mode
Function
Value
1
Function
2
Red
000-007
008-190
191-200
201-247
248-255
000-255
3
Green
000-255
4
Blue
5
Motor
000-255
000-255
Dimmer 0
Dimmer 1-100%
Dimmer 100%
Strobe slow to fast
Stand alone
0-100%
0-100%
0-100%
0°~ 360°
Technical specifications
-
Powerful LED derby effect
High output thanks to 9W RGB LED chip
Dozens of narrow, colourful and moving beams fill the room with light
Razorsharp optics for intense beam projections
Individual LED chip control with colour mixing, for creative colour combinations.
Working modes: Automatic, music-controlled, master/slave, DMX
Exciting built-in programs or full control with a DMX controller
DMX operation: 5 channels
Adjustable microphone sensitivity for music-controlled mode
Menu display and buttons for easy adjustment of settings
Low power consumption – High output – Long lifespan
Power:
- Voltage: AC100-240V 50Hz/60Hz
- Power: 20W
Physical:
- Dimensions: 325 x 270 x 240 mm (with folded bracket)
- Weight: 4 kg
Connectors:
- DMX: 3p XLR male and female
- Power: IEC Power input with fuse, Power Link output
Included accessories:
- Power cable with Schuko & IEC connectors
Connectors and wiring schematics:
DMX-connections:
Electrical wiring: