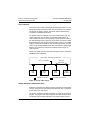
1
Instruction Bulletin VVDED397044US R12/00 December 2000 Raleigh, NC, USA ALTIVAR® 58 Adjustable Speed Drive Controllers MODBUS® PLUS Communication Option VW3A58302U Retain for future use. DANGER HAZARDOUS VOLTAGE • Read and understand this bulletin in its entirety before installing or operating ALTIVAR 58 drive controllers. Installation, adjustment, repair, and maintenance of the drive controllers must be performed by qualified personnel. • Disconnect all power before servicing the drive controller. WAIT THREE MINUTES until the DC bus capacitors discharge, then measure DC bus capacitor voltage between J2-4 (+) and J2-5 (-) for drive controllers ATV58U09M2 and U18M2, or between J2-5 (PA) and J18-7 for all other ALTIVAR 58 drive controllers, to verify that the DC voltage is less than 45 V. Refer to the bus voltage measurement procedure on page 8. • DO NOT short across DC bus capacitors or touch unshielded components or terminal strip screw connections with voltage present. • Close the door before applying power or starting the drive controller. • User is responsible for conforming to all applicable code requirements with respect to grounding all equipment. • Many parts in this drive controller, including printed wiring boards, operate at line voltage. DO NOT TOUCH. Use only electrically insulated tools. Before servicing drive controller: • Disconnect all power. • Place a “DO NOT TURN ON” label on the drive controller disconnect. • Lock disconnect in open position. Electrical shock will result in death or serious injury. Bulletin No. VVDED397044US R12/00 December 2000 ALTIVAR 58 MODBUS PLUS Communication Option Contents INTRODUCTION . . . . . . . . . . . . . . . . . . . . . . . . . . . . . . . . . . . . . . . . . . . . . . . . . . . . . . . . 3 USING THIS MANUAL . . . . . . . . . . . . . . . . . . . . . . . . . . . . . . . . . . . . . . . . . . . . . . . . . . . . 5 REVISION LEVEL . . . . . . . . . . . . . . . . . . . . . . . . . . . . . . . . . . . . . . . . . . . . . . . . . . . . . . . 5 SECTION 1—INSTALLATION & CONFIGURATION . . . . . . . . . . . . . . . . . . . . . . . . . . . . 7 RECEIVING, PRELIMINARY INSPECTION, AND STORAGE . . . . . . . . . . . . . . . . . . . . . 7 COMMUNICATION INTERFACE SPECIFICATIONS . . . . . . . . . . . . . . . . . . . . . . . . . . . . 7 BEFORE INSTALLING THE OPTION CARD . . . . . . . . . . . . . . . . . . . . . . . . . . . . . . . . . . . 8 BUS VOLTAGE MEASUREMENT PROCEDURE . . . . . . . . . . . . . . . . . . . . . . . . . . . . . . . 8 INSTALLATION . . . . . . . . . . . . . . . . . . . . . . . . . . . . . . . . . . . . . . . . . . . . . . . . . . . . . . . . 10 LED . . . . . . . . . . . . . . . . . . . . . . . . . . . . . . . . . . . . . . . . . . . . . . . . . . . . . . . . . . . . . . . 11 HARDWARE SETUP . . . . . . . . . . . . . . . . . . . . . . . . . . . . . . . . . . . . . . . . . . . . . . . . . . . . 12 Setting the Drive Controller Address . . . . . . . . . . . . . . . . . . . . . . . . . . . . . . . . . . . . . . 12 Enabling/Disabling the Card . . . . . . . . . . . . . . . . . . . . . . . . . . . . . . . . . . . . . . . . . . . . 13 Network Connection . . . . . . . . . . . . . . . . . . . . . . . . . . . . . . . . . . . . . . . . . . . . . . . . . . 13 Network Grounding . . . . . . . . . . . . . . . . . . . . . . . . . . . . . . . . . . . . . . . . . . . . . . . . . . . 14 Cable Routing Practices . . . . . . . . . . . . . . . . . . . . . . . . . . . . . . . . . . . . . . . . . . . . . . . 19 NETWORK OVERVIEW . . . . . . . . . . . . . . . . . . . . . . . . . . . . . . . . . . . . . . . . . . . . . . . . . . 21 Logical Network . . . . . . . . . . . . . . . . . . . . . . . . . . . . . . . . . . . . . . . . . . . . . . . . . . . . . 22 Physical Network . . . . . . . . . . . . . . . . . . . . . . . . . . . . . . . . . . . . . . . . . . . . . . . . . . . . 24 TRUNK AND DROP CABLING WITH TAPS . . . . . . . . . . . . . . . . . . . . . . . . . . . . . . . . . . 24 Routing Cables . . . . . . . . . . . . . . . . . . . . . . . . . . . . . . . . . . . . . . . . . . . . . . . . . . . . . . 25 Mounting the Tap . . . . . . . . . . . . . . . . . . . . . . . . . . . . . . . . . . . . . . . . . . . . . . . . . . . . 26 Connecting the Trunk Cables . . . . . . . . . . . . . . . . . . . . . . . . . . . . . . . . . . . . . . . . . . . 27 MODBUS PLUS Trunk Cable . . . . . . . . . . . . . . . . . . . . . . . . . . . . . . . . . . . . . . . . 27 Cable Entry and Jumpers (Taps at In-Line Sites) . . . . . . . . . . . . . . . . . . . . . . . . . 27 Cable Entry and Jumpers (Taps at End Sites) . . . . . . . . . . . . . . . . . . . . . . . . . . . 27 Connecting the Wires . . . . . . . . . . . . . . . . . . . . . . . . . . . . . . . . . . . . . . . . . . . . . . 28 Connecting the Drop Cable . . . . . . . . . . . . . . . . . . . . . . . . . . . . . . . . . . . . . . . . . . . . . 29 MODBUS PLUS Drop Cable . . . . . . . . . . . . . . . . . . . . . . . . . . . . . . . . . . . . . . . . . 29 Connecting the Signal Wires . . . . . . . . . . . . . . . . . . . . . . . . . . . . . . . . . . . . . . . . . 30 Connecting the Drop Cable Drain Wire . . . . . . . . . . . . . . . . . . . . . . . . . . . . . . . . . 31 Labeling . . . . . . . . . . . . . . . . . . . . . . . . . . . . . . . . . . . . . . . . . . . . . . . . . . . . . . . . . . . 31 Checking the Cable Installation . . . . . . . . . . . . . . . . . . . . . . . . . . . . . . . . . . . . . . . . . 32 Inspecting the Cable Installation . . . . . . . . . . . . . . . . . . . . . . . . . . . . . . . . . . . . . . 32 Checking Cable Continuity . . . . . . . . . . . . . . . . . . . . . . . . . . . . . . . . . . . . . . . . . . 32 PARAMETER SETUP . . . . . . . . . . . . . . . . . . . . . . . . . . . . . . . . . . . . . . . . . . . . . . . . . . . 33 Configuring the Communication Parameters . . . . . . . . . . . . . . . . . . . . . . . . . . . . . . . 33 © 1998–2000 Schneider Electric All Rights Reserved i ALTIVAR 58 MODBUS PLUS Communication Option Contents Bulletin No. VVDED397044US R12/00 December 2000 Initial Power-Up . . . . . . . . . . . . . . . . . . . . . . . . . . . . . . . . . . . . . . . . . . . . . . . . . . . 33 Configuration . . . . . . . . . . . . . . . . . . . . . . . . . . . . . . . . . . . . . . . . . . . . . . . . . . . . . 33 Example of MODBUS PLUS Network Operation . . . . . . . . . . . . . . . . . . . . . . . . . . . . 34 OPTIMIZING NETWORK PERFORMANCE . . . . . . . . . . . . . . . . . . . . . . . . . . . . . . . . . . 35 DIAGNOSTICS . . . . . . . . . . . . . . . . . . . . . . . . . . . . . . . . . . . . . . . . . . . . . . . . . . . . . . . . . 37 SECTION 2—MODBUS PLUS OVERVIEW . . . . . . . . . . . . . . . . . . . . . . . . . . . . . . . . . . 39 INTRODUCTION . . . . . . . . . . . . . . . . . . . . . . . . . . . . . . . . . . . . . . . . . . . . . . . . . . . . . . . 39 ALTIVAR 58 REGISTERS AND DATA EXCHANGE . . . . . . . . . . . . . . . . . . . . . . . . . . . . 39 Messaging . . . . . . . . . . . . . . . . . . . . . . . . . . . . . . . . . . . . . . . . . . . . . . . . . . . . . . . . . . 39 MSTR BLOCK . . . . . . . . . . . . . . . . . . . . . . . . . . . . . . . . . . . . . . . . . . . . . . . . . . . . . . . . . 40 Overview of MSTR Block . . . . . . . . . . . . . . . . . . . . . . . . . . . . . . . . . . . . . . . . . . . . . . 40 MSTR Block Structure . . . . . . . . . . . . . . . . . . . . . . . . . . . . . . . . . . . . . . . . . . . . . . . . 41 Inputs . . . . . . . . . . . . . . . . . . . . . . . . . . . . . . . . . . . . . . . . . . . . . . . . . . . . . . . . . . 41 Outputs . . . . . . . . . . . . . . . . . . . . . . . . . . . . . . . . . . . . . . . . . . . . . . . . . . . . . . . . . 41 Top Node Content . . . . . . . . . . . . . . . . . . . . . . . . . . . . . . . . . . . . . . . . . . . . . . . . . 42 Middle Node Content . . . . . . . . . . . . . . . . . . . . . . . . . . . . . . . . . . . . . . . . . . . . . . 42 Bottom Node Content . . . . . . . . . . . . . . . . . . . . . . . . . . . . . . . . . . . . . . . . . . . . . . 42 Read and Write MSTR Operations . . . . . . . . . . . . . . . . . . . . . . . . . . . . . . . . . . . . . . . 43 Control Block . . . . . . . . . . . . . . . . . . . . . . . . . . . . . . . . . . . . . . . . . . . . . . . . . . . . . 43 PEER COP . . . . . . . . . . . . . . . . . . . . . . . . . . . . . . . . . . . . . . . . . . . . . . . . . . . . . . . . . . . . 43 GLOBAL DATA TRANSMISSION . . . . . . . . . . . . . . . . . . . . . . . . . . . . . . . . . . . . . . . . . . 46 EXAMPLE OF SETTING UP PEER COP AND GLOBAL DATA SERVICE . . . . . . . . . . . 47 COMMAND SEMAPHORE . . . . . . . . . . . . . . . . . . . . . . . . . . . . . . . . . . . . . . . . . . . . . . . . 49 Register Update Times . . . . . . . . . . . . . . . . . . . . . . . . . . . . . . . . . . . . . . . . . . . . . . . . 50 CONTROL MODES . . . . . . . . . . . . . . . . . . . . . . . . . . . . . . . . . . . . . . . . . . . . . . . . . . . . . 50 Hand/Off/Auto (HOA) . . . . . . . . . . . . . . . . . . . . . . . . . . . . . . . . . . . . . . . . . . . . . . . . . 51 Local and Remote . . . . . . . . . . . . . . . . . . . . . . . . . . . . . . . . . . . . . . . . . . . . . . . . . . . . 53 Local Control . . . . . . . . . . . . . . . . . . . . . . . . . . . . . . . . . . . . . . . . . . . . . . . . . . . . . 53 Remote Control . . . . . . . . . . . . . . . . . . . . . . . . . . . . . . . . . . . . . . . . . . . . . . . . . . . 53 Forced Local . . . . . . . . . . . . . . . . . . . . . . . . . . . . . . . . . . . . . . . . . . . . . . . . . . . . . . . . 53 Communication Fault Monitoring . . . . . . . . . . . . . . . . . . . . . . . . . . . . . . . . . . . . . 54 Protection of Adjustment and Configuration Access . . . . . . . . . . . . . . . . . . . . . . . 55 Access Protection by Forced Local . . . . . . . . . . . . . . . . . . . . . . . . . . . . . . . . . . . . 55 CONTROL REGISTERS (READ AND WRITE) . . . . . . . . . . . . . . . . . . . . . . . . . . . . . . . . 55 ii © 1998–2000 Schneider Electric All Rights Reserved Bulletin No. VVDED397044US R12/00 December 2000 Introduction MODBUS PLUS Communication Option INTRODUCTION The VW3A58302U MODBUS® PLUS Communication Option allows the connection of an ALTIVAR® 58 (ATV58) drive controller to MODBUS PLUS networks. This allows a remote host to control the drive through the network. To build a MODBUS PLUS network, you must supply the following equipment (available from Square D): • Drop cable, 8 or 20 feet (see Table 1) • MODBUS PLUS tap 990NAD230 00 • MODBUS PLUS trunk cable. See Table 2. Cable length depends on your installation. • Hand/Off/Auto operator must be installed as illustrated on pages 52 and 52. See Table 3 on page 4 for recommended operators. Table 1: MODBUS PLUS Drop Cables Length of Cable Catalog No. 8 ft (2.4 m) 990NAD219 10 20 ft (6 m) 990NAD219 30 Table 2: MODBUS PLUS Trunk Cable Catalog Numbers Length of Cable on Reel Catalog No. 100 ft (30.5 m) 490NAA271 01 500 ft (152.5 m) 490NAA271 02 1,000 ft (305 m) 490NAA271 03 1,500 ft (457 m) 490NAA271 04 5,000 ft (1,525 m) 490NAA271 05 © 1998–2000 Schneider Electric All Rights Reserved 3 Introduction MODBUS PLUS Communication Option Table 3: Bulletin No. VVDED397044US R12/00 December 2000 Hand/Off/Auto Operators Description Selector switch Collar Contact block Operator Part No. 22 mm 30 mm ZB4BD3 1 — KS42B — 1 ZB4BZ009 1 — ZBE1026P 1 — ZBE1016P 2 — KA32 — 1 KA33 — 1 As a node on a network, the ATV58 drive controller can receive and respond to data messages. This data exchange allows your network to access ATV58 functions, such as: • Downloading adjustment parameters • Command and control • Monitoring • Diagnostics WARNING LOSS OF CONTROL • The control scheme designer must consider the potential failure modes of control paths. • Certain critical control functions, provide a means to achieve a safe state during and after a path failure.1 • Separate or redundant control paths must be provided for critical control functions. • System control paths may include communication links. Consideration must be given to the implications of unanticipated transmission delays or failures of the link.2 Failure to follow this instruction can result in death, serious injury, or equipment damage. 1. 2. 4 Examples of critical control functions are emergency stop and overtravel stop. For additional information, refer to NEMA ICS 1.1 (latest edition), “Safety Guidelines for the Application, Installation, and Maintenance of Solid State Control” and to NEMA ICS7.1 (latest edition), “Safety Standards for Construction and Guide for Selection, Installation and Operation of Adjustable-Speed Drive Systems.” © 1998–2000 Schneider Electric All Rights Reserved Bulletin No. VVDED397044US R12/00 December 2000 Introduction MODBUS PLUS Communication Option USING THIS MANUAL This manual applies to all ATV58 drive controllers. It has three sections: • Section 1: Installation and Configuration (page 7) • Section 2: MODBUS PLUS Overview (page 39) For register description and address locations refer to the ATV58 Register Access Guide for Communication Networks, VVDED397058US. For information about specific drive parameters, refer to the Keypad Display Manual, VVDED397047US, or the ATV58 catalog, 8806CT9901. Other documentation applicable for using MODBUS PLUS with ATV58 drive controllers: • Installation Guide for ALTIVAR 58 Type H Controllers, VVDED397048US • Modicon MODBUS PLUS Network Planning and Installation Guide, 890 USE 100 00 REVISION LEVEL This is revision A of this manual. It replaces VVDED397044US dated September 1998. © 1998–2000 Schneider Electric All Rights Reserved 5 Introduction MODBUS PLUS Communication Option 6 Bulletin No. VVDED397044US R12/00 December 2000 © 1998–2000 Schneider Electric All Rights Reserved Bulletin No. VVDED397044US R12/00 December 2000 Section 1—Installation & Configuration Interface Specifications SECTION 1—INSTALLATION & CONFIGURATION RECEIVING, PRELIMINARY INSPECTION, AND STORAGE After receiving the VW3A58302U communication option card: • Ensure that the catalog number printed on the box label is the same as that on the packing slip and corresponding purchase order. Contact your local Square D representative if there are any errors. • Observe the following precautions for handling static sensitive components as the card is removed from its packaging for inspection. — Keep static producing material (plastic, upholstery, carpeting, etc.) out of the immediate work area. — Avoid touching exposed conductors and component leads with skin or clothing. • If any damage is found, notify the carrier and your local Square D representative. • To store the option card, replace it in its original package (including the anti-static bag) and store it at -40 to 185 °F (-40 to 85 °C). COMMUNICATION INTERFACE SPECIFICATIONS Table 4: MODBUS PLUS Option Card Specifications Isolation (network to drive controller) Galvanically isolated for 30 V RMS, 50 V peak Isolation (cable jacket to ground) 150 V RMS Connector 9-pin, female D-shell Electrical interface RS-485 Storage temperature -40 to 185 °F (-40 to +85 °C) Operating temperature Same as drive controller. See VVDED397048US. Humidity < 95% relative humidity at +140 °F (+60 °C), non-condensing Altitude Up to 15,000 ft (4,500 m) Shock (non-operating) 30 g for 11 ms (three shocks/axis) Shock (operating) Same as drive controller. See VVDED397048US. © 1998–2000 Schneider Electric All Rights Reserved 7 Section 1—Installation & Configuration Bus Voltage Measurement Procedure Bulletin No. VVDED397044US R12/00 December 2000 BEFORE INSTALLING THE OPTION CARD WARNING UNINTENDED EQUIPMENT ACTION Read and understand documents VVDED397048US and VVDED397047US before operating the drive controller. Failure to follow this instruction can result in death, serious injury, or equipment damage. Before installing, removing, or replacing the MODBUS PLUS option card, remove all power from the drive controller, including external control power that may be present on the option module, and perform the “Bus Voltage Measurement Procedure” on page 8. BUS VOLTAGE MEASUREMENT PROCEDURE Before installing the VW3A58302U communication card, measure the bus voltage as described in this section. DANGER HAZARDOUS VOLTAGE • Read and understand the bus voltage measurement procedure before performing the procedure. Measurement of bus capacitor voltage must be performed by qualified personnel. • DO NOT short across capacitors or touch unshielded components or terminal strip screw connections with voltage present. • Many parts in this drive controller, including printed wiring boards, operate at line voltage. DO NOT TOUCH. Use only electrically insulated tools. Electrical shock will result in death or serious injury. The DC bus voltage level is determined by monitoring the (+) and (–) measurement points. Their location varies by drive controller model number as listed in Table 5 on page 9. The drive controller model number is listed on the nameplate. 8 © 1998–2000 Schneider Electric All Rights Reserved Bulletin No. VVDED397044US R12/00 December 2000 Table 5: Section 1—Installation & Configuration Bus Voltage Measurement Procedure (+) and (–) Measurement Points (+) Measurement Point (–) Measurement Point Drive Controller ATV58• Terminal Terminal Block or Designation Connector Terminal Terminal Block or Designation Connector U09M2• and U18M2• J2 (+) J2 (–) U29M2• to D12M2•, U18N4• to D23N4• J2 PA J18 7 D16M2• to D46M2•, D28N4• to D79N4• J2 (+) J2 (–) The J18 connector is in the upper left hand corner of the main control board behind the flexible shield. Use a thin probe to access the connector pin. J18-7 Flexible Shield – + J18 } ATV58•U29M2–D12M2 ATV58•U18N4–D23N4 L1 L2 L3 PA PB U + – L1 L2 + – Main Control Board } ATV58•U09M2–U18M2 U V W + – L1 L2 L3 + V W } ATV58•D16M2–D46M2 ATV58•D28N4–D79N4 – PA PB U V W Power Terminal Block Figure 1: DC Bus Voltage Measurement Point Locations (ATV58HU09M2 Shown) © 1998–2000 Schneider Electric All Rights Reserved 9 Section 1—Installation & Configuration Installation Bulletin No. VVDED397044US R12/00 December 2000 To measure the DC bus capacitor voltage: 1. Disconnect all power from the drive controller including external control power that may be present on the control board and the option board terminals. 2. Wait 3 minutes for the DC bus capacitors to discharge. 3. Read the model number of the drive controller from the nameplate and identify the corresponding (+) and (–) measurement points from Table 5 and Figure 1 on page 9. 4. Open the door or cover of the drive controller. 5. Set the voltmeter to the 1000 Vdc scale. Measure the voltage between the (+) and (–) measurement points identified in step 3. Verify that the DC bus voltage has discharged below 45 V before servicing the drive controller. 6. If the DC bus capacitors will not discharge below 45 V, contact your local Square D representative. Do not operate the drive controller. 7. Replace all doors or covers after servicing the drive controller. INSTALLATION To install the VW3A58302U communication card, consult Figure 2 and follow these steps: 1. Verify that DC bus voltage is not present. See “Bus Voltage Measurement Procedure” on page 8. 2. Place the 50/60 Hz switch in the position corresponding to the motor as indicated in the drive controller installation guide, VVDED397048US. 3. Open the flexible protective cover ① over the option card connector. 4. Mount the option card on the control card support by plugging it into the connector ➁. Secure it with the three screws ➂ provided. 5. Close the flexible protective cover back over the option card. 6. Replace all doors or covers when installation is complete. 10 © 1998–2000 Schneider Electric All Rights Reserved Bulletin No. VVDED397044US R12/00 December 2000 Section 1—Installation & Configuration Installation 1 3 2 3 1 0 3 Figure 2: Installing the Option Card LED The MODBUS PLUS option card has one LED (see ② in Figure 3 on page 12). For LED operation, see Table 9 on page 37. For operation of the controller status indicators, see the Installation Guide, VVDED397048US. © 1998–2000 Schneider Electric All Rights Reserved 11 Section 1—Installation & Configuration Hardware Setup Bulletin No. VVDED397044US R12/00 December 2000 2 LED 1 0 1 1 Address Switches 8 Connector Figure 3: Card Layout HARDWARE SETUP Setting the Drive Controller Address An ALTIVAR 58 drive controller is identified on the MODBUS PLUS network by its unique address, which can range from 1 to 64.Select the address by setting DIP switches on the option card. Refer to Figure 4 on page 13 for details and examples. Switches 1–6 collectively make up a binary number, and the address is determined by adding 1 to that binary number. In other words, each switch corresponds to a value as shown in Figure 4. The address is determined by adding the values corresponding to each switch set to 1 (on) and then adding 1. NOTE: The drive controller updates an address from the switch setting on power-up. 12 © 1998–2000 Schneider Electric All Rights Reserved Bulletin No. VVDED397044US R12/00 December 2000 Switch Value Section 1—Installation & Configuration Hardware Setup 1 2 4 8 16 32 1 Position 1 0 Address 2 = 1+1 0 1 2 3 4 5 6 7 8 Switch Value 1 2 4 8 16 32 1 1 0 0 Position Figure 4: Address 22 = 1+1+4+16 1 2 3 4 5 6 7 8 Setting the Drive Controller Address Enabling/Disabling the Card Enable and disable the option card with switch 7. • To disable the card, set switch 7 to 1. • To enable the card, set switch 7 to 0. The settings of switches 1 to 6 (address) and switch 7 (enable/disable) become effective only when the drive controller is restarted. Switch 8 is not used. Network Connection 9-pin female connector on card MODBUS PLUS cable equipped with connectors 990NAD219 xx Note: When using the network, separate the network cable from control cabling, such as motor wiring. MODBUS PLUS trunk cable 490NAA271 xx MODBUS PLUS tap junction 990NAD230 00 Figure 5: Connecting the Option Card to the Network © 1998–2000 Schneider Electric All Rights Reserved 13 Section 1—Installation & Configuration Hardware Setup Pin 1 Bulletin No. VVDED397044US R12/00 December 2000 Pin 2 Pin 3 Pin 1: Shielding Pin 2: Signal Pin 3: Signal Figure 6: 9-Pin D-Shell Connector, Viewing the End of the Drop Cable Network Grounding Connect the shield of the MODBUS PLUS cable to the ground terminal. Route the cable as shown in Figure 7 on page 15. You must maintain this connection even if there is no node device connected to the network at the site (for example, if the drive controller has been temporarily removed for repair). The ground terminal locations for each ATV58 drive controller frame size are illustrated in Figures 8–12. 14 © 1998–2000 Schneider Electric All Rights Reserved Bulletin No. VVDED397044US R12/00 December 2000 Figure 7: Section 1—Installation & Configuration Hardware Setup Grounding Control Terminals Power Terminals Ground Terminal Figure 8: Terminal Locations (Product Frame Size 1) © 1998–2000 Schneider Electric All Rights Reserved 15 Section 1—Installation & Configuration Hardware Setup Bulletin No. VVDED397044US R12/00 December 2000 Control Terminals Power Terminals Ground Terminal Figure 9: 16 Terminal Locations (Product Frame Sizes 2 and 3) © 1998–2000 Schneider Electric All Rights Reserved Bulletin No. VVDED397044US R12/00 December 2000 Section 1—Installation & Configuration Hardware Setup Control Terminals Power Terminals Ground Terminal Figure 10: Terminal Locations (Product Frame Sizes 4 and 5) © 1998–2000 Schneider Electric All Rights Reserved 17 Section 1—Installation & Configuration Hardware Setup Bulletin No. VVDED397044US R12/00 December 2000 Control Terminals Power Terminals Ground Terminal Figure 11: Terminal Locations (Product Frame Size 6) 18 © 1998–2000 Schneider Electric All Rights Reserved Bulletin No. VVDED397044US R12/00 December 2000 Section 1—Installation & Configuration Hardware Setup Control Terminals Power Terminals Ground Terminal Figure 12: Terminal Locations (Product Frame Size 7) Cable Routing Practices When wiring the ATV58 drive controllers to a MODBUS PLUS network, follow all wiring practices required by national and local electrical codes. Observe the following guidelines: • Avoid areas of high temperature, moisture, vibration, or other mechanical stress. • Secure the cable where necessary to prevent its weight and the weight of other cables from pulling or twisting the cable. • Use cable ducts, raceways, or other structures to protect the cable. Use these structures for signal wiring paths. They should not contain power wiring. © 1998–2000 Schneider Electric All Rights Reserved 19 Section 1—Installation & Configuration Hardware Setup Bulletin No. VVDED397044US R12/00 December 2000 • Avoid sources of electrical interference that can induce noise into the cable. Use the maximum practicable separation from such sources. When planning cable routing within a building, follow these guidelines: • Maintain a minimum separation of 3.3 ft (1 m) from the following equipment: — air conditioners and large blowers — elevators and escalators — radios and televisions — intercom and security systems — fluorescent, incandescent, and neon lighting fixtures. • Maintain a minimum separation of 10 ft (3 m) from the following equipment: — power wiring — transformers — generators — alternators When wiring in electrical equipment rooms or large electrical equipment line-ups, observe the following guidelines for cable segregation and separation of circuits: • Use metallic conduit for drive controller wiring. Do not run control network and power wiring in the same conduit. • Separate non-metallic conduits or cable trays used to carry power wiring from metallic conduit carrying low-level control network wiring by at least 12 in (305 mm). • Separate metallic conduits carrying power wiring or low-level control network wiring by at least 3 in (80 mm). • Cross the metallic conduits and non-metallic conduits at right angles whenever power and control network wiring cross. • Attenuate conducted emissions from the drive controller to the line in some installations to prevent interference with telecommunication, radio, and sensitive electronic equipment. Such instances may require attenuating filters. Consult the ATV58 catalog for selection and application of these filters. 20 © 1998–2000 Schneider Electric All Rights Reserved Bulletin No. VVDED397044US R12/00 December 2000 Section 1—Installation & Configuration Network Overview NETWORK OVERVIEW MODBUS PLUS is a Local Area Network system designed for industrial control applications. Up to 32 node devices can connect directly to the network bus cable over a length of up to 1,500 ft (450 m) including drop lengths. Repeater devices are used to extend the cable distance to its maximum of 6,000 ft (1,800 m) and the node count to a maximum of 64. The MODBUS PLUS network provides host level, peer-to-peer communication for networked PLCs. As a node on a MODBUS PLUS network, the ATV58 drive controller can receive and respond to data messages transmitted from a PLC and place information into the network’s global database. Other nodes can access drive controllers on the local network, or on remote networks through bridge devices. The network also provides distributed input/output (DI/O) communications in which PLCs communicate directly with input/output (I/O) subsystems. The network must use a single-cable layout. MODBUS devices or networks of MODBUS devices may join MODBUS PLUS networks through bridge multiplexers. A multiplexer provides four serial ports that are separately configurable to support MODBUS or custom RS-232 / RS-485 devices. MODBUS devices can communicate with MODBUS PLUS networked devices, as well as with devices at the other serial ports. WARNING LOSS OF CONTROL • The designer of any control scheme must consider the potential failure modes of control paths and, for certain critical control functions, provide a means to achieve a safe state during and after a path failure. Examples of critical control functions are emergency stop and overtravel stop. Separate or redundant control paths must be provided for critical control functions. • System control paths may include communication links. Consideration must be given to the implications of unanticipated transmission delays or failures of the link.1 Failure to follow this instruction can result in death, serious injury, or equipment damage. 1. For additional information, refer to NEMA ICS 1.1 (latest edition), “Safety Guidelines for the Application, Installation, and Maintenance of Solid State Control” and to NEMA ICS7.1 (latest edition), “Safety Standards for Construction and Guide for Selection, Installation and Operation of Adjustable-Speed Drive Systems.” © 1998–2000 Schneider Electric All Rights Reserved 21 Section 1—Installation & Configuration Network Overview Bulletin No. VVDED397044US R12/00 December 2000 Figure 13 shows an example of two MODBUS PLUS networks. Networks A and B are host level networks joined by a BP85 Bridge Plus. For more information, consult the Modicon Modbus Plus Network Planning and Installation Guide, 890 USE 100 00. Node 10 Node 5 ATV58 Drive Controller PLC RR85 Repeater Network A Up to 64 Nodes Total * Node 4 Node 23 BM85 Bridge Multiplexer BP85 Bridge Plus Node 2 ATV58 Drive Controller Modbus or Custom Serial Devices DI/O Interfaces P S P L C D I O D I O Network B Local 10 Up to 64 Nodes Total * * Maximum of 32 nodes on each side of a repeater Figure 13: Network Overview Logical Network User-assigned addresses identify network nodes. Each node’s address is independent of its physical site location. Addresses must be within the range of 1 to 64, although they do not have to be sequential. Duplicate addresses are not allowed. A device with a duplicate address will not be allowed to join the network. If it attempts to join the network, it will display an LED pattern for duplicate address. See Table 9 on page 37. 22 © 1998–2000 Schneider Electric All Rights Reserved Bulletin No. VVDED397044US R12/00 December 2000 Section 1—Installation & Configuration Network Overview Network nodes function as peer members of a logical ring, gaining access to the network upon receipt of a token frame. The token is a grouping of bits that is passed in rotating address sequence from one node to another. Each network maintains its own token rotation sequence, independent of other networks. Where multiple networks are joined by bridges, the token is not passed through the bridge device. While holding the token, a node initiates message transactions with other nodes. Each message contains routing fields defining its source and destination, including its routing path through bridges to the final destination on a remote network. When passing the token, a node can write a message to a global database to be broadcast to all nodes on the network. Global data is transmitted as a field within the token frame. Other nodes monitor the token pass and can extract the global data if they have been programmed to do so. Use of the global database allows rapid updating of alarms, setpoints, and other data. Each network maintains its own unique global database, as the token is not passed through a bridge to another network. Figure 14 shows an example of the token sequences in two networks joined by a BP85 Bridge Plus. Network 1 Token Sequence: 2 - 5 - 10 - 12 - 22 - 2 . . . 12 2 10 BP85 Bridge Node Plus 5 Node Node 5 10 4 9 Node BP85 Bridge Node Plus Node Node Node 22 BP85 Bridge Plus 24 Network 2 Token Sequence: 4 - 5 - 9 - 10 - 24 - 4 . . . Figure 14: Token Sequences © 1998–2000 Schneider Electric All Rights Reserved 23 Section 1—Installation & Configuration Trunk and Drop Cabling with Taps Bulletin No. VVDED397044US R12/00 December 2000 Physical Network The network bus consists of twisted-pair shielded cables that are run in a direct path between successive nodes. The two data lines in the cable are not sensitive to polarity; however, this bulletin follows standard wiring conventions to facilitate maintenance. The physical network consists of one or more cable sections, with any section supporting up to 32 nodes at a maximum cable distance of 1,500 ft (450 m). Sections can be joined by repeater devices to extend the network’s length and to support up to 64 nodes. The minimum cable length between any pair of nodes must be at least 10 ft (3 m). Drop cable length is counted twice towards the 10 ft minimum requirement. The drop cable is a loop of the MODBUS PLUS cable. The maximum cable length between two nodes is the same as the maximum section length of 1,500 ft (450 m). NOTE: The ATV58 drive controller does not support a dual or redundant MODBUS PLUS cable layout. 32 Nodes Max.; 1500 ft (450 m) Cable Max. 10 ft (3 m) Cable Min. End Node BP85 Inline Bridge Node Plus = Termination Connected CableTaps Inline Node ATV58 Drive Controller = Termination Disconnected Figure 15: Single Cable Layout TRUNK AND DROP CABLING WITH TAPS Nodes are connected to the cable by means of a tap device. This provides “through” connections for the network trunk cable and “drop” connections for the cable to the node device. The tap also contains a resistive termination connected by two internal jumpers. The jumpers of the taps at each end of a cable section must be connected to prevent signal reflections. The jumpers of taps at in-line 24 © 1998–2000 Schneider Electric All Rights Reserved Bulletin No. VVDED397044US R12/00 December 2000 Section 1—Installation & Configuration Trunk and Drop Cabling with Taps sites on the cable section must be removed (open). See Figure 18 on page 27. Routing Cables Figure 16 shows typical cable routing of the network trunk cable between tap locations. The figure also shows cable drops to several node devices and service access points. NOTE: The tap’s internal termination jumpers are connected at the two end taps of a cable section, and disconnected and removed at each inline site on the cable section. Termination jumpers connected in each end tap Termination jumpers removed from each inline tap Trunk cable secured in raceway or conduit Drop Cable Node Device Node Device End Location Inline Location Node device connector (part of drop cable) Termination jumpers connected in each end tap Strain Reliefs Service Access Point Inline Location Node Device End Location Service Loop = Termination Connected = Termination Disconnected Figure 16: Typical Cable Routing Referring to Figure 16, route the cable between the site locations of the node devices. Guidelines for cable routing are described below. • Use a continuous length of trunk cable between locations. Do not use any splices. • At each tap location, allow sufficient trunk cable length for a service loop to prevent pulling or twisting of the cable. © 1998–2000 Schneider Electric All Rights Reserved 25 Section 1—Installation & Configuration Trunk and Drop Cabling with Taps Bulletin No. VVDED397044US R12/00 December 2000 • For each drop cable, provide a service loop to allow the connector to be connected and disconnected at the network node device without any strain on the cable. A service loop of 6 in. (152 mm) minimum radius is adequate for most installations. • Install cable ties or clamps on each trunk cable segment as required for strain relief, to prevent the cable from pulling on the tap. • Install cable ties or clamps on each drop cable as required for strain relief, to prevent the cable from pulling on the tap or node device connector. • Use additional ties or clamps as required to secure each cable to prevent flexing or other damage in areas of mechanical motion devices and traffic. Mounting the Tap Mount each tap at a location near its node device, preferably outside the drive controller enclosure. The tap must be near enough to the node device to allow the drop cable to reach the node device with a service loop. See Figure 16 for drop cable routing. The location must also be accessible for installing the trunk and drop cables and for future maintenance. Figure 17 shows the tap’s outer and mounting dimensions. 3.16 (80.2) Mounting Centers 2.2 (56) Hole Diameter 0.2 (5) 4.4 (112) Dim: in (mm) Figure 17: Tap Layout (Cover Open) 26 © 1998–2000 Schneider Electric All Rights Reserved Bulletin No. VVDED397044US R12/00 December 2000 Section 1—Installation & Configuration Trunk and Drop Cabling with Taps Connecting the Trunk Cables MODBUS PLUS Trunk Cable Cable specified for MODBUS PLUS trunk use is available from Square D. See Table 2 on page 3. The cable should run directly between network device locations. Each cable segment must be a continuous run between the taps at two locations. Do not use splices, splitters, or any other configurations such as star or tree configurations. The only media components permitted are the network cable and taps. Plan cable runs according to the horizontal distances between sites. Trunk cable is ordered in reels of fixed length. Order reels of sufficient length to allow continuous runs between the network devices. Cable Entry and Jumpers (Taps at In-Line Sites) At each in-line tap site, install two lengths of trunk cable. Connect the cable from the right side of the previous tap to the left side of this tap. Connect the cable from the left side of the next tap to the right side of this tap. Remove the two internal jumpers. Figure 18 shows the connections for taps at in-line sites. Cable Tie Jumpers Removed Cable Tie Network Trunk Cable Network Trunk Cable To right side of previous tap To left side of next tap Figure 18: Taps at In-Line Sites Cable Entry and Jumpers (Taps at End Sites) At the two end sites on the cable section, install one length of trunk cable and connect it to either side of the tap. Install the two internal jumpers between the center posts and the lower two posts at the side of the tap opposite from the cable. Figure 19 shows the connections for taps at end sites. © 1998–2000 Schneider Electric All Rights Reserved 27 Section 1—Installation & Configuration Trunk and Drop Cabling with Taps Bulletin No. VVDED397044US R12/00 December 2000 Jumpers Installed Cable Tie Network Trunk Cable J2 J1 B W Jumpers Installed J2 J1 Cable Tie Network Trunk Cable B W Figure 19: Taps at End Sites Connecting the Wires Detailed instructions for stripping the wires and making the connections are enclosed in each tap package. This section provides a general trunk cable description of the connections. The trunk cable is connected as shown in Figure 20 on page 29. The terminals are marked as shown in Table 6. Table 6: 28 Trunk Cable Terminals Terminal Meaning Location GND Network Bus, Ground Top Wire Color Shield W Network Bus, White Middle White BLK Network Bus, Blue or Black Bottom Blue or Black © 1998–2000 Schneider Electric All Rights Reserved Bulletin No. VVDED397044US R12/00 December 2000 Section 1—Installation & Configuration Trunk and Drop Cabling with Taps Cable Tie Cable Tie BLK BLK W W GND GND Figure 20: Trunk Cable Connections To connect each wire: 1. Remove the plastic cap from the terminal. 2. Place the wire into the terminal slot. 3. Using a Phillips screwdriver, press the cap into the terminal to force the wire down into the slot. A special tool is available for making these connections (AMP part number 552714-3). Figure 21 shows the connection sequence. 1 2 3 Cap Terminal Figure 21: Wire Terminal Connection Connecting the Drop Cable MODBUS PLUS Drop Cable A drop cable is used at each site to connect between the tap and a network node device. The cable is preassembled with a 9-pin D connector on one end for connection to the node device. The other end is open for connection to the taps. Cables are available in two lengths (see Table 1 on page 3). © 1998–2000 Schneider Electric All Rights Reserved 29 Section 1—Installation & Configuration Trunk and Drop Cabling with Taps Bulletin No. VVDED397044US R12/00 December 2000 Order a sufficient quantity of drop cables and taps to allow extra ones for service access and spare parts. Connecting the Signal Wires Detailed instructions for stripping the wires and making connections are enclosed in each tap package. Below is a general description of the signal wire connections. The drop cable contains two sets of twisted-pair signal wires with separate shield wires. It also has an outer shield drain wire, for a total of seven wires. • One set of wires is color-coded WHITE and ORANGE, with a bare shield wire. • The other set is WHITE and BLUE, with a bare shield wire. Before connecting the wires, make sure you have identified the two sets of twisted-pair wires. The two white wires are not interchangeable. When you connect the wires, you must connect each wire to its proper terminal. Insert the cable into the tap and secure it with a cable tie. Viewing the tap as shown in Figure 22 on page 31, connect the wires. The terminals are marked as illustrated in Table 7. Table 7: 30 Drop Cable Terminals Terminal Location Wire Color O Left ORANGE W Left Center WHITE GND Center Shields (both sets of wires) W Right Center WHITE BLU Right BLUE © 1998–2000 Schneider Electric All Rights Reserved Bulletin No. VVDED397044US R12/00 December 2000 Section 1—Installation & Configuration Trunk and Drop Cabling with Taps Drop Cable Drain Wire Cable Tie BLU O W GND W Connect drop cable drain wire at this point. DO NOT connect drain wire to ground. Drain is connected to ground only at drive controller. Figure 22: Drop Cable Connections To connect each wire: 1. Remove the plastic cap from the terminal. 2. Place the wire into the terminal slot. 3. Using a Phillips screwdriver, press the cap into the terminal to force the wire down into the slot. A special tool is available for making these connections (AMP part number 552714-3). Figure 21 on page 29 shows the connection sequence. Connecting the Drop Cable Drain Wire Install a lug on the drain wire. Tightly crimp or solder the lug to the wire. Connect the lug to the tap’s screw as shown in Figure 22. Labeling After the cable is installed, label the drop cable for easy identification during future maintenance. Adhesive labels are available commercially for cable identification. If a cable layout diagram exists for the installation, label each drop cable in accordance with the diagram. If a diagram does not exist, prepare one showing the cable segments and method of identifying them for future service. Then label the segments accordingly. Affix the labels to the cables at each network node drop. Place them at a point that will be visible to maintenance personnel. © 1998–2000 Schneider Electric All Rights Reserved 31 Section 1—Installation & Configuration Trunk and Drop Cabling with Taps Bulletin No. VVDED397044US R12/00 December 2000 Complete the network installation labeling by properly labeling each site’s cabinet or enclosure, device mounting panel, and device. Checking the Cable Installation Inspecting the Cable Installation Visually inspect the cable for the following points: • The cable runs are consistent with the physical and electrical protection requirement described in “Cable Routing Practices” on page 19. • The cable runs are consistent with the network cable routing illustrated in Figure 16 on page 25. • The tap at each end drop site on each section of the network has its two internal termination jumpers connected. They are connected between the two center posts and the W and B posts at the side of the tap opposite from the trunk cable connection, as shown in Figure 19 on page 28. • The tap at each in-line drop site has its two internal terminal jumpers disconnected and removed, as shown in Figure 18 on page 27. • Service loops exist on the trunk cable at each tap, and on each drop cable at the node device end of the cable. • Adequate strain reliefs are installed on the cable at each drop. • All identification labels are in place and properly marked. Checking Cable Continuity Before checking continuity, disconnect all network cable connectors from the node devices. Leave the drop cable ground lugs connected to their site panel grounds. Verify the cable’s end-to-end electrical continuity by checking the following points, illustrated in Figure 23 on page 33: • At any node device connector, measure the resistance between pins 2 and 3. This should range between 60 and 80 Ω, including the cable wire resistance. • At each node device connector, check for an open circuit between pin 2 and pin 1. Then check between pin 3 and pin 1. An open circuit should exist for both checks. 32 © 1998–2000 Schneider Electric All Rights Reserved Bulletin No. VVDED397044US R12/00 December 2000 Section 1—Installation & Configuration Parameter Setup • At each connector, check the continuity between pin 1 and the MODBUS PLUS cable shield ground point on the heat sink. Direct continuity should not be present. • Check for proper termination and insulation of individual drop twisted pair shields. If any check point fails, inspect the cable and all connections for damage or miswiring, and correct the condition. Pin 1 Pin 5 Pin 1 is the shield pin Pins 2 and 3 are the signal pins Pin 6 Pin 9 Figure 23: 9-Pin D-Shell Drop Cable Connector PARAMETER SETUP Configuring the Communication Parameters Initial Power-Up When the MODBUS PLUS card is initially powered up, it is automatically recognized by the drive controller. It provides access to the 8—Communication menu on the operator keypad. Configuration Select the 8—Communication menu (see Table 8 on page 36) to access the option card configuration parameters. Using the keypad, enter “8 SL” (Serial Link, Communication). The first parameter is the address of the drive controller on the network. Because this parameter is physically configured on the card with switches 1 to 6 (see “Setting the Drive Controller Address” on page 12), it can only be read from the keypad. NOTE: The communication parameters can only be modified with the motor stopped. © 1998–2000 Schneider Electric All Rights Reserved 33 Section 1—Installation & Configuration Parameter Setup Bulletin No. VVDED397044US R12/00 December 2000 Example of MODBUS PLUS Network Operation Figure 24 illustrates a typical MODBUS PLUS network with two ALTIVAR 58 drive controllers as nodes. The figure illustrates that a single node controls the drive controller by implicit reservation of the command semaphore. Specific transfer with peer cop enabled in the ALTIVAR 58 drive controller creates a command node (Node 1). Node 4 Modicon PLC Node 1 HMI Node 2 HMI sends messages to read data from drive controller 1 Node 5 Global Data Specific transfer from node 3 to node 5 is ignored by drive controller 2 since it has peer cop reception disabled. Specific transfer from node 3 to Modicon node 4 is ignored by drive PLC Node 3 controller 2 since its designated control node is node 1. Node 3 can Node 6 on MODBUS PLUS send messages using MSTR blocks to node 5. Network 1 Bridge Node 3 MODBUS PLUS Network 1 MODBUS PLUS Network 2 Node 1 Drive 1 Drive 2 Peer cop node = No Peer cop node = Yes Command node = 1 Node 4 Node 5 Node 2 Figure 24: MODBUS PLUS Network Operation 34 © 1998–2000 Schneider Electric All Rights Reserved Bulletin No. VVDED397044US R12/00 December 2000 Section 1—Installation & Configuration Optimizing Network Performance Command message to drive controller 1 (Node 4) is refused since Modicon node 2 has PLC Node 3 reserved the command semaphore of drive controller 1. HMI sends MB Plus commands to reserve the command semaphore in drive controller 1. Modicon PLC Node 1 HMI Node 2 MODBUS PLUS Network 1 Drive 1 Peer cop node = Yes Command node = 1 Node 4 Peer cop=Yes, with semaphore (control) reserved by Node 2, causes drive controller 1 (Node 4) to ignore peer cop data and to take commands only from Node 2. Other nodes attempting to control drive controller 1 (Node 4) with a message are refused. Drive controller 1 (Node 4) writes its status using global data Xfer when sending the token (other nodes may monitor reservation of command semaphore, including the command node). Drive 2 Node 5 Drive controller writes its status using global data Xfer when sending the token. Drive controller 2 (Node 5) allows command parameters to be written by any node (including across bridges), since command semaphore is free and peer cop = No. Figure 25: Using the Command Semaphore OPTIMIZING NETWORK PERFORMANCE To optimize network performance consider the following points during network design and implementation: 1. When structuring the information exchange requirements for a network, consider the speed of the communication required to implement the application properly. — Use the communication method which best matches the speed requirements of the information exchange. — Communicate information only when the application requires it. — Minimize network traffic by design. For example, when controlling a simple process requiring only the control functions contained in the first several command registers available via peer cop, set up peer cop to send only those registers. This minimizes network traffic and maintains best overall network speed. 2. For better network security, keep drive controllers and their associated control devices on the same local network. As far as possible, minimize or eliminate the need for drive controller signals to cross network bridges. 3. Use command with no monitoring of communication faults (W402, Bit 14 set to 1) during troubleshooting and start-up operations. Do not © 1998–2000 Schneider Electric All Rights Reserved 35 Section 1—Installation & Configuration Optimizing Network Performance Bulletin No. VVDED397044US R12/00 December 2000 use this function during normal network operation. This function is also called NTO, No Time-Out. 4. Use distributed control where possible. The ALTIVAR 58 drive controller has a large number of application functions that can be used in conjunction with network communications. Where possible, use these functions to allow local control by the drive controller while using the network to communicate supervisory information. This minimizes the information exchange burden on the network and unburdens the controlling device. 5. Understand the failure possibilities of the designed network. Provide control redundancies and contingencies appropriate for the intended application. 6. Follow the wiring practices described in section 1. Improperly installed network wiring can cause noisy or intermittent data transmission with resulting loss of network speed and deterioration of security. Table 8: Parameter Code Range Default Value Comments Address Adrc 1–64 1 Address of MODBUS PLUS node. Read-only. Configured with switches 1–6 on option card. Protocol -Pro — — Automatically set to MODBUS PLUS if the card is present. Read-only. Time-Out [1] -tLP 0.1 to 60 s 1.0 Increments of 10 ms. Peer Cop Node -PrC No/Yes No — Global Tx [2] -GLb 0 to 32 0 0= No global data transmitted Command Node [3] -Cdn 0 to 64 0 Must be different from the drive controller network address. 0 = No reception of peer cop registers. Number of Registers [3] 0 to 32 0 0 = No reception of peer cop registers. [1] [2] [3] 36 Communication Parameters -rEG Time-out represents: • The maximum time in which no token is received. • The maximum time between receiving two peer cop transmissions. • The maximum time before semaphore is lost by a station controlling the drive controller via message handling. When a time-out occurs the drive displays a CnF fault. For more information, see “Global Data Transmission” on page 46. For more information, see “Peer Cop” on page 43. © 1998–2000 Schneider Electric All Rights Reserved Bulletin No. VVDED397044US R12/00 December 2000 Section 1—Installation & Configuration Diagnostics DIAGNOSTICS The MODBUS PLUS option card has one LED that indicates the status of the communication link. 2 LED 1 0 1 1 Address Switches 8 Connector Figure 26: LED Location Table 9: LED States State of LED Meaning Off Card Disabled: Switch 7 is in ON state ILF Fault: A communication problem exitst between the communication option card and the drive controller. 1 flash per second Monitor Link: On powering up or after exit from “4 flashes per second” mode, the card monitors the network and constructs a table of nodes which are active and hold a token. At the end of 5 seconds, the card attempts to switch to normal operating status (indicated by 6 flashes per second). 6 flashes per second Token OK: The token is circulating normally and the card is receiving it once per rotation. 2 flashes per second followed by a pause of 2 seconds Never Getting Token: The token is passing via other nodes, but the card never receives it. 3 flashes per second followed by a pause of 1.7 seconds Sole Station: The network only contains one node or the link has been lost. 4 flashes per second followed by a pause of 1.4 seconds Duplicate Station: Another node is using the card address. The card is waiting for reconfiguration or for the other node to be disconnected from the network. © 1998–2000 Schneider Electric All Rights Reserved 37 Section 1—Installation & Configuration Diagnostics Bulletin No. VVDED397044US R12/00 December 2000 NOTES 38 © 1998–2000 Schneider Electric All Rights Reserved Bulletin No. VVDED397044US R12/00 December 2000 Section 2—Modbus Plus Overview ALTIVAR® 58 Registers and Data Exchange SECTION 2—MODBUS PLUS OVERVIEW INTRODUCTION The MODBUS PLUS option card allows an ALTIVAR 58 (ATV58) drive controller to function as a node on a MODBUS PLUS network. This section explains how information is exchanged between the drive controller registers and other nodes on the network. For a complete description of MODBUS PLUS networks and protocol, or to reference MODBUS PLUS terms and concepts, please refer to the following Modicon documents: • MODBUS PLUS Network Planning & Installation Guide, 890 USE 100 00 • MODBUS Protocol Reference Guide, PI-MBUS-300 • Ladder Logic Block Library User Guide, 840 USE 10 100 ALTIVAR 58 REGISTERS AND DATA EXCHANGE When an ATV58 drive controller is a node on a MODBUS PLUS network, the data in its adjustment (read and write), command (read and write), and display (read only) registers can be accessed by other devices on the network. There are three ways to access the drive controller registers with the MODBUS PLUS option card: • Messaging • Peer Cop • Global Data The following sections are an overview of MODBUS PLUS networks and communication methods. For details on the drive controller registers and their MODBUS PLUS addresses, refer to ATV58 Register Access Guide for Communication Networks, VVDED397058US. Messaging Messaging is a method of peer-to-peer communication between networked devices. It follows a query-response sequence. The initiating device sends a query to a specific node and receives a response. When messages are issued over a MODBUS PLUS network, the solicited node must send an immediate acknowledgment. When the solicited node holds the token, it may then send all requested data to the initiating node. © 1998–2000 Schneider Electric All Rights Reserved 39 Section 2—Modbus Plus Overview MSTR Block Bulletin No. VVDED397044US R12/00 December 2000 As a node on a MODBUS PLUS network, the ATV58 drive controller cannot initiate messages, but all of its command (read and write), adjustment (read and write), and display (read only) registers can be read by other networked devices through messaging at any time, even when the drive controller is running. Other networked devices can write to: • Command registers, as long as they are not peer cop registers and the command semaphore is not taken • Adjustment registers, as long as they are not peer copped Other nodes cannot write to peer copped registers via message handling except in the event of a peer cop time-out. If a write message is received for peer copped registers, the message is refused and a negative acknowledgment is returned. MSTR BLOCK Overview of MSTR Block PLCs that support MODBUS PLUS communications have a special MSTR (master) instruction with which nodes of the network can initiate message transactions. The MSTR function allows you to initiate one of nine possible network communications operations. Each operation is designated by a code (see Table 10): Table 10: MSTR Operation Codes MSTR Operation Code MSTR Operation Code Write Data 1 Get Remote Statistics 7 Read Data 2 Clear Remote Statistics 8 Get Local Statistics 3 Peer Cop Status 9 Write Global Database 5 Read Global Database 6 This section discusses read and write MSTR instruction blocks. For additional information on Modbus instructions, refer to the Ladder Logic Block Library User Guide, 840 USE 10 100. 40 © 1998–2000 Schneider Electric All Rights Reserved Bulletin No. VVDED397044US R12/00 December 2000 Section 2—Modbus Plus Overview MSTR Block MSTR Block Structure Inputs MSTR has two control points (see Figure 27 on page 41): • Top node input — enables the instruction when top node input is ON. • Middle node input — terminates the active operation when middle node input is ON. Outputs MSTR can produce three possible outputs (see Figure 27): • Top node output — echoes the state of the top node input (goes ON while the instruction is active). • Middle node output — echoes the state of the middle node input and goes ON if the MSTR operation is terminated prior to completion. • Bottom node output — goes ON when MSTR operation is completed successfully. Enables selected MSTR operation Control Block Terminates active MSTR operation Data Area Operation terminated unsuccessfully MSTR Length Operation successful Operation active Figure 27: MSTR Block Structure © 1998–2000 Schneider Electric All Rights Reserved 41 Section 2—Modbus Plus Overview MSTR Block Bulletin No. VVDED397044US R12/00 December 2000 Top Node Content The 4x register entered in the top node is the first of nine contiguous holding registers that comprise the control block (see Table 11). Table 11: Register Control Block Holding Registers Content Displayed Identifies one of the nine MSTR operations 1st implied Displays error status 2nd implied Displays length 3rd implied Displays MSTR operation-dependent information 4th implied Routing 1 register, used to designate the address of the destination node for a network message transaction. 5th implied Routing 2 register 6th implied Routing 3 register 7th implied Routing 4 register 8th implied Routing 5 register NOTE: You must understand MODBUS PLUS routing path procedures before programming an MSTR instruction. For a complete overview, refer to the MODBUS PLUS Network Planning and Installation Guide, 890 USE 100 00. Middle Node Content The 4x register entered in the middle node is the first in a group of contiguous holding registers that comprise the data area. • For operations that provide the communication processor with data— such as a write operation—the data area is the source of the data. • For operations that acquire data from the communication processor— such as a read operation—the data area is the destination for the data. Bottom Node Content The integer value entered in the bottom node specifies the length—the maximum number of registers—in the data area. Although the typical MODBUS PLUS length may range from 1 to 100 registers, the ATV58 drive controller range is 1 to 60 registers. 42 © 1998–2000 Schneider Electric All Rights Reserved Bulletin No. VVDED397044US R12/00 December 2000 Section 2—Modbus Plus Overview Peer Cop Read and Write MSTR Operations An MSTR write operation transfers data from a controlling device to the drive controller. An MSTR read operation transfers data from the drive controller to a controlling device on the network. Control Block Table 12 shows the information contained in the top node of the MSTR control block in a read or write operation. Table 12: Control Block Registers — Read and Write Operations Register Function Content Displayed Operation type 1 = Write; 2 = Read 1st implied Error status Displays a hex value indicating MSTR error, when relevant 2nd implied Length Write = # of registers to be sent to drive controller Read = # of registers to be read from drive controller 3rd implied Drive controller data area Specifies starting register in the drive controller to be read from or written to 4th…8th implied Routing 1…5 Designates 1st…5th routing path addresses, respectively; last non-zero byte in routing path is the transaction device. PEER COP Peer cop (also known as specific output) is a method of mapping a block of registers from one specific node to the drive controller’s Command and Adjustment registers. The transmitting node sends the peer cop data once per token rotation with the token pass. Each command node can send up to 32 words of peer cop data to specific nodes on the network as long as the total does not exceed 500 words. Peer cop is a fast, efficient way to send data from the command node to the drive controller. It does not require ladder logic to be written. NOTE: Peer cop data cannot be passed through bridges. Also, the drive controller can receive peer cop data but cannot transmit it. Peer Cop must be enabled through the 8—Communication menu and configured the same way in MODSOFT® software. The factory setting for peer cop communication is “No.” To enable peer cop reception: © 1998–2000 Schneider Electric All Rights Reserved 43 Section 2—Modbus Plus Overview Peer Cop Bulletin No. VVDED397044US R12/00 December 2000 1. Select Peer Cop and press ENT. The peer cop status appears. Select YES using the ▲▼ keys and press ENT. 2. Select Control Node and press ENT. Using the ▲▼ keys, enter the number of the node from which the peer cop data is to be received. 3. Select Number Registers and press ENT. Using the ▲▼ keys, enter the number of variables to be received. Received peer cop data is mapped in the three control words CMD, LFR, and CMI (addresses 400 to 402) and in the first 29 adjustment variables from HSP to TL2 (addresses 250 to 278). If a write message is received for peer copped registers, it is refused and a negative acknowledgment is returned. If no peer cop data is received from the control node within the specified time-out period, the drive controller switches to CNF fault mode and authorizes other nodes to write to the peer copped registers via message handling. You can specify the number of peer cop registers required. • If you enter 2 in the Num Registers field of the 8—Communication menu and in the length field of the peer cop screen in MODSOFT software, variables W400 (CMD) and W401 (LFR) receive peer cop data. • If you enter 4 in the Num Registers field, then control variables W400 to W402 receive the first three words of peer cop data (1 to 3), and adjustment variable W250 receives peer cop data word 4. Adjust the number of peer cop registers configured with the peer cop screen in MODSOFT software according to the application requirements. 44 © 1998–2000 Schneider Electric All Rights Reserved Bulletin No. VVDED397044US R12/00 December 2000 Section 2—Modbus Plus Overview Peer Cop Table 13 lists the control and adjustment variables mapped through peer cop transfers. Table 13: Peer Cop Order Number Control and Adjustment Variables Mapped w/Peer Cop Address of Drive Controller Variable Designation Description 1 400 CMD DRIVECOM command register 2 401 LFR Frequency reference in line mode 3 402 CMI Internal command register 4 250 HSP High speed 5 251 LSP Low speed 6 252 ACC Acceleration 7 253 DEC Deceleration 8 254 UFR IR compensation 9 255 FLG Frequency loop gain 10 256 PFL U/F control ratio profile 11 257 STA Damping 12 258 ITH Thermal protection current 13 259 SLP Slip compensation 14 260 AC2 Acceleration 2 15 261 DE2 Deceleration 2 16 262 JOG JOG frequency 17 263 JGT Anti-repeat delay (JOG) 18 264 SP2 Preset speed 2 19 265 SP3 Preset speed 3 20 266 SP4 Preset speed 4 21 267 SP5 Preset speed 5 22 268 SP6 Preset speed 6 23 269 SP7 Preset speed 7 24 270 IDC Injection current 25 271 TDC Injection time 26 272 TLS Maximum time at low speed (LSP) 27 273 BRL Brake release threshold 28 274 BEN Brake engage threshold 29 275 BRT Brake release time 30 276 BET Brake engage time 31 277 IBR Brake release current threshold 32 278 TL2 Second torque limit © 1998–2000 Schneider Electric All Rights Reserved 45 Section 2—Modbus Plus Overview Global Data Transmission Bulletin No. VVDED397044US R12/00 December 2000 GLOBAL DATA TRANSMISSION When a networked node holds the token, it may communicate with other nodes on the link and gather network statistics. When a node releases the token, it appends up to 32 sixteen-bit words of global data to the token frame. All nodes present on the network detect this data packet, and any appropriately programmed node can extract the data and record it in its global database. For a MODBUS PLUS network with a maximum 64 nodes, the global database can contain up to 2048 sixteen-bit words (32 words per node). Different networks cannot share global data since the token cannot pass through a bridge. If global data transmission is enabled for the ATV58 drive controller, up to 32 display registers of the drive controller can be broadcast to the network as global data with each token rotation. To enable global data transmission, enter the number of display registers to be transmitted in the ”Global Tx” field of the 8—Communication menu (see Table 8 on page 36). Entering “0” in this field disables global data transmission. Table 14 on page 46 lists the display registers transmitted as global data, their addresses in the drive controller, and the order in which the registers are transmitted in global data transfers. For example, if 8 is entered in the Global Tx field of the 8—Communication menu, the first eight display registers (words 2041–2048) will be broadcast as global data each time the drive controller passes the token. Table 14: 46 Display Register Mapping w/ Global Data Address of Global Data Drive Order Controller Number Variable Designation 1 450 FRH Frequency reference 2 451 RFR Output frequency applied to motor Description 3 452 SPD Motor speed estimated by drive controller 4 453 LCR Current in motor 5 454 ULN Line voltage (via bus) 6 455 THR Motor thermal state 7 456 THD Drive controller thermal state 8 457 LFT Last fault to occur 9 458 ETA DRIVECOM drive controller status register 10 459 ETI Drive controller internal status register No. 1 © 1998–2000 Schneider Electric All Rights Reserved Bulletin No. VVDED397044US R12/00 December 2000 Table 14: Section 2—Modbus Plus Overview Global Data Transmission Display Register Mapping w/ Global Data (Continued) Address of Global Data Drive Order Controller Number Variable Designation Description 11 483 DF1 Register of active faults No. 1 12 484 DF2 Register of active faults No. 2 13 462 DP1 Number of past fault No. 1 14 463 EP1 Status of past fault No. 1 15 464 DP2 Number of past fault No. 2 16 465 EP2 Status of past fault No. 2 17 466 DP3 Number of past fault No. 3 18 467 EP3 Status of past fault No. 3 19 468 DP4 Number of past fault No. 4 20 469 EP4 Status of past fault No. 4 21 470 DP5 Number of past fault No. 5 22 471 EP5 Status of past fault No. 5 23 472 DP6 Number of past fault No. 6 24 473 EP6 Status of past fault No. 6 25 474 DP7 Number of past fault No. 7 26 475 EP7 Status of past fault No. 7 27 476 DP8 Number of past fault No. 8 28 477 EP8 Status of past fault No. 8 29 478 IOLR Image of logic I/O 30 479 AI1R Image of analog input AI1 31 480 AI2R Image of analog input AI2 32 481 AI3R Image of analog input AI3 To optimize network response time, keep the number of global data registers to a minimum. EXAMPLE OF SETTING UP PEER COP AND GLOBAL DATA SERVICE This section describes the steps for configuring the drive controller so that a PLC at address 3 can control the drive controller via five peer cop registers and display these states via 14 global data transfers. It is assumed that the PLC is configured to send five peer cop data items to the drive controller and receive 14 global data transfers. 1. With the drive controller powered down, set its MODBUS PLUS address using switches 1 to 6. Leave switches 7 and 8 at zero. For example, to select address 4, set switches 1 and 2 to 1. The address can be displayed using operator keypad menu 8, AdrC. 2. Connect the drive controller to the line supply. © 1998–2000 Schneider Electric All Rights Reserved 47 Section 2—Modbus Plus Overview Global Data Transmission Bulletin No. VVDED397044US R12/00 December 2000 3. Power up the drive controller. 4. Adjust the five MODBUS PLUS parameters using the operator keypad or the PC software (part number VW3A8104). — TLP: Peer cop time-out. Factory setting 1 s. Change the setting if necessary. Disconnecting the PLC or the drive controller for this duration will stop the motor and the drive controller will switch to CNF fault mode. — CDN: Control node. Factory setting is 0. Set this parameter to 3 to correspond to the address of the PLC which is to control the drive controller via peer cop. — REG: Number of peer cop registers received from the PLC. Factory setting is 0. Set this parameter to 5 (five registers received from the PLC). Note that other stations can no longer write to these five peer cop registers via message handling. 1st peer cop register = CMD control word (Run, Stop, Reset, etc.) 2nd peer cop register= LFR speed reference word 3rd peer cop register = CMI integral control word 4th peer cop register = HSP high speed limit 5th peer cop register = LSP low speed limit — GLB: Number of global data registers sent on the network. Factory setting is 0. Set this parameter to 14 (14 registers sent to the network and read by the PLC). — PRC: Factory setting is No. Set this parameter to Yes to use peer cop. 5. To fix the speed reference at 25 Hz, set LFR to 250 (second peer cop register sent by the PLC). 6. Bring the drive controller from “ATV58 On and Locked” to “Standby Status” by setting CMD to 6 and waiting until the ETA (word 458) is equal to 21. 7. Next set the drive controller to “Ready” state. Set CMD to 7 and wait until the 9th global data register ETA is XX23h. 8. Bring the drive controller to “Running” state by setting CMD to 0F for forward or 80F for reverse and wait until the ETA (word 458) is equal to 27h. 9. To set the drive controller to STOP, set CMD = 100 Fh. 10. If the drive controller is in CNF fault mode (register ETA = XXX8h), to reset it via the network set CMD to 80h. Then perform steps 6 and 7 to rotate the motor. 11. To change the Time-Out parameter TLP: — Stop the motor by setting CMD to 100 Fh. 48 © 1998–2000 Schneider Electric All Rights Reserved Bulletin No. VVDED397044US R12/00 December 2000 Section 2—Modbus Plus Overview Command Semaphore — Change TLP using the operator keypad or the PC software. — Perform steps 6 and 7 to set the motor to RUN FORWARD. 12. The other nodes on the network can read all of the drive controller registers via message handling. They cannot write to the registers used in peer cop (in this example, they are the five registers CMD, LFR, CMI, HSP, LSP). However, they can write to other adjustment registers (ACC, DEC, etc.). COMMAND SEMAPHORE The command semaphore is a means of identifying which device the drive controller receives its commands from. The drive controller can be controlled locally by the logic on the terminal strip, the keypad, by the MODBUS port the keypad plugs into, or through a fast serial link (PLC for example). There is no configurable semaphore between the terminal strip, the keypad, the MODBUS port, or a fast serial link. An implicit command semaphore exists between the network nodes. If peer cop data is enabled, none of the stations connected to the network can write to control words. It is possible to take the command semaphore only when peer cop data is disabled, or the drive controller is in CNF fault mode without having lost the token. When peer cop data is disabled, the first node to write via message handling to control words 400, 401, and 402 automatically takes the command semaphore. The drive controller responds to this write operation by implicitly taking the command semaphore. Only the node reserving the semaphore in this way can write to control words. The semaphore remains reserved as long as the node writes or reads at least once during the time-out period specified in the 8—Communication menu. The command semaphore is released by writing bit 8 of word 400 to a value of 1 within the specified time. Otherwise, the semaphore is freed if no write/read operation takes place and the drive controller switches to CNF fault mode. NOTE: If peer cop data is again received from the network, the node which has implicitly taken the command semaphore automatically loses it and all requests to write to the control words via message handling are refused by the drive controller. The MODBUS PLUS port takes priority over the MODBUS port; if the MODBUS PLUS port is active the drive controller’s control words cannot be written through the MODBUS port. However, other devices can still write to configuration words and read display words through the MODBUS port. The MODBUS PLUS control device can release control © 1998–2000 Schneider Electric All Rights Reserved 49 Section 2—Modbus Plus Overview Command Semaphore Bulletin No. VVDED397044US R12/00 December 2000 of the drive controller to the MODBUS port device by setting bits 8 and 15 of control word CMD to 1. Among MODBUS PLUS devices, only one device can write to the drive controller’s control words. If peer cop data is enabled within the drive controller, it receives its peer cop data from a designated control device. No other device can write to the control words, unless the drive controller does not receive peer cop data within the designated time-out period, and so falls into CNF fault mode. Once the drive controller receives peer cop data again, it again rejects all message requests to write to the control words. (See “Peer Cop” on page 43.) If peer cop is disabled or the drive controller is in CNF fault mode, the first device to write to control words 400, 401, and 402 via message handling gains access to the control words, and no other devices can write to these words. The controlling device releases control under any of these three conditions: • The control device writes a value of 1 to bit 8 of Word 400. • The control device fails to send any read or write message to the drive controller within the specified time-out period. • The drive controller experiences a communications fault (CNF). Register Update Times The times to update variables for 32 peer cop data processing operations and for 32 global data transfers are as follows: • Peer cop data processing, first three control variables: 15 ms • Peer cop data processing, following 29 adjustment variables: 500 ms • Update period of global data, first 14 variables: 15 ms • Update period of global data, following 18 variables: 500 ms CONTROL MODES The ATV58 drive controller can be controlled in local mode via the operator keypad or terminal, or remotely through the serial link. The setpoints and control orders cannot be controlled separately. The possible sources of control are: • through hard-wired I/O points on the terminal strip • through a keypad or computer connected to the drive controller through its built-in MODBUS serial port 50 © 1998–2000 Schneider Electric All Rights Reserved Bulletin No. VVDED397044US R12/00 December 2000 Section 2—Modbus Plus Overview Hand/Off/Auto (HOA) • through a PLC or other controller connected to the fast serial link via a communication card NOTE: The operator keypad takes priority over the terminals. When the communication network has control of the drive, the setpoints and commands are controlled via the network and cannot be modified by the terminals, the keypad, or any device connected to the RS-485 MODBUS serial port. To command the drive controller by the terminals, the keypad, or any device connected to the RS-485 MODBUS serial port, forced local must be enabled. WARNING UNINTENDED EQUIPMENT ACTION When in serial link/line mode, all terminal inputs are ignored except digital inputs configured as stop functions. Failure to consider the implications of unanticipated operations can result in death, serious injury, or equipment damage. Hand/Off/Auto (HOA) WARNING LOSS OF CONTROL The user must provide a Hand/Off/Auto switch with the following functionality: • In the Hand position, forced local mode must be enabled. • In the Off position, all run terminal inputs must be disabled via open circuit, and forced local mode must be enabled. • In the Auto position, the run terminal inputs must be disabled via open circuit, and forced local mode must be disabled. Failure to follow these instructions can result in death or serious injury. When the control switch is in the auto position, all local run and start commands to the drive controller must be removed. During power-up, the ATV58 drive controller defaults to local control. (See “Local and Remote” on page 53.) After the drive controller recovers from a power up sequence (including such unplanned events as an AC line power disturbance), it immediately responds to any local controls that are active © 1998–2000 Schneider Electric All Rights Reserved 51 Section 2—Modbus Plus Overview Hand/Off/Auto (HOA) Bulletin No. VVDED397044US R12/00 December 2000 before the MODBUS PLUS communication board has initialized and assumed control. This can result in unintended equipment operation. When the control switch is in the hand or off position, the drive controller must be placed into the forced local mode . While it is possible to stop the drive controller in the remote mode by activating one of the local stop commands (such as the keypad display stop button), commands sent over the network can restart the drive controller if it is not in forced local mode. See “Forced Local” on page 53. Refer to Figures 28 and 29 for assistance in designing Hand/Off/Auto control. For the run reverse and forced local functions, select any unused logic inputs on the main control board. Assign a logic input to the run reverse function only if appropriate for the application. +24 Hand Off Auto LI1 Run Forward User Control Scheme LIx Run Reverse LIy Forced Local Figure 28: Example 2-Wire Control NOTE: When the HOA switch is in the auto position, removing the local run forward or run reverse commands does not stop the drive controller. +24 Hand Stop Off Auto LI1 Stop Fwd Rev LI2 Run Forward LIx Run Reverse LIy Forced Local Figure 29: Example 3-Wire Control 52 © 1998–2000 Schneider Electric All Rights Reserved Bulletin No. VVDED397044US R12/00 December 2000 Section 2—Modbus Plus Overview Local and Remote Local and Remote The ATV58 drive controller can be commanded in local and remote control modes. Local Control In local (hand) control, the drive controller is controlled by either: • Operators such as push buttons, switches, and a speed potentiometer that are wired to the drive controller terminal block • The keypad display buttons See the latest revision of the keypad display manual VVDED397047US for more details on how to select between the two modes of local control. Remote Control In remote (auto) control: • The drive controller is controlled by the serial communication network. • The speed reference and the start/stop control cannot come from separate sources. Forced Local Switching between local and remote control is achieved by a switch wired to a logic input on the controller terminal block as illustrated in Figure 28 on page 52 and Figure 29 above. The logic input must be assigned to the function, forced local. When the logic input assigned to forced local is active (high), all control of the drive controller is assigned to the selected local (hand) control mode. In this case, command requests by the network are refused. Command parameters can be monitored. All other parameters can be read/write accessed. © 1998–2000 Schneider Electric All Rights Reserved 53 Section 2—Modbus Plus Overview Forced Local Bulletin No. VVDED397044US R12/00 December 2000 WARNING UNINTENDED EQUIPMENT ACTION When in forced local mode, all commands from the communication ports are ignored. Failure to consider the implications of unanticipated operation can result in death, serious injury, or equipment damage. When the logic input is not active (low), all control of the drive is transferred to the network if wired as shown in Figures 28 or 29. The only local (hand) controls that are still monitored by the drive controller include the logic input assigned to Forced Local and any input assigned to a drive stop function. Examples include: • the stop button on the keypad display • logic input one (LI1) which is assigned to the function STOP if the ATV58 drive controller is configured for 3-wire control • any logic input assigned to the functions freewheel stop, DC injection braking, and fast stop. See the keypad display manual VVDED397047US (latest revision) for more details. Communication Fault Monitoring Word 402, bit 14 of command register CMI is used to inhibit communication fault responses. If bit 14 = 1, the drive controller ignores communication errors from the serial link. This function is intended for use during troubleshooting and start-up. Do not use this function during normal network operation. WARNING UNINTENDED EQUIPMENT ACTION Loss of communication will not cause the drive controller to fault. Failure to consider implications of unanticipated operations can result in death, serious injury, or equipment damage. 54 © 1998–2000 Schneider Electric All Rights Reserved Bulletin No. VVDED397044US R12/00 December 2000 Section 2—Modbus Plus Overview Control Registers Protection of Adjustment and Configuration Access A configuration semaphore has not been provided in order to ensure read-only access to the configuration and adjustment parameters. Any processing unit can access the configuration and adjustment parameters. Access Protection by Forced Local Writing of Command registers is blocked during forced local. CONTROL REGISTERS (READ AND WRITE) Control registers cannot be modified if another device on the MODBUS PLUS Network has reserved this drive controller’s command semaphore, or is peer copping the desired control register. © 1998–2000 Schneider Electric All Rights Reserved 55 Section 2—Modbus Plus Overview Control Registers Bulletin No. VVDED397044US R12/00 December 2000 NOTES 56 © 1998–2000 Schneider Electric All Rights Reserved Bulletin No. VVDED397044US R12/00 December 2000 Index Numerics F N 50/60 Hz switch 10 fast serial link 49, 51 NTO 36 forced local 52 A address drive controller 12 P G parameter communication 33 global database duplicate 22 max. number of words 46 peer cop setup 47–49 attenuating filters 20 mapping words 44 max. number of words 43 setup 47–49 C H cabling Hand/Off/Auto 51 electrical interference 20 R routing 19–20, 25–26 communication PLC 21, 47–49, 51 handling the option card 7 labels 31 trays 20 time-out 40 I receiving the option card 7 interference routing cable 19–20, 25–26 faults 35 electrical 20 operations 40 S parameters 33 peer-to-peer 21, 39 control local and remote 53–54 modes 50–55 control sources 50 D DIP switches 12 L shipping damage 7 labels 31 storage 7 LED operation 37 length cable 21 T max. cable 24 token 23, 39, 43, 46 min. cable 24 local and remote control 53–54 display registers 46–47 M E electrical interference 20 environment 19 W wiring 20 MSTR function 40–43 inputs 41 outputs 41 multiplexer 21 © 1998–2000 Schneider Electric All Rights Reserved 57 91598103011102 W915981030111A02 ALTIVAR® 58 Adjustable Speed Drive Controllers MODBUS® PLUS Communication Option VW3A58302U Square D Company 8001 Highway 64 East Knightdale, NC 27545 1-888-SquareD (1-888-778-2733) www.SquareD.com Bulletin No. VVDED397044US R12/00 February 2001 Replaces VVDED397044US dated 9/98.