1
The Evolution of Printing and Scanning
Technology
When the personal computer was first developed in the late 1970s, many people thought that we’d
see the end of paper in the office. The rise of the PC was accompanied by a rise in the speed, print
quality, and overall performance of printers to help produce outputs of computer data. Thus, as personal computers enter their third decade, we realize that instead of abolishing paper, computers have
made it easier to produce more and more complex output ranging from the simple reports that were
the major use of the first dot-matrix printers to elaborate brochures and photos that might outlast the
life of the users who print them (let alone their computers!).
We’ve realized since the first PCs were developed in the late 1970s that the capability to produce a
printed version (often called a hard copy) of a document is a primary function of a PC, and that a PC
without access to a printer is only a shadow of the useful tool it can be. Printers and Internet access
have become the two required accessories for the modern computer at home or at work. Whether
connected directly to the computer or accessed via a network, printers are essential. Network access to
printers enables a single high-performance printer to serve many users, and printing can now take
place remotely via the Internet.
But what about the mounds of documents produced before the computer age, or produced in formats
that aren’t PC-friendly? Scanners, once a specialized device found only in the art department of major
companies, have made their way onto corporate and SOHO (small office, home office) desks alike.
Scanners enable printed text and image-based documents alike to be converted into digital form for
printout or storage. Because their use, features, and most common interfaces (parallel or USB) complement printers, they are also discussed in this chapter.
As you will learn in this chapter, one size cannot fit all when it comes to printers or scanners. With a
wide variety of technologies, features, speeds, intended tasks, and cost, you should be able to find a
printer or scanner that meets your needs—whether you are a corporate buyer looking for a single
device to serve a department, a “road warrior” looking for a portable unit, or a SOHO user looking for
the best bang for the buck. This chapter examines the underlying concepts of all printer and scanner
technologies, the basic types of printers and scanners available today and how they function, and
how to install and troubleshoot a printer or scanner on your PC.
Printer Technology
Three basic types of printer technologies are used with PCs, defined by the method in which the
image is produced on the paper. These three technologies are as follows:
■ Laser. Laser printers function by creating an electrostatic image of an entire page on a photosensitive drum with a laser beam. When an ultrafine colored powder called toner is applied to the
drum, it adheres only to the sensitized areas corresponding to the letters or images on the page.
The drum spins and is pressed against a sheet of paper, transferring the toner to the page and
creating the image. This technology is similar to that used by photocopiers, although differences do exist in the details of image transfer and in the internal temperatures of the units.
A similar technology is the LED printer pioneered by Okidata and also produced by Lexmark.
These printers replace the laser beam with a fixed array of light-emitting diodes (LEDs) for imaging but are otherwise similar in performance. See the section, “LED Page Printers,” later in this
chapter.
■ Inkjet. Inkjet printers, as their name implies, have tiny nozzles that spray specially formulated
ink onto a page. One method uses heated ink (as used by Canon’s BubbleJet line), and another
method uses piezo-electric print heads (as in Epson’s Stylus and Stylus Color line).
■ Dot matrix. Dot-matrix printers use an array of round-headed pins to press an inked ribbon
against a page. The pins are arranged in a rectangular grid (called a matrix); different combinations of pins form the various characters and images. A few non-impact printers also use a dotmatrix print head with heat-sensitive ribbons, but these printers are primarily for portable use.
Although dot-matrix printers are largely absent from today’s offices, they are still merrily
whizzing away in warehouses, stores, and other locations where their capability to print multipart forms is valued.
Note
A fourth option, daisywheel, which created fully formed characters similar to typewriting, was popular in law offices
during the early days of PCs but has been replaced by laser printers.
In general, laser printers provide the best quality output, followed closely by inkjet, with dot-matrix
printers coming in a distant third. Dot-matrix printers have become largely relegated to commercial
applications requiring continuous feed and multipart forms. Inkjet printers have become important
parts of SOHO (small office, home office) printing because of their high print quality (rivaling less
expensive lasers for text), color capabilities, versatility, and inclusion in many popular “all-in-one”
printer-scanner-fax units. In addition, high-end units increasingly are found in corporate offices and
graphic arts departments. Laser printers continue to be the best choice for text-based applications
because of their speed, print quality, and low cost per page.
Most printers use the same basic terminology to describe their features and capabilities. The following
sections examine some of this technology, how (or if) it applies to the various printer types, and what
you should look for when shopping for a printer.
Print Resolution
The term resolution is used to describe the sharpness and clarity of the printed output. All these
printer technologies create images by laying down a series of dots on the page. The size and number
of these dots determine the printer’s resolution and the quality of the output. If you look at a page of
text produced by a low-resolution dot-matrix printer, for example, the pattern of dots that forms the
individual characters is immediately obvious to the naked eye. This is because the dots are relatively
large and of a uniform size. On high-resolution laser printer output, however, the characters look
solid because the dots are much smaller and often can be of varying sizes.
Printer resolution is usually measured in dots per inch (dpi). This refers to the number of separate dots
the printer can produce in a straight line one inch long. Most printers function at the same resolution
both horizontally and vertically, so a specification such as 600dpi implies a 600-dot×600-dot one-inch
square. A 6666600dpi printer can therefore print 360,000 dots in a square inch of space. Some printers, however, specify different resolutions in each direction, such as 720×1,440dpi, which means the
printer can produce more than one million dots(!) in one square inch (1,036,800 dots to be precise).
Despite improvements in monitor resolution, printer resolution has increased far more. Thus, the resolution of a printed page continues to be far higher than that of a typical PC monitor. The word resolution is used to quantify PC video displays, too—usually in terms of the number of pixels, such as
800×600 or 1024×768. By print standards, however, the typical PC video display has a resolution of
only 72dpi–96dpi. By measuring the actual height and width of an image on your screen and comparing it to the image’s dimensions in pixels, you can determine the dpi for your display.
See Chapter 15, “Video Hardware,” for more information about video display resolution.
As a result, the claims of WYSIWYG (what you see is what you get) output by software and hardware
manufacturers are valid only in the roughest sense. Even the lowest-resolution inkjet or laser printers
produce output that is far superior to that of your screen display:
■ Current SOHO-market laser printers have resolutions that range from 600dpi to 1200dpi.
■ Current SOHO-market inkjet printers have resolutions that range from 600dpi (black ink) to as
high as 720×2,880dpi or 2400dpi for full-color photo printing with special papers.
Increasing Print Resolution
It might seem that 90,000 dots per square inch is an extraordinary amount of detail, but at 300dpi,
printed characters can have noticeably jagged diagonal lines. Two ways to improve the quality of the
printed output and eliminate the “jaggies” exist. One way is to increase the resolution, as seen in the
previous printer comparisons. By itself, 600dpi or higher resolution is sufficient to eliminate the obvious jaggedness in the print output. This reduction in jaggedness is the first benefit of improving resolution. Commercial offset printing (as used in the printing of this book, for example), by contrast,
usually runs from 1,200dpi to 2,400dpi; the difference between laser or inkjet printing and commercial printing is still a large one, but not nearly as large as in the days of 300dpi or lower printers.
A second benefit of improved print resolution is the effect that higher resolutions have on photographic reproduction. Higher resolutions enable laser and inkjet printers in particular to create more
detailed and finer-grained photo printouts. The newest photorealistic inkjet printers combine high
resolutions with smaller ink droplets and special color printing techniques to create prints that rival
snapshot quality when viewed from a short distance.
600dpi and above laser printers also achieve better photographic reproduction, but through different
means. A true halftone, as seen in a newspaper photograph, uses dots of various sizes to reproduce
gray levels. Early-model laser printers were incapable of varying the size of dots, so they divided the
image to be printed into a grid and placed groups of pixels into each square of the grid (known as a
halftone cell) to simulate the different-size dots of a true halftone. This method is still used today, and
the higher resolution enables them to use smaller halftone cells to simulate halftoning, thus producing better quality photo printing.
As you’ll see later, high printer resolutions for inkjet printers are also heavily media dependent; you
can’t get the best print quality unless you use paper or other media made for high-resolution printing.
Resolution Enhancement
The quality of the print output can also be increased without increasing the resolution by varying the
size of the dots. This technique was originated by Hewlett-Packard and is called Resolution
Enhancement Technology (RET). RET uses smaller dots to fill in the jagged edges created by larger dots.
Because the dots are so small, the cumulative effect to the naked eye is a straight diagonal line. Other
manufacturers have developed their own versions of this concept by using other names, such as edge
enhancement. This type of enhancement is possible only for laser and inkjet printers. Because dotmatrix printers produce images by having pins physically strike the page (through an inked ribbon),
they cannot use variable-size dots.
Inkjet printers use variable-size ink droplets during the dithering process, which produces colors—
such as orange—that must be mixed from the cyan, magenta, and yellow inks used by the printer.
The capability to mix colors and vary the size of droplets enables today’s best inkjet printers to come
incredibly close to photographic quality.
Interpolation
In addition, many printers produce higher-resolution output by means of a process called
interpolation. Printer resolution is not just a physical matter of how small the dots created by a laser or
an inkjet can be; a higher-resolution image also means that the printer must process more data. A
1,200dpi printer must process 1,440,000 dots per square inch, whereas a 600dpi printer processes only
360,000 dots per square inch.
In this example, the higher-resolution image, therefore, requires four times the memory of its lowerresolution counterpart and a great deal more processing and transfer time between the computer and
the printer. Some comparisons between printers would involve even greater differences in amounts of
data processed.
Interpolation uses algorithms to add pixels between the original pixel data; this is similar to the
process by which a scanner can produce scanned resolutions higher than its optical resolution supports. When used by printers, interpolation provides a smoother output because of the extra pixels
used in the image. Interpolation enables a printer designed to print at 600dpi to interpolate the image
to 1,200dpi, even though it lacks the required memory and processing power for true 1,200dpi output.
Although an interpolated 1,200dpi image is better than a 600dpi image without interpolation, a
printer that operates at a true 1,200dpi resolution should produce noticeably better output than an
interpolated 1,200dpi. In addition, it will probably cost somewhat more as well. It is important when
you evaluate printers that you check to see whether the resolution specified by the manufacturer is
interpolated. Also, because interpolation techniques don’t always improve printouts, the user can normally disable this option in the printer’s properties sheet.
Paper Quality
Whereas laser printers produce their images by fusing toner to the paper, inkjet printers place the ink
on top of the paper. Although many general-purpose papers supposedly suitable for laser, copier, and
inkjet printers are sold, using anything less than true inkjet paper degrades the actual print resolution.
This is because inkjet paper should be smoother than laser/copier paper and promote rapid drying of
ink. Paper that lacks these features has loose fibers that cause the ink to “wick,” causing a fuzzy
appearance to inkjet printing. Photorealistic printing at resolutions above 720dpi usually requires the
use of photo-quality paper that is heavy, very smooth, and very fast drying. Many users’ disappointments with inkjet print quality stem from improper paper choices or from incorrect matching of
paper with printer modes. To make printing easier, most inkjet printers today allow the user to select
a single paper type at print time. This option then selects the correct combination of resolution and
printing techniques necessary for a top-quality print job.
Dot-Matrix Print Quality
Dot-matrix printers are different from inkjet and laser printers in several fundamental ways. Most
importantly, dot-matrix printers do not process an entire page’s worth of data at a time like lasers do
or a line of information like inkjet printers do; instead, they work with streams of characters. The
print resolution of a dot-matrix printer is based not on its memory or its processing power, but rather
on its mechanical capabilities. The grid of dots a dot-matrix printer uses to create characters is not a
data set in a memory array or a pattern on a photosensitive drum; the grid is formed by a set of metal
pins that physically strike the page in various combinations. The resolution of the printer is therefore
determined by the quantity of its pins, which usually number either 9 or 24. Because it uses more
pins to create characters of the same size, a 24-pin printer has pins that are necessarily smaller than
those of a 9-pin printer, and the dots they create are smaller as well. As with the other printer types,
smaller dots result in fewer jagged edges to the printed characters and a better appearance to the
document overall. However, techniques such as resolution enhancement and interpolation do not
apply to dot-matrix technology, making the resolution of the printer a far less important statistic.
Beyond checking to see whether the printer has 9 or 24 pins, you will not see differences in print
quality that are the result of print resolution technology.
Instead, the freshness of the ribbon and the character set used by the printer are the biggest determinants of a dot-matrix printer’s print quality.
Note
Manufacturers once described 24-pin dot-matrix printers as producing “near letter quality” output. In an era of 600dpi
and higher-resolution laser and inkjet printers, “near letter quality” is no longer accurate. Dot-matrix printers still have their
place in the professional world, such as for printing multipart forms and carbon copies, but when it comes to printing letters and other general office documents, they lack the resolution necessary to produce a professional-looking product.
Although any dot-matrix printer is vulnerable to print head damage (the “pins” are actually fine wires), 24-pin dot-matrix
printers are particularly sensitive to incorrectly set head gaps and worn ribbons. These problems can cause the extra-fine
wires to break, resulting in gaps in the printing. When evaluating dot-matrix printers for heavy-duty printing, find out what
the replacement or repair costs of a print head will be.
Page Description Languages
Both laser and inkjet printers are known as page printers because they assemble an entire page in memory before committing it to paper; the laser printer assembles the page within its own memory,
whereas most inkjet printers use the computer’s memory to assemble the page. Some high-end printers have large memory buffers onboard, but these are used to receive the documents after assembly by
the computer. This is in contrast to dot-matrix printers, which are character-based. When your PC
communicates with a page printer, it does so using a specialized language called a page description language (PDL). A PDL is simply a means of coding every aspect of a printed document into a data stream
that can be transmitted to the printer. After the PDL code arrives at the printer, internal firmware converts the code to the pattern of dots that are printed on the page. Currently, two PDLs are in use
today that have become de facto standards in the computer industry: PCL and PostScript. These languages are discussed in the following sections.
Printers that do not support a PDL use escape code sequences to control the printer’s features in combination with standard ASCII text for the body of the document (see the section, “Escape Codes,”
later in this chapter). The printer driver loaded on your PC is responsible for producing print output
that is understood by your printer, whether it uses escape codes or a PDL. No matter what the source
of the document you are printing and no matter which format is used to store the original document,
the data must be converted into a PDL data stream or an ASCII text stream with escape codes to be
printed.
Regardless of the PDL or escape-code sequence method used by a printer, its capability to print a reasonable facsimile of what’s on your screen or in your document depends on using the correct PDL or
printer driver for your printer. Failing to switch to the new printer driver when you upgrade to a new
printer will cause your new printer to spit out garbage instead of useful printouts if it uses a PDL different from your old printer.
Printer Control Language
Printer Control Language (PCL) is a page description language developed by Hewlett-Packard for use
in its printers in the early 1980s. As a result of HP’s dominance in the printer market, PCL has become
a standard that is emulated by many other printer manufacturers. Apart from the actual text being
printed, PCL consists largely of commands designed to trigger various features and capabilities of the
printer. These commands fall into four categories:
■ Control codes. Standard ASCII codes that represent a function rather than a character, such as
Carriage Return (CR), Form Feed (FF), and Line Feed (LF).
■ PCL commands. Basically the same type of escape code sequences used by dot-matrix printers.
These commands comprise the majority of a PCL file’s control code and include printer-specific
equivalents to document parameters, such as page formatting and font selection.
■ HP-GL/2 (Hewlett-Packard Graphics Language) commands. Commands that are specific to the
printing of vector graphics as part of a compound document. An HP-GL/2 command consists of
a two-letter mnemonic that might be followed by one or more parameters that specify how the
printer should process the command.
■ PJL (Printer Job Language) commands. Enable the printer to communicate with the PC bidirectionally, exchange job status and printer identification information, and control the PDL the printer
should use for a specific job and other printer control panel functions. PJL commands are limited to job-level printer control and are not involved in the printing of individual documents.
PCL has evolved over the years as printer capabilities have improved. PCL versions 1 and 2 were used
by Hewlett-Packard inkjet and daisywheel impact printers in the early 1980s and could not be considered to be full-fledged page description languages. The first LaserJet printer released in 1984 used PCL
3, and the latest models contain PCL 6. Table 1 lists the various versions of PCL, the major capabilities
added to each new version, and the HP laser printer models that use them.
Table 1
Version
Hewlett-Packard Printer Control Language (PCL) Versions
Date
Models
Benefits
PCL 3
May 1984
LaserJet, LaserJet Plus
Full page formatting; vector graphics
PCL 4
Nov. 1985
LaserJet Series II
Added typefaces; downloadable
macros; support for larger bitmapped
fonts and graphics
PCL 4e
Sep. 1989
LaserJet IIP, IIP Plus
Compressed bitmap raster fonts;
images
PCL 5
Mar. 1990
LaserJet III, IIID, IIIP, IIIsi,
HP-GL/2
Scalable typefaces; outline fonts;
(vector) graphics
PCL 5e
Oct. 1992
LaserJet 4, 4M, 4L, 4ML,
4P, 4MP, 4 Plus, 4M Plus,
5P, 5MP, 5L, 5L-FS, 5Lxtra,
6L, 6Lxi, 6Lse, 6P, 6MP,
6Psi, 6Pse and newer
600dpi support; bidirectional
communication between printer and
PC; additional fonts for Microsoft
Windows
PCL 5c
Oct. 1994
Color LaserJet, Color
LaserJet 5, 5M, Color
LaserJet 4550
Color extensions
PCL 6
Apr. 1996
LaserJet 5, 5se, LaserJet 6,
6Pse, 6Psi, 6MP, 2200,
4050, 5000 series, and
newer
Redesigned, object-oriented graphics
handlers for faster printing and font
synthesis for better document fidelity
PCL XL
1996
LaserJet 6P, 6MP
Enhanced graphics commands;
multipage printing on one sheet;
watermark; smaller file sizes
Although PCL is wholly owned and developed by Hewlett-Packard, this company’s long-term dominance in the printer market has made it a de facto standard. Many other companies manufacture
printers that use PCL and often advertise these printers as being compatible with a specific HewlettPackard model.
Note
Most HP inkjet printers use stripped-down versions of PCL; see the particular printer’s documentation for information on
which PCL features it supports.
PostScript
PostScript is a page description language developed by Adobe that first introduced in the Apple
LaserWriter printer in 1985. PostScript possessed capabilities at its inception, such as scalable type and
vector graphics support, that were only added to PCL years later. For this reason, PostScript quickly
became and still remains the industry standard for desktop publishing and graphics work. Adobe
licenses the PostScript language to many printer manufacturers, including those that make the highresolution image setters used by service bureaus to produce camera-ready output for the offset printing processes used by newspaper, magazine, and book printers.
PostScript does not use escape code sequences like PCL does; it is more like a standard programming
language. PostScript is called an object-oriented language because the printer sends images to the
printer as geometrical objects rather than bitmaps. This means that to produce type using a particular
font, the printer driver specifies a font outline and a specific size. The font outline is a template for
the creation of the font’s characters at any size. The printer actually generates the images of the characters from the outline, rather than calling on a stored bitmap of each character at each size. This
type of image that is generated specifically for use on a particular page is called a vector graphic—as
opposed to a bitmap graphic, which arrives at the printer as a fully formed dot pattern. PCL did not
have the capability to print scalable type until version 5 was introduced in 1990.
When it comes to printing fonts, outlines simplify the process by enabling printers to be equipped
with more internal fonts that can be printed at any size. Bitmapped fonts, on the other hand, usually
must be downloaded to the printer from the PC. When graphic images are involved, the difference
between a vector-based object and a bitmap often can be seen in the printed output. Because a vector
image is actually generated inside the printer, its quality is based on the printer’s capabilities. Printing
a vector image on a 600dpi printer produces a much better quality product than printing the same
image on a 300dpi printer. A bitmap image, on the other hand, generates the same output on either
printer.
At first, modifications to the PostScript language were based on the evolving capabilities of the Apple
laser printers that were its primary outlet. These minor modifications eventually became numerous
enough for Adobe to release a new baseline version of the language called PostScript Level 2 in 1992.
The evolution continued, and PostScript 3, the most recent version of PostScript, was introduced in
1997. These updates improved the speed and performance of PostScript printers and accommodated
their physical changes, such as increased amounts of memory and added paper trays, but they did not
introduce revolutionary new features the way the PCL updates did. PostScript had its most powerful
features from the very beginning, and the succeeding revisions of the language remain backwardcompatible.
Note
PostScript provides the basis for the PDF (Portable Document Format) files you can create with Adobe Acrobat, and
PostScript level 3 can print PDF files directly, without the need for an application to process the print job.
For more information about PostScript’s standard and optional features and uses, see Adobe’s Web
site.
Note
For users who want to retrofit the graphics power of PostScript to an existing printer but cannot get a hardware upgrade,
many Raster Image Processing (RIP) programs are available that provide for PostScript imaging on common SOHO and
office laser and inkjet printers. These programs serve two purposes: They improve printed output, and they enable a user
with a low-cost color or monochrome inkjet or laser printer to use that printer as an accurate preview device for preparing
PostScript files for output by a high-end typesetter.
Leading low-cost RIPs for popular brands of inkjet printers include
■ Zenographic’s SuperPrint (www.zeno.com)
■ Iproof’s PowerRIP 2000 (www.iproofsystems.com)
■ Epson’s ESR-Stylus RIP Software driver (www.epson.com)
For other RIPs, see the comparison chart (a bit dated, but still useful) available at www.islandartcards.com/epson/
RIPcompare.html.
https://www.iproofsystems.com/forms/custorders.htm
PDL Support
When you are evaluating printers, the decision as to which PDL you want to use should be based primarily on your interaction with other parties, their documents, and their printers.
If you are concerned about printing for personal or company use only, you can either use a PCL-compatible or PostScript laser printer for text or use a high-quality color inkjet printer for color images. To
minimize the reformatting of documents you have already created, when you upgrade I’d recommend
that you upgrade to a later model of the same printer family if you are happy with the print quality
and features of your current printer. Because both PCL and PostScript are quite comparable in their
text-handling capabilities today, you will get excellent printed output with either type of PDL, or with
a high-quality inkjet printer using inkjet paper.
However, the situation is quite different if you are creating documents for use by others (such as prepress work for service bureaus or proofs for graphic designers). In these cases, PostScript rules. Because
PostScript is the dominant standard in the world of professional graphics, printing, and publishing,
you should create these types of documents with PostScript in mind.
You also might come across documents on the Internet and in other places that are provided in the
PostScript format. For a long time, a PostScript output file (usually with a PS extension) was the most
convenient, platform-independent format for distributing a document containing graphical content.
Any user with a PostScript printer, regardless of the computing platform, can simply copy a Postscript
(.PS) file to the printer and produce a hard copy of the document, including all the graphics and fonts
found in the original. Although the practice of releasing raw PostScript files is far less frequent now
that platform-independent formats, such as Adobe Acrobat (.PDF format), are available, this can still
be a valid reason for having a PostScript printer available or for using a PostScript interpreter (RIP)
with a non-PostScript printer (see the preceding note). Keep in mind, though, that a raw PostScript
file cannot be viewed. However, you can convert PostScript .PS files into Acrobat-compatible .PDF
files with the Aladdin Ghostscript program for Windows, Unix, VMS, Linux, MS-DOS, OS/2, and
Macintosh. For more information about Ghostscript, go to www.cs.wisc.edu/~ghost/.
Both PCL and PostScript are available in a variety of printers. The Macintosh printing platform is
designed around PostScript, which is standard equipment in all Apple’s laser printers. Obviously,
because Hewlett-Packard developed the PCL standard, all their printers use that PDL by default.
However, most of the HP laser printers are available in a version with PostScript as well. In addition,
most HP laser printers can accept a special add-on module that provides the printer with PostScript
support. Very few inkjet printer models contain a PostScript interpreter, and those few are normally
B-size (11”×17” paper) or larger units designed for graphic-arts prepress work.
Note
Different HP printers use different levels of PCL. You also should know that printers that nominally use the same level of PCL
might vary in their implementations of PCL commands. Search HP’s Web site for details about an HP printer model’s use of
PCL.
Many other manufacturers also use PCL or PostScript (or both), which they have either licensed from
HP or Adobe or emulated themselves for their printers. The question of whether a printer has genuine, licensed versions of its PDLs can be very important. Numerous instances have occurred throughout the history of these PDLs in which unauthorized or poorly emulated versions of PCL and
PostScript have been foisted on the public as the real thing. In the mid-1980s, the term “LaserJet Plus
Emulation” came to have as little meaning as “Hayes compatible” did for modems. Nowadays, most
of the PCL (usually version 5) emulations used in other manufacturers’ printers are quite good, but
PostScript is a far more complex language and is more difficult to emulate. You still can find discrepancies between an emulated version of a PDL and the real thing that result in visible differences in
the printed output.
Here again, the PDL emulation issue largely depends on your interactions with other users. If you
have a printer with an emulated version of PostScript and a printer driver that accurately addresses
that emulated printer firmware, it matters little if the language does not conform precisely to the
Adobe specifications. If you are sending your PostScript output to a service bureau for printing on an
image setter, however, the discrepancies between an emulated PostScript and the real thing can make
a vast difference.
Whenever possible, you should purchase a printer that uses the genuine PDL licensed from its creator.
A minimum of PCL 5 or PostScript Level 2 is preferable.
Many laser printers support both PCL and PostScript, and you should check to see how a printer handles mixed jobs using various PDLs. The best printers detect the PDL of each job as it arrives in the
printer and automatically switch to the appropriate language. If a printer does not have this feature,
you might have to send a command with each print job triggering the mode change. For a single user
on a standalone system, this is not much of a problem. For a printer connected to a network, knowing for sure the order in which jobs are printed is often difficult unless someone constantly monitors
the print queue. In addition, manual mode changes can be difficult to organize.
Escape Codes
Virtually all laser printers and most inkjet printers support at least one page description language, but
some printers (especially dot-matrix) do not, and in this case the printer driver usually communicates
with the printer using escape code sequences. Similar to the PCL commands described earlier, escape
codes are control sequences used to activate the features of a particular printer. Escape codes are so
named because the ASCII value for the Esc key (decimal 027) is used as the first character of the code
to signal to the printer that what follows is an instruction code and not a textual element of the document being printed.
On a dot-matrix printer, you might be able to select various resolutions, fonts, and speeds, depending
on the printer’s capabilities. The printer driver you install on your PC is designed to generate the
appropriate escape codes based on the options you specify in your application and your printer driver
configuration. If your printer driver cannot generate the codes you desire, you normally can set a particular font, size, and enhancement for an entire document through the printer’s control panel or
control software.
Escape codes are not as standardized as PDLs; you might see different printers use different codes for
the same function. Epson, for example, has long been a market leader in the dot-matrix printer industry, and its escape codes have come to be accepted by some other manufacturers. However, the acceptance of the codes has not been general enough for them to be called an industry standard.
Epson’s escape code standards are ESC/P for their older dot-matrix printers and ESC/P2 for newer dotmatrix printers and most inkjet printer models. ESC/P was the original Epson version and didn’t support built-in scalable fonts. ESC/P2 does support built-in scalable fonts found in Epson’s newer
dot-matrix and inkjet printers and works well with Windows 3.x and 9x/Me.
Host-Based/GDI
An increasing number of low-cost inkjet and laser printers don’t use either “classic” PDL (PostScript or
HP-PCL) but instead use the computer to render the page for printing. These printers are called hostbased printers. Some variations on host-based printing include printers that use the Windows GDI
(graphics device interface) engine to image the page (GDI printers) and Hewlett-Packard’s line of
Printing Performance Architecture (PPA) printers. In theory, these printers have some advantages:
■ Low cost. Because the computer has already rendered the page, the printer doesn’t need to
include a PDL, reducing the printer price.
■ Faster computer means faster printing. Because most of the printing work is being done by the
host computer, speeding up the computer by adding RAM, increasing processor speed, or using
IEEE-1284 bidirectional printer connections (EPP/ECP ports and cables) can improve printing
speed. In 1996 tests by PC Magazine, the improvements ranged from a modest 5% to 87%, with
complex images showing a bigger improvement than simple text-only print jobs.
■ Flexible architecture with PPA. Hewlett-Packard’s PPA, depending on the printer, might have virtually all printer functions performed in the computer (for economy) or might move some features into the printer (for performance).
Although host-based printing has its advantages, it also has several key disadvantages:
■ No direct connection equals no printing. Host-based printers must be tied directly to the host for
printing because all they do is produce the finished image. This “gotcha” becomes apparent
when your new SOHO or departmental network can’t print because the printers no longer have
a true host to work with. This affects both GDI-based printers and HP’s PPA product line. The
need for a host prevents these printers from working with network print servers, such as HP’s
JetDirect series. This also can be an issue with sharing a printer via peer networking.
■ Problems with printing from non-Windows applications. Depending on how the host-based printer
is designed, it might not be capable of printing from any operating system other than
Windows. Some printers can print from a “DOS box”—an MS-DOS session that runs within
Windows. The issue of support for increasingly popular operating systems, such as Linux, could
also be a big problem for some users.
■ Lower performance levels. Many vendors of host-based printers built these printers for casual
users. Although the print resolutions of a host-based printer might equal that of a printer with a
true PDL, print speeds are often slower.
The more flexible your printing needs, the less likely it is that a host-based printer can meet them. If
you plan to use nothing but Windows or Macintosh as an environment, a host-based printer might
suffice. Choose carefully.
Note
If you are looking for a printer that will work with both Windows and Linux, don’t buy anything until you check out the
Linux printer-compatibility database located at www.linuxprinting.org.
You’ll also find news about Linux printer support and links to leading Linux printer drivers, such as Ghostscript, stp, and
others.
You will find that host-based printers are more difficult to use with Linux than printers that use a true PDL.
Printer Memory
Printers have memory chips in them just as PCs do, and laser and inkjet printers usually have a
processor as well, making the printer a computer unto itself—albeit a highly specialized one. Printers
can use their internal memory for several purposes: as a buffer to hold print job data while it is being
fed to the actual print engine; as a workspace to hold data during the processing of images, fonts, and
commands; and as permanent and semipermanent storage for outline fonts and other data.
For a page printer (laser or LED), the amount of memory onboard is an extremely important gauge of
its capabilities. The printer must be capable of assembling a bitmap image of an entire page to print it,
and the graphic images and fonts that are used on that page all take up memory. Even vector graphics
and outline fonts must be processed into bitmaps before they can be printed. The larger the graphics
on the page and the more fonts used, the more memory is required. This is in addition to the memory necessary to store the PDL interpreter and the printer’s permanent fonts.
You might find that your printer has sufficient memory to print an average page of mixed text and
graphics but not enough to print a full-page graphic or a page with many fonts. The result of this
might be a graphic split in half over two pages (a problem sometimes referred to as guillotining), missing fonts, or even no output at all. Fortunately, most printers can accept additional memory to extend
their capabilities.
Expansion memory for printers can come in many forms. Some printers use standard memory modules, such as SIMMs or DIMMs, whereas others use proprietary designs you must purchase from the
manufacturer (at an inflated price, of course). As with a PC, extra memory installed in a printer is
almost never wasted. In addition to the capability of processing larger graphics and more fonts, printers might be capable of using extra memory to process the data for one page while printing another
and to buffer larger amounts of data received from the PC.
Tip
Because many laser printers use data-compression techniques to print graphics with a small amount of memory, some laser
printers print graphics-rich pages much more quickly after a memory upgrade. This is because the printer needs to spend
less time calculating whether the page will fit into memory and little or no time compressing the data to fit.
If you add memory to your laser printer, make sure you adjust the driver properties for the laser printer to reflect the additional memory so your software will take advantage of it. See your printer manual for details.
A printer with additional memory can accept more data from the PC at one time. Depending on your
PC’s operating system and its printer driver configuration, this can result in a noticeable difference in
your system’s performance. When you print a document in a DOS application, you cannot proceed
with your work (in most cases) until the entire print job has been transmitted to the printer.
Multitasking operating systems, such as Windows 9x/Me/2000, usually can print in the background,
enabling work to proceed as the PC processes the print job. However, performance still might suffer
until the print job is completed. The larger the printer’s memory buffer, the faster the print job data
leaves the PC, returning the PC to its normal operation.
Simply learning how much memory is installed in the printer you plan to buy is insufficient to make
an intelligent purchasing decision. You also must be aware of how much memory is used by the PDLs
and resident fonts and how much is left free for print job data. Different PDLs, page sizes, and resolutions require different amounts of memory. As an example, for a 300dpi letter size (8 1/2”×11”)
printer using PCL, 12MB is a great deal of memory. For a 600dpi tabloid size (11”×17”) PostScript
printer, it is barely enough. Check with the printer manufacturer and the application software developer for memory guidelines, but keep in mind that one of the best upgrades for a laser printer—as
well as for a computer—is more RAM.
The SIMM module sockets on some printers, notably some HP LaserJet models, can be used for more
than memory expansion. HP offers PostScript upgrades for certain models that are packaged as a
SIMM.
Note
The issue of memory expansion is applicable primarily to page printers such as lasers. Most dot-matrix and inkjet printers
receive data from the PC as a stream of ASCII characters, and because they do not have to assemble an entire page at
a time, they can maintain a much smaller buffer, usually only a few kilobytes. Even graphic images are processed by the
PC and transmitted to the printer as a bit stream, so augmenting a dot-matrix printer’s memory is rarely possible.
Some large-format inkjet printers, such as HP’s DesignJet and Epson’s Stylus Pro 5000 series, offer memory expansion for
holding multiple-copy print jobs, but this is uncommon on normal SOHO and office inkjet printers using letter-size paper.
Fonts
Fonts are one of the most commonly used and most entertaining printer features. Having quality
fonts and using them correctly can make the difference between a professional-looking document and
an amateurish one. The term font refers to a particular typeface in a particular typestyle at a particular
size. A typeface is a design for a set of alphanumeric characters in which the letters, numbers, and
symbols all work well together to form an attractive and readable presentation. Thousands of typefaces are available, with many new designs being produced all the time. Some basic typefaces included
with the Windows operating systems are Times New Roman, Arial, and Courier. A typestyle is a variation on a typeface, such as bold or italic. A typeface might have only one style, or it might have a
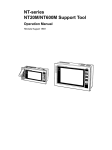
dozen or more. You can compare various typefaces to each other on a Windows PC by opening the
\Windows\Fonts folder and opening two or more typefaces. Each typeface appears in a preview window (see Figure 1).
Typefaces often are classified by characteristics they have in common. For example, Times New
Roman is known as a serif typeface because all its characters have little decorative strokes that are
known as serifs. A typeface such as Arial, which lacks these strokes, is called a sans-serif typeface.
Frequently, sans-serif typefaces include an oblique rather than a true italic typestyle. Courier is called
a monospaced typeface because all its letters occupy the same width on the page, as on a typewriter. In
contrast, Arial and Times New Roman are both proportional typefaces because the characters are
designed to fit together based on their widths. The letter i in a proportional typeface occupies less
horizontal space on the page than the letter w, as seen in Figure 1.
Figure 1 Examples of previewing three TrueType scalable typefaces: monospaced (Century Schoolbook
Monospace BT; upper left), sans-serif (Lucida Sans Regular; lower center), and serif (Bookman Old Style;
upper right).
Technically, the term font refers to a typeface at a particular size, usually measured in points (72
points equals one inch). 10-point Courier and 12-point Courier would be considered two separate
fonts. This is because in traditional printing and in the first PC printers, each size of a particular typeface was a separate entity. On an old-time printing press, each character on a page was printed by a
separate wood or metal slug that would be pressed against the paper to make an impression. Slugs of
different sizes were needed to produce different sized characters. In the same way, printers originally
used bitmaps to create type. In this printing technique, every character of a typeface exists as a separate pattern of dots ready to be sent to the printer. In essence, each character existed as an individual,
tiny graphic. To print the same typeface at various sizes requires individual graphics for each size.
These are called bitmap fonts.
Today, printers nearly always use scalable fonts. This is a technology in which a typeface requires only
a single outline for each character to produce type of any size. The printer retains the outline in memory and generates bitmaps of the text characters at the size required for each job. The bitmaps are
stored in a temporary font cache, but only for the duration of the job. The printer also can rotate a
scalable font to any angle, whereas bitmaps can be rotated only in 90° increments. Outline fonts take
up less memory space in the printer and provide a wider range of variations for each typeface. Also,
because they use what amounts to a vector graphic technology, scalable fonts can take advantage of
the printer’s full resolution, whereas bitmap fonts look the same at any resolution. The drawback to
scalable fonts is that they require more processing power from the print engine, but when compared
to the advantages they offer, this is a small sacrifice.
Note
Although bitmap fonts are seldom used any longer for normal business documents, some professionals prefer them for certain high-resolution printing tasks because they can be customized to suit a particular need. Bitmap fonts are also sometimes used by graphical operating systems for screen displays because scalable fonts do not look good at the low
resolution of the typical monitor; Windows 9x, for example, uses the MS Sans Serif bitmap font in various sizes for its
menus and onscreen icon displays. However, a technology called antialiasing, which uses pixels of varying shades of
gray (instead of just black and white) to smooth out jagged lines, has largely replaced the use of bitmap fonts on screen
displays for text entry. Popularized by Adobe Type Manager (with Type 1 fonts), antialiasing has become more widespread for Windows users thanks to the font smoothing features in the Microsoft Plus! add-on for Windows 95 and the
built-in font smoothing in Windows 98 and Me.
Because antialiasing occasionally can cause problems due to incompatibilities with a few display drivers, it can be turned
off.
As a result of this evolution in technology, the terms font and typeface have come to be confused. In
the old days, when you purchased a typeface, you would receive the same character set in a variety of
sizes, with each size being called a font. Today, when you purchase a typeface, you receive only a single outline font that your printer can scale to any size; depending on the vendor, you typically get the
font in several typestyles, such as Roman, Bold, Italic, and Bold Italic.
Before TrueType scalable fonts were common, bitmap fonts were commonly used on laser printers.
Many LaserJet and compatible printers, such as the HP LaserJet II and LaserJet III, were designed to
handle removable font cartridges. Virtually all laser printers also could use bitmap fonts on a disk that
needed to be downloaded to the laser printer’s memory.
Today, scalable type is all but universal, and although printers usually are equipped with a selection of
font outlines permanently stored in memory, this is more for reasons of speed and convenience than
necessity. The printer driver on your PC can automatically download font outlines to the printer as
needed or generate scalable type just as your printer can. Technologies such as the TrueType fonts
found on both Windows and Macintosh systems can provide you with access to hundreds of typefaces in many styles and at almost any size. Another benefit of scalable type is that a TrueType font
can be used on any printer that supports graphics, not just laser printers. Thus, laser, LED page, and
inkjet printers can print a document using the same TrueType fonts and produce pages that look very
similar.
See “Driver Problems”
Although all outline fonts function in basically the same way, various types of scalable fonts are available. PostScript was the original scalable font technology, and Adobe has built up a library of typefaces over the years that is without peer in the digital type industry. Most PostScript printers are
equipped with a collection of 39 or more basic fonts stored internally, but you can choose from thousands of others by browsing Adobe’s online services or its Type On Call CD-ROM. In either case, after
you purchase these PostScript Type 1 font outlines, you install them on your computer along with a
utility called Adobe Type Manager, which is responsible for downloading the appropriate font outlines
to your printer as necessary. PostScript Type 3 font outlines were once widely used, but they produce
poor results and should be avoided. Type 3 outlines lack the “hinting” necessary to getting topquality results from a single font outline at any size. This “hinting” feature is used by Type 1 and
TrueType fonts.
Note
Adobe Type Manager also can be used with non-PostScript printers, allowing laser and inkjet printers to access the wide
world of Type 1 fonts.
The other major scalable font technology in use today is TrueType. Developed about six years after
PostScript, TrueType is the result of a joint project between Apple and Microsoft. Both companies
wanted to integrate a PostScript-style scalable font engine into their respective operating systems, but
neither of them wanted to delegate the control over an important element of their OS to a third-party
company, such as Adobe. Microsoft Windows versions 9x, Me, and 2000 make viewing your existing
TrueType fonts and comparing fonts to each other easy by using the Windows Explorer’s special
menus in the Fonts folder, as previously seen in Figure 1.
Although substantial technical differences exist in the way their font outlines are created, PostScript
and TrueType function in much the same way. The primary advantage of TrueType is that it is already
integrated into the Windows and Macintosh operating systems and does not require external software, such as Adobe Type Manager. Most type foundries now produce their fonts in both PostScript
Type 1 and TrueType versions, and any difference between the two in the final product is usually
quite difficult to spot.
As with PostScript, many printers include an internal collection of TrueType fonts that the operating
system makes available to your applications. You should consider the number of fonts supplied with
your printer primarily as a bonus when you evaluate various products. Any typeface provided as an
internal TrueType font in your printer can just as easily be produced using a software version,
although you might have to purchase it separately.
Note
Thousands of TrueType and PostScript Type 1 fonts are available today at a wide range of prices. Many fonts are available free for the downloading from the Internet or on bargain CD-ROMs, whereas others (such as those offered by
Adobe) are quite expensive by comparison. Be aware that profound differences can exist in the quality of these fonts, and
although it is not always true that more expensive is better, a great many more cheap bad fonts exist than expensive bad
fonts.
Before you decide you need to buy new fonts, take a look at the fonts bundled with office suites and graphics programs.
If you didn’t install these fonts when you installed the program, look at the font samples with the documentation. You might
find that you already have all the fonts you need (And then some!).
Printer Drivers
As with many peripherals, printers are highly reliant on a driver installed on the PC. The printer driver provides the software interface between the printer and your application or operating system. The
primary function of the driver is to inform the PC about the capabilities of the printer, such as the
PDLs it uses, the types of paper it handles, and the fonts installed. When you print a document in an
application, the print options you select are supplied by the printer driver, although they appear to be
part of the application.
In DOS, printer drivers were integrated into individual applications. A few major software packages,
such as WordPerfect 5.x, provided drivers for a full range of printers, but most included only a few
generic drivers. If you still use DOS applications, you’ll find that driver development for printers was
discontinued years ago for most programs. At times like these, the best thing to do is to select a driver
that supports the same PDL revision as your printer. For example, a LaserJet III driver uses PCL 5,
which will support almost all subsequent LaserJet models, even if it does not use all the printer’s features. A DOS application that doesn’t have a driver for your exact printer model quite possibly might
not be capable of taking advantage of all your printer’s capabilities. However, the ability to print at all
from your old DOS application might well outweigh the lack of support for special features.
In all versions of Windows, you install the printer driver as part of the operating system, not in the
individual applications. The Windows product includes drivers for a range of printers, and individual
drivers are almost always available from the printer manufacturer’s online services. Note that the
drivers included with Windows are usually developed by the manufacturer of the printer—not by
Microsoft—and are included in the Windows package for the sake of convenience.
Although the printer manufacturer develops the drivers for any printer model used with Windows,
significant differences might exist between the printer drivers included with Windows and those
shipped with the printer or available online. Drivers included with Windows normally provide access
to a printer’s basic features, whereas the enhanced drivers provided by the manufacturer on CD-ROMs
included with the printer or via download might include deluxe color-matching, enhanced spooling,
improved dialog boxes, or other benefits. Be sure to try both types of drivers to see which one works
best for you. Check the printer manufacturer’s Web site for the latest version of the driver. Note that
in some cases, printer manufacturers no longer support older printers with enhanced drivers, forcing
you to use the ones supplied with Windows.
Before you try to use an older inkjet printer in particular with the newest versions of Windows (Me
and 2000), make sure drivers are available. Whereas Windows Me can use most Windows 9x drivers
for devices, Windows 2000 requires its own native drivers. Many relatively recent inkjet printers are
not supported by Windows 2000 drivers, which means you must look for a newer printer. Fortunately,
printer performance keeps increasing, even as printer prices drop, so replacing a desktop inkjet printer
isn’t a major expense—although it can be a major annoyance.
PostScript Printer Descriptions
Whereas printers that use PCL or escape sequences all have completely separate Windows drivers,
PostScript printers use a single generic driver to support the PDL. For all versions of Windows, this
driver is called PSCRIPT.DRV. To support the various capabilities of individual printers, the driver uses
plug-in modules called PostScript Printer Descriptions (PPDs). The PPD provides information on the
specific mechanical capabilities of the printer, such as paper trays and sizes, whereas the language support is provided by the PostScript driver. To support multiple PostScript printers in Windows, you
install additional PPDs to the existing driver architecture.
In addition to the module included with Windows, a PostScript driver called AdobePS also is freely
available from Adobe, the owners of the PostScript language. If you have a printer that uses true
Adobe PostScript, this driver is recommended because it provides more complete support for the language and all its capabilities. Although the PostScript driver is provided by Microsoft or Adobe, you
typically obtain new PPDs from the manufacturer of your printer.
How Printers Operate
Each of the three main printer types uses a different method to create images on a page, as well as a
different substance: powdered toner, liquid ink, or a fabric ribbon. The following sections examine
how each type of printer creates images on the page.
Laser Printers
The process of printing a document on a laser printer consists of the following stages:
■ Communications
■ Processing
■ Formatting
■ Rasterizing
■ Laser scanning
■ Toner application
■ Toner fusing
Various printers perform these procedures in various ways, but the steps are fundamentally the same.
Less expensive printers, for example, might rely on the PC to perform more of the processing tasks,
whereas others have the internal hardware to do the processing themselves.
Communications
The first step in the printing process is to get the print job data from the PC to the printer. PCs traditionally use the parallel port to communicate with a printer, although many printers can use a serial
port. Some devices can even use both types of ports at the same time to connect to two computers.
Network printers often bypass these ports entirely and use an internal Ethernet adapter to connect
directly to the network cable. The newest SOHO and office printers offer USB connections, either as
their only port or along with a parallel port.
Communications between the printer and the PC obviously consist largely of print job data sent from
the computer to the printer. However, communications flow in the other direction, as well. The
printer also sends signals back to the PC for the purpose of flow control—that is, to inform the computer when to stop sending data and when to resume. These signals also can indicate error conditions, such as paper out. The printer typically has an internal memory buffer that is smaller than the
average print job and can handle only certain amount of data at a time. As pages are actually printed,
the printer purges data from its buffer and signals the PC to continue transmitting. This is commonly
called handshaking. The handshaking protocols used for this communication depend on the port used
to connect the printer to the PC.
The amount of data a printer can hold varies widely, and you read earlier in this chapter how you
often can enlarge the buffer by installing additional memory. Some printers even contain internal
hard disk drives and can store large amounts of print data and collections of fonts. The process of
temporarily storing multiple print jobs as they await processing is known as print spooling. Spooling
can also take place in the computer or on the network, using the client PC or the print server’s hard
drive to store print jobs.
Almost all printers today support even more advanced communications with a PC, enabling a user to
interrogate the printer for its current status using a software application and even to configure parameters that previously were accessible only from the control panel on the printer. This type of communication requires that the PC have a bidirectional, an ECP, or an EPP port and the appropriate
cable IEEE-1284 parallel cable or be connected via the USB port. If the printer is shared through a
switchbox, the extension cables and switchbox must also be IEEE-1284 compliant. Bidirectional
modes enable the printer to transmit more advanced status information, such as ink levels, toner
levels, and error messages.
Note
If you are not getting ink or toner level messages or other status reports from a parallel printer that is supposed to provide
this information, check the following:
■ Make sure that EPP or ECP support (check printer documentation for which to use) is enabled in the port setup.
On most systems, the parallel port is controlled through the system BIOS. Restart your computer and enter the
system BIOS to verify that the correct setting is present.
■ Make sure you are using an IEEE-1284 parallel printer cable. Many inexpensive cables still sold in stores do not
support IEEE-1284 modes, such as EPP and ECP, and leftover cables you previously used with a dot-matrix or
other printer probably don’t either. Some printers come bundled with an IEEE-1284 cable, but if you must buy
one, expect to pay $10–$30 for one, depending on brand and length. I recommend the 10-foot cable because
it gives you more flexibility than the 6-foot cable for printer placement.
Processing
After the printer receives the data from the PC, it begins the process of interpreting the code. Most
laser printers are really computers in themselves, containing a microprocessor and a memory array
that functions much like the equivalent components in your PC. This part of the printer is often
called the controller or the interpreter and includes the firmware supporting the page description languages the printer uses.
The first step of the interpretation process is the examination of the incoming data to distinguish the
control commands from the actual content of the document. The printer’s processor reads the code
and evaluates the commands it finds, organizing those that are to be part of the formatting process
and executing others that require physical adjustments to the printer configuration, such as paper
tray selection and simplex (single-sided) or duplex (double-sided) printing. Some printers also convert
the document formatting commands into a specialized code that streamlines the formatting process
to come, whereas others leave these commands in their raw form.
Note
A common error after changing printers is failing to set the new printer as the default printer. This often leads to sending
the wrong printer commands to the new printer, resulting in many sheets of paper covered with gibberish because the
printer doesn’t understand the (incorrect) commands being sent to it. This is also a concern when using a two-printer-to-onePC switchbox. You must switch the box to use the correct printer and use the correct printer driver to send the document to
avoid garbage printing.
Formatting
The formatting phase of the data interpretation process involves the interpretation of the commands
that dictate how the content is to be placed on the page. Again, this is a process that can differ
depending on the processing capabilities of the printer. With low-end printers, the PC does much of
the formatting, sending highly specific instructions to the printer that describe the exact placement of
every character on the page. More capable printers perform these formatting tasks themselves, and
you might be surprised to find just how much work your printer does in this respect.
Your application might display your document in a WYSIWYG format that looks very similar to the
printed output, but this is not necessarily how the printer driver sends the document data to the
printer. In most cases, the printer actually lays out the document all over again by interpreting a
series of commands that dictate parameters such as the paper size, the location of the margins, and
the line spacing. The controller then places the text and graphics on the page within these guidelines,
often performing complex procedures, such as text justification within the printer.
The formatting process also includes the processing of outline fonts and vector graphics to convert
them into bitmaps. In response to a command specifying the use of a particular font at a particular
size, for example, the controller accesses the font outline and generates a set of character bitmaps at
the correct size. These bitmaps are stored in a temporary font cache where the controller can access
them as needed while laying out the text on the page.
Rasterizing
The result of the formatting process is a detailed set of commands defining the exact placement of
every character and graphic on each page of the document. In the final stage of the data interpretation process, the controller processes the formatting commands to produce the pattern of tiny dots
that will be applied to the page. This process is called rasterization. The array of dots typically is stored
in a page buffer while it awaits the actual printing process.
The efficiency of this buffering process depends on the amount of memory in the printer and the resolution of the print job. On a monochrome printer, each dot requires 1 bit of memory, so a letter-size
page at 300dpi requires 1,051,875 bytes of memory {[(8 1/2×11)×3002]/8}, or just over 1MB. At 600dpi,
the memory requirement jumps to 4,207,500 bytes—more than 4MB. Some printers have sufficient
memory to buffer an entire page while the formatting of the next page proceeds. Others might lack
enough memory to store even one full page and use what are called band buffers instead.
Printers that use band buffers divide a page into several horizontal strips, or bands. The controller rasterizes one band’s worth of data at a time and sends it to the print engine, clearing the buffer for the
next band. This way, the printer can process a page gradually, with the entire array coming together
only on the photosensitive drum in the print engine. The band buffer method is cheaper than a fullpage buffer because it uses less memory, but it is also slower and more prone to errors. In recent years,
the price of memory has dropped so much that band buffers are rarely used in laser printers.
Band buffers are used primarily by inkjet printers, which convert each line of text or graphics into a
band.
Tip
Some printer drivers enable you to control whether graphics are sent to the printer in vector or raster form. In general, vector graphics provide better speed, but if you experience problems with the placement of the graphics on the page, you
can switch to the raster option. Most printer drivers that offer this feature place the control on the Graphics page of the
printer’s Properties dialog box. However, some drivers might place the control elsewhere or not provide it at all.
A common reason for switching to raster graphics is when a multilayer graphic doesn’t print properly. This can be a problem with PCL 5 laser printers and some presentation programs, such as Microsoft PowerPoint or Lotus Freelance Graphics.
Laser Scanning
After the rasterized image of a page is created by the controller and stored in memory, the processing
of that page passes to the print engine, the physical part of the printing process. Print engine is a collective term used to refer to the actual imaging technology in the printer, including the laser scanning
assembly, the photoreceptor, the toner container, the developer unit, the corotrons, the discharge
lamp, the fuser, and the paper transport mechanisms. These components often are treated as a collective unit because the print engine is essentially the same hardware that is used in copy machines.
Most printer manufacturers build their products around a print engine they obtain from another
manufacturer, such as Canon. A PC printer differs from a copy machine primarily in its data-acquisition and processing procedures. A copier has a built-in scanner, whereas a printer receives and
processes digital data from the PC. After the raster image reaches the print engine, however, the procedure that produces the actual document is very similar.
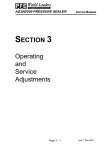
Figure 2 illustrates the laser writing process.
Rotating mirror
Laser beam
Laser beam (writes page to drum
by discharging portions of drum surface)
ABC
Laser
Developer (spreads toner
across drum)
Charger corotron (corona wire)
(applies charge to drum)
Toner
Drum
Discharge lamp (erases drum surface)
Paper
C
B
A
Transfer corotron
(transfer corona)
(applies charge to paper)
Figure 2
Detrac
corotron
(cancels charge
on paper)
Fuser rollers (melts toner to paper)
The stages of laser imaging with a typical laser printer are shown here.
The laser assembly in a laser printer, sometimes called a raster output scanner (ROS), is used to create
an electrostatic pattern of dots on a photosensitive drum (called the photoreceptor) that corresponds
to the image stored in the page buffer. The laser assembly consists of the laser, a rotating mirror, and a
lens. The laser always remains stationary. To create the pattern of dots across the horizontal width of
the drum, the mirror rotates laterally, and the lens adjusts to focus the beam so the dots on the outer
edges of the drum are not distorted by having been farther from the light source. The vertical motion
is provided by the slow and steady turning of the drum.
Caution
Because the drum is sensitive to any form of light, it should not be exposed to room light or daylight for extended periods
of time. Some printers have a protective mechanism that shields the drum from exposure to light whenever you open the
printer’s service compartment. Even when this is the case, however, you should leave the compartment open only long
enough to service the printer or change the toner cartridge.
The photoreceptor drum, which in some printers might actually be a belt, is coated with a smooth
material that holds an electrostatic charge that can be discharged on specific areas of its surface by
exposure to light. The initial charge over the entire surface of the drum can be applied by either a
charger corotron or conditioning rollers. A corotron is a wire carrying a very high voltage that causes the
air immediately around it to ionize. This ionization charges the drum’s surface and also produces
ozone, the source of the smell that is characteristic of laser printers. Most recent laser printers use
charged rollers instead of corotrons specifically to avoid the production of ozone.
Note
Some laser printer manufacturers, such as HP, refer to coronas instead of corotrons. They perform the same functions.
Caution
Ozone is a noxious and corrosive gas that should be avoided in closed, unventilated spaces. Although ozone is used to
deodorize air and purify water, working in close proximity to laser printers for extended periods of time without a sufficient
fresh air supply can cause health problems.
Many laser printers have replaceable ozone filters that should be changed after several thousand pages have been
printed. Check your printer documentation to determine when the ozone filter should be changed. Use the self-test feature
on the printer to print a page showing the number of pages the printer has produced to help you determine how many
more pages you can print before you change the filter (or if you’re overdue).
HP’s Web site has detailed information on which of its laser printers require ozone filter changes and the relevant part
numbers.
The drum is sensitive to any type of light, but a laser can produce fine enough dots to support the
high resolutions required for professional-looking documents. Every spot the laser light touches on
the drum is electrically discharged, leaving the pattern of the page’s characters and images on its surface. The laser in a printer discharges the areas of the drum corresponding to the black parts of the
page—that is, the characters and images that comprise the document’s content. This is known as
write-black printing. By contrast, copiers discharge the background areas of the page—a process called
write-white printing.
Toner Application
As the photoreceptor drum rotates, the portion of its surface the laser has discharged next passes by
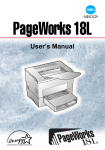
the developer unit (see Figure 3). The developer is a roller coated with fine magnetic particles that
function as a “brush” for the toner. Toner is an extremely fine, black plastic powder that actually
forms the image on the printed page. As the developer roller rotates, it passes by the toner container
and picks up an even coating of the particles on its magnetic surface. This same developer roller is
also located right next to the photoreceptor drum. When its surface passes by the roller, the toner particles are attracted to the areas that have been discharged by the laser, thus forming the image of the
page on the drum using the toner particles as a color medium.
As the drum continues its slow rotation, it next passes close to the surface of the paper. The printer
has an entirely separate mechanism for extracting one sheet of paper at a time from the supply tray
and passing it through the print engine so that its flat surface passes underneath the drum (without
actually touching it) at the same speed that the drum is rotating. Beneath the sheet of paper is
another corotron (called the transfer corotron) that charges the paper, causing it to attract the toner
particles from the drum in the exact pattern of the document image. After the toner is transferred to
the page, the continued rotation of the drum causes it to pass by a discharge lamp (usually a row of
LEDs) that “erases” the image of the page by completely discharging the surface of the drum. By this
time, the drum has completed a full revolution, and the entire charging and discharging process can
begin again for the next page of the document.
As you might imagine, these processes leave little margin for error when it comes to the proximity of
the components involved. The drum must pass very close to the corotrons, the developer roller, and
the paper surface for the toner to be applied properly. For this reason, many print engines (including
Canon and HP) combine these components into a single integrated cartridge that you replace every
time you replenish the printer’s toner supply. This increases the price of the toner cartridge, but it also
enables you to easily replace the most sensitive parts of the printer on a regular basis, thus keeping
the printer in good repair.
Laser Scanning Unit
Charge corotron
Discharge
lamp
Laser
beam
Toner
hopper
Toner
Photoreceptor
Developer
roller
Fuser
Paper
Transfer
corotron
Detrac
corotron
Figure 3 A laser printer’s print engine largely revolves around a photoreceptor drum that receives the document image from the laser and applies it to the page as it slowly rotates.
Toner Fusing
After the toner is transferred from the photoreceptor drum to the page, the page continues its journey
through the printer by passing over yet another corotron, called the detrac corotron. This corotron
essentially cancels the charge that was originally applied by the transfer corotron just before the application of the toner. This is necessary because an electrostatically charged piece of paper tends to stick
to anything it contacts, such as the printer’s paper handling rollers or other pieces of paper.
At this point in the printing process, you have a sheet of paper with toner sitting on it in the pattern
of the printed page. The toner is still in its powdered form, and because the page is no longer statically charged, nothing is holding it in place except gravity. A slight breeze or tremor can ruin the
image at this point. To permanently fuse the toner to the page, it passes through a pair of rollers
heated to 400° Fahrenheit or more (see Figure 4). This heat causes the plastic toner particles to melt
and adhere to the fibers of the paper. At this point, the printing process is complete, and the page
exits the printer. It is the nature of the toner and the fusing process that causes the characters of a
laser-printed document to have a raised feel and appearance to them that is very attractive, whereas
an inked page feels perfectly flat.
Upper Teflon Roller
Heater Halogen
Toner applied in
powder form
Lower Pressure Roller
Figure 4 Laser printing produces an attractive “embossed” appearance because the toner is fused to the
surface of the paper. Extremely rough paper can cause imaging problems, although laser printers can handle
many more types of paper than inkjet printers can.
LED Page Printers
LED page printers, pioneered by Okidata and produced by Okidata and Lexmark, represent an excellent alternative to a “true” laser printer. Both technologies use a rotating drum and copier-like fusing
mechanism to create high-quality printing. The difference is that LED page printers use an LED (lightemitting diode) array, rather than a laser beam, to place the image data on the imaging drum (see
Figure 5). This difference in imaging provides three advantages:
■ A straight-through paper path
■ A longer warranty on the print head compared to laser printers
■ Faster color printing because all colors can be placed in a single pass, compared to the four-pass
method that must be used by color laser printers (one color per pass)
LED array
Focusing lens
ir:
ar S
Toner
De
Rotating
drum
Figure 5
LED printers use a light-emitting diode array to place the image on the imaging drum.
From the standpoint of print quality and speed, LED page printers produce quality comparable to
similar laser printers. In essence, LED page printers are “laserless laser printers.”
Note
Whether you print black or white text or graphics with a typical LED page or laser printer, similarly rated printers produce
an identical page at about the same time. The same is not true for color, however. Why?
LED page printers are capable of printing all four colors in a single pass of the drum. Laser printers, on the other hand,
must apply cyan, yellow, magenta, and black colors with separate passes. After the first color is applied, the paper
passes through the mechanism again for the second color, and so forth. Thus, a color LED page printer has the same maximum speed rating for both color and black-and-white printing, whereas laser-based color printers print black four times
faster than color pages because only one pass is required for black.
Inkjet Printers
The data interpretation stages of the inkjet printing process are fundamentally similar to those of a
laser printer. The main difference is that, because many inkjets tend to occupy the low end of the
printer market, they are less likely to have the powerful processors and large amounts of memory
found in lasers. You are therefore likely to find more inkjet printers on the market with relatively
small memory buffers that rely on the PC for the majority of their processing activities. These printers
can print graphics using band buffers instead of full-page buffers. Higher-end inkjets, however, can
have virtually the same processing capabilities and memory capacities as laser printers. Because most
low-end inkjet printers rely on the computer for much of the processing, slow computers are likely to
print pages more slowly with a given printer than a faster computer will.
The primary difference between an inkjet printer and a laser printer, however, is the way the image is
applied to the page. Inkjet printing technology is far simpler than laser printing, requires fewer and
less expensive parts, uses less power, and takes up much less space. Instead of an elaborate process by
which toner is applied to a drum and then transferred from the drum to the page, inkjet printers use
tiny nozzles to spray liquid ink directly onto the paper in the same dot patterns used by laser printers.
Inkjet printers print one band of text and graphic data at a time as the printer receives it, as opposed
to the page-oriented laser and LED printer, which must receive the entire page before printing. For
these reasons, inkjet technology is more easily adapted for use in portable printers.
Two basic types of inkjet printing are in use today: thermal and piezo (discussed in the following sections). These terms describe the technology used to force the ink out of the cartridge through the nozzles. The inkjet cartridge typically consists of a reservoir for the liquid ink and the tiny (as small as
one micron) nozzles through which the ink is expelled onto the page. The number of nozzles is
dependent on the printer’s resolution; configurations using anywhere from 21 to 256 nozzles per
color are common. Some printers provide more nozzles in their black-printing cartridges to improve
printing speed. Color inkjet printers use four or more reservoirs with different color inks (cyan,
magenta, yellow, and black are the most common; light cyan and light magenta are added for sixcolor printing by some printers for better photo quality). By mixing the different-colored inks, the
printer can produce virtually any color. (Most inkjets use one replaceable cartridge to hold the reservoirs for the three basic colors: cyan, magenta, and yellow.)
Thermal Inkjet Printing
Thermal inkjet printers function by superheating the ink in the cartridge to approximately 400°. This
causes vapor bubbles to form inside the cartridge and rise to the top of the reservoir. The pressure
from the vapor forces ink out of the cartridge through the nozzles in tiny droplets that form the dots
on the page. The vacuum caused by the expelled ink draws more ink down into the nozzles, making a
constant stream of droplets as needed.
The thermal type of inkjet printing was the first to be developed and is still the most popular. Because
of the vapor bubbles that form in the cartridge, Canon began calling its inkjet printers BubbleJet, a
name that has become almost synonymous with this technology. This method is also used by
Hewlett-Packard and others. Because of the high heat used by this method, printers that use thermal
inkjet printing normally use an ink cartridge that also contains the print head, or, as in the case of
Canon BubbleJet printers, a removable and replaceable print head with a removable ink cartridge
insert.
Piezo Inkjet Printing
Piezo inkjet printing is a newer technology than thermal printing, and it presents distinct advantages.
Instead of heat, these printers apply an electric charge to piezo-electric crystals inside the cartridge
nozzles. These crystals change their shapes as a result of the electric current, forcing the ink out
through the nozzles.
Removing the high temperatures from the inkjet printing process presents two important advantages.
First, the selection of inks that can withstand 400° heat is very limited; piezo technology enables
printers to use ink formulations that are better suited to the printing process and less prone to smearing, which is a traditional problem with inkjet printing. Second, spray nozzles that are not exposed to
extreme heat can last far longer than those traditional thermal cartridges. Epson pioneered the use of
piezo inkjet printing, and this method also is used by Lexmark.
Improving the Quality of Inkjet Printing
The early inkjet printers from companies such as Canon, Hewlett-Packard, and Epson could print at a
maximum resolution of only 300dpi–360dpi. Since the mid-1990s, though, resolutions have climbed
to 600dpi and beyond. Today’s cheapest inkjet printers typically have print resolutions of at least
600dpi–720dpi, and the newest high-performance printers feature resolutions as high as 2,400dpi, or
720dpi×2,880 for color printing.
Several developments have made these very visible improvements in print quality possible:
■ Improved ink nozzles. By reducing the size of the ink nozzles, a smaller dot is possible, improving
the look of both black text printing and color images. For example, Canon’s BJC-8200 introduced a star-shaped nozzle capable of producing a truly round dot with more precise ink placement to further improve print quality (see Figure 6). Some recent printers also use a staggered
two-column print head for each color, using one column of nozzles for lower-resolution photo
printing and adding the second column of nozzles for high-resolution printing by filling in the
gaps between the nozzles in the first column.
Figure 6 Canon’s BJC-8200 uses a star-shaped nozzle to improve the placement and shape of droplets for
improved resolution and better print quality.
■ Multicolor layering. HP inkjet printers use two forms of a process referred to as Photo REt:
• Photo REtII. It places 16 dots of ink in various colors into a single dot; conventional inkjet
printers can place only 8 colors into a single dot.
• Photo REtIII. It is used on most current HP inkjet printer models and uses a five-picoliter
droplet and 29 colors of ink in a single dot to print as many as 3,500 color combinations
per dot using 136 nozzles per each of the three colors in the color cartridge.
■ Reduced ink volume. Even though some inkjet printers of 1997–98 featured print resolutions
comparable to today’s inkjet printers, current models often provide better-looking print quality
because they use less ink per droplet, which is measured in picoliters. The Epson Stylus Photo
870, for example, has the same 1,440×720dpi print resolution as the earlier Epson Stylus Photo
EX, but the Photo 870 uses only 4 picoliters of ink per droplet, compared with the Photo EX’s
11 picoliters per droplet. Other models from Lexmark, Epson, Canon, and Hewlett-Packard have
ink volumes ranging from 7 picoliters to as low as 3 picoliters per droplet, creating pages that
can dry more quickly as well as display finer print details than older printers. An equivalent
amount of ink also lasts longer and brings the cost per page down for newer printers when
compared with older printers that use more ink per printed page.
■ Improved printer-control software. Getting the best results with inkjet printers can be confusing
because of the wide variety of options for paper type, image type, and print resolutions.
Enhanced printer drivers supplied with the newest inkjet printers provide better control with
less possibility of error in printing. Rather than selecting from a variety of print resolutions and
paper types, these printer drivers often provide a few preselected combinations, as well as provide customization for users with special needs.
Inkjet Limitations
The latest inkjet printers can provide features once found only on laser printers:
■ Full-duplex printing (printing on both sides of the paper) is available with the Hewlett-Packard DeskJet
970Cxi and HP PhotoSmart P1100.
■ Rated black-ink text print speeds exceeding 10ppm, and as high as 13ppm are available from the best
printer models from HP, Epson, Canon, and Lexmark. Although actual real-world performance is far
less, today’s inkjet printers are definitely a lot faster than their predecessors.
These features make inkjet printers, with their combination of black-and-white and color print capabilities, better choices than ever before for more and more SOHO and corporate office users. However,
the biggest problem remains the need for specially coated or designed papers and transparency stocks
to avoid smearing and achieve the high-quality results the printers are designed to produce.
Special inkjet papers can prevent this problem, but they are more expensive and offer far less variety
than the laser printer papers on the market.
Inkjet printers also must use special transparency stock with a roughened (sandpaper-like) surface to
promote proper ink drying. The extra cost of special paper and other print media, along with the relatively high cost and limited print life of inkjet cartridges, makes them a high cost-per-page type of
printing. Figure 7 illustrates Canon’s four-layer paper, which is ideal for inkjet printing.
Ink-absorbent layer
Middle reflective
layer
Base paper
Black-coated layer
Figure 7 Special papers, such as Canon’s four-layer inkjet photo-quality paper shown here, are essential to
getting the best possible print quality from today’s high-resolution inkjet printers. Match the paper to the
resolution you use for printing and use paper made by the printer maker for best results.
Portable Printers
Portable printers typically use one of four imaging technologies:
■ Thermal wax-transfer
■ Direct thermal output
■ Thermal inkjet
■ Piezo-electric inkjet
Some portable printers from Citizen employ thermal wax-transfer technology, using a thermal-transfer
dot-matrix print head and a choice of a multistrike ribbon for draft work and a one-time-use film ribbon for final copies. These thermal-fusion printers are tiny, approximating the size of a foot-long
French bread loaf, making them a good choice for travel. Their extremely compact size and low travel
weight is balanced by extremely slow printing speeds, relatively low resolution (360dpi at a maximum), limited availability of ribbons, short ribbon life, and the requirement for single-sheet handfeeding. Citizen is the main maker of these printers for PC use today, but the technology also is used
by many bar-code printers from a number of vendors.
An alternative thermal approach is taken by the Pentax PocketJet series: direct thermal output at
200dpi–300dpi onto specially prepared single-sheet heavyweight thermal paper. According to Pentax,
its thermal paper printouts are actually about half the cost of ribbon-based, thermal-transfer printers
and are about 50% faster per page. Similar to the Citizen printers, Pentax PocketJets are designed for
portable use and require hand-feeding of multiple-sheet print jobs.
Portable printers made by Canon and Brother represent a miniaturization of normal desktop inkjet
printers and enable resolutions up to 720dpi with an ink cartridge life of hundreds of pages. Canon’s
portable printers use the same thermal inkjet print head technology used by their desktop and multifunction inkjet printers, whereas Brother uses the piezo-electric technology originally created by
Epson.
Although portable printers offer high print quality similar to their desktop siblings of a similar technology, they must make compromises in other areas to reach the desired goals of light weight (under
five pounds) and compact size. They normally feature limited paper-handling with small-capacity
paper trays or sometimes manual feed only. They often use only a single ink cartridge, requiring a
swap to print in color. A rechargeable battery might be included, or the printer might use a PC card
(PCMCIA) interface for both power and data transfer. Other typical features include infrared printing
and optional scanning heads (which replace the normal print head). Although portable printers can’t
compete in features or speed with desktop printers, they enable travelers to deliver a high-quality
printout anywhere.
All-In-One/Multifunction Devices
If you are short of space and money, an all-in-one or multifunction device that combines print, scan,
copy, and sometimes fax features might seem like a desirable alternative to purchasing two or more
separate devices. You’ll certainly save some money by doing so; you can buy a typical inkjet-based
printer/copier/scanner for as little as $150 (which is little more than a good inkjet printer costs by
itself).
What might you lose when you put all your digital eggs in one basket by using a multifunction
device?
■ Lower print speed. The print mechanisms found in low-cost all-in-one units can run at speeds significantly lower than those found in most inkjet printers from the same vendor. Laser-based allin-one units often come closer to keeping up with the printer-only siblings.
■ Less sophisticated print features. The print mechanism in an inkjet-based all-in-one unit also
might lack the latest high-resolution and color-layering print features found in the standalone
inkjet printers. Laser-based all-in-one units often match their printer-only siblings resolutions
and output options, though.
■ Lower scan resolutions. Whether you choose a sheet-fed model or the increasingly popular flatbed
all-in-one models, you are often limited to 600dpi scans. These are acceptable for scanning fullsize documents but are a limiting factor if you want to enlarge small photos, documents, or
details from photos.
Because models change frequently, you should compare the printing and scanning features of any
multifunction device you are considering to printers and scanners from the same vendor. Keep in
mind that if you also need a copier and fax machine, most (but not all) multifunction devices also
feature these options, and you might find that a multifunction device will be used primarily for those
tasks with just occasional use as a printer or scanner.
Dot-Matrix Printers
Dot-matrix printers were, at one time, the most popular type of printer on the market because they
were small, inexpensive to buy and to run, and fairly reliable. As the price of laser printers steadily
dropped, however, and inkjet printers came to market that offered far superior output quality at virtually the same price, the market for dot-matrix printers contracted dramatically. Although they continue to perform certain tasks quite well, dot-matrix printers generally are too noisy, offer mediocre
print quality, and have poor paper handling for single-sheet paper.
Unlike lasers and most inkjets, dot-matrix printers do not process documents a page at a time.
Instead, they work primarily with a stream of ASCII characters up to a line at a time and therefore
require very small memory buffers. As a result, their speed is measured in characters per second (cps)
instead of pages per minute. In addition, very little processing is performed in the printer when compared to a laser printer. Dot-matrix printers do not use complex page description languages such as
PCL and PostScript. The data stream from the computer contains escape sequences used to set basic
printer parameters, such as page size and print quality, but any complex processing required is performed by the PC.
Dot-matrix printers work by advancing paper vertically around a rubberized roller, called a platen, one
line at a time. At the same time, a print head travels back and forth horizontally on a metal bar. The
print head contains a matrix of metal pins (usually either 9 or 24) that it extends in various combinations to make a physical impression on the paper. Between the pins and the paper is an inked ribbon,
much like that used in a typewriter. The pins pressing through the ribbon onto the page make a series
of small dots, forming typographic characters on the page. Dot-matrix printers also usually have rudimentary graphical capabilities, enabling them to produce low-resolution bitmaps using their limited
memory as a band buffer.
Dot-matrix printers usually are associated with continuous sheet paper, driven by pinholes on the
edges. Most models can also handle single sheets, although rarely with the accuracy found in most
laser or inkjet printers. Because they are impact printers, meaning that actual physical contact occurs
between the print head and the paper, dot-matrix printers can do one thing that lasers and inkjets
can’t: print multipart forms and carbon copies. Many printers enable you to adjust the pressure of the
impact to support various numbers of copies. Dot-matrix printers are rarely used for correspondence
and general office printing anymore. Instead, they have found their place in commercial applications,
such as for banks, hotels, auto and appliance parts stores, and warehouses.
Note
Visit the Epson Web site for an interactive product finder for its impact printers. Okidata offers a similar service, which
also includes its LED printers and fax machines. Both of these services will ask you detailed questions about your printer
requirements and match your answers to the models that fit your requirements most closely.
Color Printing
A number of competing technologies are available for color printing aside from the nearly universal
inkjet printers found at home and at the office. Other technologies include color laser and LED printers, solid-ink printers, and dye-sublimation printers. Color printing, once limited to only expensive
graphic arts use, now spans the entire price range of printers—from slow inkjet printers under $100 to
high-speed, 1,200dpi PostScript laser, LED, and solid-ink printers that cost $2,500 or more. This section covers the various color printing technologies in detail to help you decide whether you need
more than an ordinary inkjet printer provides for color output.
Several types of color printers are available; most of them are adaptations of existing monochrome
technologies. In most cases, color printers function by using the same printing medium in several colors (usually four). Thus, a color inkjet printer or color solid-ink printer uses four or more colored inks,
and a color laser uses toner in four colors. As in process color offset printing, virtually any color can
be created by combining cyan, magenta, yellow, and black in various proportions. This is called the
CMYK color model and is referred to as four-color printing. In the past, some very inexpensive inkjet
printers used only three colors, eliminating the black. These printers create a simulated black (often
called process black) by combining the maximum proportions of the other three colors, but the result
is far less effective than a true black medium, as well as costly. If you still are using a single-cartridge
inkjet printer, you’ll find that even the cheapest of today’s dual-cartridge models produces better print
quality for both black and color images without the hassle of flipping ink cartridges in and out of the
printer. Because a true black is available at all times, you also will save money by needing to replace
the color cartridge far less often. Depending on the color medium, various processes exist for combining the four colors (see Figure 8). Most color printers can’t actually mix the four colors to achieve the
desired result as you would mix paint. Instead, the printer applies the four colors very close to one
another in the correct proportion to achieve the desired result. For example, an inkjet printer works
by creating an interlaced pattern of dots, with each dot using one of the four inks. This is known as
bilevel printing. The proportion of dots of each color and the pattern in which they’re interlaced dictates the final color. This process of mixing different-colored dots to form another color is called
dithering. The process is similar to the display on your color monitor that creates the color for each
pixel by placing red, green, and blue dots of varying intensities very close to one another.
Drum
Photoconductor
Yellow
Magenta
or
Cyan
or
then
To paper
Intermediate
transfer surface
Black
Direct to paper
Figure 8 Color laser and LED printers transfer the ink (left) to a photoconductor surface (top center)
before it can be transferred to paper. Because four colors are used, this process requires four passes to print a
single page with laser printers, but LED printers can print all four colors with a single pass. Color inkjet
printers spray the colored inks directly onto the paper surface (bottom center), printing all colors in a single
pass. In either case, the printer must control the placement of primary colors to accurately reproduce the
original document.
In most cases, dithering is only a moderately successful color process. The resolution of some color
printers is not high enough to prevent you from seeing the individually colored dots if you look carefully. The cumulative effect is of a solid color when seen from a distance, but close up, the dithering
pattern can be discernible to the naked eye. Some methods of overcoming these limitations include
HP’s use of color layering, Canon’s use of variable-sized ink droplets (similar to laser printer “font
smoothing” technologies), Xerox/Tektronix’s use of solid ink with superfine pitch, many vendors’ use
of six ink colors instead of just four for photo printers (increasing print resolution into the 1,000dpi
or higher range), and the development of photo-optimized high-gloss paper. These technologies are
found on most mid-range ($150 and up) inkjet printers and can produce stunningly good results.
Printing in color necessarily complicates the language the printer uses to communicate with the PC.
Only the PostScript page description language has supported color from its inception. A version of
PCL 5 with extensions to accommodate color, called PCL 5c, was introduced by Hewlett-Packard in
1994 and is still used by HP on its color LaserJet printers. Most inkjet printer manufacturers, however,
have their own proprietary color printing technologies, usually employing the printer driver to perform the additional processing required within the PC.
Obviously, many applications are available for color printing, but the true test of any color printer is
photographic reproduction. Dithered color that is acceptable for use in a bar chart, for example,
might be totally inappropriate for printing photographs. Although the first high-resolution color
inkjet and laser printers produced decent-looking photos only when the output was viewed from a
distance, color inkjet printers in the $250 and up range are now capable of honestly claiming
near–continuous-tone photo quality because of the technical developments mentioned in earlier
sections.
Need even better quality? If you are looking strictly for snapshot printing, consider the low-cost ($300
and up) dye-sublimation printers available from many of the same vendors that produce digital cameras and DV camcorders.
If you’re a graphic artist who needs high-quality proofing, consider large-format inkjet, laser, LED, or
solid-ink printers that provide full-color output at 800dpi or above and have PostScript RIPs included.
The leader in print quality by many accounts continues to be the Xerox/Tektronix solid-inktechnology printers (originally developed by Tektronix and now sold by Xerox).
Color Inkjet Printers
Inkjet printers use a fairly simple technology that is easy to adapt to color use and initially is the most
inexpensive. In fact, every inkjet printer on the market today is capable of printing in color. The most
typical arrangement is for the printer to use two cartridges: one containing black ink only and one
containing the other three colors (cyan, yellow, and magenta). The advantage of this arrangement is
that you have fewer individual ink containers to replace, but the disadvantage is that when any one
of the color reservoirs is empty, you have to replace the entire three-color cartridge, thus driving up
the cost. Some printers (such as a few of the HP DeskJet and Canon BubbleJet models) also accept a
second three-color cartridge in place of the black one or allow six separate ink cartridges, providing a
six-color printing solution that achieves better results in photographic printing. Some mid-range and
high-end color inkjet printers use a separate tank for each color, which enables more economy in
color use, especially for people who use a single color frequently.
Inkjet printers can have problems with various types of papers. The ink must dry quickly on the paper
to keep from smearing. Standard inexpensive copy paper is relatively porous, which enables quick
drying, but it also causes the ink to be wicked along the paper fibers. This expands dot size, making
the image less sharp and dulling the colors. Inkjets have just the opposite problem when printing
transparencies or even coated papers. Because of their hard and smooth surfaces, the image can easily
smudge before it has a chance to dry. Normally for the best results, you need special paper for an
inkjet printer.
Inkjet printers can be sensitive to environmental conditions. For example, if conditions are very dry
and usage is low, some ink can dry in the print nozzles, clogging them and resulting in missing colors
and terrible-looking print jobs. On the other hand, humid conditions can slow ink drying, which can
lead to smudging, dot blooming, and feathering. Also, if the paper curls due to high or low humidity,
it can make contact with the print head, smudging the print. I recommend that you clean the heads
using the inkjet printer’s own cleaning feature before you start a print job on high-quality media,
especially if you haven’t printed for several days with that printer.
Another problem with inkjet printers relates to the ink levels. When the ink runs low, it causes sputtering, resulting in fuzzy text and images. Compounding this, the ink level can be difficult to accurately gauge in an ink cartridge. On some inkjet printers, pages will continue to print even though
one or more inks have been exhausted. This can cause a significant amount of waste when it occurs
in the middle of a large print job. Many newer models have improved their ink-level sensors, but it
still pays to keep an eye on a long, multipage print job if you haven’t replaced the ink cartridges for
awhile.
Inkjet printers vary widely in their capabilities and their prices. Very low-end models typically operate
at 600dpi–720dpi, support only letter-sized paper, and print at only 3ppm–4ppm. Some of the newest
models in the under-$100 category have only a USB port, which can prevent you from using the
printer if you still use Windows 95. Some late releases of Windows 95 have USB support, but most
vendors require Windows 98 or later. As you move up the price scale, resolutions and speeds increase;
parallel, USB, IEEE-1394, and network interface options are added to some models, and printers might
be capable of using larger page sizes. One specialized breed of printer that often uses inkjet technology is designed to print poster-sized images on paper up to 36 inches wide.
Some of the latest inkjet printers have added features, such as
■ Duplex printing
■ Flash memory slots for instant printing of digital camera photos
■ Print heads that can be interchanged with scanning heads
■ Archival ink for extended printout life when special papers are used
Use the printer selection criteria section later in this chapter to help you focus on the most important
features you need.
Color Laser Printers
Color laser printers are a relatively recent development when compared to the other technologies discussed here. The technology is the same as that of a monochrome laser printer, except that it has four
toners in different colors. Unlike the other types of color printers, which apply all the colors at the
same time, many color lasers actually print each color on the page individually. Because the printer
has only a single photoreceptor drum, the entire print engine cycle repeats four times for each page,
applying the colored toners on top of each other.
This method greatly complicates the printer’s paper handling. In a monochrome printer, the page
passes beneath the photoreceptor drum at a speed equal to the drum’s rotation so the toner can be
applied evenly onto the page. In a color printer, however, the page must reverse so that it can pass
under the drum four times. In addition, the page must be in precisely the same position for each pass
(registration) so the individual dots of different colors fall directly on top of one another.
Toner levels can affect the quality of output from laser printers. Just as with monochrome lasers or
copiers, a gradual degradation of quality occurs—or variations in print density—over the life of a
toner cartridge. This becomes most noticeable as the toner runs out and is compounded in a color
laser by the fact that four toner cartridges are used.
Color lasers can suffer from registration problems due to the fact that the same piece of paper has to
make four passes. If any misalignment occurs, the colors will be slightly smeared or smudged.
Textured paper types also can pose problems. If the paper has a textured or rough surface, such as
classic laid bond, toner is deposited in both the high and low spots, but the fuser rollers might not
exert sufficient pressure to reach the depressions. As a result, the toner can remain a powder in those
places and can be brushed off during normal handling.
To overcome the speed and registration problems of conventional color laser printers, the LED page
printer mechanism (using light-emitting diodes instead of a laser) pioneered in desktop printers by
Okidata is now being used by both Okidata and Lexmark in some color page-printer models. Printers
using LEDs can print color pages at the same speed as monochrome pages because they can place all
four colors in a single pass. Some lasers mix the toner on the drum by applying each toner in turn,
after which all four colors are laid onto the paper at once. This eases the paper-handling difficulties
but presents other problems when applying the toner to the drum. In either case, the result is four
toner colors mixed on the page and passing through the fuser assembly at once. This technique provides results that are vastly superior to dithered inks and other media. However, color laser printers
are still very expensive, with PostScript-compatible models starting at $2,000–$3,000. Also, because
the drum must rotate four times for each page, these printers are significantly slower than monochrome lasers. Although new developments in host-based color laser printers designed for Windows
9x and NT have dropped the price of some models below $1,300, host-based printers generally are
unsuitable for elaborate graphics printing.
In addition to the relatively high initial costs of color laser printers, the type and costs of consumables and accessories should also be considered before acquiring a color laser printer.
Environmental Issues with Color Laser Printers
Humid or dry conditions can affect laser output as well. As the paper passes through the laser printer,
it receives a static charge so the oppositely charged toner can adhere to it. If the static charge on the
paper is too great due to low humidity, the toner can spread or splatter when transferred to the paper.
On the other hand, if the humidity is high and the paper won’t hold a charge, the toner might not
transfer to the page effectively, resulting in uneven print.
Solid-Ink Printers
I’ve become somewhat jaded in this business; it takes something really astounding to get me excited.
Well, excited is exactly how I felt when I discovered the secret to truly usable and functional color
printing—that is, color printing that would have the speed and low cost of monochrome and yet be
capable of printing in full color as easily as black and white, with none of the standard color drawbacks of inkjet or color laser printers. The secret I’m referring to is solid-ink printing, developed originally by Tektronix and now owned by Xerox.
Solid-ink printing was first developed by Tektronix in 1992, and although one or two other companies played with the technology, Tektronix is the only company that remained committed to making
it work. In 1998 and 1999, it completely revised its product line and came out with some revolutionary products. It received 35 patents on its latest product, the Phaser 850 printer family. So revolutionary is its designs that it caught the attention of Xerox, which purchased the color printer division of
Tektronix just to get the technology and patent portfolio. As it stands, Xerox is currently the only
source for this type of printer. With an initial cost less than that of most color laser printers (about
$2,500 to start for the upgrade-ready 850N model at 800dpi), and the low cost of the consumables,
solid-ink is not only the best color printing technology I’ve seen, but weighing cost versus benefits,
it’s by far the most economical.
How Solid-Ink Printers Work
Solid-ink technology uses blocks of wax that are dropped into a loading tray and melted internally in
the printer. When printing, the colored inks are sprayed onto a drum and then transferred to the
page, much like a monochrome laser would work. The main difference between solid-ink and color
laser, though, is that with solid-ink only one drum is used and all the colors are applied simultaneously to the drum with a special print head. The result is printing that is fully four times faster than
color laser, with printing that looks incredibly smooth and saturated—due to the natural blending of
the colors as they are applied.
Not only is the solid-ink printer four times faster than a color laser when printing in color, but it is
also faster when initiating the print job. A typical color laser, such as the HP 4500, takes approximately 36 seconds to print the first page, whether you are printing in monochrome or color.
Conversely, the solid-ink Xerox 850 takes about 12 seconds for the first page to print. Part of this is
because of the use of a high-speed, 200MHz PowerPC processor inside the printer, which is faster than
most other printers on the market.
Print Quality
Although solid-ink is technically a dot-level technology just like laser or even inkjet, the resolution is
incredibly fine (1200dpi), and the natural blending of the melted ink renders beautifully saturated
and vibrant colors with virtually no trace of dithering. The printing has an almost raised quality to it,
similar to how some business cards are printed in raised ink. This is because the ink is actually wax,
which is not just coating the paper but becomes embedded in it. The printed result is durable and
impervious to water (unlike inkjet printing). Heat can be a concern, but the ink melts at a relatively
high temperature of 165° F, which wouldn’t be experienced under normal circumstances. Still, you
might be careful about leaving print jobs in a locked car in the summer, where temperatures that high
are common.
To see how revolutionary solid-ink printing really is, you must compare it to the other color printing
technologies. In virtually every area solid-ink has them all beat. Take speed, for example. A color laser
printer is four times slower than a monochrome laser for the simple reason that four complete laser
mechanisms exist inside the printer and the paper must travel through all of them to pick up the
various colors. This means that most color lasers, such as the HP 4500 series, end up with a 4-pageper-minute (ppm) output rate. By comparison, the Xerox Phaser 850 has an astounding 14ppm output rate, in color, which is the same speed in monochrome and the same speed as a monochrome
laser. That’s true color printing at the same speed as monochrome.
Low Costs for Consumable and Maintenance Items
One of the biggest benefits of solid-ink printing is that of consumables, or rather the lack of them. A
solid-ink printer can print 45,000 pages nonstop before it needs any attention. The only part that
needs to be replaced at that time is a very low-cost maintenance roller, which can be replaced in less
than one minute with no tools. Because you can add solid ink sticks even while the printer is running, you can print for almost two years without ever having a single print job interrupted.
By comparison, the average number of pages a color laser printer can print before it requires some
form of attention (new imaging kit, transfer kit, toner cartridge, fuser, and so on) is only about 1,250
pages. That would occur every two or three weeks in a normal office environment. Not only are the
consumables less costly for the solid-ink printer, but Xerox and Tektronix offer black ink for free during the life of the printer. Thus there is no penalty for printing monochrome; in fact, you could say
monochrome printing is subsidized.
Consider that an average office prints about 50,000 pages every two years. To print 100,000 pages (or
four years’ worth of printing), a typical color laser will consume 100 expensive toner cartridges ($100
each), 20 imaging kits ($75 each), 2 transfer kits ($150 each), and 1 fuser ($200). To print the same
number of pages on a solid-ink printer uses only 85 blocks of ink ($50 per block, except black ink,
which is free for the life of the printer), and 2 maintenance rollers ($130 each). This makes the total
cost of consumables less than half that of a color laser, and with far less maintenance and print stoppages or problems along the way.
Not only does the solid-ink printer have very little in the way of consumables compared to a color
laser or even an inkjet, but the ink blocks are 100% biodegradable and even edible, although I don’t
think they taste very good. Seriously, though, very little is wasted with solid-ink technology, and the
wax ink blocks are no more harmful to the environment than crayons. Also, no toner cartridges have
to be thrown away or sent back for refilling.
If any color runs out, the printer simply stops and waits for you to drop in another block. The last
page printed before the ink runs out will look as good as the first page printed after the ink is replenished. There is simply no degradation in quality no matter what the status of the ink.
Unlike lasers, no registration problems occur with solid-ink. Because the color is applied to the drum
in one pass, the registration is perfect every time. Inkjets have problems with various types of papers,
whereas solid-ink prints the same regardless of paper type. In other words, you can use cheap paper
without bleeding, smudging, or dull color output.
Temperature and humidity levels have little or no effect on solid-ink print quality. Solid-ink prints are
not affected by contact with moisture.
Over the years I’ve tried inkjet and color laser printers, and neither of them were workable for me as a
sole printer. I still had to maintain a laser printer for black-and-white printing. With solid-ink technology, I now have the first printer I’ve seen that can serve as the sole printer in an office, handling
both color and black-and-white with the same speed and efficiency. Check with Xerox at
http://www.tektronix.xerox.com for more information on solid-ink printing and the printer models
available. Now that Xerox has purchased this Tektronix-developed technology, I expect to see many
more applications in the future as people discover how well it works.
Dye-Sublimation Printers
Dye sublimation, also called thermal dye transfer, is a printing technique that uses ribbons containing
four colored dyes the printer heats directly into a gas. This way, the four colors are mixed before the
printer applies them to the paper. These printers can produce 256 hues for each of the four colors,
which combine into a palette totaling 16.7 million colors. This results in continuous tone (that is,
undithered) images that come very close to photographic quality.
Dye-sublimation printers produce excellent output, but they suffer in almost every other way. They
are slow and costly, both to buy and to run. They require a special paper type that is quite expensive,
as are the ribbon cartridges they use. However, dye-sublimation technology is quite compatible with
thermal wax-transfer printing; the two differ primarily in the color medium they use. Several manufacturers make dual-mode printers that can use both thermal wax transfer, which is less expensive,
and dye sublimation. This enables you to use the cheaper thermal wax mode for proofing and everyday printing, saving the dye-sublimation mode for the final product and other special uses.
One of the pioneers of this technology, Fargo Electronics, has turned its attention to card printers,
but many other vendors—including Alps, Fuji, Kodak Digital Science, Mitsubishi, Olympus, Seiko
Instruments, and others—have introduced dye-sublimation printers for uses ranging from inexpensive
snapshot printing to high-end graphic arts.
Thermal Wax-Transfer Printers
Thermal wax-transfer printers use wax-based inks, similar to the Tektronix/Xerox solid-ink technology, but at a much lower resolution and quality. They apply the ink directly to the page like an inkjet,
not to a drum like a laser does. The process is faster than dye sublimation but is still much slower
than even a color laser. The low resolution (generally 300dpi) means the dots are very coarse and colors are dithered rather than smooth. The print quality suffers as a result when compared to continuous tone output, but it is generally better than the output from inkjets.
In printers that offer both dye-sublimation and thermal wax-transfer options, the thermal waxtransfer is used for proofing, and the dye-sublimation mode is used for final results. To see the
differences in print quality represented by these technologies, see the Seiko Instruments Web site.
Choosing the Right Color Printer for the Job
Unless you are faced with a very tight budget, you have a wide variety of choices you can make when
it’s time to select a color printer. What kind of color printer you choose should be determined by how
critical you are about the color quality, how long you want the output to last, how fast you want the
output, and whether the output will be considered the final result or is being used as a proof for evaluation before a higher-performance printer or typesetter is used to produce the final page.
SOHO users who use color sparingly and print just a few color pages a week can use any of the current inkjet printers with resolutions at 600dpi or above, either in a standalone version or as part of a
multifunction/all-in-one device.
If you are an amateur photographer, you might want to consider a specialized inkjet photo printer
with a resolution of at least 1,440×720dpi or 1,200dpi or higher. Even though most of these printers
can be used for text work as well, they are optimized for photos. Some of them use six, rather than
just four, ink colors. If you are looking strictly for snapshot-sized (4”×5”) output, choose from the
low-cost (under $500) 300dpi dye-sublimation printers made by Olympus, Canon, and others. If you
are willing to spend $400–$1,000 or more, you can choose from a variety of specialized models,
including features such as these:
■ PC Card and Compact Flash slots for direct import of digital photos into the printer, so you can
print without a computer
■ Duplex operation for double-sided color printing
■ Archival-quality photo printing using specially-formulated inks and archival-paper
■ Wide-format printers
■ Printers with network and IEEE-1394 interfaces
Most of the choices listed here use inkjet technology, but a few dye-sublimation printers that achieve
true continuous-tone results are available starting around $300. If you are a graphics professional,
very few of the color printers under $1,000 will be suitable for you because most models either lack
built-in PostScript RIP features or are too slow for producing proofs in a high-volume production environment. Most inkjet printers that sell for prices above $1,000 are suitable for graphics pros, but the
high cost of consumables (ink and paper) for these models makes color laser, LED, or solid-ink printers (most of which have PostScript built in) a suitable alternative for many users.
Note
In the world of color printing, low-cost is a highly relative term. To a professional graphic artist or designer, a $2,000
color inkjet or $5,000 color laser printer is a low-cost alternative to the enormously expensive printing systems used by
service bureaus. As you learned earlier in this chapter, you can purchase high-quality, low-cost color inkjet printers in
the $150–$300 range.
The Effect of the Cost Per Page on Color Printing
Should you use separate black and full-color printers? Despite the huge improvements in both color
inkjet and color laser printers in the past few years, the answer is still “yes” in most cases. If you are a
SOHO user, for example, using a single color inkjet printer for both full-color and black-text output
could cost you much more per year than if you used a monochrome laser printer for text output.
For example, a recent (November 2000) PC Magazine study of print costs per page found that the average cost per page of an inkjet printer for color and black ink ranged from as little as 7 cents per page
to as much as 31 cents per page (based on 5% coverage of the page for color prints and 8% of the
page for black text). If a user printed just 25 black-text pages and 25 color prints per week, the ink
cost at 7 cents per page would reach about $190 per year, whereas ink costs at 31 cents per page
would exceed $800 per year! This is enough to pay for a SOHO-market laser printer—twice. Low-cost
printers tend to have higher cost-per-page figures because of the small capacity of their ink tanks.
For the best bang for the buck in a SOHO environment, I recommend that you use a mid-range
($150–$300) inkjet printer for color work and a laser printer for black text. Laser printers typically
have a toner cost of well below 1 cent per page, less expensive paper when compared to inkjet printers, and better (and faster!) black-text quality, even when compared to inkjet printers with higher dpi
ratings.
How expensive to operate are 1,200dpi color laser printers, such as the Xerox/Tektronics Phaser 750?
For example, with 30% of the page covered with text and limited color illustrations, the Phaser 750
costs just 7.8 cents per page. With 11% page coverage (text and spot-color illustrations), the Phaser
750 costs just 6.7 cents per page. These values compare favorably with inkjet printers and don’t take
into account the much faster speed of color laser printing. Although color lasers can cost 10 times as
much as mid-range inkjet printers, their operating costs are much lower than the average.
One variable not figured in the previous discussion can substantially change the cost-per-page picture:
the cost of paper.
The typical monochrome laser printer has a miniscule cost per page, even when paper is considered.
Ordinary copy paper selling for under $4/ream produces very sharp and satisfactory results in operation because the fuser bonds the toner to the paper. Similarly, color laser printers also can use ordinary paper for text, although more expensive coated paper at costs of about 90 cents per sheet is
recommended for best results in color page proofing or final production.
Inkjet printers require better paper to reach their rated resolutions. Why? As you learned earlier,
inkjets spray the ink onto the paper, where it dries to make the image. The rough surface of typical
copy paper—although no barrier to acceptable operation with laser printers—greatly reduces the effective visual resolution of an inkjet printer because the ink wicks through loose fibers on the surface of
the paper.
At a minimum, smooth papers designed for inkjet printers (and costing a buck or two more per ream
than copy paper) should be used even in high-speed “plain paper” printing modes for best results.
If you decide to print your own photos (and avoid a trip to the photo counter at your local store for
reprints), be prepared for sticker shock. Although many grades of so-called “photo paper” are available
for inkjet printers, the newest 2,400dpi and 2,800×720dpi printers need the finest-quality glossy
photo stock for best results at costs of as much as $1.75–$2 per full-page sheet. To avoid paper jams
and misfeeds caused by small paper sizes, I recommend that you buy the 8.5”×11” paper that has
punchouts for two 4”×6” or 5”×7” prints; you print two pictures per page either using your standard
graphics or page-layout program or using special color-printing software supplied by some vendors. If
you plan to print more than a few pages per month, consider carefully how much your printer costs,
how much your media costs, and how much your ink or toner costs per page before you decide which
color printer to buy.
Choosing a Printer Type
With so many printers to choose from, it can be confusing to go the store or e-store to find the best
one for your needs. This section helps you focus on the best choices for you and your company or
family.
When you’re buying a printer, you’re really buying a combination of the following factors:
■ Output quality
■ Output speed
■ Versatility
■ Flexibility
■ Economy
■ Reliability
Always keep in mind that your printer makes an impression on those who receive the output. Make it
a good impression!
Because the print quality is really the bottom line when it comes to printing, use the checklists that
follow to help you decide on two or three models. Then, compare prices, availability of supplies, cost
per page, and print quality to help you get the best models for your needs. Most printer manufacturers allow you to request print samples from their Web sites, enabling you to see actual output, even if
your local stores don’t have the model set up for a live demonstration.
Use the following feature checklists to help you focus on the most important features. Three checklists are presented: one for SOHO users, one for network users, and one for mobile users.
SOHO Users
SOHO (small office, home office) users often must use a single printer as a jack of all trades. The following feature checklists will help you buy a printer that comes as close as possible to “mastering”
your small-office or home-office domain.
For inkjet printers, I recommend that you purchase a printer with the following features:
■ At least two ink cartridges (one for black and one for color). This enables you to print true black and
full-color without changing ink cartridges.
■ A print resolution of 600dpi or above. Look for “plain paper” output of 600dpi–720dpi and higher
resolutions when you use special paper.
■ A rated speed of at least 8ppm (pages per minute) for black and 5ppm for color text. Actual speeds will
be less.
■ A parallel or USB port. I prefer having both ports in case I want to use the printer with Windows
NT 4.0, older releases of Windows 95, or Linux distributions (all of which lack USB support).
■ Compatibility with your operating system.
Desirable options include
■ 1200dpi, 720×1440dpi, or higher print options.
■ Separate ink cartridges for each color.
■ Photo-realistic features, such as six-color output and color-layering. This can improve photo appearance.
■ Flash memory slots. This is useful for digital photographers.
■ High-speed black ink cartridges (if it’s your only printer). These have more nozzles for faster printing.
■ Duplexing capability. Printing on both sides of the paper makes creating double-sided originals
very simple and saves paper.
For laser printers, I recommend that you purchase a printer with the following features:
■ A true print resolution of 600dpi or above.
■ 8ppm or higher print speeds.
■ PCL 5 or above (true or a good emulation).
■ At least 4MB of RAM or above. This should be installed at the factory or field-upgradable.
■ A parallel or USB port. I prefer having both ports in case I want to use the printer with Windows
NT 4.0, older versions of Windows 95, or Linux distributions (all of which lack USB support).
Desirable options include
■ High-capacity paper trays. This enables you to print large jobs without constant reloading of
paper.
■ Optional straight-through paper path. Makes printing heavier paper stock, business cards, labels,
and envelopes more reliable.
Network Users
A printer that will be shared among many users needs more horsepower and more features than a
printer meant for a single user. Some features from the SOHO checklist are repeated here, but the
emphasis here is on helping you get a printer that’s meant to be shared among all types of users.
For inkjet printers, I recommend that you purchase a printer with the following features:
■ Separate ink cartridges for each color. This enables you to replace only the color that runs out.
■ A print resolution of 720×1440dpi, 1200dpi, or above.
■ A speed of at least 10ppm (pages per minute) for black and 6ppm for color.
■ A parallel port or USB port and an Ethernet port (standard or optional).
■ True PDL or escape-sequence printer control. This should not be host-based.
Tip
If the printer is designed for use only with Windows, it’s usually not networkable.
■ Can be networked.
■ Supports all networks and operating systems used in office.
Desirable options include:
■ Photorealistic features (if you print photos).
■ High-speed black ink cartridges for extra speed.
■ Envelope feeder.
■ Duplexing capability. Printing on both sides of the paper makes creating double-sided originals
very simple and saves paper.
For laser printers, I recommend that you purchase a printer with the following features:
■ A true print resolution of 600dpi or above
■ 12ppm or higher print speeds
■ PCL 5 or above (true or a good emulation)
■ Supports all networks and operating systems in your office
■ At least 8MB of RAM or above (installed at factory or field-upgradable)
■ A parallel port and an Ethernet port (standard or optional)
■ High-capacity paper trays
Desirable options include
■ USB port option (for easy movement between PCs)
■ Modular paper trays for adding extra capacity
■ Envelope feeder
■ Duplexing capability. Printing on both sides of the paper makes creating double-sided originals
very simple and saves paper.
Mobile Users
Mobile printer users have limited platform choices because only thermal or small inkjet printers are
available. However, a checklist can still provide valuable guidance:
■ Same PDL or escape-sequence control as used by office printers to make field printing similar to
office printing
■ Parallel interface with optional PC Card or USB for portability between systems
■ Multiple-sheet paper feed to improve reliability of printing
■ Readily available ribbons, ink cartridges, or thermal paper (check your favorite office-supply
chain to see if you can get spares at any of their locations)
■ Print quality is more important than speed
All-in-One/Multifunction Users
Multifunction units are compromises, but careful study of the features of various units can help you
get the best balance of features for the money:
■ Flatbed scanner/copier mechanism with at least 300dpi optical resolution
■ 6ppm black-text minimum speed for inkjet-based models
■ 8ppm minimum speed for laser-based models
■ Copier that can run whether computer is on or off
■ Fax features
Installing Printer Support
As soon as you connect a typical printer with a PDL or escape-sequence controls onboard to your PC’s
parallel or serial port, it is capable of receiving and processing ASCII text input. Even before you
install a driver, you can issue a simple DOS command, such as the following:
dir > LPT1
The greater-than sign in this command redirects the directory listing to the PC’s parallel port. A
printer connected to that port will receive and print the listing using the printer’s default page format.
If the printer connected to your PC processes data a page at a time, you must manually eject the current page to see the printed results. This is because the echo command does not include the form feed
escape sequence that causes the printer to eject the page.
You also can redirect a text file to the printer port using a command such as the following:
copy readme.txt > LPT1
These commands prove that the PC’s parallel or serial port provides a fully functional interface to the
printer, but to exercise any further control over the print job, you must install a printer driver.
However, if you are troubleshooting a system problem that prevents you from loading the Windows
printer drivers, this capability can be useful for printing documentation files or other documents.
Note
These simple tests will not work with most host-based printers. A few can perform these DOS-based tests from within a
DOS session running under Windows (a “DOS box”), but most require that printer drivers be installed first.
PostScript-only printers must receive PostScript commands to print. A simple printer test that does work with PostScript printers is part of the venerable Microsoft MSD utility shipped with MS-DOS and Windows 3.1 and found on the Windows
95 CD-ROM. A dual-mode printer with both PostScript and PCL modes will use the PCL mode for this print test if PCL is the
default mode.
DOS Drivers
Many DOS programs use no printer drivers, relying instead on the capabilities of the printer and the
ASCII characters that represent control codes (such as carriage return and line feed). Larger applications, however, such as word processors and spreadsheets, typically do include drivers for specific
printers. Normally, the driver selection is part of the program’s installation process.
Only a few DOS applications provide driver support for a large selection of printers. WordPerfect, for
example, traditionally took pride in its comprehensive printer support, but most applications tend to
include a few generic drivers that enable you to specify your printer only in the most general sense.
There have been virtually no new MS-DOS programs in several years, meaning that you will probably
have a difficult time finding support for a new-model printer even in a product such as WordPerfect.
If you have a laser printer that is not specified in the applications list of drivers, you should be able to
use a driver supporting the same version of the page description language your printer uses. A LaserJet
III driver, for example, will function with any of the LaserJet III variants—such as the IIId and the
IIIsi—because they all use PCL 5. The same driver also should work with the LaserJet 4 and 5 lines if
necessary because the versions of PCL these printers use are backward-compatible with PCL 5.
These more generic drivers might not support all your printer’s paper trays and the other features that
distinguish the various models. For example, you will not be able to print at 600dpi on your LaserJet
5 printer with a PCL 5 (not PCL 5e) driver. However, you should be able to expect reasonably good
results with this type of driver support.
If you have an inkjet printer, you might need to use it in an emulation mode, treating it as a very
quiet dot-matrix printer. Check the emulations recommended by the vendor of your printer.
Caution
DOS printing support, once a given except for PostScript-only printers, is becoming a missing feature, especially with lowcost laser and inkjet printers. Some models offer printing from within a “DOS box” under Windows, but this is of no help
if you need to print BIOS setup screens or need to print from a DOS program without Windows in the background. The
lack of DOS support in new printers is a good reason to keep older inkjet or dot-matrix printers that use a true PDL or
escape-code sequence programming around for utility jobs.
Windows Drivers
Printer drivers in Windows differ from those in DOS in two ways:
■ The printer drivers are part of the operating system, so a Windows printer driver supports every
Windows application.
■ You can get printer drivers for your specific model from the printer manufacturer rather than
waiting on an application software developer.
Windows 3.1, Windows 9x/Me, Windows NT, and Windows 2000 might use different drivers to support the same printer, and the interface you use to add printer support might be different in each
operating system, but the process of installing a driver is fundamentally the same:
1. Select a printer manufacturer
2. Select the model of printer
3. Select the port (serial, parallel, network, or USB)
This process is performed through the Printers icon in the Control Panel.
Using the Printers Icon in the Control Panel
All the Windows operating systems have a Printers icon in the Control Panel. This is the central location for all driver-configuration activities:
■ Local printer driver installation
■ Network printer driver installation
■ Printer testing
■ Alternative drivers for a given printer
■ Viewing and setting of printer properties
■ Printer diagnostics and utilities (many inkjet printers have head-alignment or cleaning features
located on the properties sheet)
If you have a printer that offers a choice of PDLs, you can install a driver for each of the supported
languages (typically PostScript and PCL) and select either one when you print a document. Experience
will teach you that each language has its strengths and when to use a particular language. Normally,
PCL is better for text-heavy documents, whereas PostScript is better for elaborate graphics, especially
those created with programs such as Adobe Illustrator and CorelDRAW.
If you have a network client installed on your system, you can install drivers for the printers you regularly access on the network. The Printers Control Panel enables you to browse the network by using
your client and to select the objects representing your network printers.
You also might encounter situations in which it is convenient to “print” a document to an imaginary
printer. If, for example, you have to submit a desktop publishing document for prepress work, you
can install the appropriate driver for their image setter on your PC and save the print job data to a file
instead of sending it out through a parallel or serial port.
The PDL code created by a printer driver is simply ASCII text, and as such, you can store it as a normal file on your PC. All Windows and most DOS printer drivers enable you to select an output destination of FILE as an alternative to a parallel or serial port. When you actually print a document, the
system prompts you for the name and location of the output file to be created.
You can then transport the print file to a system with the appropriate printer by using a disk, a
modem, or any other standard medium. After the file is there, you can simply direct it out the appropriate printer port by using the COPY command shown earlier. Because the printer driver has already
processed the job, you do not need to have the application that created the document or the printer
driver installed on the system. All the commands are in the output file, and you simply must get it to
the printer. With Windows, you also can drag-and-drop the output file to the appropriate printer icon
or right-click the file and select Send To (printer name) to print the document.
If you need plain-text output from a program that lacks a File, Save command but allows printed output, you should set up a text-only printer (Generic-Text only in Windows) as one of your printer
choices and set its port to FILE. “Print” a report to this “printer” and you create a plain-text ASCII file
you can use with a word-processing program.
Windows 9x/Me/NT/2000 Driver Installation
Windows 9x, Windows Me, Windows NT, and Windows 2000 include a wizard for installing printer
drivers that walks you through the entire process. The procedure in Windows 3.1 is fundamentally
the same, although the screens are somewhat different in appearance. When you click the Add Printer
icon in the Printers Control Panel, the wizard first asks whether you are installing a driver for a
printer connected to the local machine or to the network. You then select the manufacturer of your
printer and the specific model.
The operating systems include a comprehensive selection of printer drivers and a Have Disk button
that enables you to install drivers you have obtained from the manufacturer of your printer or from
other sources.
After selecting the printer type, you specify the port to which the printer is attached. The available
COM and LPT ports installed on your system are listed. The FILE option enables you to save print jobs
to disk files.
The wizard also asks whether you intend to use the printer with DOS applications. If you answer yes,
the wizard configures your system to redirect all output sent to the LPT1 printer port to the printer
driver. This is necessary when you are configuring a network printer because DOS applications usually
do not have support for network printing.
After you specify whether you want to make the new printer your default Windows printer, the wizard creates a new icon in the Printers Control Panel. This makes the printer available to all your
Windows applications and provides access to the printer’s Properties dialog box, which you can use to
configure the driver and manipulate your print jobs.
Tip
If you want the best performance and most features for your printer, use the printer driver provided by the manufacturer on
the setup CD-ROM or disks, or downloaded it from the manufacturer’s Web site. The driver provided on the Windows
CD-ROM is often very limited in its features and might prevent you from getting the most out of your printer.
USB Printer Drivers for Windows 98/Me/2000
Microsoft provides the following USB printer driver files with these versions of Windows:
■ Usbprint.sys
■ Usbmon.dll
Ideally, all USB printers will use these drivers along with any additional drivers provided by the
printer vendor to support a particular printer. If you install a new USB printer and your existing USB
printer stops working, your existing USB printer most likely used its own drivers rather than these
drivers. Contact the printer vendor for an updated driver that uses these files.
Driver Signing
In an attempt to control the quality of device drivers for Windows, Windows 98/Me/2000 checks
device drivers during installation for a digital signature indicating that the device driver has been
approved by Microsoft’s Windows Hardware Quality Labs (WHQL). Unsigned drivers for printers and
most other hardware classes can be installed in place of digitally signed drivers, but the user is warned
that the driver hasn’t been digitally signed by WHQL. Drivers installed from the Windows CD-ROM
that either are used to support devices installed in a new system or are installed by Windows Update
are digitally signed, but drivers downloaded directly from the device manufacturer might not be, especially when first introduced.
Microsoft provides various ways for vendors to receive digital signatures for their device drivers; therefore, over time, the use of unsigned drivers is likely to diminish.
Note
“Whistler,” the Microsoft code name for the next release of Windows due in late 2001, is designed to be a cross
between Windows 9x/Me and Windows 2000 in hardware and software support, along with a major redesign of the
user interface. Because of fundamental differences in driver support between Windows 9x/Me and Windows 2000,
some Windows 9x/Me-compatible hardware might not work properly with “Whistler.”
Windows Driver Configuration
The Properties dialog box for a particular printer typically contains numerous settings apart from
those for selecting the port that the printer is to use. The features and the appearance of this dialog
box depend on the printer driver you have installed; however, in most cases it enables you to select
items such as the size and orientation of the paper the printer will use, the tray in which the paper is
loaded, and the number of copies of each page to print.
Many printer drivers provide settings that enable you to adjust the way the driver handles print elements, such as fonts and graphics. A typical Graphics page such as that for the HP LaserJet 5P driver
might contain the following parameters:
■ Resolution. Enables you to select from the print resolutions supported by the printer. A lower resolution provides faster printing and uses less printer memory. This setting doesn’t affect text
quality on most recent laser printers; the text will still print at the printer’s maximum resolution (600dpi on this model).
■ Dithering. Enables you to select various types of dithering for the shades of gray or colors produced by your printer. The various dithering types provide different results depending on the
nature of the image and the resolution at which you are running the printer.
Note
You might find that choosing “coarse dithering” for graphics that will be photocopied later actually produces a better quality copy than “fine dithering.” This is because normal (nondigital) copiers tend to smear the dots making up the photographic image. If you plan to photocopy your original for distribution, always make a test copy and evaluate it before you
make your high-volume copy run. You might need to adjust your printer options and reprint the original to get acceptable
results by varying dither, darkness, contrast, and other options.
■ Intensity. Enables you to control how dark the graphic images in your documents should be
printed.
■ Graphics mode. Enables you to select whether the driver should send graphic images to the
printer as vectors to be rasterized by the printer or should rasterize the images in the computer
and send the resulting bitmaps to the printer. If you’re printing complex slides from a program
such as Lotus Freelance Graphics to an HP LaserJet printer, you might find that the layers
become “transparent” if you use the default vector graphics setting but print as intended with
the bitmap setting.
Caution
If you’re planning to use the printer to produce multiple copies of pages with vector graphics from presentation or drawtype software, such as Freelance Graphics, Microsoft PowerPoint, CorelDRAW, or Adobe Illustrator, do a single-copy test
print first to see whether you have problems before running your high-volume print job.
Many printer drivers include a Fonts page that lets you control how the driver treats the TrueType
fonts in the documents you print. The usual options are as follows:
■ Download TrueType Fonts as Outline Soft Fonts. Causes the driver to send the fonts to the printer
as vector outlines so the printer can rasterize them into bitmaps of the proper size. This option
generally provides the fastest performance.
■ Download TrueType Fonts as Bitmap Soft Fonts. Causes the driver to rasterize the fonts in the computer and send the resulting bitmaps to the printer. This option is slightly slower than sending
the font outlines but uses less printer memory.
■ Print TrueType as Graphics. Causes the driver to rasterize the fonts into bitmaps and send them
to the printer as graphic images. This is the slowest of the three options, but it enables you to
overlap text and graphics without blending them.
The Device options provided by many printer drivers enable you to specify values for the following
options:
■ Print Quality. Enables you to select the level of text quality for your documents. Lower qualities
print faster but have a coarser appearance.
■ Printer Memory. Enables you to specify how much memory is installed in the printer. The setting
displays the amount of memory that ships with the printer, but if you install additional memory, be sure to modify this setting. This setting is used by the Printer Memory Tracking feature
(see the following option) to calculate compression and the likelihood of the print job being
completed successfully.
■ Printer Memory Tracking. Enables you to control how aggressively the printer driver will use the
amount of memory configured in the printer memory parameter. When it processes a print job,
the driver computes the amount of printer memory needed and compares it to the amount
installed in the printer. If the job requires a great deal more memory than the printer has, it will
abort the job and generate an error message. When the amount of memory required is close to
the amount installed, this setting determines whether the driver will attempt to send the job to
the printer, at the risk of incurring an out-of-memory error, or behave conservatively by aborting the job.
Inkjet printers often feature a Main page that enables you to specify resolution, paper type (plain,
photo-quality, transparency), resolution, ink (black or colors), and color adjustments. The Utility page
enables you to clean the nozzles, align the nozzles, and check for clogged nozzles on many models.
Tip
If you use an inkjet printer (or use the fold-down straight-through paper path on some laser printers), your pages are
stacked in reverse order. Some printers offer an “ordered printing” or “reverse order” option that enables you to print a
multipage document last page first. This produces a properly stacked document in the printer output tray.
Make sure you enable this feature in either the printer properties sheet or with the printer setup in your application, but not
in both places. Enable it in both places, and they cancel out each other.
Printer Sharing via a Network
Windows 9x, Windows Me, Windows NT, and Windows 2000 enable you to share local printers with
other users on a Windows network. To do this, you must explicitly create a share representing the
printer from the Sharing page of its Properties dialog box. On this page, you specify a NetBIOS name
that will become the share name for the printer and a password if you want to limit access to certain
users.
After you have created the share, the printer appears to other users on the network just like a shared
drive. To access the printer, a network user must install the appropriate driver for the printer and
specify the name of the share instead of a local printer port. To avoid having to type out the path,
you can drag an icon representing a network printer from the Network Neighborhood and drop it
onto the Add New Printer icon in the Printers Control Panel. After this, you need only select the
appropriate driver and answer the default printer and printer test page questions to complete the
printer installation.
Caution
Before you try to network your printer, make sure it’s network compatible. Many low-cost printers today are host based
and cannot be shared over a network. Check with the printer vendor for details.
You also can share your printer with non-Windows users if you set up a TCP/IP network and if the
other computers (such as Mac or Linux) have compatible drivers for your printer. This is much easier
if you can use a PostScript-compatible printer on the network.
Remote Drivers
Windows NT 4.0 and Windows 2000 differ from Windows 9x and Windows Me in that they can store
and distribute the printer drivers for multiple operating systems. When you share a printer in
Windows NT/2000, the dialog box contains an Alternate Drivers selector that enables you to choose
the other versions of Windows operating systems used by the other computers on your network.
After the wizard installs the driver for the Windows NT/2000 system, it prompts you for the appropriate media containing the drivers for the other operating systems you’ve selected. This way, when a
client selects that Windows NT/2000 printer share, it automatically downloads the proper driver from
the Windows NT/2000 system and installs it, preventing the user from having to identify the printer
manufacturer and model.
Print Sharing via Switchboxes
As an alternative to networking, a variety of printer-sharing devices are available at low cost. The
easiest, cheapest way to share a single printer with two to four computers nearby is with an autosensing switchbox, available from cable makers, such as Belkin and many others.
Printer switchboxes have an output plug to which the cable to the printer is connected and two or
more input plugs to which the cables from the computers are connected. Computers are normally
connected to the box by 25-pin straight-through cables, and the connection from the box to the
printer uses a standard DB-25 to Centronics printer cable.
Manual Switchboxes
Simple switchboxes use a rotary switch to determine which computer has control of the printer.
Although these units are still on the market, they’re not recommended for use with laser or inkjet
printers or non-printer parallel devices because these devices can be damaged by the switching
process and the boxes normally lack IEEE-1284 bidirectional features.
Autosensing Switchboxes
Autosensing switchboxes are powered by either an external power pack or the data cables; they continuously switch from one port to the next until a print job is sensed. At that point, the box “locks
on” to the print job until the printer has been sent the last page. For use with MS-DOS printing
(which often cannot wait for the switchbox to scan the port), many of these boxes also provide the
capability for the desired port to be set manually. Most recent models support bidirectional IEEE-1284
modes, such as EPP and ECP. Autosensing switchboxes that support IEEE-1284 modes work with most
modern laser and inkjet printers, and they also enable sharing of peripherals, such as scanners, tape
backups, and other parallel-port devices. IEEE-1284–compliant autosensing switchboxes are available
from Hewlett-Packard, Belkin, and many other vendors. Many of these devices are reversible, enabling
a single computer to access multiple printers from a single parallel port.
Other Options for Sharing Printers
For sharing a printer among more than four users or for long-distance printing (more than 25 feet
between printer and computer), a variety of solutions are available that use a special type of telephone-style cable. Following are a few of the products available, all of which will print more slowly
than the previously mentioned switchboxes because they convert short-distance parallel ports into
long-distance serial communications.
Products that plug into the MIO port found on many HP LaserJet models include Excellink’s JetCard
for up to 10 users and BayTech’s LaserShare for up to 8 users. Products that create a “mini-LAN” that
can daisy-chain many computers together to any parallel printer (except host-based) include the following: DataDocs’s Max-A-Laser, which provides for up to 30 users at distances up to 2,000 feet away,
and Linksys’s MultiShare for up to eight printers and up to 24 computers at distances up to 1,200 feet.
Support for Other Operating Systems
If your office contains a mixture of Macintoshes and PCs, make sure the printer offers Macintosh support. Many “personal” printers are basically host based, requiring Windows 9x/Me or NT/2000 to
function. Users of the increasingly popular Linux operating system also must shop carefully because
Linux support is still primarily provided by the Linux software vendors, not by the printer makers
themselves. For example, Red Hat’s popular version of Linux supports PostScript printers natively but
uses a PostScript-type interpreter called Ghostscript to support certain non-PostScript models. Look for
the hardware compatibility list at Red Hat’s Web site. Also, see Upgrading and Repairing PCs, Linux
Edition, published by Que.
Preventative Maintenance
Printers are traditionally one of the most annoying devices to troubleshoot for computer professionals
because they are prone to many mechanical problems that PCs and other networking devices are not.
Variability in the quality of consumables and improper handling by users can exacerbate these problems, resulting in printers that require more attention and maintenance than other devices.
As with PCs, preventative maintenance for printers is largely based on common sense. If you keep the
unit clean and treat it properly, it will last longer and produce better quality output than if you don’t.
Keep the exterior of your printer clean and free of smudges by wiping it with a soft cloth dampened
with water.
Laser and Inkjet Printers
For laser printers, the best preventative maintenance regimen results from purchasing a printer that
uses toner cartridges with photoreceptor and developer assemblies. These components regularly come
in contact with the toner, so replacing them on a regular basis ensures that these vital parts are clean
and undamaged. If your printer does not use this type of cartridge, you should take extra care to clean
the inside of the printer whenever you replenish the toner, following the manufacturer’s recommendations. Some printers include a special brush or other tool for this purpose.
Caution
It is particularly important to follow the manufacturer’s recommendations regarding safety whenever you are working inside
a laser printer. Apart from the obvious danger caused by live electrical connections, be aware that some components are
very delicate and can be damaged either by rough handling (such as the developer unit and the corotrons or corona
wires) or by excessive exposure to light (such as the photoreceptor). In addition, the printer’s fusing mechanism is designed
to heat up to 400° F or more and might remain very hot for some time after you unplug the unit. Always allow the printer
to cool down for at least 15 minutes before performing any internal maintenance that brings you near the fusing rollers.
Most inkjet cartridges contain new nozzles and a new ink supply, which prevents problems caused by
nozzles that have become clogged with dried ink. Similar to lasers, thermal inkjet printers also rely on
a powerful heat source, so you should take precautions before touching the internal components.
Low-cost inkjet cleaning kits can be purchased to help keep your inkjet printer free of ink build-up.
Some work with a specially textured cleaning sheet you spray with the cleaning fluid provided with
the kit and then run through the printer by printing a few words. These work with all brands and are
particularly useful with piezo-electric inkjet printers, such as those made by Epson, because these
printers do not allow the user to remove the print head. Others let you clean the print head after you
remove it from the printer; these work with Canon and HP models.
To avoid inkjet problems, be sure you turn off the printer with its own power switch, not the surge
protector or power director! The printer’s own power switch initiates a controlled shutdown of the
printer, including capping the print heads to keep them from drying out. If you turn off the power
externally (with a surge protector, for example), the print heads might dry out because they’re
exposed to the air, which eventually clogs them beyond user adjustment.
Minor clogging of inkjet cartridges can sometimes be cured by using the printer’s diagnostics routines,
accessible either through push buttons on the printer or through the printer’s property sheets in
Windows.
Dot-Matrix Printers
Dot-matrix printers are more prone to collecting dirt and dust than are any other type of printer. This
is due both to the physical contact between the inked ribbon and the print head and to the use of
continuous feed paper. As the printer runs, a fabric ribbon turns within its cartridge to keep a freshly
inked surface in front of the print head. This lateral movement of the ribbon, combined with the continuous high-speed back-and-forth motion of the pins within the print head, tends to produce an inksaturated lint that can clog the print heads and smudge the printed characters. Film ribbons can help
reduce these problems and provide better print quality but at the cost of a shorter ribbon life.
Continuous feed paper presents another problem. This paper has perforated borders on both edges
with holes the printer uses to pull the paper through the printer. Depending on the quality of the
paper you purchase, some of the dots punched out to produce the holes might be left in the pad of
paper. As the paper passes through the printer, these dots can be left behind and eventually can interfere with the paper handling mechanism. Keep dot-matrix printers clean by removing the dots and
dust with canned air or a vacuum cleaner and swabbing the print heads regularly with alcohol.
Choosing the Best Paper
Both laser and inkjet printers use cut-sheet paper exclusively and are therefore prone to paper-handling problems, such as paper jams and clumping (multiple sheets feeding simultaneously). You can
minimize these problems by ensuring that you use paper intended for your printer type. This is especially true when you are printing on unusual media, such as heavy card stock, adhesive labels, or
transparencies.
Tip
If you want to run heavier-than-usual paper or card stock through a laser printer, see whether you can set the printer to use
a straight-through paper path. On some models this requires you to flip down a special feed tray on the front of the printer
and open a rear-mounted output tray in place of the normal feed tray and top-mounted output tray. A straight-through
paper path minimizes the chances of jams and is also recommended for label and transparency stock.
Printer manufacturers usually specify a range of paper weights the printer is designed to support, and
exceeding these can affect the quality of your results. Even more dangerous, using labels or transparencies in a laser printer that are not designed for laser use can be catastrophic. These media usually
are not capable of withstanding the heat generated by the fusing process and might actually melt
inside the printer, causing severe or irreparable damage.
You also should take precautions when storing your printer paper supply. Damp paper is one of the
chief causes of paper jams, clumping, and bad toner coverage. Always store your paper in a cool, dry
place—with the reams lying flat—and do not open a package until you are ready to use the paper.
When you load paper into your printer, it’s always a good idea to riffle through the pad first. This
helps the individual pages to separate when the printer extracts them from the paper tray.
Common Printing Problems
You can avoid many printing problems with regular preventative maintenance procedures, but occasionally you will still find that the output from your printer is not up to its usual standards or that
the printer is not functioning at all. When you are faced with a printing problem, determining
whether the problem originates in your application, in the computer’s printer driver, or in the printer
hardware can be difficult.
In many cases, you can apply standard troubleshooting methodology to printing problems. For example, if you experience the same printing problem when you generate a test page from the printer’s
control panel as when you print a document from your PC, you can rule out the computer, the driver,
and the printer connection as the source of the problem and begin examining the printer. If you
experience the same printing problem with various drivers, you can probably rule out the driver as
the cause (unless the manufacturer produced several versions of the driver with the same bug).
Consistency is also an important factor when troubleshooting printer problems. If one page in ten
exhibits the problem, you can generally rule out software as the cause and begin looking at the hardware, such as the connecting cable and the printer.
The following sections examine some of the most commonly seen printer problems, categorizing
them according to the source of the problem. However, these categories must be taken loosely because
some of the problems can have several causes.
It’s important to understand that none of the procedures described in the following sections should
take the place of the maintenance and troubleshooting instructions provided with your printer. Your
printer might use components and designs that differ substantially from those described in this chapter, and the manufacturer should always be the ultimate authority for hardware maintenance and
problem-solving procedures.
Printer Hardware Problems
Problems with the printer usually result from the consumables, such as toner and paper. If the toner
cartridge is nearly empty or if the printer’s internal components become encrusted with loose toner,
the quality of the print output can degrade in various ways. In the same way, paper that is damp,
bent, wrinkled, or inserted into the tray improperly can cause myriad problems. You should always
check the following elements before assuming that the printer’s internal hardware is at fault:
■ Fuzzy print. On a laser printer, characters that are suddenly fuzzy or unclear are probably the
result of using paper that is slightly damp. On an inkjet printer, fuzzy or smeary characters can
result when you use various types of paper not specifically intended for inkjet printing. This
also can occur if a problem exists with the connection between the print cartridge and the cradle. Try reinstalling the print cartridge.
■ Variable print density. If you find that some areas of the page are darker than others when using
a laser printer, the problem is probably due to the distribution of the toner on the photoreceptor. The most common cause for this is uneven dispensation of the toner as its container empties. Removing the toner cartridge and shaking it from side to side redistributes the toner and
should cause it to flow evenly. You can also use this technique to get a few more pages out of a
toner cartridge after the printer has registered a “toner low” error. If your printer consistently
produces pages with the same varied print density, the problem could be the printer’s location.
If the unit is not resting on a level surface, the toner can shift to one side of the cartridge,
affecting the distribution of the toner on the page. Your printer also might have a light leak
that is causing one area of the photoreceptor to be exposed to more ambient light than others.
Moving the printer away from a bright light source can sometimes remedy this problem.
■ Dirty or damaged corotrons. A laser printer’s corotrons (corona wires) apply electrostatic charges
to the photoreceptor and the paper. If the transfer corotron (which charges the paper) has
clumps of toner or paper fragments on it, it can apply an uneven charge to the paper, and you
might see faint or fuzzy white lines running vertically down your printed pages. All-black or allwhite pages can be caused by a broken charger or transfer corotron, respectively. A toner cartridge that contains the photoreceptor drum typically includes the charger corotron as well, so
replacing the cartridge can remedy some of these problems. You also can (gently!) clean a dirty
corotron with a lint-free foam swab or other material recommended by the manufacturer. If you
use a cotton swab, be sure not to leave cotton fibers behind on the wires. The transfer corotron
is usually built into the printer (and not the cartridge) and will require professional servicing if
it is broken. These components are made of fragile wires, so be very careful when you clean
them. Some low-cost printers use rollers instead of corona wires.
■ Sharp vertical white lines. A sharp white line extending vertically down the entire length of your
laser-printed pages that does not go away when you shake the toner cartridge is probably
caused by dirt or debris in the developer unit that is preventing the unit from evenly distributing the toner onto the photoreceptor. Again, if the toner cartridge includes the developer unit,
replacing it is the simplest fix. If not, your printer might have a mechanism that enables you to
remove the developer roller for cleaning or even a tool designed to remove dirt from the roller
while it is in place. You also might be able to clean the roller by slipping the corner of a sheet of
paper down the slots between the roller and the metal blades on either side of it.
■ Regularly spaced spots. If your laser-printed pages have a spot or spots that are consistently left
unprinted, the cause might be a scratch or other flaw in the photoreceptor drum or a build-up
of toner on the fusing roller. You can often tell the difference between these two problems by
the distance between the spots on the page. If the spots occur less than three inches apart (vertically), the problem is probably caused by the fusing roller. Because the photoreceptor drum
has a larger diameter than the fusing roller, the spots it produces would be farther apart or perhaps only one on a page. Replacing a toner cartridge that contains the photoreceptor drum and
the fuser cleaning pad (an oil-impregnated pad that presses against the fuser roller to remove
excess toner) should solve either of these problems. Otherwise, you probably will have to
replace the drum assembly or the fuser cleaning pad separately. Some printers require professional servicing to replace the photoreceptor drum. To be sure where the problem lies, check the
printer vendor’s Web site or the printer documentation for the circumferences of the fusing
roller, photoreceptor drum, and other rollers in the printer and where they leave marks on the
paper.
■ Gray print or gray background. As the photoreceptor drum in a laser printer wears, it begins to
hold less of a charge, and less toner adheres to the drum, resulting in printing that is gray
rather than black. On printers that include the drum as part of the toner cartridge, this is not
usually a problem because the drum is changed frequently. Printers that use the drum for longer
periods of time often have a print density control that enables you to gradually increase the
amount of toner dispensed by the developer unit as the drum wears. Eventually, however, you
will have to replace the drum; at that point, you must lower the print density back to its original setting, or you might find that your prints have a gray background because the developer is
applying too much toner to the photoreceptor drum.
■ Loose toner. If the pages emerging from your laser printer have toner on them that you can rub
or brush off, they have not been properly fused. Usually, this means the fuser is not reaching
the temperature necessary to completely melt the toner and fuse it to the page. A problem of
this type nearly always requires professional service.
■ Solid vertical black line. A vertical black line running down the entire length of several consecutive pages is a sign that your laser printer’s toner cartridge might be nearly empty. Shaking the
cartridge can usually eliminate the problem, but eventually you will have to replace it.
■ Frequent paper jams. Paper handling can be a delicate part of the printer mechanism, which is
affected by several elements. Printer jams can result when paper is loaded incorrectly into the
feed tray, when the paper is damp or wrinkled, or when you use the wrong type of paper.
Occasional jams are normal, but frequent jamming can indicate you are using paper stock that
is too heavy or is textured in such a way as to be improper for laser printing. Jams also can
result when the printer is not resting on a level surface.
Envelope handling is often the weak spot in paper handling, especially with older laser printers
or low-cost inkjet printers. Because of their uneven thickness, they tend to produce a high percentage of jams. Even if your printer is designed to handle multiple envelopes, consider feeding
them one at a time if you have problems, or use alternative addressing means, such as clear
labels.
■ Blank pages appear between printed pages. Paper that is damp, wrinkled, or too tightly compressed
can cause two or more sheets to run through the printer at one time. To prevent this, store your
paper in a cool, dry place; don’t stack the reams too high; and riffle through the stack of paper
before you insert it in the feed tray. This also can be caused by different paper types or sizes
loaded in the IN tray at the same time.
Note
Before you look for a paper problem, be sure to check the printer setup. Some printers, especially on networks, are set to
use a blank page to separate print jobs.
■ Memory overflow/printer overrun errors. These errors indicate that the job you sent to the printer
was too complex or consisted of more data than its buffers could handle. This can be caused by
the use of too many fonts, text that is too dense, or graphics that are too complex. You can
resolve this problem by simplifying your document, reducing the graphics resolution or
installing more memory in the printer. You also can try adjusting the page-protection setting in
your printer driver (see the previous option).
Connection Problems
■ Gibberish. If your page printer produces page after page of seemingly random “garbage” characters, the problem is probably that the printer has failed to recognize the PDL used by the print
job. For example, a PostScript print job must begin with the two characters %!. If the printer
fails to receive these characters, all the remaining data in the job prints as ASCII. This kind of
problem is usually the result of some sort of communications failure between the PC and the
printer. Check that the cable connections are secure and the cable is not damaged. If the problem occurs consistently, it might be the result of an improperly configured port in the PC, particularly if you are using a serial port. Check the port’s parameters in the operating system. A
serial port should be configured to use 8 data bits, 1 stop bit, and no parity (N-8-1).
Using the wrong printer driver also causes gibberish printing. If you had an inkjet printer as
your default and switched to a laser printer but failed to set the laser printer as the default, your
print jobs would produce garbage printing unless you specifically sent jobs to the laser printer.
Similarly, failing to flip a switchbox to use the intended printer also causes this type of printing
error. Thus, many of these printing problems are due to operator error. Whenever you change to
a new printer, make sure you set it as the default. Also, to avoid printer-switch errors, consider
adding a second parallel port for the other printer, or use the new USB-compatible printers if
your system is compatible with them.
■ Printer not available error. When Windows does not receive a response from a printer over the
designated port, it switches the driver to offline mode, which enables you to print jobs and
store them in the print spooler until the printer is available. The printer might be unavailable
because the parallel or serial port is incorrectly configured; the printer cable is faulty; or the
printer is turned off, is offline, or is malfunctioning. A malfunctioning port can be caused by an
IRQ conflict (LPT1 uses IRQ 7, and COM 1 and COM 2 use IRQs 4 and 3, by default). In the
case of a serial port, incorrect start/stop/parity bit settings could be the culprit. A switchbox that
is supposed to automatically scan for print jobs but has been set to manual mode or has been
turned off also can cause this error.
■ Printer does not notify Windows when it is out of paper, is jammed, or has some other problem. This
indicates a communications problem between the printer and the PC. Check the printer cable
and its connections at both ends. Some manufacturers recommend that you use a cable that
complies with the IEEE-1284 standard.
Note
IEEE-1284 cables don’t work in their advanced EPP/ECP modes unless your printer port is also set for an IEEE-1284
mode. Check your system documentation for details.
■ Intermittent or failed communications or a partial print job followed by gibberish. Interruptions in the
communication between the computer and the printer can cause data to be lost in transit,
resulting in partial print jobs or no print output at all. Aside from a faulty cable, these problems
can result from the use of additional hardware between the printer port and the printer.
Switchboxes used to share a printer among several computers and peripherals that share the
parallel port with the printer (such as CD-ROM drives) are particularly prone to causing problems such as this.
■ Port is busy error or printer goes offline. These errors can occur when an ECP sends data to a
printer at a rate faster than it can handle. You can remedy the problem by using the Windows
System Control Panel to load the standard printer port driver instead of the ECP driver.
■ Error-reporting methods. Some models of the HP LaserJet printers (such as the LaserJet II and III)
report errors with a numerical code displayed on their LCD status panels. Other models use a
series of blinking lights on the system to report errors. Note the error number or blinking light
pattern and check the printer manual or online source to determine the problem and its resolution.
Driver Problems
The best way to determine whether a printer driver is causing a particular problem is to stop using it.
If a problem printing from a Windows application disappears when you print a directory listing by
issuing the DIR > LPT1 command from the DOS prompt, you can safely say that you need to install a
new printer driver. Other driver problems include the following:
■ Form feed light comes on but nothing prints. This indicates that the printer has less than a full page
of data in its buffer and that the computer has failed to send a form feed command to eject the
page. This is a common occurrence when you print from a DOS prompt or application without
the benefit of a printer driver or use the Print Screen key from DOS or within your BIOS setup
screens, but it also can be the result of a malfunctioning driver. Some drivers (particularly
PostScript drivers) provide an option to send an extra form feed at the end of every print job.
Otherwise, you must eject the page manually from the printer’s control panel.
■ Incorrect fonts printing. Virtually all laser printers have a selection of fonts built into the printer,
and by default, most drivers use these fonts in place of similar TrueType or PostScript Type 1
fonts installed on the computer. Sometimes, noticeable differences can exist between the two
fonts, however, and the printed text might not look exactly like that on the screen. Slight size
discrepancies between the fonts can also cause the page breaks in the printed output to differ
from those on the screen.
Note
Because different printers will use TrueType or Type 1 fonts differently, you should select the printer your document will be
printed with before you save the document. After you select the printer, you should scroll through the document and check
for problems due to page breaks being shifted, margins changing, or other problems.
You also should perform this procedure before you fax your document using a fax modem. Because fax resolution is a
maximum of 200dpi in most cases, this lower resolution can cause major layout changes, even with scalable fonts such
as TrueType or PostScript Type 1.
Application Problems
■ Margins out of range error. Most laser printers have a border around all four sides of the page of
approximately one-third of an inch where the toner cannot reach; inkjet printers might have
an unprintable area as wide as one-half inch. If you configure an application to use margins
smaller than this border, some drivers can generate this error message, whereas others simply
truncate the output to fit the maximum printable page size. If your application or driver does
not generate an error message and does not give you an opportunity to enter a correct margin
setting, be sure to check your printer manual to find the possible margin settings before printing.
Note
Some applications offer a “print-to-fit” option that automatically adjusts the document to fit on the page in case you’ve
made a margin-setting mistake. These options work by changing the font size or readjusting line and page breaks. This
option can be useful, but preview it before you use it blindly.
Network Printing Problems
■ Can’t print to a networked printer. Make sure you have rights to the printer; you must log on to
the network to be able to use any networked resource. If your printer is a peer resource, you
might need to provide a password. If the printer is on a Linux, Novell NetWare, Unix, or
Windows NT/2000 network, contact the network administrator to have the printer added to
your list of permissions.
Make sure the printer is designed to be networked. If nobody but the user connected directly to
the printer can use it, but the network settings are correct, the printer might not be suitable for
network use. Check this feature before you buy (see the checklists found earlier in this chapter).
You must map an LPT or COM port to the print queue to print from an MS-DOS printer; you
can use the UNC (Universal Naming Convention) print queue name to print from a Windows
application.
■ Simple jobs print, but complex jobs don’t. Adjust the timings in the printer properties sheet for the
network printer.
■ Printer prints gibberish for some users. The wrong printer driver might be used by some network
users; install the correct driver.
Scanners
Scanners provide you with a way to convert documents and photographs of many types into computer-readable form. Similar to the scanning element on a copier, a scanner works by transferring
digital signals representing the document to the computer for processing.
Regardless of the final use for the scanned document, all scans are received by the computer as digital
images.
Scanners differ in how the signals are created, how the scanner is interfaced with the computer, and
which types of documents can be scanned. After the document is scanned, a scanning utility program
provided with the scanner sends the scan to application software. This software determines whether
the scan will be saved as an image or converted into computer-readable text. If page-recognition software, such as OmniPage, is used, both text and graphics on a page can be recognized and converted
into digital form during the same operation.
Recent price drops and technology improvements on scanners have transformed scanners from exotic
devices restricted to graphic artists and media-conversion specialists into one of the most popular
add-ons for home and office use alike.
This section helps you choose the best scanner for your needs and shows you how to ensure it works
reliably for you.
The Hand Scanner
The oldest type of scanner is the hand scanner, developed in the late 1980s by input-device companies such as Logitech and Genius. Hand scanners work by reflecting a narrow beam of light from an
LED onto the document to be scanned. The user moves the scanner slowly down the document to be
scanned, transmitting data to a lens and CCD (charge-coupled device), which converts the data into
digital form. The document is converted into lines of data by the scanner, and the software in the
computer reassembles it into a digital image. Depending on the scanner, the data might be captured
as black, white, or shades of gray—or if it’s one of a few late-model scanners, color up to 24-bit level
(16.8 million colors).
On most models, sliding controls on the scanner are used to determine the resolution (dpi) used for
scanning, along with the brightness of the scan. Black-and-white scanners also have a switch used for
line art or dithered scans (dithered is used for photos).
Interfacing a Hand Scanner to Your Computer
Early-model hand scanners used proprietary interface cards that often required an IRQ, a DMA channel, and an I/O port address to work, but more recent models use either the parallel port or a dedicated PC Card (PCMCIA) interface for installation.
At least one vendor (Essex Portable Computer Solutions at www.goessex.com) is currently distributing
a hand scanner for portable computers that interfaces through a dedicated PC Card (PCMCIA) connection. Artec’s hand scanner can be interfaced through either a dedicated adapter card or a parallel
port with optional adapter (www.artecusa.com).
Benefits of a Hand Scanner
■ They have a low cost. Hand scanners, because the user provides the “motor” that moves the scanner, have very few moving parts and thus cost little to make or purchase. They have been the
first scanner for many users.
■ They’re portable. When the parallel-port connection replaced the dedicated proprietary interface
card, the hand scanner became a truly “universal” device that was capable of working on desktop or notebook computers with parallel ports.
■ You can scan a book without breaking it. Hand scanners can be used to scan books whose bindings
won’t permit them to be scanned with ordinary flatbed scanners. Because only the page
scanned needs to be flat, this minimizes strain on old and rare books and makes the scanning
of pages from bulky volumes possible.
Drawbacks of the Hand Scanner
■ The user as motor. The number one problem that virtually all users of hand scanners have is the
difficulty of getting a straight scan. Early models made keeping the scanner going in a straight
line virtually impossible because they required users to keep a button on the side of the scanner
pressed to keep the unit on. Although later models made the button a toggle, the amount of
wavy scans that were discarded was colossal. Some vendors even introduced scan trays with
guides to help scans be straight. This helped but worked directly against the portability and lowcost nature of the scanner.
Even when improvements in scanner design made getting a straight scan less than impossible,
the movement away from a dithered black-and-white image (mixing small dots to produce the
illusion of gray tones) toward true grayscale and then color meant that scanning speed became
more critical. Countless users had to rescan color photos again and again because their attempts
to get 300dpi scans meant their hands were quicker than the mechanical “eye” they were pushing.
■ The picture is bigger than the scanner. The second major drawback of hand scanners is their builtin size limitation: A photo of about 4” wide was all they were designed to scan. Although later
models of hand scanners came with “stitching” software designed to enable two or more overlapping scans to become a single final image, this method sounded better than it actually
worked.
Hand scanners are virtually obsolete today for most uses, although notebook computer users who
must travel might find that a hand scanner that interfaces through the PC Card or parallel interfaces
could be a useful tool for image and text research.
Sheetfed Scanners—”Faxing” Without the Fax
Hand scanners have been replaced by more powerful, less fussy scanner technologies that are now
often similarly low in price.
A sheetfed scanner uses motor-driven rollers to pull the document or photograph to be scanned past a
fixed imaging sensor. The design is virtually identical to the scanner built into fax machines. This fact
made it easy for even the first multifunction office machines (see preceding sections) to incorporate
limited scanning capabilities.
Sheetfed scanners, such as Visioneer’s PaperPort, work well for letter-sized documents. In addition,
color-compatible models with scanning resolutions of 300dpi or above have also proved competent at
handling photographs.
Advantages of the Sheetfed Scanner
■ Easy interfacing. Almost all sheetfed scanners take advantage of the “hidden” bidirectional features of the parallel (LPT) port and provide a second port to enable printers to daisy-chain to
the scanner.
■ Low cost. Because the sheetfed scanner uses a simple, rigid imaging device and a straightforward
motorized-roller mechanism, its production and selling costs are low.
■ Size. The sheetfed scanner is very compact and portable; it can easily fit into a briefcase. Some
vendors produce ultra-thin models specially designed for use with portable computers.
Drawbacks of the Sheetfed Scanner
■ Scanning limited by resolution, origins of mechanism. As an outgrowth of fax imaging, sheetfed
scanners were originally intended for line art or text scanning only. Although later models also
could support grayscale and color scanning, the mechanism’s limitations mean that resolutions
are typically limited to 300dpi–400dpi. This is adequate for same-sized scanning but precludes
serious enlargements of small originals.
■ Limited media handling. Because the sheetfed scanner is essentially a computer-controlled fax
scanner, it’s subject to the same limitations as a fax machine. It can’t handle books or even anything thicker than a piece of paper. It might jam or pull the document through unevenly, producing some unintentionally “creative” effects. It can’t work with any type of transparent
media, such as negatives or slides, and will even have problems with smaller than letter-sized
documents or snapshot-sized photos.
Although some late-model sheetfed scanners were supplied with a transparent sleeve to hold oddsized originals, their inability to work with anything beyond individual sheets is a serious limitation.
For these reasons, sheetfed scanners are less popular than flatbed scanners today but continue to be
an important part of the jack-of-all-trades multifunction office machine.
Flatbed Scanners
Take the toner, drum, and paper feed off a copier and add a computer interface, and you have the
basic understanding of a flatbed scanner—the current favorite among after-the-fact imaging technologies. Recent developments have pushed flatbed scanners to new heights in optical (true) resolution
while reducing the price: In many cases you can buy a scanner with 1,200dpi or higher resolution for
about one-third the cost of a model with 600dpi resolution just a couple of years earlier.
As with other types of scanners, reflected light is used to start the imaging process, but flatbed scanners require a more precise design than hand or sheetfed scanners because the light that reflects off
the document has a long way to go afterward (and even before because scanning colored images
requires the light to go through red, green, and blue filters first). See Figure 9.
The light that bounces off the document is reflected through a series of mirrors to light-sensing
diodes that convert the light into electricity. The electricity is sent to an analog-to-digital converter
(ADC) that converts the electricity into digital pixels that can represent black-and-white, gray tones,
or color (if the original was scanned in color). The digital information is sent to the computer, where
your application determines its future as text, graphics, or a bad scan that must be redone.
Light Path from Light Source to A/D Converter
Cover glass
Light source and mirror
Pivoting mirror
Drive mechanism
Lens
Light-sensing diodes
and A/D converter
Pivoting mirror
Interface (SCSI, Parallel, or USB)
Figure 9
The path from the light source to the A/D converter is shown here.
Advantages of Flatbed Scanners
■ Flexible media handling. Even the simplest flatbed scanners, such as flatbed copiers, can handle
documents of varying sizes, from small scraps of paper and wallet-sized photos to letter-size
documents and books. More sophisticated scanners with automatic document feeders can even
handle legal-size 8.5”×14” documents. Add a transparency adapter, which shines light through
the item to be scanned, and your scanner can also handle negatives, slides, and filmstrips of
varying sizes.
Several ways of handling transparency media are available. The least expensive way is an
adapter that will reflect light from the normal scanner mechanism behind and through the
media. This unit, which might be capable of handling a few 35mm slides or a single strip of
negatives, is intended for casual use. More serious users will opt for a true transparency adapter.
Some models have a lid that doubles as a transparency adapter for up to 4”×5” slides, whereas
others use a device that replaces the normal scanner cover and contains its own light source
and mirror mechanism. The scanner driver is used to select this adapter as the scanning source,
and the normal light source inside the main scanner body is turned off. The most sophisticated
variation found in very high-priced scanners is a media drawer that slides open and enables
transparencies to be slid into the body of the scanner. Of these three, only the media drawer
technology provides for true high-resolution scanning of small 35mm slides and negatives.
■ High resolution made even higher through interpolation. Unlike simpler types of scanners, flatbed
scanners actually have two resolutions: optical and interpolated. Optical resolution refers to the
actual resolution of the scanning optics—the hardware. To achieve higher resolution, flatbed
scanners also offer a second resolution in which the scanner’s software driver fills in fine details
lost when detailed line art or text is scanned. This second method is called interpolation and usually increases the maximum resolution of the scanner by a factor of at least 4×. Thus, a scanner
with a 1,200dpi optical resolution might have an interpolated resolution of at least 4,800dpi.
Because the interpolated resolution is software-based (instead of hardware-based), poorly-written
scanner drivers can cause poor results when using these higher resolutions. However, most scanners feature excellent interpolated modes that can produce much better results when scanning
line art or text for OCR use. Although these modes also can be used for photographs, this is seldom necessary because of the resolution limitations inherent in photographs (see the following). Interpolated resolutions should not be used to scan 35mm transparencies, either.
Drawbacks of Flatbed Scanners
■ Size and bulk. Because flatbed scanners are designed to handle letter-size documents, they take
up a fairly large amount of desk space, although some newer models are hardly larger than the
8.5”×11” letter-size paper they handle as a maximum size.
■ Reflective media limitations. The least expensive flatbed scanners have no provision for transparency adapters, but most mid-range to high-end models have optional adapters for 35mm
and larger negatives and slides. The scanning quality is very high when scanning 4”×5” and
larger negatives (I’ve scanned about a thousand 1900–1920 vintage glass negatives for a university archiving project with my transparency-adapter-equipped scanner). However, because of the
limits of optical resolution, they’re not the best choice for small negatives and slides.
Slide Scanners
Slide scanners use a motorized film holder that pulls a 35mm slide or filmstrip holder past a scanning
mechanism. Even though the moving parts in the scanner are limited to the film holder, the high
optical resolution of these scanners (2,700dpi–4,000dpi are typical), the resulting precision of the
motors, and the relatively small market for transparency film make most slide scanners relatively
expensive ($700–$1600). However, a few parallel-port models are available for around $100.
Most slide scanners use SCSI interfacing and are usually limited to 35mm film, although some models
can be fitted with adapters for Advanced Picture System (APS) film holders or microscope slides. A few
slide scanners can handle media up to 4”×5”.
Although the high cost of slide scanners means they’re not for casual users, models with 2,700dpi or
higher resolution represent the best way to maximize the quality of the small 24mm×36mm (approximately 1”×1.5”) 35mm negatives or slides at a reasonable cost. They often feature advanced software
for automatically correcting color based on the characteristics of the slide or print films being scanned
and even automatic digital dust and fine-scratch removal.
Photo Scanners
This newest type of scanner is designed for users who want to scan both snapshots and 35mm transparencies and who don’t want to pay a bundle to do it. This young product category has only a couple of participants at this time: HP and Artec.
HP’s PhotoSmart provides a 300dpi snapshot resolution for prints up to 5”×7” and a 2,400dpi highresolution scan for 35mm negatives and slides.
Note
Although the differences in scanning resolution between prints and slides/negatives seems startling, there’s a good reason
for it. Most prints don’t provide better quality if scanned at more than 300dpi because of the loss of fine details in prints.
Also, prints are at or near the size they’ll be when reprinted after scanning. However, slides and negatives are only
24mm×36mm (about 1”×1.5”) and must be enlarged a great deal for typical printing or even Internet Web page use.
Scanning them at a higher resolution makes sense.
Although the original version required users to wrestle with SCSI interfacing, a newer version—the
PhotoSmart S20—uses a USB port instead. Both units provide very high image quality, especially with
slides and negatives, but the included software has been the source of many complaints. Lenik
Terenin has developed a free replacement for the standard HP scanner software for the PhotoSmart
units. You can download his Pscan32 free from the Web. Another replacement PhotoSmart scanner
program is Ed Hamrick’s shareware VueScan.
Artec’s ScanROM 4E is an updated version of its original ScanROM Photo. The ScanROM name comes
from the CD-ROM–style loading tray each unit features for media handling. The 4E offers resolutions
of up to 4,800dpi, whereas the ScanROM Photo’s resolution is 300dpi with Windows 3.1 and up to
1,200dpi with Windows 9x. These units use the EPP-type parallel port for interfacing, making them
slower in operation than the HP models but easier to use with a wide range of computers. For more
information, see the Artec Web site.
Drum Scanners
Despite the quality improvements in flatbed scanners and the development of slide and transparency
scanners, the ultimate image scanners remain drum scanners. Whereas high-resolution flatbed scanners can achieve optical resolutions of 3,000dpi, drum scanners can reach as high as 8,000dpi. This
makes them the perfect choice for creating color separations for professional glossy magazine and
catalog reproduction.
Drum scanners attach the media to be scanned to a rotating drum that spins at thousands of rpms
(revolutions per minute). Light passes through the drum and image and is converted to digital format
by PMTs (Photo Multiplier Tubes).
Drum scanners’ superior optical resolution is matched by their capability to pick up fine details
(resolving power) and handle of a very wide range of light to dark tones (dynamic range). Highquality drum scanners can handle the entire dynamic range from 0 (pure white) to 4.0 (dead black)
optical density (OD). This exceeds the needs of typical prints (0.05OD–2.2OD) and even transparencies (0.25OD–3.2OD). Some models even perform color separations within the scanner itself.
Although drum scanners are far too expensive for all but high-end graphics studios to purchase (typical models sell for $10,000–$30,000 and above), many companies offer drum scanning on a per-item
basis for graphics that need to be of ultimate quality, such as for high-quality color image setting.
Interfacing Your Scanner
Four interface methods are used on recent and current-model scanners: parallel-port, SCSI, USB, and
IEEE-1394.
Parallel (LPT) Port Interfacing
Parallel-port connections are primarily limited to low-priced models. This interface type often takes
advantage of the higher data-transfer rates of the IEEE-1284–compatible port settings, such as EPP and
ECP, and always takes advantage of bidirectional or PS/2-style printer ports. Because virtually all computers have a parallel port, parallel-port scanners are universal scanners capable of working virtually
everywhere with every type of computer running Microsoft Windows.
Parallel-port scanners have some significant disadvantages, though. First, juggling any combination of
devices beyond a scanner and a printer can be difficult. With Zip, LS-120, CD-R/CD-RW, tape backup,
and other types of removable-media drives often fighting for the parallel port, the order in which
devices are connected to the computer can be critical. Should the Zip drive or the scanner be connected first? The printer must be the last item in the daisy-chain because printers lack the passthrough ports used by the other devices. You’ll need to experiment or add a second LPT port to
separate your scanner and printer from other devices.
A second disadvantage is scanning speed. Even if your scanner can use the fastest ECP or ECP/EPP
port modes, the parallel port can’t lay a glove on the faster SCSI, USB, or IEEE-1394 ports.
A third disadvantage is operating-system compatibility. Most parallel-port scanners won’t work with
Windows NT4.0, for example, and cannot be used with most Macs or so-called legacy-free PCs (which
use USB ports in place of serial, parallel, keyboard, and mouse ports). Use parallel-port scanners for
light-duty operation with consumer versions of Windows (9x/Me) or when other types of expansion
aren’t feasible.
SCSI Interfacing
As you saw in Chapter 8, “The SCSI Interface,” SCSI interfacing is extremely flexible, providing for
daisy-chains of up to seven SCSI devices of varying types and even more with advanced SCSI interface
cards. The SCSI Interface is covered in more detail in Chapter 8.
In tests, a typical scanner equipped with both SCSI and USB ports scanned an 8”×10” color image in
about half the time using the SCSI port as compared to when the USB port was used. SCSI is the best
choice for users who need speed and flexibility and who already have a SCSI interface or don’t mind
the extra cost of the card (some scanners come with an appropriate interface card).
Note that some vendors are now switching to USB ports in place of SCSI for some models because
both offer daisy-chaining, but SCSI remains the better choice for high performance.
If your SCSI-based scanner comes with a host adapter card, can you use it for other devices?
Frequently, the answer is “Probably not.” Such low-cost cards are often optimized just for scanner support. I have used some cheap SCSI cards of this type to attach to a scanner and SCSI Zip drive, but
more elaborate daisy-chains aren’t recommended and often don’t work.
USB Interfacing
The Universal Serial Bus is the latest widely available port and is beginning to replace serial and parallel ports. For users needing to mix the “no-brainer” installation typical of parallel-port devices with
the flexibility of SCSI device handling, USB is the way to go for hobbyist use on systems featuring
with Windows 98, Windows Me, or Windows 2000. USB is covered in more detail in Chapter 17,
“Serial, Parallel, and Other I/O Devices.”
Note
Not every USB device is supported by Windows 2000. Before you buy a USB scanner for use with Windows 2000,
verify that you have Windows 2000 drivers available for it.
IEEE-1394 (i.Link/FireWire) Interfacing
Recent developments in scanner technology have made the development of 1,000dpi and above optical scanners at reasonable prices possible. Scanners with this level of performance can be used to create incredibly sharp and detailed scans, but only by delivering an enormous amount of data to the
host PC. The IEEE-1394 (i.Link) interface is now available on high-performance scanners from Epson,
UMAX, and others, enabling large amounts of scanned data to be transported to the computer from
the scanner.
To use an IEEE-1394 scanner with a system, you must have the following:
■ IEEE-1394 port installed in your computer. These cards are PCI-based and typically contain three or
more ports; a few computers have built-in IEEE-1394 ports.
■ Compatible operating system software (Windows 98/Me/2000) and drivers
You can find a list of IEEE-1394-interface scanners at the AllFireWire.com Web site: www.
allfirewire.com.
TWAIN
Regardless of which interface you choose for the scanner, a scanner can’t work without driver software. One of the hidden factors driving the popularity of scanners is a standard called TWAIN.
TWAIN, the “acronym that isn’t” (see the following Note), is the collective name for a very popular
type of software driver that enables virtually any application to drive virtually any scanner or digital
camera.
Note
TWAIN, according to the official TWAIN online site, is short for nothing (“TWAIN is TWAIN”). However, one unofficial
name that’s made the rounds for years is “Technology Without an Interesting Name.”
Before TWAIN, each scanner maker had to provide device drivers and an image-scanning program
that was hard-wired to the scanner. These programs were usually limited, and most users preferred to
perform most image-editing with other programs, such as Adobe Photoshop. To get a scanned image
into Photoshop, for example, you had to close Photoshop, start the image-scanning program, scan the
image, save it, and load it into Photoshop. When combined with the limited multitasking capabilities
of early versions of Windows, this clunky process made scanning very difficult for most users. OCR
software vendors—such as Caere, creators of OmniPage—were among the first to need direct access to
the scanner. Before TWAIN, this meant they had to write direct-support drivers for every scanner they
wanted to support.
The result was that new scanners would often not work with existing OCR and graphics programs. In
addition, you had to make sure your scanner and software combination would work together.
TWAIN was created in 1992 by a group of industry vendors in the scanning hardware and OCR/imaging software fields. More than 175 vendors form the TWAIN Coalition, which reviews standards developed by the TWAIN Working Group.
TWAIN provides a hardware-specific driver that can be integrated into OCR, imaging, word processing, and other types of applications. Any TWAIN-compliant application can use any TWAIN device
installed on the system. A common use for TWAIN is to enable programs such as Adobe Photoshop to
access scanners within the program.
TWAIN devices such as scanners and digital cameras come with a driver that enables all TWAIN-compliant applications’ access to the device. Although a user with two or more scanners (this writer has
Epson, Canon, and Polaroid scanners) will have a TWAIN driver for each device, any device can be
used with any software that supports TWAIN. Instead of each application needing a separate driver
routine for every scanner, each application only needs to have TWAIN compatibility to use any
TWAIN device on the system.
This integration enables a Photoshop user, for example, to choose a TWAIN device as an image source,
start the device (a scanner, for example), scan the image, and have the resulting image appear in the
Photoshop window for editing—all without the need to close down or reopen Photoshop. TWAIN also
opens the door to direct scanner support in word processing and page layout programs, as well as in
the traditional graphics-editing, photo-editing, and OCR programs.
Because TWAIN provides a standardized interface at the application level, creators of photo editors,
OCR programs, and other typical scanner-driven programs no longer need to write customized drivers
for the increasing numbers of scanners on the market.
TWAIN also minimizes the chances of scanners becoming outdated due to a lack of software support.
Because all the scanner manufacturer has to do is write a single TWAIN driver for each operating system/scanner combination, older scanners can be supported for several years.
Image and Scanner Interface Specification
Image and Scanner Interface Specification (ISIS), created and controlled by Pixel Translations, is
another popular imaging-software interface standard. Unlike TWAIN, ISIS is designed to provide support for not only image acquisition, but also image processing and image handling with languages
such as Java and Visual Basic OCXs and applications created with these languages.
Pixel Translations provides free toolkits enabling vendors to create ISIS-compliant drivers and also
supplies customized drivers to many major scanner vendors. If your scanner provides both ISIS and
TWAIN support, try each of them to see which provides you with better performance and features.
Because TWAIN, despite its more limited role, is more popular than ISIS, Pixel Translations will be
releasing drivers that enable any ISIS application to use TWAIN drivers.
If your software lists a File option such as Acquire or Import, your application probably supports
TWAIN or ISIS scanner control. If you have multiple TWAIN or ISIS devices, you’ll normally have a
menu option to Select Source, enabling you to choose which scanner or other digital source to use for
image acquisition.
Getting the Most from Your Scanner’s Hardware
Configuration
1. Use the fastest interface your scanner offers.If your scanner offers either SCSI and USB or SCSI and
parallel, it’s worth the extra time and expense (both minimal with Windows 9x) to buy and
install a SCSI interface card (some scanners come with the appropriate SCSI card). SCSI is the
fastest of the three major interfaces, and speed is a critical factor in scanning, especially with
large originals and high scanning resolutions. If you’re already using a SCSI card for any other
device, you should be able to attach your scanner to it if it’s an Adaptec ASPI-compliant SCSI
card and scanner. If your system has an IEEE-1394 port and you can afford to spend more
money, get an IEEE-1394 scanner for even better performance than with SCSI.
2. Set your LPT port for best performance if you use a parallel-port scanner. Generally, bidirectional, EPP,
or ECP/EPP modes are recommended for scanners that use parallel ports. (Check your documentation for details.) As you saw with other parallel-port devices, using the fastest possible settings
that are compatible with all LPT devices you use is the best route to follow.
3. Get SCSI right. Although SCSI interfacing is one of the fastest interfaces for scanners and many
other peripherals, it offers several challenges.
If your scanner will be added to a daisy-chain of existing SCSI devices, you might need to purchase a different cable from the one that came with your scanner.
If you’ll be using a scanner bundled with a SCSI card and cable, the cable you receive will work
fine, but you must ensure that your scanner’s terminator is turned on and connected to end the
SCSI bus. If in the future, you add another SCSI device to your system by connecting it to the
scanner, turn off the scanner’s terminator and turn on or install the new device’s terminator.
For more information about SCSI, see Chapter 8 in the book.
Scanner Troubleshooting
For a scanner to work properly, the operating system, application, and scanner must all work properly
together. When the scanner won’t respond or doesn’t produce the results you expect, use this list of
typical problems and solutions to get your scanner back into action.
Scanner Fails to Scan
If the scanner’s on a parallel port, make sure you’ve loaded the correct DOS-based parallel-port driver
as well as the scanner driver for Windows. For example, Epson scanners use EPSN.SYS in the computer’s CONFIG.SYS file. These device drivers normally require configuration options to indicate the
correct LPT port address.
Also, make sure the parallel port is set correctly. At a minimum, parallel-port scanners require the
bidirectional or PS/2-style port setting. Some might work with the later IEEE-1284 EPP or ECP modes,
but others don’t.
If the scanner’s SCSI-based, make sure the scanner’s device ID isn’t in use by other SCSI devices. If
your SCSI interface card is made by Adaptec, for example, you can use the included SCSI Interrogator
to make sure your scanner and other SCSI-based devices are available.
Make sure terminators are set correctly for SCSI devices; the last device in the daisy-chain needs to be
terminated. If you terminate any other devices in the daisy-chain, devices beyond the terminated
device will be ignored.
If you’ve just updated a Windows 95 system to Windows 98, an important TWAIN driver file might
have been replaced. Use the Microsoft Windows 98 Version Conflict Manager (VCM) to check for a
changed file called TWAIN.DLL, and replace the one installed during the Windows 98 upgrade with the
one you were using (that worked!).
With newer hot-swap technologies, such as USB and IEEE-1394, make sure that your system is ready
for the scanner:
1. Enable the USB port or install an IEEE-1394 or a USB card.
2. Use an operating system that supports the port type. Windows 98/Me/2000 are required for
IEEE-1394, and USB devices work best with these versions of Windows, although late releases of
Windows 95 do support some USB devices.
3. Make sure the device drivers for the scanner are installed.
4. Attach the scanner to the system and power it up.
If you forgot to plug in a USB or an IEEE-1394 scanner, you can attach it to your system at any time
because these technologies are both Plug-and-Play and hot-swappable.
Can’t Detect Scanner
SCSI and parallel-port scanners must already be turned on when the system starts to be detected. In
some cases with a SCSI-based device, you can open the Device Manager (Control Panel, System,
Properties Sheet) for Windows 9x/Me/2000 and click the Refresh button after resetting or turning on
the scanner. If this fails or if the scanner’s a parallel-port model, you must turn on the scanner and
restart the computer to enable the scanner to be recognized.
You can attach IEEE-1394 and USB scanners to your system at any time.
Can’t Use “Acquire” from Software to Start Scanning
To see whether the scanner or the application is at fault, use the scanner’s own driver to scan directly
(it’s normally added to the Windows 9x/Me/NT/2000 menu). If it scans correctly, you might have a
problem with TWAIN registration in your application’s File, Import/Acquire option. Check your application’s documentation for help; the fix might require reinstalling your scanner drivers.
Distorted Graphic Appearance During Scan
Most scanners are designed to handle a wide range of originals, from black-and-white pencil drawings
to full-color photographs. You must correctly identify the image type to get good results. Check your
document or image type against the checklist given. You probably have selected the wrong scan type
for the document.
Use Table 2 as a quick reference to help you determine the best scanning mode for your documents.
Table 2
Recommended Scanning Modes for Document Types
Document Type/
Scanning Mode
Color Photo
Drawing
Line Art
No
OCR
No
Grayscale
No
Color Photograph
Yes
Color Halftone
Yes
No
No
No
Color Drawing
No
Yes
No
No
256-color
No
Copy/Fax
Yes
3
Text
Black-and-White
Photo
Yes
Yes
No
No
Yes
No
Yes1
No
Yes
No
No
Yes2
Yes
4
Yes
No
4
Yes
No
4
Yes4
1. Recommended only for drawings containing pencil shading and ink wash effects.
2. Use to convert color to black-and-white if photo-editing software conversion is unavailable or produces inferior
results.
3. Adjust halftone options to match output device’s requirements.
4. Use to prepare scanned image for sending as fax or when image will be photocopied; converts all tones to digital
halftones.
Graphic Looks Clear Onscreen But Prints Poorly
As you learned in the printer section of this chapter, a big difference exists between how a graphic
displays onscreen and how well it prints. Use this list of typical problems and solutions to get the best
results:
■ Colors don’t match. You must use a color-management tool (which might be included with your
scanner or have to be purchased separately), and you must color-calibrate your scanner and
your monitor. See the documentation for your photo-editing program and scanner for compatible color-management tools.
■ Print is fuzzy and lacks definition. You might have scanned the photograph at 72dpi instead of
200dpi or higher (depending on the printer). Because inkjet and laser printers have many more
dots per inch than displays do, a display-optimized scan will become very small and still lack
sharpness when printed on a printer with a higher resolution.
OCR Text Is Garbled
OCR applications, such as OmniPage, enable your scanner to convert printed pages of all types back
into computer-readable text and graphics. These programs boast remarkable accuracy when used correctly, but it’s up to you to ensure that you provide readable documents. Follow these recommendations to ensure the best results possible:
■ Check the quality of your document. Photocopies of documents scanned after handwritten notes
and highlighters were used on the original are very difficult for even the most accurate pagerecognition program to decipher.
■ Scan at a minimum of 300dpi or higher if your scanner permits it. Compare the results at 300dpi to
those at 600dpi or even higher; standardize on the resolution that provides the best results. The
higher resolutions might take a bit more time, but quality is king! You can’t recognize data that
doesn’t exist. Plus, you always can reduce the resolution of a high-resolution scanned image if
you want to use it on a Web page.
■ Check the straightness of your document. Deskew the scan, or reinsert the original and rescan it.
■ The fonts in the document might be excessively stylized—such as script, black letter Gothic, and others.
If you have a hard time telling an “A” from a “D,” for example, a page-recognition program will
have an equally difficult time trying to decipher it. If you plan to scan documents using the
same hard-to-recognize fonts frequently, consider taking the time to train your page-recognition
program to understand the new alphabet, numbers, and symbols.
■ Try manually zoning the document (drawing boxes around what you want scanned). Check the
expected data type in each zone. The program might be mistaking a graphics box for a text area
or a table for ordinary text.