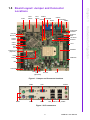
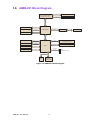
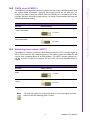
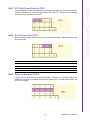
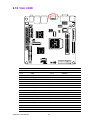
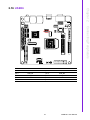
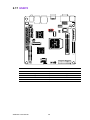
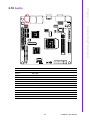
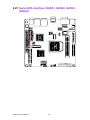
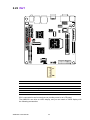
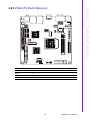
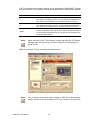
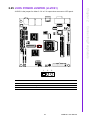
1
User Manual
AIMB-221
Socket S1g1
AMD 64X2 Turion / Mobile
Sempron Processor
HyperTransport Speed 800 MHz
Industrial Mini-ITX Motherboard
with DDR2/Dual GbE/PCI
Copyright
This document is copyrighted, 2008, by Advantech Co., Ltd. All rights are reserved.
Advantech Co., Ltd. reserves the right to make improvements to the products
described in this manual at any time without notice.
No part of this manual may be reproduced, copied, translated or transmitted in any
form or by any means without the prior written permission of Advantech Co., Ltd.
Information provided in this manual is intended to be accurate and reliable. However,
Advantech Co., Ltd. assumes no responsibility for its use, nor for any infringements
upon the rights of third parties which may result from its use.
Acknowledgements
AWARD is a trademark of Phoenix Technologies Ltd.
IBM and PC are trademarks of International Business Machines Corporation.
AMD, ATI, TurionTM 64X2, SempronTM, HyperTransportTM are the trademarks of
Advanced Micro Devices, Inc.
Winbond is a trademark of Winbond Electronics Corpation.
All other product names or trademarks are the properties of their respective owners.
A Message to the Customer
Advantech Customer Services
Each and every Advantech product is built to the most exacting specifications to
ensure reliable performance in the harsh and demanding conditions typical of industrial environments. Whether your new Advantech equipment is destined for the laboratory or the factory floor, you can be assured that your product will provide the
reliability and ease of operation for which the name Advantech has come to be
known.
Your satisfaction is our primary concern. Here is a guide to Advantech's customer
services. To ensure you get the full benefit of our services, please follow the instructions below carefully.
Technical Support
We want you to get the maximum performance from your products. So if you run into
technical difficulties, we are here to help. For the most frequently asked questions,
you can easily find answers in your product documentation. These answers are normally a lot more detailed than the ones we can give over the phone.
So please consult this manual first. If you still cannot find the answer, gather all the
information or questions that apply to your problem, and with the product close at
hand, call your dealer. Our dealers are well trained and ready to give you the support
you need to get the most from your Advantech products. In fact, most problems
reported are minor and are able to be easily solved over the phone.
In addition, free technical support is available from Advantech engineers every business day. We are always ready to give advice on application requirements or specific
information on the installation and operation of any of our products.
AIMB-221 User Manual
Part No. 2006022100
Edition 1
Printed in China
July 2008
ii
Declaration of Conformity
This device complies with the requirements in part 15 of the FCC rules: Operation is
subject to the following two conditions:
! This device may not cause harmful interference
! This device must accept any interference received, including interference that
may cause undesired operation
This equipment has been tested and found to comply with the limits for a Class A digital device, pursuant to Part 15 of the FCC Rules. These limits are designed to provide reasonable protection against harmful interference when the equipment is
operated in a commercial environment. This equipment generates, uses, and can
radiate radio frequency energy and, if not installed and used in accordance with the
instruction manual, may cause harmful interference to radio communications. Operation of this device in a residential area is likely to cause harmful interference in which
case the user will be required to correct the interference at his/her own expense. The
user is advised that any equipment changes or modifications not expressly approved
by the party responsible for compliance would void the compliance to FCC regulations and therefore, the user's authority to operate the equipment.
Caution! There is a danger of a new battery exploding if it is incorrectly installed.
Do not attempt to recharge, force open, or heat the battery. Replace the
battery only with the same or equivalent type recommended by the manufacturer. Discard used batteries according to the manufacturer's
instructions.
iii
AIMB-221 User Manual
Memory Compatibility
AIMB-221 Memory Tested for Compatibility
Brand
Size Speed Type
ECC Vendor
PN
Advantech Memory
PN
Result
256 DDR2 SODIMM N
MB 533
DDR2
M20SS2 NA
F3G3410
A1BOZ
SAMSUNG 52B
PASS
K4T56083QF-GCD5
(32x8)
512 DDR2 SODIMM N
MB 533
DDR2
M20EL2 NA
G3H3410
A1BOZ
ELPIDA JAPAN
E5108AB-5C-E
(64x8)
256 DDR2 SODIMM N
Apacer MB 533
DDR2
78.82054 NA
.420
ELPIDA JAPAN
PASS
E5116AB-5C-E
05050WPWA (64x8)
1
Apacer
GB
(ROHS)
DDR2 SODIMM N
667
DDR2
78.02G6 96SD2ELPIDA
3.423
1G667NN- E5108AGBG-6E-E
AP
(64x8)
PASS
1
GB
DDR2 SODIMM N
800
DDR2
NA
NA
PASS
DSL
(RoHS) 2
GB
ELPIDA TWN
E5108AHSE-8E-E
(64x8)
DDR2 SODIMM N
800
DDR2
NA
NA
ELPIDA JPN
E1108ACSE-8E-E
(128x8)
PASS
256 DDR2 SODIMM N
MB 667
DDR2
NA
NA
ELPIDA E5116AF6E-E (32x16)
PASS
512 DDR2 SODIMM N
MB 667
DDR2
NA
NA
ELPIDA
E5108AGBG-6E-E
(64x8)
PASS
A-DATA
PASS
DSL
(RoHS) 1
GB
DDR2 SODIMM N
667
DDR2
NA
NA
ELPIDA
E5108AGBG-6E-E
(64x8)
PASS
2
GB
DDR2 SODIMM N
667
DDR2
NA
NA
ELPIDA
E1108ACSE-6E-E
(128x8)
PASS
PASS
Transcend
256 DDR2 SODIMM N
MB 533
DDR2
TS32MS NA
Q64V5M
Hynix
HY5PS121621BFPY5
512 DDR2 SODIMM N
MB 533
DDR2
1198330266
Infineon HYB18T512 PASS
800AF37 SVV39006
0526 (32x8)
2
GB
TS256M NA
SQ64V5
U
AIMB-221 User Manual
DDR2 SODIMM N
533
DDR2
iv
NA
Micron D9HNL
(128x8)
PASS
256 DDR2 SODIMM N
MB 667
DDR2
TS32MS NA
Q64V6M
Hynix
HY5PS121621BFPY5
PASS
512 DDR2 SODIMM N
MB 667
DDR2
TS64MS NA
Q64V6J
SAMSUNG
K4T51083QC ZCE6
(64x8)
PASS
1
GB
TS128M NA
SQ64V6J
SAMSUNG
K4T51083QC ZCE6
(64x8)
PASS
Transcend
(RoHS) 2
GB
DDR2 SODIMM N
667
DDR2
DDR2 SODIMM N
667
DDR2
TS256M NA
SQ64V6
U
Micron D9HNL
(128x8)
PASS
1
GB
DDR2 SODIMM N
800
DDR2
TS128M NA
SQ64V8J
HYNIX
HY5PS12821E-FPS5 (64x8)
PASS
2
GB
DDR2 SODIMM N
800
DDR2
TS256M NA
SQ64V8
U
Micron D9HNP
(128x8)
PASS
512 DDR2 SODIMM N
MB 533
DDR2
UG64T6 NA
400L8SU
-5AS
SEC 525 ZC05
K4T51083QC
EDE406CB (64x8)
PASS
UG12T6 NA
400L8SU
-6AP
ELPIDA E5108AG6E-E (32x16)
PASS
UG
1
UG
GB
(ROHS)
DDR2 SODIMM N
667
DDR2
Product warranty
Advantech warrants to you, the original purchaser, that each of its products will be
free from defects in materials and workmanship for two years from the date of purchase.
This warranty does not apply to any products which have been repaired or altered by
persons other than repair personnel authorized by Advantech, or which have been
subject to misuse, abuse, accident or improper installation. Advantech assumes no
liability under the terms of this warranty as a consequence of such events.
If an Advantech product is defective, it will be repaired or replaced at no charge during the warranty period. For out-of-warranty repairs, you will be billed according to
the cost of replacement materials, service time and freight. Please consult your
dealer for more details.
If you think you have a defective product, follow these steps:
1. Collect all the information about the problem encountered. (For example, type of
PC, CPU speed, Advantech products used, other hardware and software used,
etc.) Note anything abnormal and list any on-screen messages you get when
the problem occurs.
2. Call your dealer and describe the problem. Please have your manual, product,
and any helpful information readily available.
3. If your product is diagnosed as defective, obtain an RMA (return material authorization) number from your dealer. This allows us to process your return more
quickly.
4. Carefully pack the defective product, a fully-completed Repair and Replacement
Order Card and a photocopy proof of purchase date (such as your sales receipt)
in a shippable container. A product returned without proof of the purchase date
is not eligible for warranty service.
5. Write the RMA number visibly on the outside of the package and ship it prepaid
to your dealer.
v
AIMB-221 User Manual
Initial Inspection
Before you begin installing your motherboard, please make sure that the following
materials have been shipped:
!
!
!
!
!
!
!
!
!
AIMB-221 AMD 64 X2 Dual Core Mini ITX industrial
motherboard
1 AIMB-221 startup manual
1 CD with utility & User's Manual
1 CPU Cooler
1 Ultra ATA 66/100 HDD cable
2 Serial ATA HDD data cable
2 Serial ATA HDD power cable
1 I/O port bracket
1 warranty card
P/N: 2006022110
P/N: 2066022100
P/N: 1750001620
P/N: 1701400452
P/N: 1700003194
P/N: 1703150102
P/N: 1960019192T000
P/N: 2190000902
If any of these items are missing or damaged, contact your distributor or sales representative immediately. We have carefully inspected the AIMB-221 mechanically and
electrically before shipment. It should be free of marks and scratches and in perfect
working order upon receipt. As you unpack the AIMB-221, check it for signs of shipping damage. (For example, damaged box, scratches, dents, etc.) If it is damaged or
it fails to meet the specifications, notify our service department or your local sales
representative immediately. Also notify the carrier. Retain the shipping carton and
packing material for inspection by the carrier. After inspection, we will make arrangements to repair or replace the unit.
AIMB-221 User Manual
vi
Contents
Chapter
1
Hardware Configuration......................1
1.1
1.2
1.3
Introduction ............................................................................................... 2
Features .................................................................................................... 2
Specifications ............................................................................................ 3
1.3.1 System .......................................................................................... 3
1.3.2 Memory ......................................................................................... 3
1.3.3 Input/Output .................................................................................. 4
1.3.4 Ethernet LAN ................................................................................ 4
1.3.5 Industrial features ......................................................................... 4
1.3.6 Mechanical and environmental specifications............................... 4
Jumpers and Connectors .......................................................................... 4
Board Layout: Jumper and Connector Locations...................................... 5
Figure 1.1 Jumper and Connector locations................................ 5
Figure 1.2 I/O connectors ............................................................ 5
AIMB-221 Block Diagram.......................................................................... 6
Figure 1.3 AIMB-221 Block Diagram ........................................... 6
Jumpers and Connectors .......................................................................... 7
Safety Precautions .................................................................................... 8
Jumper Settings ........................................................................................ 8
1.9.1 How to set jumpers ....................................................................... 8
1.9.2 CMOS clear (JCMOS1) ................................................................ 9
Table 1.1: CMOS (JCMOS1)....................................................... 9
1.9.3 Watchdog timer output (JWDT1) .................................................. 9
Table 1.2: Watchdog timer output (JWDT1) ................................ 9
Table 1.3: ATX/AT mode selector (JPSON1) ............................ 10
Table 1.4: COM1 RS-232 with 5V or 12V selector (JSETCOM1) .
10
Table 1.5: COM2 RS-232/422/485 mode selector (JSETCOM2)..
10
Figure 1.4 COM2 RS-232/422/485 jumper setting .................... 10
System Memory ...................................................................................... 11
1.10.1 CPU FSB and memory speed..................................................... 11
Memory Installation Procedures.............................................................. 11
Cache Memory........................................................................................ 11
Processor Installation.............................................................................. 11
PCI Bus Routing Table............................................................................ 12
Table 1.6: PCI Bus Routing Table ............................................. 12
Table 1.7: PCI1 (Routing: AD31 / PCI_#INTF, #INTG, #INTH,
#INTE) ...................................................................... 12
Table 1.8: MINIPCI1 (Routing: AD28 / #INTE / #INTF) ............. 13
1.4
1.5
1.6
1.7
1.8
1.9
1.10
1.11
1.12
1.13
1.14
Chapter
2
Connecting Peripherals ....................15
2.1
2.2
2.3
2.4
Introduction ............................................................................................. 16
Primary (IDE1) IDE Connector................................................................ 16
DVI2 (Optional) ....................................................................................... 18
Front Panel Connectors (JFP1, JFP2, JFP3).......................................... 20
2.4.1 ATX Soft Power Switch (JFP1) ................................................... 21
2.4.2 Reset Connector (JFP1) ............................................................. 21
2.4.3 External Speaker (JFP2)............................................................. 21
2.4.4 HDD LED Connector (JFP2)....................................................... 22
2.4.5 SM Bus Connector (JFP2 PIN6,8) .............................................. 22
2.4.6 Power LED and keyboard lock connector (JFP3 /PWR_LED&KEY
LOCK) ......................................................................................... 23
vii
AIMB-221 User Manual
2.6
2.7
2.8
2.9
2.10
2.11
2.12
2.13
2.14
2.15
2.16
2.17
2.18
2.19
2.20
2.21
2.22
2.23
2.24
2.25
Table 2.1: ATX power supply LED status (No support for AT power) ............................................................................. 23
ATX/AT Mode Selector (JPSON1).......................................................... 24
Table 2.2: ATX/AT Mode selector (PSON1).............................. 24
Serial Port Header (COM 3/4/5/6)........................................................... 25
CPU Fan Connector (CPU Fan1) ........................................................... 26
System Fan (SYSFAN1, SYSFAN2)....................................................... 27
Parallel Port (LPT1) ................................................................................ 28
JSETCOM1............................................................................................. 30
JSETCOM2............................................................................................. 31
GPIO1 ..................................................................................................... 33
VGA HDMI .............................................................................................. 34
LAN1_USB12.......................................................................................... 35
LAN2_USB34.......................................................................................... 36
USB56..................................................................................................... 37
USB78..................................................................................................... 38
Audio....................................................................................................... 39
FPAUD1.................................................................................................. 40
SPKOUT1 ............................................................................................... 41
Serial ATA Interface (SATA1, SATA2, SATA3, SATA4)......................... 42
INV1 ........................................................................................................ 44
VGA2 (TV-Out) (Optional)....................................................................... 45
LVDS....................................................................................................... 47
LVDS POWER JUMPER (JLVDS1)........................................................ 49
3
Award BIOS Setup ............................ 51
3.1
Introduction ............................................................................................. 52
3.1.1 BIOS Setup program .................................................................. 52
3.1.2 CMOS RAM Auto-backup and Restore ...................................... 53
Entering Setup ........................................................................................ 53
Figure 3.1 Award BIOS Setup initial screen .............................. 53
Standard CMOS Setup ........................................................................... 54
Figure 3.2 Standard CMOS Features Screen ........................... 54
3.3.1 Date ............................................................................................ 54
3.3.2 Time............................................................................................ 54
3.3.3 IDE channel 0/1 Master/Slave .................................................... 54
3.3.4 Drive A / Drive B ......................................................................... 54
3.3.5 Video........................................................................................... 55
3.3.6 Halt On........................................................................................ 55
3.3.7 Memory....................................................................................... 55
Advanced BIOS Features ....................................................................... 55
Figure 3.3 Advanced BIOS Features screen............................. 55
3.4.1 CPU Features ............................................................................. 56
3.4.2 Hard Disk Boot Priority ............................................................... 56
3.4.3 Virus Warning ............................................................................. 56
3.4.4 CPU L1, L2 & L3 Cache ............................................................. 56
3.4.5 Hyper-Threading Technology ..................................................... 56
3.4.6 Quick Power On Self Test .......................................................... 56
3.4.7 First/Second/Third Boot Device .................................................. 56
3.4.8 Boot Other Device ...................................................................... 56
3.4.9 Swap Floppy Drive...................................................................... 56
3.4.10 Boot Up Floppy Seek.................................................................. 57
3.4.11 Boot Up NumLock Status ........................................................... 57
3.4.12 Gate A20 Option ......................................................................... 57
3.4.13 Typematic Rate Setting .............................................................. 57
3.4.14 Typematic Rate (Chars/Sec) ...................................................... 57
3.4.15 Typematic Delay (msec) ............................................................. 57
3.4.16 Security Option ........................................................................... 57
2.5
Chapter
3.2
3.3
3.4
AIMB-221 User Manual
viii
3.5
3.6
3.7
3.8
3.9
3.10
3.4.17 APIC Mode.................................................................................. 57
Advanced Chipset Features.................................................................... 58
Figure 3.4 Advanced Chipset Features screen ......................... 58
3.5.1 Memory Hole At 15M-16M .......................................................... 58
3.5.2 Configure AMT BIOS Support (Intel Active Management
Technology) ................................................................................ 58
3.5.3 PEG / Onchip VGA Control......................................................... 58
3.5.4 On-Chip Frame Buffer Size......................................................... 59
3.5.5 DVMT Mode................................................................................ 59
3.5.6 DVMT / FIXED Memory Size ...................................................... 59
3.5.7 Init Display First .......................................................................... 59
Integrated Peripherals............................................................................. 59
Figure 3.5 Integrated peripherals............................................... 59
Figure 3.6 On-Chip IDE Device ................................................. 59
3.6.1 IDE HDD Block Mode ................................................................. 60
3.6.2 IDE DMA Transfer Access .......................................................... 60
3.6.3 IDE Primary Master/Slave PIO/UDMA Mode (Auto) ................... 60
3.6.4 SATA Mode................................................................................. 60
3.6.5 Legacy mode support ................................................................. 62
Figure 3.7 Onboard Device........................................................ 62
3.6.6 On board LAN1 ROM.................................................................. 62
3.6.7 Onboard LAN2 Control ............................................................... 62
3.6.8 On board LAN2 ROM.................................................................. 62
Power Management Setup...................................................................... 63
Figure 3.8 Power management setup screen............................ 63
3.7.1 Power Supply Type..................................................................... 63
3.7.2 ACPI Function............................................................................. 63
3.7.3 ACPI Suspend Type ................................................................... 63
3.7.4 Run VGA BIOS if S3 Resume..................................................... 63
3.7.5 Power Management.................................................................... 63
Table 3.1: Power Saving ........................................................... 64
3.7.6 Video Off Method ........................................................................ 64
3.7.7 Video Off In Suspend.................................................................. 64
3.7.8 Suspend Type............................................................................. 64
3.7.9 Suspend Mode............................................................................ 64
3.7.10 HDD Power Down....................................................................... 64
3.7.11 Soft-Off by PWR-BTTN............................................................... 64
3.7.12 PowerOn by LAN ........................................................................ 64
3.7.13 PowerOn by Modem ................................................................... 64
3.7.14 USB KB Wake Up From S3 ........................................................ 64
3.7.15 PowerOn by Alarm...................................................................... 65
3.7.16 Primary IDE 0 (1) and Secondary IDE 0 (1)................................ 65
3.7.17 FDD, COM, LPT PORT............................................................... 65
3.7.18 PCI PIRQ [A-D]# ......................................................................... 65
3.7.19 PWRON After PWR-Fail ............................................................. 65
PnP/PCI Configurations .......................................................................... 65
Figure 3.9 PnP/PCI configurations screen................................. 65
3.8.1 Reset Configuration Data............................................................ 65
3.8.2 Resources Controlled By ............................................................ 65
3.8.3 PCI / VGA Palette Snoop............................................................ 66
3.8.4 Maximum Payload Size .............................................................. 66
PC Health Status..................................................................................... 66
Figure 3.10PC Health Status Screen.......................................... 66
3.9.1 Current System Temperature ..................................................... 66
3.9.2 FAN1: CPU FAN Speed.............................................................. 66
3.9.3 FAN2: System FAN Speed ......................................................... 66
3.9.4 VCORE and Other Voltages ....................................................... 66
Frequency / Voltage Control ................................................................... 67
Figure 3.11Spread Spectrum Frequency/Voltage Control screen ..
67
ix
AIMB-221 User Manual
3.11
3.12
3.13
Chapter
4
3.10.1 Spread Spectrum........................................................................ 67
Password Setting .................................................................................... 68
Save & Exit Setup ................................................................................... 69
Exit Without Saving................................................................................. 69
Chipset Software Installation Utility
and VGA Setup71
4.1
4.2
Before you begin..................................................................................... 72
Windows XP Driver Setup....................................................................... 74
5
LAN Configuration ............................ 81
5.1
5.2
5.3
5.4
Introduction ............................................................................................. 82
Features.................................................................................................. 82
Installation............................................................................................... 82
Win XP Driver Setup (LAN)..................................................................... 82
6
AC97 Audio Setup............................. 85
6.1
6.2
Introduction ............................................................................................. 86
Windows XP Driver Setup (AC97) .......................................................... 86
Appendix A
Programming the Watchdog Timer . 89
A.1
A.2
A.3
Watchdog timer overview........................................................................ 90
Reset/Interrupt selection ......................................................................... 90
Programming the Watchdog Timer ......................................................... 90
Table A.1: Watchdog timer registers ......................................... 92
A.3.1 Example Programs ..................................................................... 92
Chapter
Chapter
AIMB-221 User Manual
x
Chapter
1
Hardware
Configuration
1
1.1 Introduction
The AIMB-221 is the most advanced AMD M690T/M690E series industrial motherboard for industrial applications that require high-performance computing. The motherboard supports the mobile and desktop Socket S1g1 Athlon 64/Athlon 64FX/Athlon
X2/AMD Sempron/AMD Turion 64 processors with 200, 400, 600, 800, and 1,000
MHz HyperTransport (HT) interface speeds and DDR2 533/667/800 MHz memory up
to 4 GB.
The AIMB-221 incorporates the AMD M690T/M690E chipset to offer cost-effective
integrated graphics. The M690T/M690E chipset features ATI RadeonTM X1250 3D
graphics core to maximize VGA performance with up to 512 MB of shared system
memory. In addition, the AIMB-221 has a single/dual Gigabit Ethernet LAN via a dedicated PCIe x1 bus, which offers bandwidth of up to 500 MB/s, eliminating network
bottlenecks. High reliability and outstanding performance make the the AIMB-221 the
ideal platform for industrial networking applications.
By using the ATI SB600 chipset, the AIMB-221 offers one 32-bit, 33-MHz PCI and a
variety of features such as 4 on-board SATA II interfaces (bandwidth = 300 MB/s), 8
USB 2.0 connections; 1 ATA 100/66/33 port; and HD Audio. These powerful I/O
capabilities ensure even more reliable data storage capabilities and high-speed I/O
peripheral connectivity. When accompanied by Advantech's SNMP-1000 intelligent
SNMP/HTTP system manager module, the AIMB-221 permits users to monitor and
manage the system remotely. This is particularly crucial for mission-critical applications.
The AIMB-221 also adopts Advantech's unique patented "Sleep Mode Control Circuit" for AT Power Mode.
1.2 Features
!
!
!
!
!
High Performance I/O Capability: Dual/single Gigabit LAN via PCIe x1 bus, 1
PCI 32-bit/33 MHz PCI slots, 4 SATA2 connectors and 8 USB 2.0 ports.
Standard Mini-ITX form factor with industrial features: AIMB-221 provides
industrial features like long product life, reliable operation under wide temperature range, watchdog timer, CMOS backup functions, etc.
Health status monitoring and remote management: System voltage levels,
fan speed and CPU temperature are monitored to ensure stable operation. The
remote management interface allows the system to be managed through Ethernet when it is connected to the SNMP-1000 Remote HTTP/SNMP System Manager.
BIOS CMOS backup and restore: When BIOS CMOS setup has been completed, data in the CMOS RAM is automatically backed up to the Flash ROM.
This is particularly useful in harsh environments which may cause setup data
loss such as battery failure. Upon such an error occurring, the BIOS will check
the data, and automatically restore the original data for booting.
Automatically power on after power failure: It is often required to have an
unattended system come back to operation when power resumes after a power
failure. Advantech's industrial motherboard allows users to set the system to
power on automatically without pushing the power on button.
AMB-221 User Manual
2
1.3.1 System
!
CPU: AMD S1g1 Turion 64X2 Dual Core and Mobile Sempron processor up to
2.1/2.0 GHz, HT 800 MHz. Advantech also certifies several optional high-performance CPU coolers for high-speed CPUs in 2U chassis or in high-temperature
environments.
!
!
!
!
!
Advantech offers one CPU Cooler in the standard package. This cooler
is capable of keeping the temperature of 35 W-thermal-spec CPUs
within specification under the environmental temperatures of 55° C without a chassis or 40° C with a chassis.
L2 Cache: CPU has one of the following built-in full-speed L2 caches
1 MB for AMD Turion 64X2 TL-62 and TL56 CPUs,
512 KB for Mobile AMD Sempron 3700 + CPUs, and
256 KB for Mobile AMD Sempron 2100 + CPUs.
BIOS: Award 16 Mbit LPC
System Chipset: AMD M690T/M690E with SB600
SATA hard disk drive interface: Four on-board SATA2 connectors support
Advanced Host controller interface (AHCI) technology and have data transmission rates up to 300 MB/s.
One on-board IDE connector: Supports PIO mode 4 (16.67 MB/s) and ATA
33/66/100 (33/66/100 MB/s) BIOS enabled/disabled.
1.3.2 Memory
!
RAM: Up to 4 GB in two 200-pin SO-DIMM sockets. Supports dual-channel
DDRII 533/667/800 SDRAM.
Note!
Due to limitations of the PC architecture, the system may NOT fully
detect 4 GB of RAM when 4 GB of RAM is installed.
3
AIMB-221 User Manual
Hardware Configuration
Note!
Chapter 1
1.3 Specifications
1.3.3 Input/Output
!
!
!
!
!
PCI Bus: 1 PCI slots, 32-bit, 33 MHz PCI 2.2 compliant
Enhanced parallel port: Configured to LPT1 or disabled. Standard DB-25
female connector provided. Supports EPP/SPP/ECP
Serial ports: Six serial ports, one DB-9 (RS-232) connector and one DB-9 (RS232/422/485) connector on rear IO, and four onboard pin header (RS-232).
Ports can be individually configured to COM1, COM2, COM3, COM4, COM5,
COM6 or disabled.
Keyboard and PS/2 mouse connector: Two 6-pin mini-DIN connectors are
located on the mounting bracket for easy connection to a PS/2 keyboard and
mouse.
USB port: Supports up to eight USB 2.0 ports with transmission rates up to 480
Mbps.
1.3.4 Ethernet LAN
!
!
!
Supports single/dual 10/100/1000Base-T Ethernet port(s) via PCIe x1 bus
which provides a 500 MB/s data transmission rate.
Interface: 10/100/1000Base-T
Controller: LAN1: Realtek RTL8111C, LAN2: Realtek RTL8111C
1.3.5 Industrial features
!
Watchdog timer: Can generate a system reset or IRQ11. The watchdog timer
is programmable, with each unit equal to one second or one minute (255 levels).
1.3.6 Mechanical and environmental specifications
!
!
!
!
!
!
!
Operating temperature: 0 ~ 60° C (32 ~ 140° F, Depending on CPU)
Storage temperature: -20 ~ 70° C (-4 ~ 158° F)
Humidity: 20 ~ 95% non-condensing
Power supply voltage: +3.3 V, ±5 V, ±12 V
Power consumption: Maximum: +5 V at 3.45 A, +3.3 V at 0.72 A, +12 V at
2.45 A, 5 Vsb at 1 A ((AMD Turion 64X2 processor
TL-62 2.1GHz and two 2 GB DDR2 800 SDRAM))
Board size: 170 x 170 mm (6.69" x 6.69")
Board weight: 0.5 kg (1.68 lb)
1.4 Jumpers and Connectors
Connectors on the AIMB-221 motherboard link it to external devices such as hard
disk drives and a keyboard. In addition, the board has a number of jumpers that are
used to configure your system for your application.
The tables below list the function of each of the jumpers and connectors. Later sections in this chapter give instructions on setting jumpers. Chapter 2 gives instructions
for connecting external devices to your motherboard.
AMB-221 User Manual
4
Audio
LAN2
USB34
LAN1
USB12
USB78
VGA,HDMI
USB56
GPIO1
Chapter 1
1.5 Board Layout: Jumper and Connector
Locations
COM12
JESTCOM2
KBMS
FPAUD1
SPKOUT1
SYSFAN1
BAT1
LPC BIOS
SATA2
SATA4
CPUFAN
SATA1
LPT1
SATA3
PCI
INV1
SODIMM
VGA2/TV-Out
(Optional)
LVDS
JLVDS1
COM3456
IDE
SYSFAN2
JWDT1 JFP3
DVI
JPSON1
ATX1
(Optional)
Figure 1.1 Jumper and Connector locations
KBMS
COM2
VGA
COM1
HDMI
AUDIO1
LAN1_USB12 LAN2_USB34
Figure 1.2 I/O connectors
5
AIMB-221 User Manual
Hardware Configuration
JESTCOM1
JCMOS1
1.6 AIMB-221 Block Diagram
LVDS
24-bit LVDS
HDMI
PCIe x8 DVO
1 ATA 133 port
DMA 66/100/133
4 SATA ports
300MB/s
Channel B
DDR2 533/667/800
Sideport Memory
DVO
AMD M690E
PCIe x4
VGA
DDR2 533/667/800
PCI-Express x 1
GbE-LAN1:
Realtek RTL8111C
PCI-Express x 1
GbE-LAN2:
Realtek RTL8111C (Optional)
SB 600
8 USB Ports
Realtek ALC655
TFP 410
4 GB/sec
CRT
Channel A
800 MHz
Hyper Transport
AMD Socket S1g1
Dual Core Mobile Turion/
Sempron Processor
USB 2.0/1.1
32-bit/33MHz
PCI Bus
AC-97
PCI1
Edge Connector
LPC
BIOS
Super IO
Winbond
W83627UHG
Figure 1.3 AIMB-221 Block Diagram
AMB-221 User Manual
6
DVI (Option)
Label
Function
Page
JCMOS1
Clear CMOS jumper
9
JWDT1
Watchdog timer output
9
Power ATX/AT mode selector
10, 24
JSETCOM1
RS-232 power mode selector for COM1
10, 30
JSETCOM2
RS-232/422/485 jumper for COM2
10, 31
IDE1
Primary IDE connector
16
DVI2
DVI connector (AIMB-221F-00A1E only)
18
JFP1, 2, 3
Front panel connector
20
COM3/4/5/6
Serial port connectors for 4 serial ports
25
ATX1
20Pin ATX power connector
-
CPUFAN1
CPU fan power connector
26
SYSFAN1, 2
System fan power connector
27
LPT1
Printer port connector
28
GPIO1
8-bit GPIO header
33
FPAUD1
Front Panel Audio header
40
LAN1_USB12
LAN2_USB34
35
RJ45 and 2 USB connector (at rear I/O)
36
SPKOUT1
Speaker Out header
41
SATA 1,2,3,4
Serial-ATA port
42
INV1
Inverter header
44
LVDS1
LVDS connector
47
VGA2
TV-Out connector (AIMB-221F-00A1E only)
45
USB5, 6
USB7, 8
37
USB connector
38
VGA1
VGA connector (at rear I/O)
34
HDMI1
HDMI connector (at rear I/O)
34
Audio
Audio connector (at rear I/O), Line-In, Line-Out, MIC
LAN1_USB12
LAN2_USB34
KB_MS
RJ45 and 2 USB connector (at rear I/O)
36
PS2 Keyboard and Mice connector (ar rear I/O)
7
39
35
-
AIMB-221 User Manual
Hardware Configuration
JPSON1
Chapter 1
1.7 Jumpers and Connectors
1.8 Safety Precautions
Warning! Always completely disconnect the power cord from your chassis whenever you work with the hardware. Do not make connections while the
power is on. Sensitive electronic components can be damaged by sudden power surges. Only experienced electronics personnel should open
the PC chassis.
Caution! Always ground yourself to remove any static charge before touching the
motherboard. Modern electronic devices are very sensitive to static
electric charges. As a safety precaution, use a grounding wrist strap at
all times. Place all electronic components on a static-dissipative surface
or in a static-shielded bag when they are not in the chassis.
Caution! The computer is provided with a battery-powered Real-time Clock circuit. There is a danger of explosion if battery is incorrectly replaced.
Replace only with same or equivalent type recommended by the manufacturer. Discard used batteries according to manufacturer's instructions.
Caution! There is a danger of a new battery exploding if it is incorrectly installed.
Do not attempt to recharge, force open, or heat the battery. Replace the
battery only with the same or equivalent type recommended by the manufacturer. Discard used batteries according to the manufacturer's
instructions.
1.9 Jumper Settings
This section provides instructions on how to configure your motherboard by setting
the jumpers. It also includes the motherboard default settings and your options for
each jumper.
1.9.1 How to set jumpers
You can configure your motherboard to match the needs of your application by setting the jumpers. A jumper is a metal bridge that closes an electrical circuit. It consists
of two metal pins and a small metal clip (often protected by a plastic cover) that slides
over the pins to connect them. To "close" (or turn on) a jumper, you connect the pins
with the clip. To "open" (or turn off) a jumper, you remove the clip. Sometimes a
jumper consists of a set of three pins, labeled 1, 2, and 3. In this case you connect
either pins 1 and 2, or 2 and 3. A pair of needle-nose pliers may be useful when setting jumpers.
AMB-221 User Manual
8
The AIMB-221 motherboard contains a jumper that can erase CMOS data and reset
the system BIOS information. Normally this jumper should be set with pins 1-2
closed. If you want to reset the CMOS data, set JCMOS1 to 2-3 closed for just a few
seconds, and then move the jumper back to 1-2 closed. This procedure will reset the
CMOS to its default setting.
Chapter 1
1.9.2 CMOS clear (JCMOS1)
Table 1.1: CMOS (JCMOS1)
Jumper Setting
* Keep CMOS data
1-2 closed
Clear CMOS data
2-3 closed
* default setting
1.9.3 Watchdog timer output (JWDT1)
The AIMB-221 contains a watchdog timer that will reset the CPU or send a signal to
IRQ11 in the event the CPU stops processing. This feature means the AIMB-221 will
recover from a software failure or an EMI problem. The JWDT1 jumper settings control the outcome of what the computer will do in the event the watchdog timer is
tripped.
Table 1.2: Watchdog timer output (JWDT1)
Function
Jumper Setting
IRQE
1-2 closed
*Reset
2-3 closed
* default setting
Note!
The interrupt output of the watchdog timer is a low level signal. It will be
held low until the watchdog timer is reset.
9
AIMB-221 User Manual
Hardware Configuration
Function
Table 1.3: ATX/AT mode selector (JPSON1)
Function
Jumper Setting
AT Mode
1-2 closed
ATX Mode*
2-3 closed
*Default setting
Table 1.4: COM1 RS-232 with 5V or 12V selector (JSETCOM1)
Use jumper to select the 5V or 12V mode for COM1. The default setting is RS-232 ring in.
RS-232 Ring In
1
2
RS-232 with 5 V
1
2
RS-232 with 12 V
1
2
Table 1.5: COM2 RS-232/422/485 mode selector (JSETCOM2)
Use JP1 to select the RS-232/422/485 mode for COM2. The default setting is RS-232.
Figure 1.4 COM2 RS-232/422/485 jumper setting
AMB-221 User Manual
10
The AIMB-221 has two sockets for 200-pin dual inline memory modules (SODIMMs)
in two memory channels.
All these sockets use 1.8 V unbuffered double data rate synchronous DRAMs (DDR
SDRAM). They are available in capacities of 256, 512 1024 and 2048 MB. The sockets can be filled in any combination with DIMMs of any size, giving a total memory
size between 256 MB and 4 GB.
The AIMB-221 can accept DDR2 SDRAM memory chips without parity. Also note that
the AIMB-221 accepts DDR2 533/667/800 MHz SDRAM. The AIMB-221 does not
support ECC (error checking and correction).
1.11 Memory Installation Procedures
To install DIMMs, first make sure the two handles of the DIMM socket are in the
"open" position. i.e. The handles lean outward. Slowly slide the DIMM module along
the plastic guides on both ends of the socket, and then press the DIMM module right
down into the socket, until you hear a click. This is when the two handles have automatically locked the memory module into the correct position of the DIMM socket. To
remove the memory module, just push both handles outward, and the memory module will be ejected by the mechanism in the socket.
1.12 Cache Memory
The AIMB-221 supports a CPU with one of the following built-in full-speed L2 caches:
! 1 MB for AMD Turion 64X2 TL-62 and TL56 CPUs,
! 512 KB for Mobile AMD Sempron 3700 + CPUs, and
! 256 KB for Mobile AMD Sempron 2100 + CPUs.
The built-in second-level cache in the processor yields much higher performance
than conventional external cache memories.
1.13 Processor Installation
Warning! Without a fan or heat sink, the CPU will overheat and cause damage to
both the CPU and the single board computer. To install a CPU, first turn
off your system.
The AIMB-221 is designed for AMD Mobile AMD TurionTM and Mobile AMD SempronTM (Socket S1g1) up to 2.1 GHz. Follow these steps to install the processor:
1. Turn the screw to loosen the processor socket.
2. Align the triangular marking on the processor with the small arrow on the corner
of the socket.
3. Turn the screw to its original position.
4. Install the heat sink on the CPU. The concave part of the heat sink should face
the capacitors to avoid contact with the capacitors.
11
AIMB-221 User Manual
Hardware Configuration
1.10.1 CPU FSB and memory speed
Chapter 1
1.10 System Memory
1.14 PCI Bus Routing Table
Table 1.6: PCI Bus Routing Table
PCI Slot
ID SEL
PCI Interrupt
PCI1
AD31
INT B, C, D, A
Mini PCI1
AD28
INT C, D, A, B
Table 1.7: PCI1 (Routing: AD31 / PCI_#INTF, #INTG, #INTH, #INTE)
pin.A1
NC
pin.B1
-VCC12
pin.A2
VCC12
pin.B2
NC
pin.A3
NC
pin.B3
NC
pin.A4
NC
pin.B4
NC
pin.A5
VCC
pin.B5
VCC
pin.A6
PCI_#INTF
pin.B6
VCC
pin.A7
PCI_#INTH
pin.B7
PCI_#INTG
pin.A8
VCC
pin.B8
PCI_#INTE
pin.A9
(rev) PCI_#GNT1
pin.B9
(rev) CLK_33M_PCI1
pin.A10
VCC
pin.B10
(rev) PCI_#REQ1
pin.A11
(rev) PCI_#GNT2
pin.B11
(rev) CLK_33M_PCI2
pin.A12
GND
pin.B12
GND
pin.A13
GND
pin.B13
GND
pin.A14
VCC3 STANBY
pin.B14
(rev) PCI_#REQ2
pin.A15
PCI_#RST
pin.B15
GND
pin.A16
VCC
pin.B16
CLK_33M_PCI0
pin.A17
PCI_#GNT0
pin.B17
GND
pin.A18
GND
pin.B18
PCI_#REQ0
pin.A19
PCI_#PME
pin.B19
VCC
pin.A20
PCI_AD30
pin.B20
PCI_AD31
pin.A21
VCC3
pin.B21
PCI_AD29
pin.A22
PCI_AD28
pin.B22
GND
pin.A23
PCI_AD26
pin.B23
PCI_AD27
pin.A24
GND
pin.B24
PCI_AD25
pin.A25
PCI_AD24
pin.B25
VCC3
pin.A26
PCI_IDSEL(AD31)
pin.B26
PCI_#C/BE3
pin.A27
VCC3
pin.B27
PCI_AD23
pin.A28
PCI_AD22
pin.B28
GND
pin.A29
PCI_AD20
pin.B29
PCI_AD21
pin.A30
GND
pin.B30
PCI_AD19
pin.A31
PCI_AD18
pin.B31
VCC3
pin.A32
PCI_AD16
pin.B32
PCI_AD17
pin.A33
VCC3
pin.B33
PCI_#C/BE2
pin.A34
PCI_#FRAME
pin.B34
GND
pin.A35
GND
pin.B35
PCI_#IRDY
pin.A36
PCI_#TRDY
pin.B36
VCC3
pin.A37
GND
pin.B37
PCI_#DEVSEL
pin.A38
PCI_#STOP
pin.B38
GND
AMB-221 User Manual
12
VCC3
pin.B39
PCI_#LOCK
pin.A40
NC
pin.B40
PCI_#PERR
pin.A41
NC
pin.B41
VCC3
pin.A42
GND
pin.B42
PCI_#SERR
pin.A43
PCI_PAR
pin.B43
VCC3
pin.A44
PCI_AD15
pin.B44
PCI_#C/BE1
pin.A45
VCC3
pin.B45
PCI_AD14
pin.A46
PCI_AD13
pin.B46
GND
pin.A47
PCI_AD11
pin.B47
PCI_AD12
pin.A48
GND
pin.B48
PCI_AD10
pin.A49
PCI_AD9
pin.B49
GND
KEY (5V-IO) - KEY (5V-IO) KEY (5V-IO) - KEY (5V-IO) pin.A52
PCI_#C/BE0
pin.B52
PCI_AD8
pin.A53
VCC3
pin.B53
PCI_AD7
pin.A54
PCI_AD6
pin.B54
VCC
pin.A55
PCI_AD4
pin.B55
PCI_AD5
pin.A56
GND
pin.B56
PCI_AD3
pin.A57
PCI_AD2
pin.B57
GND
pin.A58
PCI_AD0
pin.B58
PCI_AD1
pin.A59
VCC
pin.B59
VCC
pin.A60
PU_#REQ64
pin.B60
PU_#ACK64
pin.A61
VCC
pin.B61
VCC
pin.A62
VCC
pin.B62
VCC
Table 1.8: MINIPCI1 (Routing: AD28 / #INTE / #INTF)
pin.1
NC
pin.2
NC
pin.3
NC
pin.4
NC
pin.5
NC
pin.6
NC
pin.7
NC
pin.8
NC
pin.9
NC
pin.10
NC
pin.11
NC
pin.12
NC
pin.13
NC
pin.14
NC
pin.15
NC
pin.16
NC
pin.17
PCI_#INTF
pin.18
VCC
pin.19
VCC3
pin.20
PCI_#INTE
pin.21
NC
pin.22
NC
pin.23
GND
pin.24
VCC3 Standby
pin.25
CLK_33M_PCI3
pin.26
PCI_#RST
pin.27
GND
pin.28
VCC3
pin.29
PCI_#REQ3
pin.30
PCI_#GNT3
pin.31
VCC3
pin.32
GND
pin.33
PCI_AD31
pin.34
PCI_#PME
pin.35
PCI_AD29
pin.36
NC
pin.37
GND
pin.38
PCI_AD30
pin.39
PCI_AD27
pin.40
VCC3
13
AIMB-221 User Manual
Hardware Configuration
pin.A39
Chapter 1
Table 1.7: PCI1 (Routing: AD31 / PCI_#INTF, #INTG, #INTH, #INTE)
Table 1.8: MINIPCI1 (Routing: AD28 / #INTE / #INTF)
pin.41
PCI_AD25
pin.42
PCI_AD28
pin.43
NC
pin.44
PCI_AD26
pin.45
PCI_#C/BE3
pin.46
PCI_AD24
pin.47
PCI_AD23
pin.48
PCI_#IDSEL(AD28)
pin.49
GND
pin.50
GND
pin.51
PCI_AD21
pin.52
PCI_AD22
pin.53
PCI_AD19
pin.54
PCI_AD20
pin.55
GND
pin.56
PCI_PAR
pin.57
PCI_AD17
pin.58
PCI_AD18
pin.59
PCI_#C/BE2
pin.60
PCI_AD16
pin.61
PCI_#IRDY
pin.62
GND
pin.63
VCC3
pin.64
PCI_#FRAME
pin.65
PD_#CLKRUN
pin.66
PCI_#TRDY
pin.67
PCI_#SERR
pin.68
PCI_#STOP
pin.69
GND
pin.70
VCC3
pin.71
PCI_#PERR
pin.72
PCI_#DEVSEL
pin.73
PCI_#C/BE1
pin.74
GND
pin.75
PCI_AD14
pin.76
PCI_AD15
pin.77
GND
pin.78
PCI_AD13
pin.79
PCI_AD12
pin.80
PCI_AD11
pin.81
PCI_AD10
pin.82
GND
pin.83
GND
pin.84
PCI_AD9
pin.85
PCI_AD8
pin.86
PCI_#C/BE0
pin.87
PCI_AD7
pin.88
VCC3
pin.89
GND
pin.90
PCI_AD6
pin.91
PCI_AD5
pin.92
PCI_AD4
pin.93
NC
pin.94
PCI_AD2
pin.95
PCI_AD3
pin.96
PCI_AD0
pin.97
VCC
pin.98
NC
pin.99
PCI_AD1
pin.100
NC
pin.101
GND
pin.102
GND
pin.103
NC
pin.104
PCI_M66EN (PD)
pin.105
NC
pin.106
NC
pin.107
NC
pin.108
NC
pin.109
NC
pin.110
NC
pin.111
NC
pin.112
NC
pin.113
GND
pin.114
GND
pin.115
NC
pin.116
NC
pin.117
NC
pin.118
NC
pin.119
NC
pin.120
NC
pin.121
NC
pin.122
NC
pin.123
NC
pin.124
VCC3 Standby
AMB-221 User Manual
14
Chapter
2
Connecting
Peripherals
2
2.1 Introduction
You can access most of the connectors from the top of the board as it is being
installed in the chassis. If you have a number of cards installed, you may need to partially remove a card to make all the connections.
2.2 Primary (IDE1) IDE Connector
AIMB-221 User Manual
16
Connecting Peripherals
IDE1
pin.1
#IDE_RST
pin.2
GND
pin.3
IDE_D7
pin.4
IDE_D8
pin.5
IDE_D6
pin.6
IDE_D9
pin.7
IDE_D5
pin.8
IDE_D10
pin.9
IDE_D4
pin.10
IDE_D11
pin.11
IDE_D3
pin.12
IDE_D12
pin.13
IDE_D2
pin.14
IDE_D13
pin.15
IDE_D1
pin.16
IDE_D14
pin.17
IDE_D0
pin.18
IDE_D15
pin.19
GND KEY
pin.21
IDE_DREQ
pin.22
GND
pin.23
IDE_#DIOW
pin.24
GND
pin.25
IDE_#DIOR
pin.26
GND
pin.27
IDE_IORDY
pin.28
GND
pin.29
IDE_#DACK
pin.30
GND
pin.31
IDE_IRQ
pin.32
NC
pin.33
IDE_DA1
pin.34
IDE_#P66DET
pin.35
IDE_DA0
pin.36
IDE_DA2
pin.37
IDE_#CS1
pin.38
IDE_#CS3
pin.39
IDE_#ACT
pin.40
GND
17
Chapter 2
You can attach up to one IDE (Integrated Drive Electronics) drive to the AIMB-221's
built-in controller.
Wire number 1 on the cable is red or blue and the other wires are gray. Connect one
end to connector IDE1 on the motherboard. Make sure that the red/blue wire corresponds to pin 1 on the connector (in the upper right hand corner).
Connect the hard drive to the other end of the cable. Wire 1 on the cable should also
connect to pin 1 on the hard drive connector, which is labeled on the drive circuit
board. Check the documentation that came with the drive for more information.
AIMB-221 User Manual
2.3 DVI2 (Optional)
Signal
PIN
PIN
Signal
VCC
2
1
DVI2_Tx0-
DVI2_TxC-
4
3
DVI2_Tx0+
DVI2_TxC+
6
5
GND
GND
8
7
DVI2_Tx1-
DVI2_DDCCLK
10
9
DVI2_Tx1+
DVI2_DDCAT
12
11
GND
14
13
DVI2_Tx2-
NC
16
15
DVI2_Tx2+
NC
18
17
VCC
NC
20
19
NC
PLUG_Detect
AIMB-221 User Manual
18
AIMB-221 User Manual
Connecting Peripherals
19
Chapter 2
The TFP410 is a DVI-compliant digital transmitter that is used in digital host monitor
systems to T.M.D.S. encode and serialize RGB pixel data streams. TFP410 supports
resolutions from VGA to UXGA and can be controlled in two ways:
1. Configuration and state pins or
2. The programmable I2C serial interface (see the terminal functions section).
The host in a digital display system, usually a PC or consumer electronics device,
contains a DVI-compatible transmitter such as the TI TFP410 that receives 24-bit
pixel data along with appropriate control signals. The TFP410 encodes the signals
into a high speed, low voltage, differential serial bit stream optimized for transmission
over a twisted-pair cable to a display device. The display device, usually a flat-panel
monitor, requires a DVI compatible receiver like the TI TFP401 to decode the serial
bit stream back to the same 24-bit pixel data and control signals that originated at the
host. This decoded data can then be applied directly to the flat panel drive circuitry to
produce an image on the display. Since the host and display can be separated by distances up to 5 meters or more, serial transmission of the pixel data is preferred (see
the T.M.D.S. pixel data and control signal encoding, pixel data and control signal
encoding, universal graphics control interface voltage signal levels, and universal
graphics controller interface clock inputs sections).
The TFP410 integrates a high-speed digital interface, a T.M.D.S. encoder, and three
differential T.M.D.S. drivers. Data is driven to the TFP410 encoder across 12 or 24
data lines, along with differential clock pair and sync signals. The flexibility of the
TFP410 allows for multiple clock and data formats that enhance system performance.
The TFP410 also has enhanced PLL noise immunity, an enhancement accomplished
with on-chip regulators and bypass capacitors.
The TFP410 is versatile and highly programmable to provide maximum flexibility for
the user. An I2C host interface is provided to allow enhanced configurations in addition to power-on default settings programmed by pin-strapping resistors.
2.4 Front Panel Connectors (JFP1, JFP2, JFP3)
AIMB-221 User Manual
20
If your computer case is equipped with an ATX power supply, you should connect the
power on/off button on your computer case to JFP1 PIN1, 2. This connection enables
you to turn your computer on and off.
Many computer cases offer the convenience of a reset button. Connect the wire from
the reset button.
JFP1
pin.1
#PWR_SW
pin.2
GND
pin.3
#RST_SW
pin.4
GND
2.4.3 External Speaker (JFP2)
JFP2 is a 4-pin connector for an external speaker. If there is no external speaker, the
AIMB-221 provides an onboard buzzer as an alternative. To enable the buzzer, set
pins 5-7 as closed.
21
AIMB-221 User Manual
Connecting Peripherals
2.4.2 Reset Connector (JFP1)
Chapter 2
2.4.1 ATX Soft Power Switch (JFP1)
2.4.4 HDD LED Connector (JFP2)
You can connect an LED to connector JFP2 to indicate when the HDD is active.
2.4.5 SM Bus Connector (JFP2 PIN6,8)
This connector is reserved for Advantech's SNMP-1000 HTTP/SNMP Remote System Manager. The SNMP-1000 allows users to monitor the internal voltages, temperature and fans from a remote computer through an Ethernet network.
JFP2 PIN6,8 can be connected to CN19 of SNMP-1000. Please be careful about the
pin assignments, pin 6 must be connected to pin 1 and pin 8 to pin 2 on both ends of
cable.
JFP2
pin.1
BUZZER+
pin.2
HDD_LED+
pin.3
NC
pin.4
HDD_LED-
pin.5
MB_BEEP+
pin.6
SM_DAT
pin.7
BUZZER-
pin.8
SM_CLK
AIMB-221 User Manual
22
Table 2.1: ATX power supply LED status (No support for AT power)
Power Mode
LED (ATX Power Mode) LED (AT Power Mode) LED (AT Power Mode)
(On/Off by tentative
(On/Off by switching (On/Off by front panel
button)
power supply)
switch)
PSON1
2-3 pin closed
(On Back plane)
Jumper Setting
1-2 pin closed
Connect 1-2 pin cable
with switch
System On
On
On
On
System Status
Fast flashes
Fast flashes
Fast flashes
System Off
Slow flashes
Off
Off
JFP3
JFP3
pin.1
PWR_LED+
pin.2
NC
pin.3
GND
pin.4
#KB_LOCK
pin.5
GND
23
AIMB-221 User Manual
Connecting Peripherals
(JFP3 / PWR_LED&KEY LOCK) is a 5-pin connector for the power on LED and Key
Lock function. The Power LED cable should be connected to pin 1-3. The key lock
button cable should be connected to pin 4-5.
There are 3 modes for the power supply connection. The first is “ATX power mode”,
system is on/off by a tentative power button. The second is “AT Power Mode”, system
is on/off by the switch of the Power supply. The third is another “AT Power Mode”
which is using the front panel power switch. The power LED status is indicated as following table:
Chapter 2
2.4.6 Power LED and keyboard lock connector (JFP3 /
PWR_LED&KEY LOCK)
2.5 ATX/AT Mode Selector (JPSON1)
Table 2.2: ATX/AT Mode selector (PSON1)
Function
AT Mode
Jumper Setting
1
1-2 closed
ATX Mode
1
2-3 closed
JPSON1
pin.1
ATX mode
pin.2
PS_SELECT
pin.3
AT mode
AIMB-221 User Manual
24
Chapter 2
2.6 Serial Port Header (COM 3/4/5/6)
Connecting Peripherals
Com #
COM3
COM4
COM5
COM6
Define
Pin
Pin
Define
Com #
COM3_#DCD
1
2
COM3_#DSR
COM3_SIN
3
4
COM3_#RTS
COM3_SOUT
5
6
COM3_#CTS
COM3_#DTR
7
8
COM3_#RI
GND
9
10
NC
COM4_#DCD
11
12
COM4_#DSR
COM4_SIN
13
14
COM4_#RTS
COM4_SOUT
15
16
COM4_#CTS
COM4_#DTR
17
18
COM4_#RI
GND
19
20
NC
COM5_#DCD
21
22
COM5_#DSR
COM5_SIN
23
24
COM5_#RTS
COM5_SOUT
25
26
COM5_#CTS
COM5_#DTR
27
28
COM5_#RI
GND
29
30
NC
COM6_#DCD
31
32
COM6_#DSR
COM6_SIN
33
34
COM6_#RTS
COM6_SOUT
35
36
COM6_#CTS
COM6_#DTR
37
38
COM6_#RI
GND
39
40
NC
25
COM3
COM4
COM5
COM6
AIMB-221 User Manual
2.7 CPU Fan Connector (CPU Fan1)
CPUFAN1
pin.1
GND
pin.2
VCC12
pin.3
SPEED
AIMB-221 User Manual
26
Chapter 2
2.8 System Fan (SYSFAN1, SYSFAN2)
SYSFAN2
SYSFAN1
pin.1
GND
pin.2
VCC12
pin.3
SPEED
SYSFAN2
pin.1
GND
pin.2
VCC12
pin.3
NC
Note!
Super IO W83627UHG support 2 sets of Fan Monitoring only. When all
the CPU fan, Sysfan 1, and Sysfan 2 are plugged, there will only show
CPU fan and Sysfan 1 in the BIOS.
27
AIMB-221 User Manual
Connecting Peripherals
SYSFAN1
2.9 Parallel Port (LPT1)
AIMB-221 User Manual
28
LTP1_#STBB
pin.2
LTP1_#AFD
pin.3
LTP1_PD0B
pin.4
LTP1_#ERR
pin.5
LTP1_PD1B
pin.6
LTP1_#INIT
pin.7
LTP1_PD2B
pin.8
LTP1_#SLIN
pin.9
LTP1_PD3B
pin.10
GND
pin.11
LTP1_PD4B
pin.12
GND
pin.13
LTP1_PD5B
pin.14
GND
pin.15
LTP1_PD6B
pin.16
GND
pin.17
LTP1_PD7B
pin.18
GND
pin.19
LTP1_#ACK
pin.20
GND
pin.21
LTP1_BUSY
pin.22
GND
pin.23
LTP1_PE
pin.24
GND
pin.25
LTP1_SLC
KEY
-
The mainboard provides a 26-pin header for connection to an optional parallel port
bracket. The parallel port is a standard printer port that supports Enhanced Parallel
Port (EPP) and Extended Capabilities Parallel Port (ECP) mode.
29
AIMB-221 User Manual
Connecting Peripherals
pin.1
Chapter 2
LPT1
2.10 JSETCOM1
JSETCOM1
pin.1
COM1_#RI
pin.2
pin.3
VCC
pin.4
pin.5
VCC12
pin.6
AIMB-221 User Manual
30
COM1_#RI
Chapter 2
2.11 JSETCOM2
Connecting Peripherals
JSETCOM2
pin.1
pin.3
COM2_SIN
pin.5
pin.2
UART2_RXD485
pin.4
UART2_RXD422
pin.6
UART2_RXD232
pin.7
COM2_#DCD
pin.8
COM2_SOUT
pin.9
COM2_PIN1
pin.10
COM2_PIN3
pin.11
COM2_TXD485N
pin.12
COM2_RXD485P
pin.13
UART2_SIN
pin.14
COM2_#DTR
pin.15
COM2_PIN2
pin.16
COM2_PIN4
pin.17
COM2_TXD485P
pin.18
COM2_RXD485N
31
AIMB-221 User Manual
RS-422
pin.1
RS-485+
pin.2
RS-485-
pin.1
RS-422 Tx-
pin.2
RS-422 Tx+
pin.3
RS-422 Rx+
pin.4
RS-422 Rx-
RS-485
AIMB-221 User Manual
32
Chapter 2
2.12 GPIO1
Connecting Peripherals
GPIO1
pin.1
GPIO_24
pin.2
GPIO_60
pin.3
VCC
pin.4
GND
pin.5
GPIO_25
pin.6
GPIO_61
pin.7
GND
pin.8
GND
pin.9
GPIO_26
pin.10
GPIO_62
pin.11
GND
pin.12
GND
pin.13
GPIO_27
pin.14
GPIO_63
General Purpose Input/Output (GPIO) is used in embedded electronics field. GPIO
devices provide a set of IO ports that can be configured for either input or output,
compounded by the resemblance to GP1 and GP0. The GPIO peripheral provides
dedicated general-purpose pins that can be configured as either inputs or outputs.
When configured as an output, you can write to an internal register to control the
state driven on the output pin. When configured as an input, you can detect the state
of the input by reading the state of an internal register.
In addition, the GPIO peripheral can produce CPU interrupts and enhanced Direct
Memory Access (EDMA) events in different interrupt/event generation modes.
For more GPIO porting and sample code, please refer to the Appendix A.
33
AIMB-221 User Manual
2.13 VGA HDMI
HDMI1
VGA1
pin.1
HDMI_P2
pin.1
RED
pin.2
GND
pin.2
GREEN
pin.3
HDMI_N2
pin.3
BLUE
pin.4
HDMI_P1
pin.4
NC
pin.5
GND
pin.5
GND
pin.6
HDMI_N1
pin.6
GND
pin.7
HDMI_P0
pin.7
GND
pin.8
GND
pin.8
GND
pin.9
HDMI_N0
pin.9
VCC
pin.10
HDMI_PCLK
pin.10
GND
pin.11
GND
pin.11
NC
pin.12
HDMI_NCLK
pin.12
DDC_DAT
pin.13
NC
pin.13
Hsync
pin.14
NC
pin.14
Vsync
pin.15
GFX_DDCCLK
pin.15
DDC_CLK
pin.16
GFX_DDCDAT
pin.17
GND
pin.18
VCC
pin.19
PLUG_Detect
AIMB-221 User Manual
34
Chapter 2
2.14 LAN1_USB12
Connecting Peripherals
LAN1_USB12
pin.1
NC
pin.2
LAN2_MDIP0
pin.3
LAN2_MDIN0
pin.4
LAN2_MDIP2
pin.5
LAN2_MDIN2
pin.6
LAN2_MDIP2
pin.7
LAN2_MDIN2
pin.8
LAN2_MDIP3
pin.9
LAN2_MDIN3
pin.10
GND
pin.11
LAN2_ACTLED-
pin.12
LAN2_ACTLED+
pin.13
LAN2_LINKLED-
pin.14
LAN2_LINKLED+
pin.15
VCC
pin.16
USB_N2
pin.17
USB_P2
pin.18
GND
pin.19
VCC
pin.20
USB_N3
pin.21
USB_P3
pin.22
GND
35
AIMB-221 User Manual
2.15 LAN2_USB34
LAN2_USB34
pin.1
NC
pin.2
LAN1_MDIP0
pin.3
LAN1_MDIN0
pin.4
LAN1_MDIP1
pin.5
LAN1_MDIN1
pin.6
LAN1_MDIP2
pin.7
LAN1_MDIN2
pin.8
LAN1_MDIP3
pin.9
LAN1_MDIN3
pin.10
GND
pin.11
LAN1_ACTLED-
pin.12
LAN1_ACTLED+
pin.13
LAN1_LINKLED-
pin.14
LAN1_LINKLED+
pin.15
VCC
pin.16
USB_N1
pin.17
USB_P1
pin.18
GND
pin.19
VCC
pin.20
USB_N0
pin.21
USB_P0
pin.22
GND
AIMB-221 User Manual
36
Chapter 2
2.16 USB56
Connecting Peripherals
USB56
pin.1
VCC
pin.2
VCC
pin.3
USB_N4
pin.4
USB_N5
pin.5
USB_P4
pin.6
USB_P5
pin.7
GND
pin.8
GND
pin.10
GND
KEY -
37
AIMB-221 User Manual
2.17 USB78
USB78
pin.1
VCC
pin.2
VCC
pin.3
USB_N6
pin.4
USB_N7
pin.5
USB_P6
pin.6
USB_P7
pin.7
GND
pin.8
GND
pin.10
GND
KEY -
AIMB-221 User Manual
38
Chapter 2
2.18 Audio
Connecting Peripherals
AUDIO1
pin.A1
GND
pin.A2
MIC_IN2
pin.A3
NC
pin.A4
NC
pin.A5
MIC_IN1
pin.B2
LINEOUT_L
pin.B3
NC
pin.B4
NC
pin.B5
LINEOUT_R
pin.C2
LINEIN_L
pin.C3
NC
pin.C4
NC
pin.C5
LINEIN_R
39
AIMB-221 User Manual
2.19 FPAUD1
FPAUD1
pin.1
FP_MIC_IN1
pin.2
GND
pin.3
MIC_VREF
pin.4
VCC
pin.5
REAR_LO_R
pin.6
LINEOUT_R
pin.7
NC
KEY
pin.9
REAR_LO_L
pin.10
AIMB-221 User Manual
40
LINEOUT_L
Chapter 2
2.20 SPKOUT1
Connecting Peripherals
SPKOUT1
pin.1
AMP_L
pin.2
AMP_L#
pin.3
AMP_R#
pin.4
AMP_R
41
AIMB-221 User Manual
2.21 Serial ATA Interface (SATA1, SATA2, SATA3,
SATA4)
AIMB-221 User Manual
42
SATA1
SATA1
1
GND
SATA_PXP2
SATA_PXN2
GND
SATA_RXN2
SATA_RXP2
GND
SATA3
SATA2
pin.1
1
SATA4
SATA3
pin.1
GND
pin.2
SATA_TXP0 pin.2
pin.3
SATA_TXN0 pin.3
pin.4
GND
pin.5
SATA_RXN0 pin.5
SATA_RXN1 pin.5
SATA_RXN2 pin.5
SATA_RXN3
pin.6
SATA_RXP0 pin.6
SATA_RXP1 pin.6
SATA_RXP2
pin.6
SATA_RXP3
pin.7
GND
GND
GND
pin.7
GND
pin.4
pin.7
GND
pin.1
SATA4
GND
pin.1
GND
SATA_TXP1 pin.2
SATA_TXP2
pin.2
SATA_TXP3
SATA_TXN1 pin.3
SATA_TXN2
pin.3
SATA_TXN3
GND
pin.4
GND
GND
pin.4
pin.7
43
AIMB-221 User Manual
Connecting Peripherals
1
GND
SATA_PXP0
SATA_PXN0
GND
SATA_RXN0
SATA_RXP0
GND
SATA2
GND
SATA_PXP3
SATA_PXN3
GND
SATA_RXN3
SATA_RXP3
GND
Chapter 2
1
GND
SATA_PXP1
SATA_PXN1
GND
SATA_RXN1
SATA_RXP1
GND
2.22 INV1
INV1
pin.1
VCC12
pin.2
GND
pin.3
BL_EN
pin.4
NC
pin.5
VCC
INV is connected to an inverter that can provide power to an LCD panel.
The AIMB-221 can drive an LVDS display, and you can install an LVDS display with
the following accessories.
AIMB-221 User Manual
44
Chapter 2
2.23 VGA2 (TV-Out) (Optional)
Connecting Peripherals
TVOUT1
pin.1
CVBS
pin.2
Y
pin.3
C
pin.4
GND
45
AIMB-221 User Manual
The TV-out feature is an optional feature that is supported by AMD M690T. Customers who utilize the TV-out feature must have the Macrovision Licensee membership.
Signal
Signal Description
Y
Luma / Green Output. This pin outputs a selectable video signal.
The output is designed to drive a 75 ohm doubly terminated load.
The output can be selected to be S-video luminance or green.
C
Chroma / Green Output. This pin outputs a selectable video signal.
The output is designed to drive a 75 ohm doubly terminated load.
The output can be selected to be S-video chrominance or red
CVBS
Composite Video / Blue Output. Chroma / Green Output. This pin
outputs a selectable video signal. The output is designed to drive a
75 ohm doubly terminated load. The output can be selected to be
composite video or blue.
Note!
When switching to the TV-out display, please right click the ATI Display
Manager from the system tray, and then setup the TV-Out display as
below shown.
Right click the grey TV icon and select the display mode:
Note!
TV-out use the same signal output channel as CRT due to the hardware
design. Therefore, the dual display of CRT and TV-Out is not supported.
AIMB-221 User Manual
46
Chapter 2
2.24 LVDS
Connecting Peripherals
47
AIMB-221 User Manual
LVDS1
pin.1
LVDS_VCC
pin.2
LVDS_VCC
pin.3
GND
pin.4
GND
pin.5
LVDS_VCC
pin.6
LVDS_VCC
pin.7
LVDS_L0N
pin.8
UVDS_U0N
pin.9
LVDS_L0P
pin.10
UVDS_U0P
pin.11
GND
pin.12
GND
pin.13
LVDS_L1N
pin.14
UVDS_U1N
pin.15
LVDS_L1P
pin.16
UVDS_U1P
pin.17
GND
pin.18
GND
pin.19
LVDS_L2N
pin.20
UVDS_U2N
pin.21
LVDS_L2P
pin.22
UVDS_U2P
pin.23
GND
pin.24
GND
pin.25
LVDS_LCLKN
pin.26
LVDS_UCLKN
pin.27
LVDS_LCLKP
pin.28
LVDS_UCLKP
pin.29
GND
pin.30
GND
pin.31
DDC_CLK
pin.32
DDC_DAT
pin.33
GND
pin.34
GND
pin.35
LVDS_L3N
pin.36
LVDS_U3N
pin.37
LVDS_L3P
pin.38
LVDS_U3P
pin.39
LVDS_BLEN1
pin.40
NC
AIMB-221 User Manual
48
JLVDS1 is the jumper for either 3.3 V or 5 V output when connect to LCD panel.
Chapter 2
2.25 LVDS POWER JUMPER (JLVDS1)
Connecting Peripherals
2
1
3
JLVDS1
pin.1
VCC3
pin.2
LVDS_VCC
pin.3
VCC
49
AIMB-221 User Manual
AIMB-221 User Manual
50
Chapter
3
3
Award BIOS Setup
3.1 Introduction
3.1.1 BIOS Setup program
This motherboard supports a programmable firmware chip that you can update. Use
the BIOS Setup program when you are installing a motherboard, reconfiguring your
system, or prompted to "Run Setup". This section explains how to configure your system using this utility.
Even if you are not prompted to use the BIOS Setup program, you can change the
configuration of your computer in the future. For example, you can enable the security password feature or change the power management settings. This requires you
to reconfigure your system using the BIOS Setup program so that the computer can
recognize these changes and record them in the CMOS RAM of the SPI chip.
The firmware chip on the motherboard stores the BIOS Setup program. When you
start up the computer, the system provides you with the opportunity to run this program. Press <Del> during the Power-On Self-Test (POST) to enter the Setup utility;
otherwise, POST continues with its test routines.
If you wish to enter the BIOS Setup program after POST, reboot the system by doing
any of the following procedures:
! Restart using the OS standard shut-down procedure.
! Press <Ctrl>+<Alt>+<Del> simultaneously.
! Press the reset button on the system chassis.
! Press the power button to turn the system off then back on.
The BIOS Setup program is designed for ease-of-use. It is a menu-driven program
that lets you browse the various submenus and make your selections from the available options using the navigation keys.
Caution! Using the power button, reset button or the <Ctrl>+<Alt>+<Del> keys
to force a reset from a running operating system can cause damage to
your data or system. We recommend to always shut-down the system
properly from the operating system.
Note!
1.
2.
3.
AIMB-221 User Manual
The default BIOS settings for this motherboard apply for most conditions to ensure optimum performance. If the system becomes
unstable after changing any BIOS settings, load the default settings
to ensure system compatibility and stability. Select the Load Setup
Defaults item under the Exit Menu.
The BIOS setup screens shown in this section are for reference
purposes only, and may not exactly match what you see on your
screen.
Save a copy of the original motherboard BIOS file to a bootable
floppy disk or a USB flash disk in case you need to restore the
BIOS in the future.
52
The CMOS RAM is powered by an onboard button cell battery. When you finish BIOS
setup, the data in CMOS RAM will be automatically backed up to flash memory. If
operation in harsh industrial environments causes a soft error, the BIOS will check
the data in CMOS RAM and automatically restore the original data from flash memory to CMOS RAM for booting.
To change the CMOS setting without restoring the previous backup,
press "DEL" within two seconds of the "CMOS checksum error..." message appearing and then use the "Setup" screen to modify the configuration. If the "CMOS checksum error..." message appears again and
again, please check to see if you need to replace the battery in your system.
Note!
ATI SB600 cannot restore system date and time, once the CMOS is
cleared.
3.2 Entering Setup
Turn on the computer and press <Del> to enter the BIOS setup.
Figure 3.1 Award BIOS Setup initial screen
53
AIMB-221 User Manual
Award BIOS Setup
Note!
Chapter 3
3.1.2 CMOS RAM Auto-backup and Restore
3.3 Standard CMOS Setup
Figure 3.2 Standard CMOS Features Screen
3.3.1 Date
The date format is:
<day of the week>, <month> <day of the month> <year>.
3.3.2 Time
The time format is <hour> : <minute> : <second>, based on the 24-hour clock.
3.3.3 IDE channel 0/1 Master/Slave
!
!
!
!
!
!
!
!
!
IDE HDD Auto-Detection: Press "Enter" to select this option for automatic
device detection.
IDE Device Setup:
– Auto: Automatically detects IDE devices during POST.
– None: Select this when no IDE device is used. The system will skip the autodetection step to make system start up faster.
– Manual: Use this for manual configuration.
Access Mode: The options are CHS/LBA/Large/Auto
Capacity: Capacity of currently installed hard disk.
Cylinder: Number of cylinders
Head: Number of heads
Precomp: Write precomp
Landing Zone: Landing zone
Sector: Number of sectors
3.3.4 Drive A / Drive B
This category identifies the types of floppy disk drives installed in the system. The
options are: None/360 K, 5.25"/1.2 M, 5.25"/720 K, 3.5"/1.44 M, 3.5"/2.88 M & 3.5".
AIMB-221 User Manual
54
This category detects the type of adapter used for the primary system monitor that
must match your video display card and monitor.
! EGA / VGA: Enhanced Graphics Adapter / Video Graphics Array. For EGA,
VGA, SVGA or PGA adapters
! CGA 40: Color Graphics Adapter, power up in 40 column mode
! CGA 80: Color Graphics Adapter, power up in 80 column mode
! MONO: Monochrome adapter, includes high resolution monochrome adapters
This category determines whether system start-up will halt or not when an error is
detected during power up.
The options are: No Errors, All Errors, All But Keyboard, All But Diskette, All But Disk/
Keyboard
3.3.7 Memory
This category displays base memory, extended memory, and total memory detected
during POST (Power On Self Test).
3.4 Advanced BIOS Features
The "Advanced BIOS Features" screen appears when choosing the "Advanced BIOS
Features" item from the "Initial Setup Screen" menu. It allows the user to configure
the AIMB-221 according to his particular requirements. Below are some major items
that are provided in the Advanced BIOS Features screen. A quick booting function is
provided for your convenience. Simply enable the Quick Booting item to save yourself valuable time.
Figure 3.3 Advanced BIOS Features screen
55
AIMB-221 User Manual
Award BIOS Setup
3.3.6 Halt On
Chapter 3
3.3.5 Video
3.4.1 CPU Features
!
!
!
!
Thermal Management
This feature controls the activation of the Thermal Monitor's automatic mode. It
allows you to determine when the Pentium 4's Thermal Monitor should be activated in automatic mode after the system boots. For example, with the default
value of 16 Minutes, the BIOS activates the Thermal Monitor in automatic mode
16 minutes after the system starts booting up. The choices are 4 Min, 8 Min, 16
Min and 32 Min.
Limit CPUID MaxVal
Set Limit CPUID MaxVa1 to 3. This should be disabled for Windows XP.
C1E Function:
This option sets the CPU C1E function.
Execute Disable Bit
When disabled, this option forces the XD feature flag to always return 0.
3.4.2 Hard Disk Boot Priority
This option sets hard disk boot device priority.
3.4.3 Virus Warning
Enables or disables the virus warning.
3.4.4 CPU L1, L2 & L3 Cache
Enabling this feature speeds up memory access. The commands are "Enabled" or
"Disabled".
3.4.5 Hyper-Threading Technology
While using a CPU with Hyper-Threading technology, you can select "Enabled" to
enable Hyper-Threading Technology in an OS that supports Hyper-Threading Technology or select "Disabled" for other OSs that do not support Hyper-Threading technology.
3.4.6 Quick Power On Self Test
This allows the system to skip certain tests to speed up the boot-up procedure.
3.4.7 First/Second/Third Boot Device
The BIOS tries to load the OS from the devices in the sequence set here. The options
are: "Floppy", "LS120", "Hard disk", "CDROM", "ZIP100", "USB-FDD", "USB-ZIP",
"USBCDROM", "USB-HDD", "LAN" and "Disabled".
3.4.8 Boot Other Device
Use this to boot another device. The options are "Enabled" and "Disabled".
3.4.9 Swap Floppy Drive
If the system has two floppy drives, choose "Enabled" to assign physical drive B to
logical drive A and vice-versa. The commands are "Enabled" or "Disabled".
AIMB-221 User Manual
56
Selection of the command "Disabled" will speed the boot up. Selection of "Enabled"
searches for floppy disk drives during boot up.
3.4.11 Boot Up NumLock Status
Sets the boot up status Num Lock. The options are "On" and "Off".
Chapter 3
3.4.10 Boot Up Floppy Seek
3.4.12 Gate A20 Option
3.4.13 Typematic Rate Setting
The typematic rate is the rate key strokes repeat as determined by the keyboard controller. The commands are "Enabled" or "Disabled". Enabling allows the typematic
rate and delay to be selected.
3.4.14 Typematic Rate (Chars/Sec)
The BIOS accepts the following input values (characters/second) for typematic rate:
6, 8, 10, 12, 15, 20, 24 and 30.
3.4.15 Typematic Delay (msec)
Typematic delay is the time interval between the appearances of two consecutive
characters, when the key is continuously depressed. The input values for this category are: 250, 500, 750 and 1000 ms.
3.4.16 Security Option
This category determines whether the password is required when the system boots
up or only when entering setup. The options are:
! System: The system will not boot, and access to Setup will be also denied
unless the correct password is entered at the prompt.
! Setup: The system will boot, but access to Setup will be denied unless the correct password is entered at the prompt.
Note!
To disable security, select PASSWORD SETTING in the main menu.
You will be asked to enter a password. Press <Enter> to disable security. When security is disabled, the system will boot and you can enter
Setup freely.
3.4.17 APIC Mode
This setting enables or disables the Advanced Configuration and Power Interface
(ACPI) support in the Advanced Programmable Interrupt Controller (APIC).
57
AIMB-221 User Manual
Award BIOS Setup
"Normal": A pin in the keyboard controller controls GateA20. Fast (Default) lets the
chipset control GateA20.
3.5 Advanced Chipset Features
Choose the "Advanced Chipset Features" option from the "Initial Setup Screen"
menu to show the following screen.
Figure 3.4 Advanced Chipset Features screen
Note!
DRAM default timings have been carefully chosen and should ONLY be
changed if data is being lost. Please contact technical support before
changing these timings.
3.5.1 Memory Hole At 15M-16M
Enabling this feature reserves the 15 MB to 16 MB memory address space for ISA
expansion cards that specifically require this setting. This makes memory from 15
MB and up unavailable to the system. Expansion cards can only access memory up
to 16 MB. The default setting is "Disabled".
3.5.2 Configure AMT BIOS Support (Intel Active Management
Technology)
This option allows you to enable or disable the Intel AMT (Active Management Technology). Intel AMT is the next generation of network client management. Intel AMT is
a set of advanced manageability features developed as a direct result of IT customer
feedback gained through Intel market research. With the new implementation of System Defense in ICH8DO, the advanced manageability feature set of Intel AMT is further enhanced. Further details please browse Intel web site: www.intel.com.
Warning! The Intel Active Management Technology requires the Intel AMTenabled software. Also, the platform must be connected to a power
source and an active LAN port.
3.5.3 PEG / Onchip VGA Control
Use this field to select PEG or Onchip VGA. The default is AUTO.
AIMB-221 User Manual
58
The On-Chip Frame Buffer Size can be set to 1 MB or 8 MB. This memory is shared
with the system memory.
3.5.5 DVMT Mode
This option shows the active system memory mode.
Chapter 3
3.5.4 On-Chip Frame Buffer Size
3.5.6 DVMT / FIXED Memory Size
3.5.7 Init Display First
Choose the first display interface to initiate while booting. The choice is "PCI Slot" or
"Onboard".
3.6 Integrated Peripherals
Figure 3.5 Integrated peripherals
Figure 3.6 On-Chip IDE Device
59
AIMB-221 User Manual
Award BIOS Setup
This option specifies the size of DVMT / FIXED system memory to allocate for video
memory.
3.6.1 IDE HDD Block Mode
If your IDE hard drive supports block mode, select Enabled to automatically detect
the optimal number of block read/writes per sector that the drive can support.
3.6.2 IDE DMA Transfer Access
Use this field to enable or disable IDE DMA transfer access.
3.6.3 IDE Primary Master/Slave PIO/UDMA Mode (Auto)
Each IDE channel has both a master and a slave, making four IDE devices possible.
Because two IDE devices may have a different Mode timings (0, 1, 2, 3, 4), it is necessary for these to be independent. The default setting "Auto" will allow auto detection to ensure optimal performance.
3.6.4 SATA Mode
The SATA modes are IDE, RAID and AHCI Mode. Select [IDE] if you want to have
SATA function as IDE. Select [AHCI] to enable the Advanced Host Controller Interface (AHCI) feature, with improved SATA performance and native command queuing.
Press [Ctrl + F] to enter the ATI FastBuildTM Utility when the below screen appears.
AIMB-221 User Manual
60
Chapter 3
Set the RAID mode as JBOD, and then select the HDD. Save and exit. Please note
that to set 2 JBODs needs to set up twice, and so on.
Award BIOS Setup
Enter the Hard Disk Boot Priority, the RAID HDD will be displayed.
61
AIMB-221 User Manual
3.6.5 Legacy mode support
This allows a SATA system to support PATA mode. The choices are "Disabled" and
"Enabled".
Note!
Please refer to the Intel Matrix Storage Technology quick start guide and
the Intel Matrix Storage Manager User's Manual in the MANUAL folder
of this CD to find out how to build and configure your RAID 0, 1, 10 or 5
system using Intel Matrix Storage Technology and Matrix Storage Manager.
Figure 3.7 Onboard Device
3.6.6 On board LAN1 ROM
The options are "Enabled" and "Disabled". Select "Disabled" if you don't want to use
the onboard LAN1 option ROM.
3.6.7 Onboard LAN2 Control
The options are "Enabled" and "Disabled". Select "Disabled" if you don't want to use
the onboard LAN2 controller.
3.6.8 On board LAN2 ROM
The options are "Enabled" and "Disabled". Select "Disabled" if you don't want to use
the onboard LAN2 option ROM.
AIMB-221 User Manual
62
Power Management Setup controls the "green" power-saving features. The following
screen shows the manufacturer's defaults.
3.7.1 Power Supply Type
AIMB-221 can support both "ATX" and "AT" power supplies. Customers can choose
the PSU type through this selection. The choices are "ATX" and "AT".
3.7.2 ACPI Function
The choices are "Enabled" and "Disabled".
3.7.3 ACPI Suspend Type
This item allows you to set ACPI suspend type to S1/POS (Power On Suspend).
3.7.4 Run VGA BIOS if S3 Resume
This setting allows the system to initialize the VGA BIOS from S3 (Suspend to RAM)
sleep state and only works when the ACPI Standby State is set to S3.
3.7.5 Power Management
This category allows you to select the type (or degree) of power saving and is directly
related to the following modes:
! HDD Power Down
! Suspend Mode
63
AIMB-221 User Manual
Award BIOS Setup
Figure 3.8 Power management setup screen
Chapter 3
3.7 Power Management Setup
There are three selections for Power Management, and they have fixed mode settings.
Table 3.1: Power Saving
Saving Mode
Function
Min Saving
Minimum power management, Suspend Mode = 1 hr., and HDD
Power Down = 15 min.
Max Saving
Maximum power management, Suspend Mode = 1 min., and HDD
Power Down = 1 min.
User Defined (Default)
Allows you to set each mode individually. When not disabled, each
of the ranges are from 1 min. to 1 hr. except for HDD Power Down
which ranges from 1 min. to 15 min., and disabled.
3.7.6 Video Off Method
Use this to select the method to turn off the video. The choices are "Blank Screen",
"V/H SYNC+ Blank" and "DPMS".
3.7.7 Video Off In Suspend
When the system is in suspend mode, the video will turn off. The choices are "No"
and "Yes".
3.7.8 Suspend Type
The choices are "Stop Grant" and "PwrOn Suspend".
3.7.9 Suspend Mode
Please refer to 3.7.5.
3.7.10 HDD Power Down
Please refer to 3.7.5.
3.7.11 Soft-Off by PWR-BTTN
If you choose "Instant-Off", then pushing the ATX soft power switch button once will
switch the system to "system off" power mode. If you choose "Delay 4 sec" then
pushing the ATX soft power button for more than 4 seconds will turn off the system,
whereas pushing the button for less than 4 seconds will switch the system to "suspend" mode.
3.7.12 PowerOn by LAN
This item allows you to power on the system via the LAN. The choices are "Enabled"
and "Disabled".
3.7.13 PowerOn by Modem
To enable or disable the function to power on the system via a Modem connection
from a remote host. The choices are "Enabled" and "Disabled".
3.7.14 USB KB Wake Up From S3
When "Enabled", pressing any key will wake the system up from the S3 state. The
choices are "Enabled" and "Disabled".
AIMB-221 User Manual
64
The choices are "Enabled" and "Disabled". The fields that follow, indicate the date
and time that the alarm is set for, if enabled.
3.7.16 Primary IDE 0 (1) and Secondary IDE 0 (1)
When Enabled, the system will resume from suspend mode if Primary IDE 0 (1) or
Secondary IDE 0 (1) becomes active. The choices are "Enabled" and "Disabled".
When Enabled, the system will resume from suspend mode if the FDD, interface,
COM port or LPT port is active. The choices are "Enabled" and "Disabled".
3.7.18 PCI PIRQ [A-D]#
When enabled, the system resumes from suspend mode if an interrupt occurs. The
choices are "Enabled" and "Disabled".
3.7.19 PWRON After PWR-Fail
Use this to set up the system after power failure. The "Off" setting keeps the system
powered off after power failure. The "On" setting boots up the system after failure.
3.8 PnP/PCI Configurations
Figure 3.9 PnP/PCI configurations screen
3.8.1 Reset Configuration Data
The default is Disabled. Select Enabled to reset Extended System Configuration
Data (ESCD) if you have installed a new add-on card, and system configuration is in
such a state that the OS cannot boot.
3.8.2 Resources Controlled By
The commands here are "Auto(ESCD)" or "Manual". Choosing "Manual" requires you
to choose resources from the following sub-menu. "Auto(ESCD)" automatically configures all of the boot and Plug and Play devices, but you must be using Windows 95
or above.
65
AIMB-221 User Manual
Award BIOS Setup
3.7.17 FDD, COM, LPT PORT
Chapter 3
3.7.15 PowerOn by Alarm
3.8.3 PCI / VGA Palette Snoop
This is set to "Disabled" by default.
3.8.4 Maximum Payload Size
This allows you to set the maximum TLP payload size for PCIe devices. The options
are [128 bytes].
3.9 PC Health Status
Figure 3.10 PC Health Status Screen
3.9.1 Current System Temperature
This shows you the current temperature of the system.
3.9.2 FAN1: CPU FAN Speed
This shows the current CPU fan speed.
3.9.3 FAN2: System FAN Speed
This shows the current system fan speed.
3.9.4 VCORE and Other Voltages
This shows the voltage of the VCORE, +3.3 V, +5 V, +12 V, -12 V and VBAT(V) power
lines.
AIMB-221 User Manual
66
Chapter 3
3.10 Frequency / Voltage Control
3.10.1 Spread Spectrum
This setting allows you to reduce EMI by modulating the signals the CPU generates
so that the spikes are reduced to flatter curves. This is achieved by varying the frequency slightly so that the signal does not use any particular frequency for more than
a moment. The choices are "Disabled" and "Enabled".
67
AIMB-221 User Manual
Award BIOS Setup
Figure 3.11 Spread Spectrum Frequency/Voltage Control screen
3.11 Password Setting
Follow these steps to change the password.
1.
Choose the "Set Password" option from the "Initial Setup Screen" menu and
press <Enter>. The screen displays the following message:
Please Enter Your Password
2.
3.
Press <Enter>.
If the CMOS is good and this option has been used to change the default password, the user is asked for the password stored in the CMOS. The screen displays the following message:
Please Confirm Your Password
4.
5.
Type the current password and press <Enter>.
After pressing <Enter> (ROM password) or the current password (user-defined),
you can change the password stored in the CMOS. The password must be no
longer than eight (8) characters.
Remember, to enable the password setting feature, you must first select either
"Setup" or "System" from the "Advanced BIOS Features" menu.
AIMB-221 User Manual
68
Chapter 3
3.12 Save & Exit Setup
3.13 Exit Without Saving
Selecting this option and pressing <Enter> lets you exit the setup program without
recording any new values or changing old ones.
Note!
The screen flickers when switching from BIOS to Windows, which is normal for AMD platforms. This is due to the display switching from text
mode to GUI mode.
69
AIMB-221 User Manual
Award BIOS Setup
If you select this and press <Enter>, the values entered in the setup utilities will be
recorded in the CMOS memory of the chipset. The processor will check this every
time you turn your system on and compare this to what it finds as it checks the system. This record is required for the system to operate.
AIMB-221 User Manual
70
Chapter
4
4
Chipset Software
Installation Utility and
VGA Setup
4.1 Before you begin
To facilitate the installation of the enhanced display drivers and utility software, read
the instructions in this chapter carefully. The drivers for the AIMB-221 are located on
the software installation CD. Microsoft .NET Framework 2.0 are required for AMD/ATI
utility. It is strongly suggested to install it first during the driver installation, if the program is missing, please follow the procedural screen below to install it.
Click Next to proceed with the installation
AIMB-221 User Manual
72
73
AIMB-221 User Manual
Chipset Software Installation Utility and VGA Setup
Once the program is installed, click "Finish" to close the installation session.
Chapter 4
Choose "I accept the terms of the License Agreement" and then click "Install"
Note!
The files on the software installation CD are compressed. Do not
attempt to install the drivers by copying the files manually. You must use
the supplied SETUP program to install the drivers.
Before you begin, it is important to note that most display drivers need to have the
relevant software application already installed in the system prior to installing the
enhanced display drivers. In addition, many of the installation procedures assume
that you are familiar with both the relevant software applications and operating system commands. Review the relevant operating system commands and the pertinent
sections of your application software's user manual before performing the installation.
4.2 Windows XP Driver Setup
AIMB-221 User Manual
74
2.
Click "Next" when you see the following message.
75
Chipset Software Installation Utility and VGA Setup
Insert the driver CD into your system's CD-ROM drive. Move the mouse cursor
to "issetup.exe" and double click it.
Chapter 4
1.
AIMB-221 User Manual
3.
Click "Yes" to accept the software license agreement.
4.
ATI Display Driver will be installed, click "Express: Recommended" for the autorun instillation.
AIMB-221 User Manual
76
Chapter 4
Select "Continue Anyway" to skip the ATI X1250 WHQL warning message.
77
AIMB-221 User Manual
Chipset Software Installation Utility and VGA Setup
5.
6.
ATI South Bridge driver will be installed automatically.
7.
Once SB600 driver being installed, HDMI Audio driver installation will be started.
AIMB-221 User Manual
78
Click "Next" to proceed the HD Audio driver installation.
9.
Choose "I Agree" and click "Next" to accept the software license agreement.
AIMB-221 User Manual
Chipset Software Installation Utility and VGA Setup
79
Chapter 4
8.
10. Click "Finish" to complete the HD Audio Driver installation.
11. Restart the system.
Note!
To use Graphic PCI card, please remove the ATI X1250 VGA driver
first, and then install the Graphic card driver, to avoid system resource
conflicts.
AIMB-221 User Manual
80
Chapter
5
5
LAN Configuration
5.1 Introduction
The AIMB-221 has a single/dual Gigabit Ethernet LAN interface (Realtek RTL8111C)
that is connected to PCIe x1 link to eliminating network bottlenecks by offering a
bandwidth of up to 500 MB/s.
5.2 Features
!
!
!
!
!
!
Integrated 10/100/1000Base-T transceiver
10/100/1000Base-T triple-speed MAC
High-speed RISC core with 24-KB cache
On-chip voltage regulation
Wake-on-LAN (WOL) support
PCIe x1 host interface
5.3 Installation
The Realtek RTL8111C gigabit Ethernet controller supports all major network operating systems. However, the installation procedure varies with different operating systems. In the following sections, refer to the one that provides the driver setup
procedure for the operating system you are using.
5.4 Win XP Driver Setup (LAN)
1.
Insert the driver CD into your system's CD-ROM drive. In a few seconds, the
software installation main menu appears, as shown in the following figure.
AIMB-221 User Manual
82
3.
Click "Install" to start the installation procedure.
83
LAN Configuration
You will see a welcome window. Click "Next" to continue the installation.
Chapter 5
2.
AIMB-221 User Manual
4.
Click "Finish" to complete the installation.
Note!
Due to the Windows kernal limitation, under Win OS [Control Panel] -->
[Network Connections], the LAN 1 will be shown "Local Area
Connection2" and the LAN 2 will be shown "Local Area Connection".
AIMB-221 User Manual
84
Chapter
6
6
AC97 Audio Setup
6.1 Introduction
Realtek ALC655 is a 16-bit, full-duplex AC'97 Rev. 2.3 compatible six-channel audio
CODEC designed for PC multimedia systems, including host/soft audio and AMR/
CNR-based designs.
The ALC655 incorporates proprietary converter technology to meet performance
requirements for PC99/2001 systems. The ALC655 CODEC provides three pairs of
stereo outputs with 5-bit volume control, a mono output, and multiple stereo and
mono inputs, along with flexible mixing, gain, and mute functions to provide a complete integrated audio solution for PCs.
6.2 Windows XP Driver Setup (AC97)
1.
Insert the driver CD into your system's CD-ROM drive. In a few seconds, the
software installation main menu appears, as shown in the following figure. Double click "Setup.exe".
AIMB-221 User Manual
86
Click "Next" to start WDM driver installation.
3.
The audio driver will be installed automatically. Once it's done, restart the system.
AIMB-221 User Manual
AC97 Audio Setup
87
Chapter 6
2.
AIMB-221 User Manual
88
Appendix
A
A
Programming the
Watchdog Timer
The AIMB-221's watchdog timer can be used to monitor system software operation
and take corrective action if the software fails to function within the programmed
period. This section describes the operation of the watchdog timer and how to program it.
A.1 Watchdog timer overview
The watchdog timer is built in to the super I/O controller W83627HF. It provides the
following functions for user programming:
! Can be enabled and disabled by the user's program
! Timer can be set from 1 to 255 seconds or 1 to 255 minutes
! Generates an interrupt or resets signal if the software fails to reset the timer
before time-out
A.2 Reset/Interrupt selection
The J2 jumper is used to select reset or interrupt (IRQ) 11 in the event the watchdog
timer is tripped. See Chapter 1 for detailed jumper settings.
Note!
The interrupt output of the watchdog timer is a low level signal. It will be
held low until the watchdog timer is reset.
A.3 Programming the Watchdog Timer
The I/O port address of the watchdog timer is 2E (hex) and 2F (hex). 2E (hex) is the
address port. 2F (hex) is the data port. You must first write an address value into
address port 2E (hex), and then write/read data to/from the assigned register through
data port 2F (hex).
AIMB-221 User Manual
90
Appendix A Programming the Watchdog Timer
Unlock W83627UHG
Select register of
watchdog timer
Enable the function of
the watchdog timer
Use the function of
the watchdog timer
Lock W83627UHG
91
AIMB-221 User Manual
Table A.1: Watchdog timer registers
Address of
register (2E)
Read/Write
Value (2F) & description
87 (hex)
-----
Write this address to I/O address port 2E (hex) twice to
unlock the W83627HF
07 (hex)
write
Write 08 (hex) to select register of watchdog timer.
30 (hex)
write
Write 01 (hex) to enable the function of the watchdog
timer. Disabled is set as default.
F5 (hex)
write
Set seconds or minutes as units for the timer. Write 0 to
bit 3: set seconds as counting unit. [default]. Write 1 to bit
3: set minutes as counting unit.
F6 (hex)
write
0: stop timer [default]
01 ~ FF (hex): The amount of the count, in seconds or
minutes, depends on the value set in register F5 (hex).
This number decides how long the watchdog timer waits
for strobe before generating an interrupt or reset signal.
Writing a new value to this register can reset the timer to
count with the new value.
F7 (hex)
read/write
Bit 6: Write 1 to enable keyboard to reset the timer, 0 to
disable.[default]
Bit 5: Write 1 to generate a timeout signal immediately
and automatically return to 0. [default=0]
Bit 4: Read status of watchdog timer, 1 means timer is
"timeout".
AA (hex)
-----
Write this address to I/O port 2E (hex) to lock the watchdog timer 2.
A.3.1 Example Programs
Enable watchdog timer and set 10 seconds as the timeout interval
;----------------------------------------------------------Mov dx,2eh
; Unlock W83627HF
Mov al,87h
Out dx,al
Out dx,al
;----------------------------------------------------------Mov al,07h
; Select registers of watchdog timer
Out
dx,al
Inc
dx
Mov
al,08h
Out
dx,al
;----------------------------------------------------------Dec dx
; Enable the function of watchdog timer
Mov
al,30h
Out
dx,al
Inc
dx
Mov
al,01h
Out
dx,al
;-----------------------------------------------------------
AIMB-221 User Manual
92
93
AIMB-221 User Manual
Appendix A Programming the Watchdog Timer
Dec dx
; Set second as counting unit
Mov
al,0f5h
Out
dx,al
Inc
dx
In
al,dx
And al,not 08h
Out
dx,al
;----------------------------------------------------------Dec dx
; Set timeout interval as 10 seconds and start counting
Mov
al,0f6h
Out
dx,al
Inc
dx
Mov
al,10
Out
dx,al
;----------------------------------------------------------Dec dx
; lock W83627HF
Mov
al,0aah
Out
dx,al
Enable watchdog timer and set 5 minutes as the timeout interval
;----------------------------------------------------------Mov dx,2eh
; unlock W83627HF
Mov al,87h
Out dx,al
Out dx,al
;----------------------------------------------------------Mov al,07h
; Select registers of watchdog timer
Out
dx,al
Inc
dx
Mov
al,08h
Out
dx,al
;----------------------------------------------------------Dec dx
; Enable the function of watchdog timer
Mov
al,30h
Out
dx,al
Inc
dx
Mov
al,01h
Out
dx,al
;----------------------------------------------------------Dec dx
; Set minute as counting unit
Mov
al,0f5h
Out
dx, al
Inc
dx
In
al,dx
Or al, 08h
Out
dx,al
;----------------------------------------------------------Dec dx
; Set timeout interval as 5 minutes and start counting
Mov
al,0f6h
Out
dx,al
Inc
dx
Mov
al,5
Out
dx,al
;----------------------------------------------------------Dec dx
; lock W83627HF
Mov
al,0aah
Out
dx,al
Enable watchdog timer to be reset by mouse
;----------------------------------------------------------Mov dx,2eh
; unlock W83627HF
Mov al,87h
Out dx,al
Out dx,al
;----------------------------------------------------------Mov al,07h
; Select registers of watchdog timer
Out
dx,al
Inc
dx
Mov
al,08h
Out
dx,al
;----------------------------------------------------------Dec dx
; Enable the function of watchdog timer
Mov
al,30h
Out
dx,al
Inc
dx
Mov
al,01h
Out
dx,al
;----------------------------------------------------------Dec dx
; Enable watchdog timer to be reset by mouse
Mov
al,0f7h
Out
dx,al
Inc
dx
In
al,dx
Or al,80h
Out
dx,al
;----------------------------------------------------------Dec dx
; lock W83627HF
Mov
al,0aah
Out
dx,al
Enable watchdog timer to be reset by keyboard
;----------------------------------------------------------Mov dx,2eh
; unlock W83627HF
AIMB-221 User Manual
94
95
AIMB-221 User Manual
Appendix A Programming the Watchdog Timer
Mov al,87h
Out dx,al
Out dx,al
;----------------------------------------------------------Mov al,07h
; Select registers of watchdog timer
Out
dx,al
Inc
dx
Mov
al,08h
Out
dx,al
;----------------------------------------------------------Dec dx
; Enable the function of watchdog timer
Mov
al,30h
Out
dx,al
Inc
dx
Mov
al,01h
Out
dx,al
;----------------------------------------------------------Dec dx
; Enable watchdog timer to be strobed reset by keyboard
Mov
al,0f7h
Out
dx,al
Inc
dx
In
al,dx
Or al,40h
Out
dx,al
;----------------------------------------------------------Dec dx
; lock W83627HF
Mov
al,0aah
Out
dx,al
Generate a time-out signal without timer counting
;----------------------------------------------------------Mov dx,2eh
; unlock W83627HF
Mov al,87h
Out dx,al
Out dx,al
;----------------------------------------------------------Mov al,07h
; Select registers of watchdog timer
Out
dx,al
Inc
dx
Mov
al,08h
Out
dx,al
;----------------------------------------------------------Dec dx
; Enable the function of watchdog timer
Mov
al,30h
Out
dx,al
Inc
dx
Mov
al,01h
Out
dx,al
;----------------------------------------------------------Dec dx
; Generate a time-out signal
Mov
al,0f7h
Out
dx,al
;Write 1 to bit 5 of F7 register
Inc
dx
In
al,dx
Or al,20h
Out
dx,al
;----------------------------------------------------------Dec dx
; lock W83627HF
Mov
al,0aah
Out
dx,al
AIMB-221 User Manual
96
Appendix A Programming the Watchdog Timer
AIMB-221 User Manual
97
www.advantech.com
Please verify specifications before quoting. This guide is intended for reference
purposes only.
All product specifications are subject to change without notice.
No part of this publication may be reproduced in any form or by any means,
electronic, photocopying, recording or otherwise, without prior written permission of the publisher.
All brand and product names are trademarks or registered trademarks of their
respective companies.
© Advantech Co., Ltd. 2008