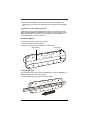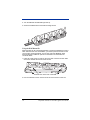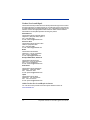
1
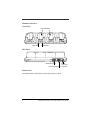
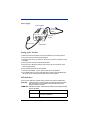
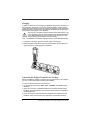
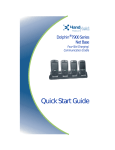
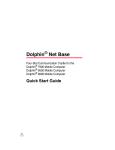
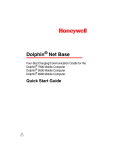
Dolphin® 9500 Series
Net Base
Four-Slot Charging/
Communication Cradle
™
Quick Start Guide
Disclaimer
Hand Held Products (“Hand Held Products”) reserves the right to make changes
in specifications and other information contained in this document without prior
notice, and the reader should in all cases consult Hand Held Products to
determine whether any such changes have been made. The information in this
publication does not represent a commitment on the part of Hand Held Products.
Hand Held Products shall not be liable for technical or editorial errors or
omissions contained herein; nor for incidental or consequential damages
resulting from the furnishing, performance, or use of this material.
This document contains proprietary information which is protected by copyright.
All rights are reserved. No part of this document may be photocopied,
reproduced, or translated into another language without the prior written consent
of Hand Held Products.
© 2005 Hand Held Products, Inc. All rights reserved.
Web Address: www.handheld.com
Table of Contents
Introduction.............................................................................. 1
Unpacking the Net Base.......................................................... 1
Software Requirements ........................................................... 1
Hardware Overview ................................................................ 2
Setting up the Net Base........................................................... 3
LED Indicators ......................................................................... 3
Configuring the Network .......................................................... 4
Accessing the Net Base Through a Browser........................... 6
Online Help.............................................................................. 7
Charging .................................................................................. 8
Connecting the Dolphin Terminal to the Net Base .................. 8
Mounting Options .................................................................... 9
Product Service and Repair .................................................. 12
Technical Assistance ............................................................ 13
Limited Warranty ................................................................... 13
iii
iv
Dolphin 9500 Series Net Base
Quick Start Guide
Introduction
The Dolphin Net Base charges up to four Dolphin 9500 Series mobile computers
and enables each one to communicate with a host device over an Ethernet
network.
Unpacking the Net Base
!
Use only Dolphin 9500 Series peripherals, power cables, and power
adapters. Use of peripherals, cables, or power adapters not sold/
manufactured by Hand Held Products will void the warranty and may
damage the terminal.
Open the shipping box and inspect the package to see that the following
standard items are included:
• One Dolphin Net Base Ethernet cradle
• One Universal AC-DC Power Adapter for the Dolphin Net Base
• One Power Cord
• One Serial Extension Cable
• Two Mounting Brackets (available separately)
These are the items you need to set up, configure, and operate the Dolphin 9500
Series Net Base. If any items are missing or anything appears to be damaged,
contact your Customer Account Representative.
Keep the original packaging in case you need to return the Net Base for service
or store the Net Base while not in use.
Software Requirements
Any Dolphin 9500 Series terminal interfacing with the Net Base should have the
following software installed:
• Kernel 7.03, Service Pack 3 or higher and
• Utils, version 2.4 (Utils_24.cab) or higher
To confirm which software is loaded on your terminal, go to Start > Utils >
SysInfo. A document appears listing the software loaded on your terminal; the
kernel and service pack appear at the top of the list.
Dolphin® 9500 Series Net Base Quick Start Guide
1
Hardware Overview
Front Panel
Terminal Wells
Dock LED
COMM LED
Back Panel
Serial DB-9 Port
Power
Connector
Two RJ-45 Ethernet Connectors
Bottom Panel
For details about the bottom panel, see Mounting Options, page 9.
2
Dolphin® 9500 Series Net Base Quick Start Guide
Power Supply
Power Adapter
Power
Connector
Cable
ON/OFF
Switch
Power Cord
ON Position
Setting up the Net Base
1. Make sure the power switch on the power adapter is in the OFF position.
2. Plug the power cord into the power adapter.
3. Plug the power connector cable into the power connector on the back of the
Net Base.
4. Plug the power cord into a standard wall outlet.
5. Plug the CAT-5 Ethernet cable into either of the RJ-45 connectors on the
back of the Net Base.
6. Plug the Ethernet cable into the network.
7. On the power adapter, turn the power switch to the ON position.
8. The COMM LEDs on all four slots flash binary codes as the Net Base finds
the DHCP server during the bootloader and kernel sequences.
LED Indicators
There are two LEDs per terminal well: the DOCK LED and the COMM LED.
Dock LED Lights solid green to indicate that the terminal is properly seated.
The terminal can communicate with the Net Base only when
properly seated in the well.
COMM LED Indicates the status of data transfer between the Dolphin terminal
and the Net Base.
Color
Description
Solid Green
A USB connection is established between the
terminal and Net Base.
Dolphin® 9500 Series Net Base Quick Start Guide
3
Color
Description
Flashing
Orange
Data is being transferred between the terminal
and the Net Base.
Configuring the Network
By default, the Net Base is configured to obtain IP addresses automatically via
DHCP server. This means that in most cases you would simply “plug and play”
the unit. If necessary, you can use the configuration utility for dynamic network
configuration.
If Your DNS Server Supports Bind 8.3 or Later
1. Obtain the serial number from the label on the bottom panel of the Net Base.
2. Connect to the network.
3. Power up and wait until the COMM LEDs stop flashing. The COMM LEDs
stop flashing when the Net Base has found the DHCP server.
4. On your PC, open the web browser and enter the Net Base serial number
exactly as it appears on the label.
5. Press ENTER and the online configuration utility displays on your PC.
If Your DNS Server Does Not Support Bind 8.3 or Later
If your DNS server does not support Bind version 8.3 or later, Hyperterminal™
or an equivalent terminal emulator program must be installed on the host PC to
configure the Net Base.
1. Connect the serial cable to the Serial DB-9 Connector on the back of the Net
Base and a COM port on the host computer.
2. Start Hyperterminal or an equivalent terminal emulator program. Use these
settings: 115200 bps, 8,N,1.
3. Power up and wait until the COMM LEDs have stopped flashing. The COMM
LEDs stop flashing when the Net Base has found the DHCP server.
4
Dolphin® 9500 Series Net Base Quick Start Guide
4. Enter the user name <handheld> and default login password <handheld> to
log into Net Base configuration utility. The Net Base menu program displays.
***********************************************
* Welcome to the Hand Held Products Net Base *
***********************************************
SD00032Login: handheld
Password: ********
1)
2)
3)
4)
5)
6)
7)
x)
View System Configuration
View Current Values
Express Setup
Advanced Setup
System Statistics
System Diagnostics
Help
Exit
Enter choice: 2
5. Enter choice 2 (View Current Values) to display IP addresses.
6. Record the IP address for the Ethernet port.
7. Open the web browser on your PC and enter the IP address for the Net Base
you wrote down in Step 6.
8. Press ENTER and the online configuration utility displays on your PC.
Dolphin® 9500 Series Net Base Quick Start Guide
5
If Your Network Does Not Support DHCP or
You Want to Configure the Net Base with a Static IP Address
1. Connect the serial cable to the Serial DB-9 Connector on the back of the Net
Base and a COM port on the host computer. Do NOT connect to the network
at this time.
2. On the PC, start Hyperterminal. Use these settings: 115200 bps, 8,N,1.
3. Wait until login prompt displays on Hyperterminal.
4. Enter the user name <handheld> and default login password <handheld>
to log into network.
***********************************************
* Welcome to the Hand Held Products Net Base *
***********************************************
SD00032Login: handheld
Password: ********
1)
2)
3)
4)
5)
6)
7)
x)
View System Configuration
View Current Values
Express Setup
Advanced Setup
System Statistics
System Diagnostics
Help
Exit
Enter choice: 3
5. Enter choice 3 (Express Setup) and enter the configuration information
requested at each prompt.
6. Press OFF on the power adapter and reconnect the Ethernet cable.
7. Press ON on the power adapter. The Net Base boots up using the
configuration information entered in Step 5.
Accessing the Net Base Through a Browser
After you have successfully configured the Net Base, you can access and
configure it through your browser.
1. Open your browser.
2. In the Address line, type the IP address assigned to the Net Base and press
ENTER. The login screen appears.
6
Dolphin® 9500 Series Net Base Quick Start Guide
3. Enter the Username and Password and click Enter. The browser retrieves
the current values and the home screen appears.
Online Help
For more information about the Dolphin 9500 Series Net Base, click the User’s
Guide link in the left column of the browser window; see page 6.
Links in the Left Column
Link
Click this link to …
User’s Guide
Open the online help files.
Setup
Choose IP address assignments from two options:
• Obtain all IP addresses dynamically - Requests five IP
addresses from a DHCP server: one is used for the Ethernet
interface and the remaining four are assigned to each terminal
slot.
• Specify IP addresses manually - Enables you to specify IP
addresses per terminal slot and change the local USB port (PPP)
IP address.
Current Values
Display the current values. This is the main screen at logon.
Statistics
Display the following system statistics:
• Dock - indicates if the device is charging
• Connect - indicates if the PPP session is active
• RX/TX Total - Total bytes received/transmitted
• RX/TX bps - Instantaneous bits per second
• RX/TX peak - Peak bits per second
Diagnostics
Chose from available diagnostic options such as pinging the network
host.
Dolphin® 9500 Series Net Base Quick Start Guide
7
Charging
In addition to Ethernet communication, the Net Base charges the main battery of
each terminal in less than four hours. The intelligent battery charging system
incorporated into all Dolphin terminals prevents overcharging, which means that
Dolphin terminals may be stored in the Net Base indefinitely without damage to
the terminals, battery packs, or the Net Base.
Use only the Li-ion battery packs provided by Hand Held Products. The
use of any battery pack not sold/manufactured by Hand Held Products
in the Dolphin 9500 Series terminal will void your warranty and may
result in damage to the Dolphin terminal or battery.
Note: The Net Base is compatible with all terminals in the Dolphin 9500 Series.
!
1. Install the Li-ion battery pack into the back panel of the terminal.
2. Slide the Dolphin terminal into one of the terminal wells until the Dock LED
lights solid green. Charging begins immediately.
POWER
SCA N
SFT
ES C
+
VOL
PG
A
B
E
F
7
I
C
5
G
J
-
Q
PG
2
8
M
;
ENT
VO
L
1
4
@
+
TA B
NUM
N
F1
:
R
Y
K
CTRL
6
Z
END
H
9
L
,
O
P
*S
F3
T
F6
V
INS
SEND
D
0
F2
F5
U
START
3
F4
F7
W
BKSP
F8
X
DEL
SP
ALT
Connecting the Dolphin Terminal to the Net Base
After the Net Base is installed, configured, and connected to the host computer,
you must connect the Dolphin terminal to the Net Base.
1. Insert a Dolphin terminal into a terminal well.
2. On the Dolphin terminal, tap Start > Utils > RASMan. The RASMan utility
initializes.
3. When the connection is established between the Dolphin terminal and the
Net Base, the terminal plays a sound and the communication icon appears in
the Navigation bar.
4. Upon connection, the Dolphin terminal is assigned an IP address from the
Net Base, which can be used by any application on the Dolphin terminal.
8
Dolphin® 9500 Series Net Base Quick Start Guide
5. When you exit RASMan or remove the terminal from the Net Base, the
terminal plays a sound and the disconnected icon appears in the Navigation
bar.
Applications on the Dolphin Terminal
Applications running on the Dolphin terminal when it is connected to the Net
Base should be designed specifically for a partially connected network. For more
details, please refer to the Best Practices for Partially Connected Networks
document available at www.handheld.com.
Mounting Options
The bottom panel offers two mounting options:
1. Insert a DIN Rail for desk mounting or
2. Use the wall mount kit (with brackets) for wall mounting.
DIN Rail slot
Screw slots
Using the DIN Rail
Use a standard 7.5mm high X 35mm wide DIN Rail to mount the Net Base to a
horizontal surface, such as a desk or table.
1. Slide the DIN Rail into the slot on the bottom panel.
Dolphin® 9500 Series Net Base Quick Start Guide
9
2. Turn the Net Base and DIN Rail right side up.
3. Secure the DIN Rail to the horizontal mounting surface.
Using the Wall Mount Kit
Wall mount kits can be purchased separately to secure the Net Base to a wall or
other vertical surface. For the Net Base, you need to purchase two kits so that
you have two mounting brackets, one for each end of the Net Base. Each
mounting bracket contains an open slot in the back to accommodate the
connector cables.
1. Insert the round end of a screw into the round end of each screw slot. Slide
each screw towards the narrow end of the slot.
Screws in the narrow end of each slot
2. Use one washer/nut set on each screw to secure the screw in each slot.
10
Dolphin® 9500 Series Net Base Quick Start Guide
3. Attach the Net Base to the mounting brackets.
Open Slot for
Connector
Cables
4. Using the remaining washer/nut sets, secure the mounting brackets to the
bottom panel.
5. Secure the back wedge of the mounting brackets to a stable vertical surface.
Dolphin® 9500 Series Net Base Quick Start Guide
11
Product Service and Repair
Hand Held Products provides service for all its products through service centers
throughout the world. To obtain warranty or non-warranty service, return the unit
to Hand Held Products (postage paid) with a copy of the dated purchase record
attached. Contact the appropriate location below to obtain a Return Material
Authorization number (RMA #) before returning the product.
North America
Hand Held Products Corporate Offices
Telephone: (800) 782-4263, Option 3
Fax: (704) 566-6015
E-mail: [email protected]
America Latina
Hand Held Products America Latina
Teléfono: (239) 263-7600
Fax: (239) 263-9689
E-mail: [email protected]
Brazil
Hand Held Products Brazil
Telephone: +55 (21) 2176-0250
Fax: +55 (21) 2176-0249
E-mail: [email protected]
Europe, Middle East, and Africa
Hand Held Products Europe
Telephone:+ 31 (0) 40 29 01 633
Fax: + 31 (0) 40 2901631
E-mail: [email protected]
Asia Pacific
Hand Held Products Asia/Pacific
Telephone: +852-2511-3050
Fax: +852-2511-3557
E-mail: [email protected]
Japan
Hand Held Products Japan
Telephone: +81-3-5770-6312
Fax: +81-3-5770-6313
E-mail: [email protected]
Online Product Service and Repair Assistance
You can also access product service and repair assistance online at
www.handheld.com.
12
Dolphin® 9500 Series Net Base Quick Start Guide
Technical Assistance
If you need assistance installing or troubleshooting, please call your Distributor
or the nearest Hand Held Products technical support office:
North America/Canada:
Telephone:
Fax number:
E-mail:
(800) 782-4263, option 4 (8 a.m. to 6 p.m. EST)
(315) 685-4960
[email protected]
Europe, Middle East, and Africa:
TelephoneEuropean Ofc: Int+31 (0) 40 29 01 600
U.K. Ofc:
Int+44 1925 240055
E-mail:[email protected]
Asia Pacific:
Telephone:
E-mail:
Int+852-3188-3485 or 2511-3050
[email protected]
America Latina:
Teléfono:
E-mail:
(704) 998-3998, opción 8
[email protected]
Online Technical Assistance
You can also access technical assistance online at www.handheld.com.
Limited Warranty
Hand Held Products, Inc. ("Hand Held Products") warrants its products to be free from
defects in materials and workmanship and to conform to Hand Held Products’ published
specifications applicable to the products purchased at the time of shipment. This warranty
does not cover any Hand Held Products product which is (i) improperly installed or used;
(ii) damaged by accident or negligence, including failure to follow the proper maintenance,
service, and cleaning schedule; or (iii) damaged as a result of (A) modification or
alteration by the purchaser or other party, (B) excessive voltage or current supplied to or
drawn from the interface connections, (C) static electricity or electro-static discharge, (D)
operation under conditions beyond the specified operating parameters, or (E) repair or
service of the product by anyone other than Hand Held Products or its authorized
representatives.
This warranty shall extend from the time of shipment for the duration published by Hand
Held Products for the product at the time of purchase ("Warranty Period"). Any defective
product must be returned (at purchaser’s expense) during the Warranty Period to Hand
Held Products’ factory or authorized service center for inspection. No product will be
accepted by Hand Held Products without a Return Materials Authorization, which may be
obtained by contacting Hand Held Products. In the event that the product is returned to
Hand Held Products or its authorized service center within the Warranty Period and Hand
Held Products determines to its satisfaction that the product is defective due to defects in
materials or workmanship, Hand Held Products, at its sole option, will either repair or
replace the product without charge, except for return shipping to Hand Held Products.
EXCEPT AS MAY BE OTHERWISE PROVIDED BY APPLICABLE LAW, THE
FOREGOING WARRANTY IS IN LIEU OF ALL OTHER COVENANTS OR
WARRANTIES, EITHER EXPRESSED OR IMPLIED, ORAL OR WRITTEN, INCLUDING,
Dolphin® 9500 Series Net Base Quick Start Guide
13
WITHOUT LIMITATION, ANY IMPLIED WARRANTIES OF MERCHANTABILITY OR
FITNESS FOR A PARTICULAR PURPOSE.
HAND HELD PRODUCTS’ RESPONSIBILITY AND PURCHASER’S EXCLUSIVE
REMEDY UNDER THIS WARRANTY IS LIMITED TO THE REPAIR OR REPLACEMENT
OF THE DEFECTIVE PRODUCT. IN NO EVENT SHALL HAND HELD PRODUCTS BE
LIABLE FOR INDIRECT, INCIDENTAL, OR CONSEQUENTIAL DAMAGES, AND, IN NO
EVENT, SHALL ANY LIABILITY OF HAND HELD PRODUCTS ARISING IN
CONNECTION WITH ANY PRODUCT SOLD HEREUNDER (WHETHER SUCH
LIABILITY ARISES FROM A CLAIM BASED ON CONTRACT, WARRANTY, TORT, OR
OTHERWISE) EXCEED THE ACTUAL AMOUNT PAID TO HAND HELD PRODUCTS
FOR THE PRODUCT. THESE LIMITATIONS ON LIABILITY SHALL REMAIN IN FULL
FORCE AND EFFECT EVEN WHEN HAND HELD PRODUCTS MAY HAVE BEEN
ADVISED OF THE POSSIBILITY OF SUCH INJURIES, LOSSES, OR DAMAGES.
SOME STATES, PROVINCES, OR COUNTRIES DO NOT ALLOW THE EXCLUSION OR
LIMITATIONS OF INCIDENTAL OR CONSEQUENTIAL DAMAGES, SO THE ABOVE
LIMITATION OR EXCLUSION MAY NOT APPLY TO YOU.
All provisions of this Limited Warranty are separate and severable, which means that if
any provision is held invalid and unenforceable, such determination shall not affect the
validity of enforceability of the other provisions hereof.
The limited duration of the warranty for the Dolphin 9500 Series is as follows:
• Dolphin 9500 and Dolphin 9550 terminals with an integrated imager are covered by a
two-year limited warranty.
• Dolphin 9551 and Dolphin 9501 terminals with an integrated laser engine are covered
by a one-year limited warranty.
• Touch screens are covered by a one-year limited warranty.
• The limited duration of the warranty for the Dolphin 9500 Series Net Base is one year.
• The limited duration of the warranty for batteries is one year. Use of any battery not
sold/manufactured by Hand Held Products may damage the terminal and/or the battery
and will void the warranty. Batteries returned to Hand Held Products in a reduced state
may or may not be replaced under this warranty. Battery life will be greatly increased
when following the battery instructions in the Dolphin 9500 Series User’s Guide.
• Use of any peripheral not manufactured/sold by Hand Held Products will void the
warranty. This includes but is not limited to: cables, power supplies, cradles, and
docking stations.
• Use only power adapters approved for use by Hand Held Products. Failure to do so may
result in improper operation or damage to the unit and will void the warranty.
Hand Held Products, Inc. extends these warranties only to the first end-users of the
products. These warranties are non-transferable.
14
Dolphin® 9500 Series Net Base Quick Start Guide
Hand Held Products, Inc.
700 Visions Drive
P.O. Box 208
Skaneateles Falls, NY 13153-0208
9500-NB-QS
Rev C
5/16/05