1
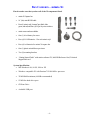
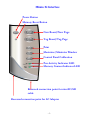
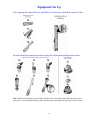
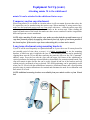
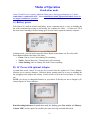
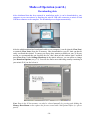
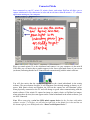
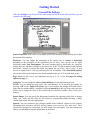
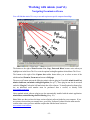
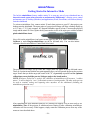
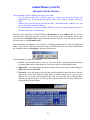
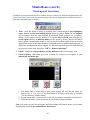
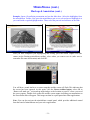
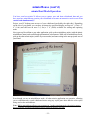
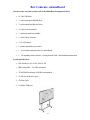
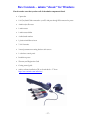
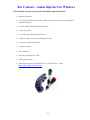
Step by Step Guide
to your
mimio Technology System
on Windows
Virtual Ink
Americas and Asia
Brighton Landing East
20 Guest Street Suite 520
Boston MA 02135
Sales: 877.696.4646 (877.my.mimio)
Fax: 617.987.0479
Support: 877.846.3721
Email: [email protected]
Virtual Ink
Europe, Middle East, Africa
7 Berkshire Business Centre
Berkshire Drive
Thatcham, Berks RG19 4EW
United Kingdom
Phone: +44 870 458 3344
Fax: +44 870 458 3355
Support: +44 870 458 3366
Email: [email protected]
www.mimio.com
www.europe.mimio.com
www.touchboards.com 205 Westwood Ave.Long Branch, NJ 077401-866-942-6273 [email protected]
-1-
About this manual
Congratulations on your ownership of a mimio system. mimio turns your ordinary
whiteboard or flip chart into a digital information capture and presentation platform.
Whether teaching, training, or collaborating, the valuable information on your board can
now be an integral part of your digital information environment. That information can be
shared real time or on demand, viewed locally or remotely, on the LAN, WAN, or via the
Internet, as printed or shared as files stand-alone or embedded in documents from your
favorite software applications.
The purpose of this manual is to provide you with a comprehensive understanding of the
remarkable tool now in your possession through a detailed description of the varied and
powerful features of your mimio system, from the most basic to the most elaborate. These
features are made possible through the richness and power of the mimio software
application. With the release of mimio version 2.7, any mimio technology based hardware
systems can now be run from this latest and most advanced mimio software version.
We highly recommend, if your currently installed mimio software is not version 2.7.2 or
later, that you obtain a copy of the installation v. 2.7.2 CD or go to
http://www.mimio.com/software where you can download the installer for free.
Installation is simple and straightforward. If you have registered optional software plugins such as classRoom, writingRecognition, or boardCast please be aware they will need to
be re-installed, after installing the base mimio 2.7 application, using the originally supplied
usernames and serial numbers. Note: Windows 95 and NT, which do not support USB, must
install mimio v. 2.1 software also available for download at the same location.
The majority of this manual describes and depicts mimio software being used with mimio
Xi, the most advanced mimio technology solution. If you use the Xi technology-based
mimioBoard or the original mimio for Windows (now referred to as “mimio classic”) or
mimio flipChart there are some differences noted in the body of this document. For details
of Box Contents and the Device Interface for mimioBoard, mimio (classic) for Windows
and mimio flipChart, see the Appendices at the end of this document. Unless otherwise
noted, you can assume that features are essentially the same for any mimio product used.
The mimio software application is designed to automatically detect the type of mimio
device connected to your PC. The appropriate software icon display and interface will be
shown as indicated below.
mimio Xi
mimioBoard
mimio “classic”
-2-
mimio flipChart
Table of Contents (with hyperlinks)
• Box Contents – mimio Xi
• Mimio Xi Interface
• mimio Xi Equipment Set Up
• mimio Xi Modes of Operation
Page 4
Page 5
Page 6
Page 9
• Getting Started
o General File Settings
Page 12
o Stand-alone mode
o Downloading data
o Connected Mode
o Settings - Page
• Working with mimio
Page 14
General
Navigating the mimio software
Control Panels
Views
Full screen mode: Virtual Whiteboard
Notes Tab
Editing Pages
Saving mimio files
Copy and Paste
Exporting data as an image
Exporting data as HTML
Plug-ins
o Optional Plug-ins
o
o
o
o
o
o
o
o
o
o
o
o
• mimioMouse – Interactive Whiteboard Mode
o
o
o
o
Page 28
Getting Started in Interactive Mode
Interactive Mode Features
Mark-up and Annotation
mimio Dual Mode Operation
• Quick Tips for Optimizing mimio Xi Performance
• Frequently Asked Questions
•
Appendix – mimioBoard – Contents & Set-up
Appendix – mimio “classic” – Contents & Set-up
Appendix – mimio flipChart – Contents & Set-up
-3-
Page 33
Page 34
Page 35
Page 37
Page 39
Box Contents – mimio Xi
Check to make sure that you have all of the Xi components listed.
•
mimio Xi Capture bar
•
16’ (5m) mini-B USB cable
•
Four (4) mimio styli, 4 smartCaps (black, blue,
green, and red) and four (4) Expo dry-erase markers
•
mimio eraser and eraser holder
•
One (1) AAA battery for eraser
•
Four (4) N-Cell batteries: 1 for each mimio styli
•
Four (4) AA batteries for mimio Xi capture bar
•
One (1) plastic mimioMouse pen insert
•
Two (2) mounting brackets
•
“Getting Started Guide” with mimio software CD, linkUSB Reference Card, Technical
Support Info card
System Specification:
• MS Windows® 98, 98 SE, 2000 or XP
•
Windows compatible PC with Pentium™ II 400 MHz+ processor
•
32 MB RAM minimum (64 MB recommended)
•
15 MB free hard drive space
•
CD Rom Drive
•
Available USB port
-4-
Mimio Xi Interface
Power Button
Memory Reset Button
New Board/New Page
Tag Board/Tag Page
Print
Maximize/Minimize Window
Control Panel Calibration
Pen Activity Indicator LED
Memory Content Indicator LED
Recessed connection point for mini B USB
cable
Recessed connection point for AC Adaptor
-5-
Equipment Set Up
After opening the mimio Xi box, install the 4 AA batteries (included) into the Xi bar.
Second, install the appropriate batteries into the stylus pens and the mimio eraser.
Note: Put the same color dry erase marker with the same color stylus (match the cap color of the
stylus pen). For mimioMouse mode, place the plastic pen insert into the stylus pen of your choice.
-6-
Equipment Set Up (cont.)
Install the software from the CD included in the box.
After inserting the CD, the browser shown below will appear. Click on “mimio” under
“install software”. The software is free and can also be downloaded from our web site:
www.mimio.com.
-7-
Equipment Set Up (cont.)
Attaching mimio Xi to the whiteboard
mimio Xi can be attached to the whiteboard in two ways.
Temporary suction cup attachment:
When using mimio Xi on a board in a location where it will not remain for more than a day, the
Xi capture bar can be attached using the suction cups. When attaching Xi using suction cups,
make sure the board and suction cups are clean (wipe with tissue – clean the suction cups only
with water or alcohol – NEVER use solvent cleaners on the suction cups). When cleaning the
upper left hand corner of the board, also make sure there are no scratches or surface irregularities
that would prevent a secure attachment.
NOTE: After attaching Xi with suction cups, make sure that both the top and bottom sets of
cups have fastened properly by applying some lateral force left, right, up and down parallel to
the board surface. If the suction cups loosen when doing this, re-clean and re-attach.
Long-term attachment using mounting brackets:
If your Xi will be used frequently on a particular board or if you wish to use Xi on any board for
an extended period of time (days or more), it is highly recommended to use the mounting
brackets, of which one pair is supplied with your Xi. The mounting brackets can be attached by
clipping them onto the Xi bar and then removing the protective slip over the 3M “Command”
adhesive strips. Press the bar with the clips onto the upper left corner of the whiteboard in
vertical orientation for landscape oriented boards or horizontally for portrait oriented boards. The
clips will remain in place but the bar can be easily clipped in and out of the brackets and will
remain precisely positioned as long as desired. This fixed positioning can be particularly useful
when your Xi is used with the mimioMouse interactive whiteboard feature and a fixed position
projector since it permits calibration to be retained and eliminates the need for recalibration each
time mimio Xi is used.
NOTE: Additional mounting brackets are available from your mimio reseller or from Virtual
Ink.
-8-
Modes of Operation
Stand-alone mode
mimio Xi enables you to capture whiteboard data (notes, drawing and diagrams) in 2 modes:
stand-alone or connected to a PC. Note: mimioBoard, mimio flipchart and mimio classic do
not support stand-alone operation.
A.) Battery power
With mimio Xi’s built-in memory and battery power, capturing data is as easy as attaching the
bar to the whiteboard, powering on and writing. No computer, no cables ... it’s that easy! All of
the notes from a meeting or lecture lasting up to 10 hours can be captured without a computer.
In battery mode, you will need to press the Power Button to turn mimio on. The color of the
Power Button indicates the battery life status:
• Green: Unit on. Over 5 hours battery life remaining
• Yellow: Unit on. Between 1-5 hours battery life remaining
• Yellow flashing: Unit on. Battery life under 1 hour remaining
B.) AC Power with optional Adapter
In stand-alone mode, mimio Xi can also be powered from the optional AC Power Adapter,
allowing you to conserve batteries. With this option, getting started is as easy as attaching the
bar, plugging in the adapter and writing. You never have to press the Power button; it’s always
on!
NOTE: you can use re-chargeable batteries in your mimio Xi but they are not re-charged by Xi
when using the AC Power Adapter.
Data Recording Indicators: In stand-alone mode the flashing green Pen Activity and Memory
Content LED’s on the capture bar confirm your notes are being recorded and stored.
-9-
Modes of Operation (cont’d.)
Downloading data
After whiteboard data has been captured in stand-alone mode, it can be downloaded to your
computer at your convenience by attaching the mini-B USB cable connector to mimio Xi and
USB host connector to the computer. The download process begins automatically.
After the whiteboard data has been downloaded to your computer, it can be cleared (Clear Now)
or retained (Clear Later) from the Xi memory. Once downloaded to your PC, data can then be
easily saved and then shared. To ensure you always have memory available on your Xi for any
session, we recommend that you check the box for “don’t show me this window again” and then
press Clear Now. Under Settings–Hardware in the mimio software, you can preset or change
your Download Options (see p. 12). You will also find a meter indicating memory remaining in
your mimio Xi if you don’t clear it.
Note: Data in the Xi bar memory can also be cleared manually by pressing and holding the
Memory Reset Button on the capture bar for one second with a thin pointed object (i.e. pen or
pencil).
- 10 -
Connected Mode
Once connected to your PC, mimio Xi, mimio classic, and mimio flipChart all allow you to
capture whiteboard or flip chart notes in color and in real time within the mimio v. 2.7 software
application running on your computer.
When you attach mimio Xi to the whiteboard and connect it to your computer via the mini-B
USB cable you will notice that a graphic appears in the lower right hand corner of your screen
(as shown) indicating that the bar is connected and communicating with the mimio software.
You will also notice that the capture bar appears on the virtual whiteboard in the mimio
software. The power button of mimio Xi will illuminate if not already running on battery or AC
power. With mimio classic and flipchart, the LED on the capture bar will illuminate yellow
when physically connected to the PC and will change to green when communicating with the
mimio software. If the mimio Xi capture bar image (or mimio classic or flipChart bar images,
when using those devices) does not appear on the virtual whiteboard in the mimio software, you
are NOT connected.
Note: When connecting a serial (no USB) mimio capture device for the first time with mimio
software version 2.7 or highe,r you will need to right click on the mimio icon in the task bar on
the bottom right of your desktop and select “Detect serial Capture Device”.
- 11 -
Getting Started
General File Settings
Under the Settings menu (located on the main menu bar and on the far left-hand side), you can
customize the following:
Session Properties: Add a title to your mimio file; list the attendees of the meeting and a short
description of the meeting.
Hardware: You can change the orientation of the capture bar to vertical or horizontal
depending on the orientation of the whiteboard you are using. You can also test for signal
interference under Test Environment. The most common types of interference are caused by
motion detectors and direct sunlight to the mimio bar. If the Test Environment results indicate
interference, attempt to position the board and capture bar out of the “line of sight” of such
devices or signal sources. Also try positioning the bar horizontally. Under Download Options,
you can also select your preferences for data downloaded after use of Xi in stand-alone mode.
Page: mimio Xi will “cover” any whiteboard area up to 4’ x 8’ in size. For page size setting
options see page 9.
Stylus Set: You can change the color and line thickness of each individual stylus pen.
NOTE: You can change the pen stroke color and thickness for all previous pen strokes by
pressing “OK” on the “Apply to Previous” box or you can have the changes affect only strokes
made after the setting change. Attaching a different smartCap to the top of the stylus pen also
allows you to change the color of the recorded ink to match the available colors of dry erase
markers.
Export Image: You can specify the dimensions/resolution for exporting mimio files as images
(bmp, .emf, .wmf.) and also select the file format for copying and pasting (and drag ‘n drop)
content from mimio into other applications.
Options: You can customize your Settings (enable audio feedback, connect to last session),
Formatting (date and time) and File Saving Features (save recovery files, auto save). These
functions are designed to ensure that you will always save and capture your data without any
chance of accidentally losing the information on the board.
- 12 -
Getting Started (cont’d.)
Settings - Page
The mimio software will automatically capture all notes, diagrams and drawings on any hard,
flat, smooth surface up to a 4’ x 8’ (1.2m x 2.4m) area in size. If you would like to adjust the size
of the virtual whiteboard in the software so that it proportionally matches the actual whiteboard
in use, simply go to Settings-Page.
Under Settings-Page (located on the main menu bar at the top or at the far left), if you know the
size of your board, simply check the appropriate size and click OK.
If you don’t know the size of your board click Auto Size and click with any mimio stylus pen in
the lower right-hand corner of the whiteboard. The mimio software automatically sizes to the
board you are using.
You can also custom size your board by checking the Custom box and adjusting the sliders at
the side and bottom of the graphic box.
Note: If your whiteboard is portrait oriented (meaning it is taller but not wider than 4’ (1.2m),
remember to go to Page-Hardware and select the horizontal mimio bar orientation.
- 13 -
Working with mimio
General
Some of the most frequently used mimio features/functions are accessible from the “General” tab on
the left-hand side of the mimio software. These functions are also located on the Xi capture bar (and
on the mimioBoard panel) so you can access them directly from the whiteboard or at the computer.
New Page: mimio saves a thumbnail of the current board and adds a new blank board to your
recorded whiteboard session. After pressing New Page, the actual whiteboard can be erased with
either a regular board eraser or mimio eraser. Note: after selecting New Page, the previous page
cannot be edited from the whiteboard but can be edited in the software. (See p.22).
Tag Page: mimio creates a thumbnail of the current board and carries that same board
content/concept to a new page allowing you to continue to add to it. Themes, ideas, concepts
and/or problems can continue to be developed without having to start from scratch.
NOTE: Pages created by New Page and Tag Page are individually numbered and are selectable
by number (single or in series) for purposes of printing, exporting to HTML and/or emailing.
Print Page: if a printer is installed, mimio will print the current page to the default printer.
The following options are located only on the physical mimio Xi capture bar and mimioBoard:
Maximize Board: maximizes / minimizes / restores the mimio application window on your
computer screen.
Activate Control Panel: Activates installed Control Panels (e.g., mimioMouse, talking
calculator). Your mimio software CD has instructions on downloading and using control panels.
(Also see page 11).
- 14 -
Working with mimio (cont’d.)
Navigating the mimio software
You will find that mimio Xi is easy to use and requires no special computer knowledge.
The buttons to the right of Print Preview: Cut, Copy, Paste and Delete become active when you
highlight text in the Notes Tab View or in the optional writingRecognition & classRoom Tab Views.
The buttons to the right of the Capture bar toolbar button allow you to select an area of the
whiteboard and Zoom in, Zoom out and return to Full page.
The next set of buttons activate the following mimio software plug-ins if installed: mimio boardCast,
mimio classRoom, and mimio writingRecognition (See p.27). These plug-ins can also be accessed
under the “Plug-ins” tab on the left hand mimio bar of the software. To install optional software plugins, an individual serial number must be purchased from a reseller, or directly from
www.mimio.com/store.
Other standard mimio software plug-ins are also automatically installed with the mimio application:
mimioMouse, mimioMeetings and NetMeeting (See p. 26).
Note: Make sure that you have the latest version of mimio software loaded on your computer. If you
are not sure what version you currently have, go to Help / Software Updates from the main menu to
confirm what version you have and then compare that with the latest version on
www.mimio.com/software.
- 15 -
Working with mimio (cont’d.)
Control Panels
The mimio software CD includes template files and instructions for using 2 Control Panels:
mimioMouse and Talking Calculator. Electrostatic decals may have been included with your Xi.
These Control Panels permit mimio and other computer functions to be operated directly from the
whiteboard instead of from the PC.
To calibrate and activate Control Panels, place one or both of the Control Panels anywhere on the
mimio whiteboard. Then, push the bottom button located on the mimio Xi capture bar (or under
Control Panels in the software) until the Control Panel you wish to activate appears on the screen.
Then follow the audio and visual instructions using one of the stylus pens. You may want to place the
plastic mimioMouse insert into the stylus for this exercise to avoid marking the Control Panel with
ink.
There is a Control Panel API developer’s kit available on http://www.mimio.com/software,
providing all the software tools and information required to design and program custom Control
Panels which can be installed with the mimio software application. You can in effect develop
interactive “hot keys” for specific functions on your PC controlled from mimio Xi.
NOTE: Computer-programming skills(C++ & Visual Basic) are required in order to use the Control
Panel API.
- 16 -
Working with mimio (cont’d.)
Control Panels
Once activated your screen will show the panel(s) that you have installed.
At this point, all of the features and functionality of the Talking Calculator and mimioMouse control
panel can be accessed from the location where you have placed the Control Panel. Note: If you are
working on a large whiteboard, we recommend placing the Calculator decal on the far right-hand side
of the board because it includes a full set of the Xi bar control buttons, eliminating the need to come
back to the bar or computer to activate these commands.
The Calculator Control Panel activates a talking calculator function. For example, press the number 5;
then the multiplication button; then number 5 again; and then the equal sign on the Control Panel (5 x
5 =)…. the calculator will do the rest; activating the calculator application on your PC desktop and
voicing the entries, commands, and results through the PC sound system.
The mimioMouse Control Panel (for use when the PC desktop is projected onto all or part of the
whiteboard) can be used to control mimioMouse calibration and also provides navigation of the cursor
and return key within applications, access to the floating keyboard, mark-up capabilities and
archiving. (Please refer to p.28 for more information in mimioMouse) NOTE: by initiating
calibration of the mimioMouse Control Panel from the Xi bar button and then touching the
calibration button on the Control Panel, it is possible to obtain at the whiteboard 100% control of
all PC functions using mimioMouse without making a single visit to your PC keyboard.
To de-activate Control Panels, click on the icon in the “Control Panels” tab of the mimio software or
press the bottom button on the capture bar until the required Control Panel icon appears and its name
is voiced. Wait 3 seconds and a voice prompt will confirm that Control Panel is de-activated.
- 17 -
Working with mimio (cont’d.)
Views
You can customize the mimio user interface by clicking on Views in the mimio software and
selecting the various options.
Note: The default Views setting displays all the options under the Views menu except “Capture Page”
(which maintains a constant thumbnail display of the active/last page).
There are also 4 Display toolbar buttons located in the lower left-hand corner of the mimio application
Single board – displays current capture page plus all tools and functions.
Player - will play back your session stroke-by-stroke. You can increase/decrease playback
speed and also choose to continually loop the playback in the Settings-Playback-Options
dialog box. NOTE: You can also right click on the New Page, Tag Page and Notes icons that
appear in the upper right hand corner of the mimio whiteboard displayed in Playback View to
insert or remove Tag Pages and New Pages at any point of the “timeline” of the mimio ink
data file.
Thumbnails - every page you have created will be displayed on one screen with a date and
time stamp. This is useful when reviewing content or creating a training record. Click on any
thumbnail and that page will be displayed as the main window. The pen set at the bottom of
the mimio application allows you or others to pick up a pen or eraser from the toolbar and
append new “ink” data to the captured data or edit any pages followed by a New Page. Note:
pages cannot be re-ordered.
Full screen – fills the PC display with the mimio virtual whiteboard with no application icons
or interface except a toolbar providing “soft” pens, erasers and controls. See following page.
- 18 -
Working with mimio (cont’d.)
Full screen mode: Virtual Whiteboard
Full Screen Display is the ideal mimio application display mode for projection of the whiteboard
onto a large screen for lecture theatre or auditorium audiences, capturing and displaying whiteboard
notes in real time.
When operating in mimioMouse mode (see p.28) Full Screen display mode will permit you to select
with your mimioMouse any of the 8 color soft pens or the wide and narrow eraser tools and write or
erase directly to the projected mimio whiteboard image interactively. The mimio .ink file will be
created as if you were using stylus pens with real markers but without putting real marker ink on the
board. Additional controls on the Full Screen Navigation Toolbar allow you to clear the board to
start a New Page, scroll Forward and Backwards through Tagged Pages or jump to the beginning or
end pages of the file.
To exit Full Screen display and return to the standard mimio application display just click on the red
circle with “X”.
Note: If you have been using a soft pen, remember after exiting Full Screen Display to press the
cursor icon button in the standard application tool bar so that your mimioMouse does not write
unintended “ink”.
- 19 -
Working with mimio (cont’d.)
Notes Tab
While the mimio software accurately captures everything that is written and drawn on the mimio
enabled board, other parts of the lesson or discussion may not have been recorded. In the “Notes”
field, additional information can be entered (typed) or copied from another text sources and saved
with the mimio page displayed.
•
Click on the Notes tab in the Tabbed Views section (located in the lower right-hand of the
software) and start typing (or copy and paste) information into the Notes area.
•
As soon as you begin to add notes, standard text formatting toolbar icons become active in the
main mimio software, enabling you to change the font type, size, color, etc.
•
You will also notice that the marker icon in the lower left-hand corner of the virtual whiteboard
is now “active” (colored red) – indicating that the board has associated notes (a great visual
reminder when reviewing an .ink file at a later time).
Any mimio Ink files shared and viewed in the mimio software application will retain and display
associated notes. The notes from the Notes tab can also be included when mimio Ink file pages are
Printed or when they are exported to HTML.
NOTE: To use the Notes feature, make sure that Tabbed Views and Show Page Information is
checked under Views (See p. 18).
- 20 -
Working with mimio (cont’d.)
Editing Pages
mimio software faithfully replicates the reality of the whiteboard you are using. Once you have
changed or erased the writing on the board, you cannot return in the software to a “Saved” or
“Tagged” page and use a mimio stylus pen to add to or edit the Ink data. However, mimio pages can
be edited in either of 2 ways:
Only if the page you wish to edit is followed by a New Page, you can use your mouse to select one
of the eight “soft” stylus or two “soft” eraser toolbar buttons located in the Styli and Erasers toolbar, to
edit or add to the ink data on the page.
You can add additional data to any mimio Ink file by simply opening the file on your PC with the
mimio Xi or any other mimio capture device (mimioBoard, mimio flipChart, mimio classic, mimio for
Mac) connected and writing with any mimio stylus pen.
- 21 -
Working with mimio (cont’d.)
Saving mimio files
Data captured on the whiteboard with mimio Xi can be saved in the mimio native format (.ink) or as a
Self-Viewing Ink (.exe) files. Go to File-Save As and select either the mimio Ink (*.ink) or Self
Viewing Ink (*.exe) file format from the Save as Type pull down menu.
There are a few benefits to saving and viewing files in the native mimio Ink format:
1. The mimio software is a free download (www.mimio.com/software). Anyone can download
and install the mimio software to view mimio Ink files.
2. In the mimio Ink format, all features and functionality of the mimio session data are accessible,
including added keyboard Notes & Recognized text as well as playback, page thumbnails, etc.
3. Recipients can also edit the session notes (add or remove Tag or New pages; add ink to pages
from soft pens etc.) - and if they have a mimio device, they can further develop and add data
and pages to the session. (See p.20)
4. mimio Ink files are rendered as vector data, which requires less memory and storage space
than bitmap or even jpeg files and therefore easier to email, share & archive.
The Self Viewing Ink file format combines a viewing application with your ink data in a single
executable file that enables the mimio data to be viewed with Page thumbnails, played back and pages
printed on any PC without installation of the mimio software application.
Note: if a recipient of a self-viewing ink file does have the mimio software loaded, the file will
automatically open up in the mimio application. CAUTION: In this age of computer viruses, it is
recommended that any Self Viewing Ink executable (.exe) file be Zipped before sending, in order to
make sure it clears the anti-virus firewalls of the receiver’s network.
- 22 -
Working with mimio (cont’d.)
Copy and Paste
Data captured from the whiteboard can also be copied and pasted (or dragged and dropped) into any
Windows application such as Microsoft Word, PowerPoint, and Excel or directly into Outlook.
Open up the application into which you want to copy mimio data. Then click on one of the
selection tools located on the Styli and Erasers tool bar, highlight the area you want to copy and
then Copy and Paste (or Drag and Drop) it into the application.
Because mimio Ink is vector data, the copied mimio images are scaleable and can be enlarged or
reduced without sacrificing image or print quality.
Creating PDF Files from mimio Data – whiteboard data is not typically the final document,
so the best way to produce “final” PDF’s incorporating mimio Ink data is to drag & drop or
copy/paste the data into Word or similar document and distill that document as a PDF.
NOTE: Under Settings–Export Image you can set the pixel resolution for Export Image files and
the dimensions and other specifications for Metafile data. You can select under Drag and Drop
Files from the following formats: Windows Metafile (.wmf), Enhanced Metafile (.emf), Windows
Bitmap (.bmp) and JPEG Bitmap (.jpg).
- 23 -
Working with mimio (cont’d.)
Exporting data as an image
To enable easy integration into other document formats or use with other applications you can
Export mimio data to Image (.jpg, .bmp, .wmf, .emf), HTML, Scalable Vector Graphic (.svg),
or Encapsulated PostScript (.eps) file formats.
You can export an entire board by clicking on File–Export–Image or just a section of it by using
the regular/irregular Selection tools located on the Styli and Erasers toolbar.
Depending on the type of file format to which you are exporting, you have the option to
specify resolution and other attributes of the mimio data in the exported format.
- 24 -
Working with mimio (cont’d.)
Exporting data as HTML
Data can be exported to HTML and posted to a website in seconds, allowing easy access for
students or others to whiteboard notes from any Internet web browser anywhere, anytime.
Simply go to File-Export-HTML, name the file and location where you would like to save it and
mimio automatically renders the mimio Ink pages in HTML for instant posting or uploading to
web pages. Numbered mimio Ink pages can be exported by selected page numbers, or as an entire
session with all pages, generating a sequenced “storyboard” of the whiteboard notes viewable in
any web browser. Colleagues, clients, customers and students benefit from being able to view
your mimio whiteboard notes - wherever and whenever – with a simple Internet connection.
Note: If you have added notes in the Notes tab (See p. 20), these notes can be selected in HTML
Export-Set-up to also appear, along with Session Properties data, in exported HTML page
Whiteboard notes
Keyboard notes
- 25 -
Working with mimio (cont’d.)
Plug-ins
mimio software is installed with plug-ins which extend functions and links to other applications.
mimioMeetings – clicking on the mimioMeetings plug-in icon when connected to the internet will
open your web browser to http://www.mimio.com/meetings/index.html where you will find links to
Glance.net and other third party online conferencing solutions which will permit shared viewing of
your mimio whiteboard over the internet. As a shared application with these third party solutions,
mimio is the ideal tool to bring a real whiteboard into the view of all meeting, training, or classroom
participants regardless of location.
mimioMouse – this built-in feature enables you to turn your mimioBoard into an interactive
touchscreen. Simply connect mimio Xi and a multi-media projector to your PC and project the PC
desktop onto any area of you whiteboard (mimioMouse can support an 80” diagonal display area).
Place the plastic mimioMouse insert into any mimio stylus; initiate mimioMouse calibration (by
clicking on the mimioMouse plug-in icon of the software or from the mimioMouse Control Panel) and
use the stylus like a cordless mouse to click, double click, drag and drop and otherwise control your PC
from the whiteboard. Browse the Internet, scroll through a PowerPoint presentations or open a
spreadsheet. mimioMouse includes a floating palette of mark-up and screen capture tools which can be
accessed either from the onscreen toolbar or the mimioMouse control panel. (See p. 28)
NetMeeting – this plug-in permits mimio Xi to work seamlessly with the Microsoft NetMeeting
network conferencing solution that is a part of Win 98/200/Xp. Any team members, clients or students
connected to your location over the internet via NetMeeting can see the actual whiteboard notes
written on your mimio enabled whiteboard in real time in the NetMeeting “virtual” whiteboard
window of NetMeeting.
- 26 -
Working with mimio (cont’d.)
Optional Plug-ins
The features of the core mimio software application can be further extended by optional software
plug-ins (writingRecognition, boardCast and classRoom). These plug-ins work with the ink data that
you are capturing to enable additional functions or create new data types. They can be purchased from
Authorized mimio Resellers. North American customers can also purchase from
www.mimio.com/software.
Optional mimio software plug-ins:
•
•
•
mimio writingRecognition – converts handwritten notes into ready-to-edit text.
Recognizes print and cursive, numbers (including basic operation symbols but not
scientific notation), letters and punctuation, and requires no training! Note:
writingRecognition works with English language writing only. Learn more at
http://www.mimio.com/meet/writingrecognition/.
mimio boardCast – records audio (your voice) in real time with your whiteboard notes to
create internet streaming multi-media content which can be archived for on-demand
viewing through any Real Player from a web server (Real Server enabled). The highly
compact boardCast files can also be recorded directly to hard disk and redistributed by
conventional file transfer methods. Learn more at http://www.mimio.com/meet/boardcast/.
mimio classRoom – permits network sharing of whiteboard notes with multiple PCs (up
to 30) in real time over your existing network. Provides access password security and oneway chat feedback for students or trainees to the Instructor. Ideal for classrooms, labs and
training centers. Learn more at http://www.mimio.com/meet/classroom/.
- 27 -
mimioMouse
Getting Started in Interactive Mode
The built-in mimioMouse feature enables mimio Xi to turn any area of your whiteboard into an
interactive touch screen (also referred to as an Interactive Whiteboard) – allowing you to control
and annotate your PC desktop (Windows) and applications (Word, PowerPoint, web browser) directly
from the whiteboard.
To activate mimioMouse, first, connect mimio Xi and a data projector to your PC; then project your
desktop onto the whiteboard. The aspect ration of your projected image will allow a desktop display up
to 4’ (1.2m) x 5’ 4” (1.6m) or approx. 80” diagonal. Maintain a gap of at least 6” between the projected
image and the mimio Xi. Next, replace the dry-erase marker in one of the stylus pens with the included
plastic mimioMouse insert.
Next, click on the mimioMouse icon located on the upper tool bar, or in Tools – mimioMouse –
Calibrate or under Plug-Ins-mimioMouse (on the far left-hand side). You can also initiate
calibration from the mimioMouse Control Panel if activated.
The projected screen image will go white and a target point will appear in the top left-hand corner.
There are 9 points in total with the next point appearing once you have pressed the pen on the previous
target. Ensure that you hit the target (the center of the “X”) as precisely as possible and for optimum
calibration accuracy hold the pen at a 90-degree angle to the board surface.
NOTE: Whichever Stylus Pen is used for the calibration of mimioMouse will become a “cordless
mouse”. It will no longer be “seen” by the mimio system as a writing marker. The other stylus pen can
be used to continue writing and capturing notes anywhere on the whiteboard (including the
mimioMouse projection area).
After completing the final calibration point, the PC desktop will reappear. You are now ready to use
mimioMouse. Note: If the projector or whiteboard moves during or after calibration, mimioMouse
calibration will lose accuracy. If this happens, simply restart the calibration process from any of the
menus or icons described above.
- 28 -
mimioMouse (cont’d.)
Interactive Mode Features
The mimioMouse feature enables you to do 3 basic tasks:
• Use the mimio stylus like a cordless mouse to control your projected desktop and
applications (e.g., scroll through PowerPoint slides, surf websites, navigate interactive
CDs).
• Mark-up any projected image (PowerPoint slides, Word documents, websites, etc.) and
save or print those annotated changes.
• Use the mimioMouse interactive feature AND have mimio Xi capturing notes with one of
the other stylus pens simultaneously.
Directly on the whiteboard, click the Windows Start button on your Taskbar and you will see
that the mimio stylus now acts like a mouse. The first press of the stylus on the board is the
equivalent of a “left mouse click”. Press and hold down the stylus for a second and you activate
the equivalent of a “right mouse click”.
After calibrating mimioMouse, you will notice a floating toolbar appears in the top right hand
corner. You can move this by pressing the stylus on the blue title bar area of the mimioMouse
bar, holding it down and dragging it anywhere on the board.
The mimioMouse Toolbar has 6 buttons.
1. Cursor - this becomes inactive once you select one of the 3 mark-up/annotation buttons
or capture/print button on the right side. Press this to return to mimioMouse mode.
2. Right Click - press this button and the next touch of the stylus on the board changes to
right click instead of left click.
3. Keyboard - press this button to activate the virtual keyboard to input data direct into any
application or text field from the board. Note: If another dialog box is open on your
desktop when you press the keyboard button, only an icon in the lower right Windows
task bar may appear. In that case, click on that keyboard icon in the task bar to display the
keyboard fully on the desktop.
- 29 -
MimioMouse (cont’d.)
Mark-up and Annotation
In addition to using mimioMouse like a cordless mouse to control your desktop and applications, this
feature also allows you to mark-up projected images (documents, applications, websites) and save or
print those annotated pages or images.
4. Tools - press this button to bring up available tools, which include a pen, highlighter,
eraser, arrow, borders and shading blocks. When you select Tools you can annotate
over documents from any open program (PowerPoint, Word, websites, etc.), windows,
dialogs, or your entire active PC desktop. You can also Save or Print your mark-ups (see
screen capture below). In mark-up mode your PC screen is “frozen” and you will not be
able to operate running applications (ie. click to next PowerPoint slide) or switch between
applications or operate any other Windows commands until you exit the mark-up mode, at
which time all annotations will disappear. To exit mark-up mode press the mimioMouse
stylus on the curser arrow and select “OK” to “Remove mark-ups?”.
5. Palette - change the color properties and line thickness of the tool currently used.
6. Screen Capture - this button gives you 3 options for saving a screen capture of your
annotations and mark-ups.
1
2
3
1. First button takes a screen shot of your entire desktop and will ask you where you
want to save it. You can “set” the destination of all future saved files by checking
“Use this directory without asking”
2. Second button takes a screen shot of a selected area using a rectangular selection tool.
3. Third button sends a screen shot direct to your default connected printer.
Note: you can preset your Screen Capture and Print settings (file format, name, save location,
default printer) under Tools–mimioMouse–Preferences.
- 30 -
MimioMouse (cont.)
Mark-up & Annotation (cont.)
Example: Open a PowerPoint presentation and run the slide show. Select the highlighter from
the mimioMouse Toolbar. Now press the mimioMouse pen over a selected area to highlight it as
you would with a regular highlight marker. Then, select the pen tool and add notes to the slide.
Once you have completed your highlighting and writing, press the Screen Capture icon (the
camera on the floating mimioMouse toolbar), select where you want to save it (make sure to
remember file name and location) and click OK.
You will hear a sound similar to a camera snapshot and the screen will flash. This indicates that
the screen has been captured. At this point, click the Cursor toolbar button, select OK to
“Remove all mark ups,” exit mark-up mode and go to the location on your PC where you saved
the screen capture. Double click on that file and the screen capture including your annotations on
the PowerPoint slide will appear. This image can then be copied pasted into other applications.
Note: You can also activate the mimioMouse control panel, which provides additional control
from the board of mimioMouse and your active applications.
- 31 -
mimioMouse (cont’d)
mimio Dual Mode Operation
You have seen how mimio Xi allows you to capture, save and share whiteboard data and you
have seen how mimioMouse permits your whiteboard to become an interactive touch screen. You
can do both simultaneously!
Project your PC desktop onto an area of your whiteboard (preferably the right side). Depending
on the size of your board, you can have an interactive projected display area up to 4’ (1.2m) x 5’
4” (1.6m) and still have an area 4’ (1.2m) x 2’ 8” (0.8m) available for writing and capturing
notes.
Next, open up PowerPoint or any other application; pick up the mimioMouse stylus (with the plastic
mimioMouse insert) and scroll through presentations or documents. While still in mimioMouse mode,
pick up the other mimio stylus (with a dry-erase marker) and start writing in the non-projected area of
your board.
Even though you are in mimioMouse mode, all other mimio application are operative, allowing
you to simultaneously record whiteboard notes using any stylus pens other than the color stylus
being used as the mimioMouse.
Note: While mimioMouse allows you to operate in 2 modes simultaneously, the mimio capture
device will only recognize one mimio stylus (writing or mouse) at a time.
- 32 -
Quick Tips for Optimizing mimio Xi Performance
•
•
•
•
•
•
•
•
•
•
•
•
•
•
•
•
•
•
•
Keep the mimio stylus you are using as close to a 90-degree angle to the board as possible.
Maintain a firm but even pressure with the stylus on the board. If you can hear the
“buzzing” noise, the stylus is generating a signal and mimio Xi will capture what you write.
When replacing the marker pens chisel tips are better for fine work than bullet tip markers.
(Most office supplies outlets stock both types).
Every now and then use a quality whiteboard cleaner on the board to remove acculated Ink
residue.
The more accurately you calibrate the board when in mimioMouse mode the easier you will
you find using drag and drop functions from the board, etc.
You can use your mimio Xi and software as a tool for creating annotated screen shots or
printouts of computer screen images. All the annotated screenshot images in this manual
were created on the PC by opening mimio, attaching the capture bar, running the
mimioMouse calibration and then using the mimioMouse tools from the to annotate the
computer screens with highlights, arrows (from whiteboard or keyboard). Use the camera
icon to save the screen captures as jpeg or .bmp files, which can be embedded in a document.
When working with mimioMouse always make sure that the stylus is in rectangle selection
tool mode when not using the soft pens to ensure that you do not create electronic ink when
you attempt to pick up something for export with the Mouse stylus. This is particularly
important when exiting Full Screen mode in the mimio software.
When using a projected image to display captured ink from the whiteboard adjust the line
thickness to suit in the Stylus Set so that the captured ink is bolder.
Once you have used screen capture and no longer need the original mark up, delete them
from your computer since they are bitmaps and take up a lot of memory.
Always remember to replace caps on the mimio styli – the markers will dry up the same as
any other dry-erase marker when not capped.
Never place the permanent eraser holder in the line of site of the capture bar. We recommend
that you place it directly underneath the capture bar so that it does overlap any active area
of the mimio-enabled whiteboard.
Remember that you cannot use more than one mimio stylus or the mimio eraser at the
same moment. The capture bar can only recognize one signal source at a time.
Ensure that the styli and erasers are not generating a signal when not in use (i.e. depressing
the nib of a stylus in your hand while using another one) for the same reason as above.
If you have any problems call our technical support team (877.846.3721 in the US or
+44 (0) 870 458 3355 in the UK or your local Master Distributor (Asia Pacific)).
Ensure that all cables are safely placed and shielded to avoid accidents.
The styli are designed so that if you drop them they will not land nib first. However care
should be taken to avoid excessive dropping to avoid possibility of damage and required
replacement.
AC Adapters (Xi only), Stylus Pens, Extended Color smartCaps, USB Cables, USB Active
Extension Cables, additional Mounting Brackets and Eraser Felt Pads are among replaceable
or optional accessories available from your mimio dealer.
The main consumables are batteries and dry-erase marker pens.
A mimio Xi carry case, only slightly larger than a typical laptop case can be purchased from
your reseller, designed to hold all mimio Xi system components securely in one place.
- 33 -
Frequently Asked Questions
Q: How does mimio technology work?
A: mimio’s tracking technology uses a combination of infrared and ultrasound to communicate and relay
information from the Styli to the capture bar. When you press to write with the Stylus, it emits infrared
and ultrasound signals in all directions (so that you don't have to worry about rotation of the Pen). The
Infrared signal (travelling at the speed of light) reaches the capture bar first and starts a timing process.
This signal is also coded uniquely for each signalling device (i.e.. Red, Green Pen, Small or Large Eraser
etc.) so that the system knows white kind of stroke has been made on the board. The Ultrasound wave
(travelling at the speed of sound) flows over the surface of the board. Sensors at each end of mimio bar
detect it. Timing the sound wave from the Pen to the Bar, the system triangulates location of the Pen 87
times per second and converts the resulting series of x,y coordinates points into mimio's native ".ink" file
format.
Q: How does mimio Xi communicate with the PC?
A: mimio Xi captures the information written or drawn on the whiteboard and processes it into a
proprietary “ink” data format that can be transferred to the PC in real-time or stored in flash memory and
downloaded later to the PC via USB cable.
Q: What is the power source for mimio Xi?
A: mimio Xi has three power options to offer the greatest ease of use and flexibility – 4 x AA batteries,
USB cable, or an optional AC power adapter.
Q: How long will the batteries last in the mimio Xi bar?
A: Approximately 40 hours of actual usage. The system will go to sleep when not used for extended
periods and the power LED on the bar will change color to indicate low battery condition well before the
system ceases to operate.
Q: In stand-alone mode, how much whiteboard information can I store in the flash memory before I need
to download to my computer?
A: The bar has enough memory (500KB) to hold approximately 10 hours of meeting notes (assuming
actual writing time equal to 15 – 20% of the meeting).
Q: What size boards will mimio Xi work with?
A: ANY standard whiteboard ranging in size from 2’ x 3’ (.6m x .9m) to 4’ x 8’ (1.2m x 2.4m).
Q: Do I need special markers?
A: mimio uses Sanford Expo® or Expo2 size dry-erase whiteboard markers. mimio branded markers of
the same size are available from your mimio dealer.
Q: Do I need a special eraser?
A: To “erase” digital data when erasing the actual board, you must use the mimio eraser. The mimio
eraser utilizes the same stylus-tracking technology. The mimio eraser allows you to erase both wide and
narrow areas with 2 different-sized felt pads: 4” and 3/4”.
Q: Can I share ink files with others who have previous version of mimio software?
A: Yes. Mimio .ink files can be shared with users who have previous versions of the software.
Q: With what operating systems will mimio Xi work?
A: mimio Xi will work with recent versions of Windows, including Windows 98, 98SE, Me, 2000, and
XP. It does not work on Windows 95 or NT. It does not work on a Macintosh at this time.
Q: What mimio systems will operate with Windows 95 and NT?
A: mimio “classic” and mimio flipChart using the serial interface cable can be used with Windows 95 and
Windows NT, which do not support USB.
Q: What mimio systems will operate with Apple Macintosh?
A: mimio “classic” with a mimio USB Adapter will operate with USB enabled Macintosh computers
using mimio for Macintosh software v. 1.5 (for OS 9.x) or v. 1.6 (for OSX).
A full list of dealers can be found on http://www.mimio.com/buy/index.html
- 34 -
Box Contents- mimioBoard
Check to make sure that you have all of the mimioBoard components listed.
•
16’ (5m) USB cable
•
2 - mimio stylus pens (Black & Red)
•
2 - mimio smartCaps (Blue & Green)
•
4 - Expo dry-erase markers
•
1 - mimio eraser and eraser holder
•
1 - AAA battery for eraser
•
4 - N-Cell batteries
•
1 - plastic mimioMouse pen insert
•
1 – set of wall mounting brackets for mimioBoard
•
1 – CD including mimio software, “Getting Started Guide” and installation instructions
System Specification:
•
MS Windows® 98, 98 SE, 2000 or XP
•
IBM compatible – 256 MHz minimum
•
32 MB RAM minimum (64 MB recommended)
•
15 MB free hard drive space
•
CD Rom Drive
•
Available USB port
- 35 -
Setting-Up mimioBoard
1. Unpack your mimioBoard and mount in the desired location on the wall, using inclosed
brackets and fitting or assemble the optional mimioBoard stand and fit the mimioBoard
on the stand as indicated in the instructions.
2. Follow the guidelines on pages 6 and 7 of this User Guide for setting up pens and
installing mimio software.
3. Connect mimioBoard to your PC using the supplied USB peripheral cable which connects
to the USB port on the side of the aluminum housing on the left side of the board.
Open the mimio program on your PC and follow the guidelines described
in this manual
- 36 -
Box Contents – mimio “classic” for Windows
Check to make sure that you have all of the mimio components listed.
•
Capture bar
•
10 ft (3m) Serial Cable connected to your PC with pass through PS2 connector for power
•
4 mimio stylus Pen cases
•
1 mimio eraser
•
1 mimio eraser holder
•
4 whiteboard markers
•
1 plastic mimioMouse insert
•
5 AAA batteries
•
2 metal permanent mounting brackets with screws
•
1 calculator control panel
•
Installation poster
•
Warranty and Registration Card
•
Getting started guide
•
mimio software installation CD (or downloaded v. 2.7 from
http://www.mimio.com/software )
- 37 -
Setting-Up mimio classic for Windows
4. Unpack the box and check that you have all of the components listed.
5. Install the supplied batteries and marker pens in the styli cases and supplied battery in
the eraser. You do this as follows:
a. Pens-remove the clear plastic cover by pressing the end of the pen. Remove the
green switch cover by lifting the cover at the nib end and slide down. Insert one
AAA battery and replace the switch cover. Insert the corresponding colour marker
to the styli case. Replace the clear plastic cover. Do this for all 4 pens.
b. Eraser-remove the top cover by pressing the sides close to the thin felt pad. Insert
one AAA battery and replace the top cover.
6. Load the operating software onto your PC. If your PC does not auto start the set-up
program after placing the CD in your CD-ROM drive press Start/Run type D:\setup.exe
(enter) in the Run dialogue box (where D:\ is the location of your CD-ROM drive). Then
follow the onscreen instructions.
7. Attach the capture bar to the top left hand corner of your whiteboard. Ensure that the 2
hinged flaps are out. Press the bar firmly to the board and close both flaps-you will hear an
audible click. (The flaps pull the suction cups upwards creating a strong ‘vacuum’
adhesion)
8. Connect the capture bar to your PC using the supplied serial cable.
NOTE: You must connect the PS2 mouse pass through connector as well as the serial
connector- this draws power to the bar.
Open the mimio program on your PC
- 38 -
Box Contents – mimio flipChart for Windows
Check to make sure that you have all of the mimio components listed.
•
Flipchart Capture bar
•
16 ft (5m) Serial Cable with min DIN connector and serial connector & pass through PS2
connector for power
•
16 ft (5m) USB Cable with mini DIN connector
•
2 mimio stylus Pen2
•
4 color smartCaps (Red, Blue, Black, Green)
•
1 flipChart Capture bar mounting clip bracket/holder
•
1 mimio stylus clip bracket/holder
•
4 flipchart markers
•
4 N cell batteries
•
Warranty and Registration Card
•
Getting started guide
•
mimio flipchart software installation CD (or downloaded v. 2.7 from
http://www.mimio.com/software )
- 39 -
Setting-Up mimio flipChart for Windows
9. Unpack the box and check that you have all of the components listed (next page).
10. Install the supplied batteries and marker pens in the Pen2 styli and the eraser. You do
this as follows:
a. Pens – follow the same procedures described at the beginning of this document
for set up the pens.
b. Eraser-remove the top cover by pressing the sides close to the thin felt pad. Insert
one AAA battery and replace the top cover.
11. Load the operating software onto your PC. If your PC does not auto start the set-up
program after placing the CD in your CD-ROM drive press Start/Run type D:\setup.exe
(enter) in the Run dialogue box (where D:\ is the location of your CD-ROM drive). Then
follow the onscreen instructions. It is recommended to download and install the latest
mimio software application from www.mimio.com/software.
12. Attach the flipchart capture bar by first attaching the bracket/holder to the backing card
or last sheets of paper of the flip chart pad being used. The flipChart bar will sit in the
bracket.
13. Connect the flipChart bar to your PC using the supplied serial or USB cable.
NOTE: When using serial cable, you must connect the PS2 mouse pass through
connector as well as the serial connector- this draws power to the bar.
Open the mimio program on your PC
- 40 -