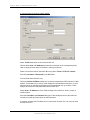
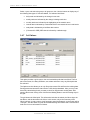
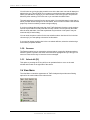
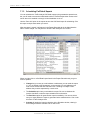
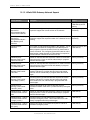
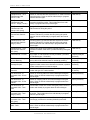
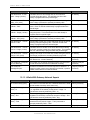
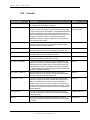
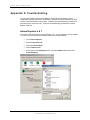
1
Administrative
Guide
Version 4.X and 5.X
Copyright © 1997-2011 by Impact Technologies, Inc. All rights reserved.
T R AF F I C AN AL Y S T AD M I N I S T R AT I V E G UI D E
TRAFFIC ANALYST ADMINISTRATORS GUIDE
Copyright © 1997-2011 by Impact Technologies, Inc. All rights reserved.
Information in this document is subject to change without notice. No part of this document may be
photocopied, reproduced, or translated by any means without the prior written consent of Impact
Technologies, Inc.
Impact Technologies, Inc.
16650 Chesterfield Grove
Chesterfield, MO 63005-1409
Main: (314) 743-1400
Technical Support: (314) 743-1420
Fax: (314) 743-1401
http://www.impacttech.com/
Siemens, OpenScape Voice, HiPath and Hicom are registered trademarks of Siemens Enterprise
Communications, Inc.
Nortel, Meridian, and SL1 are registered trademarks of Nortel Networks Corp.
Avaya, Aura, Definity G3 and S8700 are registered trademarks of Avaya Inc.
Cisco and Unified Communications Manager are registered trademarks of Cisco Systems, Inc.
Microsoft is a registered trademark, and Windows, Windows 95, Windows 98 and Windows NT are
trademarks of Microsoft Corporation.
InstallShield is a trademark of Stirling Technologies, Inc.
Sybase SQL Anywhere is a trademark of Sybase, Inc.
Secure Sentinel is a registered trademark, and Sentinel 2000 is a trademark of ION Networks Inc.
E-COMMS CAB-5 and E-COMMS CAB-6 are trademarks of E-COMMS, Inc.
Western Telematic and PollCat NetLink are trademarks of Western Telematic, Inc.
UDS-10 is a trademark of Lantronix
Chilkat Zip Library copyright Chilkat Software Inc., 2000-2010
JUNE 2011
I M P AC T T E CH N O L OG I ES , I N C
CONFI DENTI AL AND PROPRI ETARY
2
T R AF F I C AN AL Y S T AD M I N I S T R AT I V E G UI D E
TABLE OF CONTENTS
ADMINISTRATIVE GUIDE ............................................................................................ 1
Overview ...................................................................................................................................................... 8
1
SETTING UP TRAFFIC ANALYST SYSTEM OPTIONS.......................................... 9
1.1
Starting Traffic Analyst (Initial Setup)............................................................................................ 9
1.2
E-mail Settings ................................................................................................................................. 9
1.3
Logging in ....................................................................................................................................... 10
1.4
License ............................................................................................................................................ 11
1.5
Backup ............................................................................................................................................ 12
1.6
Main Window .................................................................................................................................. 13
2
DEFINING AND POLLING SWITCHES.................................................................. 14
2.1
New Switch Setup .......................................................................................................................... 14
2.1.1
User Accounts........................................................................................................................... 14
2.1.2
Creating a Switch ...................................................................................................................... 15
2.1.3
Communications ....................................................................................................................... 16
2.1.3.1 Siemens 9000-9751, Hicom 300 & Nortel Serial Communications ....................................................17
2.1.3.2 Siemens Hicom 300 (release 6.6 only) TCP/IP Communications .......................................................20
2.1.3.3 Nortel Rlogin Communications ...........................................................................................................21
2.1.3.4 Nortel FTP Communications ...............................................................................................................22
2.1.3.5 Nortel Lantronix Communications ......................................................................................................24
2.1.3.6 Nortel Buffer Box Communications ....................................................................................................25
2.1.3.7 Siemens HiPath 3000 TCP/IP Communications..................................................................................31
2.1.3.8 Siemens HiPath 3000 Data Directory Communications ......................................................................32
2.1.3.9 Siemens HiPath 4000 TCP/IP Communications..................................................................................33
2.1.3.10
Siemens HiPath 4000 Data Directory Communications ..................................................................35
2.1.3.11
Siemens OpenScape Voice TCP/IP Communications .....................................................................36
2.1.3.12
Siemens OpenScape Voice Data Directory Communications .........................................................37
2.1.3.13
Avaya Data Directory Communications ..........................................................................................38
2.1.3.14
Cisco Unified Communications Manager TCP/IP Communications...............................................39
2.1.3.15
Cisco Unified Communications Manager Data Directory Communications ...................................40
2.1.4
Polling ....................................................................................................................................... 42
2.1.4.1 Periodic Studies ...................................................................................................................................42
2.1.4.2 Continuous Polling ..............................................................................................................................42
2.1.5
Trunk Groups ............................................................................................................................ 48
2.1.5.1 HiPath 3000 Trunk Groups..................................................................................................................48
2.1.5.2 Siemens OpenScape Voice & Cisco Trunk Groups.............................................................................49
2.1.6
Gateways .................................................................................................................................. 50
JUNE 2011
I M P AC T T E CH N O L OG I ES , I N C
CONFI DENTI AL AND PROPRI ETARY
3
T R AF F I C AN AL Y S T AD M I N I S T R AT I V E G UI D E
2.1.6.1 HiPath 3000 Gateways.........................................................................................................................50
2.1.6.2 HiPath 4000 Gateways (IPDA options) ...............................................................................................52
2.1.7
Trunk Group Analysis ............................................................................................................... 53
2.1.8
Gateway Analysis...................................................................................................................... 54
2.1.8.1 HiPath 3000 Gateway Analysis ...........................................................................................................54
2.1.8.2 HiPath 4000 Gateway Analysis ...........................................................................................................56
2.1.9
Console Group Analysis (all except HiPath 3000, OpenScape Voice, Avaya and Cisco) ....... 57
2.1.10 CDR Data (HiPath 3000 only)................................................................................................... 58
2.1.11 CDR Call Costs (all switches with Call Accounting module) .................................................... 59
2.1.12 Scheduled Reports Setup ......................................................................................................... 61
2.1.13 Switch Access ........................................................................................................................... 62
2.2
Poll and Store On Demand ............................................................................................................ 62
2.3
Pending Schedule .......................................................................................................................... 64
2.4
Status Log ....................................................................................................................................... 65
2.4.1
Detail Message Information ...................................................................................................... 66
2.4.2
Monitor or Communication Audit File Window.......................................................................... 66
2.5
Logoff/Logon E-mail ...................................................................................................................... 67
2.5.1
Logoff E-mail ............................................................................................................................. 67
2.5.2
Logon E-mail ............................................................................................................................. 67
2.6
Logoff/Logon Traffic Analyst ........................................................................................................ 68
2.6.1
Logoff Traffic Analyst ................................................................................................................ 68
2.6.2
Logon Traffic Analyst ................................................................................................................ 68
2.6.3
Client Logon .............................................................................................................................. 68
2.7
Exit ................................................................................................................................................... 69
2.8
What’s Next= ................................................................................................................................. 70
3
USING TRAFFIC ANALYST................................................................................... 71
3.1
System Menu .................................................................................................................................. 71
3.1.1
Users......................................................................................................................................... 72
3.1.2
User Accounts........................................................................................................................... 73
3.1.3
Ports .......................................................................................................................................... 74
3.1.4
Modem Pools ............................................................................................................................ 74
3.1.5
Default CDR Call Cost .............................................................................................................. 75
3.1.6
Reindex ..................................................................................................................................... 76
3.2
Tools Menu ..................................................................................................................................... 77
3.2.1
Busy Hour Capacity - Analyze Tab ........................................................................................... 77
3.2.1.1 What If .................................................................................................................................................78
3.2.1.2 Save Projection Window .....................................................................................................................78
3.2.2
Busy Hour Capacity - Graph Tab.............................................................................................. 79
3.2.3
Busy Hour Capacity - Variations Tab........................................................................................ 80
3.2.4
Advanced Capacity Analysis..................................................................................................... 81
3.2.5
Trend Analysis .......................................................................................................................... 82
3.2.6
Engineering Calculator.............................................................................................................. 82
3.3
Reports Menu ................................................................................................................................. 83
3.3.1
Network and System Reports ................................................................................................... 84
JUNE 2011
I M P AC T T E CH N O L OG I ES , I N C
CONFI DENTI AL AND PROPRI ETARY
4
T R AF F I C AN AL Y S T AD M I N I S T R AT I V E G UI D E
3.3.2
3.3.3
3.3.4
3.3.5
3.3.6
3.3.7
3.3.8
Call Detail Reports .................................................................................................................... 85
E-mail Signature........................................................................................................................ 86
Run Now ................................................................................................................................... 86
Schedule ................................................................................................................................... 86
Report Packs............................................................................................................................. 88
Report File Naming ................................................................................................................... 88
Copy To..................................................................................................................................... 90
3.4
File Menu......................................................................................................................................... 91
3.4.1
Groups ...................................................................................................................................... 92
3.4.2
Pools ......................................................................................................................................... 93
3.4.2.1 Pool Properties.....................................................................................................................................93
3.4.3
Traffic / System Alarms............................................................................................................. 94
3.4.3.1 Alarm Definition..................................................................................................................................95
3.4.4
Switch Alarms ........................................................................................................................... 96
3.4.4.1 Alarm Definition..................................................................................................................................97
3.4.4.2 Enable Alarm .....................................................................................................................................100
3.4.4.3 Alarms Tab on Main Window ...........................................................................................................101
3.4.5
Special Days ........................................................................................................................... 102
3.4.6
Data Calendar ......................................................................................................................... 103
3.4.7
Poll Failures ............................................................................................................................ 104
3.5
Right Mouse Menu ....................................................................................................................... 105
3.5.1
Delete...................................................................................................................................... 105
3.5.2
Deactivate/Activate ................................................................................................................. 105
3.5.3
Expire Switch .......................................................................................................................... 105
3.5.4
Poll On Demand...................................................................................................................... 106
3.5.5
Edit/Create Studies ................................................................................................................. 106
3.5.6
Cut and Paste ......................................................................................................................... 107
3.5.7
Copy........................................................................................................................................ 107
3.5.8
Rename................................................................................................................................... 108
3.5.9
Refresh All (F5) ....................................................................................................................... 108
3.6
View Menu..................................................................................................................................... 108
3.6.1
Status Log Filter ...................................................................................................................... 109
3.6.2
Alarms Filter ............................................................................................................................ 109
3.6.3
Refresh Settings...................................................................................................................... 110
3.6.4
Refresh All............................................................................................................................... 110
3.7
Multiple Switch Operations ......................................................................................................... 111
3.8
Traffic Analyst Reports via a Browser ....................................................................................... 111
USER GUIDE.............................................................................................................. 112
4
USING TRAFFIC ANALYST................................................................................. 113
4.1
Access to Reports........................................................................................................................ 113
4.2
Traffic Analyst Users ................................................................................................................... 113
5
NETWORK............................................................................................................ 114
JUNE 2011
I M P AC T T E CH N O L OG I ES , I N C
CONFI DENTI AL AND PROPRI ETARY
5
T R AF F I C AN AL Y S T AD M I N I S T R AT I V E G UI D E
5.1
Creating Network Reports........................................................................................................... 114
5.2
Performance Reports................................................................................................................... 115
5.2.1
Trunk Groups .......................................................................................................................... 115
5.2.1.1 Performance Detail ............................................................................................................................115
5.2.1.2 Performance Summary ......................................................................................................................116
5.2.1.3 Activity ..............................................................................................................................................116
5.2.2
Gateways ................................................................................................................................ 116
5.2.2.1 Siemens HiPath 4000.........................................................................................................................116
5.2.2.2 Siemens HiPath 3000.........................................................................................................................117
5.2.3
System .................................................................................................................................... 118
5.2.3.1 Siemens HiPath 4000.........................................................................................................................118
5.2.3.2 Nortel Meridian .................................................................................................................................122
5.3
Usage Profiles .............................................................................................................................. 123
5.3.1
Usage...................................................................................................................................... 123
5.3.2
Capacity Required .................................................................................................................. 123
5.4
Capacity Analysis......................................................................................................................... 123
5.4.1
Trunk Groups .......................................................................................................................... 123
5.4.1.1 Detail .................................................................................................................................................123
5.4.1.2 Summary............................................................................................................................................124
5.4.2
Gateways ................................................................................................................................ 124
5.4.2.1 Siemens HiPath 4000.........................................................................................................................124
5.4.2.2 Siemens HiPath 3000.........................................................................................................................125
6
6.1
CONSOLE ............................................................................................................ 127
Creating Console Reports........................................................................................................... 127
6.2
Performance Reports................................................................................................................... 128
6.2.1
Activity..................................................................................................................................... 128
6.2.2
Utilization................................................................................................................................. 128
6.2.3
Utilization and Service ............................................................................................................ 128
6.2.4
Call Profile............................................................................................................................... 128
6.2.5
Call Length .............................................................................................................................. 129
6.3
Usage Profile ................................................................................................................................ 129
6.4
Capacity Analysis......................................................................................................................... 129
6.4.1
Detail ....................................................................................................................................... 129
7
CALL DETAIL....................................................................................................... 130
7.1
Reports .......................................................................................................................................... 130
7.1.1
Call Detail Report Filters and Fields ....................................................................................... 130
7.1.2
Creating Call Detail reports..................................................................................................... 134
7.1.3
Scheduling Call Detail Reports ............................................................................................... 138
7.1.4
How Traffic Analyst Counts Calls for Call Detail..................................................................... 139
7.1.5
“Unavailable” and “Blocked” in Call Detail Reports................................................................. 139
8
ALARMS ............................................................................................................... 140
JUNE 2011
I M P AC T T E CH N O L OG I ES , I N C
CONFI DENTI AL AND PROPRI ETARY
6
T R AF F I C AN AL Y S T AD M I N I S T R AT I V E G UI D E
8.1
Reports .......................................................................................................................................... 140
8.1.1
Network ................................................................................................................................... 140
8.1.2
Switch/System......................................................................................................................... 141
8.1.3
CDR ........................................................................................................................................ 142
8.2
Create/Edit .................................................................................................................................... 142
8.2.1
How Alarm Creation Works with Alarm Reports ..................................................................... 144
9
ADMIN .................................................................................................................. 145
9.1
Password ...................................................................................................................................... 145
9.2
Users (Administrative users only).............................................................................................. 145
9.3
Pools (Administrative users only) .............................................................................................. 146
9.3.1
Creating a Pool (Administrative users only)............................................................................ 146
9.4
Using Organization Information in Call Detail Reports ............................................................ 146
9.4.1
Creating the Organization File ................................................................................................ 146
9.4.2
Upload Organization File (Administrative users only)............................................................. 147
10
DATA DICTIONARIES....................................................................................... 149
10.1
Network...................................................................................................................................... 149
10.1.1 Trunk Group/Pools Network Reports ...................................................................................... 149
10.1.2 HiPath 3000 Gateway Network Reports ................................................................................. 154
10.1.3 HiPath 4000 Gateway Network Reports ................................................................................. 156
10.2
Console...................................................................................................................................... 159
10.3
Call Detail .................................................................................................................................. 163
10.3.1 Call Detail Data Items ............................................................................................................. 163
10.3.2 Call Detail Fields Available by Switch Type............................................................................ 166
APPENDIX A: TROUBLESHOOTING........................................................................ 169
JUNE 2011
I M P AC T T E CH N O L OG I ES , I N C
CONFI DENTI AL AND PROPRI ETARY
7
T R AF F I C AN AL Y S T AD M I N I S T R AT I V E G UI D E
Overview
Welcome to Traffic Analyst from Impact Technologies!
Traffic Analyst should be installed and the switches prepared for polling. If not, go through
the Traffic Analyst Install Guide first.
This guide contains the following sections:
Section 1: Setting Up Traffic Analyst System Options discusses initial startup and options
that appear on the System Menu.
Section 2: Defining and Polling Switches discusses the options used to create switches
and set up their polling schedules. When you are done with this section, you should be set
up to poll one or more switches, and you should have a basic understanding of how to
monitor the polls.
Section 3: Using Traffic Analyst describes those options that you will use frequently.
After Section 3 the Traffic Analyst User Guide is included. This guide is for customers who
have purchased the web-enabled version of Traffic Analyst.
JUNE 2011
I M P AC T T E CH N O L OG I ES , I N C
CONFI DENTI AL AND PROPRI ETARY
8
T R AF F I C AN AL Y S T AD M I N I S T R AT I V E G UI D E
1 Setting Up Traffic Analyst System Options
This section discusses initial startup and options that appear on the System Menu.
1.1 Starting Traffic Analyst (Initial Setup)
To start Traffic Analyst, click Start =>Programs=>Traffic Analyst=>Traffic Analyst.
1.2 E-mail Settings
When starting Traffic Analyst for the first time, an initial splash screen displays, followed by
an e-mail settings option window.
Traffic Analyst can e-mail alarms and reports to users. The Traffic Analyst server must be
set up on an e-mail system with an e-mail account also created for that server.
JUNE 2011
I M P AC T T E CH N O L OG I ES , I N C
CONFI DENTI AL AND PROPRI ETARY
9
T R AF F I C AN AL Y S T AD M I N I S T R AT I V E G UI D E
Select the type of e-mail to use – None, Extended MAPI, or SMTP.
•
If None is chosen, you can enable e-mail later by going to E-mail Settings from
the System Menu in Traffic Analyst.
•
If Extended MAPI is chosen, you are finished. You can send a test e-mail with
the Test section. You will be asked to choose an e-mail profile. To log off or on to
e-mail, choose the e-mail item from the File Menu in Traffic Analyst. Each time
Traffic Analyst is started, the log on prompt will be displayed.
•
If SMTP is chosen, enter the e-mail server Host Name or IP Address. Normally
this is “mail.<company website>.” Enter a Return E-mail Address. This is the
“From” address listed on e-mails sent by Traffic Analyst and the address to which
undeliverable e-mails will be returned. Enter the Return E-Mail Name of the
person the return e-mail address belongs.
The Login Name and Password are optional. Some e-mail servers have login security. If
this is the case, enter the login name and password. The Test is optional also. Enter the email address to receive the test e-mail message.
1.3 Logging in
The next window that appears is the Log On window.
Select the User ID field and log on with the default username and password below:
User ID:
Password:
traffic
impact
The next screen that appears is the License window.
JUNE 2011
I M P AC T T E CH N O L OG I ES , I N C
CONFI DENTI AL AND PROPRI ETARY
10
T R AF F I C AN AL Y S T AD M I N I S T R AT I V E G UI D E
1.4 License
The appearance of the License screen may differ slightly, depending upon the type of
software license purchased. Traffic Analyst is licensed for a number of clients (called
users), and then it is licensed for a number of sites (switches) or a number of study days.
Click the Users radio button and enter the license key provided by Impact Technologies in
the License Key field, and press Apply. The key will appear in the upper portion of the
screen and display the maximum number of users purchased.
Next, click on the Capacity (or Days) radio button and enter its license key in the same
fashion.
If you purchased Days, please contact Impact Technologies for the license key. Impact
Customer Service will ask for the default license key that appears on the screen, and then
provide a new key to enter.
When done, click on OK. The Backup window appears next.
JUNE 2011
I M P AC T T E CH N O L OG I ES , I N C
CONFI DENTI AL AND PROPRI ETARY
11
T R AF F I C AN AL Y S T AD M I N I S T R AT I V E G UI D E
1.5 Backup
Schedule the backups using this screen
The Static section of this window defines the type of data to back up. Database backs up
the Traffic Analyst database. The backup is performed live, meaning the database is not
disabled when the backup occurs.
Com Audit Files can also be backed up. These files are the most recent data files polled
from your switch or buffer box.
Typically both the Database and Com Audit Files are backed up.
Specify a Target Directory where the backup files will be placed. We recommend this to
be a network server that is backed up on a regular basis.
The Schedule section of this window sets the Backup Time and the Days of Week on
which the backup will occur. Pick a time when the system will be least busy. Try to
schedule a backup to occur after Reindex. You can schedule one weekday, several, or
even all weekdays for a backup to occur.
Keep no more than X backups determines how many backups will be saved. If this is left
blank, then all backups will be saved and none will be deleted. You will then have to clean
up the backup directory periodically. We do not recommend leaving this field blank.
The backup file will use a TAYYMMDD.TDB naming convention, where "YYMMDD" is the
year, month, and date. The file will be in ZIP format. Contact Impact Technologies for help
in restoring a backed up database.
JUNE 2011
I M P AC T T E CH N O L OG I ES , I N C
CONFI DENTI AL AND PROPRI ETARY
12
T R AF F I C AN AL Y S T AD M I N I S T R AT I V E G UI D E
The last setting defines an alarm that can be generated if the available disk space on the
Traffic Analyst server dips below the setting.
Backups MUST be run on a regular basis to ensure database integrity. Failure to do so
may cause the excessive hard disk space to be used.
Use the Backup Now button to schedule a backup to start immediately. Note that this
does not save any other changes made to the form.
1.6 Main Window
The main Traffic Analyst window is divided into two sections.
The left section will contain the list of switches, once defined. To work with the data of a
single switch, select it on this tree.
The right section contains one of five screens selected by clicking on a tab at the bottom of
the panel. The screens available are:
JUNE 2011
•
Report Schedule – saved reports
•
Status Log – completed or in-progress activities.
•
Pending Schedule – pending or scheduled activities.
•
Alarms – alarms generated as a result of polling or system thresholds.
•
Switches – defined switches, presented so that multiple switches can be
selected and perform a common action on them.
I M P AC T T E CH N O L OG I ES , I N C
CONFI DENTI AL AND PROPRI ETARY
13
T R AF F I C AN AL Y S T AD M I N I S T R AT I V E G UI D E
2 Defining and Polling Switches
This section discusses the options used to create switches and set up their polling
schedules.
2.1 New Switch Setup
Before creating your new switch a User Account needs to be created. To do this first go to
the Systems pull down Menu and select
2.1.1
User Accounts
This option defines accounts and allows Web Admin users to be set up for new accounts.
Accounts designate what user can view what switches and features. When a switch is
assigned to an account, that account name will appear in brackets to the right of the switch
name in Traffic Analyst.
Enter the Max Switches and Max Users to designate the maximum amount of switches
and users that can be assigned to the account.
Choose the Feature Access and Switch Access buttons to set which switches and
features are viewable in this account. Available features are determined by the Traffic
Analyst modules you have purchased.
JUNE 2011
I M P AC T T E CH N O L OG I ES , I N C
CONFI DENTI AL AND PROPRI ETARY
14
T R AF F I C AN AL Y S T AD M I N I S T R AT I V E G UI D E
2.1.2
Creating a Switch
To create a new switch, click on the File => New => Switch.
The first screen of the Switch Properties wizard is now displayed.
NOTE: This screen may vary slightly depending on the PBX selected. Also, it is pertinent
to select the right switch release because communication types vary. For example, if your
switch is a Siemens HiPath 4000 Version 4 that uses SSH, you will need to select Version
4.4 for the release. Earlier releases of HiPath 4000 use Telnet, and HiPath 4000 Version
5 uses SSH.
JUNE 2011
I M P AC T T E CH N O L OG I ES , I N C
CONFI DENTI AL AND PROPRI ETARY
15
T R AF F I C AN AL Y S T AD M I N I S T R AT I V E G UI D E
Enter a Name that identifies the switch. The ID is automatically populated with the next
available switch reference number. (This ID can be changed to any unique three-character
ID that will be used to help identify reports that are saved for this switch. Reports that are
saved to a file will have a name that ends in this three-character ID.)
Select the settings that apply to the switch to be polled. The PBX selection, and the
following Model and Release fields, will determine screen and option settings throughout
the rest of the product, since each switch type works differently.
The Time Zone setting is from the perspective of where the switch is located and whether
Daylight Savings Time is recognized. It is important that information is accurate as it will
affect the poll time information for switches polled hourly.
If the switch is a Siemens HiPath 3000, you will select American or European date format.
This determines how dates are displayed in Traffic Analyst reports.
For a HiPath 4000, if the Siemens Fault Management (SNMP) client software installed on
the same system that Traffic Analyst server is installed, a checkbox for Send Alarms with
SNMP will be displayed. If this checkbox is selected, all defined alarms will be sent to the
SNMP Fault Monitoring system when the alarms are triggered. Also, if SNMP alarms are
chosen, a small Traffic Analyst window will appear that can be minimized. Do not close
this window. Traffic Analyst will shut down if this window is closed.
Display section is used to set the units of measurement for Usage and Average Call
Length. These settings are then used in all screens and reports.
Primary Days section is used to select what days are included in study data for busy hour
and average busy hour calculations and for any CCITT busy hour calculations. The data
for non Primary Days (or unchecked days) will still be collected and available in daily,
weekly and monthly reports. Edit Special Days button will display a calendar and allow
you to select non-work days (such as holidays). By checking Special Days are not
Primary Days option, any Special Days will be excluded as Primary Days.
Primary Hours section is used to select hours of operation. Only hours falling within the
Primary Hours will be included in the study data for busy hour and average busy hour
calculations and for any CCITT busy hour calculations. The data for non Primary Hours will
still be collected and available in daily, weekly and monthly reports.
Select Next.
Note: If serial ports were not setup through the System menu's Ports option, then a popup window will open asking to define those ports now. If the switches will be polled via
TCP/IP, then answer No to this question and continue.
2.1.3
Communications
The Communications screen defines how Traffic Analyst connects to the switch or buffer
box. Options on this screen differ depending on the type of switch and communication
options available for the switch.
To go directly to the switch and communication type, click one of the links below:
Siemens 9000-9751, Hicom 300 & Nortel Serial Communication Screen
Siemens Hicom 300 (release 6.6 only) TCP/IP Communications Screen
JUNE 2011
I M P AC T T E CH N O L OG I ES , I N C
CONFI DENTI AL AND PROPRI ETARY
16
T R AF F I C AN AL Y S T AD M I N I S T R AT I V E G UI D E
Nortel Rlogin Communication Screen
Nortel FTP Communication Screen
Nortel Lantronix Communication Screen
Nortel Buffer Box Communication Screen
Siemens HiPath 3000 TCP/IP Communication Screen
Siemens HiPath 3000 Data Directory Communication Screen
Siemens HiPath 4000 TCP/IP Communication Screen
Siemens HiPath 4000 Data Directory Communication Screen
Siemens OpenScape Voice TCP/IP Communication Screen
Siemens OpenScape Voice Data Directory Communications Screen
Avaya Data Directory Communication Screen
Cisco Unified Communications Manager TCP/IP Communication Screen
Cisco Unified Communications Manager Data Directory Communication Screen
2.1.3.1 Siemens 9000-9751, Hicom 300 & Nortel Serial Communications
Select the Com Port
JUNE 2011
I M P AC T T E CH N O L OG I ES , I N C
CONFI DENTI AL AND PROPRI ETARY
17
T R AF F I C AN AL Y S T AD M I N I S T R AT I V E G UI D E
Select Baud Rate, Data Bits & Parity that match the port of the switch.
Phone Number is used if polling via modem. Enter the phone number of the switch to be
dialed. If using a security device that requires a security string, enter it after the phone
number, separating the phone number and the string by pauses (represented by commas).
If accessing the switch via a direct serial connection or Lantronix device using Comm Port
Redirector or Device Comm Manager, leave this field blank.
For Siemens Data Switching (DCI/DCM) connections only:
If accessing the switch via a Siemens data device (DCI/DCM), enter the appropriate
dialing string in the Phone Number field. (Example: "c ccms ^M") The ^M, needs to follow
the phone number or data group in the Phone Number field as it sends a carriage return.
In the case of a DCI/DCM connection, the call must complete before any Access String is
processed.
If needed, use the following symbols to send information to the data switching network:
! indicates a long pause (10 seconds)
~ indicates a short pause (1 second)
^ indicates that the character immediately after it will be a control character (^M indicates a
carriage return, for example)
@N indicates that N lines of input will be read from the remote system and will be
displayed in the communication audit file, where N is a number you enter
| indicates that the character immediately after it will be sent. You would use this if you
needed to actually send an exclamation point as part of a password, for example. Without
the | symbol, the exclamation point would be interpreted as a 10 second pause.
Any other character will be sent as entered.
Example: ^M!traffic^M!impact^M
Access String is used to send information once Traffic Analyst has made a successful
connection to the switch.
User Name is the Username to be used to access the switch. The username MUST have
appropriate permission to access the CNFG & LIST functions on the switch.
Password is the Password assigned to the Username above.
Next Password allows the entry of a password that will be automatically used by Traffic
Analyst to access the switch when the current password it uses expires. When the current
password expires, Traffic Analyst will try the new password. If this password works, it is
moved into the Password field as the new permanent password and the Next password
field is left blank. This is only available for Hicom 300 switches.
JUNE 2011
I M P AC T T E CH N O L OG I ES , I N C
CONFI DENTI AL AND PROPRI ETARY
18
T R AF F I C AN AL Y S T AD M I N I S T R AT I V E G UI D E
Failure Retry is the number of times Traffic Analyst should retry a polling connection, in
the event that the first attempt fails. Retries occur after failures due to a busy signal, ring
no answer, excessive line noise, dropped connection, or some timeout conditions (when
the switch does not respond). Retries are not attempted when failures are caused by an
incorrect user name or password, or when the switch response does not match the
expected configuration.
Timeout is used to specify the delay between failure retries, such as when a busy signal is
received during an attempted poll. It also specifies how long Traffic Analyst should wait for
a switch response. If the switch does not respond within the timeout minutes, Traffic
Analyst logs a failure and will generally retry, depending on where Traffic Analyst is at in
the polling process.
For Call Detail data collection only:
Check the Collect CDR Data checkbox if you have purchased the CDR module for Traffic
Analyst. This enables you to set up Traffic Analyst for Call Detail data collection. You will
also need to set up a buffer box that will store Call Detail data from your switch. Traffic
Analyst will retrieve the Call Detail data from the buffer box.
Select Host or IP Address to direct Traffic Analyst to the buffer box. Host is usually a
machine name.
Enter the User Name and Password that gives Traffic Analyst access to the buffer box.
Consult your buffer box instructions for this information.
Enter the Data File Name so that Traffic Analyst retrieves the CDR file it needs from the
buffer box.
VPN Setup is used to set up a VPN connection. This type of connection may be
necessary due to security restrictions.
Polling is the next section.
JUNE 2011
I M P AC T T E CH N O L OG I ES , I N C
CONFI DENTI AL AND PROPRI ETARY
19
T R AF F I C AN AL Y S T AD M I N I S T R AT I V E G UI D E
2.1.3.2 Siemens Hicom 300 (release 6.6 only) TCP/IP Communications
Select TCP/IP radio button under Communicate Via.
Choose either Host or IP Address and enter the information in the corresponding field.
Host is usually a name where IP Address is a string of numbers.
FTP File Transfer should be checked if retrieving data from the switches FTP directory.
User Name is the Username to be used to access the switch. If communicating using
FTP, the default Username is tal.
Password is the Password assigned to the Username above. If communicating using
FTP, the default Password is tal.
For Call Detail data collection only:
Check the Collect CDR Data checkbox if you have purchased the CDR module for Traffic
Analyst. This enables you to set up Traffic Analyst for Call Detail data collection. You will
also need to set up a buffer box that will store Call Detail data from your switch. Traffic
Analyst will retrieve the Call Detail data from the buffer box.
Enter the Telnet Host name or IP Address to determine how Traffic Analyst will use the
Telnet command to access trunk configuration data.
Enter the Telnet Login User Name and Password if connecting in that manner so that
Traffic Analyst can use the Telnet command to access trunk configuration data.
JUNE 2011
I M P AC T T E CH N O L OG I ES , I N C
CONFI DENTI AL AND PROPRI ETARY
20
T R AF F I C AN AL Y S T AD M I N I S T R AT I V E G UI D E
Select Host or IP Address to direct Traffic Analyst to the buffer box. Host is usually a
machine name.
Enter the User Name and Password that gives Traffic Analyst access to the buffer box.
Consult your buffer box instructions for this information.
Enter the Data File Name so that Traffic Analyst retrieves the CDR file it needs from the
buffer box.
VPN Setup is used to set up a VPN connection. This type of connection may be
necessary due to security restrictions.
Polling is the next section.
2.1.3.3 Nortel Rlogin Communications
Get Data from Switch.
Communicate Via TCP/IP.
Choose either Host or IP Address and enter the information in the corresponding field.
Host is usually a name where IP Address is a string of numbers.
User Name is the Username to be used to access the switch.
Password is the Password assigned to the Username above.
Session is Rlogin. This option only available on switch release 25 or higher and
Succession releases.
JUNE 2011
I M P AC T T E CH N O L OG I ES , I N C
CONFI DENTI AL AND PROPRI ETARY
21
T R AF F I C AN AL Y S T AD M I N I S T R AT I V E G UI D E
Rlogin Username is the Username that will allow access to the Rlogin port.
For Call Detail data collection only:
Check the Collect CDR Data checkbox if you have purchased the CDR module for Traffic
Analyst. This enables you to set up Traffic Analyst for Call Detail data collection. You will
also need to set up a buffer box that will store Call Detail data from your switch. Traffic
Analyst will retrieve the Call Detail data from the buffer box.
Select Host or IP Address to direct Traffic Analyst to the buffer box. Host is usually a
machine name.
Enter the User Name and Password that gives Traffic Analyst access to the buffer box.
Consult your buffer box instructions for this information.
If required, complete the File Name field. In most cases, however, the user can just leave
the field name as “*”.
VPN Setup is used to set up a VPN connection. This type of connection may be
necessary due to security restrictions.
Polling is the next section.
2.1.3.4 Nortel FTP Communications
JUNE 2011
I M P AC T T E CH N O L OG I ES , I N C
CONFI DENTI AL AND PROPRI ETARY
22
T R AF F I C AN AL Y S T AD M I N I S T R AT I V E G UI D E
Get Data from Switch.
Communicate Via TCP/IP.
Choose either Host or IP Address and enter the information in the corresponding field.
Host is usually a name where IP Address is a string of numbers.
User Name is the Username to be used to access the switch. A default is provided.
Password is the Password assigned to the Username above. The password to the
default is provided.
Session is FTP File Transfer. This option only available on switch release 25 or higher
and Succession releases.
Enter the Data File Name in the field provided. This is the file name created on the switch.
The default is provided.
For Call Detail data collection only:
Check the Collect CDR Data checkbox if you have purchased the CDR module for Traffic
Analyst. This enables you to set up Traffic Analyst for Call Detail data collection. You will
also need to set up a buffer box that will store Call Detail data from your switch. Traffic
Analyst will retrieve the Call Detail data from the buffer box.
Select Host or IP Address to direct Traffic Analyst to the buffer box. Host is usually a
machine name.
Enter the User Name and Password that gives Traffic Analyst access to the buffer box.
Consult your buffer box instructions for this information.
If required, complete the File Name field. In most cases, however, the user can just leave
the field name as “*”.
VPN Setup is used to set up a VPN connection. This type of connection may be
necessary due to security restrictions.
Polling is the next section.
JUNE 2011
I M P AC T T E CH N O L OG I ES , I N C
CONFI DENTI AL AND PROPRI ETARY
23
T R AF F I C AN AL Y S T AD M I N I S T R AT I V E G UI D E
2.1.3.5 Nortel Lantronix Communications
Get Data from Switch.
Communicate Via TCP/IP.
IP Address is the IP Address you assigned to the Lantronix device during the Lantronix
setup process.
User Name is the Username to be used to access the switch. The username MUST have
appropriate permission to access the Load 2 (LD2) function on the switch.
Password is the Password assigned to the Username above.
Session is Lantronix UDS-10.
IP Port is the port number configured on the Lantronix. IP port number 10001 is the default
and is recommended. Only change the default port number if this has been changed
during the Lantronix setup.
Check Specify Password for Lantronix Device if one has been configured, then enter
the Password. See Lantronix Installation Guide for more information.
For Call Detail data collection only:
Check the Collect CDR Data checkbox if you have purchased the CDR module for Traffic
Analyst. This enables you to set up Traffic Analyst for Call Detail data collection. You will
also need to set up a buffer box that will store Call Detail data from your switch. Traffic
Analyst will retrieve the Call Detail data from the buffer box.
JUNE 2011
I M P AC T T E CH N O L OG I ES , I N C
CONFI DENTI AL AND PROPRI ETARY
24
T R AF F I C AN AL Y S T AD M I N I S T R AT I V E G UI D E
Select Host or IP Address to direct Traffic Analyst to the buffer box. Host is usually a
machine name.
Enter the User Name and Password that gives Traffic Analyst access to the buffer box.
Consult your buffer box instructions for this information.
If required, complete the File Name field. In most cases, however, the user can just leave
the field name as “*”.
VPN Setup is used to set up a VPN connection. This type of connection may be
necessary due to security restrictions.
Polling is the next section.
2.1.3.6 Nortel Buffer Box Communications
Traffic Analyst supported Buffer Boxes and Communication:
JUNE 2011
E-COMMS CAB 5 & 6
-
Serial
PollCat NetLink & Jr.
-
Serial & TCP/IP
Poll-Safe 635P & 680
-
Serial
Sentinel 2000 & 2000S
-
Serial, TCP/IP & Data Directory
I M P AC T T E CH N O L OG I ES , I N C
CONFI DENTI AL AND PROPRI ETARY
25
T R AF F I C AN AL Y S T AD M I N I S T R AT I V E G UI D E
Serial Communication
Select the Com Port
Select Baud Rate, Data Bits & Parity that match the port of the switch.
Enter the Phone Number of the switch to be dialed.
Access String is used to send information once Traffic Analyst has made a successful
connection to the switch.
User Name is the Username to be used to access the switch. The username MUST have
appropriate permission to access the Load 2 (LD2) function on the switch.
Password is the Password assigned to the Username above.
Failure Retry is the number of times Traffic Analyst should retry a polling connection, in
the event that the first attempt fails. Retries occur after failures due to a busy signal, ring
no answer, excessive line noise, dropped connection, or some timeout conditions (when
the switch does not respond). Retries are not attempted when failures are caused by an
incorrect user name or password, or when the switch response does not match the
expected configuration.
Timeout is used to specify the delay between failure retries, such as when a busy signal is
received during an attempted poll. It also specifies how long Traffic Analyst should wait for
a switch response. If the switch does not respond within the timeout minutes, Traffic
Analyst logs a failure and will generally retry, depending on where Traffic Analyst is at in
the polling process.
JUNE 2011
I M P AC T T E CH N O L OG I ES , I N C
CONFI DENTI AL AND PROPRI ETARY
26
T R AF F I C AN AL Y S T AD M I N I S T R AT I V E G UI D E
Source is the partition that Traffic Analyst will get the data from on the buffer box. This is
only available on PollCat NetLink.
For Call Detail data collection only:
Check the Collect CDR Data checkbox if you have purchased the CDR module for Traffic
Analyst. This enables you to set up Traffic Analyst for Call Detail data collection. You will
also need to set up a buffer box that will store Call Detail data from your switch. Traffic
Analyst will retrieve the Call Detail data from the buffer box.
Select Host or IP Address to direct Traffic Analyst to the buffer box. Host is usually a
machine name.
Enter the User Name and Password that gives Traffic Analyst access to the buffer box.
Consult your buffer box instructions for this information.
If required, complete the Data File Name field. In most cases, however, the user can just
leave the field name as “*”.
VPN Setup is used to set up a VPN connection. This type of connection may be
necessary due to security restrictions.
Polling is the next section.
IP Communications (PollCat Netlink & Netlink Jr.)
Select TCP/IP radio button under Communicate Via.
JUNE 2011
I M P AC T T E CH N O L OG I ES , I N C
CONFI DENTI AL AND PROPRI ETARY
27
T R AF F I C AN AL Y S T AD M I N I S T R AT I V E G UI D E
Choose either Host or IP Address and enter the information in the corresponding field.
Host is usually a name where IP Address is a string of numbers.
Enter Password for the Buffer Box.
Source is the partition that Traffic Analyst will get the data from on the buffer box. This is
only available on PollCat NetLink and PollCat NetLink Jr.
For Call Detail data collection only:
Check the Collect CDR Data checkbox if you have purchased the CDR module for Traffic
Analyst. This enables you to set up Traffic Analyst for Call Detail data collection. You will
also need to set up a buffer box that will store Call Detail data from your switch. Traffic
Analyst will retrieve the Call Detail data from the buffer box.
Select Host or IP Address to direct Traffic Analyst to the buffer box. Host is usually a
machine name.
Enter the User Name and Password that gives Traffic Analyst access to the buffer box.
Consult your buffer box instructions for this information.
If required, complete the File Name field. In most cases, however, the user can just leave
the field name as “*”.
VPN Setup is used to set up a VPN connection. This type of connection may be
necessary due to security restrictions.
Polling is the next section.
JUNE 2011
I M P AC T T E CH N O L OG I ES , I N C
CONFI DENTI AL AND PROPRI ETARY
28
T R AF F I C AN AL Y S T AD M I N I S T R AT I V E G UI D E
IP Communications (Sentinel 2000 & 2000S)
Select TCP/IP radio button under Communicate Via.
Choose either Host or IP Address and enter the information in the corresponding field.
Host is usually a name where IP Address is a string of numbers.
Select to access the data on the Buffer Box using either Telnet or FTP File Transfer.
Enter the User Name & Password for the Buffer Box.
For Call Detail data collection only:
Check the Collect CDR Data checkbox if you have purchased the CDR module for Traffic
Analyst. This enables you to set up Traffic Analyst for Call Detail data collection. You will
also need to set up a buffer box that will store Call Detail data from your switch. Traffic
Analyst will retrieve the Call Detail data from the buffer box.
Select Host or IP Address to direct Traffic Analyst to the buffer box. Host is usually a
machine name.
Enter the User Name and Password that gives Traffic Analyst access to the buffer box.
Consult your buffer box instructions for this information.
If required, complete the File Name field. In most cases, however, the user can just leave
the field name as “*”.
JUNE 2011
I M P AC T T E CH N O L OG I ES , I N C
CONFI DENTI AL AND PROPRI ETARY
29
T R AF F I C AN AL Y S T AD M I N I S T R AT I V E G UI D E
VPN Setup is used to set up a VPN connection. This type of connection may be
necessary due to security restrictions.
Polling is the next section.
Data Directory Communications (Sentinel 2000 & 2000S)
Select Data Directory radio button under Communicate Via.
Enter the FTP Relative Directory Name of the Buffer Box.
VPN Setup is used to set up a VPN connection. This type of connection may be
necessary due to security restrictions.
Polling is the next section.
JUNE 2011
I M P AC T T E CH N O L OG I ES , I N C
CONFI DENTI AL AND PROPRI ETARY
30
T R AF F I C AN AL Y S T AD M I N I S T R AT I V E G UI D E
2.1.3.7 Siemens HiPath 3000 TCP/IP Communications
Select TCP/IP radio button under Communicate Via.
Choose either Host or IP Address of the switch, HiPath Manager or HiPath 5000 RSM
and enter the information in the corresponding field. Host is usually a name where IP
Address is a string of numbers. If the switch is sending the data to Traffic Analyst, the only
field that needs to be completed is Host or IP Address.
Select FTP File Transfer to access data via FTP on the switch and enter the Relative
FTP Directory & Data File Name in the fields provided. Data File Name is the File Name
created in the HiPath 5000 RSM. The default is file name is “gcallserv.”
Enter a User Name and Password that will allow Traffic Analyst to access the switch or
administration system.
Node ID identifies the node of the switch. This is a single node number displayed by the
switch or RSM Server. This field is only used for FTP.
VPN Setup is used to set up a VPN connection. This type of connection may be
necessary due to security restrictions.
Polling is the next section.
JUNE 2011
I M P AC T T E CH N O L OG I ES , I N C
CONFI DENTI AL AND PROPRI ETARY
31
T R AF F I C AN AL Y S T AD M I N I S T R AT I V E G UI D E
2.1.3.8 Siemens HiPath 3000 Data Directory Communications
Select Data Directory radio button under Communicate Via.
Browse to the Data Directory. This is the directory or folder where Traffic Analyst can find
the data file. The directory can be any valid network directory using either a drive letter or
a server name (ex. \\servername\directory). This directory is specified in the
COL/Collecting Agent setup of the HiPath Manager or HiPath 5000 RSM.
Node ID identifies the node of the switch. This is a single node number displayed by the
switch or RSM Server.
VPN Setup is used to set up a VPN connection. This type of connection may be
necessary due to security restrictions.
Polling is the next section.
JUNE 2011
I M P AC T T E CH N O L OG I ES , I N C
CONFI DENTI AL AND PROPRI ETARY
32
T R AF F I C AN AL Y S T AD M I N I S T R AT I V E G UI D E
2.1.3.9 Siemens HiPath 4000 TCP/IP Communications
Select TCP/IP radio button under Communicate Via.
Node ID identifies the node of the switch. This may be a single node number a set of 3
numbers displayed from the switch. If it is a single number, enter it as a single number.
Traffic Analyst will enter the preceding zeros. If it is a set of 3 numbers, enter the numbers
in the format of x.y.z, where x is a number between 0-99, y is a number between 0-999
and z is a number between 1-999.
Note: Node ID is not needed if using AMO Data Collection or Auto Configure Switch
CDR.
TCP/IP Section
Choose either Host or IP Address. If using AMO Data Collection, which is
recommended, then select IP and enter in the IP address of the HiPath 4000 Assistant. If
using Collection Agent for data collection then you will need to enter in either the Host
name or IP address for the HiPath Manager or HiPath Assistant.
*Host is usually a name where IP Address is a string of numbers.
Check AMO Data Collection to retrieve the data directly from the switch, without having to
use Collecting Agent. If this option is not checked, data will be retrieved from the HiPath
Manager or HiPath Assistant using Collecting Agent. Notice many of the fields below will
become grayed out once checking AMO Data Collection.
Check Auto Configure CDR Switch to automatically run the AMO data collection
commands on the switch in order to configure Call Detail data collection. If this option is
not checked, the AMO commands will need to be entered manually on the switch.
JUNE 2011
I M P AC T T E CH N O L OG I ES , I N C
CONFI DENTI AL AND PROPRI ETARY
33
T R AF F I C AN AL Y S T AD M I N I S T R AT I V E G UI D E
Check Collect Processor Load to have processor load data collected. This data will show
how busy the CPU is on the switch. Be aware that checking this option can add to the load
of the switch processor, as this will produce many records to be generated.
Relative FTP Directory. This is the directory or folder where Traffic Analyst can find the
data file. The directory can be any valid network directory using either a drive letter or a
server name (ex. \\servername\directory). This directory is specified in the COL/Collecting
Agent setup of the HiPath Manager (default is /var/col/data/deliver) or the switch (HiPath
4000 Assistant). This is not required if using AMO Data Collection.
Data File Name is the File Name created in the COL/Collecting Agent setup HiPath
Manager or HiPath 4000 Assistant. We recommend using Traffic_CDR. This is not
required if using AMO Data Collection.
Enter a User Name and Password that will allow Traffic Analyst to access the switch or
administration system. You will need to enter the engr username and password if using
AMO Data Collection.
Direct Switch Connection Section – This is not required if using AMO Data Collection.
Choose either Host or IP Address of the switch (HiPath 4000 Assistant) and enter the
information in the corresponding field. Host is usually a name where IP Address is a string
of numbers. This information will be used to retrieve the Trunk Group information.
Enter the User Name and Password that will allow Traffic Analyst to access the switch
(HiPath 4000 Assistant).
VPN Setup is used to set up a VPN connection. This type of connection may be
necessary due to security restrictions.
Polling is the next section.
JUNE 2011
I M P AC T T E CH N O L OG I ES , I N C
CONFI DENTI AL AND PROPRI ETARY
34
T R AF F I C AN AL Y S T AD M I N I S T R AT I V E G UI D E
2.1.3.10 Siemens HiPath 4000 Data Directory Communications
Select Data Directory radio button under Communicate Via.
Node ID identifies the node of the switch. This may be a single node number a set of 3
numbers displayed from the switch. If it is a single number, enter it as a single number.
Traffic Analyst will enter the preceding zeros. If it is a set of 3 numbers, enter the numbers
in the format of x.y.z, where x is a number between 0-99, y is a number between 0-999
and z is a number between 1-999.
Data Directory Section
Enter the Data Directory. This is the directory or folder where Traffic Analyst can find the
data file. The directory can be any valid network directory using either a drive letter or a
server name (ex. \\servername\directory). This directory is specified in the COL/Collecting
Agent setup of the HiPath Manager (default is /var/col/data/deliver) or the switch (HiPath
4000 Assistant)
Data File Name is the File Name created in the COL/Collecting Agent setup HiPath
Manager or HiPath 4000 Assistant. We recommend using Traffic_CDR.
VPN Setup is used to set up a VPN connection. This type of connection may be
necessary due to security restrictions.
Polling is the next section.
JUNE 2011
I M P AC T T E CH N O L OG I ES , I N C
CONFI DENTI AL AND PROPRI ETARY
35
T R AF F I C AN AL Y S T AD M I N I S T R AT I V E G UI D E
2.1.3.11 Siemens OpenScape Voice TCP/IP Communications
Select TCP/IP radio button under Communicate Via.
Node ID is the three digit number is set in the OpenScape Voice Configure CDR settings
screen as the PISN ID. That same PISN ID must be entered as the node ID here.
TCP/IP Section
Choose either Host or IP Address. If using IP Address, enter the IP address of the
OpenScape Voice server when using Switch (SFTP) for data retrieval, or enter the IP
address of the FTP Server/Buffer Box when using FTP Server/Buffer Box (FTP) for data
retrieval. Note: You select whether you are using Switch (SFTP) or FTP Server/Buffer Box
(FTP) on this screen.
*Host is usually a name, whereas IP Address is a string of numbers.
Choose either Switch (SFTP) or FTP Server/Buffer Box (FTP). Switch (SFTP) will
retrieve data directly from the switch. (This is the default.) SFTP is an encrypted file
transfer protocol used with switches on Unix or Linux servers. FTP Server/Buffer Box
(FTP) will retrieve switch data indirectly, through a server or buffer box. FTP is the most
common file transfer protocol used with buffer boxes, as well as Unix, Linux or Windows
servers. Note that the data is not encrypted using this method.
Relative FTP Directory. This is the directory or folder where Traffic Analyst can find the
data file. This will always be /cdr.
Data File Name will always be *.BF.
JUNE 2011
I M P AC T T E CH N O L OG I ES , I N C
CONFI DENTI AL AND PROPRI ETARY
36
T R AF F I C AN AL Y S T AD M I N I S T R AT I V E G UI D E
Backup Host or Backup IP Address can be entered so in the event the .BF files are not
written to the original directory they can be retrieved from this location.
Admin Server enter the IP address to gather the trunks names and routing. Port 8768
must be open. This is also referred to as the OSV Admin IP address.
Direct Switch Connection Host or IP Address. To gather the stations enter the CMP
Assistant IP Address.
Enter a User Name and Password that will allow Traffic Analyst to access the CMP
Assistant. You will need to enter the Administrator username and your password.
VPN Setup is used to set up a VPN connection. This type of connection may be
necessary due to security restrictions.
Polling is the next section.
2.1.3.12 Siemens OpenScape Voice Data Directory Communications
Select Data Directory radio button under Communicate Via.
Node ID is the three digit number is set in the OpenScape Voice Configure CDR settings
screen as the PISN ID. That same PISN ID must be entered as the node ID here.
Data Directory Section
Enter the Data Directory. This is the directory or folder where Traffic Analyst can find the
data file. This directory will always be /cdr.
JUNE 2011
I M P AC T T E CH N O L OG I ES , I N C
CONFI DENTI AL AND PROPRI ETARY
37
T R AF F I C AN AL Y S T AD M I N I S T R AT I V E G UI D E
Data File Name is the File Name. This file name will always be *.BF.
VPN Setup is used to set up a VPN connection. This type of connection may be
necessary due to security restrictions.
Polling is the next section.
2.1.3.13 Avaya Data Directory Communications
The Data Directory radio button under Communicate Via is automatically selected.
Enter the Data Directory. This is the directory or folder where Traffic Analyst can find the
data file. The directory can be any valid network directory using either a drive letter or a
server name (ex. \\servername\directory). This directory is specified in the Report setup of
ASA (Avaya Site Administration). Either the directory or the data file name needs to be
unique per switch.
Data File Name is the File Name specified in the Report setup of ASA (Avaya Site
Administration). We recommend using hourlydata.txt. Either the directory or the data file
name needs to be unique per switch. Example: chicagohourlydata.txt,
bostonhourlydata.txt, etc.
For Call Detail data collection only:
JUNE 2011
I M P AC T T E CH N O L OG I ES , I N C
CONFI DENTI AL AND PROPRI ETARY
38
T R AF F I C AN AL Y S T AD M I N I S T R AT I V E G UI D E
Check the Collect CDR Data checkbox if you have purchased the CDR module for Traffic
Analyst. This enables you to set up Traffic Analyst for Call Detail data collection. You will
also need to select whether the Source of the CDR Data will be Directory, Switch (SFTP)
or FTP Server/Buffer Box (FTP).
CDR Data File Name will always be “CDR*” unless manually changed in the switch.
Select Host or IP Address to direct Traffic Analyst to the CDR Data Source. Host is
usually a machine name, while IP Address is a string of numbers.
Enter the User Name and Password that gives Traffic Analyst access to the CDR Data
Source.
VPN Setup is used to set up a VPN connection. This type of connection may be
necessary due to security restrictions.
Polling is the next section.
2.1.3.14 Cisco Unified Communications Manager TCP/IP Communications
Select TCP/IP radio button under Communicate Via.
Choose either Host or IP Address. If using IP Address, enter the IP address of the Cisco
server.
*Host is usually a name, whereas IP Address is a string of numbers.
JUNE 2011
I M P AC T T E CH N O L OG I ES , I N C
CONFI DENTI AL AND PROPRI ETARY
39
T R AF F I C AN AL Y S T AD M I N I S T R AT I V E G UI D E
Enter a User Name and Password that will allow Traffic Analyst to access the switch or
administration system. You will need to enter the Administrator username and your
password.
SFTP Server data is retrieved directly from the switch
FTP Server/Buffer Box data is transferred using File Transfer Protocol (FTP)
Relative FTP Directory. This is the directory or folder where Traffic Analyst can find the
data file.
Data File Name will always be cdr_* unless manually changed in the switch.
VPN Setup is used to set up a VPN connection. This type of connection may be
necessary due to security restrictions.
Polling is the next section.
2.1.3.15 Cisco Unified Communications Manager Data Directory
Communications
Select Data Directory radio button under Communicate Via.
Enter the Data Directory. This is the directory or folder where Traffic Analyst can find the
data file.
Data File Name is the File Name. This file name will always be cdr_* unless manually
changed in the switch.
JUNE 2011
I M P AC T T E CH N O L OG I ES , I N C
CONFI DENTI AL AND PROPRI ETARY
40
T R AF F I C AN AL Y S T AD M I N I S T R AT I V E G UI D E
VPN Setup is used to set up a VPN connection. This type of connection may be
necessary due to security restrictions.
Polling is the next section.
JUNE 2011
I M P AC T T E CH N O L OG I ES , I N C
CONFI DENTI AL AND PROPRI ETARY
41
T R AF F I C AN AL Y S T AD M I N I S T R AT I V E G UI D E
2.1.4
Polling
Polling is the activity Traffic Analyst performs to retrieve the switch data.
Traffic Analyst polls in one of two modes - periodic or continuous. This is an important
setting, and one that cannot be changed after initial set-up because it affects the behavior
of how data is stored and analyzed.
2.1.4.1 Periodic Studies
Periodic studies are generally only used in special circumstances; for example, in a
service center environment. Most users will implement continuous polling. Contact Impact
Technologies if you wish to learn more about periodic studies.
2.1.4.2 Continuous Polling
When a continuous switch is created, it will be scheduled to collect data. If polling must be
postponed, uncheck the "polling is activated" check box. Activating the switch at a later
time can be achieved by selecting the created switch and using the right mouse click
menu.
The Continuous Polling section of this screen is universal to all switch types:
Save Interval Data For - (we recommend 15-30 days)
Save Hour Data For - (we recommend 365 days)
Save Day Totals For - (we recommend 365 days)
Save Week Totals For - (we recommend 52 weeks)
Save Month Totals For - (we recommend 36 months)
Keep in mind the more data saved, the greater the disk space used.
Please choose the switch type that is being configured:
Siemens 9000 or 9751 (9005)
Siemens Hicom 300 or Avaya
Siemens HiPath 3000, 4000, or OpenScape Voice
Nortel
Cisco
JUNE 2011
I M P AC T T E CH N O L OG I ES , I N C
CONFI DENTI AL AND PROPRI ETARY
42
T R AF F I C AN AL Y S T AD M I N I S T R AT I V E G UI D E
Siemens 9000 or 9751 (9005)
Time of Day is when Traffic Analyst will poll the switch for collected data. The data
collected will be for the previous day unless “Retrieve current day” checkbox is checked.
JUNE 2011
I M P AC T T E CH N O L OG I ES , I N C
CONFI DENTI AL AND PROPRI ETARY
43
T R AF F I C AN AL Y S T AD M I N I S T R AT I V E G UI D E
Siemens Hicom 300 or Avaya
Time of Day is when Traffic Analyst will poll the switch for collected data. The data
collected will be for the previous day.
JUNE 2011
I M P AC T T E CH N O L OG I ES , I N C
CONFI DENTI AL AND PROPRI ETARY
44
T R AF F I C AN AL Y S T AD M I N I S T R AT I V E G UI D E
Siemens HiPath 3000 or 4000, or OpenScape Voice
Time of Day is when Traffic Analyst will poll and/or store the collected data for the switch.
The data collected will be for the previous day.
Polling and Alarm Interval lets you select the polling interval -- daily, hourly, half-hourly,
or quarter-hourly. If you select hourly, half-hourly, or quarter-hourly processing, then
specify the minutes after the hour that you wish the processing to occur. We recommend
using hourly processing if you are polling a large switch and do not want a large file
residing on the switch or want to risk losing data. Also, Traffic Analyst will perform hourly
processing automatically if Hourly Alarms have been setup.
Save CDR Data specifies the number of days to keep CDR data. We recommend 90.
JUNE 2011
I M P AC T T E CH N O L OG I ES , I N C
CONFI DENTI AL AND PROPRI ETARY
45
T R AF F I C AN AL Y S T AD M I N I S T R AT I V E G UI D E
Nortel
Time of Day is when Traffic Analyst will poll and/or store the collected data for the switch.
The data collected will be for the previous day.
Polling and Alarm Interval lets you select the polling interval -- daily, hourly, or halfhourly. If you select hourly or half-hourly processing, then specify the minutes after the
hour that you wish the processing to occur. We recommend using hourly processing if you
are polling a large switch via AMO Data Collection and do not want a large file residing on
the switch or want to risk losing data. Also, Traffic Analyst will perform hourly processing
automatically if Hourly Alarms have been setup.
Perform Interval Processing allows you to designate how many minutes after the interval
(selected in the Polling and Alarm Interval dropdown) polling should be processed. For
example, if you choose 10 minutes for this field, and the Polling & Alarm Interval is Hourly,
polling will be processed at 12:10AM, 1:10AM, 2:10AM, etc. If you choose 10 minutes for
this field and the Polling & Alarm Interval is Half-Hourly, polling will be processed at
12:10AM, 12:40AM, 1:10AM, 1:40AM, etc.
JUNE 2011
I M P AC T T E CH N O L OG I ES , I N C
CONFI DENTI AL AND PROPRI ETARY
46
T R AF F I C AN AL Y S T AD M I N I S T R AT I V E G UI D E
Cisco
Time of Day is when Traffic Analyst will poll and/or store the collected data for the switch.
The data collected will be for the previous day.
Polling and Alarm Interval lets select the polling interval -- daily, hourly, half-hourly, or
quarter-hourly. If you select hourly, half-hourly, or quarter-hourly processing, then specify
the minutes after the hour that you wish the processing to occur. We recommend using
hourly processing if you are polling a large switch and do not want a large file residing on
the switch or want to risk losing data. Also, Traffic Analyst will perform hourly processing
automatically if Hourly Alarms have been setup.
Save CDR Data specifies the number of days to keep CDR data. We recommend 90.
JUNE 2011
I M P AC T T E CH N O L OG I ES , I N C
CONFI DENTI AL AND PROPRI ETARY
47
T R AF F I C AN AL Y S T AD M I N I S T R AT I V E G UI D E
2.1.5
Trunk Groups
The Trunk Groups screen defines the trunk groups accessed by Traffic Analyst. Options
on this screen differ depending on the type of switch.
2.1.5.1 HiPath 3000 Trunk Groups
This screen is where the Trunks & Trunk Groups are defined. Trunk Groups must be
defined and Trunks assigned to the Trunk Groups before Traffic Analyst can store data.
Trunk Group will show any Trunk Groups that have been defined. Add, Edit, or Remove
the Trunk Group by selecting the corresponding button.
Select Add next to the Trunk Group field to add a Trunk Group to the drop-down list. The
Trunk Group can be named anything. Enter the Trunk Group name and select OK. Multiple
Trunk Groups can be entered by using a comma to separate the Trunk Group names (ex.
Group 1, Group 2, etc.).
Select Add under Trunks in Trunk Group to add a Trunk to the selected Trunk Group.
When adding a Trunk, use the Trunk number. To add multiple Trunk number you can
specify a range (ex. 1-5) or use a comma to separate Trunk numbers (ex. 10, 13, 15).
Select Add under Unassigned Trunks to add an unassigned trunk number. This is also
the location where unassigned trunks that Traffic Analyst receives from the switch will be
shown.
JUNE 2011
I M P AC T T E CH N O L OG I ES , I N C
CONFI DENTI AL AND PROPRI ETARY
48
T R AF F I C AN AL Y S T AD M I N I S T R AT I V E G UI D E
2.1.5.2 Siemens OpenScape Voice & Cisco Trunk Groups
This is the Trunk Groups switch property screen for the Siemens OpenScape Voice and
the Cisco Unified Communications Manager. The Group Name and the # Trunks fields are
editable from this window.
The Group Name column’s default display includes the host name or the IP address for
each trunk group. This field may be edited for your convenience.
For Network customers, the # Trunks column is displayed and may be edited. Enter the
number of trunks that are configured for each group. The default value for this field is 0.
Note: Completing this field is not required; however, it is recommended for users
interested in viewing data related to trunk group capacity (e.g. ATB, % Utilized – Peak, %
Utilized – Total).
The Description field is initialized from CDR data and can only be edited by accessing the
Groups window for a particular switch from the File menu. (See 3.4.1 for more details.)
Note: The Trunk Groups screen is not displayed when creating a new switch because
Traffic Analyst is not aware of trunk groups until data starts being collected. However,
once data starts being collected, this tab appears when you are editing the switch
properties.
JUNE 2011
I M P AC T T E CH N O L OG I ES , I N C
CONFI DENTI AL AND PROPRI ETARY
49
T R AF F I C AN AL Y S T AD M I N I S T R AT I V E G UI D E
2.1.6
Gateways
The Gateways screen defines the gateways accessed by Traffic Analyst. A gateway
converts TDM to IP communication. Options on this screen differ depending on the type of
switch.
2.1.6.1 HiPath 3000 Gateways
This screen is where the Gateway (HG 1500 card) is defined for the HiPath 3000.
Gateway Name will show any Trunk Groups that have been defined. Add, Edit, or
Remove the Trunk Group by selecting the corresponding button.
Select Add next to the Gateway Name field to add a Gateway to the drop-down list. The
Gateway can be named anything. Enter the Gateway name and select OK.
Assign the appropriate Trunk Groups in Gateway that belongs to the Gateway as it is
defined in the switch. Once the Trunk Group is assigned to the Gateway, select whether it
is a TDM (versus IP) Trunk Group. Traffic Analyst will store the data from each assigned
Trunk Group to the Gateway.
Leave any Trunk Groups in the Unassigned Trunk Groups section that would not be
used with the Gateway -- (e.g., analog line on dedicated trunk group). If Traffic Analyst
receives data on a Trunk Group that has not been manually assigned to the Gateway, it
will not analyze that data for the Gateway.
Check the Reserve B-Channel for Music on Hold option if you have music when on
hold. Also, enter the Number of B-Channels you are licensed. Traffic Analyst will use this
information when analyzing the Gateway data.
JUNE 2011
I M P AC T T E CH N O L OG I ES , I N C
CONFI DENTI AL AND PROPRI ETARY
50
T R AF F I C AN AL Y S T AD M I N I S T R AT I V E G UI D E
In the bottom section, browse to the location of the Switch Configuration File. This file is
created by the HiPath Manager and is an ascii.txt file format. It tells Traffic Analyst which
phones are TDM or IP. Normally, you will only need to create this file once; thereafter, you
will only create a new version of the file if your switch configuration changes.
To create this file in your HiPath Manager software, select “Program options].” On the
General screen, check the ASCII file option under Save options. Make sure the path
location is the same as the prn file (generated in the previous step) and the kds file. The
file will be named according to the database name. For example, if the database file is
3000.kds, then the ASCII file will be named 3000.ASCII.txt or just 3000.txt.
Click on “Save customer database” and then “Close customer database.” This will create
the Switch Configuration file.
An example of the HiPath Manager screen where you perform these options is below.
Note that this screen may vary somewhat depending on the version of your HiPath
Manager software.
JUNE 2011
I M P AC T T E CH N O L OG I ES , I N C
CONFI DENTI AL AND PROPRI ETARY
51
T R AF F I C AN AL Y S T AD M I N I S T R AT I V E G UI D E
2.1.6.2 HiPath 4000 Gateways (IPDA options)
This screen is where you define your IPDA settings.
Enter a name in the Gateway Name field and an IPDA number in the IDPA Number field.
The IPDA Number can be from 17 to 99. It should be the same as the shelf number used
in your switch configuration for all devices configured on the IPDA.
The trunk group list will be automatically filled after the switch communications have been
successfully tested and a gateway is defined with a valid IPDA number. You cannot add
trunk groups through this list.
You can enter a percentage in the Music/Announcement Channels field to reserve
channels (and bandwidth) for hold music or announcements generated on the switch and
broadcast to the IPDA. You do not need to reserve channels if you are using the hold
music generated locally on the IPDA. Note that it also possible for an IPDA to have an
external announcement device that sends announcements to other IPDAs. If you are using
such an external announcement device, reserve a channel for broadcasting for each IPDA
that receives those announcements. The receiving IPDAs only need one channel per
announcement received.
The Channel Capacity field lets you select either Small or Large and this is used in
reports to determine the percentage of channels in use.
JUNE 2011
I M P AC T T E CH N O L OG I ES , I N C
CONFI DENTI AL AND PROPRI ETARY
52
T R AF F I C AN AL Y S T AD M I N I S T R AT I V E G UI D E
Please note that for the purposes of estimating bandwidth used between the switch and an
IPDA, we assume that all the calls between the IPDA and the switch or another IPDA are
using the same network IP path. In some unusual cases when using Direct Media
Connection (DMC) with IP devices, this may not be the case. You may have a situation
where some of the IP bandwidth may travel on the network path directly between the
IPDAs without going through the IP channels to the switch.
2.1.7
Trunk Group Analysis
This screen sets the default settings for Trunk Group Analysis.
NOTE: These setting are industry standards and can be left at the default settings. They
can be changed at any time and the data will be reanalyzed.
Trunk Group allows the designation of different values to individual Trunk Groups. If no
data has been collected, the only option is Default Trunk Groups.
Engineering Model allows the designation of an Engineering Model for the selected Trunk
Group. Choices are Erlang B, Extended Erlang B, Erlang-Engset, Poisson, Erlang C, or
MMcK. Erlang B is recommended and the industry standard. See in-application Help for
detailed description of these models.
Call Basis can either be Offered or Carried calls used for traffic engineering. Offered
includes estimates for calls blocked, whereas carried includes only those volumes that
were actually handled by the system.
JUNE 2011
I M P AC T T E CH N O L OG I ES , I N C
CONFI DENTI AL AND PROPRI ETARY
53
T R AF F I C AN AL Y S T AD M I N I S T R AT I V E G UI D E
Grade of Service Target or GOS has one of two meanings based on the Engineering
Model chosen.
For Erlang B, Extended Erlang B, Poisson and Erlang-Engset, GOS is expressed as the
decimal equivalent of percentage blocked. For example, if the goal is to block no more
than 1% of calls, enter .010.
For Erlang C and MMcK, GOS is more complex. It is 1 part of a 2-part equation. For these
formulas it represents a target percentage of calls delayed longer than the Answer
Seconds Target. For example, for no more than 5% of your calls to be delayed beyond the
target of 6 seconds, enter .05 for this GOS.
Monthly Cost Per Trunk (optional) is an estimated monthly cost per trunk that is used in
reports that include cost information relative to current and projected trunks.
Compression Model (optional) is an estimated IP Bandwidth that would be required if the
trunk group were to be converted to IP trunks.
2.1.8
Gateway Analysis
The Gateway Analysis screen sets the default settings for Gateway Analysis. Options on
this screen differ depending on the type of switch.
2.1.8.1 HiPath 3000 Gateway Analysis
This screen sets the default HiPath 3000 settings for Gateway Analysis.
Note: These setting are industry standards and can be left at the default settings. They
can, however, be changed at any time and the data will be reanalyzed.
JUNE 2011
I M P AC T T E CH N O L OG I ES , I N C
CONFI DENTI AL AND PROPRI ETARY
54
T R AF F I C AN AL Y S T AD M I N I S T R AT I V E G UI D E
Gateway allows the designation of different values to individual Gateways. If no gateway
has been defined, the only option is Default Gateways.
Engineering Model allows the designation of an Engineering Model for the selected
Gateway. Choices are Erlang B, Extended Erlang B, Erlang-Engset, Poisson, Erlang C, or
MMcK. Erlang B is recommended and the industry standard. See in-application Help for
detailed description of these models.
When the Busy Hour is used as the engineering interval, the Busy Ordinal specifies which
Busy Hour is used. The first through the tenth busiest hour can be used as the basis for
traffic engineering.
Call Basis can either be Offered or Carried calls used for traffic engineering. Offered
includes estimates for calls blocked, whereas carried includes only those volumes that
were actually handled by the system.
Internal/Conf Adjust allows you to increase call counts and usage to allow for undetected
internal and conference calls, as a percentage of the outgoing traffic of the gateway. The
HiPath 3000 doesn’t report internal calls or whether calls are conference calls, so this field
allows you to estimate for that unreported traffic volume.
Grade of Service Target or GOS has one of two meanings based on the Engineering
Model chosen.
For Erlang B, Extended Erlang B, Poisson and Erlang-Engset, GOS is expressed as the
decimal equivalent of percentage blocked. For example, if the goal is to block no more
than 1% of calls, enter .010.
For Erlang C and MMcK, GOS is more complex. It is one part of a two-part equation. For
these formulas it represents a target percentage of calls delayed longer than the Answer
Seconds Target. For example, for no more than 5% of your calls to be delayed beyond the
target of 6 seconds, enter .05 for this GOS.
Compression Model (optional) is an estimated IP Bandwidth that would be required for
the gateway.
JUNE 2011
I M P AC T T E CH N O L OG I ES , I N C
CONFI DENTI AL AND PROPRI ETARY
55
T R AF F I C AN AL Y S T AD M I N I S T R AT I V E G UI D E
2.1.8.2 HiPath 4000 Gateway Analysis
The Gateway Analysis screen for the HiPath 4000 IPDA is very similar to the HiPath 3000
Gateway Analysis screen. The HiPath 4000 version replaces the Internal/Conference
Adjust field with a Compressed Calls percent field. It also adds a second VoIP call model
field.
The Compressed Call percentage field is the estimated number of calls using the
compression model. These calls would use less bandwidth. Siemens recommends
estimating zero (0) for this field. This is a conservative estimate, but normally conference
calls are not compressed.
For the Compression Model, the best value to use would be the G.729A model with IPDA
in its name and the largest sampling rate used on that devices and trunks on the IPDA (40
milliseconds is the switch’s default sampling rate).
The VoIP model (Uncompressed Model) is the model used to convert TDM calls into IP
packages without any compression. The best value would be the G.711 model with IPDA
in its name and the largest sampling rate used for uncompressed calls in the switch
configuration -- 20 milliseconds is the default.
Note that you should always use models for the IPDA Gateway that include “IPDA” in the
name because these models include the IPDAs per call signaling and control overhead.
JUNE 2011
I M P AC T T E CH N O L OG I ES , I N C
CONFI DENTI AL AND PROPRI ETARY
56
T R AF F I C AN AL Y S T AD M I N I S T R AT I V E G UI D E
2.1.9
Console Group Analysis (all except HiPath 3000, OpenScape
Voice, Avaya and Cisco)
This screen sets the default settings for Console Group Analysis.
NOTE: These setting are industry standards and can be left at the default settings. They
can be changed at any time and the data will be reanalyzed.
Console Group allows the designation of different values to individual Console Groups. If
no data has been collected, the only option is Default Console Groups.
Engineering Model allows the designation of an Engineering Model for the selected
Console Group. Choices are Erlang B, Extended Erlang B, Erlang-Engset, Poisson, Erlang
C, or MMcK. Erlang C is recommended and the industry standard. See in-application Help
for detailed description of these models.
Call Basis can either be Offered or Carried calls used for traffic engineering. Offered
includes estimates for calls blocked, whereas carried includes only those volumes that
were actually handled by the system.
Grade of Service Target or GOS has one of two meanings based on the Engineering
Model chosen.
For Erlang B, Extended Erlang B, Poisson and Erlang-Engset, GOS is expressed as the
decimal equivalent of percentage blocked. For example, if the goal is to block no more
than 1% of calls, enter .010.
JUNE 2011
I M P AC T T E CH N O L OG I ES , I N C
CONFI DENTI AL AND PROPRI ETARY
57
T R AF F I C AN AL Y S T AD M I N I S T R AT I V E G UI D E
For Erlang C and MMcK, GOS is more complex. It is 1 part of a 2-part equation. For these
formulas it represents a target percentage of calls delayed longer than the Answer
Seconds Target. For example, for no more than 5% of your calls to be delayed beyond the
target of 6 seconds, enter .05 for this GOS.
% Retries (Extended Erlang B only) is the percentage of callers you expect to retry.
Delay (Answer Target) (Erlang C and MMcK only) is the target number of seconds within
which calls should be answered.
Average Time Before Abandon (Erlang C and MMcK only) is the target number of
seconds before the caller abandons the call.
2.1.10 CDR Data (HiPath 3000 only)
If licensed for CDR reports
This screen allows the data to be “passed” to another Traffic Analyst server or application.
Select Pass Data to IP Address to send the data collected to the specified IP Address
including the Port Number. In order for this to work properly, the application that the data
is being sent to must be “listening” for the data.
Selecting Copy CDR Data files at the end of the day to requires a valid path to the local
hard drive or network drive. Manually enter the path or select Browse.
Copy On Demand allows for immediate copying of the CDR data from Traffic Analyst to a
user specified location.
JUNE 2011
I M P AC T T E CH N O L OG I ES , I N C
CONFI DENTI AL AND PROPRI ETARY
58
T R AF F I C AN AL Y S T AD M I N I S T R AT I V E G UI D E
2.1.11 CDR Call Costs (all switches with Call Accounting module)
If licensed for CDR reports
This screen allows for the entry of prefixes dialed and costs associated with those prefixes.
Note: The values shown are the Default CDR Call Costs taken from the
System=Default CDR Call Costs menu item – these defaults the user enters are picked
up and displayed on the CDR Reports tab. Any changes made on this tab are specific to
this switch and do not override the values on the System=Default CDR Call Costs.
Define the Prefixes associated with the Call Type listed. If more than one prefix is
associated with a type of call, enter all prefixes separated with a comma. (For example,
you may want to assign prefixes for local and network calls to handle cases where the
number called is passed to another switch or IPDA to make a specific call a local call
instead of long distance. Defining prefixes allows you to treat these as exceptions to the
long distance rules.) You may type prefixes directly into the prefix display field. Or, you
may click the buttons (with the ellipses) to the right of each field to access a popup window
where you may also edit the prefixes.
Define a Cost in cents per minute for each type of call. You define a cost for the initial
minute of the call, and for additional minutes of the call. This gives you flexibility of
assigning a flat cost to calls by charging for the initial minute only. If a dialed number
matches the prefix defined, then the calls cost is calculated using the duration of the call
(minutes), minus the initial minute, multiplied by the cost plus the cost of the initial minute.
Outgoing calls are always rounded up, too, so calls less than a minute will be charged for
the entire minute. You can use decimals to enter the cost per minutes.
JUNE 2011
I M P AC T T E CH N O L OG I ES , I N C
CONFI DENTI AL AND PROPRI ETARY
59
T R AF F I C AN AL Y S T AD M I N I S T R AT I V E G UI D E
Define the billing increments that will be used to determine the increments used for billing
purposes. The default is 60 seconds. If you entered six seconds, for example, then a call
that lasted nine seconds would be billed for two increments.
If a call is an outgoing call and does not match the prefix for 800, 900, Long Distance, or
International types of calls then the call is considered a Local call.
Use Defaults will allow the values to revert to the Default CDR Call Costs. Edit Defaults
will allow the editing of the default values.
After you edit any of the Prefixes or Cost fields and hit OK or Apply, a Reanalyze
Existing Days popup will appear.
This window allows you to apply your recent change(s) to old data without having to re-poll
the data. Simply enter the date from which you would like recalculation to take place in the
Starting at Date field.
Special Rules for Hicom 300 - Long Distance numbers do not include a 1 in the Hicom
300. To address this for Traffic Analyst, you will need to enter the following prefixes for
Long Distance numbers: 2,3,4,5,6,7,8, and 9. You will also need to enter your local area
codes in the Local Prefixes field.
For example, if your local area code is 314, any number that begins with that string (314)
will be classified as a Local call. Numbers that begin with 2 through 9 and which do not
match any other prefix will be classified as a Long Distance call.
Select whether PIN numbers can be displayable in CDR reports with the Allow PIN
column in reports checkbox. If it is not checked then PIN numbers will not be available
for use in reports.
Users may implement the Remove VNR Node Access Codes option if the switch network
is using the VNR feature for the HiPath 4000. This feature adds a node access code to
the front of every extension number in the CDR report. To remove this node access code,
select this checkbox, enter the prefix digits that identify that a number is starting with a
node access code, and enter the length of the node access codes. The example above
shows how the feature would be setup to remove node access codes where the network
uses node access codes like 0735 and 0775. Note: If you choose not to remove the node
access codes, the prefix used for the node access codes should be entered into the
Network Prefixes field, so that call types can be correctly determined.
For more information regarding the “Organization CSV File” browser at the bottom of this
menu, please see section 9.4.
JUNE 2011
I M P AC T T E CH N O L OG I ES , I N C
CONFI DENTI AL AND PROPRI ETARY
60
T R AF F I C AN AL Y S T AD M I N I S T R AT I V E G UI D E
2.1.12 Scheduled Reports Setup
This screen allows you to schedule reports as the switch is being setup. Note that this
screen will only appear this way during initial switch definition. To schedule reports after
switch creation, do so through the Reports menu.
Choose Defaults, Copy From Another Switch, or None for a report type. If unsure of
what reports will be needed, choose None.
Output to choices are Default Printer, Display, E-mail, or File. If E-mail or File is
chosen, enter the E-mail Address or Location for the file to be written to.
Report type options Daily (D), Weekly (W) or Monthly (M) for Network Activity, Console
Group Activity, Console Operator Activity and Call Activity (CDR). Activity reports will only
be available if that option was purchased. Below is a grid that shows what is available for
each switch type.
Switch
Siemens
9751
Siemens
Hicom 300
Siemens
HiPath 3000
Siemens
HiPath 4000
Siemens
OpenScape
Voice
Nortel
Avaya
Cisco
JUNE 2011
Network
Activity
Console Group
Activity
Console Operator
Activity
X
X
X
X
X
X
X
X
X
(6.5 & 6.6)
X
X
X
X
X
X
X
Call
Activity
X
X
X
I M P AC T T E CH N O L OG I ES , I N C
CONFI DENTI AL AND PROPRI ETARY
X
X
X
X
61
T R AF F I C AN AL Y S T AD M I N I S T R AT I V E G UI D E
2.1.13 Switch Access
This screen allows you to assign the switch to an account and view and manage what
users have access. Assigning a switch to an account allows users to view only those
switches assigned to that account.
Choose from the drop down menu a User Account for this switch.
You can view Users with preset Access to Switch. These are users set up with System
Administration access or as Web Account Administrators.
You can also view standard Users with or without access to the switch and change that
status.
2.2 Poll and Store On Demand
If you defined a continuous mode switch that has past days of data available, you can
attempt to poll and store those days. Periodic mode switches can also poll past data, but
you have to create a study first using the Edit/Create Studies option on the right mouse
click menu.
The amount of data available depends on the switch configuration:
For a Siemens 9006 (Hicom 300), up to 10 days of stored trunk data may be available.
For CDR, data stored in buffer box is available.
For a Siemens 9005 - 9000, up to 3 days of data may be available.
JUNE 2011
I M P AC T T E CH N O L OG I ES , I N C
CONFI DENTI AL AND PROPRI ETARY
62
T R AF F I C AN AL Y S T AD M I N I S T R AT I V E G UI D E
For Nortel Network data, data collection methods vary.
For Nortel CDR data, the capacity of the buffer box.
For a Siemens HiPath 3000, only current data is available. If using RSM 5000, may
contain multiple days of data.
For a Siemens HiPath 4000 and OpenScape Voice, buffered data available in the switch.
For Avaya Network data, all available data since the last poll will be retrieved. Pick one
date for the poll on demand and it will parse all the data in the file and create advanced
stores for the dates found.
For Avaya CDR data, the capacity of the buffer box.
For a Cisco Unified Communications Manager, buffered data available in the switch.
If you do not care about polling and storing past data, skip to the next section, Pending
Schedule.
Highlight the switch in the tree by clicking on it, and then click on the right mouse button.
The right mouse menu appears. Select the Poll On Demand option.
Select the start and end date for the range of data you want to collect and/or store. If
polling and storing just one date, you do not need an end date.
Poll Data From Switch will retrieve the data. This option is used to test connectivity
and/or poll previous days data.
Store Data will process and save the data in the Traffic Analyst database. This option
allows separating the tasks of retrieving and storing data, if you want to store the data after
previously collecting it. This may be used if you have made changes to CDR costs and
would like past days already collected to reflect the costing changes.
JUNE 2011
I M P AC T T E CH N O L OG I ES , I N C
CONFI DENTI AL AND PROPRI ETARY
63
T R AF F I C AN AL Y S T AD M I N I S T R AT I V E G UI D E
Click on OK. If you are on the server's console, the poll and store will kick off immediately.
If you are on a client PC, the poll may take a couple of minutes to start. When you poll and
store, either through a Poll On Demand or a scheduled poll, Traffic Analyst must be up and
running. The poll and store takes place on the server computer.
2.3 Pending Schedule
Now look at the main window, and notice the tabs in the lower right portion of the screen.
Click on the tab called Pending Schedule. This brings up the list of activities that are
scheduled to be performed.
You should see the switch polls you have scheduled. You can double click on any activity
and get more information about it or change its schedule.
Note: If you don't see your poll activities scheduled for your switches, try clicking on the
Traffic folder in the tree view. It may be that a filter is turned on in the View menu.
JUNE 2011
I M P AC T T E CH N O L OG I ES , I N C
CONFI DENTI AL AND PROPRI ETARY
64
T R AF F I C AN AL Y S T AD M I N I S T R AT I V E G UI D E
2.4 Status Log
After examining the Pending Schedule tab, click on the Status Log tab, also located in
the lower portion of the screen.
This screen displays activities that are either in progress or are finished. By default,
activities in progress are displayed at the top of the list. You can sort the list by clicking on
the various column headings and then sort in either ascending or descending order based
on the column information. To return to the original display, sort on Date/Time in
descending order.
The status of the activity is important. Activity descriptions include:
JUNE 2011
•
In Progress - in which case the field becomes a button that allows you to
terminate the process by clicking on it and confirming
•
Success - worked as expected
•
Failure - the activity was attempted but failed
•
Terminated - the application was shut down during an event in progress. (You
will need to reschedule the event if you want it to reoccur.)
•
Warning - an error condition was noted.
•
Message
I M P AC T T E CH N O L OG I ES , I N C
CONFI DENTI AL AND PROPRI ETARY
65
T R AF F I C AN AL Y S T AD M I N I S T R AT I V E G UI D E
2.4.1
Detail Message Information
To see detailed information about any activity in progress or that is finished, double-click
on it. This will bring up the Detail Message Information window:
This Detailed Message Information window gives you the task-by-task progress of the
overall activity from the perspective of Traffic Analyst. It tells you each step of what Traffic
Analyst is trying to accomplish, and the result of that step.
2.4.2
Monitor or Communication Audit File Window
Another diagnostic tool available from the Status Log tab is the Monitor or Communication
Audit (Support) File. When you look at the Status Log, look at the Support File column =.
When you click on the support file name or the ellipsis button, the monitor will open with
the support file loaded.
JUNE 2011
I M P AC T T E CH N O L OG I ES , I N C
CONFI DENTI AL AND PROPRI ETARY
66
T R AF F I C AN AL Y S T AD M I N I S T R AT I V E G UI D E
In this window you can view the character-by-character interaction with the switch, both in
real-time and after the poll. It is very useful for diagnosing problems.
Note: On clients, the real-time updates are slightly delayed, as compared to the response
on the server itself.
Use the Communication Audit and the Detail Message Information windows to help you
diagnose any problems with your polls.
2.5 Logoff/Logon E-mail
This option is only enabled if you have Extended MAPI set up as the e-mail type in E-mail
Settings from the System Menu.
2.5.1
Logoff E-mail
This option logs off the current e-mail client. Traffic Analyst will be unable to send alarms
or reports via e-mail if its server is not logged onto an e-mail client.
2.5.2
Logon E-mail
The option brings up the default e-mail client for the server. Once you are logged on,
Traffic Analyst can send alarms and reports via e-mail. The e-mail client is invoked as a
background session. It is not visibly running on the Windows desktop.
JUNE 2011
I M P AC T T E CH N O L OG I ES , I N C
CONFI DENTI AL AND PROPRI ETARY
67
T R AF F I C AN AL Y S T AD M I N I S T R AT I V E G UI D E
2.6 Logoff/Logon Traffic Analyst
2.6.1
Logoff Traffic Analyst
This option logs off the current user but keeps Traffic Analyst up and running. By doing
this, you enable scheduled activities to run as planned but prevent unauthorized users
from accessing anything in the Traffic Analyst product. All of the menu options will become
disabled.
2.6.2
Logon Traffic Analyst
The logon option is available when no user is currently logged on. When the option is
selected, or the user double clicks on any main window item, the logon screen appears
requiring entry of a valid username and password.
Note: If you ever start up Traffic Analyst and most menu options appear ghosted
(disabled), then you probably have not logged on. Just logon from the File menu and the
options should become available.
2.6.3
Client Logon
If you are a client that can connect to more than one Traffic Analyst server, you will have to
specify the name of the database server of interest. Otherwise, you can accept the default.
The name defaults to the last successful server connected to. In a simple environment with
only one server, you can accept the default and never change it.
The Client Logon also has an options button that leads to the following screen:
When a client connects to the server, it connects it one of two ways. The default method is
for the client to broadcast a message over the network, announcing its presence and
looking for the database server to connect to. That method is shown by the checkmark in
the box above labeled “Perform a network broadcast to search for the database server.”
The other way is for a client to look specifically for the database server. You must know
either the Host name or the IP Address of the computer that the server resides on. If
multiple Traffic Analyst database servers are in your environment, then you must know this
information for each server.
JUNE 2011
I M P AC T T E CH N O L OG I ES , I N C
CONFI DENTI AL AND PROPRI ETARY
68
T R AF F I C AN AL Y S T AD M I N I S T R AT I V E G UI D E
To have the client connect directly to the server, turn off the network broadcast and specify
a database server host name or IP Address. In the example below, a database server host
name is supplied:
In the next example, a database server IP Address is supplied:
Click OK to save your selection, and Traffic will attempt the connection. An error will
appear if there is a problem.
These connection options will be stored for the database server name entered on the Log
On screen.
2.7 Exit
This option closes the Traffic Analyst product and shuts off any scheduled activities. After
it is selected, it will take a few moments for all database activity to end.
In general, a Traffic Analyst server should always be kept running. For security purposes,
you may wish to logoff, but the program and its database should be running. Otherwise,
clients will not be able to log onto the database and scheduled activities will not occur.
JUNE 2011
I M P AC T T E CH N O L OG I ES , I N C
CONFI DENTI AL AND PROPRI ETARY
69
T R AF F I C AN AL Y S T AD M I N I S T R AT I V E G UI D E
2.8 What’s Next…
There are a variety of tools and reports available, and special features like alarms and
pools. These are briefly described in the next section, Using Traffic Analyst and in the
help system within the product.
Training and support are also available from Impact Technologies.
JUNE 2011
I M P AC T T E CH N O L OG I ES , I N C
CONFI DENTI AL AND PROPRI ETARY
70
T R AF F I C AN AL Y S T AD M I N I S T R AT I V E G UI D E
3 Using Traffic Analyst
Before proceeding into this section, it is best if you have successfully polled data from at
least one switch. By having data in the screens to look at, it is easier to understand their
functionality.
3.1 System Menu
The System Menu contains those options that define system wide settings. In a clientserver environment, these options only apply to the server.
The options E-mail Settings, License, and Backup, which came up automatically at the
initial startup have already been discussed. Please refer to those sections to make
changes to those settings.
JUNE 2011
I M P AC T T E CH N O L OG I ES , I N C
CONFI DENTI AL AND PROPRI ETARY
71
T R AF F I C AN AL Y S T AD M I N I S T R AT I V E G UI D E
3.1.1
Users
This option defines users (and their passwords) who can access Traffic Analyst.
There are two applications within Traffic Analyst.
There is the Windows-based admin portion that has been documented in this book up to
this point, and there’s the web-based portion of Traffic Analyst that lets users create
reports within their web browsers.
Users can belong to a group which defines their level of privileges within Traffic Analyst.
The groups are:
•
System Administration allows a user complete permission to perform any
Traffic Analyst action in the Windows-based admin portion of Traffic Analyst (not
the web-based side). The default user and password has System Administration
access.
•
Standard User allows all access except to user information and switch
properties.
•
Reports only, can only view reports.
Web Account Admin allows a user permission to perform any Traffic Analyst action within
their assigned Account.
The Access Control section is where User IDs are assigned permissions to features and
switches.
Users can also be notified via Pager and/or E-mail when selected alarms occur.
JUNE 2011
I M P AC T T E CH N O L OG I ES , I N C
CONFI DENTI AL AND PROPRI ETARY
72
T R AF F I C AN AL Y S T AD M I N I S T R AT I V E G UI D E
Enter the Pager and E-mail information, and in the Alarms screen identify those alarms
that should be sent to this user. Note that the e-mail definition within the pager grouping is
for pagers that have e-mail capability. The e-mail address outside of the pager grouping is
for a standard e-mail notification to a user's e-mail address.
Paging should only be enabled pages can be accepted at any time, including night or early
mornings when Traffic Analyst could be polling and storing data. E-mail notification is
useful at any time.
3.1.2
User Accounts
This option defines accounts and allows Web Admin users to be set up for new accounts.
Accounts have assigned switches and features that can be accessed by a particular user.
In other words, they designate what user can view what switches and features. When a
switch is assigned to an account, that account name will appear in brackets to the right of
the switch name in Traffic Analyst.
Enter the Max Switches and Max Users to designate the maximum amount of switches
and users that can be assigned to the account.
Choose the Feature Access and Switch Access buttons to set which switches and
features are viewable in this account. Your options are determined by the Traffic Analyst
modules you have purchased. These modules can include Network, CDR, Console, and
OnTraQ.
JUNE 2011
I M P AC T T E CH N O L OG I ES , I N C
CONFI DENTI AL AND PROPRI ETARY
73
T R AF F I C AN AL Y S T AD M I N I S T R AT I V E G UI D E
3.1.3
Ports
Serial ports need to be setup on the Traffic Analyst server's PC so that Traffic Analyst can
communicate with the switches. This step can be skipped if all of your switches will be
communicating via TCP/IP (Hicom 300 v. 6.6, HiPath 3000, HiPath 4000, OpenScape
Voice, Cisco & Nortel switches only).
Go to the System Menu and select the Ports option. The following window displays:
To define a serial port, do the following:
Select Add.
In the dialog window that pops up, enter a Name and Number of the port (e.g. COM1 is
the name, and 1 is the number). Select OK.
Enter the Interface – Direct RS232, Modem or DCM/DCI. (DCM/DCI is only available in
Siemens environments).
Provide a Maximum Baudrate for the port. This can be greater than, but not less than, the
switch baud rate.
Select Apply if other ports need to be defined or OK to accept your changes and close the
Ports window. We recommend that ports defined here should only be used for Traffic
Analyst.
3.1.4
Modem Pools
Modem pools are optional, and they are only recommended if more than one modem is
used and is polling many switches. A modem pool optimizes the use of the modems
available for polling, so that the first available modem in the pool can perform the next poll.
Go to the System Menu and select Modem Pools. The following window displays:
JUNE 2011
I M P AC T T E CH N O L OG I ES , I N C
CONFI DENTI AL AND PROPRI ETARY
74
T R AF F I C AN AL Y S T AD M I N I S T R AT I V E G UI D E
Select Add in Modem Pools to create a new modem pool. Then select ports from the
Available Ports list on the right. Select Add button between the Current Modem Pool
and Available Ports list to add them to the modem pool. Select OK.
3.1.5
Default CDR Call Cost
Default CDR Call Costs are optional, and are used to define the default cost data that will
be assigned to a Siemens Hicom 300, HiPath 3000, HiPath 4000, or OpenScape Voice,
Avaya, Nortel or Cisco switches only, if the CDR ability is licensed.
Go to the System Menu and select the Default CDR Call Costs option. The following
window displays:
JUNE 2011
I M P AC T T E CH N O L OG I ES , I N C
CONFI DENTI AL AND PROPRI ETARY
75
T R AF F I C AN AL Y S T AD M I N I S T R AT I V E G UI D E
Define the Prefixes associated with the Call Type listed. If more than one prefix is
associated with a type of call, enter all prefixes separated with a comma. (You can assign
prefixes for local and network calls to handle cases where the number called is passed to
another switch or IPDA to make a specific call a local call instead of long distance.
Defining prefixes allows you to treat these as exceptions to the long distance rules.)
Define a Cost in cents per minute for each type of call. You will define a cost for the initial
minute of the call, and for additional minutes of the call. This gives you flexibility of
assigning a flat cost to calls by charging for the initial minute and then not charging for
additional minutes. If a dialed number matches the prefix defined, then the calls cost is
calculated using the duration of the call (minutes), minus the initial minute, multiplied by
the cost plus the cost of the initial minute. Outgoing calls are always rounded up, too, so
calls less than a minute will be charged for the entire minute. You can use decimals to
enter the cost per minutes.
Define the billing increments that will be used to determine the increments used for billing
purposes. The default is 60 seconds. If you entered six seconds, for example, then a call
that lasted nine seconds would be billed for two increments.
If a call is an outgoing call and does not match the prefix for 800, 900, Long Distance, or
International types of calls then the call is considered a Local call.
Use Defaults will allow the values to revert to the Default CDR Call Costs. Edit Defaults
will allow the editing of the default values.
Also, the gray box to the right with the three dots allows you to access a popup window for
convenient editing of the prefixes, though you can always type prefixes directly into the
prefix display field.
3.1.6
Reindex
The Reindex form defines when the database will be reindexed or cleaned up, which
speeds up database operations.
Select a Reindex At time at which re-indexing will occur every night. Since re-indexing
slows down the database while it is performed, it is best to schedule the activity for when
the system is not busy. In many cases, a good time is late night. Select Reindex Now to
perform this operation immediately. Note that doing this does not save any changes made
to the form.
JUNE 2011
I M P AC T T E CH N O L OG I ES , I N C
CONFI DENTI AL AND PROPRI ETARY
76
T R AF F I C AN AL Y S T AD M I N I S T R AT I V E G UI D E
3.2 Tools Menu
This menu contains all of the options used to analyze data.
It is here that you can see the results of your continuous or periodic studies and perform
what-if analysis, as well as look at capacity and trending graphs. There is even an
engineering calculator available.
3.2.1
Busy Hour Capacity - Analyze Tab
The first option brings up the results of traffic studies in the Analyze tab. As Traffic Analyst
polls and stores data, it reanalyzes its current engineering intervals. When you select this
option, you are pulling up the results of that analysis. So it is very quick to see the busiest
hour of traffic for each trunk group, or indeed, the busiest 10 hours, or the average busy
hour, etc.
Examine the screen. Notice that in addition to viewing the results for trunk groups, you can
view the results for console groups (provided data was available) and for pools.
JUNE 2011
I M P AC T T E CH N O L OG I ES , I N C
CONFI DENTI AL AND PROPRI ETARY
77
T R AF F I C AN AL Y S T AD M I N I S T R AT I V E G UI D E
You can also select the group of interest. All of the trunk groups on your switch should be
listed here, providing you have polled successfully. As soon as you select one, its default
study results are brought to the screen.
Experiment a bit with the settings in front of you. For example, select different engineering
intervals, models, etc. and click Analyze to bring up that set of results. Use what's this
help for information on the remaining fields on this screen.
3.2.1.1 What If
The What If button leads to this window where you can temporarily edit actual engineering
interval results, so you can make projections based on the modified data.
Select the Scope of the what-if projection. This can be as small as an hour and as large as
an entire study. Click on the data item you want to edit directly in the grid. You can change
the highlighted item directly, or you can also use mathematical operations to change the
value (these operations are described in detail in the what's this help).
You can also directly enter a value for blocked calls.
When you click on OK, you will return to the Group Analyze screen and see new data
displayed on the window. You can then Reset to the original data set, save the What-If as
a new projection, or return to the What-if screen for additional changes.
3.2.1.2 Save Projection Window
The Save button on the Analyze tab lets you save the snapshot of the results on screen,
including any what-if changes you have made.
JUNE 2011
I M P AC T T E CH N O L OG I ES , I N C
CONFI DENTI AL AND PROPRI ETARY
78
T R AF F I C AN AL Y S T AD M I N I S T R AT I V E G UI D E
This is also useful when operating in continuous mode, because you can save projection
studies used as the basis for provisioning without worrying they will eventually "roll out" of
the database with the passage of time.
Use the Load button on the Analyze tab to re-load the saved projections.
3.2.2
Busy Hour Capacity - Graph Tab
Click on the Graph tab, and you see the results as selected on the Analyze tab in graph
form. The graph compares the data for the engineering interval to any hour you have
stored in the database. To change the engineering interval in the graph, select another
one on the Analyze tab and return to the graph.
Note that you can change the appearance of the graph by playing around with the graph
button bar options (above the graph). When you exit this window the graph will return to its
original format.
JUNE 2011
I M P AC T T E CH N O L OG I ES , I N C
CONFI DENTI AL AND PROPRI ETARY
79
T R AF F I C AN AL Y S T AD M I N I S T R AT I V E G UI D E
3.2.3
Busy Hour Capacity - Variations Tab
The Busy Hour Capacity - Variations tab shows the relationship between grade of service
and number of trunks or consoles. The results are based on the engineering interval
selected in the Analyze tab.
You can start with the proposed number of trunks and consoles and see how increasing or
decreasing this number changes grade of service, or you can start with a grade of service
target and see how increasing the number of trunks or consoles improves this value.
You can change the look of the graph by playing around with the graph button bar options.
However, when you exit this window the graph will return to its original default format.
JUNE 2011
I M P AC T T E CH N O L OG I ES , I N C
CONFI DENTI AL AND PROPRI ETARY
80
T R AF F I C AN AL Y S T AD M I N I S T R AT I V E G UI D E
3.2.4
Advanced Capacity Analysis
Next, drop down the Tool menu and select the Advanced Capacity Analysis option.
The Advanced Capacity Analysis window is an innovation in traffic engineering. Rather
than relying on a single data interval as the basis for provisioning, you can instantly see
the effect of different numbers of trunks on calls blocked over a significant time span. (Or,
in the case of attendant consoles, the effect of different numbers of consoles on calls
delayed.)
Use the what's this help for information on any item on this screen.
You can also perform "What If" analysis by clicking on the What If button. The What If
Advanced Capacity Analysis window will display and you can adjust the calls and average
call length (ACL) data to see how your blocked calls will be affected.
JUNE 2011
I M P AC T T E CH N O L OG I ES , I N C
CONFI DENTI AL AND PROPRI ETARY
81
T R AF F I C AN AL Y S T AD M I N I S T R AT I V E G UI D E
After you make your What-If change, click OK and it will be reflected in the Capacity graph.
3.2.5
Trend Analysis
The Trend Analysis option lets you look at how trunk and attendant console usage has
risen or fallen over time (so initially, there may not be much data to graph).
You select the type of group to view and the specific group to graph.
You select a scope of monthly, weekly, or daily usage and then select what is to be viewed
in the graph. Generally, this is the total usage for all days or all business days. For the
daily scope, you can also graph just a specific day of week, such as Monday, to see how
the Monday usage volume has changed over time. Enter the date range to be included in
the graph.
Use the graph button bar to change the format of the graph. When you exit this window the
graph will default back to its original format, however.
3.2.6
Engineering Calculator
This calculator is a utility for performing engineering model calculations. This calculator
does not use data taken from the Traffic Analyst database.
JUNE 2011
I M P AC T T E CH N O L OG I ES , I N C
CONFI DENTI AL AND PROPRI ETARY
82
T R AF F I C AN AL Y S T AD M I N I S T R AT I V E G UI D E
Select the Engineering Model you want to use in the calculations. Note that some of the
fields are not active based on the engineering model or calculation option selected.
Use the Calculation Option radio buttons to select the type of answer you want to
calculate. Servers, in this case, is a generic term referring to either trunks of attendant
consoles.
Enter values into the Input Data fields except for the field that corresponds to the
Calculation Option radio button you selected. Then click on Calculate to derive an answer.
The answer will display in the Result field. You can change the numbers around to see
different results.
3.3 Reports Menu
This menu contains all of the options used to create and manage reports.
It is here that you can create, change, delete, run, schedule, and copy reports. You can
also produce report packs and change report file names.
JUNE 2011
I M P AC T T E CH N O L OG I ES , I N C
CONFI DENTI AL AND PROPRI ETARY
83
T R AF F I C AN AL Y S T AD M I N I S T R AT I V E G UI D E
3.3.1
Network and System Reports
The report selector window lets you generate and schedule reports.
You select the scope, which narrows the selection of reports based on time scope or
subject matter.
Once the scope is selected, pick the group(s) and report(s) to be generated. Depending on
these selections, you select the study or time range to be included in the report. You can
see examples and descriptions of from the Impact Technologies web page at
http://www.impacttech.com/index.php you can login Username Impact password Customer
Please note that you are limited to a selection of 250 trunk groups per report.
Reports can be output to the screen (display), printer, file, or one or more e-mail
addresses. If you choose to save the report to a file, you have a number of file formats you
can save the data in. This will allow you to import the report data into other applications,
such as a spreadsheet, or onto a web page.
If you choose e-mail, you select the file formats and enter the e-mail addresses to receive
the report. Separate e-mail addresses with a semi-colon (;). For information on changing
the E-mail Signature, please see section 3.3.3.
To generate the report immediately, click Run Now. Use the Schedule buttons to
generate the report on a recurring basis.
Note: Report Packs provide a way of grouping reports for common output, even reports of
different scopes. Once defined, report packs are available within this Reports screen via
the "Report Packs" scope selection.
JUNE 2011
I M P AC T T E CH N O L OG I ES , I N C
CONFI DENTI AL AND PROPRI ETARY
84
T R AF F I C AN AL Y S T AD M I N I S T R AT I V E G UI D E
3.3.2
Call Detail Reports
The Reports window lets you generate and schedule Call Detail reports. The fields on this
window are filtering or sorting options to customize the data that appears in the report.
You may select how you would like the report assembled in the Group By field. You then
select the Sort By method and whether you would like the sorting to be Ascending or
Descending.
If Grouping by Trunk Group, pick the Trunk Group(s) to be included in the report. All
groups will appear if none are selected. If Grouping by Account, pick the Account(s) to be
included in the report. All accounts will appear if none are selected.
You can choose to have individual extensions or extension ranges (ex. 1400-1499)
included in the report. All extensions will appear if none are added.
Miscellaneous Options include Show Daily Totals and Show Summary Totals in the report,
as well as Include calls with zero cost.
You can select only one type of call, such as 800 calls, to be included in the report or
choose the <Display All> option for all Types of Calls.
You can also enter an External Number to be included in the report. All external numbers
will appear if this field is left blank.
Select the date and time range to be included in the report.
Reports can be output to the screen (display), printer, file, or one or more e-mail
addresses. If you choose to save the report to a file, you have a number of file formats you
can save the data in. This will allow you to import the report data into other applications,
such as a spreadsheet, or onto a web page.
JUNE 2011
I M P AC T T E CH N O L OG I ES , I N C
CONFI DENTI AL AND PROPRI ETARY
85
T R AF F I C AN AL Y S T AD M I N I S T R AT I V E G UI D E
If you choose e-mail, you select the file formats and enter the e-mail addresses to receive
the report. Separate e-mail addresses with a semi-colon (;). For information on changing
the E-mail Signature, please see section 3.3.3.
To generate the report immediately, click Run Now. Use the Schedule button to generate
the report on a recurring.
3.3.3
E-mail Signature
The E-mail Signature option appears in both the Call Detail and Network & System reports
windows. Selecting this button allows you to customize the subject line and signature for emailing reports. This is the only place where these settings can be edited. Once the
changes are accepted by selecting OK, these settings apply to all e-mailed reports.
3.3.4
Run Now
The Run Now option allows you to produce "right now" the reports you select from the
Reports Schedule tab. The scheduled reports will still be produced as scheduled.
3.3.5
Schedule
The Schedule option lets you schedule your report activity. You select the report or group
of reports from the Reports Schedule tab, and then select the Schedule option. Choose
the time of day you want the report to be produced.
JUNE 2011
I M P AC T T E CH N O L OG I ES , I N C
CONFI DENTI AL AND PROPRI ETARY
86
T R AF F I C AN AL Y S T AD M I N I S T R AT I V E G UI D E
You can schedule the report to occur on a specific date or dates or on one or more
weekdays. You can also designate the month or months. For example, you can schedule
the report for Tuesdays and Fridays in the months of January and April. Or you can
schedule the activity for a specific day.
Note that the Report Schedule tab on the main window shows any reports that have been
created. See example below.
You can sort the list by clicking on the various column headings and then sort in either
ascending or descending order based on the column information.
If you double click on any report, the Reports Menu pops up to allow you to edit the report
options. If you select a report or group of reports you can choose any of the options on the
report menu. The same options are available by selecting the report(s) and doing a right
mouse click.
JUNE 2011
I M P AC T T E CH N O L OG I ES , I N C
CONFI DENTI AL AND PROPRI ETARY
87
T R AF F I C AN AL Y S T AD M I N I S T R AT I V E G UI D E
3.3.6
Report Packs
Report Packs provide a way of bundling a group of reports to be automatically generated
at the same time.
For switches polled in periodic mode, they can be generated automatically at the end of a
study. They are assigned to switches in the Polling Tab of the Switch Properties screen.
Otherwise, report packs can be selected inside of the Reports option.
In the Report Packs screen, you identify report packs by name, and you select the reports
to be included in the pack.
If you are responsible for different types of switches, you may need to select the proper
switch series to find the right report(s) to put in the pack.
3.3.7
Report File Naming
The Report File Naming option provides a way for renaming reports when they are output
to files. In other words, you do not have to use Impact's default names. You can define
your own.
JUNE 2011
I M P AC T T E CH N O L OG I ES , I N C
CONFI DENTI AL AND PROPRI ETARY
88
T R AF F I C AN AL Y S T AD M I N I S T R AT I V E G UI D E
This screen sets up an overall filename format. This format will be used whenever a report
is output to file. Build a filename format by using the codes available through the Insert
Code button. These codes represent variables that are replaced with information when a
report is output. The codes available are:
•
<RN> Report Name: defined in the table at the bottom of this screen
•
<SN> Switch Name: defined in the Properties - Definition screen
•
<###> Switch Identifier: the three character switch ID defined in the Properties Definition screen
•
<MM> Current Month
•
<DD> Current Date
•
<YY> Current Year
Note that the order in which you select codes or enter text determines how the filename
looks. An example is shown and updated as you make changes to the filename field.
The grid at the bottom of this screen lets you rename the Traffic Analyst reports. Click on
any report in the list and then double click in the Report Output Name column. The name
is highlighted, and you can type in a replacement name. If you make a mistake, use the
Set to Default button to undo a specific report name. Use the Restore All Defaults button
only if you want to revert to Impact's name for all reports.
The first column on the grid, the Type Specific column, indicates if the report is specific
for a switch type. If it is enabled, it is specific by switch type. In other words, if it is specific
for a switch type and you change it, the change is only applied to that switch type. Other
switch types with the same report name are not updated.
But, if the column is not enabled, it applies to all switch types. If you change this report
name, any other reports with the same report name will be changed.
JUNE 2011
I M P AC T T E CH N O L OG I ES , I N C
CONFI DENTI AL AND PROPRI ETARY
89
T R AF F I C AN AL Y S T AD M I N I S T R AT I V E G UI D E
There are a lot of reports in Traffic Analyst, so finding the right report to name is half the
battle. The Switch Type and Show Only fields just above the grid can help you narrow
the list.
3.3.8
Copy To
The Copy To function provides a way to copy a report already created on one switch to
another switch or switches.
First select a report or a group of reports from the Report Schedule tab. Then go to the
Copy To function from the Reports menu. Select the switch or switches you wish to copy
to in the Target Switch section. Use the Copy button to copy the report(s). You may
deselect a report in the Reports section by clicking on it prior to using the Copy button.
Once using the copy button you will be prompted for a Report Activity Name for each
report being copied. The name will default to the name of the report being copied. You
may keep the default name or change it. If you choose Cancel on the Report Activity
Name window, it will cancel the copying of that report.
As each report is copied, a status line will appear in the Copy Status section. This status
will state 'Copied' if the copy was successful. If the copy was unsuccessful a reason or an
error will appear. Use the Clear button to remove all entries in the Copy Status section.
Use the OK button to exit the window and accept any changes. Use the Cancel button to
exit and cancel any copied reports.
JUNE 2011
I M P AC T T E CH N O L OG I ES , I N C
CONFI DENTI AL AND PROPRI ETARY
90
T R AF F I C AN AL Y S T AD M I N I S T R AT I V E G UI D E
3.4 File Menu
Now, let’s return to the File Menu and wrap up those options that we have not yet touched
on.
JUNE 2011
I M P AC T T E CH N O L OG I ES , I N C
CONFI DENTI AL AND PROPRI ETARY
91
T R AF F I C AN AL Y S T AD M I N I S T R AT I V E G UI D E
3.4.1
Groups
The Groups screen lets you view the current trunk groups and consoles for the selected
switch. You can add a description (up to 60 characters) for the group. The description
shows on some reports.
Notice the Display column (the leftmost column in the grid). The checkbox here gives you
a way of removing groups that you are not interested in from Traffic Analyst reports and
screens. If you disable the selection, data is still collected for the group, but the group will
not appear to be available in the Tools menu options. If you enable this box, the group is
available in all options throughout Traffic Analyst.
The Group Type column lists whether the group is a console or trunk group.
Most switch types have a group name which is imported from the switch and displayed in
the Group Name column. For OpenScape Voice and Cisco, the host name or IP address
is the default group name, but this can be edited in the Group tab of the switch Properties
screen. For the HiPath 3000, the user picks the group names during configuration.
The Group Number is a unique ID that some switches use to identify each trunk group.
VoIP switches, like the OpenScape Voice, do not have a group number, but they do have
a host name or IP address, which is the default for the Group Name field. No group IDs
(number, host name or IP address) can be downloaded from the HiPath 3000.
The Description field allows you to add a description for the group that appears on some
reports.
To delete a group, select its row and click the Delete button. After confirmation, the group
and its historical data will be removed from the database. Be aware, if a group is deleted
that still exists on the switch, it will be re-added with the next successful poll, although its
historical data will remain lost. The exception here is a Siemens HiPath 3000 switch. In
this case the groups are NOT re-added. You must re-add the groups in the Groups tab of
the switch.
JUNE 2011
I M P AC T T E CH N O L OG I ES , I N C
CONFI DENTI AL AND PROPRI ETARY
92
T R AF F I C AN AL Y S T AD M I N I S T R AT I V E G UI D E
3.4.2
Pools
A pool combines the results of multiple trunk groups and presents those results as if they
were one functional group. A pool can include trunk groups from more than one switch.
Note that for the HiPath 4000 switch, each route that has a unique set of trunks will have a
trunk group pool created for it by Traffic Analyst.
Pools are extremely useful for evaluating all trunks busy and blockage across trunk groups
that overflow into one another. They are useful for identifying consolidation opportunities.
All Tools menu report and analysis options can be applied to pools.
You do not have to use pools. They have been provided as an optional way of looking at
and manipulating the data collected from your switch groups. For example, if you have 3
trunk groups servicing your sales force you could create a "Sales" pool and combine the
results from these trunk groups.
The pools option lets you define pools - their names, descriptions and trunk group
members. This opening screen (above) shows those pools already defined. When you
click the Add or Edit buttons, the Pools Properties screen appears. If you click delete, the
pool and all of its data will be deleted from the database, but you must first confirm the
action.
3.4.2.1 Pool Properties
When you create a pool, you supply its name, a descriptive comment and you pick the
groups from any switches whose results will become part of the pool's overall results.
JUNE 2011
I M P AC T T E CH N O L OG I ES , I N C
CONFI DENTI AL AND PROPRI ETARY
93
T R AF F I C AN AL Y S T AD M I N I S T R AT I V E G UI D E
The field, "Inherit Study Properties From Switch" identifies a switch to act as the "parent" of
the pool. The pool will inherit its default analysis properties from the defaults for this
switch's default trunk groups. Also, when a switch selection is required before a trunk
group or pool can be selected, you select this parent switch and the pool will be available
for analysis.
3.4.3
Traffic / System Alarms
The main Alarms screen is used to Edit and Enable Traffic Alarms.
JUNE 2011
I M P AC T T E CH N O L OG I ES , I N C
CONFI DENTI AL AND PROPRI ETARY
94
T R AF F I C AN AL Y S T AD M I N I S T R AT I V E G UI D E
To Enable a Traffic / System alarm highlight the Alarm name and click on the Enable
button. Click on the check box to Enable and then click on OK
To Edit the alarm this will allow you to select the user(s) to notify via email if the alarm is
true.
3.4.3.1 Alarm Definition
The Alarm Definition screen is dynamic and the fields displayed change based on the
Alarm Type selected. In this screen, you define the alarm conditions (thresholds) and
specify the users to be notified if the alarm occurs
To define an alarm, follow these steps:
Select the Alarm Type
Select an Account associated with this alarm. The Account designates which alarms and
which switches each user has access to.
Enter the alarm threshold. This is the condition that triggers the alarm.
JUNE 2011
I M P AC T T E CH N O L OG I ES , I N C
CONFI DENTI AL AND PROPRI ETARY
95
T R AF F I C AN AL Y S T AD M I N I S T R AT I V E G UI D E
If desired, select users to be notified via e-mail
These are the different Alarm Types:
3.4.4
•
License near Capacity – triggered license usage is greater than or equal to
‘X’. Recommend to enter 10%. This means you are getting close and
should consider purchasing more licenses.
•
License Over Capacity – triggered license usage is has been exceeded.
You need to purchase more license as soon as possible as data storage has
stopped.
•
Failed to Validate Database – triggered when the validate of database
during a backup has failed. Should contact Impact Technologies to look at
database.
•
Failed Backup – triggered when the backup failed to write backup file to the
selected directory. Check that access to this directory is available still.
•
Disk Free Space – triggered if free disk space falls below the set amount.
Recommend 100 MB
Switch Alarms
The main Alarms screen is used to create or edit alarms, then enable them by assigning
them to switches, trunk groups and pools.
To create or edit alarms, click the Add, Edit or Copy buttons. The Alarm Definition screen
will appear where you can select an alarm type, customize its name and threshold
conditions, and identify users to be notified if the alarm occurs.
To activate alarms, click on the Enable button. This will bring up the Enable Alarm screen,
where you assign the alarms to switches, trunk groups or pools.
JUNE 2011
I M P AC T T E CH N O L OG I ES , I N C
CONFI DENTI AL AND PROPRI ETARY
96
T R AF F I C AN AL Y S T AD M I N I S T R AT I V E G UI D E
By default, the Alarms screen shows all alarms that are defined. Use the Switch selection
to filter the alarms so that only those alarms that are not enabled and those that are
enabled for a specific switch appear in the grid.
3.4.4.1 Alarm Definition
The Alarm Definition screen is dynamic and the fields displayed change based on the
Alarm Type selected. In this screen, you define the alarm conditions (thresholds) and
specify the users to be notified if the alarm occurs.
JUNE 2011
I M P AC T T E CH N O L OG I ES , I N C
CONFI DENTI AL AND PROPRI ETARY
97
T R AF F I C AN AL Y S T AD M I N I S T R AT I V E G UI D E
To define an alarm, follow these steps:
Select the Alarm Type from the drop-down list.
Enter a Display Name for this alarm. This is the name that will display when this alarm
occurs. It is also used when enabling the alarm.
Select a severity level to display when the alarm condition occurs.
Select an Account associated with this alarm. The Account designates which alarms and
which switches each user has access to.
If applicable, enter the alarm threshold. This is the condition that triggers the alarm.
If applicable, enter a time range over which this alarm is active.
If desired, select users to be notified via e-mail or pager when this alarm occurs. Be
careful with paging. In many instances, especially with Siemens 9006 alarms, the alarms
are generated after early morning polling (midnight to 5 a.m.). So specify paging only if
users can accept early morning pages. If you choose to be notified by pager, a pager code
will be sent to the pager to identify the alarm. See the below alarm types for specific pager
codes.
JUNE 2011
I M P AC T T E CH N O L OG I ES , I N C
CONFI DENTI AL AND PROPRI ETARY
98
T R AF F I C AN AL Y S T AD M I N I S T R AT I V E G UI D E
Note that you can define multiple alarms from the same type, each with different threshold
conditions.
This screen lets you define multiple alarms, one after the other, and all are saved with the
final OK button or canceled with the final Cancel button.
These are the different Alarm Types:
JUNE 2011
•
All Trunks Busy – triggered if all the trunks in the group are busy for X
number of minutes (seconds or hours). The pager code is 33.
•
Could Not Store Data – triggered if Traffic Analyst cannot store the data it
polls. The pager code is 99.
•
Erratic Trunk Peg Count – (Siemens 9006 and HiPath 3000 only) triggered
if a trunk's peg count differs by X% from the group mean over a specified
time range. The pager code is 33.
•
Erratic Trunk Usage – (Siemens 9006 and HiPath 3000 only) triggered if a
trunk's usage differs by X% from the group mean over a specified time
range. The pager code is 33.
•
Failed to Poll Switch – triggered if Traffic Analyst cannot successfully poll a
switch as scheduled. The pager code is 77.
•
No Data Collected – triggered if Traffic Analyst cannot successfully find data
for a switch. The pager code is 88.
•
No Seizures for Trunk – (Siemens 9006 and HiPath 3000 only) triggered
when any one trunk in a group experiences no seizures and another trunk in
the same group has more than two seizures during the same interval. This
alarm is intended to find broken trunks as opposed to idle trunks. The pager
code is 33.
•
No Seizures for Trunk Group – triggered if an entire trunk group
experiences no trunk seizures during an interval within a specified time
range. The pager code is 33.
•
OnTraQ Server Not Responding – (Siemens HiPath 4000 only, OnTraQ
module only) Traffic Analyst is unable to send updates to a defined OnTraQ
server during end of day processing. The alarm message will have the Traffic
Analyst server name in it. Typically this alarm indicates that the OnTraQ
server named isn’t running or that there are network problems. The pager
code is 55.
•
Outbound Off Hour Usage – triggered if outbound off hour usage reaches X
hours (minutes or seconds) over a specified time range. The pager code is
33.
•
Over Utilized Hour - triggered if an interval rises above X% of its utilization.
The utilization is calculated by the usage per interval divided by the capacity.
If collection is daily, interval will be hourly. The pager code is 33.
I M P AC T T E CH N O L OG I ES , I N C
CONFI DENTI AL AND PROPRI ETARY
99
T R AF F I C AN AL Y S T AD M I N I S T R AT I V E G UI D E
•
Over Utilized Peak Hour – triggered if the busy hour ordinal 1 for the day
reaches X% of its utilization. The utilization is calculated by the peak usage
divided by the capacity. The pager code is 33.
•
Seizure Too Long – (Siemens 9006 and HiPath 3000 only) triggered if any
trunk in the trunk group experiences a seizure equal to X hours (seconds or
minutes). The pager code is 33.
•
Too Many Trunks – triggered if the interval falls below X% of its utilization.
The utilization is calculated by the usage divided by the capacity during a
specified time range. If collection is daily, interval will be hourly. The pager
code is 33.
•
Trunks Not In-Service – (Siemens 9006 and Avaya only) triggered if data
from the switch shows a trunk is defined but not activated. The pager code is
33.
•
Unassigned Trunk – (Siemens HiPath 3000 only) triggered if a call is shown
on a particular trunk that wasn't defined in the Groups tab of that switch in
Traffic Analyst. Since the trunk wasn't defined the call will show in an
Unassigned Trunk. The pager code is 33.
•
Under Utilized Peak Hour – triggered if the busy hour ordinal 1 for the day
falls below X% of its utilization. The utilization is calculated by the usage
divided by the capacity. The pager code is 33.
3.4.4.2 Enable Alarm
In addition to creating alarms, many must be enabled for specific trunk groups.
The Enable Alarm screen is accessed from the Alarms option. You activate alarms by
turning them on for selected switches, trunk groups and/or pools.
Start by selecting the name of an alarm. Then use the list boxes to assign the alarm to
switches, trunk groups or pools. The alarm is enabled for those groups you move to the
right list box.
JUNE 2011
I M P AC T T E CH N O L OG I ES , I N C
CONFI DENTI AL AND PROPRI ETARY
100
T R AF F I C AN AL Y S T AD M I N I S T R AT I V E G UI D E
Use the Show Only field to filter the switches that are displayed in the list boxes. This
makes it easier to enable alarms that are targeted for a specific switch.
You can enable multiple alarms, one right after the other, and then save all of your
changes by clicking OK (or cancel them all by clicking Cancel).
3.4.4.3 Alarms Tab on Main Window
The Alarms tab on the main window shows any alarms that have been generated.
JUNE 2011
I M P AC T T E CH N O L OG I ES , I N C
CONFI DENTI AL AND PROPRI ETARY
101
T R AF F I C AN AL Y S T AD M I N I S T R AT I V E G UI D E
You can sort the list by clicking on the various column headings and then sort in either
ascending or descending order based on the column information. To return to the original
display, sort on Date/Time in descending order.
If you double click on any alarm, the alarms screen pops-up to allow you to edit the alarm
definition or the list of switches that the alarm is enabled for.
3.4.5
Special Days
Special Days are holidays or other days that are excluded as Primary Days. Primary Days
are used to select what days are included in study data for busy hour and average busy
hour calculations and for any CCITT busy hour calculations. The data for non Primary
Days (or Special Days) will still be collected and available in daily, weekly and monthly
reports.
When you select the Special Days option this window appears:
The Special Days you specify through the button on the right are copied to any switches
that are checked in this list. This provides a quick way of setting up one Special Day
calendar, and having it apply to all switches.
You can then further customize individual switch holidays via the Properties-Definition tab.
When you click the Special Days button from the screen above, or when you select the
button via the Properties-Definition tab, the following calendar appears so you can define
Special Days:
JUNE 2011
I M P AC T T E CH N O L OG I ES , I N C
CONFI DENTI AL AND PROPRI ETARY
102
T R AF F I C AN AL Y S T AD M I N I S T R AT I V E G UI D E
3.4.6
Data Calendar
This calendar on the File menu displays the types of data stored in the Traffic Analyst
database.
JUNE 2011
I M P AC T T E CH N O L OG I ES , I N C
CONFI DENTI AL AND PROPRI ETARY
103
T R AF F I C AN AL Y S T AD M I N I S T R AT I V E G UI D E
Select a year, and select the group or all groups to view. Use the buttons to display any of
the following data types. If data is available, it is indicated as follows:
•
daily totals are indicated by the change in text color
•
weekly totals are indicated by the change in background color
•
monthly totals are indicated by the highlighting of the month's name
•
interval data is indicated by a raised rather than a recessed cell and a red border
•
study data is indicated by a boldface date number
•
(If licensed for CDR) CDR data is indicated by a strikethrough
3.4.7
Poll Failures
This option provides a quick way to view and reschedule polls that have failed. The first
part of the screen, the Retry Schedule, sets a date and time to retry any failed polls that
are selected.
The Options section allows you to only Store data versus Poll and Store the missing data.
Storing parses and stores the data into the Traffic Analyst database. Also, you may enter
how many calendar days back you want to check for days that are missing data. After
entering the amount of days, then click Retrieve Missing Dates to see the missing days in
the grid.
The grid shows the failed polls. This information includes the switch, the failure days, the
last failure, and the last reason for failure. In this screen, only a brief summary of the
failure is shown. In many cases, a brief summary cannot be detected, so the reason will be
"unknown." Use the Status Log with its Detailed Message Information and Communication
Audit File for more information on failures.
JUNE 2011
I M P AC T T E CH N O L OG I ES , I N C
CONFI DENTI AL AND PROPRI ETARY
104
T R AF F I C AN AL Y S T AD M I N I S T R AT I V E G UI D E
If more than one day failed to poll for a switch, you will only see the reason for the last
failure.
If you do not want the polls rescheduled, then make sure the checkbox for retry is
disabled. Once you click OK, those that are enabled will be scheduled for polling. Click
cancel to exit the screen without rescheduling any polls.
3.5 Right Mouse Menu
If you right-click on a switch, a menu will appear. Most of these are also represented on
the File menu, but some are unique. These are described below.
3.5.1
Delete
Delete is used to delete a switch and all of its data and settings from the Traffic Analyst
database.
Obviously, use great care with this option. Highlight the switch you want to delete, drop
down the right mouse click menu, and then select delete. You must confirm the action
before the switch is deleted.
3.5.2
Deactivate/Activate
This is used when you want to stop scheduled activities from occurring for a specific
switch, but not for all switches. For example, if maintenance activities were being
performed on a switch and you should not poll for a night, the deactivate option could be
used to suspend the polling.
When first selected, the option deactivates any pending schedule activities for a switch. In
other words, it cancels any scheduled activities for a switch until you reactivate them. The
option then acts as a toggle. The next time it is selected for the switch, it will reactivate the
normally scheduled activities.
If a switch is deactivated, its icon in the tree view becomes white.
3.5.3
Expire Switch
This option allows you to remove a deactivated switch from the report choice list. To do so,
simply right-click on the switch in the tree control that you wish to remove and select Expire Switch.
A dialogue box appears, prompting you to confirm this switch’s removal from the report choice list.
Click Yes to accept. A red X appears over the switch’s icon in the tree control.
It is possible to revive the switch if it becomes active again or if it was removed from the report
choice list by mistake. Right-click the switch in the tree control and select Expire Switch. A dialogue
box appears, prompting you to confirm this switch’s revival. Click Yes to accept. The red X
disappears from the switch’s icon in the tree control.
JUNE 2011
I M P AC T T E CH N O L OG I ES , I N C
CONFI DENTI AL AND PROPRI ETARY
105
T R AF F I C AN AL Y S T AD M I N I S T R AT I V E G UI D E
3.5.4
Poll On Demand
This option, discussed earlier, is also available from a button on the Properties Polling Tab
for a switch.
Use this option to poll the switch on demand, outside of the normal polling schedule. The
most common use of this option is to get the data for a date when the scheduled poll
failed. It can also be used when first defining a switch to poll all data currently available.
Select the start and end date for the range of data you want to collect. If polling just one
date, you do not need an end date.
3.5.5
Edit/Create Studies
This option displays individual studies as they exist for switches that are polled
periodically. This option is not applicable to switches that are polled in continuous mode,
since they have one continuous, rolling study.
A study is defined by its name and polling period. It is the range of dates over which hourly
data was polled, stored and analyzed for engineering interval results.
Periodic studies are automatically created and scheduled based on the information in the
switch's Properties-Polling tab. In this screen, you see any such studies that have occurred
for this switch and the next pending study.
You can edit these studies, including their start and end dates, but the dates are subject to
rules:
A start date cannot be changed if the date has already occurred. (Note: If the start date
is changed, then the next automatically scheduled study will be calculated from the new
start date, plus whatever frequency is defined for the switch.)
JUNE 2011
I M P AC T T E CH N O L OG I ES , I N C
CONFI DENTI AL AND PROPRI ETARY
106
T R AF F I C AN AL Y S T AD M I N I S T R AT I V E G UI D E
An end date cannot be changed to a date earlier than one that has already been polled
and stored. But, you can shorten a study length, and you can end a study in progress by
changing its end date to the date that was last successfully polled (usually yesterday's
date).
If you are creating a new study, it cannot overlap the date boundaries of any existing or
pending studies, and it cannot butt up against the end date of an existing study.
You can delete studies and their historical data. Any studies that are created through this
screen are not deleted automatically, and must be deleted using the Delete button here.
3.5.6
Cut and Paste
These options work together. When you cut a selected switch, you can then paste that
switch definition to a new folder in the tree.
Note: If you cut but don't paste, it has no effect on the database. The switch appears
"ghosted" in the menu until you select paste, or until you exit and restart the Traffic Analyst
program.
3.5.7
Copy
The Copy Switch option lets you copy one switch's definition into several new switch
definitions. This can be a great time saver if you know the switches are identical or very
similar in their set up.
To create the new switches click in the first column of the grid and start typing a name for
the switch. If you wish to specify an ID other than the one suggested, tab to that column
and enter a three character ID. Uncheck Yes in the last column if you want polling inactive
for this switch.
JUNE 2011
I M P AC T T E CH N O L OG I ES , I N C
CONFI DENTI AL AND PROPRI ETARY
107
T R AF F I C AN AL Y S T AD M I N I S T R AT I V E G UI D E
You will notice as you begin typing a switch name in the last row a new row will always be
added to the grid. This will allow you to create more switches that are patterned after the
switch you selected for copying. If you wish to delete a row in the grid you can press the
delete key after selecting a cell in the row or you can blank the switch name.
The study start date is copied from the source switch. You should change it to the date on
which you want studies to begin for the new switch, and be careful to select a date with the
proper day of week on which you want to begin studying.
If you do not change the study start date, then Traffic Analyst is forced to use the settings
from the copied switch for study start date and day of week. The first poll may then start
after the study start date, since that copied date may have been in the past or may not
match the day of week setting.
You can enter the phone number for the new switch's modem. And check Yes in the last
column only if you want polling to be active for this switch.
If you need to change anything else in the new switch definition, select the switch and go
to the switch properties window.
3.5.8
Rename
The Rename option lets you rename the selected switch. It works like Windows explorer.
When the option is selected, the switch name becomes highlighted and you can type in a
new one. Press the Esc key to leave the name unchanged.
3.5.9
Refresh All (F5)
This option or pressing the F5 key will force an update/refresh to occur on the main
window and its tabs on the right side of the screen.
3.6 View Menu
The View Menu controls the appearance of Traffic Analyst and provides some filtering
options for the various tabs on the main window.
JUNE 2011
I M P AC T T E CH N O L OG I ES , I N C
CONFI DENTI AL AND PROPRI ETARY
108
T R AF F I C AN AL Y S T AD M I N I S T R AT I V E G UI D E
Filter By Switch and Show Traffic Items are check boxes that are either on or off. The
Filter By Switch check box, when enabled, causes the items listed in the report schedule,
pending schedule, status log, and alarms tab to be filtered so that only those belonging to
the selected switch appear.
The Show Traffic Items check box, if enabled, means that general Traffic Analyst
messages will appear in the Status Log.
The other check box menu items - Toolbar and Status Bar - indicate whether or not you
want those items to appear on the Traffic Analyst main window.
3.6.1
Status Log Filter
The Status Log Filter option leads to a screen where you can filter status messages based
on the type of activity that generated the message, the status of the activity, the severity of
the message, and dates.
3.6.2
Alarms Filter
The Alarms Filter option is similar, leading to a screen where you can filter the alarms on
screen by type, severity, date or date range.
Any changes you make are saved. To disable all filters and show all alarms on screen,
click the Show All button.
JUNE 2011
I M P AC T T E CH N O L OG I ES , I N C
CONFI DENTI AL AND PROPRI ETARY
109
T R AF F I C AN AL Y S T AD M I N I S T R AT I V E G UI D E
3.6.3
Refresh Settings
The Refresh Settings option controls how frequently the main window screens are updated
with new information.
The default setting will refresh the main window screens every 5 seconds. You can adjust
this automatic refresh to any value between 1 and 3600 seconds.
If the refresh action is slowing your computer or you do not want it performed
automatically, set the refresh settings to manual refresh. Then, the window will not
refresh unless you select the Refresh All option from the View Menu or the right mouse
click menu (or press the F5 key).
3.6.4
Refresh All
Refresh All is the same option as on the right mouse menu. It refreshes all data in the
main window screens.
JUNE 2011
I M P AC T T E CH N O L OG I ES , I N C
CONFI DENTI AL AND PROPRI ETARY
110
T R AF F I C AN AL Y S T AD M I N I S T R AT I V E G UI D E
3.7 Multiple Switch Operations
The only option we have not discussed is the Switches tab on the main window. This
screen exists so that you can perform multiple switch operations.
For example, if you want to change the Special Days for all switches, you could select
them all on this tab, bring up the File menu Special Days option and make the change. It
would apply to all selected switches.
Not all menu options are available when multiple switches are selected. You can change
certain switch Properties and request Reports.
3.8 Traffic Analyst Reports via a Browser
Traffic Analyst reports allow any user with the Internet Explorer web browser and webbased access to the Traffic Analyst server to create reports. Typically, this means users on
the corporate network will be able to use Traffic Analyst reports.
The reports come with predefined default reports, but you can also create and save your
own unique reports.
You can display, print, e-mail, and export reports to csv formats (Microsoft Excel uses csv,
for example).
Note that these reports are only available for the web-enabled version of Traffic Analyst.
For more information, see The Traffic Analyst User Guide on the following pages.
JUNE 2011
I M P AC T T E CH N O L OG I ES , I N C
CONFI DENTI AL AND PROPRI ETARY
111
T R AF F I C AN AL Y S T AD M I N I S T R AT I V E G UI D E
User Guide
Version 5.X
Copyright © 1997-2011 by Impact Technologies, Inc. All rights reserved.
JUNE 2011
I M P AC T T E CH N O L OG I ES , I N C
CONFI DENTI AL AND PROPRI ETARY
112
T R AF F I C AN AL Y S T U S E R G UI D E
4 Using Traffic Analyst
Traffic Analyst reports allow any user with Internet Explorer and access to the Traffic
Analyst server to create reports.
You can display, print, e-mail reports, and export reports to Microsoft Excel format. Note
that you need to have e-mail enabled within Traffic Analyst to e-mail. For more on enabling
e-mail, see The Traffic Analyst Administrative Guide.
4.1 Access to Reports
The URL to access Traffic Analyst’s reports via your web browser is
http://(IP address of server)/trafficweb
For example, if the IP address of your Traffic Analyst server is 100.1.2.3, the URL you
would use in your browser would be as follows:
http://100.1.2.3/trafficweb
You can also try appending :8080 after the IP address.
Once you bring up the interface for the Traffic Analyst reports, you need to log in. Use the
default username and password (traffic / impact) and then create user logins by going to
the Admin-> Users option in the interface.
Note: The Export button (available on many reports) can cause some versions of Excel to
fail. This can occur when you select the Open option on the download dialog. This is a
known bug in Windows/Excel. The workaround is to Save rather than Open from the
download dialog. Once saved, you can open the saved file in Excel.
4.2 Traffic Analyst Users
There are two types of Traffic Analyst users:
•
Standard
•
Administrative
Standard users can view and edit reports and create report templates for their own use.
Standard users can also change their passwords.
Administrative users have the following abilities:
•
create and edit user information, both for themselves and for other users
•
create report templates to share with other users
•
create trunk group pools
•
upload an organization file
These various options are discussed in the Admin section later in this document.
AP R I L 2010
I M P AC T T E CH N O L OG I ES , I N C
CONFI DENTI AL AND PROPRI ETARY
113
T R AF F I C AN AL Y S T U S E R S G U I D E
5 Network
Traffic Analyst Network reports give you historical data, trends, and what-if analysis. There
are three kinds of Network reports:
•
Performance
•
Usage Profile
•
Capacity Analysis
Traffic Analyst also models call routing pools. Caller experience is based on all available
trunks as defined by your call routing schemes. True grade of service can only be
determined by an examination of their pooled results.
5.1 Creating Network Reports
There are a variety of Network reports available, but most have report elements similar to
the following Trunk Group Performance Detail report.
Pick All Available, the last day, week,
month, etc., or a date range.
Select Detail by the time
duration displayed in the report
(results for hours, for days,
etc.).
The Options section lets you save a
template for the current report type or
all report types. MUST SET TO THIS
REPORT
The Calendar icons are a quick way to
select a date range.
You also choose All or Primary
for Days and Hours.
Administrators also have the flexibility
to make the template available to
everyone or just themselves.
Select Dates for the report.
Select a Switch
and Trunk
Group(s) and
Pools (only for
trunk group
reports).
For Gateway
reports, you can
select IPDAs.
JUNE
Display the report, or Export it to Excel format.
Once displayed, you can print or e-mail the
report.
Select Formatting. Choose how you
want to display data (CCS, seconds,
minutes, or hours, etc.).
To recreate this report with ease, use Save As to
create a template for reuse.
Show Criteria displays the report
elements used to create the report.
2011
I M P AC T T E CH N O L OG I ES , I N C
CONFI DENTI AL AND PROPRI ETARY
114
T R AF F I C AN AL Y S T U S E R S G U I D E
5.2 Performance Reports
There are three kinds of reports grouped under Performance Reports:
•
Trunk Groups, which report on call traffic on trunk groups and trunk group pools
•
Gateways, which report on IPDAs and HiPath 3000 Gateways
•
System, which reports on the frequency each switch feature was used and on
administrative load.
5.2.1
Trunk Groups
There are several Trunk Group reports available, including Performance Detail and
Summary reports, and an Activity reports.
Summary reports can be a good starting point for investigating call traffic, and then any
anomalies found can be zeroed in on by using Detail reports. These reports are described
individually on the following pages.
5.2.1.1 Performance Detail
The Performance Detail report provides the following:
•
call volume statistics by]
o
completed (in, out, total)
o
blocked (# and %)
o
attempts
•
average call length metrics
•
total usage
•
maximum configured number of trunks
•
service level information
o
% utilization
o
all trunks busy
Note: Reports may differ based on switch type. Nortel switches, for example, measure All
Trunks Busy by number of occurrences (occ) rather than seconds (secs). For hourly data,
the ATB column for Nortel platforms reflects the number of occurrences of ATB reported
by the switch. For intervals greater than an hour, it will sum up the individual intervals.
In addition, Nortel switches provide usage in CCS units. When the usage is less than 100
seconds (CCS) then it returns a value rounded down (e.g. zero), so you may have reports
that show calls but no usage for an interval. Also, it is possible to have usage and no calls
visible in a report, when a call is started in the previous interval and has run over into the
current interval.
JUNE
2011
I M P AC T T E CH N O L OG I ES , I N C
CONFI DENTI AL AND PROPRI ETARY
115
T R AF F I C AN AL Y S T U S E R S G U I D E
5.2.1.2 Performance Summary
The Performance Summary report provides one summarized row of data for each trunk
group or route pool including:
•
calls completed
•
average call length
•
usage
•
trunk circuits
o
max used
o
configured
o
% utilized
• at peak
• overall
o
the time all trunks (circuits) were busy
o
required
o
shortage/surplus
•
IP Bandwidth Required
•
peak period – date & time
This report provides a quick overview of the utilization of each trunk group or route pool
along with the date/time that the peak occurred so you can easily use other reports to drill
down into the details of the usage.
5.2.1.3 Activity
This report provides the following:
•
incoming trunk group usage (offered, blocked and carried statistics)
•
outgoing trunk group usage (offered, blocked and carried statistics)
•
total trunk group usage (offered, blocked and carried statistics)
5.2.2
Gateways
Gateway reports focus on IPDAs and channel capacity, looking at calls, usage, TDM to IP
and IP to TDM, and more, including virtual channels. These reports are described
individually on the following pages.
5.2.2.1 Siemens HiPath 4000
There is one Network Gateway report available for the HiPath 4000, an Activity Summary
report. This report is described below:
Activity Summary
This report can include a single gateway, multiple gateways associated with a single
switch or all gateways associated with multiple switches.
JUNE
2011
I M P AC T T E CH N O L OG I ES , I N C
CONFI DENTI AL AND PROPRI ETARY
116
T R AF F I C AN AL Y S T U S E R S G U I D E
This report provides the following:
•
calls
•
usage
•
average call/seizure length
•
maximum channels seized for the IP channels.
For IP channels, voice connections use one (1) IP channel.
A DMC call will use one channel and a fraction of another channel.
A TDM call will use only a single channel.
5.2.2.2 Siemens HiPath 3000
There are several Network Gateway reports available for the HiPath 3000. You can view
reports for Gateway Activity Summaries, TDM Activity, and IP Activity. These reports are
described below:
Activity Summary
This report provides reporting on channels and virtual channels, including the following:
•
TDM to IP
•
IP to TDM
•
total calls
•
total usage
•
average call length
Virtual channel reporting includes the following:
•
IP into node
•
IP out of node
•
total calls
•
total usage
•
average call length
TDM Activity
This report provides information about the following:
JUNE
2011
•
channels
•
calls
•
usage
•
average call/seizure length
I M P AC T T E CH N O L OG I ES , I N C
CONFI DENTI AL AND PROPRI ETARY
117
T R AF F I C AN AL Y S T U S E R S G U I D E
IP Activity
This report provides additional detail not available in the Gateway Activity Summary report.
It breaks out the usage and average call length for each call type carried over IP resources
– IP into node and IP out of node.
5.2.3
System
Depending on the type of switch you have (Nortel versus Siemens, for example), the
standard system reports are available via Traffic Analyst reports. These reports look at
feature utilization and processor load.
5.2.3.1 Siemens HiPath 4000
There are two System reports available for the HiPath 4000: a Processor Load report and
a Feature Utilization report. These reports are described below:
JUNE
2011
•
Processor Load - displays switch processor load and the administration
processor load.
•
Feature Utilization - highlights the frequency each feature was used – broken
out by days (primary, other, all) and then by hours (primary, other, all).
o
Internal Seizures - This counter logs the number of times internal
system users lift the handset of their telephones either to make
internal/external calls or to activate features. Feature activation or
interrogation via the Memory key is also included. All user telephones
including attendant consoles are scanned regardless of whether the
seizure was made off hook, hands-free, or via a feature key.
o
Call Processing Events - This counter registers every software event in
the central processor related to the processing (setup, release, transfer
etc.) of calls in the system. An internal call between 2 analog telephones
requires typically 9 events to be processed, a call between digital
telephones typically 12 events; an external call from a digital telephone
18 events. The very large number of events processed for example in a
large system in the course of a day can lead to overflow of this counter,
(currently = 24 bit register) which will result in seemingly implausible
values (e.g. Dunton values attached).
o
Call Processing Buffers Allocated - Call processing buffers are pooled
memory elements which are dynamically allocated each time call setup
is attempted. This count gives an approximate BHCA value assuming
ZAUSL has been run for an hour only.
o
External Seizures Incoming - This counter records the total number of
calls signaled to the system node from an external source i.e. exchange
calls, tie calls, transit seizures. A combination of this and number of
internal seizures gives an accurate BHCA value for the system
concerned.
o
External Seizures Outgoing - This counter records the total number of
calls leaving the system to an external destination (exchange, other node
etc.).
o
Calls Answ. At Atnd Queue A / S1 Til S12 - This counter registers all
calls appearing on the trunk answer key i.e. 'T' category on the attendant
screen.
I M P AC T T E CH N O L OG I ES , I N C
CONFI DENTI AL AND PROPRI ETARY
118
T R AF F I C AN AL Y S T U S E R S G U I D E
JUNE
2011
o
Calls Answered At Atnd Queue M - This counter registers all calls
appearing on the operator key (i.e. 'O' category) on the attendant screen.
o
Seizures with Trunk Group Key - These are outgoing seizures dialed
via the trunk group keys marked.
o
Individual Speed Dialing - This counter records how many times
Individual Speed Dialing is used.
o
Destination Keys - This counter records how many times Destination
Keys are used.
o
Repertory Keys - This counter records how many times Repertory Keys
are used.
o
DSS Keys - This counter records how many times DSS Keys are used.
o
Call Forwarding - This counter records how many times Call Forwarding
is activated.
o
Call Waiting/Override - This counter records how many times Call
Waiting/Override is executed.
o
Class of Service Changeover - This counter records how many times
Class of Service Changeover is executed.
o
Do-Not-Disturb - This counter records how many times Do Not Disturb
is activated.
o
Add-On Conference - This counter records how many times an Add-On
Conference is established.
o
Saved Number Redial - This counter records how many times Saved
Number Redial is used.
o
Callback/Trunk Queuing - This counter records how many times
Callback/Trunk Queuing is activated.
o
Mixed-Mode Communication - This counter records how many times
Mixed-Mode Communication is executed.
o
NCT Invocation: Attempts That Are Successful - This counter logs the
number of successful NCT (network call transfer) invocation attempts.
o
NCT Invocation: Attempts That Fail - This counter logs the number of
failed NCT invocation attempts.
o
Rerouting Events - This counter logs the number of attempts to search
for a possible route in case of network congestion.
o
Number of Transit Calls - This counter logs the number of (successful
and unsuccessful) transit call attempts.
o
Completed Calls - This counter logs the number of attempts to save two
party connections.
o
ACL Output (Monitoring) Messages - This counter logs the number of
messages that CP sends to ACL.
o
ACL Input (Commands) Messages - This counter logs the number of
messages that ACL sends to CP.
o
(1.5) Seconds In Dynamic Overload - This counter logs the total
number of (1.5) Second intervals that the system is in Dynamic Overload
condition.
I M P AC T T E CH N O L OG I ES , I N C
CONFI DENTI AL AND PROPRI ETARY
119
T R AF F I C AN AL Y S T U S E R S G U I D E
JUNE
2011
o
Transitions to Dynamic Overload - This counter logs the number of
times the system goes from normal operation into a Dynamic Overload
condition.
o
Calls Rejected Due to Dynamic Overload - This counter registers
every call attempt which is rejected because the system is in Dynamic
Overload.
o
All AM Adapt Events - This counter logs the number of all events, which
are released at AM-Adapt.
o
Neg. Ack. Events of AM Adapt Due to Timeout - This counter logs the
number of negativ acknowledge events of AM-Adapt, which are released
by timeout.
o
Neg. Ack. Evts. of AM Adapt Due to Evt. - This counter logs the
number of negativ acknowledge events of AM-Adapt, which are released
by max. number of events.
o
Segments Transferred By Am Update - This counter logs the number
of transferred segments by AM update.
o
1.5 Sec Spot Check Count. For Incons. Partner DB - This counter logs
every 1.5 sec spot checks for an inconsistent partner database.
o
1.5 Sec Spot Check Count. For Cons. Partner DB - This counter logs
every 1.5 sec spot checks for a consistent partner database.
o
Update Cycles Started By AM Update - This counter logs every
updates, started by AM update cycles.
o
Messages From HSR to HHS - This counter logs the number of
messages, sending from HSR to HHS.
o
Messages From AP to HHS - This counter logs the number of
messages, sending from any AP shelf (Access point) to HSR.
o
Blockades While Sending From HSR to HHS - This counter logs the
number of blockades, while sending from HSR to HHS.
o
Messages From HHS to HSR - This counter logs the number of
messages, sending from HHS to HSR.
o
Messages From HSR to AP - This counter logs the number of
messages, sending from HSR to any AP shelf (Access point).
o
Blockades While Sending From HSR to AP - This counter logs the
number of blockades, while sending from HSR to an AP shelf (Access
point).
o
Network Conn. Attempts In HHS - This counter logs the number of B
channel connection attempts (incoming or outgoing) between HHS and
IP network.
o
Network Conn. Blocked In HHS (No B Chl) - This counter logs the
number of B channel connection blocked (incoming or outgoing) between
HHS and IP network, because no more B channel or no DSP license is
available.
o
Network Conn. Attempts In Any AP - This counter logs the number of
B channel connection attempts (incoming or outgoing) between any AP
shelf (Access point) and IP network via NCUI.
I M P AC T T E CH N O L OG I ES , I N C
CONFI DENTI AL AND PROPRI ETARY
120
T R AF F I C AN AL Y S T U S E R S G U I D E
JUNE
2011
o
Netw. Conn. Blocked In Any AP (No B Chl) - This counter logs the
number of B channel connection blocked (incoming or outgoing) between
any AP shelf (Access Point) and IP network via NCUI, because no more
B channel or no DSP license is available.
o
Seiz. Attempts of Code Sender In HHS - This counter logs the number
of seizure attempts of a code sender in HHS.
o
Seiz. Rejected of Code Sender In HHS - This counter logs the number
of blocking with the seizure of a code sender in HHS, since no more
code sender was available.
o
Seiz. Attempts of Code Sender In Any AP - This counter logs the
number of seizure attempts of a code sender in any AP shelf (Access
Point).
o
Seiz. Rejected of Code Sender In Any AP - This counter logs the
number of blockings with the seizure of a code sender in any AP shelf
(Access Point), since no more code sender was available.
o
Seiz. Attempts of Code Receiver In HHS - This counter logs the
number of seizure attempts of a code receiver in the HHS.
o
Seiz. Rejected of Code Receiver In HHS - This counter logs the
number of blockings with the seizure of a code receiver in the HHS,
since no more code receiver was available.
o
Seiz. Attempts of Code Receiv. In Any AP - This counter logs the
number of seizure attempts of a code receiver in any AP shelf (Access
Point).
o
Seiz. Rejected of Code Receiv. In Any AP - This counter logs the
number of blockings with the seizure of a code receiver in any AP shelf
(Access Point), since no more code receiver was available.
o
Immediate Cnam Deliveries (In Setup Msg) - This counter logs the
number of setup messages where the Call Name is delivered
immediately.
o
Delayed Cnam Deliveries (In Facility Msg) - This counter logs the
number of facility messages where the Call Name is delivered delayed.
o
Failed Call Name Deliveries - This counter logs the number of setup
messages where the Call Name is expected but never delivered.
o
All Success. DMC Attempts (Act. Or Pas) - This counter logs the
number of messages where the DMC setup is confirmed by an active or
passive DMC endpoint.
o
All Unsucces. DMC Attempts (Act. Or Pas) - This counter logs the
number of messages where the DMC setup is rejected by an active or
passive DMC endpoint.
o
Successful DMC Attempts, Both Prox. Intr - This counter logs the
number of messages where the DMC setup is confirmed by the active
DMC endpoint. The passive DMC endpoint is in the same switch and
therefore counted twice at N0059 [All Success. DMC Attempts (Act. Or
Pas)].
I M P AC T T E CH N O L OG I ES , I N C
CONFI DENTI AL AND PROPRI ETARY
121
T R AF F I C AN AL Y S T U S E R S G U I D E
o
Unsuccessful DMC, Both Proxies Internal - This counter logs the
number of messages where the DMC setup is rejected by the active
DMC endpoint. The passive DMC endpoint is in the same switch and
therefore counted twice at N0060 [All Unsucces. DMC Attempts (Act. Or
Pas)].
o
Call Transfer - This counter records how many times Call Transfer is
used.
o
Attendant Recall - This counter records how many times Attendant
Recall is activated.
o
Pickup - This counter records how many times Pickup is used.
o
Internal Call Forward - This counter records how many times Internal
Call Forward is activated.
o
Attendant Remote Call Forward - This counter records how many
times Attendant Remote Call Forward is activated.
5.2.3.2 Nortel Meridian
The following Nortel Meridian System reports are available for those switch types:
JUNE
2011
•
Feature Utilization - highlights the frequency each feature was used – broken
out by days (primary, other, all) and then by hours (primary, other, all).
•
Processor Load - displays switch processor load and the administration
processor load.
•
Network Terminal Loops - measures Intra-loop and Total Loop usage –
information is listed by number of calls, usage in hh:mm:ss and blocked calls.
•
Service Loop Traffic - measures Service Loop Traffic for the following: CONF,
DTR, TDS, MFS and Tone Dectors. Each type of service has its own report line,
including number of calls, usage, Blocked and % blocked.
•
Junctor Traffic - displays measurements associated with the paths that connect
various network groups, involving an intergroup junctor. Measurements indicate
the Failure to Match (FTM) for each junctor, the junctor usage and the calls
counts.
•
Selected Terminals - shows accumulated traffic for loop numbers. It displays
usage, as well as Average Call Length.
•
Dial Tone Delay - reports the number of Calls Delayed Over 3 Seconds and
Over 10 Seconds, as well as the Total Delay Time of All Calls Delayed More
Than 1 Second.
•
IP Phone Zone Traffic - displays IP phone data at the zone level. Data is
collected and displayed on an intrazone and interzone basis. Includes data for 16
different usage and warning fields.
•
DSP Peg Count - displays the number of times calls were blocked on an IP
Media Gateway (IPMG) due to insufficient Digital Signal Processor (DSP)
resources or lack of bandwidth.
I M P AC T T E CH N O L OG I ES , I N C
CONFI DENTI AL AND PROPRI ETARY
122
T R AF F I C AN AL Y S T U S E R S G U I D E
5.3 Usage Profiles
Usage Profiles are helpful in understanding traffic patterns and identifying anomalies in
those patterns, which may indicate equipment not performing as expected or the
fraudulent or inappropriate use of the company’s network.
This report displays work volume (usage) for the following:
•
incoming calls
•
outgoing calls
•
both incoming and outgoing calls
The Value drop-down box lets you select either a Usage or Capacity Required report.
These reports are described below:
5.3.1
Usage
This report graphs the work volume (usage) for incoming calls, outgoing calls or both.
5.3.2
Capacity Required
This report graphs the following:
•
number of trunk circuits required to achieve the desired service level
•
number of trunks currently in service
5.4 Capacity Analysis
Capacity Analysis reports let you look at current data and make projections. You can see
things such as grade of service based on changes you make in call volumes and call
lengths. These reports are helpful for planning for changes in your call traffic when your
business conditions are expected to change. They also let you see how shortages and
surpluses in your current trunking configurations.
You can view Capacity Analysis reports for trunk groups and gateways.
5.4.1
Trunk Groups
You can view Capacity Analysis data for trunk groups, including Detail and Summary data.
These two report types are described below:
5.4.1.1 Detail
This graph shows the grade of service for a trunk group or route pool based on varying
levels of network capacity. The right end is anchored where no calls are blocked. The left
end is anchored where an average of one (1) call would be blocked per day.
Grade of service is measured in terms of calls that would have been blocked over the
duration of the study period.
JUNE
2011
I M P AC T T E CH N O L OG I ES , I N C
CONFI DENTI AL AND PROPRI ETARY
123
T R AF F I C AN AL Y S T U S E R S G U I D E
The “What if” columns allows the user to model the report to meet service levels with the
selected compression model. The user can adjust for changes in call volumes and
average length.
The Calls and Average Call Length values are based on the switch and trunk group
selected, for the date range selected. If you change the switch or trunk group, these values
are recalculated immediately and you will see them change as the screen refreshes.
5.4.1.2 Summary
This report provides a single report for all route pools and trunk groups across multiple
switches. It summarizes the following:
•
current trunk circuits
•
required trunk circuits
•
the surplus or shortage of trunk circuits
•
IP bandwidth requirements
The user can test varying grades of service and VoIP compression models.
The “What if” column allows the user to model the report to meet how company service
levels are set and what compression model they are using.
Grade of Service will provide the service levels for each option checked. If selectable has
been checked you may take the default value for blocking or select a value from the drop
down menu.
1% blocking is equivalent to P.01 or 1 in 100 calls blocked.
The (n)th Busy Hour will reflect the busy hour to which you will engineer. One (1) equals
th
the busiest and 10 is the 10 busiest hour.
5.4.2
Gateways
The Gateway reports let you see and analyze data for what-if purposes for all the site’s
gateway channels, including displaying shortage and surplus in channels based on desired
grade of service. You can see the expected number of blocked calls for varying levels of
IPDA capacity.
There are reports available for the HiPath 4000 and HiPath 3000.
5.4.2.1 Siemens HiPath 4000
Gateway reports for the HiPath 4000 include Detail and Summary reports. These reports
are described below.
Detail
This graph summarizes the tradeoff of service quality versus cost by showing the number
of blocked calls expected for varying levels of IPDA capacity for an extended period of
time. The right end is anchored where no calls are blocked. The left end is anchored
where an average of one (1) call would be blocked per day.
JUNE
2011
I M P AC T T E CH N O L OG I ES , I N C
CONFI DENTI AL AND PROPRI ETARY
124
T R AF F I C AN AL Y S T U S E R S G U I D E
The Calls and Average Call Length values are calculated based on the following:
•
switch and Gateway selected
•
date range selected
If you change the switch or Gateway, these values are recalculated immediately and you
will see them change as the screen refreshes.
Adjusting the number of calls upwards or downwards, or the average call length, will affect
the results you see graphed.
Summary
This report provides a single report for all gateway channels across multiple switches.
Users can see summaries of the following:
•
current channels
•
required channels
•
the surplus or shortage of channels
The user can test varying grades of service and VoIP compression models.
The percent DMC calls shows the percentage of IP phones that connect to another Direct
Media Connection IP phone.
Users also see the channels and bandwidth required for zero blocking.
5.4.2.2 Siemens HiPath 3000
Gateway reports for the HiPath 3000 include Detail and Summary reports. These reports
are described below.
Detail
This report shows the grade of service for a single HiPath 3000 gateway based on varying
levels of channel and signaling resource capacities.
•
a graph that shows the number of B channels required to meet different service
levels
•
a graph that highlights the number of signaling resources required
Grade of service is measured in terms of calls that would have been blocked over the
duration of the study period.
The “what if” columns allow the user to model this report for different scenarios.
Users will select the following criteria when creating this graph:
JUNE
2011
•
select the Load Basis (handled or offered)
•
pick the applicable TDM engineering model and VoIP compression model
•
indicate the percentage of internal calls/conferences that are typical
•
note if one B channel is reserved for Music on Hold or not
•
adjust the call volumes and average call length by call types
I M P AC T T E CH N O L OG I ES , I N C
CONFI DENTI AL AND PROPRI ETARY
125
T R AF F I C AN AL Y S T U S E R S G U I D E
Summary
This report provides a single report for all gateways across multiple HiPath 3000 switches.
This report summarizes the following:
•
current TDM channels and VoIP signaling resources
•
required TDM channels and VoIP signaling resources
•
the surplus or shortage of TDM channels and VoIP signaling resources
The “what if” column allows the user to model the report to meet how company service
levels are set and what compression model they are using (each box provides specific
options). Additionally, the user may indicate the percentage of internal calls/conferences
that are typical and note if one B channel is reserved for Music on Hold or not.
For each gateway, the tabular report includes the current TDM channels and VoIP
signaling resources plus the TDM channels, VoIP resources and IP bandwidth required to
provide zero blocking. The shortage/surplus is also included.
JUNE
2011
I M P AC T T E CH N O L OG I ES , I N C
CONFI DENTI AL AND PROPRI ETARY
126
T R AF F I C AN AL Y S T U S E R S G U I D E
6 Console
Traffic Analyst Console reports give you the information you need to meet your service
goals. Console reports consist of the following types:
•
Performance Reports
•
Usage Profile
•
Capacity Analysis
Console lets you monitor for personal call abuse and stay on top of requirements.
6.1 Creating Console Reports
There are a variety of Network reports available, but most have report elements similar to
the following Console Utilization report.
Select Dates for the report.
Pick All Available, the last day,
week, month, etc., or a date range.
The Calendar icons are a quick
way to select a date range.
Select Detail by the time
duration displayed in the report
(results for hours, for days,
etc.).
You also choose All or Primary
Days and Hours.
The Options choices let
only you use this report,
or lets everyone use it.
You can also reuse the
report criteria in all
reports with All Reports.
Select a switch
and consoles.
Display the report, or Export it to Excel
format. Once displayed, you can print or email the report.
If the report is useful, use Save As to create
a template for reuse.
JUNE
2011
I M P AC T T E CH N O L OG I ES , I N C
CONFI DENTI AL AND PROPRI ETARY
Show Criteria displays the
report elements used to create
the report.
127
T R AF F I C AN AL Y S T U S E R S G U I D E
6.2 Performance Reports
Performance Reports gives you valuable measurement of operator availability, and
productivity, including call activity, call lengths, time logged into consoles, and more. The
following Performance Reports are available for Console:
•
Activity
•
Utilization
•
Utilization and Service
•
Call Profile
•
Call Length
6.2.1
Activity
This report provides a summary of the following:
•
call activity
•
average call lengths
•
time usage
This report details handled calls (external, internal and personal calls) and outgoing calls.
Efficiency and service metrics are provided in the far right columns in terms of %
occupancy and blocked hours.
6.2.2
Utilization
This report provides the following:
•
the time spent logged into consoles
•
a detailed accounting of how that time was used – console (business), personal
and idle
6.2.3
Utilization and Service
This report provides the following:
•
the time available to console groups
•
how that time was used
•
resultant service levels
6.2.4
Call Profile
The Console Call Profile report provides a comprehensive set of call counts including calls
answered and abandoned from the queue.
JUNE
2011
I M P AC T T E CH N O L OG I ES , I N C
CONFI DENTI AL AND PROPRI ETARY
128
T R AF F I C AN AL Y S T U S E R S G U I D E
6.2.5
Call Length
The Console Call Length profile provides comprehensive look at average call length for
each call type, including redirected calls.
6.3 Usage Profile
This report displays the work volume (usage) for the following:
•
incoming calls
•
outgoing calls
•
both incoming and outgoing calls
Usage Profiles are helpful in understanding traffic patterns and identifying anomalies in
those patterns, which may indicate equipment not performing as expected or the
fraudulent or inappropriate use of the company’s network.
The report provides a visual profile of a console group’s usage, and can be viewed in
hourly, daily, weekly and monthly increments.
6.4 Capacity Analysis
This Capacity Analysis report provides detail on service levels, letting you model different
service and load criteria for what-if analysis. The report is described below.
6.4.1
Detail
This report provides the service level (abandoned calls) based on varying levels of
available consoles, permitting input of various service and load factors to model changing
business conditions. It provides a simple, easy to understand report to communicate to
management what resource requirements (and therefore dollars) are needed to meet
various service levels.
The Y axis represents the estimated number of abandoned calls. The X axis is the
required number of consoles.
JUNE
2011
I M P AC T T E CH N O L OG I ES , I N C
CONFI DENTI AL AND PROPRI ETARY
129
T R AF F I C AN AL Y S T U S E R S G U I D E
7 Call Detail
Call Detail reports are flexible. You can set up your own template for reports you would like
to see on a recurring basis.
7.1 Reports
Traffic Analyst comes with some template Call Detail reports, but you will want to create
your own reports as well.
The Chargee field in the switch shows up in Call Detail reports in the Charged Extension
field. The Chargee field lets the user assign rules to it, so different things can display in
that field based on the assigned rules.
In the Call Detail portion of Traffic Analyst, you need to set your call types based on the
Destination field.
7.1.1
Call Detail Report Filters and Fields
Creating a call detail report is a process of selecting the data you wish to see by filtering
out the data you do not need to see. Call Detail collects data on individual calls, and the
calls themselves can be complex, moving from switch to switch and extension to
extension. In other words, there can be a lot of data available. Traffic Analyst gives you
filters to be selective about the data presented in reports.
JUNE
2011
I M P AC T T E CH N O L OG I ES , I N C
CONFI DENTI AL AND PROPRI ETARY
130
T R AF F I C AN AL Y S T U S E R S G U I D E
Below is a brief description of the fields available to filter the information displayed in Call
Detail reports:
Switch – Select one or more switches.
Number of Party – enter any number or numbers you are looking for in your report. This
filters out any calls that don’t contain the number you enter in this field. You can include
more than one number by using commas to separate numbers.
For example, if you have a complaint that your fax server is calling someone by mistake
you would enter the number that is being dialed in this field. Select all options under
Include to get any occurrence of this number. This filters out any Call Detail records that
do not include the number you entered. Then you can pinpoint the server that is making
the call.
Include – you can determine the level of detail displayed in the report by including any or
all of the following parameters:
•
Connected Number – the other end of a call from the charged extension. For
outgoing and internal calls it’s the called number (or destination if called number
is empty). For incoming calls, it’s the calling number.
•
Originating Number – the phone number of the party that placed the call.
•
Called Number – the number that was dialed by the originating number. For
incoming and internal calls, this isn’t always the extension that answers the call, it
could be a hunt group pilot number, an ACD number, the call could be forwarded
or picked, etc.
•
Destination – the number that got the call. It’s an extension number for an
incoming call answered on the same switch (not that extension’s DID number).
For outgoing calls it’s usually the same as the called number.
•
Transfer number – when a call is transferred, this is the phone number that the
call was transferred to. But see above, it’s not necessarily the number of the
device that answers the transferred call.
•
Charged Extension – this can be affected by the switch setup. It’s the “paying”
party of the call. That’s normally the calling number for an outgoing or internal
call. For an incoming call, it is usually the destination number. There’s an AMO
that let’s you change the rules for this: DEFPP (Define Paying Party).
Charged Extensions – leave this field blank if you want to include all charged extensions,
or enter charged extensions individually or as a range. Use commas to separate individual
charged extensions.
Account Code – leave this field blank if you want to include all account codes, or enter
codes individually. Use commas to separate individual codes.
PIN – leave this field blank if you want to include all PINs (Personal Identification
Numbers), or enter PINs individually. Use commas to separate individual PINs.
Seizure Code – leave this field blank if you want to include all seizure codes, or enter
codes individually. Use commas to separate individual seizure codes.
LCR Route – leave this field blank if you want to include all LCR routes, or enter routes
individually. Use commas to separate individual LCR routes.
JUNE
2011
I M P AC T T E CH N O L OG I ES , I N C
CONFI DENTI AL AND PROPRI ETARY
131
T R AF F I C AN AL Y S T U S E R S G U I D E
Charged Party, Manager, Department, Cost Center, Organization – these fields are
organization data that is not tracked by the switch. The column and filter names are as
listed above. The organization data is imported from a comma delimited file (like output
from Excel, for example). It can be uploaded on demand through the Upload Organization
File option under Admin.
Conventions for using Number of Party, Charged Extensions, Account Code, PIN, Seizure
Code LCR Route, Charged Party, Manager, Department, Cost Center, and Organization
are as follows. When making entries in fields requiring numeric entries, you can use a
dash (-) to enter a range and comma (,) to enter multiple entries not in a range. Commas
can also be used for multiple entries in fields where entries may be names. You can also
use wildcards. Use a question-mark (?) as a wildcard for a single character and an asterisk
(*) as a wildcard for a string of characters.
Additionally, you can use quotation marks (“) with Charged Party, Manager, Department,
Cost Center, and Organization. For example, if you need to find a name with a comma in
it, you would enter it in the Charged Party field like this: “Smith, Mike” and the report will
find occurrences of that exact string. You can also put quotes together with nothing in
between (e.g., “”) and the report will find records that have no name associated with them.
DATES
All Available – selecting this option includes all dates for which data is stored in the report.
Last X (Hours, Days, Weeks, Months, Quarters, Years) – selecting this option includes the
most recent number of hours, days, weeks, months, quarters, or years in the report,
depending on the time increment selected. Note If the Include current period box is
selected too then the report will include up to the last interval of data that has been
collected and stored. Without this checked the data will contain up to the last full hour of
data stored.
For example, Last 1 Day, this report would include data from the most recent midnight to
midnight time period, and not from 10 a.m. to the previous 10 a.m.
Start – use Start to enter the beginning of a date range. The calendar icon is an easy way
to enter the date.
End – use End to enter the end of a date range. The calendar icon is an easy way to enter
the date.
INCLUDE
Cost – you define Call Detail costs in the Administration portion of Traffic Analyst. Once
defined, a cost per call will be assigned based on the type and duration of the call. This
Cost filter allows you to filter by cost. You can use the typical operands – greater than, less
than, equal to, greater than or equal to, etc. For example, you could create a report that
only shows call records with a cost that is greater than $0.99.
Call Duration – you can narrow your report to include calls that had a certain call duration
(i.e. call length). Enter the duration in mm:ss format or as a number of seconds. The query
can be adjusted to find calls that are greater than (>), less than (<) or equal to (=) the
specified duration.
JUNE
2011
I M P AC T T E CH N O L OG I ES , I N C
CONFI DENTI AL AND PROPRI ETARY
132
T R AF F I C AN AL Y S T U S E R S G U I D E
Wait Duration – you can narrow your report to include calls that had a certain wait duration
(i.e. time between the call being placed and the call being answered). Enter the duration in
mm:ss format or as a number of seconds. The query can be adjusted to find calls that are
greater than (>), less than (<) or equal to (=) the specified duration.
Type – you can select all or narrow your report to only include certain call types. Here are
the call types and their meanings:
•
Internal – a call between two extensions on the same switch or between two
extensions on an IPDA.
•
Incoming – a call that arrives at the switch through a trunk.
•
Network – a call from an extension on one switch in the customer network to
another switch in the customer network, or a call between the switch and an
IPDA, or between two IPDAs connected to the same switch.
•
Local – an outgoing call that has no toll charges.
•
Regional – an outgoing toll call to a local region which has a cost that differs from
long distance calls.
•
Long Distance – an outgoing toll call to a number (within the same country).
•
International – an outgoing toll call to another country.
•
800 – an outgoing toll-free call, even though it may be to a destination outside of
the local calling area.
•
900 – an outgoing toll call that is charged a substantial amount above the typical
long distance rate.
Include Network Hops – you can choose to have each network hop the call makes
displayed as a line item if you select this checkbox. This is helpful for multi-switch sites if
you want to see how the calls move from switch to switch.
DETAIL
All Occurrences – if you select All Occurrences, you can fine tune the report detail you see
with the following options:
Call Records – the report will display a line for each call record
Daily – gives a Daily total
Weekly or Monthly – gives a Weekly or Monthly total per your selection
Days – All, Primary (set up in the Traffic Analyst Admin tool.)
Hours – All, Primary or select a start or end time.
Top Occurrences – if you select Top Occurrences, you can enter the number of
occurrences you wish to see. You can enter from 1 to 999 occurrences.
FORMATTING (Report Columns, Sort By, Duration Units and Show Criteria)
JUNE
2011
I M P AC T T E CH N O L OG I ES , I N C
CONFI DENTI AL AND PROPRI ETARY
133
T R AF F I C AN AL Y S T U S E R S G U I D E
The Formatting section of the Call Detail screen lets you select the report columns in the
report, including the left-to-right order in which they will display in the report, and the way
the rows of data are sorted. You also have an option to display the criteria used to create
the report.
Report Columns – the report columns are the heart of your Call Detail reports. Move
headers to and from the Available and Include lists with the arrow keys.
•
Available – shows column headers that can be used in the report
•
Include – report headers in the report
Each data item can appear as a column. To use a data item in a report, move it from the
Available list to the Include list. To remove a data item, move it from the Include list back to
the Available list.
You can also sort the way the columns appear in the report by moving the data items up or
down in the Include list with the arrow keys. Report columns at the top of the list will
appear on the left side of the report.
For more information on Call Detail data items that can be used in report columns, and
which data items are available for different switches, refer to the Data Dictionary at the end
of this document.
Sort By - you can sort by different columns in your report. You can have up to six sorting
criteria and you can choose to include subtotals based on the sorting criteria.
For example, you could make the primary sort Charged Extensions in Ascending order,
and the report rows would be ordered by Charged Extension number, from lowest to
highest. As a secondary sort, you could select Call Duration in Ascending, and then the
call records already sorted by Charged Extension would be sorted shortest call to longest.
If you had subtotals checked for Charged Extensions in the above example, the report
would include a row subtotaling the results for each Charged Extension.
Duration Units – lets you select the time format that report data in which report data will be
displayed, either CCS, seconds, minutes, hours, or hh:mm:ss format.
Show Criteria – lets you select to display in the report the criteria used to create the report.
For example, if you expect to see records you are not seeing in the report, the report
criteria might show you that the report is filtering out the records you expect to see. A
summary of the criteria used displays at the bottom of the report if this option is selected.
7.1.2
Creating Call Detail reports
Building Call Detail reports is a quick process, but you will probably want to experiment
with different report parameters. Remember, you do not need to use every parameter or
filter. To reset the report fields at any time, select the “Reset” template from the template
dropdown menu at the top of the report screen. Note that this automatically selects the
switch that was most recently used in a report. Also, selecting this template does not clear
out the report columns, but resets them to a standard set of fields to be included.
The following is an example of how to build a report.
JUNE
2011
I M P AC T T E CH N O L OG I ES , I N C
CONFI DENTI AL AND PROPRI ETARY
134
T R AF F I C AN AL Y S T U S E R S G U I D E
Let’s say we want to see a report for five extensions over the last week, and further, we
only want to look at calls that lasted more than three minutes.
The extensions we want are 1420, 1421, 1422, 1425, and 1433. Here are the steps we
follow:
Select the switch in the switch selection list. This is the field in the upper left corner of the
Call Detail Reports screen.
We don’t need to use the Include list under the switch. Those filters are only used if we
enter a number in the Number of Party field. Leave those selections unselected.
In the Charged Extensions field, enter the extension numbers using this convention:
1420-1422, 1425, 1433
At this point, your Call Detail Report entries should look like this:
Now select the date range of the report. We will select “Last Week,” which will give us the
last complete week – that is, the last week beginning with Sunday and ending with
Saturday, and not the most recent seven days.
Next, we want to include only calls that are greater than three minutes in length. We do
this in the Call Duration field. The drop-down menu lets us select the operand, which in
this case is a greater than sign ( > ). Use the mm:ss format to define the time. In our
example, we will enter it as 03:00.
Under Type, we want to include all call types so we don’t miss any. Use shift-click to select
them all.
Now we will select the kind of call records we want to see. We are interested in seeing the
individual calls, so we will check the boxes for Call Records and not worry about looking at
totals for the entire report.
We want to see data for All Days and All Hours, so we will select those. Our report
definition should now look like this:
JUNE
2011
I M P AC T T E CH N O L OG I ES , I N C
CONFI DENTI AL AND PROPRI ETARY
135
T R AF F I C AN AL Y S T U S E R S G U I D E
Now we will select the report columns. We will select the following:
•
Charged Extension
•
Start Date
•
Call ID
•
Start Talk Time
•
Called Number
•
Connected Number
•
Call Duration
We select these by clicking on them in the Available list under Formatting and using the
arrow button ( > ) to move them to the Include list. Then, to get them in the order we see
above, we use the up and down arrow keys to move a highlighted column up or down in
the list. The report columns are sorted in the report from left to right based on their order in
the Include list. Columns at the top of the Include list will appear on the left side of the
report, etc.
Next we select the Sort by criteria. We will sort by Charged Extension in ascending order,
and then use a secondary sort after that of Called Number in Ascending order. Our
selections should look something like this:
JUNE
2011
I M P AC T T E CH N O L OG I ES , I N C
CONFI DENTI AL AND PROPRI ETARY
136
T R AF F I C AN AL Y S T U S E R S G U I D E
We will display the report in the hh:mm:ss time format.
We will also select to display report criteria at the end of the report.
Now we can display our report. Here are the results of the report created by these steps:
Note: When e-mailing (or printing) CDR Reports with over 100,000 rows of data you can
only print or e-mail 100,000 rows at a time. If this occurs, you will see arrow selector keys
that allow you to select the next section to print or e-mail.
JUNE
2011
I M P AC T T E CH N O L OG I ES , I N C
CONFI DENTI AL AND PROPRI ETARY
137
T R AF F I C AN AL Y S T U S E R S G U I D E
7.1.3
Scheduling Call Detail Reports
You can schedule the Traffic Analyst Call Detail reports to be generated at preset times,
but you will need to access the administrative side of Traffic Analyst either access to the
server where it is installed or through a client installation to do so.
Use the “Save As” option in the reports to save the Call Detail report for scheduling. Give
the report a unique name when you save it.
After the report is saved, it will appear in the Report Schedule tab in the Administrative
side of Traffic Analyst. You may have to refresh Traffic Analyst to see it listed.
When you right-click on a Call Detail report listed in the Report Schedule tab, you get a
menu of options.
JUNE
2011
•
Change lets you enter an e-mail address or addresses you can send the report
to. You are limited to 255 characters, so the number of e-mail addresses you
enter cannot exceed that 255 character limit. If sending to multiple e-mail
address they must be separated by a semi-colon.
•
The Schedule option lets you schedule the report. Be sure to deselect the
Inactive checkbox or else the report schedule will not be active.
•
The Run Now option will generate the report immediately. You can use this to
test your output before the report is generated at the scheduled time. Can not do
this from a Traffic Analyst client.
•
Activate will toggle the Inactive checkbox in the Schedule window, clearing it
and making an inactive schedule into an active one.
I M P AC T T E CH N O L OG I ES , I N C
CONFI DENTI AL AND PROPRI ETARY
138
T R AF F I C AN AL Y S T U S E R S G U I D E
•
Deactivate will toggle the Inactive checkbox in the Schedule window, checking
the Inactive checkbox, making an active schedule inactive.
•
Copy To and Delete do not apply to scheduled Call Detail reports.
7.1.4
How Traffic Analyst Counts Calls for Call Detail
When Traffic Analyst retrieves data from a switch, it is able to get a true call count for Call
Detail reports. When a call comes into your switch, the switch assigns an ID to that call.
Traffic Analyst uses that ID to follow that call throughout its life in your switch.
When a call is switched from one number to another in your switch, this is a call segment.
Other Call Detail applications count each call segment as a separate call. Traffic Analyst is
able to combine these call segments and identify them as a single call. This lets you get a
very accurate record of your call counts on your switch.
For example, an incoming call from 3141234567 goes to extension 1234, who then
transfers the call to extension 5678. This is one call that creates two call segments. Traffic
Analyst gives both call segments the same call ID and the two segments count as only one
call in the report.
Note: HiPath 3000 and Hicom 300 switches do not report internal calls. This means that
internal calls cannot be tied together to make a single call.
For example, say extension 1234 calls extension 5678. Extension 1234 then conferences
in an external number, 3141234567, and extension 5678 conferences in external number
6361234567. This will look like two unrelated external calls in a HiPath 3000 or Hicom 300
because there is no record for the internal call between the two extensions. Traffic Analyst
would report the example above as two separate calls.
7.1.5
“Unavailable” and “Blocked” in Call Detail Reports
If you see “Unavailable” it means that the HiPath 4000 switch did not receive a calling
number. If you see “Blocked” in a HiPath 4000 report it means that the caller number is
being blocked. These will display in the originating number field. For OpenScape and
Hicom 300 switches, blocked and calling numbers not received are displayed as
“Unavailable.”
JUNE
2011
I M P AC T T E CH N O L OG I ES , I N C
CONFI DENTI AL AND PROPRI ETARY
139
T R AF F I C AN AL Y S T U S E R S G U I D E
8 Alarms
Traffic Analyst’s alarms permit the easy identification and notification of several key
networks conditions including:
•
Changing capacity requirements
•
Non-performing equipment
•
Off-hour outbound fraud/abuse
Alarms apply to the different modules you purchase, though some apply to all modules.
For example, the License Over Capacity alarm is available no matter which module you
have purchased, but the All Trunks Busy alarm is only available to users of the Network
module.
8.1 Reports
Traffic Analyst Alarms reports allow you to create reports for Network alarms,
Switch/System alarms and Call Detail alarms. You may choose to save alarm reports for
reuse.
8.1.1
Network
Network alarms let you select the switch or switches, dates, and alarm types you want to
include in the report.
You select the alarm detail, which is the severity of the alarm, so if you only want to see
High alarm conditions you can filter out Medium and Low conditions.
You can also sort the report data in a variety of ways. Below are descriptions of the default
Network Alarms.
The following alarms are available to users of the Traffic Analyst Network module.
JUNE
2011
•
All Trunks Busy – triggered if all the trunks in the group are busy for X number
of minutes (seconds or hours). The pager code is 33.
•
Erratic Trunk Peg Count – (Siemens 9006, HiPath 4000, HiPath 3000 only)
triggered if a trunk's peg count differs by X% from the group mean over a
specified time range. The pager code is 33.
•
Erratic Trunk Usage – (Siemens 9006, HiPath 4000, HiPath 3000 only)
triggered if a trunk's usage differs by X% from the group mean over a specified
time range. The pager code is 33.
•
No Seizures for Trunk – (Siemens 9006, HiPath 4000, HiPath 3000 only)
triggered when any one trunk in a group experiences no seizures and another
trunk in the same group has more than two seizures during the same interval.
This alarm is intended to find broken trunks as opposed to idle trunks. The pager
code is 33.
•
No Seizures for Trunk Group – triggered if an entire trunk group experiences
no trunk seizures during an interval within a specified time range. The pager
code is 33.
I M P AC T T E CH N O L OG I ES , I N C
CONFI DENTI AL AND PROPRI ETARY
140
T R AF F I C AN AL Y S T U S E R S G U I D E
•
Outbound Off Hour Usage – triggered if outbound off hour usage reaches X
hours (minutes or seconds) over a specified time range. The pager code is 33.
•
Over Utilized Hour - triggered if an interval rises above X% of its utilization. The
utilization is calculated by the usage per interval divided by the capacity. If
collection is daily, interval will be hourly. The pager code is 33.
•
Over Utilized Peak Hour – triggered if the busy hour ordinal 1 for the day
reaches X% of its utilization. The utilization is calculated by the peak usage
divided by the capacity. The pager code is 33.
•
Seizure Too Long – (Siemens 9006,HiPath 4000, HiPath 3000 only) triggered if
any trunk in the trunk group experiences a seizure equal to X hours (seconds or
minutes). The pager code is 33.
•
Too Many Trunks – triggered if the interval falls below X% of its utilization. The
utilization is calculated by the usage divided by the capacity during a specified
time range. If collection is daily, interval will be hourly. The pager code is 33.
•
Trunks Not In-Service – (Siemens 9006 and Avaya only) triggered if data from
the switch shows a trunk is defined but not activated. The pager code is 33.
•
Under Utilized Peak Hour – triggered if the busy hour ordinal 1 for the day falls
below X% of its utilization. The utilization is calculated by the usage divided by
the capacity. The pager code is 33.
8.1.2
Switch/System
The following alarms are available to all Traffic Analyst users, except where noted by
switch type or module in the description:
JUNE
2011
•
Could Not Store Data – triggered if Traffic Analyst cannot store the data it polls.
The pager code is 99.
•
Failed to Poll Switch – triggered if Traffic Analyst cannot successfully poll a
switch as scheduled. The pager code is 77.
•
License Near Capacity – triggered when the license capacity is at some
percentage of the maximum. Users set the percentage. The pager code is 11.
•
License Over Capacity – triggered when the licensed capacity is exceeded. The
pager code is 22. Note: Alarm text includes the date the license was exceeded
and when the use of Traffic Analyst will be restricted.
•
No Data Collected – triggered if Traffic Analyst cannot successfully find data for
a switch. The pager code is 88.
•
OnTraQ Server Not Responding – (Siemens HiPath 4000 only, OnTraQ
module only) Traffic Analyst is unable to send updates to a defined OnTraQ
server during end of day processing. The alarm message will have the Traffic
Analyst server name in it. Typically this alarm indicates that the OnTraQ server
named isn’t running or that there are network problems. The pager code is 55.
•
Unassigned Trunk – (Siemens HiPath 3000 only) triggered if a call is shown on
a particular trunk that wasn't defined in the Groups tab of that switch in Traffic
Analyst. Since the trunk wasn't defined the call will show in an Unassigned Trunk.
The pager code is 33.
I M P AC T T E CH N O L OG I ES , I N C
CONFI DENTI AL AND PROPRI ETARY
141
T R AF F I C AN AL Y S T U S E R S G U I D E
8.1.3
CDR
The following alarms are available to users of the Traffic Analyst Call Detail module.
•
Call Too Expensive – triggered if the call exceeds the user-defined cost. The
pager code is 44.
•
Call Too Long – triggered if the call exceeds the user-defined length. The pager
code is 44.
•
Originating Number – triggered if the originating number matches the number
defined in the alarm. The user will also define the alarm to look for either an
internal or external call. The pager code is 44.
•
Terminating Number – triggered if the terminating number matches the number
defined in the alarm. The user will also define the alarm to look for either an
internal called number or external destination. The pager code is 44.
8.2 Create/Edit
Select the Create/Edit option under Alarms to create a new alarm or edit an existing one.
The following screen displays:
If you have more than one switch, you can display alarms by switch or switches. Select
switches in the list with shift-click and then click on Display.
To edit an alarm, click on the alarm name.
To create a new alarm, click on Add Alarm.
JUNE
2011
I M P AC T T E CH N O L OG I ES , I N C
CONFI DENTI AL AND PROPRI ETARY
142
T R AF F I C AN AL Y S T U S E R S G U I D E
When you edit or add alarms, a screen similar to the following displays:
You can do several things on this screen to edit or create alarms:
Select the alarm in the upper portion of the screen. Under the Alarm Type drop-down, you
can see the list of alarms you can define.
JUNE
2011
I M P AC T T E CH N O L OG I ES , I N C
CONFI DENTI AL AND PROPRI ETARY
143
T R AF F I C AN AL Y S T U S E R S G U I D E
Define the Display Name for the alarm.
Select the Severity level that the alarm will be logged as – Low, Medium, or High.
Define the alarm, typically by entering a number and time unit. You will see an operand,
such as greater than, so the alarm condition will occur when the time unit has exceeded
the greater than number. For example, in an All Trunks Busy alarm, you might set the
alarm condition as any time that all trunks are seized that is greater than 10 seconds.
Select the switch(es) for which this alarm will be used by putting a check in the Enabled
box to the right of the switch name.
Select Primary Days Only by putting a check in that box. Leaving it unchecked defaults to
All Days
Select any users for whom you want the alarm condition to generate an e-mail or pager
notification.
Once you have defined or edited an alarm, click on Save. Now this alarm will be in effect
for the selected switch(es).
8.2.1
How Alarm Creation Works with Alarm Reports
Every alarm you create is tied to the alarm type you selected. For example, you could
create three different alarms based on the All Trunks Busy alarm and assign them to the
same switch.
One All Trunks Busy alarm could be a low severity alarm that is triggered when all trunks
are busy for more than 10 seconds, while a second alarm might trigger at medium severity
when all trunks are busy for more than 20 seconds, and the third alarm might trigger at
high severity when all trunks are busy for more than 30 seconds.
Then, when you create an alarm report for the All Trunks Busy alarm for the switch in
question, you would be able to see results from all three defined All Trunks Busy alarms.
JUNE
2011
I M P AC T T E CH N O L OG I ES , I N C
CONFI DENTI AL AND PROPRI ETARY
144
T R AF F I C AN AL Y S T U S E R S G U I D E
9 Admin
The Admin options in Traffic Analyst reports let you set passwords, add users and set their
access levels, create trunk group pools, and upload an Organization file. These options
are controlled by user level access. There are two user levels, Standard and
Administrative.
Administrative users have the following abilities:
•
create and edit user information, both for themselves and for other users
•
create report templates to share with other users
•
create trunk group pools
•
upload an organization file
9.1 Password
The Password option lets you reset your password for accessing Traffic Analyst reports.
9.2 Users (Administrative users only)
The Users option lets you add Traffic Analyst report users. You enter the following
information:
•
User name
•
Password
•
Security Level
•
E-mail Address
•
Switch Access
•
Feature Access
Security Level is either Standard or Administrative. Only Administrative users can add or
edit users.
Feature Access and Switch Access set which switches and features are viewable in this
account. Your options are determined by the Traffic Analyst modules you have purchased.
These modules can include Network, CDR, Console, and OnTraQ.
JUNE
2011
I M P AC T T E CH N O L OG I ES , I N C
CONFI DENTI AL AND PROPRI ETARY
145
T R AF F I C AN AL Y S T U S E R S G U I D E
9.3 Pools (Administrative users only)
A pool combines the results of multiple trunk groups and presents those results as if they
were one group. A pool can include trunk groups from more than one switch.
Pools are useful for evaluating all trunks busy and blockage across trunk groups that
overflow into one another. They help identify consolidation opportunities. For example, if
you have three trunk groups servicing your sales force you could create a "Sales" pool and
combine the results from these trunk groups.
Note that for the HiPath 4000, switch, each route that has a unique set of trunks will have
a trunk group pool created for it by Traffic Analyst. Openscape Voice and Cisco switch will
also create the routes if connections to OSV is provided in the Communication tab of the
switch properties.
9.3.1
Creating a Pool (Administrative users only)
The Add Pools option lets you define pools. When you click the Add Pool or select an
existing pool to edit, the Pool Definition screen displays.
When you create a pool, you do the following:
•
Select the switch
•
Supply the pool name
•
Add a descriptive comment
•
Select the trunk groups whose results will become part of the pool's overall
results
The Inherit Study Properties From Switch option identifies a switch to act as the
"parent" of the pool. The pool will inherit its default analysis properties from the defaults for
this switch's default trunk groups. Also, when a switch selection is required before a trunk
group or pool can be selected, you select this parent switch and the pool will be available
for analysis.
9.4 Using Organization Information in Call Detail Reports
Traffic Analyst allows you to include departmental or organizational information in your Call
Accounting reports, so that you have the ability to track unusual or problem calls more
easily to a specific department or employee. Using organization information in call detail
reports is a very easy way to hold people accountable. And, getting organizational files
uploaded is a snap for any administrator.
9.4.1
Creating the Organization File
The organization file is a .csv file. It can be created manually (for example, with Excel), or
automatically extracted from an Active Directory using the Traffic Analyst Active Directory
Connector. (For more information on the Active Directory Connector, please see the
document entitled Traffic Analyst Active Directory Overview.)
JUNE
2011
I M P AC T T E CH N O L OG I ES , I N C
CONFI DENTI AL AND PROPRI ETARY
146
T R AF F I C AN AL Y S T U S E R S G U I D E
The rows in the organization .csv file are:
<switch name>,<extension>,<name>,<department>,<cost center>,<organization>,
<manager>, <pin>
Following is an example of an organization file.
The switch name field is optional and fields must be enclosed in quotes if the field contains
a comma. Here’s an example:
Impact HiPath 4000, 1414, “Maycock, Becky”, Marketing, MK100, Impact Technologies,
Bryan Baehr, 2410
Or
Impact HiPath 4000, 1414, Becky Maycock, Marketing, MK100, Impact Technologies,
Bryan Baehr, 2410
If extension numbers are unique within the account the switch name can be left off, as
shown below.
1414, “Maycock, Becky”, Marketing, MK100, Impact Technologies, Bryan Baehr, 2410
Also, some fields may be left blank, although commas still serve as place markers for the
different fields. For example, if a PIN is used for a specific department, fields like “name”
and “extension” might not be filled in for that department’s record. Notice that the example
below only includes switch, department, cost center, organization and pin.
Impact HiPath 4000,,,Sales,SA101,Impact Technologies,,3320.
Once you have uploaded an organization file, you can still add new employees to it at a
later date. You can do this by uploading a new file that only contains the new employees.
Say you are adding three new employees that start tomorrow. Upload a file which has a
line for each new employee (3 rows) and enter an effective date of tomorrow. This
organization data will be combined with the previous organization data.
9.4.2
Upload Organization File (Administrative users only)
The Upload Organization File option lets you point to a file that will add organization data
not tracked by the switch for use in Call Detail reports. The column titles are: “Switch”
(optional if only one switch in network), “Extension” “Name,” “Department,” “Cost Center,”
“Organization,” “Manager” and “PIN.”
The organization data is imported from a comma delimited file (.csv format).
JUNE
2011
I M P AC T T E CH N O L OG I ES , I N C
CONFI DENTI AL AND PROPRI ETARY
147
T R AF F I C AN AL Y S T U S E R S G U I D E
When you upload an organization file via the web interface, the changes are applied to
existing call detail records immediately.
You can also select an “Effective Date,” which allows you to apply the Organization file to
older data. Doing so will make the organization changes take effect from first date in the
range. You can “backdate” organization changes this way. In addition, by selecting an
“Effective Date,” you can also simply schedule the organization changes to take place at
some point up to 30 days in the future.
Once you have uploaded the organization file and selected an Effective Date, from that
date forward the organization file will be applied to the data Traffic Analyst collects.
(Please note that that processing multiple days of time is time consuming, so the further
back you go in time to add Organization data to older records, the more time it will take for
Traffic Analyst to reprocess the data. Also, you can only go back in time to a past date
range for which the data files still exist -- those files that Traffic Analyst takes and stores in
its database. You will see an error message if you select a date too far back in time.)
In addition to updating your organization data though the web client, you also have the
ability to upload information through the administrative tool. Traffic Analyst is set to
perform automated updates during end of day processing; changes are then applied to
that entire day.
JUNE
2011
I M P AC T T E CH N O L OG I ES , I N C
CONFI DENTI AL AND PROPRI ETARY
148
T R AF F I C AN AL Y S T U S E R S G U I D E
10 Data Dictionaries
10.1
Network
The Network Data Dictionary groups data items by trunk group, pools, and switch types.
Note: Any field for which there isn’t valid data will display a dash ( - ).
10.1.1 Trunk Group/Pools Network Reports
Column Heading
Description
Report
ACL (secs)
The average length of all calls during this period, which is total
usage divided by total calls. (The same as Avg Call Length
(secs) – Total.)
Performance
Summary
Avg Call Length (secs) In
The average length of incoming calls during this period, which
is incoming usage divided by incoming calls.
Performance Detail
Avg Call Length (secs) Out
The average length of outgoing calls during this period, which
is outgoing usage divided by outgoing calls.
Performance Detail
Avg Call Length (secs) Total
The average length of all calls during this period, which is total
usage divided by total calls. (The same as ACL (secs).)
Performance Detail
Call Volumes –
Completed - In
The number of calls coming into the switch that first used a
trunk channel during this interval. Does not include calls
already in progress when the interval began.
Performance Detail
Call Volumes –
Completed – Out
The number of calls going out the switch that first used a trunk
channel during this interval. Does not include calls already in
progress when the interval began.
Performance Detail
Call Volumes –
Completed - Total
The total number of calls coming into or going out the switch
that first used a trunk channel during this interval. Does not
include calls already in progress when the interval began. (The
same as Calls Completed.)
Performance Detail
Calls Completed
The total number of calls coming into or going out the switch
that first used a trunk channel during this interval. Does not
include calls already in progress when the interval began. (The
same as Call Volumes – Completed – Total.)
Performance
Summary
Call Volumes – Blocked #
The actual or estimated number of calls that were blocked*
(unable to connect to a trunk channel) during this interval. A
dash indicates that the value couldn’t be estimated.
Performance Detail
Call Volumes – Blocked %
The percent of calls that were blocked* (unable to connect to a
trunk channel) during this interval. This is blocked calls divided
by attempted calls * 100. A dash indicates that the value
couldn’t be estimated.
Performance Detail
Call Volumes – Attempts
The total number of calls that were attempted (completed or
blocked) during this interval. Depending on the switch type, this
value could be actual or estimated.
Performance Detail
Date
Identifies the period for the row.
A time by itself indicates a period of an hour or lesser period
Performance Detail
and Activity
JUNE
2011
I M P AC T T E CH N O L OG I ES , I N C
CONFI DENTI AL AND PROPRI ETARY
149
T R AF F I C AN AL Y S T U S E R S G U I D E
Column Heading
Description
Report
and the time is the start of the period. Periods shorter than one
hour are indented compared to the hour data.
A date by itself indicates a day total.
“Week Of <date>” indicates a week total and the date is the
first day of that week.
“Month Of <date>” indicates a month total the date is the first
day of that month.
A date range indicates a total for all days in that range.
“All Through <date>” indicates all past days of data available
up to and including the given date.
Not all switches have data for periods of less than one hour,
but all switches have at least hour, day, week, and month
totals.
Incoming Usage (<units>)
- Offered
The total of Incoming Usage - Blocked and Incoming Usage –
Carried.
Activity
Incoming Usage (<units>)
- Blocked
For switch types that report blocked* calls, the number of the
blocked calls that are incoming multiplied by the average call
length.
Activity
Incoming Usage (<units>)
- Carried
The total cumulative time trunks are busy with calls coming into
the switch during this period. This includes time from calls
already in progress when this period began. The time units
used are selectable. (The same as Total Usage (<units>) – In.)
Activity
IP Bandwidth Required st
<x.x>% Blocked @ (1 )
Busiest Hour
The bandwidth required if the trunk traffic is carried via IP,
based off the required trunks for the busiest hour with the given
allowed percentage (x.x) of blocked calls. For the Performance
Summary report, the conversion from required trunks to
bandwidth is determined by the IP compression model
configured using the TA Classic interface and can be set per
trunk group.
Performance
Summary
IP Bandwidth (Kbps)
Required for
<Compression Model> –
Non-Blocking
The estimated IP network capacity required to carry the
number of calls based on the Non-Blocked required trunks. The
<Compression Model> is selectable in the report request.
Capacity Analysis
Summary
IP Bandwidth (Kbps)
Required for
<Compression Model> <x.x>% Blocking @
(<n>th) Busiest Hour
The estimated IP network capacity required to carry the
number of calls based on required trunks for the <n>th busiest
hour with the given allowed percentage (x.x) of blocked calls.
The <Compression Model> is selectable in the Capacity
Analysis Summary report request.
Capacity Analysis
Summary
IP Bandwidth (Kbps)
Required for
<Compression Model> –
1 Call Blocked Per Day
The estimated IP network capacity required to carry the
number of calls based on the 1 call blocked per day required
trunks. The <Compression Model> is selectable in the report
request.
Capacity Analysis
Summary
Outgoing Usage (<units>)
- Offered
The total of Outgoing Usage – Block and Outgoing Usage –
Carried.
Activity
Outgoing Usage (<units>)
- Blocked
For switch types that report blocked* calls, the outgoing
blocked calls multiplied by the average call length.
Activity
Outgoing Usage (<units>)
- Carried
The total cumulative time trunks are busy with calls going out of
the switch during this period. This includes time from calls
Activity
JUNE
2011
I M P AC T T E CH N O L OG I ES , I N C
CONFI DENTI AL AND PROPRI ETARY
150
T R AF F I C AN AL Y S T U S E R S G U I D E
Column Heading
Description
Report
already in progress when this period began. The time units
used are selectable. (The same as Total Usage (<units>) –
Out.)
Peak Period – Date
The date on which the peak percent trunks utilized occurred
with the period.
Performance
Summary
Peak Period – Time
The time of day at which the peak percent trunks utilized
occurred with the period.
Performance
Summary
Total Usage (<units>) Blocked
The estimated usage for blocked* calls, based on the number
of blocked calls multiplied by the average call length.
Activity
Total Usage (<units>) Carried
The total cumulative time that trunks are busy with calls coming
into or going out of the switch during this period. This includes
time from calls already in progress when this period began. The
time units used are selectable. (The same as Usage
(<units>).)
Activity
Total Usage (<units>) - In
The total cumulative time trunks are busy with calls coming into
the switch during this period. This includes time from calls
already in progress when this period began. The time units
used are selectable. (The same as Incoming Usage (<units>)
– Carried.)
Performance Detail
Total Usage (<units>) Offered
The sum of Total Usage Carried and Total Usage Blocked.
Activity
Total Usage (<units>) Out
The total cumulative time trunks are busy with calls going out of
the switch during this period. This includes time from calls
already in progress when this period began. The time units
used are selectable. (The same as Outgoing Usage (<units>)
– Carried.)
Performance Detail
Total Usage (<units>) Total
The total cumulative time that trunks are busy with calls coming
into or going out of the switch during this period. This includes
time from calls already in progress when this period began. The
time units used are selectable. (The same as Usage
(<units>).)
Performance Detail
Trunk Circuits - Max Used
The maximum number of trunk channels that were in use
simultaneously. Note: Not available for Siemens 9005, Avaya
or Nortel switches.
Performance Detail,
Performance
Summary and
Capacity Analysis
Summary
Trunk Circuits - Config
The number of configured trunks for a period. This is the
number of configured trunks at the end of that time range. If
you see an interval in the report marked with asterisks, it
means that the number of trunk circuits configured was
changed during that interval. Note: Configured trunks may be
entered manually for OpenScape Voice and Cisco switches.
Performance Detail,
Performance
Summary and
Capacity Analysis
Summary
Trunk Circuits - % Utilized
- Peak
For the shortest period recorded for the switch, the percent of
the maximum number of trunks in use simultaneously
compared to the number of configured trunks. For longer
periods, the maximum of the values from the shorter periods
during that time. For Siemens 9005, Avaya and Nortel reports,
this is equal the % Total Utilization column for hourly report and
equal to the maximum value for an hour found in % Total
Performance Detail
and Performance
Summary
JUNE
2011
I M P AC T T E CH N O L OG I ES , I N C
CONFI DENTI AL AND PROPRI ETARY
151
T R AF F I C AN AL Y S T U S E R S G U I D E
Column Heading
Description
Report
Utilization for intervals larger than an hour.
Trunk Circuits - % Utilized
- Total
The percent of the time that trunks were in use during the
interval compared to the total amount of trunk time available.
Performance Detail
and Performance
Summary
Trunk Circuits - ATB
(secs or occ)
The number of seconds (or occurrences, in the case of Nortel
reports) during the period in which all trunk channels were in
use. A dash indicates that the total number of channels
available is unknown.
Performance Detail
and Performance
Summary
Trunk Circuits – Required
st
- <x.x>% Blocking @ (n )
Busiest Hour
The number of trunks required based on statistical modeling
using data from the <n>th busiest hour during the period,
based on a configurable acceptable percentage (x.x) of blocked
calls. For the Performance Summary report, the statistical
model used is configured using the TA Classic interface and
can be set per trunk group. The user can define model for
Capacity Analysis Detail report.
Performance
Summary and
Capacity Analysis
Summary
Trunk Circuits – Required
– Non-Blocking
The number of trunks required based on statistical model so
that no calls are blocked during the period.
Capacity Analysis
Summary
Trunk Circuits – 1 Call
Blocked Per Day
The number of trunks required based on statistical model to
average only one call blocked per day during the period.
Capacity Analysis
Summary
Trunk Circuits – +/- <x.x>% Blocked @
(<n>th) Busiest Hour
The difference between required trunks and configured trunks,
where required trunks is estimated using the <n>th busiest
hour in the period and the configurable acceptable percentage
(x.x) of blocked calls. (The same as Trunk Circuits –
Shortage/Surplus - <x.x>% Blocking @ (<n>th) Busiest Hour)
Performance
Summary
Trunk Circuits –
Shortage/Surplus – NonBlocking
The difference between required trunks and configured trunks,
where required trunks is estimated for non-blocking.
Capacity Analysis
Summary
Trunk Circuits –
Shortage/Surplus <x.x>% Blocked @
(<n>th) Busiest Hour
The difference between required trunks and configured trunks,
where required trunks is estimated using the <n>th busiest
hour in the period and the configurable acceptable percentage
(x.x) of blocked calls. (The same as Trunk Circuits – +/- x.x>% Blocking @ (<n>th) Busiest Hour)
Capacity Analysis
Summary
Trunk Circuits –
Shortage/Surplus – 1 Call
Blocked Per Day
The difference between required trunks and configured trunks,
where required trunks is estimated allowing an average of one
blocked call per day.
Capacity Analysis
Summary
Usage (<units>)
The total cumulative time that trunks are busy with calls coming
into or going out of the switch during this period. This includes
time from calls already in progress when this period began. The
time units used are selectable. (The same as Total Usage
(<units>) – Total.)
Performance
Summary
*The outgoing portion of blocked calls is the actual value for Siemens 9751
(9005), Avaya, and Meridian SL/1. For those switch types, the incoming portion
of blocked calls is estimated based on the ratio of outgoing calls to outgoing
blocked calls. (e.g. If the number of blocked is 1/100 of the number of completed
outgoing calls, then the incoming blocked calls are estimated to be 1/100 of the
number of completed incoming calls.) The total for blocked calls is then the sum
of actual outgoing blocked calls plus estimated incoming blocked calls.
JUNE
2011
I M P AC T T E CH N O L OG I ES , I N C
CONFI DENTI AL AND PROPRI ETARY
152
T R AF F I C AN AL Y S T U S E R S G U I D E
Other switch types estimate blocked calls based on All Trunks Busy and the
average number of calls in the interval. For example, if you have 30 seconds of
All Trunks Busy and you have an average of 4 calls per minute, then blocked
calls is estimated to be 2.
JUNE
2011
I M P AC T T E CH N O L OG I ES , I N C
CONFI DENTI AL AND PROPRI ETARY
153
T R AF F I C AN AL Y S T U S E R S G U I D E
10.1.2 HiPath 3000 Gateway Network Reports
Column Heading
Description
Report
Date
Same as for Trunk Groups
Activity Summary,
TDM Activity and IP
Activity
IP LAN Bandwidth (Kbps)
Required for
<Compression Model> Current VoIP Channels
Based on the configured compression model, the bandwidth
required to support the current number of IP channels.
Capacity Analysis
Summary
IP LAN Bandwidth (Kbps)
Required for
<Compression Model> Zero Blocking VoIP
Channels
Based on the configured compression model, the bandwidth
required to support the required number of IP channels for zero
blocking.
Capacity Analysis
Summary
TDM Resources Channels
The number of TDM channels available in the gateway. This is
the number of B-Channels configured in the Gateway tab of
switch properties, less one channel if music on hold needs to
reserve a channel. The configured licensed B-Channels value
should be the number licensed. A TDM channel is required to
convert between TDM and IP devices on a call.
Activity Summary and
TDM Activity
TDM Resources Gateway Calls Carried TDM to IP External
Number of external calls that required a TDM to IP conversion
during the period. Does not include calls already in progress
when the interval began.
Activity Summary
TDM Resources Gateway Calls Carried IP to TDM External
Number of external calls that required an IP to TDM conversion
during the period. Does not include calls already in progress
when the interval began.
Activity Summary
TDM Resources Gateway Calls Carried Total Calls
Total number of external calls that required conversion
between TDM and IP (in either direction) during the period.
Does not include calls already in progress when the interval
began.
Activity Summary
TDM Resources Gateway Calls Carried –
Total Usage (<units>)
Total time used by all external calls that required conversion
between TDM and IP (in either direction) during the period.
This includes time from calls already in progress when this
period began.
Activity Summary
TDM Resources Gateway Calls Carried Total ACL (secs)
Average Call length for all external calls that required
conversion between TDM and IP (in either direction) during the
period.
Activity Summary
TDM Resources - TDM to
IP External Calls Carried Calls
Number of external calls that required a TDM to IP conversion
during the period. Does not include calls already in progress
when the interval began.
TDM Activity
TDM Resources - TDM to
IP External Calls Carried
– Usage (<units>)
Total time used by all calls that required a TDM to IP
conversion during the period. This includes time from calls
already in progress when this period began.
TDM Activity
TDM Resources - TDM to
IP External Calls Carried ACL (secs)
Average Call Length for all calls that required a TDM to IP
conversion during the period.
TDM Activity
JUNE
2011
I M P AC T T E CH N O L OG I ES , I N C
CONFI DENTI AL AND PROPRI ETARY
154
T R AF F I C AN AL Y S T U S E R S G U I D E
Column Heading
Description
Report
TDM Resources – IP to
TDM External Calls
Carried - Calls
Number of external calls that required an IP to TDM conversion
during the period. Does not include calls already in progress
when the interval began.
TDM Activity
TDM Resources - IP to
TDM External Calls
Carried – Usage (<units>)
Total time used by all external calls that required an IP to TDM
conversion during the period. This includes time from calls
already in progress when this period began.
TDM Activity
TDM Resources - IP to
TDM External Calls
Carried - ACL (secs)
Average Call Length for all external calls that required an IP to
TDM conversion during the period.
TDM Activity
TDM Resources – Total
External Calls Carried Calls
Total number of external calls that required conversion
between TDM and IP (in either direction) during the period.
Does not include calls already in progress when the interval
began.
TDM Activity
TDM Resources Total
External Calls Carried –
Usage (<units>)
Total time used by all external calls that required conversion
between TDM and IP (in either direction) during the period.
This includes time from calls already in progress when this
period began.
TDM Activity
TDM Resources - Total
External Calls Carried ACL (secs)
Average Call Length for all external calls that required
conversion between TDM and IP (in either direction) during the
period.
TDM Activity
TDM Channels - Current
The number of TDM channels currently available. (The same
as TDM Resources – Channels.)
Capacity Analysis
Summary
TDM Channels - Required
for Zero Blocking
The number of TDM channels required to make it very likely
that no calls will be blocked based on statistical modeling.
Capacity Analysis
Summary
TDM Channels Shortage/Surplus
The difference between current and required TDM channels. A
negative number means more channels are needed, a positive
number means there are unused channels.
Capacity Analysis
Summary
VoIP Resources - Virtual
Channels
The number of IP channels available. This depends on the
number and type of IP cards installed.
Activity Summary and
IP Activity
VoIP Resources - IP
Internodal Calls - IP Into
Node
Number of incoming calls on IP trunks that began during the
period. Does not include calls already in progress when the
interval began.
Activity Summary
VoIP Resources - IP
Internodal Calls - IP Out
of Node
Number of outgoing calls on IP trunks that began during the
period. Does not include calls already in progress when the
interval began.
Activity Summary
VoIP Resources - IP
Internodal Calls - Total
Calls
Total number of calls on IP trunks during the period. Does not
include calls already in progress when the interval began.
Activity Summary
VoIP Resources - IP
Internodal Calls - Total
Usage (<units>)
Cumulative time for all calls on IP trunks that occurred during
the period. This includes time from calls already in progress
when this period began.
Activity Summary
VoIP Resources - IP
Internodal Calls - Total
ACL (secs)
Average Call Length for all calls on IP trunks during the period.
Total usage (converted to seconds) divided by total calls.
Activity Summary
VoIP Resources - IP Into
Node - Calls
Number of incoming calls on IP trunks that began during the
period. Does not include calls already in progress when the
interval began.
IP Activity
JUNE
2011
I M P AC T T E CH N O L OG I ES , I N C
CONFI DENTI AL AND PROPRI ETARY
155
T R AF F I C AN AL Y S T U S E R S G U I D E
Column Heading
Description
Report
VoIP Resources - IP Into
Node - Usage (<units>)
Cumulative time for all incoming calls on IP trunks that
occurred during the period. This includes time from calls
already in progress when this period began.
IP Activity
VoIP Resources - IP Into
Node - ACL (secs)
Average Call Length for incoming calls on IP trunks during the
period. Usage (converted to seconds) divided by calls.
IP Activity
VoIP Resources - IP Out
of Node - Calls
Number of outgoing calls on IP trunks that began during the
period. Does not include calls already in progress when the
interval began.
IP Activity
VoIP Resources - IP Out
of Node - Usage (<units>)
Cumulative time for all outgoing calls on IP trunks that occurred
during the period. This includes time from calls already in
progress when this period began.
IP Activity
VoIP Resources - IP Out
of Node - ACL (secs)
Average Call Length for outgoing calls on IP trunks during the
period. Usage (converted to seconds) divided by calls.
IP Activity
VoIP Resources - Total IP
Carried - Calls
Total number of calls on IP trunks that began during the period.
Incoming calls plus outgoing calls. Does not include calls
already in progress when the interval began.
IP Activity
VoIP Resources - Total IP
Carried - Usage (<units>)
Cumulative time for all calls on IP trunks that occurred during
the period. Incoming usage plus outgoing usage. This includes
time from calls already in progress when this period began.
IP Activity
VoIP Resources - Total IP
Carried - ACL (secs)
Average Call Length for all calls on IP trunks during the period.
Total usage (converted to seconds) divided by total calls.
IP Activity
VoIP Channels - Current
The number of IP channels currently available. (The same as
VoIP Resources - Virtual Channels.)
Capacity Analysis
Summary
VoIP Channels - Required
for Zero Blocking
The number of IP channels required to make it very likely that
no calls will be blocked based on statistical modeling.
Capacity Analysis
Summary
VoIP Channels Shortage/Surplus
The difference between current and required IP channels. A
negative number means more channels are needed, a positive
number means there are unused channels.
Capacity Analysis
Summary
10.1.3 HiPath 4000 Gateway Network Reports
Column Heading
Description
Report
All Channels Busy (secs)
The number of seconds that all IP channels between the IPDA
and the switch were busy at the same time.
Activity Summary
Average Call Length
(secs) - In
The average length of a call going to the IPDA from the switch
(i.e. originated on the switch) for the period. Usage – In
(converted to seconds) divided by Calls – In.
Activity Summary
Average Call Length
(secs) – Out
The average length of a call going from the IPDA (i.e.
originated on the IPDA) to switch for the period. Usage – Out
(converted to seconds) divided by Calls – Out.
Activity Summary
Average Call Length
(secs) - Total
The average length of all calls between the IPDA and the
switch that for the period. Usage – Total (converted to
seconds) divided by Calls – Total.
Activity Summary
Bandwidth (Mb) Required
The IP bandwidth that should be available to ensure that all
Capacity Analysis
JUNE
2011
I M P AC T T E CH N O L OG I ES , I N C
CONFI DENTI AL AND PROPRI ETARY
156
T R AF F I C AN AL Y S T U S E R S G U I D E
Column Heading
Description
Report
for Zero Blocking
calls can be carried between the IPDA and the switch with no
blocking or lost of voice quality.
Summary
Calls – In
The number of calls going to the IPDA from the switch (i.e.
originated on the switch) that started during the period. Does
not include calls already in progress when the interval began.
Activity Summary
Calls – Out
The number of calls from of the IPDA (i.e., originated on the
IPDA) to the switch that started during the period. Includes
calls that came in on a trunk on the IPDA and were routed to
the switch. Does not include calls already in progress when
the interval began.
Activity Summary
Calls – Total
The number of calls carried between the IPDA and the switch
that started during the period. Does not include calls already in
progress when the interval began.
Activity Summary
Channels Required for
Zero Blocking
The number of IP channels between the IPDA and the switch
which are required to in order to make it very likely that no
calls will be blocked due to a lack of channels.
Capacity Analysis
Summary
Date
The same as for Trunk Groups/Pools
Activity Summary
Gateway
The name of the gateway.
Capacity Analysis
Summary
MOH Channels
The number of IP channels between the IPDA and the switch
that are used for sending Music On Hold (MOH) from the
switch to the IPDA, or between two different IPDAs.
Activity Summary
% DMC Calls
The percent of total calls that do not involve a non-IP device.
Calls between IP devices are able to use Direct Media
Connection (DMC) for higher call quality, but using DMC
involves some signaling overhead that uses extra channels
between the switch and the IPDA, based on the number of
DMC calls in progress and the switch version.
Activity Summary and
Capacity Analysis
Summary
Peak Calls
The peak number of calls between the IPDA and the switch
during the period.
Activity Summary
Peak Channels Used
The peak number of IP channels used between the IPDA and
the switch during the period. If percent DMC is 0, then this is
always Peak Calls plus MOH Channels. When percent DMC is
not zero, it will be higher.
Activity Summary and
Capacity Analysis
Summary
Peak % Channel
Utilization
The percent of peak channels compared to the total capacity.
Activity Summary
Total Channels Available
The total number of IP channels available on the IPDA for
connecting to switch. There are only two sizes available, large
(120) and small (60). Siemens documentation often describes
the capacity in terms of the number of DMC calls that can be
carried, which gives lower numbers. The corresponding DMC
call capacities for HiPath 4000 version 3 and below are 90 and
45. The corresponding DMC call capacities for version 4 and
above are 100 and 50. If you see an interval in the report
marked with asterisks, it means that the number of channels
configured was changed during that interval.
Activity Summary and
Capacity Analysis
Summary
Usage (<units>) – In
The cumulative time for all calls going to the IPDA from the
switch (i.e. originated on the switch) that occurred during the
Activity Summary
JUNE
2011
I M P AC T T E CH N O L OG I ES , I N C
CONFI DENTI AL AND PROPRI ETARY
157
T R AF F I C AN AL Y S T U S E R S G U I D E
Column Heading
Description
Report
period. Includes time from calls that started in previous
periods.
Usage (<units>) - Out
The cumulative time for all calls going from the IPDA (i.e.
originated on the IPDA) to switch that occurred during the
period. Includes time from calls that started in previous
periods.
Activity Summary
Usage (<units>) – Total
The cumulative time for all calls between the IPDA and the
switch that occurred during the period. Includes time from calls
that started in previous periods.
Activity Summary
JUNE
2011
I M P AC T T E CH N O L OG I ES , I N C
CONFI DENTI AL AND PROPRI ETARY
158
T R AF F I C AN AL Y S T U S E R S G U I D E
10.2
Console
Column Heading
Description
Report
% All Consoles Busy
Number of seconds that all active consoles were busy divided
by seconds that the console is manned.
Utilization & Service
% Calls Abandoned
(The sum of the number of times incoming external calls hung
up while on hold, the number of times incoming internal calls
hung up while on hold, the number of calls abandoned while in
queue [not available for the Hicom 300], and the number of
times recalls hung up while on hold) divided by (the sum of the
number a recalls, the number of incoming internal calls
answered at console, and the number of incoming external
calls answered at console).
Utilization & Service
and Call Profile
% Occupancy
(Seconds that the console is manned minus seconds that
console is active but no call is in progress) divided by the
seconds that the console is manned.
Utilization & Service
% Occupancy – Active
Seconds that the console is manned minus the seconds that
console is active but no call is in progress, divided by one.
Activity
ACL (secs) - External
Seconds of usage for incoming external calls divided by
incoming external calls answered at console.
Activity
ACL (secs) - Internal
Seconds of usage for incoming internal calls divided by
incoming internal calls answered at console.
Activity
ACL (secs) - Outgoing
(The sum of seconds of usage for outgoing calls placed by
console for another party and seconds of usage for outgoing
calls placed by an operator when no other party was on the
line) divided by (the sum of outgoing calls placed by console
for another party and outgoing calls placed by operator when
no other party was on the line).
Activity
ACL (secs) - Personal
Seconds spent on incoming calls directly to console’s
extension divided by the number of incoming calls directly to
console’s extension that were answered.
Activity
ACL (secs) - Total
(The sum of seconds of usage for incoming external calls,
seconds of usage for incoming internal calls, and seconds
spent on incoming calls directly to console’s extension)
divided by (the sum of incoming external calls answered at
console, incoming internal calls answered at console, and the
number of incoming calls directly to console’s extension that
were answered).
Activity
All Calls (secs)
The sum of seconds of usage for incoming external calls,
seconds of usage for incoming internal calls, and seconds of
usage for recalls.
Utilization & Service
All Calls
The sum of incoming external calls answered at console,
incoming internal calls answered at console, and the number
of recalls.
Call Profile
JUNE
2011
I M P AC T T E CH N O L OG I ES , I N C
CONFI DENTI AL AND PROPRI ETARY
159
T R AF F I C AN AL Y S T U S E R S G U I D E
Column Heading
Description
Report
All Calls (secs)
(The sum of seconds of usage for recalls, seconds of usage
for incoming external calls, and seconds of usage for incoming
internal calls) divided by (the sum of the number of recalls, the
number of incoming internal calls received at console, and the
number of incoming external calls received at console).
Call Length
Avg Queue Time (secs)
Average time in queue for internal or external incoming calls.
Utilization & Service
Available (secs)
Seconds that the console is manned.
Utilization & Service
Available (secs)
Seconds that the console is manned.
Followed by:
The second number is always 100%.
Utilization
Auto – Blocked (Hrs)
The auto blocked time divided by 3600.
Note that the HiPath 4000 does not supply data for this field,
so reports will display zeros.
Activity
Calls Abandoned
The sum of the number of times incoming external calls hung
up while on hold, the number of times incoming internal calls
hung up while on hold, the number of calls in queue that were
abandoned (not available for the Hicom 300), and the number
of times recalls hung up while on hold.
Call Profile
Calls - External
Incoming external calls answered at console.
Activity
Calls - Internal
Incoming internal calls answered at console.
Activity
Calls - Outgoing
The sum of outgoing calls placed by console for another party
and outgoing calls placed by operator when no other party
was on the line.
Activity
Calls - Personal
Number of incoming calls directly to console’s extension that
were answered.
Activity
Calls – Total
The sum of incoming external calls answered at console,
incoming internal calls answered at console, and the number
of incoming calls directly to console’s extension that were
answered
Activity
External Calls
Incoming external calls answered at console.
Call Profile
External – Console Activity
(secs)
Seconds of usage for incoming external calls.
Followed by:
Seconds of usage for incoming external calls divided by the
number of seconds that the console is manned.
Utilization
External (secs)
Seconds of usage for incoming external calls.
Utilization & Service
External (secs)
Seconds of usage for incoming external calls divided by the
number of incoming external calls received at console.
Call Length
Forward – Redirected
Number of forwarded external calls.
Call Profile
Forwards (secs)
Seconds usage for forwarded external calls divided by the
number of forwarded external calls.
Call Length
Fwd – Redirected (secs)
Seconds of usage for forwarded external calls.
Followed by:
Seconds of usage for forwarded external calls divided by the
number of seconds that the console is manned.
Utilization
Hrs – Active
Seconds that the console is manned divided by 3600
Activity
JUNE
2011
I M P AC T T E CH N O L OG I ES , I N C
CONFI DENTI AL AND PROPRI ETARY
160
T R AF F I C AN AL Y S T U S E R S G U I D E
Column Heading
Description
Report
Idle (secs)
Seconds that console is active but no call is in progress.
Utilization & Service
Incoming Calls
Number of incoming calls directly to console’s extension that
were answered.
Call Profile
Incoming – Personal
Extension (secs)
Seconds spent on incoming calls directly to console’s
extension.
Followed by:
Seconds spent on incoming calls directly to console’s
extension divided by the number of seconds that the console
is manned.
Utilization
Incoming (secs)
Seconds spent on incoming calls directly to console’s
extension.
Utilization & Service
Incoming (secs)
Seconds spent on incoming calls directly to console’s
extension divided by the number of incoming calls directly to
console’s extension that were answered.
Call Length
Internal – Console Activity
(secs)
Seconds of usage for incoming internal calls.
Followed by:
Seconds of usage for incoming internal calls divided by the
number of seconds that the console is manned.
Utilization
Internal Calls
Incoming internal calls answered at console.
Call Profile
Internal (secs)
Seconds of usage for incoming internal calls.
Utilization & Service
Internal (secs)
Seconds of usage for incoming internal calls divided by the
number of incoming internal calls received at console.
Call Length
Manual – Blocked (Hrs)
The manual blocked time divided by 3600.
Note that the HiPath 4000 does not supply data for this field,
so reports will display zeros.
Activity
Night – Idle (secs)
Seconds that console was in night service mode.
Followed by:
Seconds that console was in night service mode divided by
the number of seconds that the console is manned.
Utilization
Night Key Time
Seconds that console was in night service mode.
Utilization & Service
Open – Idle (secs)
Seconds that console is active but no call is in progress.
Followed by:
Seconds that console is active but no call is in progress
divided by the number of seconds that the console is manned.
Utilization
Outgoing Calls
Outgoing calls placed by operator when no other party was on
the line.
Call Profile
Outgoing – Personal
Extension (secs)
Seconds of usage for outgoing calls placed by operator when
no other party was on the line.
Followed by:
Seconds of usage for outgoing calls placed by operator when
no other party was on the line divided by the number of
seconds that the console is manned.
Utilization
Outgoing (secs)
Seconds of usage for outgoing calls placed by operator when
no other party was on the line.
Utilization & Service
JUNE
2011
I M P AC T T E CH N O L OG I ES , I N C
CONFI DENTI AL AND PROPRI ETARY
161
T R AF F I C AN AL Y S T U S E R S G U I D E
Column Heading
Description
Report
Outgoing (secs)
Seconds of usage for outgoing calls placed by operator when
no other party was on the line divided by the number of
outgoing calls placed by operator when no other party was on
the line.
Call Length
Outside – Redirected
Number of outgoing calls placed by console for another party.
Call Profile
Outside - Redirected
(secs)
Seconds of usage for outgoing calls placed by console for
another party.
Followed by:
Seconds of usage for outgoing calls placed by console for
another party divided by the number of seconds that the
console is manned.
Utilization
Outside (secs)
Seconds of usage for outgoing calls placed by console for
another party divided by the number of outgoing calls placed
by console for another party.
Call Length
Queued Calls Answered
Number of answered calls that had been queued.
Call Profile
Recall – Console Activity
(secs)
Seconds of usage for recalls.
Followed by:
Seconds of usage for recalls divided by the number of
seconds that the console is manned.
Utilization
Recalls
Number of recalls.
Call Profile
Recalls (secs)
Seconds of usage for recalls.
Utilization & Service
Recalls (secs)
Seconds of usage for recalls divided by the number of recalls.
Call Length
Total – Blocked (Hrs)
(The sum of auto blocked time and manual blocked time)
divided by 3600.
Note that the HiPath 4000 does not supply data for this field,
so reports will display zeros.
Activity
Total – Console Activity
(secs)
The sum of seconds of usage for incoming external calls,
seconds of usage for incoming internal calls, and seconds of
usage for recalls.
Followed by:
(The sum of seconds of usage for incoming external calls,
seconds of usage for incoming internal calls, and seconds of
usage for recalls) divided by the number of seconds that the
console is manned.
Utilization
Transfer – Redirected
Number of transferred external calls.
Call Profile
Transfers (secs)
Seconds of usage for transferred external calls divided by the
number of transferred external calls.
Call Length
Xfer - Redirected (secs)
Seconds of usage for transferred external calls.
Followed by:
Seconds of usage for transferred external calls divided by the
number of seconds that the console is manned.
Utilization
JUNE
2011
I M P AC T T E CH N O L OG I ES , I N C
CONFI DENTI AL AND PROPRI ETARY
162
T R AF F I C AN AL Y S T U S E R S G U I D E
10.3
Call Detail
10.3.1 Call Detail Data Items
The following table lists the Call Detail data items you can use when you create Call Detail
reports. Some of the data items may be available as both filters for creating the report and
as available report columns within a report.
Call Detail Data
Item
Definition
Account Code
The account code reported by the switch, if used. Some customers require some
toll calls to be charged to an account.
Call Duration
The time that a call is connected (in seconds). Does not include ring time.
Call ID
A unique number that is the same for all call segments that are part of the same
call. Sort of like a serial number.
Call Type
Internal -- A call between two extensions on the switch (including extensions on
IPDAs attached to the same switch).
Incoming -- A call that arrives at the switch through a trunk.
Network -- A call from an extension on one switch in the customer network to
another switch in the customer network.
Local -- An outgoing call that has no toll charges.
Regional -- An outgoing toll call to a local region which has a cost that differs from
long distance calls.
Long Distance -- An outgoing toll call to a number (within the same country).
International -- An outgoing toll call to another country.
800 -- An outgoing toll free call, even though it may be to a destination outside of
the local calling area.
900 -- An outgoing toll call that is charged a substantial amount above the typical
long distance rate.
Called Customer
ID
The ID assigned by the switch to the called customer party. In order for this field to
be populated, the Customer Identification number must be set for each Business
Group in the OpenScape Voice Common Management Portal.
Called Number
The originally called number. Basically the number dialed by the caller before the
call is forwarded or distributed. OSV uses the dialed digits.
Calling
Customer ID
The ID assigned by the switch to the calling customer party. In order for this field to
be populated, the Customer Identification number must be set for each Business
Group in the OpenScape Voice Common Management Portal.
Calls
The number of calls reported. For simple calls, this is just the number of call
records. More complex calls, such as those involving a transfer, may have multiple
call records and still count as only one call. All of the call segments for a single call
will have the same Call ID.
Charged
Extension
The extension that placed an outgoing call or received an incoming call. For the
HiPath 4000, this is the same as the “paying party” on the switch, so it can be
customized using an AMO command.
JUNE
2011
I M P AC T T E CH N O L OG I ES , I N C
CONFI DENTI AL AND PROPRI ETARY
163
T R AF F I C AN AL Y S T U S E R S G U I D E
Call Detail Data
Item
Definition
Charged Party
The name of the charged extension for the call. The organization data is imported
from a comma delimited file (like output from Excel, for example) so it is userdefined. This field allows you to filter and report Call Detail statistics for different
parts of your organization.
Clearing Cause
Call information on why a call segment ended.
Connected
Number
The originating number’s phone number for an incoming call or the
destination/called number for an outgoing call. The opposite party as the Charged
Extension.
Cost
The cost of a call.
For outgoing calls, defined in cents per minute where any part of minute used
counts as a full minute. (Typical rule for calculating toll changes in the United
States.) The first minute of outgoing calls can have a different cost set than the rest
of the minutes.
For incoming and interval calls, there is no rounded up to a full minute. The cost per
minute is converted to cost per second and applied to each call segment in the
calls. The difference between the configured first minute cost and the additional
minutes cost is applied to the first call segment for the call.
Cost Center
The name of the cost center that corresponds to the charged extension for this call.
The organization data is imported from a comma delimited file (like output from
Excel, for example) so it is user-defined. This field allows you to filter and report Call
Detail statistics for different parts of your organization.
Department
The name of the department that corresponds to the charged extension for this call.
The organization data is imported from a comma delimited file (like output from
Excel, for example) so it is user-defined. This field allows you to filter and report Call
Detail statistics for different parts of your organization.
Destination
The extension number that is connected to the call for an incoming call or the
outside number for an outside call.
Gateway Called
If a call is placed to an extension or trunk connected to an IPDA, this is the name of
that IPDA gateway.
Gateway Calling
If a call is placed from an extension or trunk connected to an IPDA, this is the name
of that IPDA gateway.
LCR Route
The Least Cost Route selected by the switch for an outgoing call.
Manager
The name of the manager that corresponds to the charged extension for this call.
The organization data is imported from a comma delimited file (like output from
Excel, for example) so it is user-defined. This field allows you to filter and report Call
Detail statistics for different parts of your organization.
JUNE
2011
I M P AC T T E CH N O L OG I ES , I N C
CONFI DENTI AL AND PROPRI ETARY
164
T R AF F I C AN AL Y S T U S E R S G U I D E
Call Detail Data
Item
Definition
Network Hop
Step
A value of 0 in this field indicates a normal call segment. A non-zero value for a call
segment indicates that this segment was routed to a HiPath 4000 switch within the
customer’s network, in addition to the source and destination. For most purposes,
these call segments with network hop step greater than 0 are filtered out, but they
can be examined if the customer wants to see how the call was routed through their
network. Call segments with a network hop step greater than 0 never have a cost of
their own. If there is a network cost defined for the switch where the call segment
was reported, that cost is included in the cost of the associated call segment with a
network hop step of 0.
Organization
The name of the organization that corresponds to the charged extension for this
call. The organization data is imported from a comma delimited file (like output from
Excel, for example) so it is user-defined. This field allows you to filter and report Call
Detail statistics for different parts of your organization.
Originating
Number
The number of the party that placed the call. This is the number that would appear
as the “Caller ID” on an extension. If the HiPath 4000 does not receive a calling
number, the Originating Number appears as “Unavailable.” If the caller is blocking
caller ID, the number appears as “Blocked.” For OpenScape and Hicom 300
switches, blocked and calling numbers not received are displayed as “Unavailable.”
Originating
Party
The name of the person associated with the Originating Number.
PIN
Personal Identification Number, up to 15 characters. Note that this option is only
available if the PBX is configured to support PINs. Also, for security reasons, the
Administrator must choose to allow the PIN column in reports, by checking the
coordinating box in the CDR Reports tab of the switch properties.
Seizure Code
The code for seizing a trunk. A typical example is the “9” dialed to get an outside
line. Not all switches report the seizure code separately.
Seizure Duration
The length of time in seconds that the switch extension or trunk used in the call was
occupied by the call.
Start Date
The date on which a call is answered or started, based on the time zone on the
switch.
Start Seizure
Time
The clock time that a call began. When the first trunk or extension used by the call
on the switch is seized. Includes ring time. In the time zone of the switch carrying
the call.
Start Talk Time
The clock time that a call is answered or sent to queue. Or if the call is not
answered, the time the call was placed. In the time zone of the switch carrying the
call.
Switch
The PBX monitored by Traffic Analyst that is carrying the call.
Transfer
Number
The extension number of the device that transferred a call.
Trunk Group
Prime
The primary trunk group used by an incoming or outgoing call. Also the only trunk
group used if call originates or terminates on the switch reporting the call.
Trunk Group
Transit
The “other” trunk group used by a call that transits the switch (in one trunk group
and out another). In this case, the outgoing trunk group is in “Trunk Group Prime”
and the incoming trunk group is “Trunk Group Transit.”
JUNE
2011
I M P AC T T E CH N O L OG I ES , I N C
CONFI DENTI AL AND PROPRI ETARY
165
T R AF F I C AN AL Y S T U S E R S G U I D E
Call Detail Data
Item
Definition
Trunk Number
Primary
The number of the trunk within the primary trunk group used by an incoming or
outgoing call. Also the only trunk group used if call originates or terminates on the
switch reporting the call.
Trunk Number
Transit
The number of the trunk in the “other” trunk group used by a call that transits the
switch (in one trunk group and out another). In this case, the outgoing trunk group is
in “Trunk Group Prime” and the incoming trunk groups are “Trunk Group Transit.”
Wait Duration
The “waiting” time, or the delta between Seizure Duration and Call Duration. Also,
is a filter in the “Include” column of the report screen.
10.3.2 Call Detail Fields Available by Switch Type
The following table displays the available Call Detail fields. A “” denotes switch
availability; a “-“ indicates that the Call Detail field is not available for that switch type.
Siemens
Field Name
Hicom 300
HiPath
3000
HiPath
4000
OpenScape
Voice
Cisco
Nortel
Avaya
Unified
Communications
Manager
CS1000
Aura
Meridian
SL1
Definity G3
S8700
Account Code
Call Duration
Call ID
(no internal
calls)
(no internal
calls)
Called
Customer ID
-
-
-
-
-
-
Calling
Customer ID
-
-
-
-
-
-
Called
Number
Calls
Charged
Extension
Charged
Party
Call Type
Clearing
Cause
Connected
Number
Cost
Cost Center
JUNE
2011
I M P AC T T E CH N O L OG I ES , I N C
CONFI DENTI AL AND PROPRI ETARY
166
T R AF F I C AN AL Y S T U S E R S G U I D E
Siemens
Field Name
Hicom 300
HiPath
3000
HiPath
4000
OpenScape
Voice
Cisco
Nortel
Avaya
Unified
Communications
Manager
CS1000
Aura
Meridian
SL1
Definity G3
S8700
Department
Destination
(same as
Called
Number)
(same as
Called
Number)
Gateway
Called
-
-
-
-
-
-
Gateway
Calling
-
-
-
-
-
-
LCR Route
-
-
-
-
-
-
Network Hop
Step
-
-
-
-
-
Manager
Organization
Originating
Number
Originating
Party
PIN
-
Seizure Code
-
Seizure
Duration
-
-
Start Date
Start Seizure
Time
-
-
Start Talk
Time
Switch
Transfer
Number
-
Trunk
Number
Primary
-
-
Trunk
Number
Transit
-
-
-
Trunk Group
Prime
Trunk Group
-
JUNE
2011
I M P AC T T E CH N O L OG I ES , I N C
CONFI DENTI AL AND PROPRI ETARY
167
T R AF F I C AN AL Y S T U S E R S G U I D E
Siemens
Field Name
Hicom 300
HiPath
3000
HiPath
4000
OpenScape
Voice
Cisco
Nortel
Avaya
Unified
Communications
Manager
CS1000
Aura
Meridian
SL1
Definity G3
-
S8700
Transit
Wait Duration
JUNE
2011
-
I M P AC T T E CH N O L OG I ES , I N C
CONFI DENTI AL AND PROPRI ETARY
168
T R AF F I C AN AL Y S T U S E R S G U I D E
Appendix A: Troubleshooting
To ensure that Traffic Analyst is accessible by users with Internet Explorer, some
configuration settings may need to be adjusted. Settings may differ depending on what
version of Internet Explorer is being used. Following are troubleshooting procedures for
Internet Explorer versions 6 and 7, as well as troubleshooting procedures for Internet
Explorer version 8.
Internet Explorer 6 & 7
To access Traffic Analyst from Internet Explorer 6 or 7, Active Scripting must be enabled.
To make sure Active Scripting is enabled, follow the instructions below:
JUNE
2011
•
Go to Internet Options
•
Select the Security Tab
•
Select the Internet Zone
•
Select Custom Level
•
Scroll down to the Scripting section, select the Enable radio button under
Active Scripting
I M P AC T T E CH N O L OG I ES , I N C
CONFI DENTI AL AND PROPRI ETARY
169
T R AF F I C AN AL Y S T U S E R S G U I D E
Internet Explorer 8
To access Traffic Analyst from Internet Explorer 8, Compatibility Mode must be enabled.
There are two options for enabling Compatibility Mode. The first solution is the simplest:
•
Browse to the Traffic Analyst website; http://(IP address of server)/trafficweb
•
Go to the Tools dropdown and click the Compatibility View menu
•
This option toggles Compatibility Mode for the currently browsed web site
A second solution is:
•
Go to the Tools dropdown, then click the Compatibility View Settings menu
•
The following dialog will appear:
•
Enter the name of your Traffic Analyst server in the “Add this website” field, then
click Add.
Note: If you need to get this information from a technical support person, ask for the FQDN
(Fully Qualified Domain Name) of the machine hosting the website.
All websites listed will browse in Compatibility Mode. To display all intranet sites in
Compatibility View, check the coordinating checkbox at the bottom of the dialog box. You
can also choose to display all websites this way.
JUNE
2011
I M P AC T T E CH N O L OG I ES , I N C
CONFI DENTI AL AND PROPRI ETARY
170
T R AF F I C AN AL Y S T U S E R S G U I D E
Testing the Connection to an OpenScape Voice Switch
If you have an IP address, user name, and password for an OpenScape Voice switch and
the connection test fails, follow these instructions for troubleshooting.
•
Do a ping to make sure the IP address is accessible.
•
Download a copy of a free program to test the SFTP connection, such as
WinSCP, off the internet.
o
•
You should be able to log into the OpenScape Voice switch and change to the
directory “/cdr”.
o
•
Note: You cannot use regular FTP.
Note: Use a forward slash, not backward slash. OpenScape Voice is
Unix.
If you see files in the /cdr directory that end in “.BF” then the switch is generating
CDR files.
Traffic Analyst Housekeeping
This section discusses procedures that may be helpful for maintaining Traffic Analyst on
your server. Please note that these are recommendations.
Shutdown/Reboot
If you need to shutdown/reboot your Traffic Analyst server, you may, but do so with
caution. When shutting down Traffic Analyst for an upgrade, make sure that the
OnTraQ server (if installed) is also shutdown. This must be done to ensure that the
database definition can be properly updated, since Traffic Analyst and OnTraQ utilize
the same database.
Normally, Traffic Analyst must be manually restarted after any reboot. The exception
is if Traffic Analyst was installed as a Windows Service. If installed as a service,
Traffic Analyst should begin running when the server is rebooted.
Managing Disk Space
Database backups can take up a lot of space, which adds up over time. If you factor
in the fact that classic Traffic Analyst reports are saved in the Traffic Analyst/Reports
directory indefinitely and scheduled OnTraQ reports are also saved indefinitely, it’s
obvious that extra space can be depleted quite quickly. And, if Traffic Analyst runs
out of disk space, it almost always corrupts the database, which, in turn, requires
restoring a backup.
Database Backups
Not only do database backups take up space on the target drive once they are
complete, but they also require room on the system to “perform/run” the backup
process. When the backup runs, it makes a copy of the database and the database
log file in the Traffic Analyst install\temp directory. It then performs a compression
JUNE
2011
I M P AC T T E CH N O L OG I ES , I N C
CONFI DENTI AL AND PROPRI ETARY
171
T R AF F I C AN AL Y S T U S E R S G U I D E
against that database and the database log file. This compression uses temporary
space in that same Traffic Analyst temp directory. Next, it appends the comm. audit
directory contents (which contains the raw data collected from the switch) to the end
of the compressed file in the temp directory, where it remains until all files are copied
to the target directory. Once this is complete, Traffic Analyst deletes the temporary
compressed file.
For Traffic Analyst to successfully perform a backup, you should have as much disk
space as possible for the following:
•
A copy of the database and it’s log file
•
A fully compressed backup file in the directory where Traffic Analyst installed
(includes database, database log file, and compressed caudit directory)
•
A copy of the final compressed backup file(s), if the target of the backup is on the
same partition that Traffic Analyst is installed on
The minimum formula needed by the database backup process is: (database and
database log file size)+(compressed database and database log file) + (compressed
caudit directory size); Optionally, if target backup directory is on same Traffic Analyst
installed partition +(size of target backup file size).
Example:
database and database log file size = 6.46GB
caudit directory size = 11.6GB
compressed database and database log size ~ (6.46GB)*.25 = 1.62GB
compressed caudit directory size ~ (11.6GB)*.12 = 1.4GB
Or (6.46GB)+(1.62GB)+(1.4GB) = 9.5GB available disk space (minimum)
Note: If you cut it close, Traffic Analyst will not run well. The operating system needs
working space, and your database and comm. audit directory data will continue to
grow as you collect more data. Be sure you give yourself at least 10% of your disk
capacity or the size of an uncompressed copy of the Traffic Analyst database, log file
and comm. audit directory, plus the necessary room to run a backup and some
additional capacity for increases in the data you will store. With the above example,
if you have a 100GB HDD after formatting, you would want at least [9.5GB + larger of
(18GB or 10GB) =] 28GB of disk space available.
WARNING: We highly recommend you do not store the backup on the same
physical drive as the operating system or Traffic Analyst application. You may want
to store them to a separate HDD or network drive, in case the drive Traffic Analyst is
installed on fails. Be sure you watch the target drive space regularly. Also, note that
in Traffic Analyst you can control how many backups are kept, so the fewer backups
you have stored at one time, the less disk space will be used.
JUNE
2011
I M P AC T T E CH N O L OG I ES , I N C
CONFI DENTI AL AND PROPRI ETARY
172
T R AF F I C AN AL Y S T U S E R S G U I D E
Windows Updates
It is important to keep up with Windows Updates on your Traffic Analyst server.
However, we recommend that you do not set Windows Updates to update
automatically, because this can cause Traffic Analyst to shut down unintentionally. If
this happens, you must restart Traffic Analyst manually. Note: Any automatic update
could shut Traffic Analyst down, so be careful about what updates you run
automatically.
It is recommended that Windows Updates are run in between data collection periods,
so that all data is collected without interruption.
Note: Impact Technologies does not test all Windows Updates against Traffic Analyst
performance. In general, these updates do not have a negative effect, however
Impact cannot be held responsible if an update does impact performance in an
undesirable way.
Virus Protection Software
Virus protection software that is generally compliant with Traffic Analyst requirements
includes:
•
McAfee
•
Norton
•
ESET
•
AVG
Other virus protection products may be acceptable, as well.
Defragment of Hard Disk Drive
Over time, Traffic Analyst (or any other program) can degrade in performance if it has
been running for a while.
We recommend you periodically “defragment” the hard disk drive on which Traffic
Analyst is installed. You may use the windows “Disk Defragmenter” or some other
third party utility. If you decide to do so, make sure you shut down as many
applications as you can, including Traffic Analyst, its database service and OnTraQ,
to get a better defragmented file system.
JUNE
2011
I M P AC T T E CH N O L OG I ES , I N C
CONFI DENTI AL AND PROPRI ETARY
173
T R AF F I C AN AL Y S T U S E R S G U I D E
Copyright © 1997-2011 by Impact Technologies, Inc. All rights reserved.
Information in this document is subject to change without notice. No part of this
document may be photocopied, reproduced, or translated by any means without
the prior written consent of Impact Technologies, Inc.
Impact Technologies, Inc.
16650 Chesterfield Grove, Suite 210
Chesterfield, MO 63005-1409
Main: (314) 743-1400
Customer Service: (314) 743-1420
Fax: (314) 743-1401
http://www.impacttech.com/
Siemens, OpenScape Voice, HiPath and Hicom are registered trademarks of
Siemens Enterprise Communications, Inc.
Nortel, Meridian, and SL1 are registered trademarks of Nortel Networks Corp.
Avaya, Aura, Definity G3 and S8700 are registered trademarks of Avaya Inc.
Cisco and Unified Communications Manager are registered trademarks of Cisco
Systems, Inc.
Microsoft is a registered trademark, and Windows, Windows 95, Windows 98 and
Windows NT are trademarks of Microsoft Corporation.
InstallShield is a trademark of Stirling Technologies, Inc.
Sybase SQL Anywhere is a trademark of Sybase, Inc.
Secure Sentinel is a registered trademark, and Sentinel 2000 is a trademark of
ION Networks Inc.
E-COMMS CAB-5 and E-COMMS CAB-6 are trademarks of E-COMMS, Inc.
Western Telematic and PollCat NetLink are trademarks of Western Telematic,
Inc.
UDS-10 is a trademark of Lantronix
Chilkat Zip Library copyright Chilkat Software Inc., 2000-2009
JUNE
2011
I M P AC T T E CH N O L OG I ES , I N C
CONFI DENTI AL AND PROPRI ETARY
174