Download Mazzer Mini Technical data
Transcript
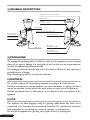
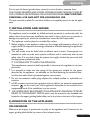
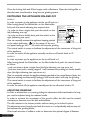
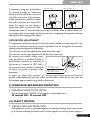
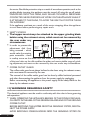
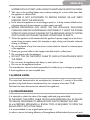
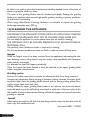
ENGLISH CONTENTS 1) 2) 3) 4) 5) 6) 7) 8) 9) 10) 11) 12) 13) 14) Foreword . . . . . . . . . . . . . . . . . . . . . . . . . . . . . . . . . . . . . . . . . . . . . . . . . . . . .page 1 Dimensions . . . . . . . . . . . . . . . . . . . . . . . . . . . . . . . . . . . . . . . . . . . . . . . . . . . . . . . .1 General description . . . . . . . . . . . . . . . . . . . . . . . . . . . . . . . . . . . . . . . . . . . . . . . . 2 Packaging . . . . . . . . . . . . . . . . . . . . . . . . . . . . . . . . . . . . . . . . . . . . . . . . . . . . . . . . . 2 Disposal . . . . . . . . . . . . . . . . . . . . . . . . . . . . . . . . . . . . . . . . . . . . . . . . . . . . . . . . . . 2 Use . . . . . . . . . . . . . . . . . . . . . . . . . . . . . . . . . . . . . . . . . . . . . . . . . . . . . . . . . . . . . . 2 Installation and wiring . . . . . . . . . . . . . . . . . . . . . . . . . . . . . . . . . . . . . . . . . . . . . . . 3 Operation of the appliance . . . . . . . . . . . . . . . . . . . . . . . . . . . . . . . . . . . . . . . . . . 3 Warnings regarding operation . . . . . . . . . . . . . . . . . . . . . . . . . . . . . . . . . . . . . . . . 5 Safety devices . . . . . . . . . . . . . . . . . . . . . . . . . . . . . . . . . . . . . . . . . . . . . . . . . . . . . 5 Warnings regarding safety . . . . . . . . . . . . . . . . . . . . . . . . . . . . . . . . . . . . . . . . . . . 6 Noise levels . . . . . . . . . . . . . . . . . . . . . . . . . . . . . . . . . . . . . . . . . . . . . . . . . . . . . . . 7 Maintenance . . . . . . . . . . . . . . . . . . . . . . . . . . . . . . . . . . . . . . . . . . . . . . . . . . . . . . 7 Cleaning the appliance . . . . . . . . . . . . . . . . . . . . . . . . . . . . . . . . . . . . . . . . . . . . . . 8 1) FOREWORD Read this manual from cover to cover before using the appliance as it contains important instructions for the safety, operation and maintenance of the appliance. Look after this manual and keep it in a safe place. The manufacturer reserves the right to make changes to the product and to the manual. 2) DIMENSIONS D A B H C H D mm 158 188 355 460 18 inches 6 1/4 7 1/2 14 18 6 1/4 1 3) GENERAL DESCRIPTION GRINDING ADJUSTMENT DISK HANDLE HOPPER COVER HOPPER (coffee bean container) LOCKING SLIDE COFFEE GRINDING ADJUSTMENT DISK CENREAL DOSING PUSH BUTTON (mod. B) SERIAL NUMBER LABEL FILTER HOLDER FORK MAIN SWITCH SINGLE DOSE ADJUSTMENT TRIMMER DOUBLE DOSE ADJUSTMENT TRIMMER 4) PACKAGING On opening the packaging, check carefully to make sure the appliance is intact and that there are no signs of damage. If in any doubt, do not use the unit and contact personnel with the appropriate professional skills. The packaging materials must be kept out of the reach of children as they represent a potential source of danger. Keep the packaging until the warranty has expired. 5) DISPOSAL Do not litter: dispose of the packaging materials according to the laws in force. Should you decide not to use the appliance any more, remember to unplug it so that it cannot be used, and cut the cable in the point where it comes out of the appliance. Contact specialized firms for information on the disposal of the components of the appliance. 6) USE This appliance has been designed solely for grinding coffee beans. Any other use is understood to be improper, and consequently hazardous.The manufacturer cannot be held responsible for any damage as a result of improper or incorrect use. Do not use the appliance for grinding other types of food, or anything else. 2 ENGLISH Do not use the doser (grinder-doser version) to store foods or measure them. THE COFFEE GRINDERS AND COFFEE GRINDER-DOSERS MANUFACTURED BY OUR COMPANY ARE INTENDED FOR SKILLED PERSONNEL ONLY FOR PROFESSIONAL USE AND NOT FOR HOUSEHOLD USE. The user must be an adult. Do not allow children or incapable persons to use the appliance. 7) INSTALLATION AND WIRING The appliance must be installed by skilled technical personnel in conformity with the safety rules in force. Incorrect installation may result in injury of persons or animals, or damage to property, for which the manufacturer cannot be held responsible. • The appliance must be placed on a stable, flat surface. • Before plugging in the appliance, make sure the voltage and frequency values of the supply mains correspond to the ratings indicated on the label featuring the appliance’s technical data. • The wall socket must be fitted with an efficient earth contact. Consequently, it is essential to make sure the earth system is efficient and in conformity with current safety rules. If in any doubt, have the system thoroughly checked by personnel with the appropriate professional skills. IT IS COMPULSORY TO EARTH THE APPLIANCE. The manufacturer cannot be held responsible in the event this regulation is not complied with. • It is essential to make sure the ratings of the system are suitable for the power absorbed by the appliance - as indicated on the label featuring the technical data and that the wall socket is protected against overcurrents. • Do not use extension cables, plug adapters for multiple sockets or makeshift connections. • In EEC member countries, the regulation in force calls for the external equipotential terminal on the outer part of the appliance’s base plate to be connected to a equipotential node if the installation is to be correct. • THE HOPPER MUST BE FASTENED TO THE APPLIANCE’S GRINDING SYSTEM BY MEANS OF THE RELEVANT SCREW which must be inserted in the threaded hole located on the upper grinding blade holder and in the hole on the neck of the hopper. 8) OPERATION OF THE APPLIANCE PRELIMINARIES Make sure the hopper is positioned correctly on the appliance and is fastened to the upper grinding blade holder by means of the relevant screw. 3 Close the locking slide and fill the hopper with coffee beans. Open the locking slide so that the beans are allowed to drop into the grinding system. SWITCHING THE APPLIANCE ON AND OFF MODEL A In order to power up the appliance, set the on-off knob to I. After having placed the filterholder on the filterholderHOPPER MANUAL GRINSAFETY SCREW GING PUSHfork, push the switch indicating the required dose. BUTTON (mod. A) - In order to dose a single dose, push the switch on the DOUBLE DOSE SWITCH (mod. A) HOPPER left (indicating one cup) SINGLE DOSE SWITCH (mod. A) - In order to dose a double dose, push the switch on the OPEN CENTRAL right (indicating two cups) COSING BUTTON One can manually activate the appliance keeping pushed (mod. B) in the switch (indicating ) in the center of the control panel, letting go the central switch will stop the grinding. This central switch is meant to facilitate the adjustment of the coarseness of the grind of the appliance. In order to switch off the appliance manually, set the on-off switch knob to O. MODEL B In order to power up the appliance, set the on-off knob to I. After having placed the filterholder on the filterholder-fork, push the central button as follow: - push one time to dose a single dose (the light indicating one cup turns on) - push two time (with a waitng range of 1 sec between two pushing) to dose a double dose (the light indicating two cups turns on) One can manually activate the appliance keeping pushed in the central button (both the lights are winking simultaneously), letting go the central switch will stop the grinding. This central switch is meant to facilitate the adjustment of the coarseness of the grind of the appliance. In order to switch off the appliance manually, set the on-off switch knob to O. ADJUSTING GRINDING In order to achieve finer or coarser grinding,the adjustment disk located under the hopper must be adjusted using the relevant handle. In order to increase the coarseness of the ground coffee, the disk must be rotated clockwise; to decrease, turn the disk anticlockwise. The disk remains in the chosen position without having to be locked in place. The adjustment must be performed with the motor on, and preferably without any coffee between the grinding blades. Grind small amounts of coffee in order to determine the optimal degree of fineness. 4 ENGLISH FINER GRINDING If necessary, using the push-botton COARSER GRINDING for manual grinding as mentioned above. In the grinder-doser version, if the coffee comes out of the espresso coffee machine very quickly, it means the coffee is ground too coarse.Vice versa, if it comes out too slowly, it means the coffee is ground too fine. Nonetheless, bear in mind that there are many conditions liable to influence the correct supply, such as the weight of the portions, the compacting, the espresso machine settings, and the cleaning of the filters. COFFEE DOSE ADJUSTMENT The adjustment of the portion has to be performed by skilled technical personell only. In order to adjust the size of the portion dispensed, one has to regulate the trimmer setting, positioned above the filterholder. The trimmer on the left regulates the single dose (one cup). The trimmer on the right regulates the double dose (two cup). By turning the trimmer setting clockwise, the portion is increased.Turning it anticlockwise results in an reduction of the portion. A rotation of 180° (half a SINGLE DOSE turn) of the trimmer results in a variation ADJUSTMENT TRIMMER of about one gramm of ground coffee DOUBLE DOSE ADJUSTMENT TRIMMER dispensed. In order to collect the portions of ground coffee dispensed, insert the coffee machine’s filter holder all the way onto the fork-shaped support under the ground coffee outlet. 9) WARNINGS REGARDING OPERATION • OPERATING RANGE OF THE MOTOR: The operating cycle ON/OFF of the appliance is the appliance is: 20 seconds ON / 30 seconds OFF. 10) SAFETY DEVICES • THERMAL OVERLOAD PROTECTION The appliance’s motor is protected against overheating resulting from overcurrents by a thermal overload protection which, when tripped, cuts off the power supply to 5 • • • • the motor. Should the protection trip as a result of anomalous operation, such as the grinding blades jamming, the appliance must be turned off using the on-off switch, UNPLUGGED FROM THE MAINS, AND SKILLED TECHNICAL PERSONNEL CONTACTED. NEVER PERFORM ANY WORK ON THE APPLIANCE WHILE IT IS ATTACHED TO THE MAINS, TO AVOID THE RISK THAT MOTOR TURNS ON SUDDENLY. If the appliance overheats as a result of the motor stopping, allow the appliance to cool down before performing any repair work. SAFETY SCREWS The hopper must always be attached to the upper grinding blade holder using the relevant screw, which must not be removed by the user under any DISK SAFETY SCREW circumstances. In order to prevent the HOPPER COFFEE adjustment disk from SAFETY SCREW OUTLET GUARD being removed - which ALTERNATIVE TAPPED HOLE would make the rotating parts accessible - there is a safety screw on the actual disk: said screw must be positioned in whichever of the two holes on the disk enables the wider and most suitable range of grinding adjustment, and must not be removed by the user under any circumstances. COFFEE OUTLET GUARD The coffee outlet guard must always be fixed to the doser using the relevant screws, wich must never be removed by the user. The removal of the coffee outlet guard can be done by skilled technical personnel only after disconnecting the appliance from the power supply by unplugging. Before reconnecting the appliance to the power supply, fix the safety device to the doser by the relevant screws. 11) WARNINGS REGARDING SAFETY This electrical appliance must be used in conformity with the rules in force governing safe operation. • WHEN OPERATING THE APPLIANCE, BEWARE OF THE MOVING MECHANICAL PARTS’ IN THE AREA OF THE GRINDING BLADES AND OF THE GROUND COFFEE OUTLET. BEFORE REMOVING THE HOPPER FROM THE GRINDING SYSTEM, DISCONNECT THE POWER SUPPLY. AVOID REMOVING FOREIGN BODIES FROM THE GRINDING SYSTEM OR 6 ENGLISH HOPPER WITHOUT FIRST UNPLUGGING THE APPLIANCE FROM THE MAINS. Take care, as the grinding blades may continue rotating for a short while even after the appliance is switched off. • THE USER IS NOT AUTHORIZED TO REMOVE SCREWS OR ANY PARTS SCREWED ONTO THE APPLIANCE. • In the event the appliance is not working properly or is faulty, contact skilled technical personnel, and do not attempt to make repairs yourself. • BEFORE PERFORMING ANY WORK ON THE APPLIANCE, INCLUDING CLEANING AND/OR MAINTENANCE, DISCONNECT IT FROM THE POWER SUPPLY BY UNPLUGGING.TURNING OFF THE APPLIANCE USING ITS MASTER SWITCH DOES NOT ASSURE THE SAME CONDITIONS OF SAFETY. • When the appliance is left unattended, the appliance’s power supply must be disconnected using its master switch (for example, at night, during work breaks, midweek closing or holidays). • Do not let liquids of any kind come into contact with the internal or external parts of the appliance. • Never put ground coffee in the hopper intended only for coffee beans. • Do not tamper with the appliance. • DO NOT TUG ON THE SUPPLY CABLE TO UNPLUG THE APPLIANCE FROM THE MAINS. • Do not touch the appliance with damp or wet hands or feet. • Do not use the appliance barefoot. The manufacturer cannot be held responsible for bodily injury or damage to property if these regulations are not complied with. • 12) NOISE LEVEL The noise level, determined in the workplace (at a distance of 1 metre), of the coffee grinders and grinder-dosers manufactured by our company is less than 74 dB. Said level has been determined on identical new appliances. 13) MAINTENANCE It is essential to check the state of the supply cable and plug periodically. IN THE EVENT THE SUPPLY CABLE OR PLUG ARE DAMAGED, CALL IN SKILLED TECHNICAL PERSONNEL TO REPLACE THEM,THIS TO PREVENT ANY RISK IN CE-CERTIFIED APPLIANCES, A SPECIAL TOOL IS REQUIRED TO OPEN THE BASE PLATE TO GET AT THE CABLE. It is recommended to use original spare parts only. In order to assure the lasting efficiency of the appliance, skilled technical personnel must 7 be called in to perform periodical maintenance, including detailed checks of the state of those components subject to wear. The state of the grinding blades must be checked periodically. Keeping the grinding blades in an excellent state assures high-quality grinding, resulting in greater productivity and limited overheating. When using coffee blends of average hardness, it is advisable to replace the grinding blades approximately every 300 kg. 14) CLEANING THE APPLIANCE DISCONNECT THE APPLIANCE’S POWER SUPPLY BY UNPLUGGING IT BEFORE CLEANING.THE APPLIANCE MUST NOT BE CLEANED USING WATER JETS. Do not install the appliance in rooms where water jets are used for cleaning. THE APPLIANCE MUST BE CLEANED PERIODICALLY BY SKILLED TECHNICAL PERSONNEL ONLY. Use perfectly clean, disinfected cloths or brushes for cleaning. Do not use abrasive products as these are liable to take the sheen off shiny parts. Hopper Wash the hopper once it has been removed from the appliance (unscrewing the relevant fastening screw), using neutral soap and water, rinse abundantly with lukewarm water and dry thoroughly. It is advisable to clean the hopper periodically. Once the hopper has been cleaned, it must be attached to the upper grinding blade holder using the relevant screw. Grinding system Remove the safety screw which prevents the adjustment disk from being removed. Unscrew the adjustment disk by turning it clockwise. Having removed the upper grinding blade holder, clean the grinding blades, threads and the entire grinding system thoroughly using a clean brush and cloth. Having refitted the upper grinding blade holder in the relevant slot, screw the adjustment disk back on, put the self-locking screw back in whichever of the two holes on the disk enables the best adjustment and, having refitted the hopper and secured, adjust the grinding as required. Funnell After having removed the lid with the operating switches, clean the funnell and its lid with a dry and disinfected brush. Last revised: ME03 12/2004 8