1
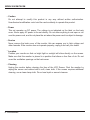
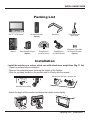
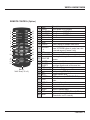
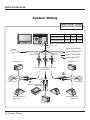
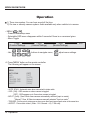
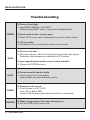
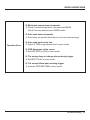
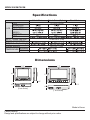
WDRV-5063M/7063M
Owner's Record
The model and serial numbers are located at the rear.
Record the serial number in the space provided below.
Refer to these numbers whenever you call your dealer regarding this product.
MODEL:
WDL-5001M
WDRV-5041M
WDRV-5043M
WDRV-5061M
WDRV-5063M
WDL-7001M
WDRV-7041M
WDRV-7043M
WDRV-7061M
WDRV-7063M
Serial Number:
Warnings
To reduce the risk of electric shock do not remove cover (or back).
NO user serviceable parts inside. Refer servicing to qualified service personnel.
The lightning flash with arrowhead symbol within an equilateral triangle is
intended to alert the user to the presence of "dangerous voltage" within a
product's enclosure that may be of sufficient magnitude to constitute a risk
of electric shock.
The exclamation point within an equilateral triangle is intended to alert the
user to the presence of important operating and maintenance (servicing)
instructions in the literature accompanying the appliance.
2. Owner's Record / Warnings
WDRV-5063M/7063M
Table of Contents
1. Table of Contents
3
2. Features/Precautions
4
3. Packing List / Installation
7
4. Functions
Monitor
Remote Control
8
9
5. System Wiring
WDRV-5043M/7043M
WDRV-5063M/7063M
WDL-5001M/7001M
WDRV-5041M/7041M
WDRV-5061M/7061M
10
10
11
11
11
6. Operation
12
7. Troubleshooting
14
11. Specifications / Dimensions
16
Table of Contents. 3
WDRV-5063M/7063M
Features
●
WDRV-5063M/7063M is specifically designed as an automotive vision system.
- High Resolution 5" / 7" TFT LCD Panel
- Free Input Voltage (DC 12V~DC 32V)
- NTSC/PAL Compatibility
- 3 Camera Inputs
- Automatic Picture Display (3 Triggering Functions)
- Auto Scanning Function
- Dimmer Fuction
- Built-in Speaker
- OSD (On Screen Display)
- Weatherproof (IP54)
- Easy Release Bracket
Precautions
●
Warning
To prevent fire or shock hazard, do not expose the set to rain or moisture. Do not rub or
strike the Active Matrix LCD with anything hard for this may scratch, mar, or damage the
Active Matrix LCD permanently.
●
Regulatory Information
This equipment has been tested and is in compliance with the limits for a Class B digital
device, pursuant to part 15 of the FCC Rules. These limits are designed to provide
reasonable protection against harmful interference when the equipment is operated in a
residential installation. This equipment generates uses and can radiate radio frequency
energy and, if not installed and used in accordance with the instruction manual, may
cause harmful interference to radio communications. However, there is no guarantee that
interference will not occur in a particular installation. If this equipment does cause harmful
interference to radio or television reception, which can be determined by turning the
equipment off and on, the user is encouraged to try or correct the interference by one or
more of the following measures.
4. Features / Precautions
WDRV-5063M/7063M
●
Do not remove the cover
To reduce the risk of electric shock and maintain the quality of the product,
please do not remove the cover.
Please follow the instructions of the wiring diagram in the Installation Guide.
●
Keep small articles out of the reach of children
Store small articles (screws, etc.) in places not accessible to children.
If swallowed, consult physician immediately.
●
Stop using immediately if a problem appears
When problems appear, stop using the system immediately and contact the
dealer from whom you purchased the equipment. Some problems which may
warrant immediate attention include a lack of sound, noxious smoke being
emitted from the unit, or foreign objects dropped inside the unit.
●
Do not use this equipment outside the vehicle
Do not use this equipment for purposes other than those listed for the vehicle.
Failure to do so may result in an electric shock or an injury.
●
Stop the vehicle before carrying out any operation that could interfere with
your driving
If the operation of the unit (such as turning on or turning off the monitor, etc.)
interferes with your driving, stop the vehicle in a safe location before attempting
operation.
●
Temperature
Before turning your unit on, be sure the temperature inside the vehicle is
between -10℃ and +50℃.
●
Maintenance
If you have problems, do not attempt to repair the unit by yourself. Return it to
your purchasing dealer.
Precautions. 5
WDRV-5063M/7063M
●
Caution
Do not attempt to modify this product in any way without written authorization.
Unauthorized modification could void the user's authority to operate this product.
●
Power
This set operates on DC power. The voltage is as indicated on the label on the back
cover. Never apply AC power to the set directly. Do not allow anything to rest upon or roll
over the power cord, and do not place the set where the power cord is subject to damage.
●
Service
Never remove the back cover of the monitor, this can expose you to high voltage and
other hazards. If the monitor does not operate properly, unplug it and call your dealer.
●
Location
Position your monitor so that no bright light or sunlight will shine directly on the screen.
Make sure that the monitor is placed in a position that allows a free flow of air. Do not
cover the ventilation openings on the back cover.
●
Cleaning
Unplug the monitor before cleaning the face of the LCD Screen. Dust the monitor by
wiping the screen and cabinet with a soft, clean cloth. If the screen requires additional
cleaning, use a clean damp cloth. Do not use liquid or aerosol cleaners.
6. Precautions
WDRV-5063M/7063M
Packing List
Set [TFT-LCD Monitor]
Manual
Remote Controller
(Option)
Easy Release Bracket
(Option)
Stand Bracket
(for WDL Series)
Power and Video
Input Cable
Sunshield
Stand Bracket
(for WDRV Series)
2 Batteries (Type AAA)
for Remote Controller
(Option)
Installation
●
Install the monitor on a surface which can width stand more weight than 5Kg (11 lbs)
- Clean the surface before installation
- Remove the protective paper covering the bottom of the bracket
- Stick the provided bracket on the surface and fix it firmly with the screws.
Mounting on the floor, console, etc.
Mounting onto ceiling
- Adjust the angle of the monitor and fasten the handle screws tightly.
Packing List / Installation. 7
WDRV-5063M/7063M
Functions
MONITOR
1
2
NO
1
2
3
3
4
5
MENU
Protection Window
SPEAKER
IR
4
UP/DOWN
5
CAMERA/SCAN
6
7
VOLUME
MENU
8
POWER/DIMMER
9
10
CONNECTOR
BRACKET
8. Function
6
7
8
2
9
10
DESCRIPTION
Non Reflection and protection of LCD. (Option)
Sound out 0.5W X 2 Max.
Remote control sensor. (Remote control is optional)
Use select items in the on screen menu, press UP/DOWN
buttons to control rear view motorized camera.
Camera 2 only.
Press CAMERA/SCAN button to change video source.
If button is beld down over 1 second the setting will be
changed to the auto scan mode.
Press to increase or decrease the volume and menu control.
Displays main menu on screen.
Press button to control dimmer.
By pressing button over 1 second will trun monitor on/off.
(Red LED light off)
Input cable (Composite Video, Audio, Power)
Bracket for fixing cable. (Option)
WDRV-5063M/7063M
REMOTE CONTROL (Option)
1
2
3
4
5
RIGHT
REAR
LEFT
6
7
8
9
15
16
17
18
19
20
21
22
23
10
24
11
12
13
14
25
26
Battery
"AAA" Size(1.5V x 2)
Description
On/off power of LCD monitor
Change camera1 RIGHT video
Change camera2 REAR video
Change camera3 LEFT video
None
None
None
Press to display all available video source
Use select items in the on screen menu,
UP/DOWN
press UP/DOWN buttons to control rear view
9
▲▼
motorized camera (Camera 2 only)
Turn menu off
10 EXIT
11 A/V ON/OFF A/V source on/off
Scanning function up to 9 seconds for selected
12 SCAN TIME
camera.
Dimmer control button
13 DIMMER
Sets priority video source when more than
TRIGGER
14
two trigger signals enter at the same time
PRIORITY
Mutes sound
15 MUTE
16 AUTO POWER The power of LCD stays on/off
Sets operating OSD display
17 OSD
Trigger function on/off
18 INPUT
Video system control (NTSC/PAL) - Option
19 SYSTEM
Automatic scan when source is connected to
20 SCAN
video.
Preset display mode
21 DISPLAY
Displays menu options on screen
22 MENU
Increase/decrease sound
23 VOL◀ ▶
ON/OFF function select
24 SELECT
Picture ratio control (Wide/Normal) - 7" only
25 WIDE
Initialize to factory default
26 RESET
(Press button over 5 seconds)
No.
1
2
3
4
5
6
7
8
Button
POWER
CA1 (RIGHT)
CA2 (REAR)
CA3 (LEFT)
CA4
A/V
QUAD
SOURCE
Function. 9
WDRV-5063M/7063M
System Wiring
[WDRV-5043M / 7043M]
[WDRV-5063M / 7063M]
Camera1 Camera2 Camera3
WDRV-5063M/7063M 4Pin Cable 6Pin Cable 4Pin Cable
WDRV-5043M/7043M 4Pin Cable 4Pin Cable 4Pin Cable
The shutter camera is optional.
Bracket for fixing cable.
(Option)
Signal In(From Lamp)
Power
DC +12~32V
GND
Trigger1 (GREEN RIGHT)
Camera1
(GREEN RIGHT)
[General Camera]
Camera2
(IVORY REAR)
Camera3
(BLUE LEFT)
Trigger2 (GRAY REAR)
Trigger3 (BLUE LEFT)
MALE
MALE
MALE
FEMALE
FEMALE
FEMALE
[General Camera]
Extension Cable (WDRV - 6260) - 60ft
4 or 6PIN CABLE
A
FEMALE
MALE
MALE
MALE
[WDRV-7063C]
FEMALE
A
FEMALE
B
[WDRV-7063C]
[REAR VIEW MOTORIZED CAMERA]
WDRV-7063C
[SIDE VIEW CAMERA-LEFT]
WDRV-3478C
[SIDE VIEW CAMERA-RIGHT]
WDRV-3478C
[General Camera]
10. System Wiring
WDRV-5063M/7063M
[WDL-5001M / 7001M]
RCA Jack
(FEMALE)
Video Input (Yellow)
Bracket for fixing cable.
(Option)
Power
DC +12~32V
GND
Audio Input (White)
[WDRV-5041M / 7041M]
[WDRV-5061M / 7061M]
WDRV-5041M/7041M
4 Pin Locking Cable
WDRV-5061M/7061M
6 Pin Locking Cable
The shutter camera is optional.
Bracket for fixing cable. (Option)
MALE
(Camera Input)
Trigger1
Power
DC +12~32V
GND
[General Camera]
WDRV-3478C Pin Connection
[SIDE VIEW CAMERA]
HOLE
1
4
2
3
A
FEMALE
Pin No.
1
2
3
4
WDRV-7063C Pin Connection
[REAR VIEW MOTORIZED CAMERA]
Description
S/D (GND)
AUDIO
VIDEO
DC +12V
HOLE
1
6
5
4
2
3
B
FEMALE
Pin No.
1
2
3
4
5
6
Description
VIDEO
DC +12V
MORTOR +
AUDIO
MORTOR GND
System Wiring. 11
WDRV-5063M/7063M
Operation
1) Three view system: You can hear sound all the time.
2) On view or security camera system: Audio available only when vehicle is in reverse.
●
MENU MENU M
- Press to enter setup menu
- Selectable OSD menu disappears within 5 seconds if there is no command given.
- Menu Toggle
Page1
(Function Settings)
- Use
Page2
(Camera Settings)
buttons to navigate menu,
Page3
(Monitor Settings)
SELECT
adjust menu settings.
A. Press 'MENU' button on the remote controller.
The following will appear on the screen.
MENU
AUTO SCAN
OSD
INPUT
TRIGGER TIME
TRIGGER PRID
ASPECT
●
●
●
●
●
[OFF]
[OFF]
[AUTO]
[800ms]
[REAR]
[WIDE]
AUTO SCAN : Automatic scan when connected to video cable
OSD : [ON] - OSD remains on when camera is toggled
[OFF] - OSD appears up to 5 sec when camera is toggled
INPUT : [Auto] - Rear & Side view cameras automatically selected (input on mode)
[Manual] - Rear & Side view cameras manually selected (input on mode)
TRIGGER : Set the priority video source when more than two trigger signals enter at the same time.
ASPECT : Picture ratio control. (Wide - 16:9 / Normal - 4:3) 7 inch only.
12. Operation
EXIT
WDRV-5063M/7063M
B. Press 'MENU' button twice on the remote controller.
The following will appear on the screen.
MENU
MIRROR SCALE SCAN-TIME
[OFF]
[0 sec]
RIGHT [OFF]
[OFF]
[0 sec]
REAR [OFF]
[
]
[
]
[0 sec]
OFF
OFF
LEFT
●
●
●
MIRROR : Set mirror option for each video source
SCALE : Ability to set scale for each video source
SCAN-TIME : Ability to set the delaytime for scanning from 0 to 9 seconds
C. Press 'MENU' button three times on the remote controller.
The following will appear on the screen.
MENU
BRIGHTNESS
CONTRAST
COLOR
TINT
SYSTEM
AUTO-ON
PRESET
●
●
●
●
●
●
●
[ 25 ]
[ 25 ]
[ 25 ]
[ 25 ]
[ NTSC ]
[ ON ]
[ OFF ]
BRIGHT : Adjust the brightness of the screen
CONTRAST : Adjust the contrast of the screen
COLOR : Adjust the color of the screen
TINT : Adjust the tint of the screen
SYSTEM : Adjust the video format. (NTSC/PAL)
AUTO-ON : The power of LCD stays on/off
PRESET : Default mode
Operation. 13
WDRV-5063M/7063M
Troubleshooting
Q: Screen is too bright.
A: Adjust BRIGHTNESS or CONTRAST.
When pressing RESET button, it will go back to default setting.
SCREEN
Q: Screen color is red or close to green.
A: Adjust TINT in menu mode. Press preset to go back to default setting.
Q: Colors are dim.
A: Decrease the color by adjusting the button in menu mode.
VIDEO
Q: Screen is not clear.
A: When the extension cable is too long diminishing of video may happen.
Resolution might decrease due to protection of LCD window.
Q: Sync signal distracts and the screen is black and white.
A: Change the SYSTEM in menu.
AUDIO
Q: Sound cannot be heard in Audio.
A: Check to see if it is in mute setting.
Audio available only when vehicle is in reverse.
POWER
Q: Power does not turn on.
A: Check if power is in DC12-32V.
Red: +Power, Black: GND
In order to set the power automatically set Auto-On in menu mode.
TRIGGER
Q: When in trigger mode, Scale does not appear on.
A: Set the SCALE [ON] in menu mode.
14. Troubleshooting
WDRV-5063M/7063M
Q: Motorized camera does not operate.
A: Check if motorized camera is connected with REAR.
Check if source switches are in REAR mode.
Q: Auto scan does not operate.
A: Scan does not operate when there is only one camera image.
Operation Error
Q: Auto scan mode is too fast.
A: Adjust S.TIME in appropriate level in menu mode.
Q: OSD disappears in the screen.
A: Set OSD [OFF] to [ON] in menu mode.
Q: The screen does not change when entering trigger.
A: Set INPUT [Auto] in menu mode.
Q: The screen blinks when entering trigger.
A: Increase TRIGGER TIME in menu mode.
Troubleshooting. 15
WDRV-5063M/7063M
Specifications
5 Inch Series(Option)
TFT-LCD COLOR
5 Inch Series
TYPE
SCREEN SIZE
BRIGHTNESS
LCD
VISUAL FIELD
(ANGLE)
CONTRAST
MTBF
INPUT SIGNAL FEATURE
POWER CONSUMPTION
SIZE(Width x Depth x Height)
POWER SOURCE
WORKING
TEMPERATURE
STORAGE
7 Inch Series
COMPOSITE (75Ω)
DC +12V ~ +32V
Dimensions
5.9"
7.7"
4.9"
5.7"
1.3"
1.3"
1.3"
[5 Inch Series]
1.3"
[7 Inch Series]
Made in Korea
Patent pending.
Design and specifications are subject to change without prior notice.