1
MILLI-Q PLUS
OPERATING
AND
MAINTENANCE
MANUAL
MILLIPORE
Copyright
Copyright© 1990, all rights reserved, Millipore Corporation.
P17516, Rev. -, 3/90
Trademarks
Millipore is a registered trademark of Millipore Corporation.
Milli-Q, QPAK, Millipak, and Organex-Q are trademarks of
Millipore Corporation.
Delrin and Teflon are trademarks of E.I. duPont de Nemours
and Co., Inc.
Iwaki is a trademark of Iwaki Co.
Noryl is a trademark of General Electric.
Slo-Blo is a trademark of littelfuse, Inc.
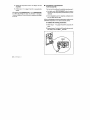
HOW TO USE THIS MANUAL
This manual describes the new, compact Milli-Q Plus water
purification system.
READ THIS BEFORE STARTING!!
Chapter 1
Introduction— introduces you to the Milli-Q
Plus water purification system and its components.
Chapter 2
Installation — describes how to install the
Milli-Q Plus system in your laboratory.
Chapter 3
Operation — describes how to take water from
the Milli-Q Plus system.
Chapter 4
Maintenance— describes how to care for your
Milli-Q Plus system, including how to change the
QPAK™ purification pack, Millipak™ 40 final
filter, and fuse.
Chapter 5
Troubleshooting The Milli-Q Plus System—
describes how to diagnose and solve problems with your Milli-Q Plus system.
Chapter 6
Technical Information — includes technical
service information, ordering information, system
specifications, and the Millipore warranty.
Send back the information card
To register your system and become eligible for
discounts, special promotions and a free subscription
to MilliporeNews, you must send back the information
card that came in this package.
Avoid leakage at connectors
To avoid leaks, push tubing in firmly; then pull back
on the tubing once or twice to make sure it is
securely seated.
Maintain sufficient water supply
Make sure that adequate feed water exists to supply
the system during operation.
Danger: high voltage
Unplug the system before replacing the fuse.
Work on PC board at own risk
Working on the PC board will void the system's
warranty. Call Millipore Technical Service if you
encounter problems with the PC board.
WettheO-Rings
Wet the O-rings on the QPAK before Call systems)
inserting the pak into the system. Failure to wet the
O-rings will damage them and can cause leaks.
Appendix 1 Advanced Maintenance and Troubleshooting
Functions— describes how to adjust and
troubleshoot the Milli-Q Plus system PC board.
Appendix 2 Remote Control of The Milli-Q Plus System —
describes how to operate the system from a
remote unit.
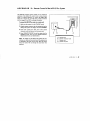
Note: Illustrations are present throughout this manual to help
you understand how to perform the procedures described. In
the upper-right corner of each illustration, the display is shown.
By comparing this against the display reading on your system,
you can double check that you have the system in the correct
mode.
TABLE OF CONTENTS
How to Use This Manual
Chapter 1: Introduction
Milli-Q Plus System Features
How The Milli-Q Plus System Works
Operate/Standby
Recirculation/Production
Temperature
Remote Standby
1
1
2
2
3
3
3
Chapter 2: Installation
Preinstallation Requirements
Electrical
Feed Water
Setting Up Your New Milli-Q Plus System
Cut and Connect Feed Water Tubing
Install the QPAK Purification Pack
Clear Trapped Air
Install the Millipak 40 Final Filter
5
5
5
5
6
8
10
13
16
Chapter 3: Operation
Pre-Operation Checklist
Operating The Milli-Q Plus System
Drain the First Two Liters of Water
Collect Water for Laboratory Use
Summary Of Milli-Q Plus System Functions
19
19
19
19
21
22
Chapter 4: Maintenance
System Shutdown
Changing The QPAK Purification Pack
Changing The Millipak 40 Final Filter
Replacing The Fuse
25
25
25
27
28
Chapter 5: Troubleshooting The Milli-Q Plus System
31
Chapter 6: Technical Information
Technical Assistance
Ordering Information
Specifications
Warranty
33
33
35
37
38
Appendix 1:
Advanced Maintenance and Troubleshooring
Adjusting The PC Board
To Access the PC Board
To Reassemble the Milli-Q Plus System
Changing the Fuse on the PC Board
Adjusting the Temperature Potentiometer
Adjusting the Resistivity Potentiometer
Adjusting the LCD Contrast Potentiometer
Changing the Frequency Setting for
the Purification Pack
Changing the Frequency Setting for
Automatic Recirculation
Troubleshooting The PC Board
Appendix 2:
Remote Control of The Milli-Q Plus System
39
39
39
40
42
43
44
45
46
46
47
49
111
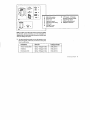
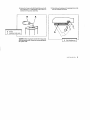
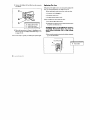
QPAK purification pack
Point of Use
Millipak 40 final filter
PRODUCnON/RECIRCUIATION valve
Control panel
Purification pack retaining arm
LCD display
Control panel push buttons
I
J
K
L
M
N
O
P
Lighted indicators
Inlet port
Wall mounting plug
Handwheel
Remote control jack
Power outlet
System fuse holder
Power switch
1
INTRODUCTION
Congratulations—you now own the latest technology in water
purification! Your new, compact Milli-Q Plus water purification
system provides up to 1.5 liters/minute 0/min) of ultrapure
water on demand for the most critical analytical and
biotechnological applications.
This state-of-the-art system is designed to provide the final
polish to water pretreated by reverse osmosis (RO), distillation,
or deionization (DO. The new, compact Milli-Q Plus system
produces Type I, reagent-grade water that meets or exceeds all
ASTM, CAP, ACS, and NCCLS standards for purity*:
Water Quality
Specification
Resistivity
18 megohm-cm
Total Organic Carbon (TOC)
< 10 ppb
Particle-free
> .22 Jim
Total Dissolved Solids
< 20 ppb
Silicates
< .1 ppb
Heavy metals
< 1 ppb
Microorganisms
< 1 cfu/mL
*ASTM: American Society for Testing and Materials
CAP: College of American Pathologists
ACS: American Chemical Society
NCCLS: National Committee for Clinical Laboratory Standards
Milli-Q Plus System Features
The Milli-Q Plus system has been carefully designed to ensure
consistently high water quality:
• The patented QPAK purification pack virtually
eliminates dead-water volume, significantly reducing
contamination.
• The Mfflipak 40 point-of-use filter provides a final,
.22 jam filtration just before water is delivered to your
point of use.
• Automatic recirculation of water in the system every
hour discourages bacterial growth and maintains water
quality between uses.
• A resistivity sensor automatically tests the resistivity,
or purity, of the water in the system; the reading is
automatically temperature compensated to 25°C (77°F).
• The system standby mode allows automatic intermittent
recirculation without continuously running the pump;
this prevents excessive wearing of the pump.
The compact design enables you to install the Milli-Q Plus
system on your laboratory bench or mount it on a wall. This
versatile system can also be automatically controlled from a
remote location such as a clinical analyzer.
The QPAK purification pack contains all of the purification
media needed to achieve high-quality water: activated carbon
to remove dissolved organics, nuclear-grade ion exchange
INTRODUCTION
1
resins to "polish" out inorganic ions to 18 megohm-cm resistivity,
and the Organex-Q™ organic scavenger mixture to remove
trace organics to 10 parts per billion (ppb). Because DI water
typically contains higher levels of particulate/colloidal matter,
microorganisms, and organics, than distilled or RO water, the
QPAK purification pack for DI feed water contains an initial
.5 micron (jim) prefilter to protect the other purification media.
The purification pack for RO and distilled feed water contains
extra ion exchange resin instead of the prefilter; this extra resin
increases the lifetime of the pack.
The QPAK purification pack can be installed quickly and
easily without tools, making the system easy to maintain. There
are no bowls to dean or multiple cartridges to store. A control
panel light indicates when the pack is recommended to be
changed for optimum water quality. The superior system design
and materials of construction eliminate extractables.
The alphanumeric display makes the Milli-Q Plus system
simple to use: it allows you to easily monitor the status of the
system at all times. In case of power failure, the system's battery
"remembers" the current function — when power is restored,
the unit will restart in the correct mode. Upon request, the
contrast of the display can be adjusted.
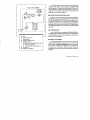
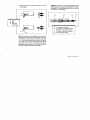
How The Milli-Q Plus System Works
The new, compact Milli-Q Plus system is controlled by a microprocessor CPC board) located inside the system's cabinet. It is
electronically connected to the alphanumeric display, which
shows you:
• water quality (resistivity)
• Auto Test results
• system mode (for STANDBY and RECIRCULATION)
• temperature
• system errors
Water flows into the Milli-Q Plus system through an inlet
solenoid valve, then through the system pump and into the
QPAK purification pack. The resistivity sensor measures the
water quality before the purified water flows through the
RECIRCULATION/PRODUCTION valve and into a check valve.
Water then flows either through a Millipak 40 final filter at the
point of use or it is recirculated through the system.
The Milli-Q Plus system contains many built-in features that
allow you to easily control and monitor the system's functions:
• OPERATE/STANDBY
When the system is in STANDBY, the Milli-Q Plus system
automatically recirculates water every 55 minutes for a 5-minute
period. During recirculation, the display reads RECIRCUIATION. Upon request, recirculation frequency can be changed
to every 3 hours.
Each time you switch the Milli-Q Plus system from STANDBY
to OPERATE, the system runs through an "Auto Test" sequence
to test the resistivity sensing system. Test resistivity is displayed
for four seconds, followed by the actual resistivity of the water
in the system.
INTRODUCTION
In the OPERATE mode, the resistivity sensor continuously
measures water quality. The set point for minimum water
MILLI-Q Plus SYSTEM
quality is preset at 14 megohm-cm (the resistivity of pure water
is 18.2 megohm-cm). If the actual water quality is less than 14
megohm-cm, the resistivity value flashes. Upon request, the
resistivity set point can be changed.
•
RECIRCUIATION/PRODUCTION
When the system is on, feed water is pumped through the
QPAK purification pack and monitored by the resistivity sensor.
The RECIRGULATION/PRODUCTION valve enables you to
control the destination of this purified water. During PRODUCTION, purified water is pumped through a final filter and
delivered to your point of use at a rate of u p to 1.5 liters/minute.
During RECIRCUIATION, water is simply recirculated through
the system.
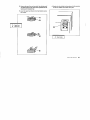
• TEMPERATURE
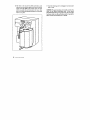
A
B
C
D
E
F
G
H
Inlet
Inlet solenoid valve
System pump
QPAK purification pack
Resistivity sensor
RECIRCUIATION/PRODUCTION valve
1 Water to production
2 Water through recirculation loop
Checkvalve
Millipak 40 final filter
In the STANDBY mode, pressing the TEMPERATURE button will cause the calibration temperature (25"C) to be displayed.
In the OPERATE mode, the current temperature of the water in
the system will be displayed.
• REMOTE STANDBY
The REMOTE STANDBY option enables you to control the
operation of the Milli-Q Plus system from a remote location. The
display will show REMOTE STANDBY until water is needed
(as in regular standby, water automatically recirculates for
5 minutes every 55 minutes). When the remote unit needs
Milli-Q Plus system water, the system automatically switches to
OPERATE.
INTRODUCTION
3
2
INSTALLATION
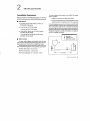
Preinstallation Requirements
To ensure adequate feed pressure, your Milli-Q Plus system
must be installed:
Before you install your new Milli-Q Plus system, your electrical
and feed water systems must meet the following requirements.
• within 3 m (9.8 ft) of your feed water system
•
• at least 10 centimeters (cm) (4 inches [inD below the feed
tank if the system is fed from an RO or DI storage tank
ELECTRICAL
• grounded electrical outlet within 2.5 meters (m)
(8.2 feet [ftD of the system
• .8 amp for the 115 V/60 Hz system
.4 amp for the 220 V/50 Hz system
• 1 amp Slo-Blo™ fuse for the 115 V/60 Hz system
(provided with the system)
If your feed pressure exceeds 15 psi (1 bar), you should install
a pressure regulator on the inlet line to the Milli-Q Plus system.
Also, a low pressure switch can be connected to the jack (the
one on the right, just below the power switch) to prevent the
Milli-Q plus system from running if feed pressure is inadequate.
The pressure regulator is available from Millipore; see pages 35
and 36 for ordering information.
.5 amp Slo-Blo fuse for the 220 V/50 Hz system
(provided with the system)
•
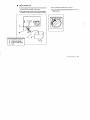
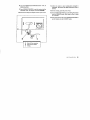
A Feed tank
B Isolating valve
C Milli-Q Plus system
FEED WATER
For best results, Millipore recommends using RO feed
water. However, the Milli-Q Plus system will produce ultrapure,
reagent-grade water from DI, RO, or distilled feed water.
For the Milli-Q Plus system to function properly, feed water
must meet the following pressure and temperature specifications:
o-
Maximum feed pressure: 15 psi (1 bar)
—A
10 cm
(4 IN.)
MIN.
Minimum feed pressure: .5 psi (.03 bar)
Feed water temperature: 5'C - 40'C (41'F - 104"F)
3 m (10 FT.) MAX.
INSTALLATION
5
Millipore also recommends that you install an isolating valve on
the inlet water line so that you can easily shut off the water
supply to the system. You may already have an isolating valve
connected to your feed tank. If not, the isolating valve is
available as an accessory from Millipore; see pages 35 and 36
for ordering information.
Note: If your feed tank is from Millipore, you can connect the
tubing to the 8 millimeter (mm) quick-connect fitting on the
tank. If your feed source terminates with a 1/2" female threaded
fitting, you must first connect the 1/2" male -1/4" female reducing bushing to the fitting, then connect the 1/4" male - 8 mm
tubing quick-connect fitting to the reducing bushing. You can
then connect the feed tubing to this quick-connect fitting.
Setting Up Your New Milli-Q Plus System
The Milli-Q Plus system is compact and can be easily installed
on your laboratory bench. By screwing the feet in or out, the
system can be adjusted to accommodate an uneven work
surface. The Milli-Q Plus System can also be wall mounted. If
you wish to wall mount the unit, you will need to order the
optional bracket from Millipore; see pages 35 and 36 for
ordering information.
1. Place the following components on the bench where you
will locate the system.
From thefirst box:
A. Milli-Q Plus system
B. point-of-use cover for Millipak 40 final filter
C. power cord
D. operator's manual
E. 5 m (16.4 ft) of feed water tubing, 8 mm O.D.
F. roll of Teflon™ tape
G. 1/4" male - 8 mm diameter tubing quick-connector
H. 1/2" female - 1/4" female, threaded reducing bushing,
with built-in stainless steel filter
I. point-of-use adapter (1/4" male -1/4" hose barb)
From the Starter Kit (second box):
J. QPAK purification pack
K. .22 urn Millipak 40 final filter
6
INSTALLATION
A
B
C
D
E
F
G
Milli-Q Plus system
Point-of-Use cover
Power cord
Operator's manual
8 mm feed water tubing
Teflon tape
1/4" Male - 8 mm
quick connector
H
I
J
K
1/2" Female - 1/2" female,
threaded reducing bushing
Point-of-Use adapter
QPAK purification pack
Millipak 40 final filter
Box 2
Note: To register your Milli-Q Plus system and become eligible
for discounts, special promotions, and a free subscription to
Millipore News, you must return the information card that came
with your Milli-Q Plus system.
2. The QPAK purification pack you use will depend on your
feed water quality. Make sure you have the correct pack
from the table below:
Pretreatment
Starter Kit
Catalogue Number
Reverse Osmosis (RO)
QPAK, + Millipak 40 filter
CPMQ K05 Rl
Distillation
QPAK, + Millipak 40 filter
CPMQ K05 Rl
Deionization (DI)
QPAK2 + Millipak 40 filter
CPMQ K05 D2
INSTALLATION
7
3. Set up your Milli-Q Plus system on the laboratory bench.
4. Plug the power cord into the Milli-Q UF Plus system and
into a grounded, electrical outlet.
5. Turn on the Milli-Q Plus system by pressing the power
switch at the top of the system. If the display shows
BATTERY, the system is not completely charged. Turn off
the system for 3 seconds, then turn on the system again.
When the system is operating, the battery will recharge.
The battery will last 1000 hours if the power is off.
CUT AND CONNECT FEED WATER TUBING
CAUTION: The Milli-Q Plus system pump is "self-priming"—
it automatically draws water into itself when it starts. Never
start the pump unless you have an adequate water supply
to feed the system. (The pump starts when you plug in the
power cord and turn on the power switch.)
1. If you have installed an isolating valve, make sure it is
closed.
2. Remove the protective plastic caps from the ends of the
8 mm feed water tubing.
3. Cut the feed water tubing to reach your water source. To
ensure that adequate pressure is attained, make sure
feed water tubing is no longer than 3 m (9.8 ft).
Note: The remainder of this tubing will be used at the point
of use to clear trapped air.
4. Remove the plug which seals the quick-connect inlet
port by pressing on the collar. The inlet port is labeled
on the lower portion of the rear cabinet.
Note: If you need to disconnect the tubing from the inlet
port, simply press the collar and remove.
5. Insert one end of the feed water tubing into the inlet port
on the Milli-Q Plus system.
CAUTION: To avoid leaks, push the tubing in firmly, then
pull back on the tubing once or twice to make sure it is firmly
seated. Once a tube is firmly secured, avoid removing and
reinstalling it frequently.
8
INSTALLATION
6. Insert and connect the other end of tubing to your feed
water supply.
CAUTION: Whenever you use a reducing bushing, wrap
the thread two or three times with Teflon tape to seal the
connection. This is particularly important if you are making
a connection to a metal fitting.
A Collar
B Plug
C 8 mm feed
water tubing
A 1/2" threaded male fitting
B 1/2" female - 1/4" female reducing
bushing with stainless steel filter
C 1/4" male - 8 mm quick connector
D 8 mm feed water tubing
Note: If your feed tank is from Millipore, you can connect
the tubing to the 8 mm quick-connect fitting on the tank.
If your feed source (for example, a DI line) terminates with
a 1/2 " male threaded fitting, you must first connect the
1/2 " female -1/4 " female reducing bushing to the fitting;
then connect the 1/4 " male - 8 mm tubing quick-connect
fitting to the reducing bushing. You can then connect the
feed water tubing to this quick-connect fitting.
INSTALLATION
9
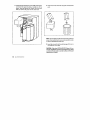
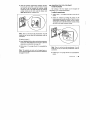
INSTALL THE QPAK PURIFICATION PACK
1. Turn off the power by pressing the power switch.
2. Remove the protective plugs from the two pack receiving
ports on the Milli-Q Plus system.
3. Remove the two protective caps from the QPAK purification pack.
A Protective caps
A Protective plugs
10
INSTALLATION
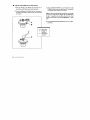
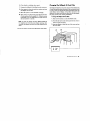
4. Moisten the O-rings on the QPAK purification pack with
clean Qaboratory- or reagent-grade) water. Failure to
moisten the O-rings may cause leaks.
5. Unlock the pack retaining arm by pressing down on the
arm and swinging it to the left.
B
A O-rings
B Laboratory-Grade water
CAUTION: Never use grease to moisten the O-rings on the
QPAK purification pack. Grease can contaminate Milli-Q
Plus system water.
A Pack-Retaining arm
INSTALLATION
11
6. The label on the top of the QPAK purification pack
indicates how to orient the pack as you insert it into the
system. Hold the Milli-Q Plus system with one hand
while you guide the pack into place with your other
hand. You will feel the QPAK purification pack seat itself
when it is in place.
12
INSTALLATION
7. Close the retaining arm by swinging it back into place
until it clicks.
CAUTION: The pack receiving microswitch monitors the
status of the QPAK purification pack. If the amber
EXCHANGE PACK lamp is I it continuously, the pack might
be loose: make sure the purification pack is securely in
place and the pack retaining arm is locked.
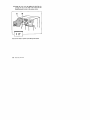
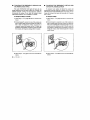
CLEAR TRAPPED AIR
1. Screw the point-of-use adapter (the 1/4" hose barb) into
the point-of-use connector on the system.
2. Attach the remainder of the 8 mm feed water tubing to
the adapter. Put the other end of the tubing to the drain.
3. If you installed an isolating valve, open it.
4. Turn the RECIRCULATION/PRODUCTION valve to
PRODUCTION.
RECIRCULATION PRODUCTION
A
B
C
D
Point-of-Use connector
Point-of-Use adapter
8 mm feed water tubing
Drain
INSTALLATION
13
5. Turn on the power. The display will read RECERCULATTON for 5 minutes, then STANDBY.
Note: Each time the power is turned on, water will recirculate for 5 minutes and the system will automatically go
into the STANDBY mode. If you press OPERATE/STANDBY
during these 5 minutes, the system will automatically go
into the OPERATE mode upon completing the recirculation
cycle. If you press OPERATE/STANDBY twice, the system
will go into the STANDBY mode.
7. Allow the system to purge water and air through the
point of use until any trapped air is removed. Then allow
the system to run to drain for 5 minutes. As you purge
the system, carefully observe each of the tubing connections for leaks.
6. Press OPERATE/STANDBY to put the system into the
OPERATE mode and to start the pump.
Note: Each time the pump is started in the OPERATE mode,
the MiUi-Q Plus system will automatically run through the
Auto Test sequence to ensure proper water quality. The
display will initially read TEST: 15 M Q c m (+ 1 megohmcm). After 4 seconds, the display will show the actual
resistivity of the water in the system (PRODUCT:
M Q,
cm, u p to 18.2 megohm-cm). This value may flash on and
off if the actual resistivity in the system is below 14
megohm-cm (the set point). Once the actual resistivity
builds to greater than 14 megohm-cm, the display will be
steady.
14
INSTALLATION
CAUTION: If water leaks from a tubing connection, perform
steps 8 and 9 below; then remove the tubing and reconnect
it. Make sure the tubing is secure. Repeat steps 6 and 7 to
continue purging the system. Make sure the tubing
connections do not leak.
8. Turn the RECIRCULATION/PRODUCTION valve to
RECIRCULATION.
9. Press OPERATE/STANDBY to put the system into the
STANDBY mode. The display will read STANDBY.
10. Remove the tubing and adapter from the point of use.
11. Allow the system to stand undisturbed overnight in
STANDBY. This allows the QPAK purification pack to
hydrate.
12. In the morning, open the point of use.
13. Press OPERATE/STANDBY to put the Mill-Q Plus system
into the OPERATE mode. Allow water to flow to drain
for 5 minutes.
14. Close point-of-use-valve. Press OPERATE/STANDBY to
put the system into the STANDBY mode.
A
B
C
Point-of-Use connector
Point-of-Use adapter
Tubing
INSTALLATION
15
INSTALL THE MILLIPAK 4 0 FINAL FILTER
1. Wrap the thread on the Millipak 40 final filter two or
three times with Teflon tape to seal the thread.
2. Screw the Millipak 40 final filter into the connector on
the Milli-Q Plus system. Make sure the vent is towards
the system.
3. Press OPERATE/STANDBY to put the system into the
OPERATE mode and to start the pump. Of you installed
an isolating valve, make sure it is open.)
Note: As before, the system will automatically run through
the Auto Test sequence; the display will read TEST: 15 M
£2 c m (± 1 megohm-cm), and then will show the actual
resistivity of the water in the system (PRODUCT:
MQ
cm).
4. Turn the RECIRCULATION/PRODUCTION valve to PRODUCTION.
A
B
C
16
INSTALLATION
Teflon tape
Millipak 40
final filter
Point-of-Use
connector
5. Purge air from the point-of-use filter by turning the vent
cap on the filter until any trapped air escapes. Have a
container ready to collect water produced during the
purging process.
6. Tighten the vent cap on the Millipak 40 final filter. Hand
tighten only; do not over tighten.
A Vent cap
7. Turn the RECIRCUIATION/PRODUCTION valve to
RECIRCULATION.
8. Press OPERATE/STANDBY to put the system into the
STANDBY mode. The display will read STANDBY.
9. Snap the point-of-use filter into the center of the
point-of-use cover.
A Millipak 40 final filter
B Point-of-Use cover
INSTALLATION
17
TO. Install the cover over the Millipak 40 final filter by
pressing the tabs on the sides of the cover; the tabs
should pop into the slots in the system cabinet
B
A Tabs
B Slot
You are now ready to operate your Milli-Q Plus system.
18
INSTALLATION
3
OPERATION
Pre-Operation Checklist
Operating The Milli-Q Plus System
Make sure you have done the following before you operate
the Milli-Q Plus system:
There are two ways to operate the Milli-Q Plus system:
directly from the unit and by remote control. This chapter
describes direct operation of the Milli-Q Plus system. For
instructions on how to operate the system by remote control,
see Appendix 2.
During normal operation of the Milli-Q Plus system,
make sure the isolating valve (if you installed one) is always
open. The isolating valve should be closed only if you want
to shut off the water supply to the system. If you turn off the
system for more than one week, remove the QPAK and the
Millipak 40 Final Filter.
• feed water connection made (page 8)
• correct QPAK purification pack inserted and retaining
arm locked (page 10)
• trapped air purged from system (page 13)
• QPAK hydrated overnight
• point-of-use filter installed and purged (page 16)
If any of these items has not been completed, see Chapter 2,
Installation, for instructions before operating your Milli-Q
Plus system.
• DRAIN THE FIRST TWO LITERS OF WATER
The first time you use your Milli-Q Plus system, discard
the first two liters of water. If you turn off the Milli-Q Plus
system for any length of time, you should again drain the
first two liters before collecting water for laboratory use.
Stagnant water in the system (without periodic recirculation)
will deteriorate in quality.
Note: If you are performing a low TOC application, drain
the first 15-20 liters of water.
1. Turn on the pump by pressing OPERATE/STANDBY.
Make sure the green power light is on. The system
will be in the OPERATE mode.
OPERATION
19
Note: Each time the pump is started in the OPERATE
mode, the Milli-Q Plus system will automatically run
through the Auto Test sequence to ensure proper water
quality. The display will initially read TEST: 15 M Q cm
(+ 1 megohm-cm). After 4 seconds, the display will
show the actual resistivity of the water in the system
(PRODUCT:
M Q cm, up to 18.2 megohm-cm). This
value may flash on and off if the actual resistivity in the
system is below 14 megohm-cm (the set point). Once
the actual resistivity builds to greater than 14 megohmcm, the display will be steady.
2. Turn the RECIRCULATION/PRODUCTION valve to
PRODUCTION.
3 . Discard the first two liters of water that is produced.
20
OPERATION
4. Turn the RECIRCULATION/PRODUCTION valve to
RECIRCULATION.
5. Press OPERATE/STANDBY to put the system into the
STANDBY mode. The display will read STANDBY.
You are now ready to collect ultrapure, reagent-grade water
for use in the laboratory.
COLLECT WATER FOR LABORATORY USE
1. Turn on the pump by pressing OPERATE/STANDBY.
2. Turn the RECIRCUIATION/PRODUCTION valve to
PRODUCTION.
3. Take your required volume of water.
rirti
REAGENT
GRADE
WATER
4. When you are finished taking your water, turn the
RECIRCULATION/PRODUCTION valve to RECIRCULATION.
5. Press OPERATE/STANDBY to return the system to the
STANDBY mode. The display will read STANDBY.
6. When you need more ultrapure water, simply repeat
steps 1-5.
CAUTION: You cannot take any water from your Milli-Q
Plus system when the system is in the STANDBY mode.
To maintain water quality between uses, the Milli-Q Plus
system automatically recirculates the water in the system
for 5 minutes every 55 minutes. During the 5 minutes
that the water is recirculating, the display will read
RECIRCULATION.
Make sure the RECIRCULATION/PRODUCTION valve
is always turned to RECIRCULATION when the system is
in the STANDBY mode. If the system is on PRODUCTION,
water will leave the system during the periodic
recirculation and your bench will become wet.
Note: If you wish, the setting for recirculation frequency
can be changed so that water recirculates for 5 minutes
every 3 hours (see Appendix 1). This should be done by
a trained Millipore service representative.
OPERATION
21
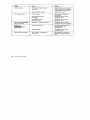
Summary Of Milli-Q Plus System Functions
The chart below summarizes the system functions that you have learned during the installation and operation of your new
Milli-Q Plus system. It also lists the messages that will be shown when a Milli-Q Plus system component needs to be replaced.
22
Action
Mode
Display
Press OPERATE/STANDBY
(when in OPERATE)
STANDBY
STANDBY
Press OPERATE/STANDBY
(when in STANDBY)
OPERATE
[see Auto Test below]
Turn valve to RECIRCULATION
STANDBY
STANDBY (55 min)
REORCUIATION (5 min)
Turn valve to
PRODUCTION
OPERATE
PRODUCT:
M Q cm
(actual resistivity; water
delivered to point of use)
Press TEMPERATURE
STANDBY
TEMPERATURE: 25"C
(4 sec; calibration temp)
Press TEMPERATURE
OPERATE
TEMPERATURE:
X
(4 sec; actual temperature)
Automatic Function
Mode
Display
Auto Test
(when you press OPERATE)
OPERATE
TEST: 15 M Q cm
+ 1 megohm-cm (4 sec)
PRODUCT:
M Q cm
(actual resistivity)
Automatic recirculation
STANDBY
RECIRCULATION
OPERATION
Replacement Item
Mode
Display
QPAK purification pack needs
to be replaced
[either mode]
amber lamp flashes
Several Milli-Q Plus system components are expendable:
Component
Lifetime
Millipak 40 final filter
variable
QPAK purification pack
4-6 months
Chapter 4, Maintenance, provides instructions for replacing
exhausted components. If you encounter problems with your
Milli-Q Plus system, see Chapter 5, Troubleshooting The Milli-Q
Plus System, to help diagnose and solve problems you might
encounter with the system. You can also telephone Millipore
Technical Service for assistance; see pages 33 and 34.
OPERATION 23
A
MAINTENANCE
System Shutdown
Changing The QPAK Purification Pack
If your Milli-Q Plus system will be turned off for more than one
week, remove the expendable components:
The EXCHANGE PACK lamp indicator will flash automatically
4 months after the installation of the QPAK purification pack,
indicating the age of the QPAK. For optimum removal of TOC
and microorganisms, Millipore recommends that you change
the purification pack when the lamp flashes. However, the ion
exchange capacity of the QPAK might not be exhausted and the
purification pack might still be capable of producing "ion-free"
18.2 M Q cm water. Replace the QPAK purification pack at the
end of the day to allow the activated carbon in the pack to
hydrate overnight
l.Turn the RECIRCULATION/PRODUCTION valve to
RECIRCULATION.
2. Turn off the power to the Milli-Q Plus system.
3. If you installed an isolating valve, close it.
4. Remove the QPAK purification pack and discard.
5. Remove the Millipak 40 final filter and discard.
When you wish to operate your Milli-Q Plus system again, open
the isolating valve and turn on the power. Then follow the
instructions in Chapter 2 to install a new QPAK purification pack,
clear trapped air, and install a new Millipak 40 final filter. Drain
the first two liters of water produced before collecting ultrapure,
reagent-grade water for use in the laboratory.
If product resistivity readings decrease to an unacceptable
level (below 10 megohm-cm), replace the purification pack. To
order a new QPAK purification pack, see pages 35 and 36.
By adjusting the PC board, the preset time for EXCHANGE
PACK can be changed to six months (see Appendix 1). This
should be done by a trained Millipore service representative.
To change the QPAK purification pack:
1. Make sure the system is in the STANDBY mode.
2. Turn the RECIRCULATION/PRODUCTIONvalvetoPRODUCTION and allow any excess water to drain from the
system. Then return the valve to the RECIRCULATION
position; this will depressurize the purification pack.
MAINTENANCE 25
3. Unlock the pack retaining arm on the Milli-Q Plus system
and remove the pack by pulling it straight out of the
system. Hold the Milli-Q Plus system with one hand
while you remove the pack with the other hand.
4. Drain excess water from the used pack and discard the
pack.
Note: The used pack must be removed from the system for
at least 10 seconds before the new pack is installed in order
to reset the EXCHANGE PACK timer.
5. Insert the new pack into the unit (see page 10 if you do
not recall how to do this).
CAUTION: If the amber EXCHANGE PACK lamp is lit continuously, theQPAK purification pack mightbe loose. Make
sure the purification pack is securely in place and the pack
retaining arm is locked.
26
MAINTENANCE
6. If you closed an isolating valve, open it.
7. Unscrew the Millipak 40 final filter from the connector.
8. Clear trapped air from the pack, then replace and vent
the Millipak 40 final filter.
9. Allow the system to sit in STANDBY overnight.
10. After 12 hours or in the morning, drain the first two liters
of water produced by the system (15-20 liters if you are
performing a low TOC application); see page 19 if you
do not recall how to do this.
Note: As usual, the display will show TEST: 15 M Q cm
(+ 1 megohm-cm) when the pump begins operating. After
4 seconds, the display will show the actual resistivity of the
water.
Changing The Millipak 40 Final Filter
The Millipak 40 final filter should be changed when the flow rate
of water leaving the system decreases to an unacceptable level
(.5 L/m) or when you change the QPAK purification pack. The
useful lifetime of the Millipak 40 final filter depends on the
quality of your feed water and how much you use the system.
See pages 35 and 36 for ordering information.
To change the Millipak 40 final filter:
1. Make sure the system is in the STANDBY mode.
2. Press the tabs on the sides of the point-of-use cover to
remove it from the system.
3. Snap the Millipak 40 final filter out of the cover and set
the cover aside.
You are now ready to operate your Milli-Q Plus system again.
MAINTENANCE
27
4. Unscrew the Millipak 40 final filter from the connector
and discard.
Replacing The Fuse
If the green power light is not lit, you may need to replace the
fuse. For ordering information, see pages 35 and 36.
Before replacing the main power fuse, make sure that
• the power cord is plugged in
• the power switch is on
• the green power lamp is not lit
If these conditions are met, replace the fuse:
1. Turn off the Milli-Q Plus system.
A Millipak 40 final filter
B Point-of-Use cover
C Point-of-Use connector
5. Follow the instructions in Chapter 2, Installation, to install and vent the new Millipak 40 final filter (steps 1-10
on pages 16-18).
You are now ready to operate your Milli-Q Plus system again.
2. Unplug the unit from the power supply and disconnect
the power cord from the unit.
WARNING: Make sure the Milli-Q Plus system is
completely disconnected from any source of
power before continuing. This is a high voltage
system.
3. Place a small screwdriver into the fuse holder and gently
pry out the fuse holder.
A Fuse holder
28
MAINTENANCE
4. Remove the spent fuse and set aside. Save the fuse until
you have turned on the system and confirmed that the
system power lamp lights up.
6. Replace the fuse holder into the plug socket by pressing
on the fuse holder until it clicks into place.
5. Insert the spare fuse (found in the fuse holder) into the
fuse socket.
A Spent fuse
B Spare fuse
I
A Fuse holder
MAINTENANCE
29
7. If you closed an isolating valve, open it.
8. Reconnect the Milli-Q Plus system to the power supply.
9. Turn on the power. The display will read REORCUIATION for 5 minutes, then STANDBY.
Note: Each time the power is turned on, water will
recirculate for 5 minutes and the system will automatically
go into the STANDBY mode. If you press OPERATE/
STANDBY during these 5 minutes, the system will
automatically go into the OPERATE mode upon completing
the recirculation cycle. If you press OPERATE/
STANDBYtwice, the system will go into the STANDBY
mode.
If the power lamp still is not lit, save both fuses. You may need
to replace the fuse on the PC board. See Appendix 1, or telephone Millipore Technical Service for assistance; see pages 33
and 34.
30
MAINTENANCE
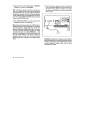
TROUBLESHOOTING
THE M I L L I - Q PLUS
SYSTEM
The chart below will help you diagnose and solve problems that you might encounter with the Milli-Q Plus system. If you are unsure
what the problem is, or how to approach solving a problem, telephone Millipore Technical Service for assistance; see pages 33 and
34.
Problem
Cause
Solution
Power light off
power switch off
make sure power switch is on
make sure power cord is connected
change fuse, see page 28
call Millipore Technical Service,
see pages 33 and 34, or see Appendix 1
power cord not connected
main power fuse blown
PC board fuse blown
Power light on, in OPERATE
mode, no product flow
RECIRCULATION/PRODUCTION valve
in RECIRCULATION position
pump not running
inlet solenoid valve closed
Low product flow
low feed pressure
inadequate water supply to pump
make sure valve is
turned to PRODUCTION
call Millipore Technical Service,
see pages 33 and 34
call Millipore Technical Service,
see pages 33 and 34
make sure pressure is at least
.5 psi - 15 psi (.03 bar - 1 bar)
if you have installed an isolating
valve, make sure it is open
point-of-use filter plugged
make sure the pump is primed
(make sure that the feed tank is full)
purge the system of air, see page 13
vent the point-of-use filter, see page 16
replace point-of-filter, see page 27
RECIRCULATION/PRODUCTION valve
partially closed
make sure valve is completely turned
to PRODUCTION
inadequate water supply to pump
inadequate water supply to pump
point-of-use filter airlocked
TROUBLESHOOTING
31
Problem
Cause
Solution
Low product quality
QPAK purification pack exhausted
air in system
replace purification pack, see page 25
purge air; ensure at least 5 psi pressure
on pump feed to avoid sucking in air
hydrate QPAK overnight
QPAK not hydrated overnight
Water at bottom of pack
pack not secured
pack-receiving micro-switch
not working
leak at RECIRCULATION/
PRODUCTION valve
Display reads TEST INCORRECT
temperature or resistivity miscalibrated
call Millipore Technical Service,
see pages 33 and 34, or see Appendix 1
feed water temp elevated
make sure feed water temperature
is between 5'C and 40'C
(40"F and 104'F)
call Millipore Technical Service,
see pages 33 and 34
when system autotests
Display shows
TEMPERATURE < 0 "C or
TEMPERATURE > + 'C
thermistor damaged
Display shows resistivity XXX
32
TROUBLESHOOTING
make sure pack retaining arm is
locked in place
call Millipore Technical Service,
see pages 33 and 34
call Millipore Technical Service,
see pages 33 and 34
system is trying to read higher than
18.2 M Q cm
there might be air in resistivity cell;
purge air from system by draining
water
6
TECHNICAL
INFORMATION
Technical Assistance
For technical assistance with your Millipore product, contact
your local Millipore sales or service representative, or telephone
the Millipore office nearest you.
In North America, you can telephone the Technical Service
Department toll-free at 800-225-1380. You can also telephone:
In
In
In
In
In
Western United States:
Canada:
Puerto Rico:
Toronto:
Massachusetts:
800-632-2708
800-268-4881
800-747-8444
416-678-2161
617-275-9200
Outside of North America, contact:
Africa
Millipore Intertech
Europe
BP307
78054 Saint-Quentin
Yvelines Cedex France
Tel. (1) 30.45.70.00
Telex 695430 militec
Australia
Millipore Pty. Ltd.
Private Bag No. 18
87-89 Mars Road
Lane Cove, N.S.W. 2066
Australia
Tel. Toll Free (008) 222-111
In Sydney Area
(02) 428-7333
Telex 25934 MILLIP
Austria, USSR,
Eastern Europe,
Middle-East
Millipore Ges. m.b.H.
Hietzinger Hauptstrasse 145
A-1130 Wien
Austria
Tel. (0222) 82 89 26
Telex 131464 miliv a
Belgium & Luxemburg
Millipore S.A.-N.V.
Rue de la FusSe 60
Rakestraat 60
1130 Bruxesses-Brussels
Belgium
Tel. (02) 242.17.40
Telex 22798 milwat b
Brazil
Millipore Industria e
Com6rcio Ltda.
Rua Prof. Campos de
Oliveira, 430
CEP 04675
Sao Paulo-SP
Brazil
Tel. (011) 548-7011
Telex (11) 57751 MLY BR
Canada
Millipore (Canada) Ltd.
3688 Nashua Drive
Mississauga, Ontario
L4V 1M5
Canada
Tel. Toll free 1-800-268-4881
In Toronto Area
(416) 678-2161
Telex 06-968513 MILLIPORE
MSGA
Denmark
Millipore A/S
Roskildevej 342
2630 Taastrup
Denmark
Tel. (42) 52 88 11
Telex 33544 MILLIP DK
Finland
Millipore Oy
Ruukinkuja 1
02320 Espoo 32
Finland
Tel. 90-801 90 77
Telex 12-2123 mipor sf
France
Millipore, S.A.
PB307
78054 Saint-Quentin-enYvelines Cedex
France
Tel. (1) 30.45.70 00
Telex 698 371 euromil
India
Millipore (India) PvL Ltd.
50A, 2nd Phase Ring Road
Peenya
Bangalore 560 058
India
Tel. 91-812 366724-26
Telex 953-8458319 BWPL IN
Italy
Millipore S.p.A.
Via Achille Grandi, 23
20090 Vimodrone MI
Milan
Italy
Tel. (02) 25078.1
Telex 312 284 milspa i
Millipore S.p.A
Via D. Sansotta 100
00144 Roma
Italy
Tel. (06) 573300
TECHNICAL
INFORMATION
33
Japan
Nihon Millipore Ltd.
Dai 5 Koike Bldg, 3-12
Kitashinagawa 1-Chome
Shinagawa-Ku
Tokyo 140
Japan
Tel. 81-3-471-8191
Telex 24948
Mexico
Millipore S.A. de C.V.
Avenida Ingenieros
Militares 85-PB
Mexico 11230 D.F.
Mexico
Tel. (905) 576-9688
Telex 1777 442 MISAME
The Netherlands
Millipore B.V.
Penningweg 33
Postbus 166
4870 AD Etten-Leur (N.B.)
The Netherlands
Tel. (01608) 22000
Telex 54 840 milwa nl
Norway
Millipore AB
Enebakkveien 133
0680 Oslo 6
Norway
Tel. (02) 67 82 53
Puerto Rico
Millipore Corporation
Puerto Rico Branch
KM 7.7
State Road 172
Cidra, Puerto Rico 00639
Tel. (809) 747-8444
FAX (809) 747-8449
Singapore
Millipore Pty. Ltd.
#26-03 United Square
101 Thomson Road
Singapore 1130
Singapore
Tel. 2532733
Telex 56556 MLLIP
Spain
Millipore Ibenca, S.A.
Avenida del Llano
Castellano, 13-3
Spain
Tel. (91) 729.03.00
Telex 23545 milli e
Millipore IbSrica, S.A.
Entenza 28, Entla
08015 Barcelona
Spain
Tel. (93) 325.96.16
Telex 50524 wtrs e
Telex 21064 milipor s
Sweden
Millipore AB
Box 233
421 23 Vaestra Frolunda
Sweden
Tel. 031-028 98 60
Telex 21064 milipor s
Millipore AB
Grahamsvagen 15
172 46 Sundbyberg
Sweden
Tel. 08-98 89 60
34
TECHNICAL
INFORMATION
Switzerland
Millipore AG
Steinackerstrasse 11
CH-8302 Kloten
Switzerland
Tel. (01) 814 13 63/65
Telex 56-067 milag ch
U.K. and Ireland
Millipore (U.K.) Ltd.
"The Boulevard"
Blackmoor Lane
Watford, Hertfordshire
WD18YW
England
Tel. (0923) 81 6375
Telex 24191 milpor g
West Germany
Millipore GmbH
Hauptstrasse 87
6236 Eschborn
Federal Republic
of Germany
Tel. (6196) 494-0
Telex 40 72 704 mil d
In All Other Countries
Millipore Intertech
P.O. Box 255
Bedford, MA 01730
U.S.A.
Tel. (617) 275-9200
Telex 4430066 MILIPR UI
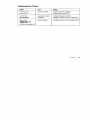
Ordering Information
Description
Catalogue Number
Mllil-Q PLUS SYSTEM
Milli-Q Plus system, 110 V/60 Hz
Milli-Q Plus system, 220 V/50 Hz
2D52 115 84
2FMQ 050 01
EXPENDABLES
Millipak 40 final filter unit, .22 |im sterile w /
1/4" NPTM inlet, 2/package
MPGL 04S K2
ForRO or distilled feed water:
Starter Kit (1 QPAKj purification pack
and 1 Millipak final filter unit, .22 nm)
Purification Pack QPAKj (without Millipak 40)
CPMQ K05 RI
Starter Kit (1 QPAK, purification pack
and 1 Millipak final filter unit, .22 \un)
Purification Pack QPAKj (without Millipak 40)
CPMQ K05 D2
ACCESSORIES
DelrinM isolating valve
Pressure regulator kit
Wall mounting bracket
1/4" male - 8 mm tubing quick connector
6.25 mm jack connector, male
Pressure switch FTPF 006 09
XXI1 000 01
2FMQ 000 PR
2FMQ 00W MB
FTPF 026 30
FTPF 023 95
FTPF 006 08
SPARE PARTS
Feed water tubing, 8 mm OD, polyamide
Main power fuse, 1 amp/250 V Slo-Blo
(for 110 V/60 Hz system)
Main power fuse, .5 amp/250 V Slo-Blo,
(for 220 V/50 Hz system)
FTPF 027 21
FTPF 007 56
PC board
(for
PC board
(for
FTPF 030 00
For DIfeed water.
fuse, .16 amp Slo-Blo
110 V/60 Hz system)
fuse, .1 amp Slo-Blo,
220 V/50 Hz system)
CPMQ 004 Rl
CPMQ 004 D2
FTPF 003 06
FTPF 029 99
TECHNICAL INFORMATION
35
SPARE PARTS (con't)
36
TECHNICAL INFORMATION
Description
Catalogue Number
Allen wrench, M5 (to remove front cover)
Check Valve
PC board control (for 110 V system)
PC board Control (for 220 V system)
1/4" male - 6 mm tubing quick connector
Iwaki1" pump (for 110 V system)
Iwaki pump (for 220 V system)
Jack connector, female with cable
Printed circuit keyboard
LCD display, 16 digits with cable
Level switch with cable (for 60 L feed tank)
Pack adapter with thread, 1/4"
Pack microswitch with cable
Point-of-Use cover
Polyamide tubing, 6 mm O.D.
Power cord line, 110 V
Power cord line, 220 V
PVDF 3-way valve, 1/4"
Solenoid valve body, stainless steel
Solenoid valve coil (for 110 V system)
Solenoid valve coil (for 220 V system)
Solenoid valve connector
Top door
1/2" female -1/4" female threaded reducing
bushing, with built-in stainless steel screen
and rubber gasket
1/4" male - 8 mm tubing quick connector
3-way valve knob
ZF20 000 70
FTPF 027 18
ZF20 000 51
ZF20 000 50
FTPF 027 10
FTPF 024 73
FTPF 017 82
ZF20 000 21
FTPF 026 05
ZF20 000 30
XFJM 000 02
ZF20 000 09
ZF20 000 20
FTPF 025 57
FTPF 027 20
FTPF 024 71
FTPF 018 66
FTPF 017 76
FTPF 024 66
FTPF 024 68
FTPF 024 67
FTPF 003 96
FTPF 025 56
ZF20 000 80
FTPF 026 30
FTPF 025 58
Specifications
Components
Materials of Construction
Cabinet
Cabinet accessories
Check valve
Fittings
Hardware (screws, nuts, washers)
Inlet screen
Inlet solenoid valve
Internal skeleton
Microsensor tips
O-rings
Point-Of-Use fittings
Point-Of-Use tubing
Pump body
Pump materials (contacting fluid)
Resistivity sensor
Tubing
3-way valve
polypropylene
polyamide
copolymer acetal resin
copolymer acetal resin/nylon
stainless steel
stainless steel
316 stainless steel
Noryl1" (polyamide)
316 stainless steel, electropolished
nitrile (EPDM)
PVDF
PTFE
316 stainless steel
stainless steel, Noryl (polyamide)
316 stainless steel, electropolished
polyamide
PVDF
Connections
Specifications
Feed connector
Product connector
polyamide tubing, 8 mm O.D.
1/4" NPTF connector, PVDF
Dimensions
Specifications
495 mm (19.5 in)
297 mm (11.7 in)
433 mm (17.0 in)
9.3 kg (20.5 lb) (without pack)
15.4 kg 04.0 lb) (with pack and water)
Height
Width
Depth
Shipping weight
Operating weight
Electrical Requirements
115 V/60 Hz, .8 amp fuse size: 1 amp/250 V, Slo-Blo (provided)
220 V/50 Hz, .4 amp fuse size: .5 amp/250 V, Slo-Blo (provided)
TECHNICAL INFORMATION
37
Feed Water Requirements
Specifications
Feed water pressure
minimum: .5 psi (.03 bar)
maximum: 15 psi (1 bar)
Operating temperature
5"C - 40'C (41'F - 104"F)
Pump and Motor
Specifications
Bypass adjustment maximum pressure
Electrical
Maximum discharge pressure
Pump Type
40 ± 2 psi (2.67 +.13 bar)
115 V/60 Hz, .43 amps or 220 V/50 Hz, .25 amps
43 psi 0 bar)
positive displacement magnetic gear
System Performance
Specifications
Product quality*
meets or exceeds ASTM.CAP, ACS, and NCCLS
standards for Type I, reagent-grade water
Water production rate
1.5 L/m (.4 g/m) (maximum)
* Water quality will deteriorate if water is stored.
Warranty
Millipore Corporation ("MiUipore") warrants the products manufactured by it against defects in materials and workmanship
when used in accordance with the applicable instructions for
a period of one year from the date of shipment of the products.
MILLIPORE MAKES NO OTHER WARRANTY, EXPRESSED OR
IMPLIED. THERE IS NO WARRANTY OF MERCHANTABILITY
OR FITNESS FOR A PARTICULAR PURPOSE. The warranty provided herein and the data, specification and descriptions of
Millipore products appearing in Millipore's published catalogues
and product literature may not be altered except by express
written agreement signed by an officer of Millipore. Representations, oral or written, which are inconsistent with this warranty
or such publications are not authorized and if given, should not
be relied upon.
38
TECHNICAL
INFORMATION
In the event of a breach of the foregoing warranty,
Millipore's sole obligation shall be to repair or replace, at its
option, any product or part thereof that proves defective in
materials or workmanship within the warranty period, provided
the customer notifies Millipore promptly of any such defect.
The exclusive remedy provided herein shall not be deemed to
have failed of its essential purpose so long as Millipore is willing
to repair or replace any nonconforming Millipore product or
part. Millipore shall not be liable for consequential damages
resulting from economic loss or property damages sustained by
a customer from the use of its products.
However, in some states the purchaser may have rights
under state law in addition to those provided by this warranty.
APPENDIX
1 : Advanced Maintenance and Troubleshooting
WARNING: Working on the PC board will void the
warranty for your Milli-Q Plus system. The information in this appendix is intended for your
information only. Millipore recommends that you
telephone Millipore Technical Service if you encounter
problems beyond the scope of simple maintenance.
If you wish to work on the PC board yourself, please
do so at your own risk.
Adjusting The PC Board
If you encounter problems with your Milli-Q Plus system you
can check the PC board. This appendix includes instructions
for:
• changing the PC board fuse
CAUTION: When working on the PC board, use extreme care.
The electronic components are delicate and can be easily
damaged. In addition, the connectors on the PC board carry
high voltages.
Regardless of which maintenance function is performed, the
steps for accessing the PC board and reassembling the system
are the same.
TO ACCESS THE PC BOARD
1. Turn off the power to the Milli-Q Plus system and unplug
the power cord.
WARNING: The cables on the PC board carry
high voltages. Proceed with caution.
• adjusting the temperature potentiometer
• adjusting the resistivity potentiometer
2. Open the back cover on the Milli-Q Plus system by
turning the handwheel and lifting off the cover.
• adjusting the LCD contrast potentiometer
• changing the pack replacement frequency setting
• changing the recirculation frequency setting
APPENDIX
1
39
TO REASSEMBLE THE MILLI-Q PLUS SYSTEM
3. Pull the PC board out of the unit as far as possible
without disconnecting the connectors.
4. Plug in the power cord and turn on the power. The
display will read RECIRCU1ATION for 5 minutes, then
STANDBY.
40
APPENDIX
1
1. Turn off the power and unplug the power cord.
2. Slide the PC board back into the cabinet
3. Replace the back cover, washer, and handwheel. Hand
tighten the handwheel; do not over tighten.
4. If you closed an isolating valve, open it.
5. Reconnect the Milli-Q Plus system to the power supply.
6. Turn on the power. The display will read RECERCUIATION for 5 minutes, then STANDBY.
On the PC board you will find the PC board fuse, the LCD
contrast, temperature and resistivity potentiometers, and the
jumper cluster for changing the temperature, setting for the
purification pack, and the calibration frequency setting for
automatic recirculation.
A
B
C
D
E
LCD contrast
Temperature potentiometer
Resistivity potentiometer
Jumper cluster
PC board fuse
APPENDIX 1 41
•
CHANGING THE FUSE ON THE PC BOARD
If the green system power light is off, the PC board fuse may
need to be replaced. First make sure that:
• the power switch is on
• the power cord is connected
• the main power fuse is fresh
If these conditions are met and the power lamp is still off, you
can replace the PC board fuse. See pages 35 and 36 for ordering
information.
To replace the PC board fuse:
1. Follow steps 1 - 3 on pages 39 and 40 to access the PC
board.
WARNING: Do not plug in the power cord or
turn on the power.
2. You will find the PC board fuse in the center of the
bottom portion of the PC board. To replace the fuse, lift
the fuse carefully out of the socket and set it aside.
3. Replace the old fuse with a new fuse.
4. Follow steps 2 - 5 on pages 40 and 41 to reassemble the
system. If the system power light does not go on,
telephone Millipore Technical Service for assistance; see
pages 33 and 34.
42
APPENDIX 1
A Spent fuse
B New fuse
• ADJUSTING THE TEMPERATURE
POTENTIOMETER
You may need to recalibrate the temperature potentiometer
if the display reads TEST INCORRECT when the system auto
tests. Before you adjust the temperature potentiometer, make
sure the feed water temperature is between 5*C and 40"C. If it
is not in this temperature range, correct the feed water
temperature. If the display still reads TEST INCORRECT, the
temperature potentiometer needs to be recalibrated.
To recalibrate the temperature potentiometer:
1. Follow steps 1 - 4 on pages 39 and 40 to access the PC
board.
2. Press the TEMPERATURE button while the system is in
the STANDBY mode. The display will show the test
calibration temperature: TEMPERATURE:
*C.
Note: If the test temperature reads 25'C, you do not need
to recalibrate the temperature potentiometer. However,
you may need to adjust the resistivity potentiometer (see
the section below).
3. While continuing to press the TEMPERATURE button,
adjust the temperature potentiometer Qabeled "P4TEMP*)
by turning the screw with a small screwdriver. Turning
the screw to the left increases the temperature setting;
turning the screw to the right decreases the temperature
setting. Gently turn the screw until the temperature
reads 25°C.
Note: There is a red seal on the potentiometer. You will
break this seal as you adjust the potentiometer with the
screwdriver.
APPENDIX
I
43
4. Release the temperature button. The display will read
STANDBY.
5. Follow steps 1 - 6 on page 40 and 41 to reassemble the
system.
If the display reads TEMPERATURE: < *C or TEMPERATURE:
> "C when the system auto tests, the thermistor is damaged.
Telephone Millipore Technical Service for assistance; see pages
33 and 34.
• ADJUSTING THE RESISTIVITY
POTENTIOMETER
You may need to recalibrate the resistivity potentiometer if:
• the display reads TEST INCORRECT when the system
auto tests and the temperature potentiometer is properly
calibrated
• the test resistivity is not 15 ± 1 megohm-cm (display does
not read TEST: 15 M Q cm)
Before recalibrating the resistivity potentiometer, make sure the
calibration temperature is 25'C (see the section above).
To recalibrate the resistivity potentiometer:
1. Follow steps 1 - 4 on pages 39 and 40 to access the PC
board.
2. Remove Jumper C to lock the PC board in the test mode.
The display will read TEST: M fl cm.
44
APPENDIX
1
3. Adjust the. resistivity potentiometer Qabeled up2 RES")
by turning the screw •with a small screwdriver. Turning
the screw to the left increases the resistivity setting;
turning the screw to the right decreases the resistivity
setting. Gently turn the screw until the display reads
TEST: 15 M £2 cm (± 1 megohm-cm).
•
ADJUSTING THE LCD CONTRAST
POTENTIOMETER
The contrast of the LCD display can be changed by
adjusting the LCD contrast potentiometer.
To adjust the potentiometer:
1. Follow steps 1 - 4 on pages 39 and 40 to access the PC
board.
2. Adjust the contrast by turning the screw on the
potentiometer with a small screwdriver. The LCD contrast
potentiometer is labeled "PI CONT" on the PC board.
Turning the screw to the left decreases contrast; turning
the screw to the right increases contrast.
Note: There is a red seal on the potentiometer. You will
break this seal as you adjust the potentiometer with the
screwdriver.
4. Replace Jumper C.
5. Press TEMPERATURE to make sure that the temperature
is set at 25'C. If the display does not read 25'C, adjust the
temperature potentiometer (see page 43).
6. Follow steps 1 - 6 on pages 40 and 41 to reassemble the
system.
Note: The resistivity set point can be changed upon request. Telephone MiUipore Technical Service for assistance;
see pages 33 and 34.
Note: There is a red seal on the potentiometer. You will
break this seal as you adjust the potentiometer with the
screwdriver.
3. Follow steps 1 - 6 on pages 40 and 41 to reassemble the
system.
APPENDIX
45
•
CHANGING THE FREQUENCY SETTING FOR
THE PURIFICATION PACK
The amber EXCHANGE PACK light will flash after the
QPAK purification pack has been in place for 4 months. For
optimum removal of TOCs and microorganisms, Millipore
recommends this setting. If you wish, the setting for pack
replacement frequency can be changed to 6 months.
46
•
CHANGING THE FREQUENCY SETTING FOR
AUTOMATIC RECIRCULATION
To maintain water quality, the Milli-Q Plus system will
automatically recirculate water for 5 minutes every 55 minutes
when the system is in the STANDBY mode. If you wish, you can
change the setting so that water will recirculate for 5 minutes
every 3 hours.
To change the setting to 6 months:
To change the setting:
1. Follow steps 1 - 3 on pages 39 and 40 to access the PC
board.
1. Follow steps 1 - 3 on pages 39 and 40 to access the PC
board.
2. Remove Jumper B; connect it to one of the contacts (so
that it remains steady on the PC board), but make sure
that it does not bridge the contacts. If Jumper B is
connected across the contacts on the PC board, the
frequency setting will be 4 months; if it does not bridge
the contacts, the frequency setting will be 6 months.
2. Remove Jumper A; connect it to one of the contacts (so
that it remains steady on the PC board), but make sure
that it does not bridge the contacts. If Jumper A is connected across the contacts on the PC board, water will
recirculate for 5 minutes every 55 minutes; if it does not
bridge the contacts, water will recirculate for 5 minutes
every 3 hours.
3. Follow steps 2 - 6 on pages 40 and 41 to reassemble the
system.
3. Follow steps 2 - 6 on pages 40 and 41 to reassemble the
system.
APPENDIX 1
Troubleshooting The PC Board
Problem
Cause
Solution
Power lamp is off,
system fuse O.K.
PC board fuse blown
replace PC board fuse; call Millipore
Technical Service or see page 42
Auto Test reads
TEST INCORRECT
temperature or resistivity
miscalibrated
recalibrate temperature or resistivity;
call Millipore Technical Service or see pages 43-45
Display shows
thermistor damaged
call Millipore Technical Service, see pages 33 and 34
TEMPERATURE < 0 *C
TEMPERATURE > + "C
and feed water temperature OK
APPENDIX
1
47
APPENDIX
2 : Remote Control of the Milli-Q Plus System
The REMOTE STANDBY option enables you to control the
operation of the Milli-Q Plus system from a remote location
(such as a clinical analyzer). To connect the Milli-Q Plus
system to a remote unit, you will need a remote connector
cord, see pages 35 and 36 for ordering information.
To connect the Milli-Q Plus system to a remote unit:
1. Make sure the system is in the STANDBY mode.
2. Plug the remote connector into the remote jack on the
Milli-Q Plus system. The display will show STANDBY.
3. Insert and connect the other end of the remote
connector cord into the port on the remote unit.
4. Press OPERATE/STANDBY to put the system into the
OPERATE mode and turn the RECIRCULATION/
PRODUCTION valve to PRODUCTION.
Note: The settings on the Milli-Q Plus system take precedence over those on the remote unit; if the system is set
on STANDBY, the pump will not start. When the pump
starts, the system will run through the usual Auto Test
sequence.
B
A
B
C
D
Remote jack
Remote connector cord
Remote unit
Remote unit jack
APPENDIX 2 4 9
5. Use the remote unit. The Milli-Q Plus system will automatically supply water when it is needed by the remote
unit.
Note: The Milli-Q Plus system will automatically switch
from OPERATE to STANDBY when the remote unit does
not need water; the display will read REMOTE STANDBY.
When water recirculates (for 5 minutes every 55 minutes),
the display will show RECIRCUIATION.
CAUTION: Manually turn the RECIRCULATION/PRODUCTION valve to RECIRCULATION if you are leaving
the system in REMOTE STANDBY for more than 55 minutes
(that is if the system will go into its recirculation cycle).
6. When you are finished using the system from the remote, simply disconnect the remote connector cord
from the remote port on the Milli-Q Plus system and
the port on the remote unit
CAUTION: Make sure the remote unit is not in use before
disconnecting the remote connector cord.
When the remote connector cord is disconnected, the Milli-Q
Plus system will automatically run through the Auto Test
sequence. The display will show TEST: 15 M Q cm (± 1
megohm-cm) for 4 seconds. The display will then show actual
resistivity (PRODUCT:
M Q cm).
50 APPENDIX 2