1
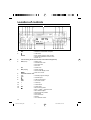
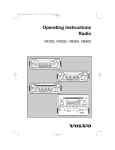
Radio / Cassette
Valencia CM 127
Operating instructions
Valencia CM127 d®
1
28.01.2004, 9:22 Uhr
Table of contents
Features ......................................................................................................................................... 21
Traffic safety and precautions ........................................................................................................ 22
Important note ................................................................................................................................ 22
Detachable face (release panel) .................................................................................................... 23
Location of controls ........................................................................................................................ 24
Instructions – general operation .................................................................................................... 26
Audio operation .............................................................................................................................. 27
Radio operation ............................................................................................................................. 28
Tape player operation .................................................................................................................... 29
Changer control (when optional CD changer is connected) ........................................................... 30
DSC menu (Direct Software Control) ............................................................................................. 33
Infrared eye for wireless remote control ......................................................................................... 36
Auxiliary input jack (cable connection with ø 3.5 mm pigtail coupler) ............................................ 36
Specifications ................................................................................................................................. 37
Blaupunkt Telephone Hotline
Address of the next service centre in your vicinity
(only for Germany)
If you would like to know the address of the next Blaupunkt service centre of your area
without having our service list at hand:
- Find out your area code.
-
Then call the following chargeable phone number: 01 80 / 5 25 56 66.
-
Using the area code to be entered you will be automatically given the address and
phone number of the next Blaupunkt service centre. You can also request this information by fax.
20
Valencia CM127 gb®
20
28.01.2004, 9:30 Uhr
DEUTSCH
Features
•
Tape player features
- Full-logic autoreverse cassette mechanism
- S-CPS (Super Cassette Program Search)
- Fast forward and rewind
- Radio monitor
- Tape scan
- Adjustable blank skip
•
CD changer control features (optional)
- CDC-A 05 changer control
- Disc naming, disc list
- Disc/track up/down
- Disc/track scan, repeat, track mix
- Track Program Memory (TPM)
- Cue/review, pause/play
•
Audio features:
- 35 watts x 4 channel integrated amplifier
- 4-channel preamp output
- Bass, treble, balance and fader control
- Source tone memory
- Programmable Loudness
- Mute, also when using cellular phone
- Auxiliary input
•
Other features:
- DSC menu (Direct Software Control)
- Integrated infrared eye for RC 06 H wireless remote control (optional)
- Detachable face with hard-shell case
- Illumination
- Clock recall
- 179 x 50 x 150 mm DIN/ISO chassis
- Detachable wire harness
- Snap-in DIN sleeve and mounting hardware
FRANÇAIS
Radio features
- Codem III concept, i.e.
new tuner, assessment of multipath interference, automatic noise suppression (ASU),
gradual mono/stereo switching, volume control as a function of signal strength.
- Superior AM frequency response
- 18 FM/6 AM presets, including 6 FM and 6 AM Travelstore presets
- Station and preset scan
- Station naming
- Tuner timer
- Local/distant seek and manual tuning
PORTUGUÊS
ESPAÑOL
SVENSKA
NEDERLANDS
ITALIANO
•
ENGLISH
Its high-power amplifier and 4-channel preamp output provide you with tremendous system
configuration flexibility. It’s auxiliary input jack lets you easily incorporate portable audio
equipment, such as a portable tape or DAT player, into your car’s sound system.
Your unit’s detachable faceplate makes the unit useless to would-be thieves.
Designed, engineered and manufactured by Blaupunkt.
21
Valencia CM127 gb®
21
28.01.2004, 9:30 Uhr
Traffic safety and precautions
•
•
•
•
Do not adjust your unit in difficult driving conditions that demand your full attention.
As the driver of a motor vehicle, it is your responsibility to pay attention to the traffic situation
at all times. Never use your unit in a way that could distract you.
Always make sure that you are still able to hear any warning signals coming from outside of
the vehicle, such as police or fire engine sirens, so that you can react accordingly.
If your vehicle was parked in direct sunlight resulting in a considerable rise in temperature
inside the vehicle, allow the unit to cool off before operating it.
Important note
You fill find a label enclosed to the car radio. We recommend to attach the label at the panel
behind the detachable face. The label will then be visible each time you have detached the face
in order to visualise that the car radio is protected against theft.
22
Valencia CM127 gb®
22
28.01.2004, 9:30 Uhr
DEUTSCH
Detachable face (release panel)
Detaching and attaching the face:
The face of this unit can be detached and taken with you to prevent it from being stolen.
Note: Do not press against the display window. Do not press hard against the face when
attaching it to the chassis, it may be easily attached with gentle pressure.
Cleaning the connectors
The unit may not operate properly if the connectors between the unit and the face are
contaminated with dirt. In order to prevent this from happening, remove the face from the unit by
pressing REL (release button), then detach it and clean the connectors from time to time. Clean
the connectors with a cotton swab and isopropyl alcohol (90% or higher). Be sure to clean them
with a vertical motion. Never clean them horizontally, because this could damage the contact
points.
NEDERLANDS
Affixing the faceplate for retail display:
The faceplate can be affixed to the unit’s chassis, which is desirable for a retail display, for
example.
FRANÇAIS
Attaching the face:
Apply the right hand side of the face to the chassis by sliding (part B) of the face to (part A) at
the front of the chassis. Gently push the left side of the face against the front of the chassis until
it snaps into place.
ITALIANO
Note: Do not pull it straight out from the chassis. Be sure not to drop the face when detaching it
from the chassis. When carrying the face with you, put it in the carrying case. Do not expose the
face to direct sunlight, heat sources such as hot air ducts or leave it in a humid place.
ENGLISH
Detaching the face:
Press the REL (release) button and detach the face by gently pulling it off as illustrated.
SVENSKA
To affix the faceplate:
Insert the black bolt into the hole at the left front of the top of the radio. See * below.
ESPAÑOL
*
A
PORTUGUÊS
B
23
Valencia CM127 gb®
23
28.01.2004, 9:30 Uhr
Location of controls
1
REL
2
– Release for detachable faceplate
– Audio mute
AUDIO
– Bass, treble, balance, fader access
– Name storing/deletion in DSC menu
– Minute: 00
3
Lens receiving for wireless remote control RC 06 H (optional)
4
SCA (scan)
–
–
–
–
PS
– Preset scan
DIS (display)
– Display change
– Demo mode display on/off
MENU
– DSC menu on/off
5
6
Cassette insertion slot
7
– Cassette program change
8
9
Station scan
Cassette track scan
Disc track scan
Disc scan
– Cassette eject
SRC
– Audio source select
LIST
– List of disc names
10
+
– Volume up
11
–
– Volume down
12
ON
– Power on/off
13
–
–
–
–
–
–
–
–
Manual tuning down
Bass - / treble - / balance to left
Menu feature adjust
Name character position
Fast rewind
Disc track down
Review
List mode disc select
24
Valencia CM127 gb®
24
28.01.2004, 9:30 Uhr
15
–
–
–
–
–
–
Seek tuning up
Fade to front
Menu feature select
Name character select
S-CPS up
Disc up
16
–
–
–
–
–
–
Manual tuning down
Fade to rear
Menu feature select
Name character select
S-CPS down
Disc down
– Display
18
RPT
– Track repeat and disc repeat
19
FM
– FM band
– FM preset bank I, II, III select
FMT
– FM Travelstore
20
MIX
– Track play in random order
21
AM
– AM band
AMT
– AM Travelstore
– Pause
22
23
NEDERLANDS
Display
LD
– Loudness
SENS (Sensitivity)
– Seek tuning sensitivity adjust
24
1, 2, 3, 4, 5, 6
– FM/AM presets
25
TPM (Track
Program Memory)
SVENSKA
17
ENGLISH
Manual tuning up
Bass + / treble + / balance to right
Menu feature adjust
Name character position
Fast forward
Disc track up
Cue
List mode disc select
FRANÇAIS
–
–
–
–
–
–
–
–
ITALIANO
14
DEUTSCH
Location of controls
PORTUGUÊS
ESPAÑOL
– TPM store
– TPM play
– TPM clear
25
Valencia CM127 gb®
25
28.01.2004, 9:30 Uhr
Instructions – general operation
See “Traffic safety and precautions” on page 22.
”Press” means a momentary press of less than 1/2 second. All presses requiring more than 1/2
second are followed by a beep.
”Time Out” - When additional button presses are anticipated to complete a procedure, the unit
will automatically exit the procedure after 4 seconds of inactivity (8 seconds in the DSC mode).
Ignition on
The unit lights up and the clock is displayed, provided it has been set before. Otherwise, “12:00”
appears. How to set the clock is described under “DSC Menu”.
Demo mode
The unit is programmed to scroll some key features across the display if no button is presses for
one minute. To turn this off, turn the unit on and press DIS for 8 seconds until ”DEMO OFF”
appears. Pressing DIS for 8 seconds again will re-activate this feature.
Power on
When the ignition on, press ON or insert a tape to turn the unit on. The last-used source
becomes active, unless the unit is turned on by inserting a cassette, in which case cassette
player becomes active.
Audio source
Use SRC to select the audio source: radio or cassette (if already inserted,) CD changer (if
connected) and/or external unit (“AUX IN” display).
Display options
When turning on the audio source, various displays are shown in sequence.
Radio:
Station name (if named) —> frequency —> clock
Cassette: “TAPE 1” or “TAPE 2” —> clock
CDC:
Disc name (if named) or disc no. —> disc no. and track no. —> track no. and
elapsed play time —> clock
AUX:
“AUX IN” —> clock
Press DIS repeatedly to select the display you wish to see permanently.
Power off
Press ON for more than 1/2 second to turn the unit off.
Release for detachable faceplate
Push REL (release) to detach the face. An already inserted cassette remains in the unit. The
current settings and the source mode are stored. If power was not switched off before removing
the face, the unit will automatically power-on when the face is reattached.
26
Valencia CM127 gb®
26
28.01.2004, 9:30 Uhr
Mute
key to temporarily reduce the volume. “MUTE” appears. Press
again to
Press the
terminate the mute function.
Audio is muted automatically, if a cellular phone is connected and in use. “TEL MUTE” appears.
Cellular mute is ended by ending the cellular telephone use.
For adjusting the mute volume level, refer to Chapter “DSC Menu”.
Bass, treble, balance and fader
• Bass
Press and hold the AUDIO button until ”BASS” appears and then press immediately
to increase or decrease bass in intervals between 7 and -7.
or
Treble
Press and hold the AUDIO button until ”BASS” appears. Then press AUDIO once again so
that ”TREB” appears. Now press immediately
or
to increase or decrease treble in
intervals between 7 and -7.
•
Balance
Press and hold the AUDIO button until ”BASS” appears. Then press AUDIO twice so that
or
to adjust the left/right volume
”BAL/FADE” appears. Now press immediately
between L9 (left) and R9 (right).
•
Fader
Press and hold the AUDIO button until ”BASS” appears. Then press AUDIO twice so that
”BAL/FADE” appears. Now press immediately or to adjust the front/rear volume
between F9 (front) and R9 (rear).
NEDERLANDS
ITALIANO
•
FRANÇAIS
Volume control
Press + and – to increase/decrease the volume from 0 to 63.
ENGLISH
DEUTSCH
Audio operation
Automatic source tone memory
Bass and treble adjustments made are source specific, allowing different settings for each
source (radio, cassette, CD changer or external unit).
PORTUGUÊS
ESPAÑOL
SVENSKA
Loudness
Press LD to increase the sound of low and high frequencies. The LD icon appears. To cancel,
press LD again. The Loudness level can be set separately for each audio source (radio,
cassette, CD changer or external unit). Refer to Chapter “DSC Menu”.
27
Valencia CM127 gb®
27
28.01.2004, 9:30 Uhr
Radio operation
FM and AM buttons
You can chose between FM and AM band (medium frequency band). Press FM or AM. Three
memory banks are available for FM. When in FM radio mode, press FM to advance to the next
FM band, FMI, FMII, or FMIII/FMT (Travelstore).
Tuning sensitivity
Press SENS for more that 2 seconds to switch between lo and dx search sensitivity. In general,
set SENS to “lo” when in metropolitan areas or where stations tend to be strong and local, and
to “dx” if in rural areas or where stations tend to be weak and distant.
Seek tuning
Press or to seek the next receivable radio station. Tuning stops at the next receivable
station.
Manual tuning
Press
or
and the frequency will go one channel/step in the direction pressed. Press and
hold causes continuous manual tuning.
Preset station storage
After tuning to the desired radio station on the desired band, press and hold a preset button for
more than 2 seconds to store the current frequency. Audio is muted during the storage, the
preset number appears, and a beep acknowledges the storage. The number of the selected
preset appears in the display.
Preset station selection
Press the desired preset button.
Travelstore
You can automatically store the six strongest stations in decreasing order of signal strength.
This function is especially useful when travelling. Press the FMT button for 2 seconds to activate
FM Travelstore. In the AM band, press the AMT button for 2 seconds to activate AM
Travelstore. “T STORE” appears for a moment. Starting at the beginning of the band,
Travelstore stores the six strongest stations and returns to preset 1.
Station Scan
To scan all receivable stations, press SCA. “STA SCAN” appears, then the frequency blinks
(along with the preset number if appropriate) during scanning. The unit continuously scans until
the user stops scan by pressing SCA. The scan time can be varied (see Chapter “DSC Menu”).
Preset Scan
Press PS for more than 2 seconds. “PS SCAN” appears, then the frequency and the preset
number blink during scanning. The unit scans all presets one after another. Press PS again to
cancel Preset Scan. The scan time can be varied (see Chapter “DSC Menu”).
Note on radio reception
When listening to weak or distant AM stations, adjusting the treble to minimum (-7) will reduce
noise and improve sound.
Stereo symbol
The stereo symbol turns on if a stereo station with an incoming signal of sufficient quality is
received. The unit gradually switches between mono and stereo automatically.
28
Valencia CM127 gb®
28
28.01.2004, 9:30 Uhr
key for a motorized
Radio Monitor
Radio can be heard during tape winding. When activated, the RM icon appears. The preset
stations on the last-heard band are available during tape winding. How to turn this function off is
described under “DSC Menu”.
Tape track repeat
To play the currently selected track repeatedly, press RPT. “RPT I” appears. While automatically
rewinding to the beginning of the track, “FAST REW” appears. To cancel, press RPT again.
Pause
To pause, press
SVENSKA
Track scan
Press SCA to start track scan. “TRCKSCAN” blinks during the scanning operation. The unit
briefly plays each track. The scan time can be varied (see Chapter “DSC Menu”). If Radio
Monitor is activated, radio play is heard while advancing to the next track. At the end of the tape,
the unit reverses and continues to scan the new side. The unit continuously scans until the SCA
button is pressed.
FRANÇAIS
Super-Cassette Program Search
Press or once for each track you wish to advance or go back. “SEARCH” will blink plus the
number of tracks, e.g. “SEARCH 4” or “SEARCH- 4”. If is pressed more times than the current
track value, the tape will fast-rewind and begin to play at the first track. If is pressed more
times than there are tracks, the tape will advance to the end of the tape, autoreverse and begin
play. To stop the S-CPS function, press or .
ITALIANO
to activate fast forward
NEDERLANDS
Cassette fast winding
Press
to activate fast rewind (“FAST REW” appears). Press
(“FAST FWD” appears). Press
or
to stop fast winding.
ENGLISH
Cassette program selection
“TAPE 1” indicates that the top side of the tape is in play; “TAPE 2” refers to the bottom side.
to reverse the tape direction during playback. The tape automatically changes the
Press
direction at the end of the tape.
. “PAUSE” appears. To cancel, press again.
Pinch roller release
During tape pause, or during change to another source, or during power off, the unit’s pinch
feature automatically activates, protecting tape and tape head.
PORTUGUÊS
Blank skip
When the unit reaches a blank section of the tape, it can automatically fast-forward to the next
recorded section. How to adjust the length of pause is described under “DSC Menu”.
ESPAÑOL
Cassette insertion and eject
“LOADING” appears upon insert and cassette play follows. Press the
eject. “EJECT” appears and the radio plays.
DEUTSCH
Tape player operation
29
Valencia CM127 gb®
29
28.01.2004, 9:30 Uhr
Changer control (when optional CD changer is connected)
Your radio is ready to control the Blaupunkt CD changer CDC-A 05 with the Disc Management
System. The changer is not included in the delivery. See your Blaupunkt dealer for more
information.
At least one disc must be inserted in the changer magazine. Press SRC as needed until
“CHANGER” appears.
Track up/down
Press
and
to select tracks. The disc number and track number appear. Pressing
will
restart the current track if not more than 1 second of the track has been played. If less than 1
in the
second has been played, the unit goes to the beginning of the previous track. Pressing
last track will select the next disc.
Track cue and review
Press and hold
or
for audible cue or review.
Naming discs
Assigning a name to a disc makes it much easier to locate the disc later on. How to store a
name is described under “DSC Menu”.
Disc select by name
Press / to select discs. For easy identification of discs, the disc name appears immediately.
The disc number appears if the disc has not been named or identified since the magazine was
inserted.
Disc name list
This feature allows you to scroll through the names of the discs inserted in the changer without
leaving the currently playing disc. Until the changer has the chance to identify the discs in a
newly inserted magazine, the names of any named discs are not available.
1. Press LIST for more than 1/2 second to access the LIST mode. A small “L” appears in the
left-most position of the display.
2. Use and to scroll though the names. The disc number appears if the disc has not been
named and identified since the magazine was inserted.
3. When you have found the name of a disc that you want to hear, press
or
and the
changer automatically goes to that disc. If no new disc is selected, the LIST mode
automatically ends after 5 seconds.
Track repeat
To play the current track repeatedly, press RPT as needed until “RPT I” appears. To cancel the
repeat function, press RPT as needed until the “RPT” indicator disappears.
Disc repeat
To play the current disc repeatedly, press RPT as needed until “RPT II” appears. Once all tracks
on the disc are played, the disc is repeated. To cancel the repeat function, press RPT as
needed until “RPT” disappears.
Track mix
Press MIX as needed until “MIX I” appears. This also cancels repeat, scan, and TPM features, if
previously active. Once all tracks have been played at random, the next disc is selected. To
cancel track mix, press MIX as needed until the MIX indicator disappears.
Disc mix
Press MIX as needed until “MIX II” appears. Once all tracks on the disc have been played, the
next disc is selected and played at random. To cancel MIX II, press MIX as needed until the MIX
indicator disappears.
30
Valencia CM127 gb®
30
28.01.2004, 9:30 Uhr
Disc scan
Press SCA for more than 2 seconds to start disc scan. “DISCSCAN” appears. The disc names
(or if unnamed, the disc numbers) blink during the scanning operation. The unit scans each disc.
The scan time can be varied (see Chapter “DSC Menu”). The unit continuously scans until the
user stops scan by pressing SCA.
Changer reset
In the unlikely case of CD changer trouble, reset the CD changer by turning the unit’s power
and/or ignition off, and then turn the unit on again.
Programming tracks with TPM (Track Program Memory)
This feature allows you to play only those tracks you want to hear.
1. In CD changer mode, select the disc you want to program.
2. During regular play mode only, select the track to be added to the program. (TPM must be
off.)
3. Press and hold TPM until “TPMSTORE” appears. The plus symbol (+) will appear in leftmost display position. This indicates that the disc track is programmed.
4. Select the next track to be programmed using the
and
buttons. Press and hold TPM
until “TPMSTORE” appears.
5. Select other discs as desired using the / controls and repeat the steps 2-4 to program
tracks of other discs.
Running track program
Press TPM to activate the TPM program. “TPM” appears. If TPM is pressed when no
programming has been entered, “NO PROG” appears. Press TPM again to cancel this function.
The TPM indicator disappears.
TPM track up/down
To advance and go back within the program, use the
and
DEUTSCH
ENGLISH
Track scan
Press SCA to start track scan. “TRCKSCAN” appears. The track number and the elapsed play
time blink during the scanning operation. The unit scans each track. The scan time can be
varied (see Chapter “DSC Menu”). After scanning all tracks on the disc, the unit advances to the
next disc. The unit continuously scans until the user stops scan by pressing SCA.
FRANÇAIS
again.
ITALIANO
. “PAUSE” appears. To resume playback, press
buttons.
TPM disc up/down
Pressing or during TPM play advances to the next disc that has been programmed.
PORTUGUÊS
TPM scan
Press TPM to start the TPM program. Press SCA. “TRCKSCAN” appears briefly. The track
number and the elapsed play time blink during the scanning operation. The programmed tracks
will be scanned in order starting with first programmed track. Press SCA to end scan and to
listen to the desired track.
ESPAÑOL
Pause
To pause, press
NEDERLANDS
Permissible combinations of MIX and RPT
Pressing MIX during RPTII mixes all of the tracks within one disc continuously. To cancel this
combination, press RPT once and MIX twice.
SVENSKA
Changer control (when optional CD changer is connected)
31
Valencia CM127 gb®
31
28.01.2004, 9:30 Uhr
Changer control (when optional CD changer is connected)
Clearing track programming
To delete a single track :
1. First, press TPM to start TPM play.
2. Select the track you want to delete from the program.
3. Press and hold the TPM button. A beep sounds after 2 seconds. If the button is released
between 2 and 4 seconds, “TPM CLR” appears and one track is deleted from the program.
To delete all tracks from one disc:
1. First, press TPM to start TPM play.
2. Select the disc you want to delete from the program.
3. Press and hold the TPM button. A beep sounds at 2 seconds and 4 seconds. If the button is
released between 4 and 8 seconds, “TPM CLR” appears and all tracks on that disc are
deleted from the program. If the name re-appears, the “+” programming symbol will no
longer appear.
To delete all track programming from all discs (whether or not inserted in the magazine):
1. First, press TPM to start TPM play.
2. Press and hold the TPM button. A beep sounds at 2 seconds, 4 seconds, and 8 seconds. If
the button is released after 8 seconds, “TPM CLR” appears and all programming on all discs
is deleted. If the name reappears, the “+” programming symbol will no longer appear.
32
Valencia CM127 gb®
32
28.01.2004, 9:30 Uhr
Blaupunkt’s exclusive Direct Software Control Menu has many unique features that allow you to
customize the unit to your needs and preferences.
Clock adjustment (“CLOCKSET”)
Pressing
or
shows the blinking time. Subsequent press of
advances the hour;
advances the minutes. Press AUDIO to adjust the minute to :00. The unit begins keeping the
time when or is pressed or when the DSC menu mode ends.
Tuner timer on/off (“TMR ON”/“TMR OFF”)
The tuner timer allows the unit to go to a certain frequency at a certain time – from any audio
source. When the ignition is on and the unit off, the timer even turns the unit on and goes to the
or
to turn the tuner timer on or off.
specified frequency. Press
Blank skip time (“BSKPTIME”)
When the unit reaches a blank section of tape, it can automatically fast-forward to the next
recorded section. Use
and
to chose a minimum amount of blank time before blank skip
begins from between 4 to 20 seconds.
Recommendation: Classical music listeners may want to specify a longer blank, so that the unit
doesn’t mistake soft passages for blank spots.
33
Valencia CM127 gb®
33
28.01.2004, 9:30 Uhr
PORTUGUÊS
Radio Monitor (“RM ON” / “RM OFF”)
Allows the radio to play during tape winding. If this feature has been activated, the RM icon
appears when a tape is in use. Press
or
to turn Radio Monitor on or off.
ESPAÑOL
SVENSKA
Tuner timer set mode (“TMR SET”)
1. Before entering the DSC menu, tune in the radio frequency to be activated by the timer.
2. Access the DSC menu mode and scroll to “TMR SET” by pressing or .
3. Press
or
to enter the timer adjustment mode.
button to
4. Select the time at which the unit should switch to this station by pressing the
adjust the hours and the
button to adjust the minutes. Press AUDIO to adjust the
minutes to :00.
5. To store the station and the time, press MENU.
ITALIANO
Turn-on message programming (“MSG ENTR”)
The unit can scroll a 40-character message across the display at the time of turn-on. To create
your own message:
1. Press the
button. Eight hyphens appear with the first one blinking.
2. Press / to select the desired characters. If you want to put a blank space in name,
select “_”.
3. Press
to locate the next character.
4. After the eighth character (the farthest right character) is completed, the first (left-most)
character of next group of eight characters begins to flash. After the fifth group of eight
characters, pressing
will access the first group again.
5. Press AUDIO to store the turn-on message and to store the message.
NEDERLANDS
Turn-on message activation (“MSG ON”/“MSG OFF”)
Press
or
to turn the message on or off.
FRANÇAIS
ENGLISH
Using the DSC menu:
1. Press MENU for 2 seconds to access the DSC menu mode.
2. Press the / controls to scroll through the DSC menu.
or
to change menu settings.
3. Use
4. After 8 seconds or by pressing the MENU button the unit exits from the DSC menu. All
changes are stored when leaving the DSC menu manually or automatically.
DEUTSCH
DSC menu (Direct Software Control)
DSC menu (Direct Software Control)
Blank Skip (“BSKP ON” / “BSKP OFF”)
Press
or
to turn Blank Skip on or off.
Scan times
You can set different scan times for radio (“RD SCNTM”), cassette (“TP SCNTM”), and changer
(“CD SCNTM”) between 1 and 16 seconds. Press
or
to adjust the scan time.
Confirmation beep on/off (“BTTNBEEP”)
To activate or defeat the beep for all button presses, press
more than 1/2 second always have a confirmation beep.
or
. Button presses requiring
Adjustable mute level (“MUTE LVL”)
The unit’s mute level can be adjusted to any volume level. This mute level also applies to
cellular mute. Once “MUTE LVL” appears, the actual mute level is heard. Adjust the mute level
or
. Do not use the + or – button to set the mute level.
volume by pressing
Note: If mute is activated when the unit volume level is lower than the mute level, the unit’s
volume level is maintained, even though “MUTE” appears.
Maximum turn-on volume level (“MAXONVOL”)
This function allows you to set the maximum volume that is heard when unit is turned on. Once
“MAXONVOL” appears, the actual turn-on volume level is heard. Adjust the turn-on volume by
using
/
. Do not use the + or – button.
Note: If the unit is turned off while the volume is louder than the adjusted turn-on volume, the
turn-on volume will be at the level it was when the unit was turned off.
Loudness levels
You can choose between two loudness settings for each audio source: “LOUD AUX” (for
external unit), “LOUD CD”, (for CD changer), “LOUDTAPE” (for cassette),“LOUD AM” and
“LOUD FM” (for radio). To set the loudness level for each source, use
and
.
Radio station naming (“STN NAME”)
This function is available only while the radio is the active source. You can enter a name of
8 characters for each radio station. Up to 30 stations can be named. If you try to enter more
than 30 names, “**FULL**” appears. You can then enter new names after erasing some of the
existing names.
To store station names:
1. Press MENU for more than 2 seconds to access the DSC menu mode.
2. Scroll to the radio station naming feature by pressing / .
3. Access the radio station naming mode by pressing
or
.
4. Tune to the desired station by pressing AM or FM, a preset button or / . If the station
was previously named, the name appears in the display.
5. Press
or
to access the station name edit mode.
6. Press / to select characters. Select “_” for a blank space.
7. Press
to select the next character position.
8. Press AUDIO to store the name. “STORING” blinks twice in the display before the unit
returns to the station access mode.
9. To name another station, repeat the steps 4-8.
10. Press MENU to exit from the DSC menu.
Erasing one radio station name
Enter the station access mode in the DSC menu (see “Radio station naming”, above). Choose
the station with the name to be deleted. Once the name appears in the display, press AUDIO for
2 seconds. A beep sounds. Now release the button to delete this name. “NAME” and
“DELETED” blink alternately. Press MENU to exit from the DSC menu.
34
Valencia CM127 gb®
34
28.01.2004, 9:30 Uhr
Erasing one disc name
Enter the disc access mode in the DSC menu (see “Disc naming”). Choose the disc that has the
name to be deleted. When the name appears, press AUDIO for 2 seconds. A beep sounds. Now
release the button to delete the name. “NAME” and “DELETED” alternately blink. Press MENU
to exit from the DSC menu.
PORTUGUÊS
ESPAÑOL
SVENSKA
Erasing all disc names
Warning: This feature erases all names of all discs, including for discs not presently
inserted in the magazine.
Enter the disc access mode in the DSC menu (see “Disc naming”). When a name appears,
press AUDIO for 8 seconds. “ALLNAMES” appears for 2 seconds, then “DELETED” until the
deletion is completed. Press MENU to exit from the DSC menu.
FRANÇAIS
To name a disc:
1. Press MENU for more than 2 seconds to access the DSC menu mode.
2. Scroll to the disc naming function by pressing / .
or
.
3. Enter into the disc access mode by pressing
4. Select the desired disc using the / buttons. If previously named, the name appears.
5. Press
or
to access the name edit mode.
6. Press / to select characters. Select “_” for a blank space.
7. Press
to select the next character position.
8. Press AUDIO to store the name. “STORING” blinks twice in the display. The unit returns to
the disc access mode.
9. To name another disc, repeat the steps 4-8.
10. Press MENU to exit from the DSC menu mode.
ITALIANO
Disc naming (“DISCNAME”)
Assigning a name to a disc makes it much easier to locate the disc later on. You can enter and
store names of up to 99 discs (one name per disc, maximum of 7 characters per name). If you
try to enter more than 99 names, “**FULL**” will appear. You can then enter new names after
erasing some of the existing names.
NEDERLANDS
Erasing all radio station names
Enter the station access mode in the DSC menu (see “Radio station naming”, above). When a
name appears, press AUDIO for 8 seconds. “ALLNAMES” appears for 2 seconds, then
“DELETED” until the deletion is completed. Press MENU to exit from the DSC menu.
ENGLISH
DEUTSCH
DSC menu (Direct Software Control)
35
Valencia CM127 gb®
35
28.01.2004, 9:30 Uhr
Infrared eye for wireless remote control
The Blaupunkt RC 06 H wireless remote control has the following buttons and can activate all of
the same features as the corresponding buttons on the radio thanks to the integrated infrared
eye:
SRC, SCA, V–, V+,
,
,
and
.
Part number: 7 607 565 510 (manual remote control without interface). See your Blaupunkt
dealer for details.
Auxiliary input jack
(cable connection with ø 3.5 mm pigtail coupler)
Connect other audio equipment, such as a portable tape or DAT player, through a 3.5 mm pigtail
connector. Press SRC until “AUX IN” appears. Adjust volume, bass, and treble settings through
the head unit.
36
Valencia CM127 gb®
36
28.01.2004, 9:30 Uhr
DEUTSCH
Specifications
Audio power specifications
ENGLISH
Output power: 23 watts per channel minimum continuous average output into 4 ohms,
4 channels driven, from 35-16000 Hz.
87.5 - 108 MHz
1.0 µV
65 dB (stereo), 70 dB (mono)
35-16000 Hz
MW (AM)
Tuning range:
Signal-to-noise ratio:
Frequency response:
531 - 1602 kHz
50 dB
30-5000 Hz
Cassette mechanism
Signal-to-noise ratio:
Tape wow and flutter:
Tape frequency response:
56 dB
0.2 %
30-18000 Hz
179 x 50 x 150 mm
Approx. 1.4 kg
12 V DC car battery (11-16 V DC allowable)
-20°C to 60°C
• Unit
• Faceplate (release panel) with hard-shell case
• Wire harness
• DIN sleeve
• Mounting hardware
• Operating instructions
• Car radio passport
• Labels
ESPAÑOL
General
Dimensions (w/o projecting parts):
Mass:
Power requirement (neg. grnd.):
Operating temperature:
Supplied accessories:
PORTUGUÊS
Auxiliary input:
SVENSKA
4-8 ohms
4 x 35 watts (at 4 ohms)
4 x 23 watts (at 4 ohms) acc. to DIN 45 324 at 14.4 volts
4-channel
2.0 volts preamp output
4-channel, low-impendance (150 ohms) preamplifier
2.0 volts
Design and specifications subject to change without notice.
37
Valencia CM127 gb®
37
NEDERLANDS
Audio
Speaker impedance:
Maximum amp power:
RMS power:
Preamp outputs:
Preamp output voltage:
ITALIANO
Tuner
FM
Tuning range:
FM mono sensitivity:
Signal-to-noise ratio:
Frequency response:
FRANÇAIS
Other specifications
28.01.2004, 9:30 Uhr
Blaupunkt-Werke GmbH
Bosch Gruppe
07/97
Valencia CM127 d®
K7/VKD 8 622 400 902
20
28.01.2004, 9:22 Uhr