1
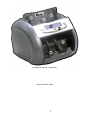
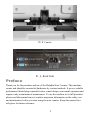
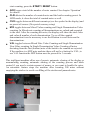
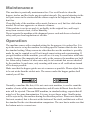
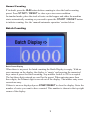
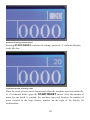
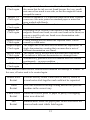
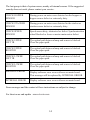
User’s Manual and Operation Instructions Dolphin Note Counter 1 Dolphin Note Counter www.ctcoin.com 1 Ill. 2, Feeder Ill. 3, Back Side Preface Thank you for the purchase and use of the Dolphin Note Counter. This machine counts and identifies counterfeit banknotes by various methods. It gives a reliable performance identifying counterfeit notes, smart design, convenient operation and requires only a minimum of maintenance. To use the machine to its full potential, please read the manual since it contains important information on the safety, use and maintenance before you start using the note counter. Keep this manual in a safe place for future reference. 2 Important to read before the first use: This machine was tested and adjusted in the factory. Anyhow, after transportation before and after sales, changes in temperature and humidity and according to the conditions of bank notes to be counted a fine adjustment is necessary before the first use. Please refer to the section ‘Setting Up’ later in this booklet. Failure to do so can result in malfunction and damage to the machine or your bank notes. The manufacturer cannot take any responsibility for damages of any kind caused by deviating from the guidelines laid out in this booklet. This booklet covers the installation, set up, maintenance and trouble shooting for the Dolphin series Bank Note Counter. Some of the features may not be available on your version. Please read this booklet thoroughly before operating the Bank Note Counter. While reading this manual please refer to the illustration at the beginning. Caution / Installation Select an appropriate workspace. The tabletop should be flat and level, away from direct sunlight or close range exposure of fluorescent light. A dust- and smoke free environment increases the life time of the machine significantly. Do not place the machine on delicate surfaces as the rubber from the anti-slipping and antivibration feet might have adverse effects. Make sure the local voltage correspondents with the voltage as mentioned on the rating label and preset on the voltage selector behind the back flap. This note counter requires connection to protective earth (grounding). Please only connect the power cord to a properly grounded socket. Before opening the machine’s back cover or any other maintenance, switch off the note counter and pull the plug. Before plugging in or out, make sure the power switch on the back, located to the right side of the power cord connector, is in the ‘off’ or ‘0’ position. This machine is fused with a fuse suitable for the country of destination. The fuse holder is incorporated with the power cord connector on the back of the note counter. To replace the fuse, you need to unplug first. For your convenience, there is a spare fuse in the fuse holder already. Please make sure to replace fuses with the same type only and never repair or bridge fuses. Dual Voltage machines have a voltage selector behind the back flap. Make sure you do not accidentally run a machine set to 110 Volts on a network with higher voltage. This Bank Note Counter has an AutoStart feature that starts operation as soon as notes are places on the hopper. Wearing loose clothes or jewellery make sure that 3 neither hangs over the machine or touches the hopper as the motor switch might be triggered and clothes or jewellery might be caught in the machine. Always keep liquids, food, loose objects (like coins, paper clips and staples) away from the Bank Note Counter. Make sure that notes to be fed into the machine do not contain stickers or coins that could peel off and block the sensors or note path. Do not operate the machine when it is wet or with wet hands. When the machine gets switches on, the motor runs for a short time. This is normal and serves the purpose of disposing off anything that might have got into the paper path. Prepare the money before counting. Do not feed heavily damaged or wet notes into the Bank Note Counter. Make sure rubber bands, coins, paper clips, staples and the like are removed before counting. Fan the notes out and arrange them to a narrow bundle before placing them on the hopper. Always adjust the hopper guides as narrow as possible. To allow for lamps and sensors to get to normal intensity and working temperature, the machine has a warming up period of about 30 seconds after being switched on. Package contents When unpacking please make sure that the bank note counter is not visibly damaged and the contents are complete. The box contains a bank note counter, a detachable power cord, this instruction booklet and an attachment to the hopper to centre the notes . If any of these is missing, please contact your dealer. Depending on the order, the box can also contain an external display and/or a data cable. The plastic bags are to protect the machine and its accessories from dust and damage during storage and transportation. They are not toys. To avoid the danger of suffocation, do not allow children or minors to play with these bags. Note There are customer specific versions of this machine available that operate differently to what is described in this manual. In this case, please refer to the special instructions sheet. 4 Quick Instructions Make sure the counter is properly set-up and adjusted to your requirements. Switch on. The power switch is on the backside, close to the power cord connector. If you receive an error message, refer to the trouble shooting section. Press the clear button (CLR). Place a stack of bank notes flat into the hopper on top of the machine. The machine works best with the guides in the hopper adjusted to the width of the largest note in the stack. Don’t have it wider than necessary. In automatic setting the machine will start counting, otherwise press the START / RESET button. The machine will start counting, stopping for dubious notes while displaying a message about the reject. The top note on the lower stack is the offending one. After all notes are counted, the total of accepted notes is displayed on the display . Features The more specialised this machine is, there more it is adapted to country specific currencies. With less detection features, it is more suitable for a wider range of currencies, but less efficient in detecting counterfeit money. Other currencies and documents (cheques) can be counted by turning off certain detection features. The installed features can be seen from the keypad where the abbreviations have the following meaning: UV detection of excessive UV light reflection from the note indicating fake notes printed on standard paper instead of special bank note paper, notes washed with bleach or otherwise heavily soiled notes. MG detection that finds the magnetic ink on bank notes. Go into SETUP and press the MG key to turn the MG function on or off. IR detection that finds areas on the bank note that are printed with special Infra-Red ink, not visible to the human eye. Go into SETUP and press the IR key to turn the IR function on or off. MT detection that looks for magnetic ink spread over the whole width of the note, a magnetic thread, a code on the magnetic thread, a currency specific code on the thread or a denomination specific code on the thread. Go into SETUP to turn the MT function on or off. On some machines, the MT function is required in certain modes. A Euro note counter needs the MT feature to positively identify the euro notes. In such a case MT is turned on automatically when € is turned on and cannot be deselected. When turning of 5 € (or other currency specific features) MT is turned of as well, but can be selected again to work as a general detection of the MT feature on bank notes. Example: Euro notes as well as English and Danish banknotes have a magnetic code on them. With the € feature selected the machine only accepts Euro notes. When the € function is turned off and the MT function on, the machine will accept Euro, English and Danish notes, but not banknotes without magnetic code on it. 3D detection measures the horizontal dimension (length) and vertical dimension (width) of the note and uses these data to determine the value of the note or to reject notes of wrong size. The 3D function can be used on value counters to determine the denomination of the currency the machine is made for. In other cases the feature is used to sort the ‘odd one out’. The first note counted, that is the one at the bottom of the stack of notes counted, is the reference note. Notes successively counted from the same batch that deviate from the size of the first note will be rejected. This feature then finds a smaller note that by accident got into a bundle of larger notes. In case the currency counted has notes all of the same length or width, the specific feature can be disabled to reduce unnecessary stops caused by torn, worn or otherwise damaged notes. To do so press SETUP for more than one second. Select the 3D feature by pressing the 3D key. Either ‘LENGTH LEVEL’ or ‘WIDTH LEVEL’ are on the display and can be changed by pressing the 3D key for more than two seconds. Below the level is the class value. Default: 03. Setting this value to zero (00) disables the respective function. After changing the settings, changes need to be confirmed by pressing the SETUP button. Pressing START/RESET cancels the changes. DD measures the vertical dimension (width) of the note and uses this to reject wrong size notes from a batch. Go into SETUP and press the IR key to turn the IR function on or off. DEN measures the density of the bank note paper to reject heavily soiled notes and avoid miscounting due to notes sticking together or overlapping. SP sets the counting speed in four steps. Steps 1 and 2 are for damaged and worn out notes, speed 3 is for notes in fair condition and speed 4 is for counting only at fastest speed with limited fake note detection. Depending on the version of the machine in some modes, the speed setting cannot be changed. MAN toggles between AutoStart and manual starting of the counting process. With notes in fair condition, it is faster putting the notes on the hopper and the machine starts counting automatically. If the notes are worn and torn and need careful placement, the machine can be switched to manual mode. To 6 start counting, press the START / RESET button. ADD keeps a total of the number of notes counted. See chapter ‘Operation’ for details. CLR deletes the number of counted notes and the batch-counting preset. In ADD mode, it clears the total of counted notes as well. CUR toggles between different currentcys (see the symbol in the display) and no preset of sensors (No special currency setup) MIX toggles between Mixed Value counting and Single Denomination Value counting. In Mixed note counting all denominations are valued and accepted to the total. After the counting the notes, the display will show the total value and value & number of each denomination. To see all the counted denomination it can be necessary to use the 0 button to scroll between the denominations. VAL toggles between Mixed Note Value Counting and Single Denomination Non-Value counting. In Single Denomination Value Counting all notes deviating from the first (bottom) note of the batch to be counted are rejected. If the machine is a MIX note machine there will not be a button for VAL, to use VAL function the MIX button must be pressed for 3 seconds. This intelligent machine offers use of presets, automatic clearing of the display or accumulating counting, automatic starting of the counting process and batch control if you need a certain amount of money or you want to bundle the notes. An automatic feature stops the machine after counting 200 notes without emptying the stacker to avoid overfilling of the stacker and jammed notes. 7 Maintenance This machine is practically maintenance free. Use a soft brush to clean the hopper, stacker and the feeder gap in regular intervals. Pay special attention to the two-part sensor in the stacker and the sensor couple in the hopper to keep them dust free. Clean the body of the machine with a moist (but never wet) lint free cloth when needed. Do not use aggressive or abrasive cleaners. If the machine is not in use pack it, preferably in the original box, and keep it away from excessive heat, cold or humidity. Do not operate the machine with a damaged power cord and observe electrical safety and your local regulations at all time. Operation The machine comes with a standard setting for the purpose it is ordered for. It is up to the user to set up the machine for testing specific features that deviate from the standard setting. Many currencies other than the one the machine is specially made for can be counted as well, but it needs some testing and experimenting. If you get familiar with the machine, you will see it is easy to count notes with basic security features like magnetic ink as easily as the currency the machine was built for. Some safety features of other notes may be in locations that are not checked by the machine. In such case, only counting with some or all verifications turned off is always possible. Make sure that the hopper guides are set as narrow as possible. Please adjust them to be not wider than the widest note. The arrows under the hopper guides shall remind you off this. Normally a machine like this, if it's not a mix note machine, is used to count the number of notes of the same denomination, and all notes different from the first note will be rejected. The non-MIX machine, in standard setting, expects that all notes be of the same denomination. It is easy to spot larger notes. Smaller notes will be rejected by the machine during the detection process. Please note that the first note counted, that is the note at the bottom of the stack, and that note will set the standard for the size/denomination comparison. The user has to make sure that the bottom note is a correct one. 8 Normal Counting If in doubt, press the CLR button before counting to clear the batch-counting preset. Press START / RESET to clear a previous error condition. In standard mode, place the stack of notes on the hopper and either the machine starts automatically counting or you need to press the START / RESET button to initiate counting. See the ‘manual/automatic operation’ section below. Batch Counting Batch Preset Display When there is no preset for batch counting the Batch Display is empty. With no error message on the display, the display is ‘empty’ and pressing the numerical keys enters a preset for batch counting. Any number from 0 to 999 is accepted. The last three digits entered are used for the preset. When entering more than three digits, the leftmost digit is moved out of the display. That makes entry error corrections easy. If there is an error displayed press START/RESET to clear the display. Enter the number of notes you want to have counted. This number is shown in the top right corner of the display. 9 A preset of twenty notes entered Pressing START/RESET confirms the setting (optional). A confirmed display looks like this: Confirmed preset of twenty notes Place the stack of notes in the hopper and either the machine starts automatically, or, if in manual mode, press the START/RESET button. After the number of notes for one batch is counted, the machine stops and displays the number of notes counted in the large display window on the right of the display for confirmation. 10 Finished count of a batch of ten notes. Take out the notes from the stacker. In AutoStart the machine continues counting until the notes from the hopper are used up or the next batch preset is reached. In ‘Manual Mode’, press START/RESET to continue. There might not be enough notes in the hopper to make up for a complete batch. Always compare with the display to make sure your batch is complete. Adding Up In SETUP mode press ADD to toggle the ADDing mode. Counted batches of notes will now be added to memory automaticly after a batch is counted, accepted and removed from the stacker. The last counted batch can be cleared from the total by pressing the CLR button one time. Pressing the CLR button two times will clear the memory. If notes are rejected remove all notes from stacker and hopper, and press the START/RESET button and CLR button one time to clear the batch from the display. The display will show the sum of the last couted baches with out the rejected batch. With the accumulation function active, a Sigma (Σ) is shown in the top row of the display. In Value Counting Mode please make sure that the accumulated amount does not exceed the display capacity. Offending Notes Should the machine find, according to your set-up, offending notes, the counting 11 process stops, an error message is displayed in the main window of the LCD display and the offending note is placed on top of the stack in the output. Remove this note, make your decision or place the note on top of the hopper and restart the counting by pressing START/RESET. There are three groups of error messages. An error related to damaged or possibly falsified note is a recoverable error. The offending note is not added to the total and its value not considered. The second line of the error message reads ‘Check again’. Pressing START/RESET will continue counting. If the error message read ‘Restart’ in the second line, the machine is out of sync and lost the count of the number of notes. That happens with the following error messages: ‘Double notes’, ‘Jam’ and Chain notes’. In this case, check the last notes for the problem displayed. With double note, some notes might stick together, or the edges are severely damaged and the machine cannot separate them. After checking place all notes from the stacker back on the hopper and count again. In adding mode, pressing CLR clears the last counted batch before the error occurred. Display / Error Messages The Dolphin displays error messages to inform you about the status and the required action after rejecting dubious notes. If notes cannot be identified or verified properly the machine stops and informs the user to take the top note from the stacker and to place it back on the hopper. By doing so, the final result is not affected. If the note is rejected several times, the user shall check it to decide if it is a genuine or a counterfeit note. Under certain circumstances, especially with old, dirty or sticky notes, the counting can get out of sync. In this case the display informs the user to take all the notes from the stacker and to count them again. It is advisable to check the top notes in the stacker for damages that caused the problem. There are three types of errors. If the machine can recover from an error or suspected fake note detection the cause for the message is displayed together with ‘Check again’ to indicate that the last note from the stack shall be checked manually or added to the hopper for another automatic checking. The accrued balance is not affected, and the offending note is not counted. 12 Suspect MG Check again Suspect UV Check again Suspect IR Check again Suspect MT Check again Suspect colour Check again Suspect length Check again Suspect width Check again Stacker full No magnetic ink found on note. Can indicate fake note, but can also mean that the ink was not found because the (very small) note moved too much to one side, so that the magnetic feature escaped the sensor. Excessive amount of UV reflection found on the note. Possible causes are: fake note printed on standard paper or notes that were washed with bleach. No IR ink found or result inconclusive. Depending on the version of the machine it can mean that no magnetic thread was found, no code was found on the threat, no currency specific code was found or no denomination code (value) was found. Colour reading does not match the expected value. Can be caused by soiled notes. The longer side of the note does not match the expectation. In single denomination counting that can mean that a note of different denomination was found. The shorter side of the note does not match the expectation. Can indicate a different denomination or a damaged note. Automatically generated after two hundred notes are counted continuously – no error condition Ripped, torn or folded note detected. Half note Check again If the machine cannot recover from an error condition the message is ‘Restart’. In this case, all notes need to be counted again. Double notes Restart Extreme density found. Either note is heavily soiled or several notes stick together and could not be separated. Tilted Restart Note was obstructed during feeding and did not pass the machine in the correct way. Chain Notes Restart Jam Restart Either an oversize piece of paper or partly overlapping notes were detected. Jammed notes block the paper path. Make sure notes are removed and count whole batch again. 13 The last group is that of system errors, mainly of internal sensors. If the suggested remedy does not work, please contact your service. CHECK HOPPER SENSOR During power on notes were detected on the hopper or hopper sensor defect or extremely dirty. CHECK STACKER SENSOR During power on notes were detected in the stacker or stacker sensor defect or extremely dirty. CHECK SPEED SENSOR Speed sensor dirty, obstructed or defect. Synchronisation wheel blocked or loose or motor main motor defect. CHECK UPPER LEFT IR The optical path between lamp and sensor is blocked. Clear the paper path. CHECK UPPER RIGHT IR The optical path between lamp and sensor is blocked. Clear the paper path. CHECK LOWER LEFT IR The optical path between lamp and sensor is blocked. Clear the paper path. CHECK LOWER RIGHT IR The optical path between lamp and sensor is blocked. Clear the paper path. MESSAGE ERROR INTERNAL ERROR Display software error or no software on main board. This message will be replaced by INTERNAL ERROR Display software error or no software on main board. Error messages and the content of these instructions are subject to change. For latest news and update : www.ctcoin.com 14