1
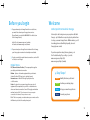
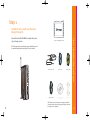
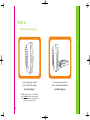
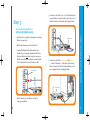
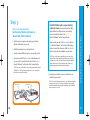
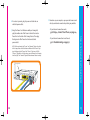
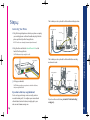
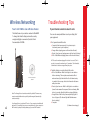
Enjoy!
Quick Start Guide
D-Link Vonage Wireless Router
SYSTEM REQUIREMENTS
• Any high speed DSL or Cable connection
• A valid Vonage account
• If you purchased your Vonage Device at a retail location, make
sure to first activate your device at www.vonage.com/activate.
In Canada, visit www.vonage.ca/activate.
Please wait 30 minutes before checking for a dial tone.
DV060607
Before you begin
1. If you purchased your Vonage Device from a retail store,
you must first activate your Vonage phone service.
(You will need to provide the WAN MAC ID on the bottom
of the Vonage Device.)
In the US, visit www.vonage.com/activate.
In Canada, visit www.vonage.ca/activate.
Welcome
to the Quick Start Guide for Vonage.
Get ready to start saving money on your phone bill with
Vonage – just follow these easy step-by-step instructions
to set up your new Vonage Device. Within minutes, you’ll
be making phone calls with high-quality, low-cost
Vonage phone service!
2. If you received your Vonage Device in the mail from Vonage,
your Vonage phone service has already been activated.
3. You also need a high speed Internet connection, such as DSL
or Cable, to use Vonage.
If you have questions along the way, please go to
the Troubleshooting Tips on Page 17 or visit:
www.vonage.com/help (US)
www.vonage.ca/help (Canada)
Helpful Terms:
ISP (Internet Service Provider) - The company that supplies
your high speed Internet connection.
Modem - A piece of network equipment that your Internet
Service Provider (ISP) sent you to gain high speed.
Internet access - either DSL through your phone line,
or Cable service.
Router - A router lets you connect more than one piece of
equipment (like computers) to your DSL or cable modem to
share one Internet connection. Some ISPs supply combination
modem/routers. (HINT: If you have more than one computer
connected to the Internet, then you have a router.)
4 Easy Steps!
Step 1: Identify the items you’ll need
Step 2: Confirm your existing setup
Step 3: Set up your new Vonage Device
Step 4: Connect your phone
Port - This is an opening on a device where you connect a cable.
An Ethernet port looks like a wide phone jack.
1
Step 1:
Identify the items you’ll need from your
Vonage Startup Kit.
D-Link Vonage Wireless Router
NOTE: You may use the optional base support included in your kit
to stand the Vonage Device vertically, but it is not required.
2
Black Power Cord
Blue Cable
Yellow Cable
Telephone Cable
D-LInk Documentation
CD-ROM
Base Support
NOTE: Ensure you are using the power supply provided with
the Vonage Device. Using the wrong power supply could result
in damage to your equipment.
Step 1: Identify the items you’ll need
You will not need the CD-ROM to complete the setup
of your Vonage service.
3
Step 2:
Confirm your existing setup.
Step 2: Confirm your existing setup
If your existing setup includes
a DSL or Cable Modem only,
If your existing setup includes
a DSL or Cable Modem and Router,
proceed to page 6.
proceed to page 10.
NOTE: If you have a DSL or Cable Modem
with a built-in Router, the setup process is
the same as if you have a separate modem
and router. Proceed to page 10.
4
5
5. Connect one end of the blue cable to the Ethernet port
on your Modem. Connect the other end to the blue port
labeled “Internet” on the back of the Vonage Device.
Step 3:
Set up your Vonage Device
(with existing Modem only)
Vonage Device
Modem’s power cord.
2. Attach the antenna to your Vonage Device.
3. Unplug the Ethernet cable that connects your
Modem to your Computer. Unplug the cable from
both your Modem and your computer. Leave your
Modem connected to your Internet connection (the
DSL or Cable line from your Internet provider).
Existing Modem
6. Connect one end of the yellow cable to the yellow
port labeled “Ethernet 1” on the back of the Vonage
Device. Connect the other end to the Ethernet port on
your Computer that you unplugged earlier.
Step 3: Set up your new Vonage Router
1. Shut down your computer and unplug your existing
Vonage Device
4. Wait 10 minutes for your Modem to clear its
memory completely.
6
7
7. Now plug your Modem’s power cord back into an electrical
power outlet.
NOTE: You should allow enough time for your Modem to complete its
start-up process. If you’re unsure about how long this takes, consult
the manual that came with your Modem. Typical Modem start-up takes
60 seconds.
8. Next, using the Power Cord that came with your Vonage kit,
If your Internet connection doesn’t work and
you have a Cable Modem:
1. Unplug the Modem for at least 10 minutes. If left off for less
than 10 minutes, it might still “remember” old information
that could prevent it from working properly.
2. If your Internet connection still does not work, you may
need to register your Vonage Device with your cable
provider. You will need the WAN MAC ID on the bottom
of the Vonage Device.
NOTE: Before continuing, the “Power” and “Internet” lights on the front
of the Vonage Device should both turn on. Wait until the “Power” light
stops blinking and both “Power” and “Phone 1” lights are solid. The
“Phone 2” light will be solid if you have a second Vonage line. Otherwise,
it will not light. The “Internet” light will flicker whenever there is
communication activity.
If your Internet connection doesn't work and
you have a DSL modem:
Vonage Device
1. On your computer, open a Web browser. In the Address
field, type http://192.168.15.1 (the default IP address
of the VWR Home Page) and press Enter. A login
window appears.
2. In both the Username and Password fields, type ‘user’
and click login. The HOME page is displayed.
3. (Perform this step only if your existing setup did NOT
include a router.) In the Home tab, make sure WAN is
selected on the left hand side.
9. Now turn on your computer, open your web browser and
check your Internet connection by visiting any website.
NOTE: After turning on your computer, the Ethernet light on the Vonage
Device will also flicker whenever there is communication activity.
• If your Internet connection works,
go to Step 4: Connect Your Phone, on page 14.
4. Under Internet Settings, select PPPoE IP Address.
Step 3: Set up your new Vonage Router
plug the smaller end of the Power Cord into the circular
Power Port on the back of the Vonage Device. Then, plug the
larger end of the Power Cord into an electrical power outlet.
5. In the Username and Password fields, type the username
and password you normally use to log in to your DSL service.
6. In the Keep Alive field, type 0 to ensure that your DSL link is
always active.
7. Click Connect to start your Internet connection. Click Apply.
Click Save and Restart button on the left and click Reboot.
8
9
Step 3:
1. Shut down your computer and unplug your existing
Modem and Router power cords.
2. Attach the antenna to your Vonage Device.
3. Locate an unused Ethernet port on your existing router.
4. Connect one end of the blue cable to the Ethernet port
on your router. Connect the other end to the blue port
labeled “Internet” on the back of the Vonage Device.
NOTE: The ports on the back of your existing router may be labeled
“Ethernet” or “LAN” and may be numbered 1-4. You can plug the
Blue Cable into any of these ports.
in the Ethernet or LAN ports from your existing
router. Connect that cable to the yellow port
labeled “Ethernet” on the Vonage Device.
Then connect one end of the blue cable to the blue
port labeled “Internet” on the back of the Vonage
Device. Connect the other end of the blue cable to
the port you just made available on your router.
NOTE: If you don’t have any available ports on your router
and you have a home network set up (where you share files
on computers or share a printer), then you should install the
Vonage device in front of your existing router. Please see
www.vonage.com/homenetwork for instructions.
5. Now plug your modem’s power cord back into an
electrical power outlet.
Existing Router
10
Vonage Device
NOTE: You should allow enough time for your Modem to complete
its start-up process. If you’re unsure about how long this takes,
consult the manual that came with your Modem. Typical Modem
start-up takes 60 seconds.
Step 3: Set up your new Vonage Router
Set up your Vonage Device
(with existing Modem and Router or
Modem with Built-In Router)
If all the Ethernet ports on your existing
router are in use, disconnect one of the cables
11
6. If a router is present, plug its power cord back into an
electrical power outlet.
7. Using the Power Cord that came with your Vonage kit,
NOTE: Before continuing, the “Power” and “Internet” lights on the front
of the Vonage Device should both turn on. Wait until the “Power” light
stops blinking and both “Power” and “Phone 1” lights are solid. The
“Phone 2” light will be solid if you have a second Vonage line. Otherwise,
it will not light. The “Internet” light will flicker whenever there is activity.
Vonage Device
12
check your Internet connection by visiting any website.
• If your Internet connection works,
go to Step 4: Connect Your Phone, on page 14.
• If your Internet connection doesn't work,
go to Troubleshooting on page 17.
Step 3: Set up your new Vonage Router
plug the smaller end of the Power Cord into the circular
Power Port on the back of the Vonage Device. Then plug
the larger end of the Power Cord into an electrical
power outlet.
8. Now turn on your computer, open your web browser and
13
Step 4:
This is what your set up should look like with an existing modem:
Connecting Your Phone
Existing Modem
1. Plug the Vonage telephone cord into your phone or unplug
Phone
Computer
your existing phone cord from the wall and plug it into the
phone port directly on the Vonage Device.
2. Plug the other end into the Green Phone 1 Port on the
back of the Vonage Device.
NOTE: Make sure the phone light is solid.
Vonage Device
This is what your set up should look like with both an existing
modem and router:
Existing Modem
3. Pick up your handset.
Existing Router
Computer
Phone
Step 4: Connecting Your Phone
Vonage Device
NOTE: If not done so already, disconnect phone from wall.
Vonage Device
NOTE: When you pick up your phone to check for a dial tone,
the phone light will blink.
If you hear a dial tone, congratulations!
You’ve set up your Vonage service correctly, and can
now start making calls. To configure your voicemail and
other included services features, simply login to your
web account at www.vonage.com.
14
If you do not hear a dial tone, proceed to Troubleshooting
on page 17.
15
Wireless Networking
Troubleshooting Tips
Your D-Link VWR is also a Wireless Router.
If your Internet connection doesn’t work:
The default name of your wireless network is DlinkVWR.
To change the default settings and enable security
encryption (highly recommended) see the D-Link
Documentation CD-ROM.
You can solve many installation issues by resetting all of
your equipment:
1. First, power down in this order:
NOTE: Leave the modem unplugged for at least 60 seconds. (The 60
seconds is to ensure the modem doesn’t “remember” old information).
Confirm that all cables are snapped firmly into place.
2. Turn the devices on one at a time in this order:
D-LInk Documentation
CD-ROM
Note: The Vonage Device has wireless enabled by default. This means any
computer enabled with wireless capability within range will automatically
connect wirelessly
16
Your Vonage Device is a wireless B/G router. If your computer is enabled with
wireless B or G capability, then you can connect wirelessly. If your computer is
Wi-Fi-enabled, you may be taking advantage of your new Wi-Fi network.
a. DSL or Cable Modem - Wait for the lights to come back on
before continuing. This may take several minutes. Most
modems have a light that should be lit solid when start-up
is complete. If necessary, refer to the information that came
with your modem.
b. Router, if you have one - Wait for the lights to come back on
(consult router manual for sequence) before continuing. Wait
at least 30 seconds after the lights have stopped blinking.
c. Vonage Device - Wait for the power and phone(s) lights to
be a solid green. (The Internet light will blink whenever
there is activity.)
d. Computer
(Continued on next page)
Troubleshooting Tips
a. Computer (shut down properly, it is not necessary to
disconnect power to your computer)
b. Vonage Device (unplug power cord from back of device)
c. Router, if you have one (unplug power cord from back of device)
d. DSL or Cable Modem (unplug power cord from back of device)
18
17
At this point, you should have both a dial tone and Internet connectivity.
How to Read the Lights on your Vonage Device:
3. Try opening your web browser to view a web page. If you cannot view
a web page, check to see whether your Cable or DSL prover is having
connection problems in your area.
If your Internet connection works, but you don't hear a
dial tone or a voice recording:
1. Be sure your phone is plugged in to the Green Phone Port 1 on
the rear panel of the Vonage Device, and that it is disconnected
from the wall jack that a traditional phone uses.
2. Reset all of your equipment as described on page 18. After you
reset all your equipment, pickup your telephone handset to
listen again for a dial tone.
If you hear a voice recording instructing you to connect
your phone to the Green Phone 1 Port:
1. Hang up your phone.
2. Confirm that the phone cord is firmly plugged into the Green
Phone Port 1, and listen again for a dial tone.
If you’re still having trouble, please call 1-866-243-4357
In Canada, call 1-877-272-0528
18
Power - When the power light stops blinking and is a solid green,
this indicates that your Vonage Device has started up properly.
Note that both the power light and the phone light must be solid
in order to make a phone call.
Internet - Solid light indicates connectivity to your router or
network - whenever there is activity this light will blink.
Ethernet - Solid light indicates connectivity to your computer(s) whenever there is activity this light will blink.
Phone 1 - Solid light indicates that phone line 1 is ready for Vonage
Internet telephone or FAX calls.
Phone 2 - Solid light indicates that optional phone line 2 is ready
for Vonage Internet telephone or FAX calls.
Wireless - Solid light indicates a wireless high-speed Internet
signal is available.
HINT: When the Vonage Device is downloading/upgrading firmware from Vonage,
the lights will blink rapidly in unison.
19
About Your Vonage Online Account
VOICEMAIL
Your Vonage voicemail is the most flexible and useful tool you’ve ever had!
Checking Your Voicemail
You can check your voicemail from anywhere in the world using these 3 options:
• Get your voicemail from your Vonage phone. Simply dial *123 to
retrieve your messages.
• Get your voicemail online: Click on “Get Voicemail” from the Voicemail menu.
• Get your voicemail via email: Check on Voicemail Email Notification within the
voicemail settings menu to enable email delivery of voicemails.
Change Pin
You can change your voicemail PIN number by clicking “Change PIN” in the
Voicemail menu.
Change Greeting
You can change your greetings anytime by dialing *123 from your Vonage phone
and pressing 91 for Greetings.
SimulRing
If you frequently change locations, or you use more than one landline and mobile
phone over the course of a day, set up the SimulRing feature to forward incoming
calls to up to 6 phones simultaneously, allowing you to pick up whatever line you
hear first or are the closest to!
Network Availability Number
Never worry about your ISP going down again! Have your Vonage number(s)
forwarded to any phone number in the US or Canada in the event your Internet
connection is disrupted.
Voicemail Settings
Set up your voicemail to allow you to access your voicemail from anywhere!
Forward your messages to your email account, or access them through any
phone or Web browser.
Bandwidth Saver
Never worry that bandwidth limitations from your ISP will prevent you from using
your computer and your phone at the same time. Use Vonage Bandwidth Saver to
change the bandwidth settings for your Vonage phone number(s).
International Calling
FEATURES
Your Vonage account can meet all your requirements when it comes to
features and access options. Just log into the Features section to customize
these features and more:
911 Dialing
Are the in-laws visiting and you don’t want them spending hours on your phone
calling international numbers? You can turn international calling on and off
through the Features menu.
Call Hunt
If your Vonage line is busy, the Call Hunt feature can automatically forward
your incoming calls to other Vonage lines in the order you specify so you’ll
never miss a call again!
Activate 911 Dialing to be sure that emergency personnel can respond quickly to
your call for help! You can easily update your street address at any time through
your Vonage Web Account
Call Forwarding
Make sure that callers can always find you – regardless of where you are! Vonage Call
Forwarding will automatically route all incoming calls to any number in the US and Canada.
Call Waiting with Caller ID
Take only the call you want! You can view incoming calls while you’re on the
phone and decide if you want to take them or let them go to voicemail.
20
Enjoy your Vonage Internet Phone Service!
If you have any questions please visit:
www.vonage.com/help (US)
www.vonage.ca/help (Canada)
If you’re still having trouble, please call 1-866-243-4357
In Canada please call 1-877-272-0528
21