1
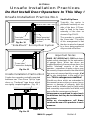
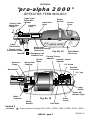
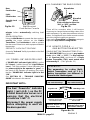
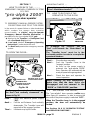
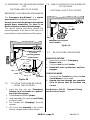
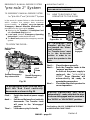
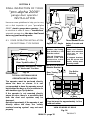
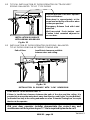
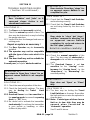
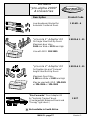
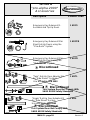
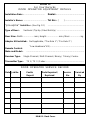
brano industries (pty) ltd.
p.o. box 277, bramley, 2018, rep. of south africa.
tel +27 (011) 887-0625
fax +27 (011) 887-7616
e-mail:- [email protected] ; web:- www.brano.co.za
Share Call No. 08600-brano
industries
( 08600-27266 )
"pro-alpha 2000"
electric garage door operator
Owner's Operating Manual
for
Automatic Domestic Garage Doors
( Incorporating SABS-IEC 60335 Safety Standards )
Manual MAN 01 - Version 5
LUBRICATION
DO NOT USE COMMON GREASE
USE ONLY "BRANO LUBRICANT GDO-L1" OR
"LOW-TEMP LUBRIPLATE" OR "AVGREASE 28"
"pro-alpha 2000"
SECTIONAL TYPE DOORS
SPRING BALANCED TIP-UP DOORS
C/ L
SPECIAL ADAPTOR SYSTEMS
brano industries (pty) ltd. 1998 / 2001 / 2003 / 2004
STEEL ROLL-UP TYPE DOOR
COPYRIGHT
C
SECTION 1
......continued on page 30
TERMS and CONDITIONS for
"STANDARD" and "EXTENDED" WARRANTIES
1
DEFINITIONS:5.2 The "3 Year Extended Life Warranty” applies only to
door operators which are fitted to doors which do not
In these terms and conditions:require any special adaptor or converter kits or any other
1.1 Brano shall mean Brano Industries (Pty) Ltd. or it's
type of modification in order to make them suitable for
subsidiaries or successors in title or assign.
conversion to automatic operation.
1.2 The "owner", "purchaser", or "end user" shall mean the
Doors such as Sectional type and Spring-Pantograph Tipindividual in whose name the ownership of the equipment
Up type doors qualify for coverage under this warranty.
is registered in terms of this agreement.
In every instance the installation of the door operator shall
be strictly in accordance with the prescribed
1.3 "Distributor" shall mean the wholesaler or distribution
installation instructions.
agent appointed by Brano.
Door Operators fitted to any other types of doors e.g.
1.4 "Dealer" or "Installer" who acts as a re-seller of the
Vertically-Tracked Tip-Up doors or Horizontally Sliding
equipment and who may also do the installation of the
doors, regardless of age, will not qualify for the "3
equipment.
Year Extended Life Warranty”!
2 SCOPE OF SUPPLY:5.3 Exception:- In respect of domestic Steel Roll-Up type
This Warranty applies only to the garage door operator
doors, Brano does offer the "3 Year Extended Life
itself. Radio remote controls, accessories such as door
Warranty" subject to the following additional conditions :conversion and adaptor kits, the garage doors 5.3.1 the door is no more than 12 months old and is in good
themselves, site work, labour or travelling expenses are
working order at the time of installation of the operator,
not considered as integral to the scope of supply.
5.3.2 the warranty shall apply only to doors which are fitted
with the "Pro-Rola" adaptor system. The extended
3 GENERAL CONDITIONS of WARRANTY
warranty shall not apply to installations which utilise the
3.1 This is an agreement between Brano and the owner of the
"Side-Mount" or any other type of adaptor system.
door operator.
5.3.3 Proof of date of purchase of the door is required.
3.2 This Warranty covers the "pro-alpha 2000" garage
door operator against faulty or defective materials, 6 EXCLUSIONS
components and / or manufacturing workmanship for a
Items Excluded From This Warranty
period of 12 months under the "Standard" Warranty, or 3
years under the "Extended Life" Warranty, from the date of Specifically excluded from the scope of this warranty are items
purchase. If no Warranty Registration Card has been of equipment which are used in conjunction with the door
received by Brano, then the date will be determined by the operators but which are manufactured or supplied by third
Serial No. of the machine.
parties. Such items shall carry the warranties / guarantees
3.3 Brano undertakes to repair or replace, at it's sole offered by said third parties. These include :discretion, free of charge, any component of the "pro- 6.1 radio remote controls,
alpha 2000" garage door operator as listed herein, 6.2 safety beams and door safety edges,
subject to the conditions stated herein. Please note the
6.3 the garage doors "per se" and garage door hardware.
exclusions to this warranty.
3.4 Incidental and Consequential Losses. Under no 7
circumstances will Brano accept liability for "incidental"
and / or "consequential" losses, (damages), resulting from
the use of this product. Also, the misuse or incorrect
installation or unauthorised modification of the product
7.1
shall render all warranties “null and void”.
4
4.1
4.2
4.3
5
5.1
QUALIFICATIONS
In order to qualify for the "3 Year Extended Life
Warranty” offer the additional following conditions shall
apply:the doors must be no more than 12 months old at the time
of installation of the operator. Proof of the age of the door
"STANDARD 12 MONTH" WARRANTY
is required, ( e.g. an invoice from the door supplier ).
The "Standard 12 Month" Warranty applies to all "pro- 7.2 the "pro-alpha 2000" door operator is new and not
alpha 2000" garage door operators provided they are
second hand or refurbished.
installed in accordance with the installation instructions 7.3 the Warranty Registration Card has been filled out and
issued with the machine. The specific instructions issued
returned, ( faxed or mailed ), directly to Brano. All
by Brano relating to the particular door being automated
information detailed must be supplied.
must be complied with in every respect.
7.4 Subject to all conditions being met, your "pro-alpha
Operators which do not qualify for the "3 Year Extended
2000" garage door operator will then be covered
Life Warranty” will be covered by the "Standard 12
against sub-standard manufacturing workmanship and
Month Warranty” subject to the terms and conditions
faulty components for a period not exceeding 3 years
stated herein.
from the date of purchase.
Radio Remote Controls, Safety Beam, etc., - Refer to
Important Note:- VALIDITY of WARRANTY OFFER
Section 6 of these Terms and Conditions.
The validity of the warranty is conditional upon the
"3 YEAR EXTENDED LIFE" WARRANTY
ownership of the door operator being registered with Brano.
Subject to the conditions stated herein, the "pro-alpha
2000" door operator is warranted to be free of defect for a
period of 3 ( three ) years from the date of purchase.
Version 5 January 2004
MAN 01 - page 1
"pro-alpha 2000”
Owner's Operating Manual
Version 5
January 2004
INDEX
SECTION 1
Conditions of Warranty.
SECTION 2
SECTION 3
SECTION 4
Suitable Types of Doors.
Doors Not Suitable for Automation.
Unsafe Installation Practices
SECTION 5
Operator Terminology.
SECTION 6
How To Use Your "pro-alpha
2000" Garage Door Operator
The Radio Transmitter.
Using the Transmitter
Where to Keep your Transmitter.
Changing the TX Battery.
The Radio Receiver.
Radio Performance.
The Wall-mounted Push-button.
"Power-On" Indicator Light.
Changing the Radio Codes.
How to Code a One Button
Transmitter.
How to Code a Multi-Button
Transmitter.
6.1
6.2
6.3
6.4
6.5
6.6
6.7
6.8
6.9
6.10
6.11
SECTION 7
7.1
7.2
7.3
7.4
7.5
7.6
7.7
7.8
7.9
SECTION 8
8.1
8.2
8.3
Emergency Manual Override
Systems.
Emergency Manual Override System
for Sectional and Tip-Up type Doors.
How to Re-couple the Operator to
the Door.
Securing The Door.
Emergency Key Release Mechanism
for Sectional and Tip-Up type Doors.
To Open the Garage Door.... from the
Outside.
How to Re-couple the Operator to the
Door. (Sectional and Tip-Up Doors)
Re-coupling Procedure.
Emergency Manual Override System
for Steel Roll-Up Type Doors, ( prorola 1 &pro-rola 2 systems ).
Re-coupling Procedure. ( pro-rola 1
&pro-rola 2 systems ).
8.4
Final Inspection of Installation.
Operator Installation on Sectional type
Doors.
Operator Installation on Spring
Balanced Tip-Up Type Doors.
Operator Installation on Spring
Balanced Tip-Up Door fitted with an
Extended Towing Arm.
General Installation Workmanship.
SECTION 9
Servicing and Maintaining Your "proalpha 2000" Door Operator.
SECTION 10
10.1
10.2
10.3
10.4
Operator Testing.
"Power-On" Test.
Operating Test.
Testing the Courtesy Light.
Performance Checks.
SECTION 11
Operator Function Checks.
SECTION 12
12.1
12.2
12.3
12.4
12.5
Garage Door Maintenance.
Monthly Inspection.
Monthly Tests.
Sectional Door Maintenance
Tip-Up Door Maintenance.
Roll-Up Door Maintenance.
SECTION 13
Trouble Shooting Guide.
SECTION 14
"pro-alpha 2000" Accessories.
SECTION 15
Garage Door Operator Spare Parts.
SECTION 16
Equipment Details and "Service
Record”
MAN 01 - page 2
SECTION 2
Suitable Types of Garage Doors
IMPORTANT NOTES ON THE CONDITION OF GARAGE DOORS
No door should be converted to automatic operation unless it is in good
working order. Before installing an automatic door operator, inspect the door
for signs of worn, damaged or missing parts and repair or replace as necessary.
Test the operation of the door to make sure that it is properly balanced.
Pay particular attention to the springs. Domestic garage door springs should
be replaced after every 10 000 operating cycles, ( or approximately 4 to 5 years
of normal usage ).
Door Type 1 - Sectional Type Doors
"Fully Tracked Doors"
Door Type 3
"Partially Tracked” Tip-Up Type Doors
"Inclined Track" Tip-up Door
With "Pantograph" Mechanism
Door
Track
Door in "Open"
Position
Path of
Door
Inclined
Track
Track
Roller
Fig No. 3
Typical Sectional Door
Fig. 1
Door Type 2
"One-piece" Tip-Up Type Doors
“Trackless" Type Tip-up Door
With "Pantograph" Mechanism
Path of Door
Door Type 4
"Horizontally Tracked" Tip-up Door
With "Pantograph" Mechanism
Horizontal
Track
Track
Roller
Fig No. 4
Fig No. 2
"Spring Balanced” Tip-Up Door
MAN 01 - page 3
Version 5
Suitable Types of Garage Doors
Door Type 5
b) "Trackless" Type Tip-up Door
With "Horizontal Pivot"
Door Type 6
Steel Roll-Up Type Doors
Path of Top
of the Door
Door Roll
"Stationary" Shaft
Pivot
Bearing
CounterWeight
"One-piece" flexible
steel curtain.
"Pivot" Type Doors
Fig. No. 6
Fig No. 5
Doors Which Require Special Modifications
Before The Installation Of Automation Systems
IMPORTANT NOTE :Door Type 7
"Vertically Tracked” Tip-Up Doors
Fig No. 5
a) "Vertically Tracked" Type Tip-up
Door With Central Guide Roller
( also known as "Canopy" Doors )
Balance
Weight
Guide
Vertical
Roller
Track
"Vertically Tracked" Counterweight
Balanced Tip-Up Doors
Fig No. 7
1) This type of door can be automated
provided the Counter-weight system is
replaced by a Jamb-Spring mechanism.
2) An alternative system, viz., the
"Vertical Track Adaptor Kit”, may be
used to render the door suitable for
automatic operation. However, this
system does not comply with the safety
requirements set down in SABS and IEC
standards. When fitted with a "VTAK"
system, the "built-in" overload sensors
of the door operator, regardless of make
or model, may be compromised to the
extent that local safety standards may
not be complied with. South African
SABS Safety Standards preclude the
use of this system for the automation of
domestic garage doors.
Check with your local operator dealer
for more information.
MAN 01 - page 4
Version 5
SECTION 3
DOORS NOT SUITABLE FOR AUTOMATION
Read this section carefully !
When fully open, the entire door remains
completely inside of the garage.
For reasons of safety, certain doors
should not be automated. One door in
particular fails to comply with the safety
standards set out in .........
These doors were intended for use in
openings that have rounded or "arched"
shapes and were sold as a cheaper
alternative to Sectional type doors.
SABS - IEC 60335-2-95
This is the door commonly referred to as a
"Tip-In" or "Cam-Spring" type door.
Typical openings in which "Tip-In"
type doors may be found.
Do not automate this
type of garage door!
Path of Door
Vertical
Guide
Track
Fig. No. 9
Door Open
Position
"Cam-Spring"
Door Mechanism
Track
Roller
Fig. No. 8
"Tip-In" or "Cam-Spring"
Type Garage Doors
WARNING! WARNING! WARNING!
These doors are unsafe for automatic
operation as the force applied by the door
operator is magnified as much as 40 times due
to the action of the door mechanism. The
operator is unable to reliably sense
obstructions in the path of the door.
IMPORTANT NOTE:These doors are classified as "Vertically
Tracked" type doors.
DISTINGUISHING FEATURES
A "one-piece" Tip-Up type door which has a
"vertical" guide track. The distinguishing
feature of the door is the position of the Guide
Roller. The Guide Roller is positioned at, or
close to, the bottom-most corner of the door
panel. The effect of this arrangement is that it
causes the door to open completely to the
inside of the garage.
At no stage during the opening or closing
cycle does any part of the door pass
through or protrude from opening.
Brano Industries (Pty) Ltd will
not condone the use of any of
it's products on this type of door.
All warranties, whether stated or
implied, shall “ipso facto” be
rendered null and void if the
equipment is fitted to such types
of doors.
MAN 01 - page 5
Version 5 January 2004
SECTION 4
Unsafe Installation Practices
Do Not Install Door Operators In This Way !
Unsafe Installation Practice No.1
Steel Roll-Up Doors
Typically, the motor is
positioned vertically at one
side of the door. A”Crosstube” is fixed to the lower
extremity of the door as
shown in Figs 10 & 11.
“Cross-tube”
Connection Adaptor
Fig. No. 10
Motor mounted
vertically at side
of door.
“Side-Mount” Roll-Up Door System
The operator is coupled to
the “cross-tube”. The effect
of this arrangement is that
the door is raised or lowered
by a force being applied at
only one side of the door.
Important Notes
“Cross-tube”
Connection Adaptor
Fig. No. 11
Unsafe Installation Practice No.2
Single door operator centrally mounted
between two "One-Piece Tip-Up” type
doors or “Sectional” type doors which
are rigidly coupled together. ( Fig. 12 )
SABS - IEC 60335-Part 2 - 1995 sets down
certain safety standards for the automation
of garage doors. When two doors are
coupled together in the way shown here, the
built-in "overload" sensors of the door
operator, regardless of make or type, may
be severely compromised to the extent that
they may not respond quickly enough, if at
all, to any obstructions in the path of the
door. This is a dangerous condition !
Should any doors which are automated in
this manner cause an injury, or worse, to any
person or damage to property, both the
owner and the installer may be held jointly
and severably responsible and liable; and
may suffer the consequences thereof.
Homeowners are advised to reject such
installations lest they be incriminated in
any claims.
Under no circumstances will Brano
condone the use of it's products in such
a manner.
Door 1
Door 2
Fig. No. 12
MAN 01 - page 6
Version 5
SECTION 5
"pro-alpha 2000"
OPERATOR TERMINOLOGY
"Closed" Limit
Switch Wire
( Purple )
"Open" Limit
Switch Wire
( Brown )
Serial Number
Traveller
Service
Cover
LUBRICATION
DO NOT USE COMMON GREASE
USE ONLY "BRANO LUBRICANT GDO-L1" OR
"LOW-TEMP LUBRIPLATE" OR "AVGREASE 28"
pro-alpha 2000
"Open"
Limit Switch
( "Closed" Limit
Switch not shown )
Extrusion
Clamp
Lubrication
Label
Serial No.
Label
299 A 8 / 3478
Hanger
Bracket
Worm-shaft
Aluminium Housing
( Extrusion )
Emergency Pull
"Release Cord"
Worm-shaft
Coupling
Electric
Motor
Fig. No. 13
Light Diffuser
Lens Cover
"Closing" Sensor
Adjustor
"Opening" Sensor
Adjustor
P.C. Board
Terminal
Connector
Worm-shaft
P.C. Tray
Serial Number
LUBRICATION
299 A 8 / 3478
DO NOT USE COMMON GREASE
USE ONLY "BRANO LUBRICANT GDO-L1" OR
"LOW-TEMP LUBRIPLATE" OR "AVGREASE 28"
Lamp
Holder
pro-alpha 2000
Motor
Capacitor
Fig. No. 14
Wiring
Harness
"Power ON"
Indicator Light
Power
Socket
Base Plate
Version 5
COPYRIGHT
C
brano industries (pty) ltd. 1987 / 1990 / 1994 / 1998 / 2001 / 2004
MAN 01 - page 7
Version 5
SECTION 6
6.2 USING THE TRANSMITTER
HOW TO USE YOUR
"pro-alpha 2000"
garage door operator.
THE DOOR OPERATOR CONTROLS,
WHAT & WHERE THEY ARE, AND...
HOW THEY WORK!!!
Your "pro-alpha 2000" garage door
operator is controlled by means of Radio Remote
Control Equipment as well as a "Wall Mounted
Push-button Console".
There are 2 parts to the radio equipment, viz.:a) the Transmitter, ( or TX ) and,
b) the Receiver, ( or RX ).
The part you carry with you in the motorcar is the
Transmitter (TX). The part connected to the
operator power-head is the Receiver (RX).
When the transmitter button is pressed a radio
signal is sent to the receiver which will, in turn, start
the motor to operate the door.
See the Sections 10 & 11 entitled "Operator
Testing and Function Checks.”
IMPORTANT NOTE:Read all the "SAFETY NOTICES" appertaining to
the correct and safe use of the door operator
system.
6.1 THE RADIO TRANSMITTER
DIPSWITCHES
L.E.D.
ON
1 2 3 4 5 6 7 8 9 10 11 12
Battery
brano industries
+
+
Do not drop it !
Do not shock it !
Do not allow it to become wet !
Do not leave it exposed to direct
sunlight for long periods ! and, most
important,
Do not allow children to play with it !
........ it's not a toy !!!
Normally, the TX will have an indicator light, ( red,
green or yellow LED ), and one or more pushbuttons. The buttons of multi-button type
transmitters are colour coded for convenience.
When the button is pressed the LED will illuminate
and a radio signal is sent to the receiver. The LED
also serves to give an indication of the state of the
battery inside the transmitter.
Press the button once only and release it!
Do not hold the button down
continuously as this may cause the
door operator to malfunction.
6.3 WHERE TO KEEP YOUR TRANSMITTER.
Keeping the TX on your key-ring is the most
effective way to abuse and damage it. Keys are
dropped, bashed about in handbags, given to
children to play with and generally subjected to a
great deal of abuse.
Radio
Transmitter
OFF
(Light Emitting Diode)
Pushbutton
The Radio Transmitter is an expensive piece of
equipment and should be treated as such.
Car's
Sunvisor
-
Fig No. 15
Front Cover
Removed
TYPICAL 1 BUTTON TRANSMITTER
L.E.D.
brano
industries
Button 1 ( Red )
Button 2 ( Blue )
Button 3 ( Green )
Fig No. 17
Fig No. 16
TYPICAL 3 BUTTON TRANSMITTER
OPTIMUM MOUNTING POSITION
FOR RADIO TRANSMITTER
MAN 01 - page 8
Version 5
The best place to keep the Transmitter is in
your car. Use some “VELCRO” tape to stick
the TX to the back of your car's sunvisor. ( Fig
17 )
Your TX will always be at hand; no possibility of
misplacing it ; it will not be subjected to abuse
and, what's more, it will afford the radio
equipment the most favourable placement to
ensure a good working range.
The placement of the receiver isvery important as
the "range" at which the radio equipment will work is
largely dependent upon the receiver having an
unobstructed reception path, i.e. the aerial
must not be shielded inside a metal casing, nor
should the RX be fixed to metal pipes etc., etc.
See section 6.6 "RADIO PERFORMANCE”.
6.4 CHANGING THE TX BATTERY
The effective transmitting range of standard lowpower radio remote control equipment is of the
order of 15 - 20 metres..... measured in direct
"Line-of-Sight" from the Receiver Set.
So called "long range" radio controls which have
an effective range of 50 - plus metres are also
available on request.
The transmitting range is greatly influenced by the
surroundings and garage structures as well as the
approaches to the garage.
For example:* Concrete ceilings, corrugated steel roofs and
steel doors will reduce the effective range of the
radio transmission!
* Trees and bushes close to the garage will also
adversely affect the transmitting range!
Basement
garages will also restrict the range!
*
* Weak batteries will reduce the transmitting range
to zero!
* Transmitters which are surrounded by a bunch of
keys will not give of their best performance.
* The placement of the radio receiver and the
position from which the transmitter is operated
has great influence on the performance of the
equipment.
TO CHANGE THE TX BATTERY:Remove the cover of the Transmitter.
Carefully insert the new battery making sure that
the "polarity" of the battery, ( i.e. positive and
negative ends of the battery ), is correct. Both the
battery and the Transmitter Casing are marked
with + and signs.
Take care not to disturb the positions of the
Dip-Switches as this will change the Signal
Code thus causing the radio controls to
malfunction and consequently the door
operator will not work.
The Dip-Switch settings of the Receiver and
Transmitter must match each other!!!
TAKE NOTE .....
The parameters for coding Multi-Button
Transmitters such as 2, 3, & 4 button types are
different to those for the 1 button types.
See section 6.9 "CHANGING THE RADIO
CODES".
6.5 THE RADIO RECEIVER
CONNECTIONS
TO MOTOR
DIPSWITCH
BLOCK
AERIAL
( Do not cut
or remove )
6.6 RADIO PERFORMANCE
6.7 THE WALL-MOUNTED
PUSH-BUTTON CONSOLE
ON
1 2 3 4 5 6 7 8 9 10 11 12
RED
BLACK
BLACK
BLUE
+
There is a second type of remote control supplied
with your "pro-alpha" garage door operator, viz.
the "Wall-Mounted Push-Button". This console
has a three function control, viz.:1) to control the door operator, and
2) to switch on the operator 's own
courtesy light.
3) to enable the "lock-out" feature.
OFF
COMM
NO
NC
LATCH NON-LATCH
TERMINAL
BLOCK
A
GND
brano
TYPICAL RADIO RECEIVER BOARD
Fig No. 18
The Radio Receiver is connected to the Control
Board of the door operator, and is normally placed
inside of, or in close proximity to the operator.
COURTESY LIGHT:The powerful courtesy light may be switched "ON"
without first having to activate the door.
This is very handy especially when walking into a
darkened garage. The light will stay on for 3-4
minutes
MAN 01 - page 9
Version 5
6.9 CHANGING THE RADIO CODES
Door
Push-button
Dipswitches
pro-alpha
door
Light
Push-button
Security Lock
Switch
Fig No. 19
light
Dipswitch
Block
Slide switches to either the
"ON" or "OFF" position.
lock
brano industries
Wall-Mounted
Push-Button Console
minutes before automatically switching itself
"OFF".
DOOR OPERATOR:Using the Wall Button to operate the door works in
exactly the same manner as the Radio
Transmitter. The Push-button is able to activate
the door even if there is no radio equipment fitted to
the operator.
SECURITY "LOCK-OUT" FEATURE.
A security "lock-out" facility is provided on the Wall
Pushbutton.
6.8 "POWER - ON" INDICATOR LIGHT.
A "POWER-ON" Indicator Light, ( LED ), is on the
P C Board, ( visible through the Light Diffuser
Lens ). This light provides a visual indication that
the power supply to the operator is "good". In
the event of the operator not working, first check
that the "POWER-ON" Indicator Light is in fact
"ON".
See SECTION 13 - "TROUBLE SHOOTING
GUIDE" elsewhere in this manual.
Fig No. 20
There will be occasions when it will become
necessary to change the transmitting codes of the
radio equipment, e.g. when transmitters are lost or
stolen, or neighbours have similar remote controls
which are interfering with your operator.
Open up the Transmitter and Receiver casings to
expose the Dip-Switch Coding Blocks.
6.10 HOW TO CODE A .....
ONE BUTTON TRANSMITTER
SINGLE BUTTON TRANSMITTERS (TX1):The DIP-SWITCHES may be set in any random
order, either "ON" or "OFF". The Dip-switches
of the Receiver, (RX), and those of a Single
Button Transmitter, (TX1), must match each
other exactly !!! ( See Figure No. 21 )
TAKE NOTE:The parameters for coding Multibutton Transmitters such as 2 & 3
button transmitters are different to
those for the 1 button types.
Transmitter
Dip-switch Settings
Receiver
Dip-switch Settings
IMPORTANT NOTE:-
The Red "Power-On" Indicator
Light, ( red L.E.D. ), on the PC
Control Board also serves as a
warning that the electrical
circuits are "LIVE" !!!
Disconnect the power supply
before attempting to work on
the door operator.
Signal Code
Matching Code
"ON"
ON
ON
1 2 3 4 5 6 7 8 9 10 11 12
OFF
1 2 3 4 5 6 7 8 9 10 11 12
OFF
SINGLE-BUTTON
TRANSMITTER
"OFF"
Transmitter Signal code.
Switches may be set in
any random order.
SINGLE CHANNEL
RECEIVER
Matching signal code.
Switches must match
Transmitter settings.
Figure No. 21
MAN 01 - page 10
Version 5
6.11 HOW TO CODE A MULTI-BUTTON TRANSMITTER ( TX3 )
TRANSMITTER'S "RED" BUTTON
MATCHES RECEIVER No.1
Setting the Dip-switches of
Multi-button Transmitters is
somewhat different!
Transmitter
Dip-switch Settings
For "RED" Button
Receiver No. 1
Dip-switch Settings
"RED" BUTTON
The first three Dip-switches in
the Transmitter only, are set to
the "OFF" position, i.e. Dipswitches No's 1,2 & 3.
Signal Code
ON
"ON"
1 2 3 4 5 6 7 8 9101112
1 2 3 4 5 6 7 8 9101112
OFF
OFF
"OFF"
Switches 1,2 & 3
are always "OFF".
Switch 1 is "ON".
2 & 3 are "OFF".
Fig No. 23
A random code can then be
selected for Dip-switches No's 4
to 12.
The matching Receivers for a
Multi-Button Transmitter system
must now be pre-selected to suit
each button separately! See the
example shown alongside for a 3
B u t t o n Tr a n s m i t t e r w h i c h
controls three separate
receivers.
See Figures Nos. 22, 23 & 24.
ON
Matching Code
TRANSMITTER'S "BLUE" BUTTON
MATCHES RECEIVER No.2
Transmitter
Dip-switch Settings
For "BLUE" Button
Receiver No. 2
Dip-switch Settings
"BLUE" BUTTON
Signal Code
Matching Code
"ON"
ON 1 2 3 4 5 6 7 8 9101112
ON 1 2 3 4 5 6 7 8 9101112
OFF
OFF
"OFF"
Switches 1,2 & 3
are always "OFF".
Switch 2 is "ON".
1 & 3 are "OFF".
Fig No. 24
TRANSMITTER'S "GREEN" BUTTON
MATCHES RECEIVER No.3
Dipswitches
Transmitter
Dip-switch Settings
For "GREEN" Button
Receiver No. 3
Dip-switch Settings
"GREEN" BUTTON
Dipswitch
Block
Slide switches to either the
"ON" or "OFF" position.
Fig No. 22
Signal Code
Matching Code
"ON"
ON 1 2 3 4 5 6 7 8 9 101112
ON 1 2 3 4 5 6 7 8 9 101112
OFF
OFF
"OFF"
Switches 1,2 & 3
are always "OFF".
Switch 3 is "ON".
1 & 2 are "OFF".
Fig No. 25
MAN 01 - page 11
Version 5
SECTION 7
HOW TO OPERATE THE ..........
EMERGENCY MANUAL OVERRIDE SYSTEM
OF YOUR
"pro-alpha 2000"
IMPORTANT NOTE! ....
Do not try to open the door by pulling "Red
Cord". Use the door handle !!!
7.2
HOW TO RECOUPLE THE
OPERATOR TO THE DOOR
garage door operator
7.1 EMERGENCY MANUAL OVERIDE SYSTEM
FOR SECTIONAL AND TIP-UP TYPE DOORS
In the event of a power failure or other breakdown
which renders the garage door operator
unserviceable, a simple, easy-to-operate
"Emergency Manual Override Mechanism" is
provided for on the "pro-alpha 2000" gdo.
Attached to the Traveller is a Red Nylon Cord
with a Red Hand-Grip fixed to it.
A red card, labeled "Emergency Operating
Instructions" is attached to the cord.
The Red Cord operates the emergency override
system.
*
*
*
TO OPEN THE DOOR:-
"pro-alpha 2000"
PULL
Fig No. 27
To "re-engage" the "Traveller", pull the
"Red" cord towards the "Motor-head" as
shown.
The "Traveller Lever" must be in the
horizontal position in order to re-couple the
operator to the door.
First! ...
Next! ...
"pro-alpha 2000"
RED CORD
PULL
TRAVELLER
ENGAGED.
Traveller lever in the
"Horizontal Position".
TRAVELLER
DISENGAGED.
Traveller lever in the
"Vertical Position".
To disengage the motor from the door, pull
the Red Cord vertically downwards as
shown in Fig. 26
Next! ....
Then! ...
Now! ...
Close the door manually.
Push the Traveller Lever to the
"engage" position.
As soon as the power supply is
restored, the "pro-alpha 2000"
Door Operator will automatically be
ready to operate the garage door.
Check the door and operator for
correct operation.
Before operating the door automatically...
make sure that the door locks are
disengaged and are secured in the
"OPEN" or "UNLOCKED" position.
Fig No. 26
First! ...
TRAVELLER
ENGAGED.
Switch the electrical power supply
"Off" .
Pull the red Release Cord vertically
downwards. The Traveller Lever will
move to the "dis-engage" position.
Lift the door up by it's handle.
7.3
SECURING THE DOOR:-
The "pro-alpha" door operator, unlike many
other types of operators, is able to secure the
door even if the power supply is switched "OFF".
When the Traveller-Lever is in the engaged
position, the door will automatically be
locked.
See Sections 10 & 11 "OPERATOR TESTING"
and OPERATOR FUNCTIONS".
MAN 01 - page 12
Version 5
7.4 EMERGENCY KEY RELEASE MECHANISM
FOR
SECTIONAL AND TIP-UP DOORS
7.6 HOW TO RECOUPLE THE OPERATOR
TO THE DOOR.
SECTIONAL AND TIP-UP DOORS
EMERGENCY KEY-RELEASE MECHANISM
The "Emergency Key-Release" is a special
mechanism which is fitted to a door when ....
the only access into the garage is through the
garage doors themselves, i.e. there is no
back or side door entrance into the garage.
This special release mechanism permits the
manual operation of the door in the event of a
power failure or other breakdown of the system.
"pro-alpha 2000"
PULL
EMERGENCY KEY-RELEASE
LOCK ASSEMBLY
Fig No. 29
"pro-alpha 2000"
TRAVELLER LEVER
in "normal"
operating position
STEEL CABLE
PULL
KEY
LOCK
1/4 TURN
LOCK
CYLINDER
Fig No. 28
7.5
TO OPEN THE GARAGE DOOR,
.... FROM THE OUTSIDE.
1
Insert the key into the "Emergency
Release Lock" and rotate it a "quarter"
turn until it disengages.
Pull the Lock out of the Cylinder.
Hold the Lock in the hand and pull firmly
on the lock cable.
The Traveller will "disengage" from the
operator.
Lift up the door manually in the normal
manner using the external door handle.
2
3
4
5
7.7
RE-COUPLING PROCEDURE
FROM THE OUTSIDE
1 Insert the key into the "Emergency
Release Lock".
2 Push the Lock into the Cylinder.
3 Rotate the Lock a "quarter turn" until it reengages.
FROM THE INSIDE
1 Re-engage the Traveller by pulling the Red
Cord towards the motor head.
2 Operate the door through one complete
cycle to ensure that all functions are
correct.
See Sections 10 & 11 "Operator Testing
and Function Checks"
MAN 01 - page 13
Version 5
EMERGENCY MANUAL OVERIDE SYSTEM
"pro-rola 1" System
7.8 EMERGENCY MANUAL OVERIDE SYSTEM
for "pro-rola 1" and "pro-rola 2" Systems
In the event of a power failure or other breakdown
which renders the garage door operator
unserviceable, a simple, easy-to-operate
"Emergency Manual Override Mechanism" is
provided for on the "pro-rola" system.
Attached to the Traveller is a Red Nylon Cord
with a Red Hand-Grip fixed to it.
A red card, labeled "Emergency Operating
Instructions" is attached to the cord.
The Red Cord operates the emergency override
system.
*
*
*
IMPORTANT NOTE! ....
DO NOT TRY TO OPEN THE DOOR BY
PULLING ON THE "RED CORD".
7.9
HOW TO RECOUPLE THE
OPERATOR TO THE DOOR
"pro-alpha 2000"
PULL
Figure No. 31
To " r e - e n g a g e " t h e
"Traveller", pull the "Red"
cord towards the "Motorhead" as shown.
The "Traveller Lever" must
be in the horizontal
position in order to recouple the operator to the
door.
TO OPEN THE DOOR:Roll-Up Door
Curtain
Pull
Down
Steel
Cable
External Emergency
Normal Emergency
Key-release Lock
Release Cord
First! ...
Next! ...
Fig. 30
Now! ...
To disengage the motor from the door,
pull the Red Cord vertically
downwards as shown in Fig. 30
First! ...
Next! ....
Then! ...
Switch the electrical power supply
"Off" .
Pull the red Release Cord vertically
downwards. The Traveller Lever
will move to the "dis-engage"
position.
Lift the door up by it's handle.
Traveller
Engaged
Close the door manually.
Push the Traveller Lever to the
"engage" position.
As soon as the power supply is
restored, the "pro-alpha
2000" Door Operator will
automatically be ready to
operate the garage door.
Check the door and operator for
correct operation.
Before operating the door
automatically... make sure that the door
locks are disengaged and are secured in
the "OPEN" or "UNLOCKED" position.
See Sections 10 & 11 "OPERATOR TESTING"
and OPERATOR FUNCTIONS".
MAN 01 - page 14
Version 5
SECTION 8
FINAL INSPECTION OF YOUR
pro-alpha 2000
"pro-alpha 2000"
garage door operator
Access
Door
INSTALLATION
Garage
Door
Here are some guidelines to help you to carry
out a final inspection of your "pro-alpha
Fig. 33
2000" electric garage door operator. Bear
in mind that in order to have a "trouble-free"
automatic garage door, the door itself must
be in very good working order.
CAUTION
light
door
brano industries
8.1 DOOR OPERATOR INSTALLATION
ON SECTIONAL TYPE DOORS
Clearance
pro-alpha 2000
Approx. 15 Angle
Door in "closed"
position, the Towing
Arm should be +/- 15
from the vertical.
The red "Emergency
Release Cord" with
Instruction Label
must be attached.
Path of Door
Door "Open Position"
Operator Mounted in "Level"
or "Horizontal" Position.
Fig. 32
Three function Pushbutton Console and
Label
T h e " Wa l l P u s h button" and "Caution
Label" to be mounted
adjacent to the
access door.
All support brackets
must be secure and
electric wiring must
be neatly routed.
Wall Anchor Bracket
( Header Bracket )
Top Roller
Bracket
Door Towing
Bracket
TYPICAL SECTIONAL DOOR
OPERATOR INSTALLATION
The operator must be anchored directly
above the door as shown. It is not
recommended to have the operator moved
back behind the door as it is possible to do
with trackless type Tip-Up doors.
If the operator is not mounted directly
above the door, there is a possibility that
both the door and operator may be
damaged.
But more importantly, if the operator is not
directly above the door, the "safety
overload sensing system" may not work
properly.
Centre Line
of Door
Door Towing Bracket and Top Roller
Bracket must be approximately in line
with each other.
VIEW OF INSIDE OF DOOR
MAN 01 - page 15
Fig. 34
Version 5
8.2 TYPICAL INSTALLATION OF DOOR OPERATOR ON "TRACKLESS"
SPRING BALANCED TIP-UP TYPE DOORS
pro-alp
ha 2000
Note the position of the Door Operator
relative to the door.
Motor-head is approximately at the
same level as the top of the door when
in the open position.
Emergency Release Cord with Label
attached.
Wall-mounted Push-button and
Caution Label mounted adjacent to
access door.
INSTALLATION IN GARAGE
WITH NORMAL HEADROOM
Fig No. 35
8.3 INSTALLATION OF DOOR OPERATOR ON SPRING BALANCED
TIP-UP DOOR USING AN EXTENDED TOWING ARM
Insufficient clearance available
between door and ceiling.
Path of Door
*
pro-a
lpha 2000
Fig No. 36
INSTALLATION IN GARAGE WITH "LOW" HEADROOM
TRACKLESS TIP-UP DOORS ONLY!!!
If there is insufficient clearance between the path of the door and the ceiling, it is
permissible to move the motor back away from the door and fix the "Anchor Bracket",
(or Header Bracket), to the ceiling and make use of an "Extended Towing Arm" to couple
the door to the operator.
Did your door operator installer demonstrate the correct use and
maintenance of the system to you??? He is required by law to do so!!!
MAN 01 - page 16
Version 5
8.4 GENERAL INSTALLATION
WORKMANSHIP
Is the general workmanship of an
acceptable standard?
1)
Are all the electrical wires neatly
routed and properly secured?
2)
Is the door operator properly
installed and secure?
3)
Are all the fasteners secure?
4)
Have all the instruction labels
and warning signs been fixed in
the appropriate places where
they are easily visible and have
they been pointed out to you?
5)
Has the Wall-mounted Pushbutton been installed?
The Push-button must be
mounted in a place that is within
site of the garage door. It is a
contravention of certain national
and international safety standards
to have the Push-button mounted
in a place from where the door
cannot be seen. The door must
always be visible when operating
it by remote control.
6)
7)
Was the operation of the door and
operator demonstrated to you,
especially the emergency manual
operating techniques?
Finally, was the garage left in a clean
state after the work was completed?
Important Information
For more detailed information on
the maintenance of automatic
garage doors refer to Brano
Industries’ information
brochure.........
“Automatic Garage Door
Operator And Garage
Door Safety And
Maintenance Guide”
This brochure is available free of charge
from any Brano Industries branch office
or it may be down-loaded from our
website.
Johannesburg :-
011-887-0625
Cape Town :-
021-552-5350
Durban :-
031-569-4276
Pretoria :-
012-349-1494
Westrand :-
011-760-5773
Bloemfontein :-
051-447-2850
National Share-Call No.
08600-brano
( 08600-27266 )
e-mail :-
[email protected]
website :-
www.brano.co.za
MAN 01 - page 17
Version 5
SECTION 9
SECTION 10
SERVICING AND MAINTAINING
YOUR
"pro-alpha 2000"
garage door operator
The Brano Industries "pro-alpha
2000" garage door operator is designed
for "Minimum Maintenance", and, if
correctly installed, the only servicing
necessary is periodic lubrication of the
worm-screw.
OPERATOR TESTING
AND
FUNCTION CHECKS
10.1 "POWER ON" TEST
Ensure that the Traveller is disengaged, i.e. the Door is not
coupled to the Door Operator.
1)
2)
3)
EVERY 3 MONTHS.
LUBRICATION:Lubricate the Worm-shaft every 3 months.
A special lubricant is required.
USE ONLY :-
"Brano Lubricant - GDO L1",
"Mobil AVGREASE 28"
"Mobil SHC 100 Low-temp"
"Aero Shell Grease No 6"
Do not use any other type of
common grease or lubricant !!
Use of the wrong type and grade
of lubricant will cause serious
and permanent damage to the
operator.
The motor is fitted with sealed ball bearings
which are "lubricated for life".
There are no other components in the Brano
"pro-alpha 2000" garage door
operator which require lubrication or
maintenance.
Switch the power supply "ON".
Check that the red "POWER-ON"
indicator light situated in the lamp
compartment is illuminated.
Using either the Transmitter or the Wallmounted Push-button, cycle the
operator to check that it starts and
stops as it should, and that the Lamp
and Radio Controls are operative.
10.2 OPERATING TEST
Ensure that the Door Lock Catches are
dis-engaged, i.e. the catches must be
in the "OPEN" or "UNLOCKED"
position.
First!.. Make sure that there are no
obstructions in the path of the door.
Next!...Couple the door to the operator by
engaging the Traveller with the worm
screw. The Traveller is engaged when
the Traveller Lever is in the
"horizontal" position.
Then!..Cycle the operator to it's "full-open"
and "full-closed" positions, by
pressing the push-button marked
"DOOR".
Check that the Traveller does not
overrun the Limit Switches.
The
Traveller should stop at the "UP" and
"DOWN" Limit Switches respectively.
MAN 01 - page 18
Version 5
SECTION 11
10.3 TESTING THE OPERATOR'S
COURTESY LIGHT
Check that the COURTESY LIGHT SWITCH
function of the Wall Push-Button is operating
correctly.
With the door in the closed position, press the
button marked "LIGHT" on the Wall PushButton Console. The operator's courtesy light
should switch "on" without the door being
activated. The courtesy light should switch
itself "off" automatically after 3 to 4 minutes.
OPERATOR FUNCTIONS
PRESSING THE "DOOR" BUTTON
ONCE.........
If closed, ..... the door will open, and
the courtesy light will
switch "ON".
If open, ....... the door will close!
If opening, ( still in motion ), ......
.... the door will stop!
10.4 OPERATOR PERFORMANCE
CHECKS
CHECK THE FOLLOWING:1
2
3
4
5
6
7
8
9
The door should open to its proper height
as specified.
Door closes completely without imposing
undue strain on the operator.
Overload sensitivity is properly set for both
opening and closing modes, { i.e. safety
reverse function }.
If the door strikes an obstruction whilst in
the "closing mode", it should first stop
and then automatically reverse its
direction to the "full-open" position.
In the "opening mode" the door must
come to a complete stop should it strike an
obstruction.
The Emergency Manual Release
Mechanism functions correctly with the
door in both the open and closed
positions.
The Courtesy Light timer is operative.
The Radio Controls and Push-Button
function properly.
CYCLE TIMES :SECTIONAL DOORS
....... approx. 18 sec.
TIP-UP DOORS ( Pantograph type ).
....... approx. 9 sec.
STEEL ROLL-UP DOORS
....... approx. 16 seconds.
If closing, ( still in motion ), ......
..... the door will stop!
THE "SAFETY OVERLOAD" FEATURE
will be automatically activated when ....
An obstruction is encountered by the
door whilst it is opening, ........
....... the door will stop!!!
Take Note:- ...
The door will not reverse its direction
whilst it is in the "opening mode". ....
......... It will stop!!!
An obstruction is encountered by the
door whilst it is closing, ......
....... the door will first stop and
then automatically reverse it's
direction and move to the "full-open"
position.
MAN 01 - page 19
Version 5
12.2 MONTHLY TESTS
SECTION 12
GARAGE DOOR MAINTENANCE
INSPECT YOUR GARAGE DOOR.
To ensure that your "pro-alpha" door operator
functions properly, make sure that the garage
door itself is in good working order. This is the
secret to having a reliable automatic garage
door. The door operator is not designed to
overcome the problems of a door which is in a
state of disrepair.
Damaged or worn-out components and
doors must be serviced or replaced!!!
Door Balance
Springs
Fig. No. 37
GARAGE DOOR MAINTENANCE
Consult your "pro-alpha" dealer for advice.
Testing the Balance of a Tip-up Door
Every month, carry out the following inspection
and tests on your garage door.
12.1 MONTHLY INSPECTION
Open and close the door manually, making sure
that it functions normally. If the door jams up or is
difficult to open and close, then proceed follows:1)
Inspect the door for signs of worn or
damaged parts. Look for loose or missing
fasteners. Make sure that all screws and
fasteners are secure.
2)
Check for worn or damaged hinges,
rollers, pulley wheels, cables and springs
and repair / replace as necessary. The
failure of any one of these components can
cause the door to malfunction.
3)
Above
Ground
+/- 1 metre
pro
-alpha 2000
Apply a suitable lubricant to all the moving
parts of the door especially pivot-pins,
hinges, rollers and bearings.
1)
Uncouple the "pro-alpha" door operator
from the garage door.
2)
Make sure that the area around the door is
clear of persons and obstructions.
3)
Lift the door by hand from the "fully
closed" position to the "full open"
position. Make sure that the door moves
freely throughout the cycle without
jamming or binding at any point along it's
path.
4)
Raise the door to the "half open" position.
If the door is correctly balanced it should be
able to remain in that position without any
assistance.
5)
If raised any higher, it should tend to rise
very slowly without assistance and remain
in the "full open" position.
6)
Below the "half open" position, it should
tend to close slowly.
7)
From the "fully closed" position, the door
should not require more than
approximately 10 kg of force to raise the
door to the "open" position, regardless of
the size of the door.
CAUTION! CAUTION! CAUTION!
IF THE SPRINGS OF YOUR
GARAGE DOOR NEED TO BE
SERVICED, CALL IN THE
SERVICES OF A PROFESSIONAL
DOOR TECHNICIAN.
MAN 01 - page 20
Version 5
12.3 SECTIONAL DOOR MAINTENANCE
12.4 TIP-UP DOOR MAINTENANCE
Check the balance of the door as shown below.
When servicing a Tip-Up garage door, pay
carefull attention to the main Pivot Pin
Bearings. These parts are subjected to high
loads and must be lubricated regularly.
Damaged bearings and bushes must be
replaced immediately as these components
bear the full weight of the door and should they
fail they would pose a great danger to persons
and property.
1) Place a bathroom scale under the door.
2) With the operator disconnected, note the
reading on the scale. A well balanced door
should show a reading of not more than 15kg.
If the door does not pass the inspection,
.......... call in the services of a professional
door mechanic to repair it for you.
Centreline
of Door
12.5 ROLL-UP DOOR MAINTENANCE
Generally, Steel Roll-Up doors require very
little maintenance. Make sure that the guide
channels (tracks) are kept clean.
Do not put grease or silicon based
lubricants in the guide channels.
If lubrication is required, use a "Dry
Graphite Stick", "Graphite Powder"
or "Graphite Spray".
Alternatively, a very light, “siliconfree” oil or “Teflon” lubricant.
Bathroom Scale
Fig. No. 38
Checking The Amount Of Force
Required To Lift The Garage Door
A heavy grease tends to collect dirt and grit
which compounds the problem of excessive
friction between the door curtain and the guide
channels.
CAUTION! CAUTION!
THE SPRINGS OF YOUR GARAGE DOOR
ARE UNDER A GREAT DEAL OF
TENSION.
DO NOT ATTEMPT TO MAKE ANY
ADJUSTMENTS TO THEM WITHOUT
HAVING THE PROPER TOOLS OR
KNOW-HOW.
SERIOUS OR EVEN FATAL INJURIES
MAY BE SUSTAINED IF THE REPAIRS
ARE NOT CARRIED OUT CORRECTLY!!!
MAN 01 - page 21
Version 5
SECTION 13
TROUBLE SHOOTING GUIDE
for the
"pro-alpha 2000"
SYMPTOM 3 :The operator "clicks", the "Courtesy
Light" switches "ON" and the motor
"hums", but Worm-Screw does not turn.
garage door operator
SOLUTIONS 3 :-
SYMPTOM 1 :OPERATOR DOES NOT WORK AT ALL.
The operator remains silent and does
not respond to either the Wall Pushbutton or the Transmitter.
The Courtesy Light does not switch
"ON".
"Power-On" indicator light remains
"OFF".
SOLUTIONS 1 :-
1.1 Electric power is not being supplied to
the operator.
1.2 Check that the Power Plug at the side of
the operator is correctly inserted into the
socket.
1.3 Check that the power supply outlet,
distribution board, fuses, mains earth
leakage, etc. are correctly wired and are
operating correctly.
1.4 Check for breaks in the Power Supply
Cable.
1.5 Check the PC Control Board for
damage, e.g. from a lightning strike,
power-surge, etc.
SYMPTOM 2 :Operator makes a "click" sound and the
"Courtesy Light" switches "ON", but the
motor remains "silent" and will not "run".
3.1 Check the manual operation of the door.
The door may be jammed or obstructed.
The Door Locks may be engaged. The
manual door locks must be
"disengaged" for automatic operation.
3.2 The Worm-Shaft may be jammed or
seized due to the ingress of dirt or some
other foreign matter. Clean out the
Aluminium Extrusion with paraffin and
re-grease the worm- screw.
3.3 The Worm-Screw can become seized if
the incorrect type of grease is used.
Refer to the section "Lubrication" in
this manual.
3.4 The "Travel Limit Switches" and the
"Overload Sensor" may be incorrectly
set. Reset the Limit Switches and
check the sensitivity setting of the
operator.
3.5 Check the Operator for signs of damage,
(as may be caused during a forced entry).
3.6 The Motor Coupling may be damaged.
SYMPTOM 4 :-
Operator switches "ON" and "runs",
but door does not move. WormScrew "turns" but door remains
stationary.
SOLUTIONS 4 :SOLUTIONS 2 :2.1 Check the manual operation of the door.
2.2 Check that the Travel Limit Switches
are set correctly and are not damaged.
4.1 Check that the Traveller Lever is in the
engaged position for the particular
type of door.
4.2 Check for damage or excessive wear to
the Traveller Nut.
4.3 The Motor Coupling may be damaged.
MAN 01 - page 22
Version 5
TROUBLE SHOOTING GUIDE
( Section 13 continued )
SYMPTOM 5 :Operator works in one direction only.
Door "opens", but will not "close".
Door "closes", but will not "open".
SOLUTIONS 5 :-
5.1 Check the Travel Limit Switches for
damage.
5.2 Inspect the limit switch wires for
damage.
SYMPTOM 6 :Operator "runs" a short distance in the
"closing" direction", then stops for no
apparent reason and then reverses it's
direction, "runs" a short distance again
then stops completely.
SYMPTOM 8 :Operator works from the Wall Pushbutton, but not from the remote
Transmitter.
SOLUTIONS 8 :8.1 Check the Battery in the Transmitter.
Replace the battery at least every 6
months.
Keep a spare Transmitter in a safe
place for use in an emergency !
8.2 Check that the codes of both the
Transmitter and the Receiver are
identical to each other.
8.3 Check that the wires from the Receiver
to the operator are properly connected.
8.4 Check that the Transmitter is working
correctly.
8.5 Check that the Receiver is functioning
correctly.
SYMPTOM 9 :SOLUTIONS 6 :-
Check the “Down" Overload Sensor. The
"Down" sensitivity may be set to be too
sensitive.
Increase the "closing force" by moving
Sensor Adjustment Lever "one notch at a
time" as indicated on the PC Board.
SYMPTOM 7 :Operator "runs a short distance in the
"Opening" direction then stops
completely for no apparent reason.
Operator works from the "Transmitter"
but not from the "Wall Push-button"
SOLUTIONS 9 :9.1 Inspect the Wall Push-Button Console
for damage.
9.2 Inspect the Push-Button Wires for
damage and proper connections to the
operator.
SYMPTOM 10 :Operator works but the Courtesy Light
does not switch "ON".
SOLUTIONS 7 :Check the "UP" Overload Sensor. The "UP"
sensitivity may be set to be too sensitive.
Increase the "opening force" by moving the
Sensor Adjustment Lever one notch at a
time as indicated on the PC Board.
SOLUTIONS 10 :-
10.1 Check the Lamp and replace if
necessary.
10.2 Check the P.C. Control Board and
replace if necessary.
MAN 01 - page 23
Version 5
SECTION 13
TROUBLE SHOOTING GUIDE
( Section 13 continued )
SYMPTOM 11 :Door "shudders" and "jerks" as it
opensand closes. Action is not
smooth and continuous.
SOLUTIONS 11 :11.1 The Door may be incorrectly installed.
11.2 Check the manual operation of door. The
door may be obstructed, or may be fouling
the garage structure.
11.3 Inspect the door for damaged and worn or
missing parts.
Repair or replace as necessary !
11.4 The Door Operator may be incorrectly
installed.
11.5 The operator may not be compatible
with the type of door onto which it is
fitted.
11.6 The door itself may not be suitable for
automatic operation.
Consult your "pro-alpha" dealer for advice.
SYMPTOM 12 :Door starts to Open then "stops" for no
apparent reason before it can complete
it's cycle.
SOLUTIONS 12 :12.1 Check the manual operation of the door.
12.2 Check the limit switch settings. The door
may be fouling the Travel
Limit
Switches.
12.3 Overload Sensor is set too sensitive for
the opening mode. Increase the opening
force, i.e. "UP" force.
12.4 Be careful not to activate the transmitter
inadvertently. Do not keep the transmitter
in your pocket or handbag, or allow
children to play with it.
SYMPTOM 13 :Door starts to Close then "stops" for
no apparent reason before it can
complete it's cycle.
SOLUTIONS 13 :13.1 Check that the Travel Limit Switches
are functioning correctly
13.2 Check that the Travel Limit Switches
are not being fouled by the door as it
moves.
SYMPTOM 14 :Door starts to "close" but "stops",
and then "reverses it's direction" for
no apparent reason before
completing it's cycle and returns to
the "full - open" position.
Note this condition carefully!
SOLUTIONS 14 :14.1 Check the manual operation of the
door. The door may be obstructed or
damaged and is not able to complete it's
cycle.
14.2 The Overload Sensor is set too
sensitive for the "closing" mode.
Increase the "closing force", i.e. the
"down-force", by "decreasing" the
sensitivity setting.
SYMPTOM 15 :Door does not "Open" or "Close"
fully.
SOLUTIONS 15 :15.1 The door may be fouling the Travel
Limit Switches as it moves. Reposition
the limit switches or raise the operator to
clear the door.
15.2 Note:- Certain types of doors have a
limit as to how high they may be
opened when converted to
"automatic" operation.
See 13 and 14 above.
MAN 01 - page 24
Version 5
SECTION 13
TROUBLE SHOOTING GUIDE
( Section 13 continued )
SYMPTOM 16 :Door activates itself for no apparent
reason.
SOLUTIONS 16 :16.1 A neighbour may be using radio control
equipment which is set to the same
signal code. Change the Dip-switch
Codes of both the Transmitter and
Receiver.
16.2 The Radio Receiver may be located in a
place where the radio reception is weak
or else the signal is being screened or
interfered with, e.g. close to steel doors,
close to fluorescent lamps, close to
powerful radio, microwave or television
broadcasting equipment, etc.
16.3 The Radio Receiver may be faulty.
16.4 The Wall Push-button may be faulty.
16.5 The PC Control Board may be faulty.
SYMPTOM 18 :-
The Courtesy Light does not switch
"On".
The Courtesy Light does not switch
"Off" automatically, ( i.e. the light
remains "On"continuously ).
SOLUTIONS 18 :-
18.1 Check that the wall mounted "PushButton" is correctly wired and that all the
contacts are "Normally Open".
18.2 Check that the push-button switch
contacts are not wet. Moisture inside the
switch can cause a short circuit.
18.3 The Push-Button Wires may be
crossed.
SYMPTOM 19 :The operator works but is very noisy.
SOLUTIONS 19 :SYMPTOM 17 :The operating range of the Remote
Radio Transmitter is very short.
SOLUTIONS 17 :17.1 Replace the Battery in the Transmitter.
17.2 The Radio Transmitter may be faulty.
17.3 The Radio Receiver may be poorly
located. Move the receiver to another
location.
17.4 The Radio Receiver may be faulty.
17.5 NOTE:The performance of low-power radio
remote control equipment in areas close
to broadcasting centres, microwave
communication towers, airports, etc., is
often very restricted. In such cases it may
be necessary to install special radio
controls which operate in the 27 MHz
frequency band.
19.1 The Worm-screw may require lubrication.
Lubricate the shaft with the special
grease as specified. Use only the type
and grade of grease stipulated.
19.2 The Worm-screw and Aluminium
Housing may have been damaged and
will need to be repaired or replaced.
19.3 The Motor Coupling may be worn or
broken.
19.4 Test the manual operation of the door.
The door may be damaged or require
realignment or adjustment.
An unbalanced door can adversely
affect the performance of the door
operator.
19.5 Inspect the door and operator for loose
fittings and fasteners and rectify.
MAN 01 - page 25
Version 5
TROUBLE SHOOTING GUIDE
( Section 13 continued )
SYMPTOM 20 :-
The door "closes" completely and
then immediately re-opens by itself
to the "full-open" position.
SOLUTIONS 20 :-
20.1 Check that the Travel Limit Switch
Wires are properly inserted into the Limit
Switch Terminals.
20.2 The Travel Limit Switch Brackets may
be loose and have moved. Set them in the
correct position and secure in place.
20.3 The PC Control Board may be faulty.
SYMPTOM 21 :The Operator works but fails to
respond to any obstruction which is in
it's way.
Operator will not "Reverse" if
obstructed whilst in the closing
mode, i.e. the automatic "Safety
Reverse" is not functioning.
Operator will not "Stop" if
obstructed whilst in the opening
mode, i.e. the automatic "Safety
Stop" is not functioning.
SOLUTIONS 21 :-
21.1 Check the manual operation of the door.
21.2 The door must be properly balanced
and in good working order.
21.3 Inspect the door for faulty or damaged
parts.
21.4 Check the Over-load Sensor settings of
the door operator.
If you are in any doubt
whatsoever as to what the
problem might be or what is
causing it, call in the services
of a professional door
technician.
Garage doors, if not
maintained in good working
order, or if not serviced
correctly, can be dangerous !
Rather than risk unnecessary
injury or damage to property,
have them serviced regularly
by a suitably qualified and
equipped door technician !
A garage door in good working
order is a blessing and a joy to
use; and it adds value to your
property !
Problem doors can become a
nightmare.
There is no substitute for
doing it right the first time !
MAN 01 - page 26
Version 5
SECTION 14
"pro-alpha 2000"
Accessories
Description
Low-Headroom Bracket for
Automatic Sectional Doors
"pro-rola 1" Adaptor Kit
industries
Product Code
1 KLHD - A
1 KROLA 1 - 01
for Single Steel Roll-Up Doors
Maximum door size:2440 mm Wide x 2135 mm High
Use with GDO 1PA 2005
"PRO
-ROL
A 1"
Kit
fo
Singl r
e o
D or
brano
indus
tries
(pty)
l
td
Sing
"PRO le Door
-ROL
A" K
it
"pro-rola 2" Adaptor Kit
C/ L
1 KROLA 2 - 01
for Double size and "Caravan"
height Steel Roll-Up Doors
Maximum Door Size:5 000 mm Wide x 3 000 mm High
May be used with GDO 1PA 2001
or 1PA 2004 or 1PA 2005
"PRO
-ROL
A 2"
Kit
f or
Twin
Singl
e Do
ors
bran
o indu
s
tries
(pty)
ltd
Twin
Singl
e
"PRO
-ROLA Door
2" Kit
"Pro-Converter" Door Adaptor Kit
for "Vertically Tracked" doors
( Counterweight Balanced Doors and
"Canopy" type doors )
*
1 KVT
Not available in South Africa
MAN 01 - page 27
Version 5
SECTION 14
"pro-alpha 2000"
Accessories
Description
industries
Product Code
Emergency Key Release Kit Sectional and Tip-Up Doors
1 KEYS
Emergency Key Release Kit for
Steel Roll-Up Doors using the
"Pro-Rola" System
1 KEYPR
Emergency Key Release Kit for
Steel Roll-Up Doors using the
"Side Mount" System
1 KEYR
* Discontinued
"Twin" Roll-Up Door Adaptor Kit
for "Side Mount" System
1 KRTL
Use with GDO 1PA 2003
* Discontinued
This System Does Not Comply With
SABS 60335 Safety Standards
"Single" Roll-Up Door Adaptor Kit
for "Side Mount" System
Use with GDO 1PA 2003
1 KRS
* Discontinued
This System Does Not Comply With
SABS 60335 Safety Standards
MAN 01 - page 28
Version 5
Section 15
Version 5
January 2004
brano industries (pty) ltd
"pro-alpha 2000”
Copyright C March 1998 / 2001 / 2003 / 2004
industries
SPARE PARTS
LUBRICATION
DO NOT USE COMMON GREASE
USE ONLY "BRANO LUBRICANT GDO-L1" OR
"LOW-TEMP LUBRIPLATE" OR "AVGREASE 28"
Discontinued
* Model
in year 2002
"pro-alpha 2000"
Door Type
Operator Model
Installation
Sectional
Trackless Tip-Up
Steel Roll-Up
Sectional Caravan
Steel Roll-Up
1 PA 2001
1 PA 2002
1 PA 2003
1 PA 2004
1 PA 2005
Overhead
Overhead
Side mount
Overhead
Overhead
*
Travel Limit
Switches
*
Door Towing
Bracket
2 BRAD
2 ESLIM
Power Cord
"Kettle-Cord Connector"
Wall Push-button
complete
Adapter Kit
Packaging
Colour
1 KRS or 1 KRTL
*
(Pro-rola) 1 KROLA 1-01
Door Header
Anchor Bracket
Yellow
Green
Brown
White
Blue
Traveller Assembly
2 BRAHE
2 TRAV
4 Core Comm-Cable
( Push-button )
Emergency Release
Pull-Cord
EW 4 PB
2 CORD
"Straight" Towing Arm
"Sectional" Doors
"Clevis" Pin
2 TOWSS
2 FPC 1025
"Owner's Instruction
Manual
"Installer's Instruction
Manual
pro-alpha
door
light
lock
brano industries
2 EPK
2 ESW
Towing Arm
"Tip-up" Doors
"L" Towing Arm
"Sectional" Doors
2 TOWT
2 TOWLS
20 x 20 x 1500 mm
Punched Angle
1 AP 20
"Caution" Label
caution
MAN - 01
"Emergency Operation"
Label
MAN - 02
Fastener Bag
emergency operation
emergency operation
emergency operation
emergency operation
LAB 02
LAB 04
MAN 01 - page 29
4 FK PA
SECTION 1 ....... continued from page 1
or "Vertical Track" type doors. )
A period of 60, ( sixty ), days from the date of purchase /
installation of the garage door operator shall be allowed for Note:- Modification of the operator, e.g. shortening the
the purpose of registering ownership. Proof of date of
worm-shaft for “Side-mount” installation on Roll-Up
purchase is required.
Doors, will render all warranties null and void as the
approved method for automating Steel Roll-Up Doors is
8
REGISTRATION CARD:with the “Pro-Rola” adaptor system only.
The attached registration card is to be filled out and returned
12.4 used for purposes other than that for which it has been
to Brano. Be sure to record all the information requested:designed, ( e.g. for the automation of driveway gates ).
8.1
The operator's serial number.
The "pro-alpha 2000" door operator is not designed to
operate in areas where it will be exposed to the elements.
8.2
The date of installation.
........ It is not weatherproof !!!
8.3
If applicable, the type of door adaptor kit installed, e.g.
"Pro-Rola 1"/"Pro-Rola 2"/"Low-headroom"system. 12.5 used to operate doors which are not in good working
order, ( e.g. doors which are improperly balanced or are in
8.4
The Type of garage door you own and the date the door
a state of disrepair ).
was purchased / installed.
8.5
The Name and contact details of your Dealer / Installer. 12.6 installed on doors which have to cater for high traffic
flows, ( i.e. more than 6 cycles per day or 2 000 cycles per
year on average ). The equipment is designed for, and
9
ACCEPTANCE OF EXTENDED WARRANTY:intended to be used, in a domestic environment .
No extended warranty will be deemed to exist unless all
12.7 damaged due to malicious causes, ( i.e. sabotage ).
the information stipulated is supplied.
12.8 damaged due to faulty or incorrect installation
10
CORRESPONDENCE:techniques and / or sub-standard workmanship, ( e.g. non
Always state the operator's Serial Number in any
standard or improper wiring work, incorrect fitting of the
operator and / or door adaptor kits ).
correspondence relating to warranty claims..
12.9 damaged or have their settings disturbed due to
11
WARRANTIED COMPONENTS:tampering with the equipment by unqualified persons.
11.1 Brano warrants that all mechanical and electrical 12.10 damaged due to fair wear and tear which is not
components of the 'pro-alpha 2000" garage door
attributable to the fault of the company, ( e.g. replacement
operator which are supplied as part of the basic kit are
of batteries and light bulbs, traveller nuts, and other
free of defect with respect to the quality of the materials
"sacrificial" wearing parts ).
and components used as well as the quality of the
13
MAINTENANCE OF THE GARAGE DOOR.
manufacturing and assembly workmanship.
It is, furthermore, a condition of this warranty that the garage
Components include the:door itself be maintained in a serviceable condition in
Electric motor, "worm-screw", aluminium housing, P.C.
accordance with the door manufacturer's instructions and as
control card, attachment brackets and towing arms.
specified in the relevant sections of this "Owner's
11.2 Important Note:Operating Manual" and SABS - IEC 60335 - 2 Standard.
The Traveller Assembly and motor-shaft coupling are
Proof of service to the doors may be required.
designed to be "sacrificial" wearing parts and will not be
considered as faulty components. They are therefore not 14
DEFECTIVE PARTS- ( under warranty ):covered by this warranty.
Faulty components shall be repaired or replaced at the sole
discretion of Brano. Defective parts replaced shall become
These specific components are designed to "fail first" in
the property of Brano.
order to protect more expensive and "difficult-to-replace"
components. If one of these components fails, it is a sure
COSTS INCURRED FOR SERVICE LABOUR,
indication that there is a fault somewhere in the system. 15
TRANSPORT / POSTAGE and TRAVELLING:Most likely the garage door is out of balance or some
component of the door system is malfunctioning or is
Brano will be liable for the cost of the replacement parts
only ! That is, the cost of specialised labour and the cost of
damaged and requires attention.
travelling to and from site and the cost of transport or postage
12
EXCLUSIONS:of spare parts are specifically excluded from the scope of
this warranty. The faulty component or door operator must be
The following components, services and work are
returned either to Brano or to one of its authorised
specifically excluded from the Scope of this Warranty,
Distributors for repair or replacement. The cost incurred
whether specifically stated or implied. This Warranty is
for such returns shall be for the account of the owner or
invalid for the repair or replacement of Door Operating
installer.
Equipment and Components which are :12.1 not supplied by Brano.
16
CANCELLATION of WARRANTY.
12.2 damaged by an act of nature, ( e.g. lightning strike,
In the event of any of these conditions being breached,
flood, fire, power surge, etc., etc.)
Brano reserves the right to cancel the warranty with
immediate effect.
12.3 damaged due to misuse or abuse of the equipment, as
when fitting the operator onto doors which are not suited
for conversion to automatic operation, (e.g. “Tip-In" doors
Revised :- January 2004
MAN 01 - page 30
Version 5
Section 16
For Your Records
DOOR OPERATOR EQUIPMENT DETAILS
Installation Date :- ...............................
Dealer:- .........................................
Installer's Name:- ................................... Tel No.:- (
"pro-alpha" Serial No.:- (See Fig. 12 )
) .............................
............................................................
Sectional / Tip-Up / Steel Roll-Up / ..........................................
Type of Door:-
Door Size:- Width ................ mm ; Height .................. mm ; Mass ................kg.
Adaptor Kit Installed:- Not Applicable / "Pro-Rola 1" / "Pro-Rola 2" /
“Low-Headroom" Kit /....................................................
Remote Controls
Make and Model:Receiver Type:-
........................................................................................
Single Channel / Multi Channel / Binary / Trinary / Codex .
Transmitter Type:-
TX 1 / TX 3 / Codex ................................................................
DOOR OPERATOR SERVICE RECORD
Date Job No.
Faults
Report
Parts Repaired /
Replaced
MAN 01 - Back Cover
Invoice
No.
Serviced
By
"pro-alpha 2000" - Warranty Registration Card
Owner’s
Name:-
Date:-
( Please print )
P.O. Box
Site Address:Tel No (
)
Fax (
Cell No
)
e-mail :-
Serial No. of "pro-alpha 2000" g.d.o.:- ( Fig. 12 )
Date of Installation:-
Type of Door:- Sectional / Tip-up / Steel Roll-Up
Type of Door Adaptor Kit:- Not Applicable / “pro-rola 1” / “pro-rola 2” / Special
Age of Door:-
Date when door was last serviced:-
Are you satisfied with the service provided by your Dealer / Installer:-
YES / NO
Comments:-
Particulars of Dealer / Installer
Dealer’s Name
Tel No (
)
Cell No
For Office Use Only:- Date Received:-
Fax (
e-mail :-
)
File Code.:-