1
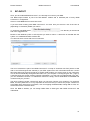
User Manual
Status: Q3, 2014
Current Version 6.X
Router Solutions
BOM Connector™
User Manual
Table of Contents
1
BOM Connector™ Overview ............................................................................................................ 4
2
System Requirements and Installation............................................................................................. 6
3
4
2.1
Hardware System Requirements............................................................................................. 6
2.2
Installing BOM Connector™ .................................................................................................... 6
BC-Link ............................................................................................................................................. 8
3.1
Required and Recommended ERP Data Fields ...................................................................... 8
3.2
Optional Data Fields ................................................................................................................ 8
3.3
Configuring the ETL ................................................................................................................. 9
3.4
Using BC-Link for SAP ............................................................................................................ 9
Using BOM Connector™ ................................................................................................................ 10
4.1
Start BOM Connector™ and update from ERP ..................................................................... 10
4.2
The user interface .................................................................................................................. 10
4.2.1
4.3
5
5.1
Key field ................................................................................................................................. 17
5.2
Exporting a BOM ................................................................................................................... 17
5.2.1
What is a Template? .......................................................................................................... 17
5.2.2
Template Description ......................................................................................................... 17
5.2.3
Template Interface ............................................................................................................. 18
5.2.4
Creating a New Template .................................................................................................. 18
5.2.5
Saving and Deleting a Template ....................................................................................... 24
5.2.6
Editing a Template ............................................................................................................. 24
5.3.1
5.4
Using the Export Function ..................................................................................................... 24
Exporting With Template ................................................................................................... 24
Viewing the Results ............................................................................................................... 24
BC-PREP ....................................................................................................................................... 25
6.1
6.1.1
7
The Action Menu ................................................................................................................... 13
BC-IN/OUT ..................................................................................................................................... 14
5.3
6
Ultra Search ....................................................................................................................... 12
CIS Search ............................................................................................................................ 25
Running the CIS Search .................................................................................................... 27
6.2
MPN Search .......................................................................................................................... 27
6.3
SmartSearch .......................................................................................................................... 29
6.4
Operator Search .................................................................................................................... 31
6.5
Recap the Search Methods ................................................................................................... 32
6.6
User Attributes ....................................................................................................................... 32
6.6.1
Creating User Attributes .................................................................................................... 32
6.6.2
Assigning User Attributes .................................................................................................. 33
6.6.3
Saving Assignments and User Attributes .......................................................................... 33
BC-QUOTE .................................................................................................................................... 35
7.1
Taking from ERP System ...................................................................................................... 35
7.2
What are Price Groups? ........................................................................................................ 35
7.3
What are Scale Prices? ......................................................................................................... 37
2
Router Solutions
7.4
9
User Manual
Searching for Pricing for Various Sources ............................................................................ 38
7.4.1
Distributor Catalog ............................................................................................................. 38
7.4.2
Octopart™ ......................................................................................................................... 39
7.4.3
Distributor Request ............................................................................................................ 42
7.5
8
BOM Connector™
"QuickPrice" ........................................................................................................................... 47
BC-CHECK ..................................................................................................................................... 49
8.1
Checking the BOM for inconsistencies .................................................................................. 49
8.2
Compare two versions of a BOM........................................................................................... 49
8.3
Compare a New BOM with the Master BOM in ERP ............................................................ 50
8.4
Compare a New BOM with the Master BOM in MSS ............................................................ 51
BC-CAD .......................................................................................................................................... 52
10 BC-EXCHANGE ............................................................................................................................. 53
3
Router Solutions
BOM Connector™
User Manual
Introduction to BOM Connector™
1
BOM Connector™ Overview
BOM Connector™ is a bill-of materials preparation, handling and quoting tool for EMS and OEM
electronic manufacturers.
Dealing with BOM data is one of the biggest headaches faced by both OEM and EMS manufacturers.
EMS manufacturers are confronted daily with a wide variety of BOM formats and ever-changing
content. Usually the only rule that applies is “there are no rules”. Matching customer parts to internal
parts, comparing different BOM revisions and communicating with purchasing are too often done
manually, which is mistake-prone and can easily take hours or even days of effort. Preparing accurate
quotations means constantly checking for current component pricing and delivery conditions.
A good BOM tool should help with all these tasks. BOM Connector™ is exactly that tool!
One of the key features of BOM Connector™ is to help EMS providers speed up the process of
preparing customer BOMs. This process normally involves
a) Reading in the myriad formats and contents received into a standard framework
b) Finding the proper internal part numbers (IPN) to use for the various customer part numbers
(CPN) in the BOM by searching through the company’s ERP parts database
c) Exporting the results into a standard format.
BOM Connector™ can also assist EMS providers to create quotes much faster and more accurately
by integrating the various pillars required for the quoting process:
a) customer BOM b)
b) internal ERP system
c) distributor catalog
d) online pricing portals such as Octopart™ and Digikey and, last but not least
e) operator knowledge and experience.
The more BOM Connector™ is used, the "smarter" the system becomes.
In addition, both EMS and OEM providers benefit by using BOM Connector™ to directly link between
their ERP system and various process engineering and shop floor management tools, such as the
MSS suite of tools from the Mentor Graphics Valor Division.
Here are the primary functions of BOM Connector™:
1. Read in a customer BOM, clean it up "scrubbing", and use the various search methods, such
as SmartSeach, CIS Search, MPN Search and others to find the best matching part in your
ERP system, in order to generate what we call a "Golden Manufacturing BOM" for further
processes. This is a key feature for EMS suppliers, as it is often one of the most timeconsuming and error-prone tasks of the manufacturing process. When used early on, in the
quoting department, it can substantially reduce the time per quotation, thus having a direct
effect on the company's "bottom line".
2. Use the advanced quoting features to find the best possible price, either through a search of
your company's distributor list, or a search of Online portals such as Octopart™. These prices
can be stored for future use.
3. During the manufacturing process, BOM Connector™ can provide one-click integration of the
project's current BOM into your process engineering and shop floor tools, such as the MSS
suite of tools from the Mentor Graphics Valor Division. This ensures that an incorrect or no
longer current BOM does not end up in the manufacturing process.
4. Compare different versions of BOMs, this includes the following scenarios:
•
New customer BOM with old customer BOM
•
New customer BOM with the current BOM stored in the in-house ERP system (i.e. the
'golden' BOM)
4
Router Solutions
BOM Connector™
•
New Customer BOM with the BOM stored in Valor MSS
•
ERP BOM with Valor MSS BOM
User Manual
This is a huge help in determining revision changes and is another key feature for EMS
suppliers.
5. Provide basic CAD viewing for early phases of the manufacturing process such as quoting or
initial job review.
6. Extract information from the CAD file and insert it into the working BOM. Since often there is
information, such as technology, side and station, which is not included in the original BOM.
These functions are handled by these program modules
5
Router Solutions
BOM Connector™
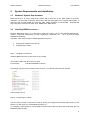
2
System Requirements and Installation
2.1
Hardware System Requirements
User Manual
BOM Connector™ is a true client-server system with a direct link to the ERP system at its heart.
Therefore, you will need a Windows Server drive with full read rights to the internal ERP system. A
client PC with at least 100MB free disk and 1280 X1024 resolution (recommended - 1024x768 will
also work) and a TCP/IP connection (min. 2MBit) to the ERP Server.
2.2
Installing BOM Connector™
Because BOM Connector™ is a client-server multi-user system, users in the different departments quoting, component engineering, process engineering, production, etc. - all to access the same
database and settings.
Therefore, there are two steps to installing BOM Connector™:
1. Copying the software to the Server
2. Configuring the clients.
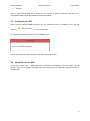
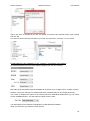
Step 1: Installing on the server
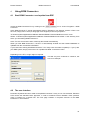
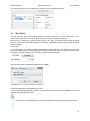
Installing BOM Connector to the server is very simple.
Just create a folder with any name you wish.
For example:
\\servername\BOM-Connector
Now simply copy the entire contents of the CD here. Your directory will now look like this:
That’s all there is to it.
Step 2: Configuring the Clients
The only thing to keep in mind here is that all clients you configure must clients have access to the
directory on the server you copied BOM Connector to.
To configure a client simply go to the BOM-Connector server directory (from the client itself) and run
BOMCON_SETUP.EXE.
6
Router Solutions
BOM Connector™
User Manual
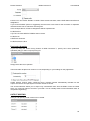
The installer will create a local instance under:
C:\Users\MYNAME\AppData\Local\Router Solutions\BOM-Connector\
where: MYNAME is your user name in Windows.
It will also place a BOMCON icon on the desktop:
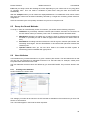
You can now start BOM Connector on this client. When in BOM Connector, you can verify that all
“pointers” to the directories are correct by clicking on
This brings up the following dialog:
and then INFO&UPDATE.
Click here to go to the client directory in Explorer
Click here to go to the server directory in Explorer
Note:
If you receive the message below when
starting BOM Connector, simply cut-andpaste the string you received via email
into the empty window area illustrated to
the right by the cursor position.
No further action on licensing is currently
required.
7
Router Solutions
3
BOM Connector™
User Manual
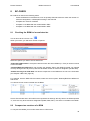
BC-Link
A direct ERP data source link is the “backbone” of BOM Connector™ and gives direct access to all
necessary ERP data. BOM Connector™ BC-LINK includes a “connection wizard” that allows it to
connect dynamically to nearly every ERP-System, including all SAP versions. ERP data is brought
smoothly into the BOM Connector™ backend database, so searching and other tasks can be
performed without effecting ERP-System performance.
BOM Connector™ has been tested with many ERP systems, including SAP, Navision, ProAlpha,
Infour, Baan, Wise and others. However, any ERP system that either uses SQL, ORACLE, Access, or
an ODBC/OLEDB compatible database structure will work.
The connection to the ERP system is provided by Router Solutions as a standard part of the software
delivery. It is known as an "ETL" (which stands for "extract - transform - load"). As the name implies,
data is extracted from the ERP database, transformed to make it better readable and loaded into a
BOM Connector™ "backend" database. Having this backend database means that searches are done
"offline" from the ERP system and thus will not affect system performance. It also gives you one
central BOM Connector™ database to store the mapping between customer part numbers "CPN" and
internal part numbers "IPN", as well as customer-specific settings. The ETL is adapted specifically for
each customer's ERP system and provides the crucial link between BOM Connector™ and your
material data.
The ETL has been pre-configured on your system and, if automated, will take place all in the
background.
To launch the connection manually, see chapter 4.1 Start BOM Connector™ and update from ERP.,
page 10
3.1
Required and Recommended ERP Data Fields
Your ERP system should have the following fields defined:
•
Customer Name (recommended)
•
Customer Number (recommended)
•
Internal (i.e. "ERP") Part Number, or "IPN" for short (required)
•
ERP Description Field or Fields (required)
•
Manufacturer Part Number, or "MPN" for short (recommended)
•
Manufacturer Name (recommended)
•
Price (recommended)
3.2
Optional Data Fields
There are no limits to the additional fields you can access in your ERP system and bring into BOM
Connector™ via the ETL.
Here are some very useful ones:
•
Additional prices
•
Bulk quantity prices
•
Storage location
•
Current supplier
•
Additional MPN 1-x
•
Additional Manufacturer Name 1-x
8
Router Solutions
•
BOM Connector™
User Manual
Process
Since a well-designed ERP link is crucial for the success of BOM Connector™ this should we
discussed in depth with Router Solutions software specialists.
3.3
Configuring the ETL
When you have launched BOM Connector you can configure the ETL by holding the CTL key and
choosing
from the Action Menu.
You will then be asked if you want to run in DEBUG mode:
Answer with YES and hit SETTINGS to enter the configuration menu.
3.4
Using BC-Link for SAP
A big plus for SAP users – BOM Connector™ interfaces via standard scripts and “BAPI” remote
function calls, so it is always compatible with future versions and no additional costs are incurred on
the SAP side.
9
Router Solutions
BOM Connector™
4
Using BOM Connector™
4.1
Start BOM Connector™ and update from ERP
Invoke the BOM Connector Exe by clicking on the
Connector.
User Manual
icon or via ALL Programs – BOM
Note: BOM Connector™ should automatically starts in English for non-German systems. If this is not
the case, simply add a /1033 (for language code "English") in the start properties:
"C:\Users\myname\AppData\Local\Router Solutions\BOM-Connector\bin\bomcon.exe" /1033
Where "C:\Users\myname\AppData\Local\Router Solutions\BOM-Connector\bin" is the directory from
which you are starting BOM Connector™.
Note: This icon should have been created by the installer automatically.
When you start BOM Connector™, the ETL is automatically invoked and the backend database is
updated from the current ERP information.
If you have been working with BOM Connector™ for many hours and want to update (i.e. "sync") with
your ERP system, simply click on the icon “Update Part Data” in the action menu.
Depending on the ETL, a login might be required.
This will vary from customer to customer, but
here is an example.
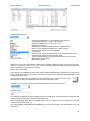
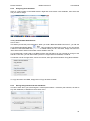
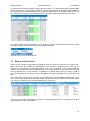
4.2
The user interface
Particular emphasis has been made to keep BOM Connector™ easy to use. We at Router Solutions
have chosen the standard "tabs" approach, in order to maximize screen utilization. Each operation
group is located on a specific tab. The next page contains a complete overview of the BOM
Connector™ user interface.
10
Router Solutions
BOM Connector™
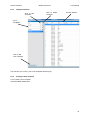
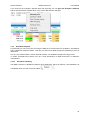
Search Options
UltraSearch
Imported BOM
User Manual
„BOM Details“
window with MPN
details/pricing.
Action
Menu
Customer
Info
Price
Groups
ERP
“UltraSearch”
ERP Material List.
This is a direct „window“
into your ERP data.
Distributor information
for selected MPN.
Imported via the
Distributor Catalog
Interface (DCI).
Octopart Info (when
Octopart search is
invoked).
MPN (ERP) Box.
Displays 1 or more
MPNs/manufacturer
names for the
selected IPN
All windows are re-sizable and, with the exception of the BOM and ERP windows, can be turned on/off
at any time.
To resize, simply "grab" at the edge horizontal or vertical edge of a window. The cursor will change
form to a double-arrow. Now, while holding the mouse down, "slide" the window up-down or left-right.
Release the mouse button when finished.
To “hide” the BOM DETAILS window, you can use the arrow to the left of it.
Click on the arrow once with the window on and the window turns off.
Click on the "reversed arrow" and the window turns on again.
11
Router Solutions
You can also use the
BOM Connector™
User Manual
icon. Click here and a drop-down displays:
Simply, de-check the window you want to turn off, and check the window you
want to turn on. It is easy!
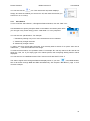
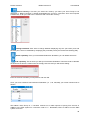
4.2.1
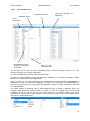
Ultra Search
To turn on/off the “Ultra-Search”, a Google-like Search Window, click the “Filter” icon:
Use UltraSearch to quickly find parts either in the BOM or the ERP system. Here
you can type in any search string, just as “100K 0805 1%” in any sequence.
You can also use “placeholders”. For example:
“*” followed by nothing or by one or more characters acts as a wildcard
“?” followed by a single character
“#” followed by a single number
A “space” acts as a typical AND command. If you actually want to search for a “space” then use an
underscore “_”. This will combine the two strings.
To make an exact search, use quotation marks. For example “R1” will only search for R1 and will not
show R11, R12, etc. If you simply type in R1 without quotes, then everything starting with R1 will be
displayed.
You can also turn on UltraSearch with CTRL-F and turn it off with SHIFT-CTRL-F.
The search engine looks through all fields and displays them. If you click:
in the BOM window,
then it will search through BOM and ERP simultaneously. See chapter 5 BC-IN/OUT, page 14 for a
concrete example.
12
Router Solutions
4.3
BOM Connector™
User Manual
The Action Menu
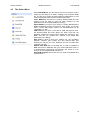
With Load BOM File you can read in any CSV or XLS file. This is
usually the first step for an EMS - reading in the customer BOM
file. The file must contain at least Reference Designators or Part
numbers (IPN) and have at least one description field.
Close BOM File removes the currently loaded BOM file from
memory, to let you read in a new one. Note: reading in a new
BOM will erase the existing BOM from memory.
Export BOM let you export your result (i.e. Golden Manufacturing
BOM into different formats, such as XLS, CSV, HTML, or, for SAP
users, a direct SAP project creator. The exported BOM can be
"cumulative" or "flat".
CAD-Link lets you open a .CCZ file for CAD viewing and crosslink between BOM and CAD. When you load a CCZ file, the
attributes contained in the file will be added into columns in your
BOM. This lets you compare the contents of the BOM with
information in the design.
Save Data is used to store your settings (i.e. the correlation
between customer part number and your internal ERP part
number) as well as your user attributes into the so-called CIS
(customer info set)
Update Parts Data will run the ERP link, in order to update the
BOM Connector™ database with your current ERP data. Note: in
a network-based client-server environment, this needs to occur
from the server-installed BOM Connector™
Run BOM Compare this function lets you read in two BOMs and
compare them.
13
Router Solutions
5
BOM Connector™
User Manual
BC-IN/OUT
Once you have started BOM Connector™, the first step is to read in your BOM.
The BOM Import feature is part of the BC-IN/OUT module and is standard part of every BOM
Connector™ configuration.
Click on LOAD BOM DATA in the action menu.
If you have been working with BOM Connector™ for some time you will see a list of the last 16
(depending on resolution) BOMs you read in.
To choose a new BOM select
half of the suggestion list.
or a directory in the second
Browse to the BOM file (CSV or XLS file) that you want to read in. A demo file is included with the
system. It is called MSS2.CSV Load this file.
You will now see a screen with a list of customers.
The list of customers is part of the BOM Connector™ concept of "Customer Info Set" (which we will
refer to as CIS throughout this manual). If your ERP system has “CIS” information built into it, and if
this information was properly brought in by the BC-LINK module, you will see a list of your customers.
This is done automatically through the BC-LINK “ETL” (see chapter 3.3 Configuring the ETL, page 9).
If the ERP does not include contain customer information, or if this was not implemented in the ETL,
you can use BOM Connector™ to administer customers. Simply choose ADD NEW CUSTOMER and
create as many as you wish.
The demo system includes a small CIS, which you see here. Choose your customer. For the demo
BOM, choose Cyberbrains. It is very important for the future that you choose the proper customer for
each BOM. Many steps that you perform, such as mapping the BOM fields, linking IPN to CPN, etc.
will be saved to the customer name.
Once the BOM is loaded, you can assign BOM fields to field types with BOM Connector™ will
understand.
14
Router Solutions
BOM Connector™
User Manual
Available field types are:
Customer Part Number (i.e. the customer's part number)
Internal Part Number (i.e. "your" part number)
Reference Designators (i.e. "U1", "R1", etc.)
Quantity* (see below)
Description - (at least one field needs to be assigned this)
PRICE - (only required for BOM which contain a price)
Currency (only required for pricing BOMs)
Position field
Assigning this means "import this column as is with the same name"
Assigning this means "do not import this field"
This is a special field type with notes that will be stored in the CIS
Manufacturer Part Number
Manufacturer Name
QUANTITY: this is the field claimed containing the quantity. BOM Connector™ will add a field "RC"
which is a "reference count" (i.e. a count of all the entities contained in REFDES for that particular
CPN). This allows you to perform a compare.
PRICE: price in the BOM
If the names in the BOM are similar, these will be assigned automatically. Otherwise, you will need to
use the drop down menu for this. When you click on a field in the list, that field will be displayed in the
preview area to the right.
Note: to use the preview area effectively, it might be necessary to expand its size. "Drag"
the window by clicking and holding the mouse on the lower-right corner
In addition, you can enter a name for the field directly into the box by clicking on it:
and then typing:
The mapping of BOM field names to BOM Connector™ field types, as well as these user-defined field
names will all be stored per-customer and available later.
With the ADD NEW BOM DATA COLUMN button you can create a new "composite" field. This will
combine several fields into one.
The FIRST ROW CONTAINS FIELD NAMES box should be checked if the field names are in the
proper row.
15
Router Solutions
BOM Connector™
User Manual
DELETE RECORDS WITHOUT CPN will eliminate "dummy" information (like text lines) so that these
do not get interpreted as parts.
When completed, hit OK and the BOM will be imported.
To quickly find parts, use UltraSearch, as described in Chapter 4.
For example, type in 470nf:
The two 470nf capacitors are displayed.
If we turn on the “Sync” button:
as well:
then the parts that match are displayed in the ERP window
(to clear the search, click on the „off filter“)
16
Router Solutions
5.1
BOM Connector™
User Manual
Key field
Your customer BOMs do not include the customer part number? No problem. In such cases, BOM
Connector™ creates a "virtual" part number based on a CRC32 encoding of the "Key Field". This is
normally the description information. This is then stored in the CIS along with the internal part number
you assigned to it, and can be re-used in subsequent BOMS. This Key Field consists of Description or
multiple other fields. To set the Key Field just click on the Box with the Key symbol. All fields
containing the "Key" symbol will be encoded together to create a "virtual" CRC32 part number.
It is very important that this be done carefully. Misassigning the key field(s) can cause problems the
next time you read in the BOM, as the encoding is done EXACTLY according to the data in the fields.
5.2
Exporting a BOM
Note: normally, you would not export a BOM until you have “prepared” it properly using the BC-PREP
and, perhaps BC-CAD and BC-QUOTE modules. However, we will now proceed first directly to the
export module. You can return here later once your BOM is “complete”.
To export a BOM, click on BOM EXPORT.
The first thing you will see is a list of “templates”. It is important to understand this concept fully.
5.2.1
What is a Template?
Users of BOM Connector™ normally need to create a multitude of different outputs. The output
required by the Quoting Dept, for example, is very different from that required by Production. Different
fields must be outputted, with different headers, different formats, etc. Outputs which are used
internally do not required additional graphics such as company logos and address, while outputs
designed to be viewed by others, particularly outside the company, definitely do.
For this reason, we have implemented a wide-reaching ability to create, store and administer different
templates. This document is designed to show you how to do this.
5.2.2
Template Description
When you click on EXPORT in BOM Connector™ you immediately see a list of templates (or none if
you have yet to create any)
17
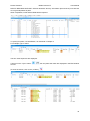
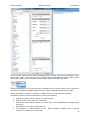
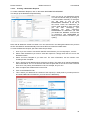
Router Solutions
5.2.3
BOM Connector™
User Manual
Template Interface
Click to edit
Template”
Click to delete
Template
Preview window
List of
Templates
Click to add
new Template
The first time you run this, your list of templates will be empty.
5.2.4
Creating a New Template
Let us create a new Template.
Click ADD NEW TEMPLATE.
18
Router Solutions
BOM Connector™
User Manual
As you can see, when you first create a template all fields are "off". First give your template a name.
We will call it "TEST". There are two types of export formats, simple CSV and EXCEL. (More on CSV
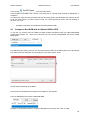
later.) Here we will create an Excel file. Choose EXCEL with the FORMAT drop-down:
Under Excel settings you can choose an Excel "template" to use. This may cause a bit of confusion so
let's look at the difference between BOM Connector™ Export Templates and Excel Templates.
What is the difference between a "template" in BOM Connector™ and the Excel Template?
The BOM Connector™ Export template lets you specify the following:
•
What type of file do I want to export? (i.e. CSV or Excel)
•
What do I want in the output? (i.e. what fields)
•
What should those fields be named? (i.e. same name as in the BOM/ERP or changed during
the output)
•
What sequence do I want the fields to be in?
•
The "relations" of certain elements (i.e. do I want my MPNs in different rows or different
columns, etc.) NOTE: more on this later
19
Router Solutions
BOM Connector™
User Manual
If the output is an Excel file, you probably want to pre-create an Excel worksheet with company logo
and other information. This is done via the Excel Template.
There is a DEFAULT Template. It is called XTDEFAULT.XLS. It is located in your BOM Connector™
local directory (C:\Users\MYNAME\AppData\Local\Router Solutions\BOM-Connector\
where: MYNAME is your user name in Windows).
XTDEFAULT is a simple Excel file which looks like this:
Feel free to modify this, adding your company logo, etc. You can also add different "placeholder"
fields. The placeholders you can add are:
1. Located at B4 is a placeholder for date. The contents are:
="Quote from" & " " & TEXT(TODAY();"TT.MM.JJJJ")
You can change the text (for example, to a local language) or the date and time format.
2. {BOM} This specifies where the data should start. In the sample it is at B12. If you want your
data lines to start further down and a bit more to the right, set this, for example, at C26
3. {CUSTOMER} This will insert the name of the customer here.
4. {PRICETOTAL} This will insert the “old” ERP-based pricing here. NOTE: older versions of
BOM Connector™ only
5. {PQLIST} This will insert the current, Price Group information (see chapter 7 BC-QUOTE,
page 35)
When you are finished, rename it as you wish and place it in the \XT\directory in the main BOM
Connector™ directory (usually located on the server).
Once you have done this, you will see when you hit the dropdown arrow next to EXCEL TEMPLATES:
Simply choose the Excel template you want to use by clicking on it.
So, now let us choose which fields we want to export.
As you can see, the fields you can add are grouped into types.
The types are:
BOM - these are fields from your BOM
MAT - these are fields from your ERP system.
20
Router Solutions
BOM Connector™
User Manual
MPN (INT) - These are the Manufacturer and MPN (manufacturer part number) fields from your ERP
system
MPN (BOM) - These are the Manufacturer and MPN (manufacturer part number) fields from your BOM
PRICING - These are all the different pricing-related fields from either ERP, or DCI (distributor catalog
interface) or OCTOPART™, or information manually entered in the SCALE PRICES menu.
REFDES - (Note: this must be scrolled down to see). These are the reference designators out of the
BOM (Note: under FIELD SETTINGS you can specify in what format your reference designators
should be exported).
To add a field into your output, simply "check" the box next to the name. You will see the contents of
the field appear in the preview window and the name of the field shows up in the EXPORT COLUMNS
box:
Important to note here is that if you check a field and then "uncheck" it, you will get a message
whether you want to remove it from the template as well. You might, for example, want it in the
template, but only want to remove it from the output for this session.
When the warning message comes:
Click YES to remove it permanently from the template, NO if you just want to remove it for this
session. This allows you to specify that a specific column should be in the export, but without any
data. Many customers want to export empty columns to be filled in later. In such a case you will see
"not assigned" displayed next to the field name, as in the example above.
If you also wish to remove the field from the list afterwards, simply select it in the list above, right-click
and choose DELETE COLUMN FROM TEMPLATE
So, now let us change the output names.
If you want a field exported to a different name, simply choose the field and right-click on it. Now
choose EDIF.
You will see the following window:
21
Router Solutions
BOM Connector™
User Manual
Type in the name of the field as you wish it to appear in the export (for example, above, type in MFG)
and click OK:
You will now see the field name as MFG. To the left, you will see the “old name” vs “new name”
Format Options in the Template (i.e. the “relations” of elements in the output)
As mentioned earlier, there are many Element Settings that you can configure.
Both ERP (INT) and BOM manufacturer/MPNs can be written out in multiple rows or multiple columns.
Similarly, pricing (for example, for multiple production quantities (PQ) can be configured this way.
In the case of multiple rows (which is the normal method for Manufacturer/MPN data, you can select
LEAVE OTHERS EMPTY. This will make the output easier to read.
The ideal setting for the Reference Designators is USE REFDES FORMAT.
When you select this you will have certain options:
22
Router Solutions
BOM Connector™
User Manual
Format: You can choose SHORT or LONG. Short will truncate them, while LONG will list all reference
designators.
If you choose SHORT (which is suggested), then there are some rules for the truncation. A separator
character and a from-to character must be given.
In the example above, reference designators will be expressed as:
R1,R4,R9-R12
If you do not check REPEAT PREFIX then it will be:
R1,R4,R9-12
LONG form would be:
R1,R4,R9,R10,R11,R12
Production Quantity:
If you are using the Scale Pricing feature of BOM Connector™, specify here which production
quantities (PQ) you want to export pricing for:
Simply select the PQ in question.
These will either be placed in columns or rows, depending on your settings on the page above.
Create position number: Many customers want a position number automatically inserted into the
output. Check here and specify the increment number to do this.
The second selection allows you to export only "unmatched" items from the BOM. These are CPNs
which you could not match to an IPN in your ERP. This is normally used to send information back to
component engineering.
OUTPUT SORTING
Here you can specify certain columns to be sorted.
23
Router Solutions
BOM Connector™
User Manual
Choose the column name which you want sorted by from the drop-down list.
5.2.5
Saving and Deleting a Template
To save your template, simply click on SAVE TEMPLATE
This will save it under the name displayed in the NAME box.
If you want to change the name before you save, simply type in the name above.
To delete a template, simply click on DELETE:
Alternatively, you can simply choose a template name from the original template list, and click on the
trashcan icon:
5.2.6
Editing a Template
To edit an existing template go back to the template list and click on the edit icon:
Follow the instructions above, as editing a template works the same way as creating a new template.
5.3
5.3.1
Using the Export Function
Exporting With Template
To export with a template, simply click on EXPORT BOM from the main BOM Connector™ screen:
You will now see a list of templates. Choose the template you want to use and click EXPORT at the
lower-right corner.
If your export type is EXCEL this will open an instance of Excel and show your exported BOM. You will
remain in the same screen in BOM Connector™
If you click on OK it will export the BOM and return to the main BOM Connector™ screen.
Click CANCEL to return to the main BOM Connector™ screen without exporting.
5.4
Viewing the Results
The results can be viewed immediately with Excel or, in the case of CSV files, with any standard text
editor.
24
Router Solutions
6
BOM Connector™
User Manual
BC-PREP
Preparing Customer BOMs and Production Planning
This module is at the heart of BOM Connector™ from EMS companies.
After you have read in the BOM, you will note that the search icon at the top of the screen becomes
active:
These search features form the basis of the BC-PREP module. They allow you to quickly find the best
part in your ERP system to match the part in the BOM (i.e. the "customer" part). This section will look
at the different searches in detail.
6.1
CIS Search
Re-usability is a key concept in BOM Connector™. What you do today you should not have to do
tomorrow. This is the idea behind the CIS Search. As mentioned earlier, "CIS" is short for Customer
Info Set. This is where you will store your "customer PN = internal PN" settings. Also, if you already
have some of these stored in your ERP system, it will be imported into BOM Connector™ through the
BC-LINK ETL (see chapter 3 BC-Link, page 9).
Before we run the CIS Search, let’s take a closer look at the Customer Info Set (CIS).
CIS information consists of:
CustomerName
This is the name of your customer
CustomerNumber
This is the ID number of your customer (often used in the ERP system for
billing, etc.)
CPN(s)
These are customer-specific part numbers
IPN(s)
These are the related internal part numbers (IPNs) for specific CPNs
Description
The Description field for a CPN.
CPN Memo
Information added manually in BOM Connector™ for a specific CPN
All the above data can come either directly from the ERP system as part of the BC-LINK process or as
a result of working with BOM Connector™, with the exception of the last two fields (description and
CPN memo). This information can only come from working with BOM Connector™.
You can view all CIS information via the CIS Tab:
In the example above there are several entries for your customer CYBERBRAINS, which has the ID
number 4004.
25
Router Solutions
BOM Connector™
User Manual
Here is a description of the fields:
CustomerID
This is the customer number as described above
CustomerName
This is the customer name as described above
Pref.
If there are multiple IPNs assigned to a given CPN then you can specify here
which one is “preferred (for example 20-520-1006 has three IPNs assigned
(01095, 02741 and 11792), but 11792 is set to preferred. So it will be
automatically assigned when you use Auto-Link.
CPNSource
This specifies where the CPN came from (i.e. how did it enter the CIS). This
will either be “ERP/INTERN” if it was imported via BC-LINK, or “BOMConnector” if it was part of a BOM that was imported.
LinkSource
This specifies where the link to your IPN came from. This will either be
“ERP/INTERN” if it was imported via BC-LINK, or “BOM-Connector” if it was
assigned by you while working with BOM Connector™, or “INTERNAL” if it
was created by you using the CREATE MATERIAL feature in BOM
Connector™ (more on this later).
BA
These are User Attributes (BOM Attribute) that you assigned while working
with BOM Connector™ (see below)
CPN
This is the customer part number as described above
IPN
This is your internal part number linked to the CPN, as described above
Description
This is the description field which was in the BOM you imported at the time
you saved the data to the CIS
Memo
You can manually add comments (i.e. Memo) to a CPN in the BOM Window
while working with BOM Connector™. These are saved to the CIS if you
check the SAVE USER NOTES box when you save.
In the example above, 20-520-1006 has three IPN assignments. The first came through from the ERP
system via BC-LINK. Here is, was defined that “when Cyberbrains uses CPN 20-520-1006, then IPN
11792 should be used”. Thus the source of the CPN AND the IPN are “ERP” and they are in green.
The other two assignments were made while working with BOM Connector™. Thus the source of the
IPN “Link” is BOM Connector™. Since the CPN originally came from the ERP system, the source CPN
Source remains set to “ERP”
To Delete a CIS entry, simply select it, do a right-click and choose DELETE CUSTOMER MATERIAL:
Note: you can only delete entries which have been created with BOM Connector™. ERP entries are
deleted or added via the BC-LINK ETL process, depending on the information in the ERP system.
This is done to preserve the integrity or the ERP data and its status as “master”.
Now back to our exercise
26
Router Solutions
6.1.1
BOM Connector™
User Manual
Running the CIS Search
The CIS Search runs automatically when you load a BOM if you have the following under SETTINGS
(in the Action Menu):
When you hit the CIS Search button, BOM Connector™ scans through the currently assigned parts
and shows them in the lower window. This may be one, or may be many. By double-clicking on the
internal part number in the lower window, you are applying it to the current BOM. The assigned part
number will be displayed green in the BOM window. Price and quantity will be calculated
automatically, if this information exists.
Note: If you use AUTOLINK, this will happen automatically for all parts which are in the CIS. If more
than one exists, the one with the "PREFERRED" flag will be taken.
When linking, you will see different icons. Here are the mappings:
"Blue Link" means : This material has been linked and stored in the CIS.
"Green Link" means - This material has been linked, but not yet stored in the CIS.
"Red Link" means - This material has been created by the BOM Connector™ user via the
"Manual Material Link" feature using the "Persistent CIS" Option and will be saved in CIS.
"Grey Link" means - This material has been created by the BOM Connector™ user via the
"Manual Material Link" using the "Temporary Material ID" Option and will not be saved in
CIS.
6.2
MPN Search
The concept of Manufacturer Part Number (which we will call “MPN” from here on in) is important to
understand.
An MPN is the number which is used by the manufacturer of the part itself, for example, let us take a
simple 100K resistor:
Within my company, the part number (IPN) for this part is for example “123-456”. But in my “approved
manufacturer list” my company has determined that this part can be purchased from 3 sources. The
name and number for each of them is the manufacturer and MPN. For example:
Manufacturer
MPN
Panasonic
ERJ3EKF5113V
Yageo
RC0603FR-071K78
The relation between IPN and MPN is 1:n. For one IPN there can be “n” (i.e. “1” or more) MPNs
associated with it. If you look at your ERP window, this is displayed as such:
27
Router Solutions
BOM Connector™
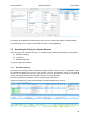
User Manual
The MPN (Manufacturer Part Number) search can only be used if the BOM provided by your customer
contains MPN information or if the customer has provided an AML (approved manufacturer list) file
and you have read this into BOM Connector™ (see Chapter 5 BC-IN/OUT, page ).
Therefore, if you receive a BOM from a customer and you need to find the IPN which most closely
matches a CPN, a logical place to start would be to search for which IPNs use the same MPN as the
part in question. Naturally this requires the customer to provide this information. This information is
either provided in the BOM itself, or through a separate “AML” List (see Chapter 5 BC-IN/OUT, page ).
If this information is not available, or is not reliable, or if you do not have MPNs in your ERP system, or
if BC-LINK has not interpreted them properly, then you must proceed to the next search, which we call
“SmartSearch”.
If, however, you have this information, then the MPN-Search is a great way to identify the best
available part in the ERP system. To run MPN-Search, simply choose it from the search list. You will
see this dialog:
You can either choose the MPN_1 field, which is the standard MPN field, or choose a different field in
the BOM.
The fault-tolerant search will give a wider search, for example, it will include MPNs that “almost”
match, or ones that have additional information attached to them, such as package type.
When we run the MPN Search on the sample BOM we get, for example, a match for CPN 20-5201074 with IPN 12299. This is because both reference the same MPN from Murata:
Double-clicking on that IPN (or by using auto-assign) creates the “link” between the IPN and the CPN.
When you click back on the line in the BOM, you will note that the MPN information from the ERP
system has been entered in the “MPN” tab of the BOM Details window and a green check placed next
to the matching part. This lets you very easily perform “AML” control.
28
Router Solutions
BOM Connector™
User Manual
Note: For this to happen, you must make sure the following is set under SETTINGS:
6.3
SmartSearch
The SmartSeach is probably the search most often used by EMS companies and is thus a key
function of BOM Connector™.. With this function you can search your ERP system for the part
number which best matches a given customer part. The search is based on an analysis of the part's
description (which, in turn, can be a single field or multiple fields). SmartSearch is far more than a
combination of SQL statements like "contains" "starts with", etc. (these are done in "Operator
Search"). SmartSearch can find similarities in expressions such as "10K" and "10.000 Ohm" or
language differences such as "CAP" and "KON". SmartSearch breaks down the entire description field
into small parts called "tri-grams" and compares these with each other utilizing its built-in "smarts".
Since the tri-gram rules are programmable and expandable, BOM Connector™ will get more intelligent
with each use. Naturally, the better the data in the BOM, the better the search will go.
SmartSearch works based on the declared description field (or composite field) in the BOM and the
description field (or fields) in ERP, which have been declared in the ETL. These are marked with a red
"S" in BOM:
and ERP:
By splitting into individual "tri grams" a field "100k 0603 1,0%" will receive a high match to an ERP part
with "R0603 1.0v.H. 100kO" description.
The parts with the highest "hit rate" are displayed first, with a "hit rate factor". You can sort your BOM
based on the hit rate factor to see which parts matched up best.
Hit rate factor
29
Router Solutions
BOM Connector™
User Manual
Click on the part in the BOM Window, the ERP window below will show all parts from "best" to "worst".
Your best match should be found in the first 10 entries.
In this example, you may want to best use the third entry - the Optocoupler "NT". Simply double-click
and the ERP part number for this selection will be added to the BOM.
In some cases you may get so many suggestions that it is hard to sort through them all. In this case,
simply use the "Filter".
Here we have added the filter "*SO4" in order to shorten our list to only show parts from the ERP
system which contain the "SO4". As you can see, you list has been considerably shortened.
30
Router Solutions
BOM Connector™
User Manual
Choosing an IPN Automatically Adds all Associated MPNs into the BOM
Note: for this to work, your ERP link ("ETL") needs to have been written to properly handle MPNs. If
this is not the case, contact Router Solutions.
6.4
Operator Search
Even the smartest of searches will not cover all the myriad parts on the market. . This is why we have
built a very powerful "Operator search" into BOM Connector™. . We call it Operator search" because
statements like "equal" "not equal" "contains" etc.. are known as "operators" in database language.
There are several instances where the operator search will produce the best results.
A good example is when the customer has put manufacturer info (like MPN) into the BOM data and
this data is embedded into fields in the ERP which are not specifically MPN fields.
Run OPERATOR SEARCH. The Conditions Window will appear:
For example, in our case we have an ERP field called DESC2, which contains vendor information. In
the BOM there is a PREF MAN field. So we will create a condition which says "show all parts where
DESC2 in ERP is equal to PREF MAN in the BOM".
In the drop down "material field" choose DESC2 from the list. The operator is "equal". Now hit the
FIELD button and choose the "Preferred Manuf" from the list of BOM fields. You can test the
expression with the "test expression" button. When finished click OK.
Once created, you can run this and any other "checked" condition by clicking on the OPERATOR
SEARCH button in the BOM tab.
31
Router Solutions
BOM Connector™
User Manual
Filter lets you easily narrow the resulting list, which depending on your criteria can be very long (think
of "contains 10uF". This can result in hundreds of parts listed. Using the filter and reduce this
substantially.
With the Compact button you can switch the displayed BOM into "non-flattened" mode, which means
that each part number will be listed individually, followed by a single line containing all the reference
designators.
Note: the automatic price and quantity calculation only works in compact mode.
6.5
Recap the Search Methods
To recap, in order to most efficiently search for matches, you should use the following sequence:
1. CIS Search If you already matched customer part numbers, and want to use these, hit
the CIS search button (or Autolink). This is the "re-usability" feature described earlier.
2. MPN Search Normally, the safest way to match is when a customer has given MPNs in
the BOM, or provided you with an AML list (approved manufacturer list- often known as
AVL).
3. SmartSearch If nothing has been stored in the CIS for a given customer part number, the
interesting work begins. Use the SmartSearch to find which ERP part best matches the
customer part.
4. Operator Search Here you can use other fields in the BOM and ERP system to
interactively perform standard SQL-type queries.
6.6
User Attributes
User Attributes let you add information to a given customer part number. The idea behind this is that
you can use your experience to tell BOM Connector™ for the future that, for example, certain parts
are problematic and should not be used.
The user attributes and their colors are defined by you under SETTINGS. They are then stored in the
CIS.
6.6.1
Creating User Attributes
Hit SETTINGS in the action menu.
The settings you make will be stored in the CIS and will be available in future whenever you do a CIS
Search of use Autolink.
The colors also appear in the Excel file when exported.
32
Router Solutions
6.6.2
BOM Connector™
User Manual
Assigning User Attributes
Click on a part number in the BOM window. Right-click and choose User Attributes, then select the
one you wish to assign.
Adding User-Savable Notes Entries
How to Use?
This works just like the price information. When you read a BOM into BOM Connector™, you will see
a new field automatically added
. This can either be entered in by hand, or you can choose
a field to be the NOTE field when you read in a BOM. When you do a CIS save, simply check the box
"Save User Notes" and this information will be added to the CIS.
To use these later, simply load a new BOM, perform the CIS Search as you normally do, and go to the
CIS tab. From here, you can either load a price for a single CPN into the BOM, or load all.
To load the note for a single CPN, choose it in the list, then right-click and select "Copy Note to BOM":
To copy all notes to the BOM, simply select "Copy all Notes to BOM".
6.6.3
Saving Assignments and User Attributes
In order to save when you have assigned - internal part numbers = customer part numbers, as well as
any user attributes, hit SAVE from the actions menu.
33
Router Solutions
BOM Connector™
User Manual
You can now choose whether you want to save only the part number correlations you have made, or
additionally, wish to save all user attributes, with or without part number correlation.
34
Router Solutions
7
BOM Connector™
User Manual
BC-QUOTE
The BC Quote is a great tool for making quotes.
To understand the BC-QUOTE module it is important to understand the BC concept of pricing. The
first and most basic source of pricing is your ERP system. If that price is accurate enough for quoting,
then the BC-LINK module will import these prices as part of the ETL process and all is fine. You can
use them without further effort. However, finding the right price for quotation and part sourcing is
normally far more complicated. The ERP price is usually just a guideline price. Proper pricing is based
on many different factors, such as
1. Quantity which will be ordered. Here the rule, as always, the more you buy the better the price
2. Distributor stock
3. Currency exchange rate
4. Delivery times
5. Ability to pre-arrange better pricing
6. Etc.
In short, getting the best price normally means “tapping in” to several sources. This blends in perfectly
with BOM Connector™’s overall philosophy of taking information from diverse sources and presenting
it in a clear, easy-to-use way, saving you the time consuming search efforts.
7.1
Taking from ERP System
As part of the ETL configuration process, it was determined where pricing is to be found in your ERP
system. You can easily see if this worked by looking in to the ERP window for a PRICE field (Note:
You might have to configure BC once to take this). Under SETTINGS – CIOMMON SETTINGS you
should see this setting:
Normally, pricing is a straight 1:1 from ERP. Sometimes, ERP pricing is very detailed and includes
“scale prices”. For this see the section 7.3 What are Scale Prices?.
To use the ERP price in your quotes, simply “activate” the ERP1 Price Group (more on Price Groups
in a moment). To do this, click the box next to ERP1 at the lower-left of the screen:
7.2
What are Price Groups?
Simply put, Price Groups are the prices calculated from various sources for a given Production
Quantity.
The Price Group ERP1 is the only one visible the first time you install BOM Connector™. This is
Source= ERP and Quantity=1 and thus, the most basic type of pricing available.
You can add, delete and change the display of price groups via these icons:
35
Router Solutions
BOM Connector™
User Manual
Select Currency: This lets you select the currency you want your Price Group to be
displayed in. BOM Connector™ already downloaded the currency cross-rates from the European
Central bank, so all you need to do is click here and choose the currency:
Change sum/total: Click here to change between displaying only the “per board” price and
the total price, which is calculated by multiplying the per-board price by the Production Quantity (PQ)
Delete a quantity: Once you have added Production Quantities, you can delete them here
Add a quantity: This is where you add your Production Quantities. These are used to calculate
the Scale Prices from the various sources. Simply click here and you will see this dialog:
Enter the amount of boards you will produce and click OK.
Once you have entered a few Production Quantities (i.e. 1, 50, 250,500) your screen should look as
follows:
We added a Price Group of “1” because it allows us to make inquiries of pricing from sources in
addition to the ERP system for a minimum order of “1”. Remember, ERP1 is ONLY from the ERP
system as source.
36
Router Solutions
BOM Connector™
User Manual
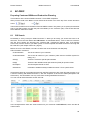
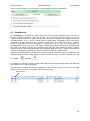
Let’s start with the simple example of using prices from ERP 1:1. In the exercises during the BC-PREP
section we used the various search routines to find and assign parts from the ERP systems (IPNs) to
the customer parts in the BOM (CPNs). Some of these parts had prices in the ERP system. When you
turn “one” ERP1, as above, you will notice that two new columns have appeared and some prices:
E=1 refers to the Price Group of ERP1. S=1 is the Sum, which for this particular Price Group is equal
to the REFCOUNT. The Price Group itself now displays the total:
Now lets move on to the “Scale Prices”.
7.3
What are Scale Prices?
Scale prices are simply pricing based on quantities. When you select a Price Group, for example “50”,
BOM Connector™ will multiply the REFCOUNT by the Production Quantity (in this case “50”) to
achieve the total number of components which need to be purchased. In the sample BOM, for
example, the part 20-520-1066 has a REFCOUNT of 44, which means the system will look for a Scale
Price for 2200 pieces. So, for example, if a distributor is offering three prices for a) QTY 1-1000 b)
QTY 1001-2000 and c) QTY 2001 and over, then BOM Connector™ will take price c) for this particular
part.
The Scale Prices for each part are visible in the BOM window under the BOM Details slider. If you
click on one of the parts with an ERP price visible, you will see that one Scale Price has been added.
If you click on “Scale Prices” in the right-hand window, you will see:
You can even edit this information right here by choosing the Scale Price in the right hand window,
right-clicking on it and choosing EDIT:
37
Router Solutions
BOM Connector™
User Manual
This brings up the Manual Price Edit Dialog, where you can change, edit, delete or add information.
This information is then saved into the BOM Connector™ Pricing Database.
7.4
Searching for Pricing for Various Sources
There are three main “external” sources (i.e. outside the ERP system) for obtaining price information:
a) Distributor Catalog
b)
Octopart™
c) Distributor Request
Let’s go through each of these:
7.4.1
Distributor Catalog
BC-Quote has something called a “Distributor Catalog Interface” (DCI). This is a configurable reader
for distributor-supplied price lists (in Excel format). The DCI automatically checks a user-defined
directory for the latest price lists and, if the date is newer than the last time it checked, it imports all
pricing and scale information into the BOM Connector™ Pricing Database.
Once this information is available, it can be checked via the DCI-Search.
Taking the example we used in the MPN search in the BC-PREP section, we see:
38
Router Solutions
BOM Connector™
User Manual
Here a price list provided by ACE has been imported via the DCI and the DCI-Search found a match
for the Murata part. The price information is displayed. However, no Scale Price has been highlighted
because no Price Group has been selected. Now, if we select, for example, Price Group “50”:
Then suddenly we see QTY 1 highlighted:
This tells us that the PRICE1 is the Scale Price that matches for this Production Quantity.
To select the price, simply right-click and choose ADD SCALE PRICE. The price is added to the
SCALE PRICE tab in the BOM Details Window
If the price doesn’t appear in the BOM, it is because there is a better price and BC-QUOTE’s “best
price” function has taken it. To de-activate the other prices, simply uncheck them
7.4.2
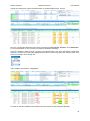
Octopart™
Octopart™ is a web-based portal where many distributors post up-to-the-minute pricing. The
Octopart™ interface is developed using the Octopart™ API toolkit. To search for prices on Octopart™,
you can choose:
This brings up the following dialog:
This is almost identical to the dialog in the MPN search described in the BC-PREP section, except that
there is no “fault-tolerant” search. MPN information must match exactly.
The Octopart™ Search searches through all MPNs in the BOM, including those which belong to the
linked IPNs.
39
Router Solutions
BOM Connector™
User Manual
Taking the example we used in the MPN search in the BC-PREP section, we see:
First off, note that the distributors have been grouped into PREFERRED, NORMAL and UNDESIRED.
For more information on this, see the next section “Distributor Handling”.
Here the Octopart™-Search found a match for the Murata parts. The price information is displayed.
However, no Scale Price has been highlighted because no Price Group has been selected. Now, if we
select, for example, Price Group “50”:
Then suddenly we see QTY 2 highlighted:
This tells us that the PRICE2 is the Scale Price that matches for this Production Quantity.
40
Router Solutions
BOM Connector™
User Manual
You will also notice that several entries are displayed in red. This indicates that either:
-
There is insufficient stock
-
The distributor in question requires a minimum order in excess of the Production Quantity.
The best price is displayed in dark green, with next-best prices in a scale of green-to-yellow.
To select a price, for example, the price from Digi-Key, simply right-click and choose ADD SCALE
PRICE. The price is added to the SCALE PRICE tab in the BOM Details Window
If the price doesn’t appear in the BOM, it is because there is a better price and BC-QUOTE’s “best
price” function has taken it. To de-activate the other prices, simply uncheck them
In this case, the Octopart™ price is the best one for 1 – 50 – 250 and 500. So you shouldn’t have to
uncheck anything. Notice that BC-QUOTE’s currency calculator has automatically calculated the Euro
price for all US Dollar prices.
Using the Octopart™ Interface for Individual MPNs
It is often easier to search for prices using the Octopart™ interface for specific MPNs.
To do this, right-click on the MPN in the BOM-Details Window:
This will run the Octopart™ search for that specific MPN.
You can also run the Octopart™ search for specific MPNs in your ERP system. To do so, right-click on
the MPN in the ERP MPN (INT) Window.
As you can see, you can either run the search for the chosen MPN or for all the MPNs which are
linked to the IPN, by choosing the middle option (Octopart™ Search (all MPNs).
41
Router Solutions
BOM Connector™
User Manual
If you click into the Octopart™ Window area and right-click you can Open the Octopart™ Website
and access information available there, such as the data sheet for that part.
7.4.3
Distributor Request
For parts that you can’t get a price for using the ERP price, the DCI search or Octopart™, BC-QUOTE
has a “Distributor Request” feature. This lets you send out an RFQ (request-for-quotation) to a list of
distributors.
This is a very useful feature in the BC-QUOTE module, as it simplifies the part sourcing process.
To better understand this feature, let’s do a brief introduction to BOM Connector™’s distributor
management.
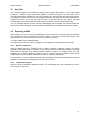
7.4.3.1
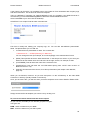
Distributor Handling
The BOM Connector™ database includes a list of distributors, which you build up. The Distributor List
is available when you click on the tab called
42
Router Solutions
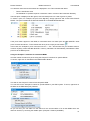
7.4.3.2
BOM Connector™
User Manual
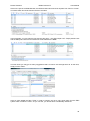
The Distributor Tab
Distributor “Alias”es
Distributor email
“Customer Overrides” for
distributors
List of
Distributors
Set Distributor Priority
“Preferred”, “Normal” or
“Undesired”
Click to add
new Distributor
The first time you run this, your list of distributors will, of course, be empty. When you run the
Octopart™ Search once, this list will be filled.
You can add distributors using the “ADD DCODE” button.
In order to maintain database integrity with past price quotations, it is currently not possible to delete
Distributors, so take caution when adding them.
Once it is filled, you can start “classifying” your distributors into three categories: PREFERRED for
distributors you wish you handle first, NORMAL for those with no preference, and UNDESIRED, for
the ones you want to keep our of any best-price calculations. (Note: to “delete” a distributor simply set
it to “UNDESIRED”.)
The ALIAS function is designed used to handle different ways of writing a distributor name. For
example, 4Star Electronics could be written as “4Star” or “4SE”, etc. Adding each of these would
needlessly fill the list and run the risk that quotes written in the different formats won’t all be
considered as coming from the same company. To enter an alias, simply click on the distributor name
and enter the various alias forms:
43
Router Solutions
BOM Connector™
User Manual
If for example, “FourStarElectronics” was already in the list as a distributor, though it is only an alias,
you can select it, then right-click and select “IS AN ALIAS FROM ANOTHER DCODE”, then choose
4Star and hit OK:
“FourStarElectronics” will now be displayed as an Alias of “4 Star Electronics”.
In the right-hand side of the screen you see a
section titled:
This lets you define customer-specific priority “overrides”. An “override” is simply a case where the
priority for a specific customer is different from your priority. ABC Components might be one of your
preferred suppliers. However, CustomerA (let us say “Cyberbrains”) has had bad experiences with
them so they have specifically prohibited them. So we will define a customer override for this
distributor by selecting “ABC Components”, then selecting “Cyberbrains” from the customer list and
changing the setting to UNDESIRED.
The option:
set the override per customer.
is simply the other way around. You choose the distributor and can
When you have finished making changes, be sure to save the
information to the BOM Connector™ database with :
44
Router Solutions
7.4.3.3
BOM Connector™
User Manual
Creating a Distributor Request
To create a Distributor Request, click on the button DISTRIBUTOR REQUEST.
This brings up the Distributor Request Dialog:
Here you see all your distributors listed.
You can sort this list easily by clicking on
a column header. Normally, for example,
you will want to see all your
PREFERRED distributors at the top of
the screen. Check the distributors you
want to send an RFW to. Once it is filled,
you can start “classifying” your
distributors
into
three
categories:
PREFERRED for distributors you wish
you handle first, NORMAL for those with
no preference, and UNDESIRED for
those you don’t want to consider in your
quoting.
Note, that all distributor emails are visible. You can enter these in the dialog described in the previous
section. BC-QUOTE will automatically send out the RFQ via email if this data exists.
To make a Distributor Request, just follow these simple steps:
1. Note: if you don’t wish to use the BC-QUOTE email function you can skip steps 2, 4 and 5.
2. Select which distributors you wish to email the request to. Simply check the box next to the
Distributor Name.
3. Select an Excel Template if you have one. For more information, see the section 5.2.4
Creating a New Template.
4. Give a primary email address which will be the recipient. The entire list of selected distributors
will be inserted as “bcc” on the email so that each recipient will not see to whom the email has
been sent. The primary email address could, for example, be your own.
5. Enter a subject and standard text for the email.
6. Click on the REQUEST Tab
7. This is where you determine the contents of the request (i.e. what parts to you want prices for
and what additional information do you want from the distributor):
45
Router Solutions
BOM Connector™
User Manual
8. Select an MPN source – this can be either BOM, ERP or BOTH. Keep in mind that if you
haven’t assigned IPNs for all CPNs yet, then you will only have MPN information from the
BOM.
9. Now choose the parts from the list that you want in the RFQ. You can choose these manually
by selecting MANUAL and choosing the parts. You can also simply specify WITHOUT
PRICES and all parts that have no pricing information will be inserted into the Distributor
Request. If you check “Only with MPN”, then only parts that have an MPN (in the BOM or ERP
or both, depending on your settings in step 8), will be listed in the Distributor Request.
10. You can select which information (in addition to Description and MPN information will be
added to the RFQ by selecting “Additional Columns”
11. You can select what information you want your distributors to fill out by checking the boxes in
“Request Columns for Distributors”. At the very least you should check “Price”, “Minimum
Quantity” (in order to establish scale pricing), “Lead Time” and “Valid Through”.
12. Specify what your Production Quantity is for the quote. These are the ones you defined
previously.
13. Now click EXCEL PREVIEW to see what you are about to generate:
14. If you are going to handle the emailing on your own, simply SAVE the Excel file and email it.
15. If you are going to use BC-QUOTE’s email feature, close the file and select SEND E-MAIL.
(Note: do not just hit OK. This registers your settings and closes the window, but does NOT
create a Distributor Request.)
16. You will see an email created with text and subject as you entered earlier. Click SEND
17. Congratulations! You’ve just created and emailed an RFQ using BC-QUOTE.
Note, that all distributor emails are visible. You can enter these in the dialog described in the previous
section. BC-QUOTE will automatically send out the RFQ via email if this data exists.
7.4.3.4
Reading in a Completed a Distributor Request
When distributors fill out the Distributor Request and return them, you’ll probably need to get this
information back into BOM Connector™.
1. From the DISTRIBUTOR Tab, select LOAD DISTRIBUTOR REQUEST
2. Browse to the file you want to read in
3. Select the name of the distributor from where it came
4. Repeat for each returned request
5. That’s it!
6. Now check your BOM and you will see the Scale Prices for the parts updated where
appropriate:
46
Router Solutions
BOM Connector™
User Manual
If you EDIT the Scale Price you will see the source is set to “Distributor Request”
7.5
"QuickPrice"
Last but not least, the newest quoting assistant in BOM Connector™ is called "Quick Price". This
allows users to get a fast overview of what vendors are currently offering what prices.
Quick Price is a great way to get the latest pricing on any part. The routine looks through all pricing
sources - ERP system, Distributor Catalog (via the DCI - Distributor Catalog Interface) and the online
portal Octopart™.
How to Use?
To use this feature, you must have MPNs (manufacturer part numbers) in your BOM. To launch Quick
Price just choose it from the search drop-down list and click START (Note: if it is the first time you are
launching it, you won't need to click "START", it will launch automatically.)
The first dialog asks to identify the MPN field in the BOM:
Choose the MPN field in the BOM and click OK.
If you sort the BOM by "Number of results" you will see what part numbers in the BOM have the most
matches in the QuickPrice window:
Click on a part in the BOM and you will see the results for that part in the QuickPrice window.
47
Router Solutions
BOM Connector™
User Manual
For example, if we choose the result with "6", we can see the following:
Where:
MPN / exact search is the result of the MPN found 1:1 in the ERP system
MPN / tolerant search is the result of the MPN found using a method that removes spaces, hyphens
and other characters that often are found in an MPN. The new "clean" MPN is then compared with the
ERP system (in this case the "/NOP8" has been considered.
MPN / alternates shows other IPNs in the ERP system where this MPN is also used.
AVL / tolerant search shows the pricing from the Distributor Catalog
Octopart™ Search (not shown here) is the result of a search in the online portal Octopart™
48
Router Solutions
8
BOM Connector™
User Manual
BC-CHECK
BC-CHECK is used for the following tasks:
8.1
-
Check the BOM for inconsistencies, such as quantity field which doesn’t match the number of
reference designators, or BOM parts missing in the CAD file
-
Compare two versions of a BOM
-
Compare a new BOM with the master BOM in ERP
-
Compare a new BOM with the master BOM in MSS
Checking the BOM for inconsistencies
This is done via the “Check” Icon:
When you hit this, you will see a number of options:
Select the options you wish to check and hit OK:
“Duplicate RefDes Items” will report instances where the same RefDes (i.e. R10) is used more than
once in the BOM.
“Quantity/RefCount difference” will compare the Quantity field in the BOM (provided you mapped
correctly during the BC-IN process) with the calculated number of reference designator (the RC field).
“RefDes missing from PCB data” will list all components in the BOM that are not in the CAD data.
(see Chapter 9 BC-CAD, page 52).
For example, with the MSS.CSV file loaded, select the second option “Quantity/RefCount difference”
and hit OK.
You will see a new column inserted into the BOM:
Check CPN 20-520-1007. BC-CHECK has reported that although the Qty field in the BOM specifies
“4”, there are only three reference designators (R268, R269, R271). So there is a mistake in the BOM.
8.2
Compare two versions of a BOM
To compare two BOMs you must first save them in CSV format.
49
Router Solutions
Then choose
BOM Connector™
User Manual
from the Action Menu.
Choose BOM1 and BOM2, then choose a key field (this is normally either Reference Designator or
CPN/IPN).
You will see a report showing all entries that are the same (green) and all differences (yellow) as well
as all new parts (white). To make it easier to read, turn of the parts which are the same by clicking on
the “turn off =” box.
-
8.3
Compare Compare a new BOM with the master BOM in ERP
Compare a New BOM with the Master BOM in ERP
To run this, you need to have the “BOM from ERP” feature activated as part of the BC-EXCHANGE
module (See Chapter 10). If this is the case then you can choose the ERP/MSS Tab and hit LOAD
BOM option:
This will bring up a dialog. Here you can enter the project number in the ERP system as in this sample
from SAP (note: this dialog will vary depending on your ERP system used):
Hit OK and this will bring up the BOM.
Now import the new BOM as described in the Chapter 5 : BC-IN/OUT.
From the ERP/MSS Tab choose COMPARE BOM
Changes to partnumbers (IPNs) or reference designators are shown with a red “X” mark:
50
Router Solutions
8.4
BOM Connector™
User Manual
Compare a New BOM with the Master BOM in MSS
This is very similar to the step described above, except that it does not require the BC-EXCHANGE
module. It does, however, require you to install the MSS Process Preparation (vPlan) plugin delivered
with the BOM Connector.
If this has been successfully installed into your ADD-IN repository, you can choose MSS IMPORT
from the ERP/MSS Tab:
Clicking on this will bring up the MSS Dialog:
Here you see a list of all your
ASSEMBLIES.
Simply
choose the one you want to
import. If you click on LOAD
CAD at the lower-left, you will
also import the CAD file (see
Chapter 9: BC-CAD).
Once the BOM is loaded, you
can compare it with the BOM
loaded in the BOM Tab by
choosing COMARE BOM.
The result is shown the same
as described in 8.3, above.
51
Router Solutions
9
BOM Connector™
User Manual
BC-CAD
Use BC-CAD to directly load CAD Data and insert the information into your BOM.
CAD data must be either in a .CCZ Format, or, for users of MSS Process Preparation (vPlan) you can
extract the data directly from the database.
There is a sample .CCZ file available called VPLANASSEMBLY.CCZ. It is located in TESTFILES. You
can load it either via the PCB tab – “Load File” or via the icon:
If you use the CAD-Link icon you will get a list of attributes:
This lets you select various attributes to insert into the BOM. If you do not wish to insert the attributes
into the BOM simply leave all unchecked and hit OK.
The PCB is now visible in the PCB Tab.
Under CAD Items you can select Components, Nets or Test points. You will see a list of all items.
Simply double-click to zoom into it.
Zoom 1:1: This will show the entire board.
Flip: This lets you switch between TOP and BOTTOM views.
SMD Displays all SMD parts in yellow
THT Shows all THT parts in grey.
Note: If you right-click on a part in the PCB view and shows „SHOW IN BOM“ you will jump to the
BOM view and that part will be displayed. Alternatively, from the BOM Window you can select a part,
right-click and hit SHOW IN LAYOUT. The view will switch to PCB and the component will be shown.
52
Router Solutions
BOM Connector™
User Manual
10 BC-EXCHANGE
Use BOM/ERP to directly load BOMS from your ERP system into CAMCAD or vPlan. For this to work,
Router Solutions must configure a so-called “EBX” module. Once configured, you can read BOMs
directly from your ERP system into either the BOM window, or especially into the ERP/MSS window,
depending on which one you have activated before running it.
53
Router Solutions
BOM Connector™
User Manual
For questions, please do not hesitate to contact Router Solutions technical support.
CONTACT ADDRESS:
Router Solutions GmbH; Rheinstrasse 40-42; 64283 Darmstadt
Tel.: 06151 59907-0 - Fax: 06151 59907-15
Email: [email protected]
54