1
This section provides step by step instructions for selecting
a location and preparing the site to install the fireplace into
the following:
To go to the previous settings press the O button.
Existing Fireplace
To increase or decrease the brightness of the flames, use
the dimmer button or the button on the Remote Control.
1. Make sure that the fire is located on a flat surface.
Pressing the O button on the remote turns off the appliance.
To turn the appliance back On press the I button - see Fig. 8.
2. Seal all draughts and vents to prevent chimney debris
from falling onto the Fireplace Insert. Do not install into
an existing fireplace that is prone to dampness.
To turn off the power the Standby Switch must be turned ‘OFF’.
3. Remove the fire front panel by following the steps as
outlined in ‘Lamp Replacement’ sections.
WARNING – ALWAYS DISCONNECT FROM THE POWER
SUPPLY BEFORE REMOVING LAMPS.
4. Locate the 4 fixing holes, position the fire accordingly, and
firmly fix the appliance to the wall using the appropriate
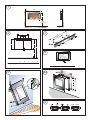
screws - see Fig. 5a.
Warning - The lamps reach high temperatures during
operation. For this reason, allow the lamps to cool down
after switching off the appliance.
5. Replace the front panel.
The front panel will need to be removed in order to change
lamps – see Fig. 9.
New Support Structure Construction
Warning - The front panel is heavy and easily damaged.
When planning where to position your purpose built support
structure the following steps must be observed:
The front panel is supported at the top by two brackets and
held tight by magnets at the bottom.
1. Place the fire in the desired location to see how it will look
in the room.
To gain access to lamps please apply the following
procedure:
2. Mark the desired location for the new support structure in
the room and store the fire in a safe, dry and dust free
location.
While holding the front panel by its sides with both hands, (1)
carefully tilt the bottom of the frame outwards until free and
then lift the panel up (2) and then away (3) from the main
body - see Fig. 9.
3. Using timber studs to support the fire, devise and construct
a suitable means of supporting the product within the
wall partition and provide electrical power for the fire to be
HARD wired. For recommended sizes of height, width
and depth of opening for recess and hole fixing
dimensions for each model - see Table 1 and Fig. 5a.
4. When the structure is complete, remove the front panel of
the fire by following the steps as outlined in ‘Lamp
Replacement’ sections.
5. Locate the 4 fixing holes, position the fire accordingly, and
firmly fix using the appropriate screws.
Lamp Replacement
To gain access to the bulbs remove the screws at ‘A’ to remove
the cover bracket ‘X’ and the screws at ‘B’ to remove the
cover bracket ‘Y’ - see Fig. 10.
To access the bottom bulbs, carefully slide the flexible
rotisserie to one side ensuring that the rubber grommet is
not lost - see Fig. 11.
Remove the defective lamp by unscrewing it - see Fig. 11.
Replace with a 60W E14 SES Clear Candle bulb, rotating it.
Take care not to over-tighten the lamp.
Steps for reassembling the appliance
6. Replace the front panel.
TABLE 1
A
X
Y
Z
1160
1143
515
146
NOTE: The appliance should be HARD wired to an electrical
power outlet when placed in a recessed installation.
Please consult a qualified electrician for appropriate wiring
requirements.
Manual Operation
The switches are located at the bottom right side of the
appliance - see Fig. 6.
Remote Operation
The standby switch (S1) must first be turned ‘ON’.
Note: It takes some time for the receiver to respond to the
transmitter. DO NOT PRESS the buttons more than once
within two seconds for correct operation.
Manual & Remote Operation
Function
Operation
Status
Flame Effect
Press the ‘ I ’ button (Switch 3)
LED On
The Standby switch must first be turned ‘ON’ to operate the
appliance manually or by remote control.
Note: It takes some time for the receiver to respond to the
transmitter. DO NOT PRESS the buttons more than once
within two seconds for correct operation.
1. Refit the rotisserie making sure that the rubber grommet
is carefully pushed into the slotted hole on the axial bracket.
2. Replace the cover brackets ‘X’ and ‘Y’ - see Fig. 10.
3. Replace the front by aligning the slots at top of the front
frame with the support brackets on the chassis and
ensuring it catches fully on the support brackets.The
magnets on the chassis will hold the front flush to the
main body.